Блокировка редактируемых областей в документах Word с помощью JavaScript
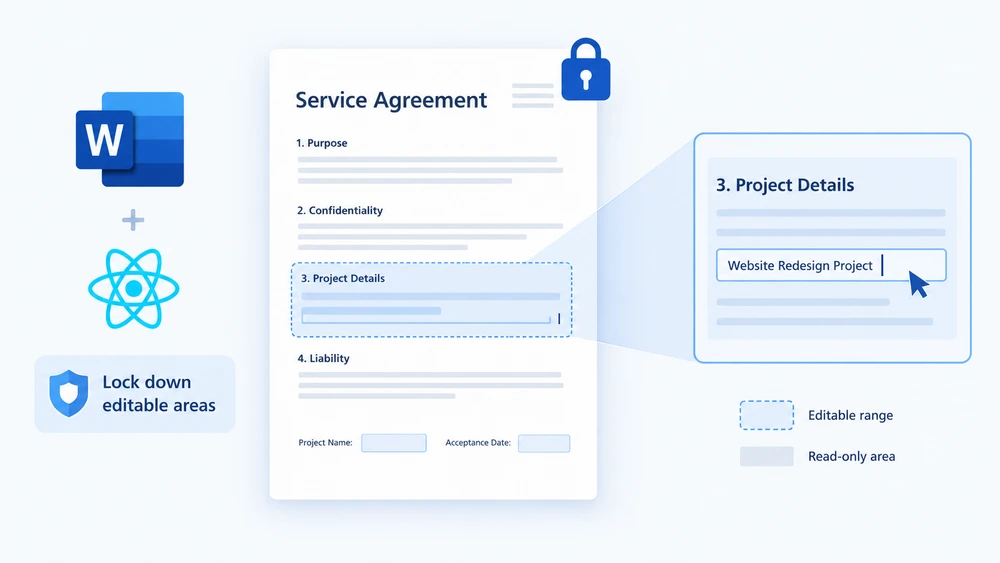
Представьте шаблон договора, который отправляется десяткам клиентов. Юридический отдел тщательно проработал каждую статью, и единственное, что должен изменить каждый получатель, — это блок подписи, название проекта и дата принятия. Дайте им полностью редактируемый файл Word, и кто-нибудь неизбежно переформулирует статью о штрафах или удалит раздел об ответственности. Заблокируйте весь документ, и никто не сможет заполнить поля. На самом деле вам нужно выборочное редактирование — способ сказать: «эти конкретные абзацы можно редактировать, всё остальное заморожено».
Именно это и дают вам редактируемые диапазоны. Вы защищаете весь документ как доступный только для чтения, а затем размещаете пару маркеров разрешений вокруг абзацев, которые хотите оставить открытыми. Любой, кто откроет файл в Word, сможет печатать внутри отмеченной области, но не сможет изменить ни одного символа за её пределами. Spire.Doc for JavaScript предоставляет эту возможность в браузере через WebAssembly, так что вы можете создавать защищённые документы из приложения React без обращения к серверу — шрифты и входные файлы управляются через виртуальную файловую систему в памяти (VFS).
В этом руководстве рассматриваются обе части рабочего процесса:
- Задать редактируемый диапазон — защитить документ и отметить открытую область
- Удалить редактируемый диапазон — удалить маркеры и снять ограничение
Если вы ещё не подключили Spire.Doc к своему проекту, начните с Интеграция Spire.Doc for JavaScript в проект React. Приведённые ниже фрагменты предполагают, что модуль WebAssembly загружен и готов.
Задать редактируемый диапазон
Процесс состоит из трёх этапов. Сначала загрузите файлы шрифтов и целевой документ Word в виртуальную файловую систему WASM с помощью FetchFileToVFS. Затем создайте экземпляр Document, загрузите файл, вызовите Protect, чтобы заблокировать весь документ как доступный только для чтения, и создайте пару PermissionStart / PermissionEnd с одинаковым идентификатором — эти два маркера обрамляют абзац, который вы хотите оставить редактируемым. Наконец, сохраните файл, прочитайте его из VFS, оберните в Blob и инициируйте скачивание.
function App() {
  const SetEditableRange = async () => {
    const docModule = window.wasmModule?.spiredoc;
    if (!docModule) {
      alert('Spire.Doc is not ready yet');
      return;
    }

    // Load the input document into VFS
    const inputFileName = "SetEditableRange.docx";
    await window.spire.FetchFileToVFS(inputFileName, "", `${process.env.PUBLIC_URL}static/data/`);

    // Create a document object and load the document
    const doc = new docModule.Document();
    doc.LoadFromFile(inputFileName);

    // Protect the whole document: everything outside the editable range is read-only
    doc.Protect({ type: docModule.ProtectionType.AllowOnlyReading, password: "password" });

    // Create the permission markers: a start and an end with the same id form one editable range
    const start = new docModule.PermissionStart(doc, "testID");
    const end = new docModule.PermissionEnd(doc, "testID");

    // Insert the markers into the first paragraph: the start at the beginning, the end appended at the end
    doc.Sections.get_Item(0).Paragraphs.get_Item(0).ChildObjects.Insert(0, start);
    doc.Sections.get_Item(0).Paragraphs.get_Item(0).ChildObjects.Add(end);

    // Save the document
    const outputFileName = "Set Editable Range.docx";
    doc.SaveToFile({ fileName: outputFileName, fileFormat: docModule.FileFormat.Docx2013 });
    doc.Dispose();

    const modifiedFileArray = window.dotnetRuntime.Module.FS.readFile(outputFileName);
    const blob = new Blob([modifiedFileArray], { type: 'application/vnd.openxmlformats-officedocument.wordprocessingml.document' });
    const url = URL.createObjectURL(blob);
    const a = document.createElement('a');
    a.href = url;
    a.download = outputFileName;
    a.click();
    URL.revokeObjectURL(url);
  };

 return (
    <div style={{ textAlign: 'center', height: '300px' }}>
      <h1>Set Editable Range in a Word Document</h1>
      <button onClick={SetEditableRange}>
        Generate
      </button>
    </div>
  );
}
export default App;
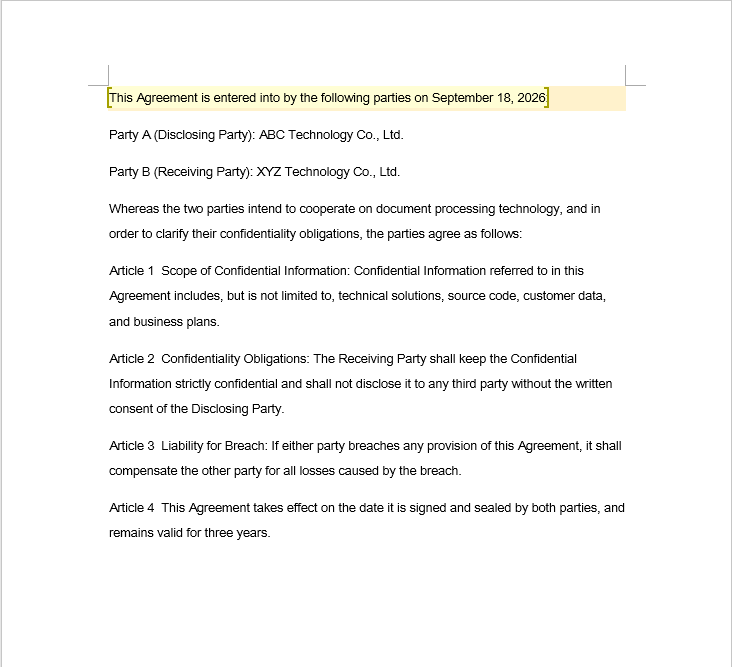
В образце документа поля, которые разрешено заполнять рецензенту, имеют лёгкую заливку — это чисто визуальная подсказка для читателя, и она не влияет на то, как редактируемый диапазон определяется в коде. После установки маркеров Word рассматривает абзац с заливкой как редактируемый, а все остальные абзацы как заблокированные.
Удалить редактируемый диапазон
Удаление редактируемого диапазона — это один обход: пройдитесь по каждому разделу и каждому абзацу, проверьте каждый объект в коллекции ChildObjects абзаца и извлеките все, что является PermissionStart или PermissionEnd.
Одна тонкость застаёт людей врасплох: ChildObjects.Remove уменьшает коллекцию на месте, поэтому каждый элемент после удалённого сдвигается на один индекс вперёд. Если вы увеличиваете счётчик цикла во время удаления, каждое удаление приводит к пропуску следующего маркера — и чем больше маркеров, тем больше их останется.
function App() {
  const RemoveEditableRange = async () => {
    const docModule = window.wasmModule?.spiredoc;
    if (!docModule) {
      alert('Spire.Doc is not ready yet');
      return;
    }

      // Load the input document into VFS
      const inputFileName = "RemoveEditableRange.docx";
      await window.spire.FetchFileToVFS(inputFileName, "", `${process.env.PUBLIC_URL}static/data/`);

      // Create a document object and load the document
      const doc = new docModule.Document();
      doc.LoadFromFile(inputFileName);

      // Iterate over every section and paragraph and delete the permission markers
      for (let i = 0; i < doc.Sections.Count; i++) {
        const section = doc.Sections.get_Item(i);
        for (let j = 0; j < section.Body.Paragraphs.Count; j++) {
          const paragraph = section.Body.Paragraphs.get_Item(j);

          // Remove on a match; the collection shrinks, so the index is not incremented
          for (let k = 0; k < paragraph.ChildObjects.Count;) {
            const obj = paragraph.ChildObjects.get_Item(k);
            if (obj instanceof docModule.PermissionStart || obj instanceof docModule.PermissionEnd) {
              paragraph.ChildObjects.Remove(obj);
            } else {
              k++;
            }
          }
        }
      }

      // Save the document
      const outputFileName = "Remove Editable Range.docx";
      doc.SaveToFile({ fileName: outputFileName, fileFormat: docModule.FileFormat.Docx2013 });

    // Release resources
    doc.Dispose();

    const modifiedFileArray = window.dotnetRuntime.Module.FS.readFile(outputFileName);
    const blob = new Blob([modifiedFileArray], { type: 'application/vnd.openxmlformats-officedocument.wordprocessingml.document' });
    const url = URL.createObjectURL(blob);
    const a = document.createElement('a');
    a.href = url;
    a.download = outputFileName;
    a.click();
    URL.revokeObjectURL(url);
  };

 return (
    <div style={{ textAlign: 'center', height: '300px' }}>
      <h1>Remove Editable Ranges from a Word Document</h1>
      <button onClick={RemoveEditableRange}>
        Generate
      </button>
    </div>
  );
}
export default App;
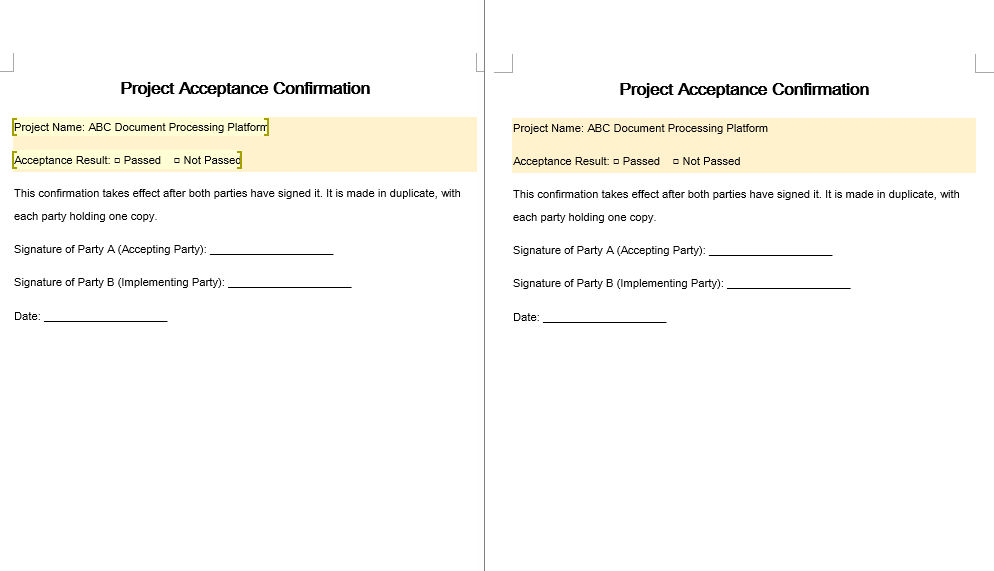
Удаление маркеров лишь перерисовывает границу того, что можно редактировать — сам текст и всё форматирование остаются нетронутыми.
Полный жизненный цикл защиты
В реальном процессе утверждения вы редко делаете что-то одно. Типичный цикл выглядит так:
- Защитить — Вызовите
doc.ProtectсAllowOnlyReading(илиAllowOnlyFormFields) и паролем. Теперь весь документ заблокирован. - Отметить — Оберните каждый редактируемый рецензентом абзац в пару
PermissionStart/PermissionEndс одним идентификатором. Эти области становятся единственными местами, где рецензент может печатать. - Снять отметку — Когда раунд проверки завершён, пройдите по документу и удалите все маркеры разрешений. Области снова присоединяются к телу, доступному только для чтения.
- Снять защиту — Вызовите
doc.Unprotect("password"), чтобы полностью снять защиту с документа и вернуть его в полностью редактируемое состояние для следующего этапа обработки.
Ключевая идея в том, что защита и редактируемые диапазоны — это два независимых слоя. Защита решает, заблокирован ли документ вообще; пара маркеров решает, какие фрагменты освобождены от этой блокировки. Вы можете добавлять и удалять маркеры сколько угодно раз, не затрагивая состояние защиты, и включать или выключать защиту, не нарушая маркеры — но маркеры имеют силу только пока защита активна.
Часто задаваемые вопросы
Редактируемый диапазон задан, но содержимое внутри него всё ещё нельзя редактировать
Почему это происходит: Маркеры разрешений сами по себе инертны. Они лишь создают исключения из ограничения на весь документ, поэтому если Protect никогда не вызывался, то нет ограничения, из которого можно сделать исключение, и маркеры ничего не делают. Второе требование — PermissionStart и PermissionEnd должны иметь одинаковую строку идентификатора — Word рассматривает их как пару только при совпадении идентификаторов.
Решение: Сначала включите ограничение редактирования, затем создайте оба маркера с одинаковым идентификатором:
// Enable protection first so that the markers mean something
document.Protect({ type: wasmModule.ProtectionType.AllowOnlyReading, password: "password" });

// The start and the end must use the same id
const start = new wasmModule.PermissionStart(document, "testID");
const end = new wasmModule.PermissionEnd(document, "testID");
Некоторые маркеры пропускаются при удалении редактируемых диапазонов
Почему это происходит: Каждый вызов ChildObjects.Remove уменьшает коллекцию на один элемент, сдвигая индекс каждого последующего элемента вниз. Если счётчик цикла увеличивается в той же итерации, что и удаление, элемент, сдвинувшийся на текущую позицию, не проверяется — он пропускается, и проблема усугубляется с каждым дополнительным маркером.
Решение: Либо удерживайте индекс на месте во время удаления (увеличивайте его только когда удаления не было), либо сначала соберите целевые объекты, а затем удаляйте их в обратном порядке:
for (let k = 0; k < paragraph.ChildObjects.Count;) {
  const obj = paragraph.ChildObjects.get_Item(k);
  if (obj instanceof wasmModule.PermissionStart || obj instanceof wasmModule.PermissionEnd) {
    paragraph.ChildObjects.Remove(obj);
    // Do not increment k here: check the new object at the current index
  } else {
    k++;
  }
}
Документ всё ещё доступен только для чтения после удаления маркеров
Почему это происходит: Маркеры лишь определяют, какие области освобождены от блокировки — они не являются самой блокировкой. Их удаление просто убирает исключения; основная защита, установленная Protect, всё ещё действует, поэтому весь документ остаётся доступным только для чтения.
Решение: После удаления маркеров и когда ограничение больше не нужно, вызовите Unprotect с исходным паролем:
document.Unprotect("password");
См. также
Proteja documentos do Word com JavaScript: restrinja a edição
Quando os desenvolvedores ouvem "proteger um documento do Word", a primeira coisa que costuma vir à mente é a criptografia — definir uma senha para que ninguém consiga abrir o arquivo. Mas existe uma segunda camada de segurança de documentos, igualmente importante: restringir o que um leitor pode fazer depois que o documento está aberto. Um modelo de contrato enviado a um cliente deve permitir que ele preencha as lacunas sem alterar os termos acordados. Um rascunho final circulado para revisão deve permitir comentários, mas bloquear edições diretas no corpo do texto. Esses cenários exigem restrições de edição, não criptografia com senha de abertura.
Spire.Doc for JavaScript traz essa capacidade diretamente para o navegador por meio do WebAssembly. Usando um sistema de arquivos virtual (VFS) para gerenciar fontes e recursos de arquivo, ele processa documentos do Word inteiramente no lado do cliente — sem servidor back-end, sem upload de arquivo, sem latência de ida e volta. O método Protect aceita um valor de enumeração ProtectionType junto com uma senha e aplica a restrição de edição correspondente ao documento.
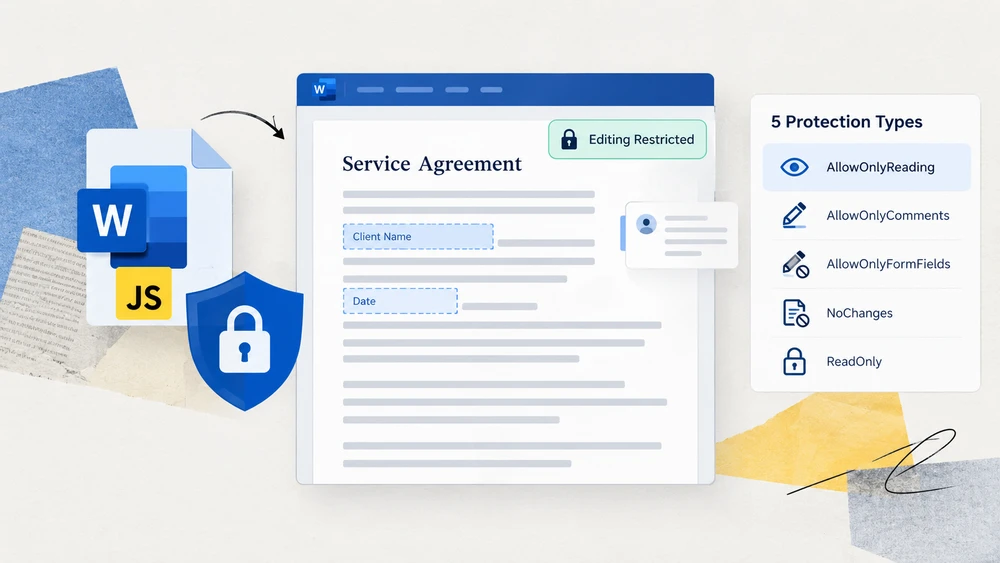
Este artigo apresenta os cinco tipos de proteção disponíveis no Spire.Doc for JavaScript, compara-os em uma única tabela de referência e, em seguida, demonstra como aplicar um tipo de proteção ao documento inteiro e como bloquear apenas seções específicas, deixando as demais editáveis.
Proteção vs. Criptografia: dois objetivos diferentes
Antes de mergulhar nos tipos de proteção, vale traçar uma linha clara entre dois conceitos que são frequentemente confundidos:
- Criptografia (senha de abertura) controla quem pode abrir o documento. Sem a senha, o conteúdo do arquivo fica inacessível.
- Restrições de edição (tipo de proteção) controlam o que um leitor pode alterar depois que o documento já está aberto. O leitor pode visualizar o conteúdo livremente; a restrição limita quais ações de edição estão disponíveis.
As restrições de edição não impedem a seleção, a cópia ou a pesquisa — elas apenas bloqueiam modificações. Se o seu objetivo é impedir que o conteúdo seja levado embora, você precisa de criptografia. Se o seu objetivo é impedir que o conteúdo seja alterado, permitindo ainda que ele seja lido, você precisa de uma restrição de edição. Os dois mecanismos são complementares e podem ser usados juntos, mas atendem a propósitos distintos.
Tipos de proteção em resumo
O Spire.Doc for JavaScript expõe cinco valores de enumeração ProtectionType. Cada um deles define um escopo editável diferente — de totalmente aberto a totalmente bloqueado. A tabela abaixo resume todos os cinco para que você possa escolher o certo num relance.
| ProtectionType | Efeito no documento | Caso de uso típico |
|---|---|---|
NoProtection |
Nenhuma restrição aplicada; todas as ações de edição estão disponíveis. | Remover uma restrição existente ou começar de um estado limpo. |
AllowOnlyReading |
O documento pode ser visualizado, mas não editado. Os comandos de edição da faixa de opções ficam desabilitados. | Relatórios finais, avisos publicados ou qualquer entrega somente leitura. |
AllowOnlyComments |
Os leitores podem adicionar comentários, mas não podem modificar o corpo do texto. | Ciclos de revisão em que os revisores devem deixar feedback sem alterar o conteúdo. |
AllowOnlyFormFields |
Apenas os campos de formulário são editáveis; o restante do documento fica bloqueado. | Contratos, pesquisas e modelos com áreas para preenchimento. |
AllowOnlyRevisions |
Todas as edições são aceitas como alterações controladas e podem ser revisadas posteriormente. | Redação colaborativa em que cada alteração deve ser visível e reversível. |
Como escolher: Se o leitor não deve alterar nada, use AllowOnlyReading. Se o leitor deve preencher apenas os espaços designados, use AllowOnlyFormFields. Se o leitor deve deixar feedback sem tocar no texto, use AllowOnlyComments. Se cada alteração deve ser controlada para revisão posterior, use AllowOnlyRevisions. Se você precisa remover uma restrição aplicada anteriormente, use NoProtection.
Aplicar um tipo de proteção ao documento inteiro
A abordagem mais direta é proteger o documento inteiro com um único valor de ProtectionType. O fluxo de trabalho tem três estágios: carregar os arquivos de fonte e o documento do Word de destino no sistema de arquivos virtual do WASM via FetchFileToVFS; instanciar um Document, carregar o arquivo e chamar Protect com o tipo de proteção desejado e a senha que posteriormente removerá a restrição; depois salvar o documento, ler o arquivo gerado do VFS, envolvê-lo como um Blob e disparar o download pelo navegador.
O exemplo abaixo usa AllowOnlyReading, mas você pode substituí-lo por qualquer um dos cinco valores de ProtectionType da tabela acima.
function App() {
  const protectWithSpecifiedType = async () => {
    const docModule = window.wasmModule?.spiredoc;
    if (!docModule) {
      alert('Spire.Doc is not ready yet');
      return;
    }

    const inputFileName = 'Template.docx';
    await window.spire.FetchFileToVFS(inputFileName, '', `${process.env.PUBLIC_URL}/data/`);

    // Load the document
    const doc = new docModule.Document();
    doc.LoadFromFile(inputFileName);

    // Protect the document with the "AllowOnlyReading" type; the password lifts the restriction
    doc.Protect({ type: docModule.ProtectionType.AllowOnlyReading, password: "123456" });

    // Define the output file name and save
    const outputFileName = "SpecifiedProtectionType.docx";
    doc.SaveToFile({ fileName: outputFileName, fileFormat: docModule.FileFormat.Docx2013 });
    doc.Dispose();

    const modifiedFileArray = window.dotnetRuntime.Module.FS.readFile(outputFileName);
    const blob = new Blob([modifiedFileArray], { type: 'application/vnd.openxmlformats-officedocument.wordprocessingml.document' });
    const url = URL.createObjectURL(blob);
    const a = document.createElement('a');
    a.href = url;
    a.download = outputFileName;
    a.click();
    URL.revokeObjectURL(url);
  };

 return (
    <div style={{ textAlign: 'center', height: '300px' }}>
      <h1>Protect a Document with a Specified Type</h1>
      <button onClick={protectWithSpecifiedType}>Generate</button>
    </div>
  );
}
export default App;
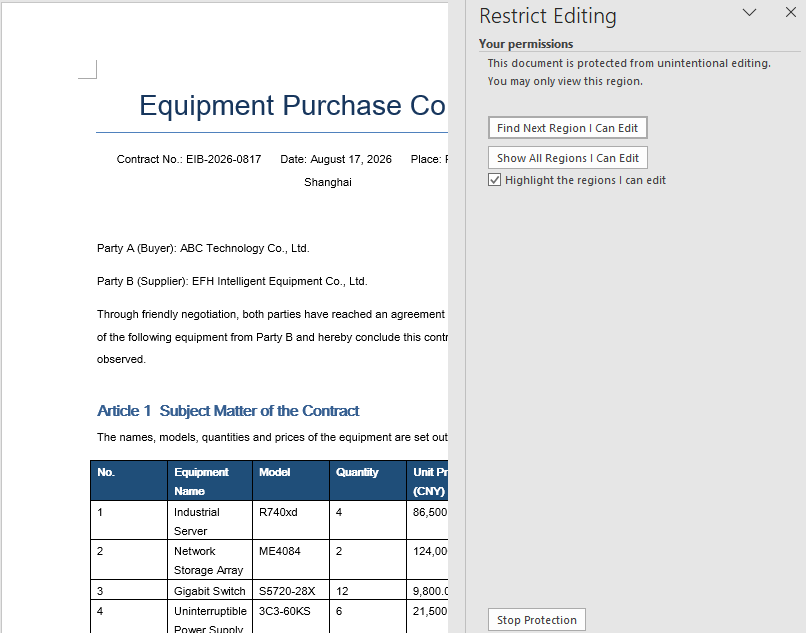
Depois que o documento é protegido com o tipo AllowOnlyReading, seu conteúdo só pode ser visualizado e os comandos de edição na faixa de opções ficam restritos.
Bloquear apenas seções especificadas
Proteger o documento inteiro de forma uniforme funciona bem para entregas simples, mas muitos documentos do mundo real exigem um cuidado mais refinado. Um modelo de orçamento, por exemplo, pode ter termos fixos que devem permanecer bloqueados ao lado de uma seção em que o cliente insere seus dados. O Spire.Doc for JavaScript resolve isso combinando a proteção do documento inteiro com substituições por seção.
A estratégia é: primeiro proteger o documento inteiro com AllowOnlyFormFields, depois definir a propriedade ProtectForm de qualquer seção que deva permanecer editável como false. Isso libera seletivamente seções individuais enquanto o restante do documento permanece bloqueado.
O fluxo de trabalho tem três estágios: carregar os arquivos de fonte no sistema de arquivos virtual do WASM via FetchFileToVFS; instanciar um Document, criar seções com AddSection e escrever conteúdo nelas, chamar Protect para bloquear o documento inteiro apenas para campos de formulário e definir ProtectForm como false na seção a ser liberada; depois salvar o documento, ler o arquivo gerado do VFS, envolvê-lo como um Blob e disparar o download pelo navegador.
function App() {
  const lockSpecifiedSections = async () => {
    const docModule = window.wasmModule?.spiredoc;
    if (!docModule) {
      alert('Spire.Doc is not ready yet');
      return;
    }

    // Create a new document and add two sections
    const doc = new docModule.Document();
    let s1 = doc.AddSection();
    let s2 = doc.AddSection();

    // Write content into each of the two sections
    s1.AddParagraph().AppendText("Spire.Doc demo, section 1");
    s2.AddParagraph().AppendText("Spire.Doc demo, section 2");

    // Protect the whole document for form fields only
    doc.Protect({ type: docModule.ProtectionType.AllowOnlyFormFields, password: "123" });

    // Release section 2 on its own so that it can be edited
    s2.ProtectForm = false;

    // Define the output file name and save
    const outputFileName = 'LockSpecifiedSections.docx';
    doc.SaveToFile({ fileName: outputFileName, fileFormat: docModule.FileFormat.Docx2013 });
    doc.Dispose();

    const modifiedFileArray = window.dotnetRuntime.Module.FS.readFile(outputFileName);
    const blob = new Blob([modifiedFileArray], { type: 'application/vnd.openxmlformats-officedocument.wordprocessingml.document' });
    const url = URL.createObjectURL(blob);
    const a = document.createElement('a');
    a.href = url;
    a.download = outputFileName;
    a.click();
    URL.revokeObjectURL(url);
  };

 return (
    <div style={{ textAlign: 'center', height: '300px' }}>
      <h1>Lock Specified Sections of a Word Document</h1>
      <button onClick={lockSpecifiedSections}>Generate</button>
    </div>
  );
}
export default App;
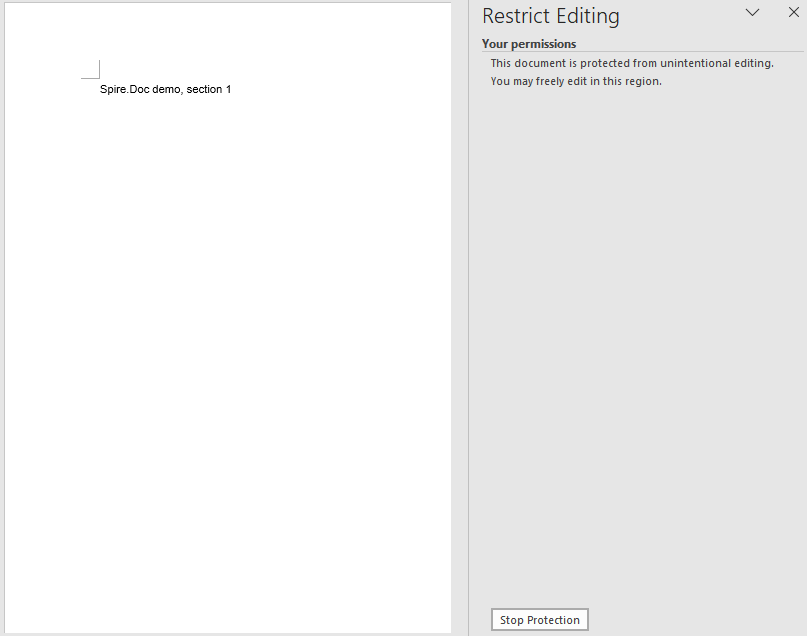
Depois que a seção 2 foi liberada, apenas a seção 1 mantém sua restrição de edição no documento.
Perguntas frequentes
Uma seção ainda não é editável após ProtectForm = false
A propriedade ProtectForm só tem efeito quando o documento foi protegido com AllowOnlyFormFields. Se um tipo de proteção diferente, como AllowOnlyReading, estiver ativo, definir ProtectForm como false em uma seção individual não a liberará — a restrição do documento inteiro tem precedência.
Para corrigir isso, certifique-se de que o tipo de proteção passado para Protect seja AllowOnlyFormFields antes de liberar seções individuais:
doc.Protect({ type: wasmModule.ProtectionType.AllowOnlyFormFields, password: "123" });
s2.ProtectForm = false;
Um documento protegido ainda pode ser selecionado e copiado
Todos os cinco tipos de proteção restringem o comportamento de edição, não o de leitura. O AllowOnlyReading, por exemplo, impede alterações no corpo do texto, mas não bloqueia a seleção, a cópia ou a pesquisa de texto. Isso é intencional — as restrições de edição controlam o que os usuários podem modificar, não o que eles podem visualizar ou extrair.
Se o conteúdo não deve ser copiável ou visível por usuários não autorizados, use a criptografia de documento (uma senha de abertura) em vez de uma restrição de edição. As duas abordagens tratam ameaças diferentes e podem ser combinadas quando tanto a confidencialidade quanto o controle de edição forem necessários:
doc.Protect({ type: wasmModule.ProtectionType.AllowOnlyReading, password: "123456" });
Veja também
JavaScript로 Word 문서 보호: 편집 제한
개발자들이 "Word 문서 보호"라는 말을 들으면 가장 먼저 떠올리는 것은 흔히 암호화입니다 — 아무도 파일을 열 수 없도록 비밀번호를 설정하는 것이죠. 하지만 문서 보안에는 똑같이 중요한 두 번째 계층이 있습니다: 문서를 연 뒤 독자가 무엇을 할 수 있는지 제한하는 것입니다. 고객에게 보내는 계약서 템플릿은 합의된 조건을 바꾸지 않고 빈칸을 채울 수 있어야 합니다. 검토를 위해 배포되는 최종 초안은 댓글은 허용하되 본문 텍스트를 직접 편집하는 것은 막아야 합니다. 이런 시나리오에는 열기 암호 암호화가 아니라 편집 제한이 필요합니다.
Spire.Doc for JavaScript는 WebAssembly를 통해 이 기능을 브라우저에 직접 제공합니다. 가상 파일 시스템(VFS)을 사용해 글꼴과 파일 리소스를 관리하며, Word 문서를 전적으로 클라이언트 측에서 처리합니다 — 백엔드 서버도, 파일 업로드도, 왕복 지연도 없습니다. Protect 메서드는 ProtectionType 열거형 값과 비밀번호를 받아 문서에 해당 편집 제한을 적용합니다.
이 글에서는 Spire.Doc for JavaScript에서 사용할 수 있는 다섯 가지 보호 유형을 살펴보고, 하나의 참조 표에서 비교한 다음, 전체 문서에 보호 유형을 적용하는 방법과 다른 섹션은 편집 가능하게 둔 채 특정 섹션만 잠그는 방법을 보여 줍니다.
보호 vs. 암호화: 서로 다른 두 가지 목표
보호 유형으로 들어가기 전에, 자주 혼동되는 두 개념 사이에 명확한 선을 그어 둘 필요가 있습니다:
- 암호화(열기 암호)는 누가 문서를 열 수 있는지를 제어합니다. 비밀번호가 없으면 파일 내용에 접근할 수 없습니다.
- 편집 제한(보호 유형)은 문서가 이미 열린 뒤 독자가 무엇을 변경할 수 있는지를 제어합니다. 독자는 내용을 자유롭게 볼 수 있으며, 제한은 사용 가능한 편집 작업을 제한합니다.
편집 제한은 선택, 복사, 검색을 막지 않습니다 — 수정만 차단합니다. 콘텐츠를 가져가는 것을 막는 것이 목표라면 암호화가 필요합니다. 읽을 수 있게 허용하면서 콘텐츠가 변경되는 것을 막는 것이 목표라면 편집 제한이 필요합니다. 두 메커니즘은 상호 보완적이며 함께 사용할 수 있지만, 각각 다른 목적을 수행합니다.
보호 유형 한눈에 보기
Spire.Doc for JavaScript는 다섯 가지 ProtectionType 열거형 값을 제공합니다. 각 값은 완전히 개방된 상태부터 완전히 잠긴 상태까지 서로 다른 편집 가능 범위를 정의합니다. 아래 표는 다섯 가지를 모두 요약하므로 한눈에 알맞은 것을 선택할 수 있습니다.
| ProtectionType | 문서에 미치는 영향 | 일반적인 사용 사례 |
|---|---|---|
NoProtection |
제한이 적용되지 않으며 모든 편집 작업을 사용할 수 있습니다. | 기존 제한을 제거하거나 깨끗한 상태에서 시작할 때. |
AllowOnlyReading |
문서를 볼 수는 있지만 편집할 수 없습니다. 리본 편집 명령이 비활성화됩니다. | 최종 보고서, 게시된 공지, 또는 모든 읽기 전용 결과물. |
AllowOnlyComments |
독자는 댓글을 추가할 수 있지만 본문 텍스트를 수정할 수 없습니다. | 검토자가 내용을 변경하지 않고 피드백을 남겨야 하는 검토 주기. |
AllowOnlyFormFields |
양식 필드만 편집할 수 있으며 문서의 나머지 부분은 잠깁니다. | 빈칸 채우기 영역이 있는 계약서, 설문 조사 및 템플릿. |
AllowOnlyRevisions |
모든 편집은 추적된 변경 사항으로 기록되고 나중에 검토할 수 있습니다. | 모든 변경 사항을 확인하고 되돌릴 수 있어야 하는 공동 작성. |
선택 방법: 독자가 아무것도 변경하지 않아야 한다면 AllowOnlyReading을 사용하세요. 독자가 지정된 빈칸만 채워야 한다면 AllowOnlyFormFields를 사용하세요. 텍스트를 건드리지 않고 피드백만 남겨야 한다면 AllowOnlyComments를 사용하세요. 모든 변경 사항을 나중에 검토할 수 있도록 추적해야 한다면 AllowOnlyRevisions를 사용하세요. 이전에 적용한 제한을 제거해야 한다면 NoProtection을 사용하세요.
전체 문서에 보호 유형 적용하기
가장 간단한 방법은 단일 ProtectionType 값으로 전체 문서를 보호하는 것입니다. 워크플로에는 세 단계가 있습니다: FetchFileToVFS를 통해 글꼴 파일과 대상 Word 문서를 WASM 가상 파일 시스템에 로드합니다; Document를 인스턴스화하고 파일을 로드한 다음, 원하는 보호 유형과 나중에 제한을 해제할 비밀번호로 Protect를 호출합니다; 그런 다음 문서를 저장하고, VFS에서 생성된 파일을 읽어 Blob으로 감싼 뒤 브라우저 다운로드를 트리거합니다.
아래 예제에서는 AllowOnlyReading을 사용하지만, 위 표의 다섯 가지 ProtectionType 값 중 무엇이든 대체할 수 있습니다.
function App() {
  const protectWithSpecifiedType = async () => {
    const docModule = window.wasmModule?.spiredoc;
    if (!docModule) {
      alert('Spire.Doc is not ready yet');
      return;
    }

    const inputFileName = 'Template.docx';
    await window.spire.FetchFileToVFS(inputFileName, '', `${process.env.PUBLIC_URL}/data/`);

    // Load the document
    const doc = new docModule.Document();
    doc.LoadFromFile(inputFileName);

    // Protect the document with the "AllowOnlyReading" type; the password lifts the restriction
    doc.Protect({ type: docModule.ProtectionType.AllowOnlyReading, password: "123456" });

    // Define the output file name and save
    const outputFileName = "SpecifiedProtectionType.docx";
    doc.SaveToFile({ fileName: outputFileName, fileFormat: docModule.FileFormat.Docx2013 });
    doc.Dispose();

    const modifiedFileArray = window.dotnetRuntime.Module.FS.readFile(outputFileName);
    const blob = new Blob([modifiedFileArray], { type: 'application/vnd.openxmlformats-officedocument.wordprocessingml.document' });
    const url = URL.createObjectURL(blob);
    const a = document.createElement('a');
    a.href = url;
    a.download = outputFileName;
    a.click();
    URL.revokeObjectURL(url);
  };

 return (
    <div style={{ textAlign: 'center', height: '300px' }}>
      <h1>Protect a Document with a Specified Type</h1>
      <button onClick={protectWithSpecifiedType}>Generate</button>
    </div>
  );
}
export default App;
문서가 AllowOnlyReading 유형으로 보호되면 내용은 보기만 가능하고 리본의 편집 명령이 제한됩니다.
지정된 섹션만 잠그기
전체 문서를 일괄적으로 보호하는 것은 단순한 결과물에는 잘 맞지만, 실제 문서 중 상당수는 더 세밀한 조정이 필요합니다. 예를 들어 견적서 템플릿에는 잠긴 상태로 유지해야 하는 고정 조건과 고객이 세부 정보를 입력하는 섹션이 함께 있을 수 있습니다. Spire.Doc for JavaScript는 전체 문서 보호와 섹션별 재정의를 결합하여 이를 처리합니다.
전략은 다음과 같습니다: 먼저 AllowOnlyFormFields로 전체 문서를 보호한 다음, 편집 가능한 상태로 남겨 둘 섹션의 ProtectForm 속성을 false로 설정합니다. 이렇게 하면 나머지 문서는 잠긴 상태로 두면서 개별 섹션을 선택적으로 해제할 수 있습니다.
워크플로에는 세 단계가 있습니다: FetchFileToVFS를 통해 글꼴 파일을 WASM 가상 파일 시스템에 로드합니다; Document를 인스턴스화하고, AddSection으로 섹션을 만들어 내용을 작성하고, Protect를 호출해 전체 문서를 양식 필드에만 잠그고, 해제할 섹션의 ProtectForm을 false로 설정합니다; 그런 다음 문서를 저장하고, VFS에서 생성된 파일을 읽어 Blob으로 감싼 뒤 브라우저 다운로드를 트리거합니다.
function App() {
  const lockSpecifiedSections = async () => {
    const docModule = window.wasmModule?.spiredoc;
    if (!docModule) {
      alert('Spire.Doc is not ready yet');
      return;
    }

    // Create a new document and add two sections
    const doc = new docModule.Document();
    let s1 = doc.AddSection();
    let s2 = doc.AddSection();

    // Write content into each of the two sections
    s1.AddParagraph().AppendText("Spire.Doc demo, section 1");
    s2.AddParagraph().AppendText("Spire.Doc demo, section 2");

    // Protect the whole document for form fields only
    doc.Protect({ type: docModule.ProtectionType.AllowOnlyFormFields, password: "123" });

    // Release section 2 on its own so that it can be edited
    s2.ProtectForm = false;

    // Define the output file name and save
    const outputFileName = 'LockSpecifiedSections.docx';
    doc.SaveToFile({ fileName: outputFileName, fileFormat: docModule.FileFormat.Docx2013 });
    doc.Dispose();

    const modifiedFileArray = window.dotnetRuntime.Module.FS.readFile(outputFileName);
    const blob = new Blob([modifiedFileArray], { type: 'application/vnd.openxmlformats-officedocument.wordprocessingml.document' });
    const url = URL.createObjectURL(blob);
    const a = document.createElement('a');
    a.href = url;
    a.download = outputFileName;
    a.click();
    URL.revokeObjectURL(url);
  };

 return (
    <div style={{ textAlign: 'center', height: '300px' }}>
      <h1>Lock Specified Sections of a Word Document</h1>
      <button onClick={lockSpecifiedSections}>Generate</button>
    </div>
  );
}
export default App;
섹션 2가 해제되면 문서에서 섹션 1만 편집 제한을 유지합니다.
자주 묻는 질문
ProtectForm = false 이후에도 섹션이 편집 가능해지지 않음
ProtectForm 속성은 문서가 AllowOnlyFormFields로 보호된 경우에만 효과가 있습니다. AllowOnlyReading과 같은 다른 보호 유형이 활성화되어 있으면 개별 섹션에서 ProtectForm을 false로 설정해도 해당 섹션이 해제되지 않습니다 — 전체 문서 제한이 우선합니다.
이 문제를 해결하려면 개별 섹션을 해제하기 전에 Protect에 전달된 보호 유형이 AllowOnlyFormFields인지 확인하세요:
doc.Protect({ type: wasmModule.ProtectionType.AllowOnlyFormFields, password: "123" });
s2.ProtectForm = false;
보호된 문서도 여전히 선택하고 복사할 수 있습니다
다섯 가지 보호 유형은 모두 읽기 동작이 아니라 편집 동작을 제한합니다. 예를 들어 AllowOnlyReading은 본문 텍스트 변경을 방지하지만 텍스트 선택, 복사 또는 검색을 차단하지는 않습니다. 이는 의도된 설계입니다 — 편집 제한은 사용자가 볼 수 있거나 추출할 수 있는 내용이 아니라 수정할 수 있는 내용을 제어합니다.
권한이 없는 사용자가 콘텐츠를 복사하거나 볼 수 없어야 한다면 편집 제한 대신 문서 암호화(열기 암호)를 사용하세요. 두 접근 방식은 서로 다른 위협을 해결하며, 기밀성과 편집 제어가 모두 필요할 때 결합할 수 있습니다:
doc.Protect({ type: wasmModule.ProtectionType.AllowOnlyReading, password: "123456" });
같이 보기
Proteggere i documenti Word con JavaScript: limitare la modifica
Quando gli sviluppatori sentono parlare di "proteggere un documento Word", la prima cosa che spesso viene in mente è la crittografia — impostare una password in modo che nessuno possa aprire il file. Ma esiste un secondo livello di sicurezza del documento, altrettanto importante: limitare ciò che un lettore può fare una volta che il documento è aperto. Un modello di contratto inviato a un cliente dovrebbe permettergli di compilare gli spazi vuoti senza modificare i termini concordati. Una bozza finale fatta circolare per la revisione dovrebbe consentire i commenti ma bloccare le modifiche dirette al testo del corpo. Questi scenari richiedono restrizioni di modifica, non la crittografia con password di apertura.
Spire.Doc for JavaScript porta questa funzionalità direttamente nel browser tramite WebAssembly. Utilizzando un file system virtuale (VFS) per gestire i font e le risorse dei file, elabora i documenti Word interamente sul lato client — nessun server backend, nessun caricamento di file, nessuna latenza di andata e ritorno. Il metodo Protect accetta un valore di enumerazione ProtectionType insieme a una password e applica la restrizione di modifica corrispondente al documento.
Questo articolo esamina i cinque tipi di protezione disponibili in Spire.Doc for JavaScript, li confronta in un'unica tabella di riferimento e poi mostra come applicare un tipo di protezione all'intero documento e come bloccare solo sezioni specifiche lasciandone altre modificabili.
Protezione vs. crittografia: due obiettivi diversi
Prima di addentrarci nei tipi di protezione, vale la pena tracciare una linea netta tra due concetti che vengono spesso confusi:
- Crittografia (password di apertura) controlla chi può aprire il documento. Senza la password, il contenuto del file è inaccessibile.
- Restrizioni di modifica (tipo di protezione) controllano cosa può modificare un lettore dopo che il documento è già aperto. Il lettore può visualizzare liberamente il contenuto; la restrizione limita quali azioni di modifica sono disponibili.
Le restrizioni di modifica non impediscono la selezione, la copia o la ricerca — bloccano solo le modifiche. Se il tuo obiettivo è impedire che il contenuto venga portato via, hai bisogno della crittografia. Se il tuo obiettivo è impedire che il contenuto venga modificato pur consentendone la lettura, hai bisogno di una restrizione di modifica. I due meccanismi sono complementari e possono essere usati insieme, ma servono scopi distinti.
I tipi di protezione a colpo d'occhio
Spire.Doc for JavaScript espone cinque valori di enumerazione ProtectionType. Ognuno definisce un diverso ambito modificabile — da completamente aperto a completamente bloccato. La tabella seguente li riassume tutti e cinque, così puoi scegliere quello giusto a colpo d'occhio.
| ProtectionType | Effetto sul documento | Caso d'uso tipico |
|---|---|---|
NoProtection |
Nessuna restrizione applicata; tutte le azioni di modifica sono disponibili. | Rimuovere una restrizione esistente o partire da uno stato pulito. |
AllowOnlyReading |
Il documento può essere visualizzato ma non modificato. I comandi di modifica della barra multifunzione sono disabilitati. | Report finali, avvisi pubblicati o qualsiasi documento di sola lettura. |
AllowOnlyComments |
I lettori possono aggiungere commenti ma non possono modificare il testo del corpo. | Cicli di revisione in cui i revisori dovrebbero lasciare feedback senza alterare il contenuto. |
AllowOnlyFormFields |
Solo i campi modulo sono modificabili; il resto del documento è bloccato. | Contratti, sondaggi e modelli con aree da compilare. |
AllowOnlyRevisions |
Tutte le modifiche vengono accettate come revisioni tracciate e possono essere riviste in seguito. | Stesura collaborativa in cui ogni modifica deve essere visibile e reversibile. |
Come scegliere: se il lettore non deve cambiare nulla, usa AllowOnlyReading. Se il lettore deve solo compilare gli spazi designati, usa AllowOnlyFormFields. Se il lettore deve lasciare feedback senza toccare il testo, usa AllowOnlyComments. Se ogni modifica deve essere tracciata per una revisione successiva, usa AllowOnlyRevisions. Se devi rimuovere una restrizione applicata in precedenza, usa NoProtection.
Applicare un tipo di protezione all'intero documento
L'approccio più semplice è proteggere l'intero documento con un unico valore ProtectionType. Il flusso di lavoro prevede tre fasi: caricare i file dei font e il documento Word di destinazione nel file system virtuale WASM tramite FetchFileToVFS; istanziare un Document, caricare il file e chiamare Protect con il tipo di protezione desiderato e la password che in seguito rimuoverà la restrizione; quindi salvare il documento, leggere il file generato dal VFS, racchiuderlo in un Blob e avviare il download dal browser.
L'esempio seguente usa AllowOnlyReading, ma puoi sostituirlo con uno qualsiasi dei cinque valori ProtectionType della tabella precedente.
function App() {
  const protectWithSpecifiedType = async () => {
    const docModule = window.wasmModule?.spiredoc;
    if (!docModule) {
      alert('Spire.Doc is not ready yet');
      return;
    }

    const inputFileName = 'Template.docx';
    await window.spire.FetchFileToVFS(inputFileName, '', `${process.env.PUBLIC_URL}/data/`);

    // Load the document
    const doc = new docModule.Document();
    doc.LoadFromFile(inputFileName);

    // Protect the document with the "AllowOnlyReading" type; the password lifts the restriction
    doc.Protect({ type: docModule.ProtectionType.AllowOnlyReading, password: "123456" });

    // Define the output file name and save
    const outputFileName = "SpecifiedProtectionType.docx";
    doc.SaveToFile({ fileName: outputFileName, fileFormat: docModule.FileFormat.Docx2013 });
    doc.Dispose();

    const modifiedFileArray = window.dotnetRuntime.Module.FS.readFile(outputFileName);
    const blob = new Blob([modifiedFileArray], { type: 'application/vnd.openxmlformats-officedocument.wordprocessingml.document' });
    const url = URL.createObjectURL(blob);
    const a = document.createElement('a');
    a.href = url;
    a.download = outputFileName;
    a.click();
    URL.revokeObjectURL(url);
  };

 return (
    <div style={{ textAlign: 'center', height: '300px' }}>
      <h1>Protect a Document with a Specified Type</h1>
      <button onClick={protectWithSpecifiedType}>Generate</button>
    </div>
  );
}
export default App;
Una volta che il documento è protetto con il tipo AllowOnlyReading, il suo contenuto può solo essere visualizzato e i comandi di modifica sulla barra multifunzione sono limitati.
Bloccare solo sezioni specifiche
Proteggere l'intero documento in modo uniforme funziona bene per documenti semplici, ma molti documenti reali richiedono un tocco più raffinato. Un modello di preventivo, ad esempio, può avere termini fissi che devono rimanere bloccati accanto a una sezione in cui il cliente inserisce i propri dati. Spire.Doc for JavaScript gestisce questa situazione combinando la protezione dell'intero documento con override per singola sezione.
La strategia è: proteggere prima l'intero documento con AllowOnlyFormFields, poi impostare su false la proprietà ProtectForm di qualsiasi sezione che deve rimanere modificabile. Questo sblocca selettivamente singole sezioni mentre il resto del documento rimane bloccato.
Il flusso di lavoro prevede tre fasi: caricare i file dei font nel file system virtuale WASM tramite FetchFileToVFS; istanziare un Document, creare sezioni con AddSection e scrivervi del contenuto, chiamare Protect per bloccare l'intero documento solo per i campi modulo e impostare ProtectForm su false nella sezione da sbloccare; quindi salvare il documento, leggere il file generato dal VFS, racchiuderlo in un Blob e avviare il download dal browser.
function App() {
  const lockSpecifiedSections = async () => {
    const docModule = window.wasmModule?.spiredoc;
    if (!docModule) {
      alert('Spire.Doc is not ready yet');
      return;
    }

    // Create a new document and add two sections
    const doc = new docModule.Document();
    let s1 = doc.AddSection();
    let s2 = doc.AddSection();

    // Write content into each of the two sections
    s1.AddParagraph().AppendText("Spire.Doc demo, section 1");
    s2.AddParagraph().AppendText("Spire.Doc demo, section 2");

    // Protect the whole document for form fields only
    doc.Protect({ type: docModule.ProtectionType.AllowOnlyFormFields, password: "123" });

    // Release section 2 on its own so that it can be edited
    s2.ProtectForm = false;

    // Define the output file name and save
    const outputFileName = 'LockSpecifiedSections.docx';
    doc.SaveToFile({ fileName: outputFileName, fileFormat: docModule.FileFormat.Docx2013 });
    doc.Dispose();

    const modifiedFileArray = window.dotnetRuntime.Module.FS.readFile(outputFileName);
    const blob = new Blob([modifiedFileArray], { type: 'application/vnd.openxmlformats-officedocument.wordprocessingml.document' });
    const url = URL.createObjectURL(blob);
    const a = document.createElement('a');
    a.href = url;
    a.download = outputFileName;
    a.click();
    URL.revokeObjectURL(url);
  };

 return (
    <div style={{ textAlign: 'center', height: '300px' }}>
      <h1>Lock Specified Sections of a Word Document</h1>
      <button onClick={lockSpecifiedSections}>Generate</button>
    </div>
  );
}
export default App;
Una volta sbloccata la sezione 2, solo la sezione 1 mantiene la sua restrizione di modifica nel documento.
Domande frequenti
Una sezione non è ancora modificabile dopo ProtectForm = false
La proprietà ProtectForm ha effetto solo quando il documento è stato protetto con AllowOnlyFormFields. Se è attivo un tipo di protezione diverso, come AllowOnlyReading, impostare ProtectForm su false su una singola sezione non la sbloccherà — la restrizione sull'intero documento ha la precedenza.
Per risolvere, assicurati che il tipo di protezione passato a Protect sia AllowOnlyFormFields prima di sbloccare le singole sezioni:
doc.Protect({ type: wasmModule.ProtectionType.AllowOnlyFormFields, password: "123" });
s2.ProtectForm = false;
Un documento protetto può comunque essere selezionato e copiato
Tutti e cinque i tipi di protezione limitano il comportamento di modifica, non quello di lettura. AllowOnlyReading, per esempio, impedisce le modifiche al testo del corpo ma non blocca la selezione del testo, la copia o la ricerca. Questo è intenzionale — le restrizioni di modifica controllano ciò che gli utenti possono modificare, non ciò che possono visualizzare o estrarre.
Se il contenuto non deve essere copiabile o visualizzabile da utenti non autorizzati, usa la crittografia del documento (una password di apertura) invece di una restrizione di modifica. I due approcci affrontano minacce diverse e possono essere combinati quando sono richiesti sia la riservatezza che il controllo delle modifiche:
doc.Protect({ type: wasmModule.ProtectionType.AllowOnlyReading, password: "123456" });
Vedi anche
Protéger les documents Word avec JavaScript : restreindre la modification
Quand les développeurs entendent « protéger un document Word », la première chose qui leur vient souvent à l’esprit est le chiffrement — définir un mot de passe pour que personne ne puisse ouvrir le fichier. Mais il existe une seconde couche de sécurité documentaire tout aussi importante : restreindre ce qu’un lecteur peut faire une fois le document ouvert. Un modèle de contrat envoyé à un client doit lui permettre de remplir les champs vides sans modifier les conditions convenues. Une version finale diffusée pour relecture doit autoriser les commentaires mais bloquer les modifications directes du corps de texte. Ces scénarios nécessitent des restrictions de modification, et non un chiffrement par mot de passe à l’ouverture.
Spire.Doc for JavaScript apporte cette fonctionnalité directement dans le navigateur via WebAssembly. En utilisant un système de fichiers virtuel (VFS) pour gérer les polices et les ressources de fichiers, il traite les documents Word entièrement côté client — pas de serveur backend, pas de téléversement de fichier, pas de latence d’aller-retour. La méthode Protect accepte une valeur d’énumération ProtectionType accompagnée d’un mot de passe, et applique la restriction de modification correspondante au document.
Cet article présente les cinq types de protection disponibles dans Spire.Doc for JavaScript, les compare dans un seul tableau de référence, puis montre comment appliquer un type de protection à l’ensemble du document et comment verrouiller uniquement des sections spécifiques tout en laissant les autres modifiables.
Protection ou chiffrement : deux objectifs différents
Avant d’examiner les types de protection, il convient d’établir une distinction claire entre deux concepts souvent confondus :
- Chiffrement (mot de passe à l’ouverture) contrôle qui peut ouvrir le document. Sans le mot de passe, le contenu du fichier est inaccessible.
- Restrictions de modification (type de protection) contrôlent ce qu’un lecteur peut modifier une fois le document déjà ouvert. Le lecteur peut consulter librement le contenu ; la restriction limite les actions de modification disponibles.
Les restrictions de modification n’empêchent pas la sélection, la copie ou la recherche — elles bloquent uniquement les modifications. Si votre objectif est d’empêcher que le contenu soit emporté, vous avez besoin du chiffrement. Si votre objectif est d’empêcher que le contenu soit modifié tout en permettant sa lecture, vous avez besoin d’une restriction de modification. Les deux mécanismes sont complémentaires et peuvent être utilisés ensemble, mais ils répondent à des objectifs distincts.
Types de protection en un coup d’œil
Spire.Doc for JavaScript expose cinq valeurs d’énumération ProtectionType. Chacune définit une portée modifiable différente — de totalement ouverte à totalement verrouillée. Le tableau ci-dessous résume les cinq afin que vous puissiez choisir la bonne en un coup d’œil.
| ProtectionType | Effet sur le document | Cas d’utilisation typique |
|---|---|---|
NoProtection |
Aucune restriction appliquée ; toutes les actions de modification sont disponibles. | Supprimer une restriction existante ou partir d’un état vierge. |
AllowOnlyReading |
Le document peut être consulté mais pas modifié. Les commandes de modification du ruban sont désactivées. | Rapports finaux, avis publiés ou tout livrable en lecture seule. |
AllowOnlyComments |
Les lecteurs peuvent ajouter des commentaires mais ne peuvent pas modifier le corps du texte. | Cycles de relecture où les relecteurs doivent laisser des retours sans altérer le contenu. |
AllowOnlyFormFields |
Seuls les champs de formulaire sont modifiables ; le reste du document est verrouillé. | Contrats, enquêtes et modèles comportant des zones à remplir. |
AllowOnlyRevisions |
Toutes les modifications sont enregistrées comme modifications suivies et peuvent être examinées ultérieurement. | Rédaction collaborative où chaque modification doit être visible et réversible. |
Comment choisir : Si le lecteur ne doit rien modifier, utilisez AllowOnlyReading. S’il doit uniquement remplir des champs prévus, utilisez AllowOnlyFormFields. S’il doit laisser un retour sans toucher au texte, utilisez AllowOnlyComments. Si chaque changement doit être suivi pour une relecture ultérieure, utilisez AllowOnlyRevisions. Si vous devez supprimer une restriction appliquée précédemment, utilisez NoProtection.
Appliquer un type de protection à l’ensemble du document
L’approche la plus simple consiste à protéger l’ensemble du document avec une seule valeur ProtectionType. Le flux de travail comporte trois étapes : charger les fichiers de police et le document Word cible dans le système de fichiers virtuel WASM via FetchFileToVFS ; instancier un Document, charger le fichier et appeler Protect avec le type de protection souhaité et le mot de passe qui lèvera ensuite la restriction ; puis enregistrer le document, lire le fichier généré depuis le VFS, l’encapsuler dans un Blob et déclencher un téléchargement dans le navigateur.
L’exemple ci-dessous utilise AllowOnlyReading, mais vous pouvez remplacer par n’importe laquelle des cinq valeurs ProtectionType du tableau ci-dessus.
function App() {
  const protectWithSpecifiedType = async () => {
    const docModule = window.wasmModule?.spiredoc;
    if (!docModule) {
      alert('Spire.Doc is not ready yet');
      return;
    }

    const inputFileName = 'Template.docx';
    await window.spire.FetchFileToVFS(inputFileName, '', `${process.env.PUBLIC_URL}/data/`);

    // Load the document
    const doc = new docModule.Document();
    doc.LoadFromFile(inputFileName);

    // Protect the document with the "AllowOnlyReading" type; the password lifts the restriction
    doc.Protect({ type: docModule.ProtectionType.AllowOnlyReading, password: "123456" });

    // Define the output file name and save
    const outputFileName = "SpecifiedProtectionType.docx";
    doc.SaveToFile({ fileName: outputFileName, fileFormat: docModule.FileFormat.Docx2013 });
    doc.Dispose();

    const modifiedFileArray = window.dotnetRuntime.Module.FS.readFile(outputFileName);
    const blob = new Blob([modifiedFileArray], { type: 'application/vnd.openxmlformats-officedocument.wordprocessingml.document' });
    const url = URL.createObjectURL(blob);
    const a = document.createElement('a');
    a.href = url;
    a.download = outputFileName;
    a.click();
    URL.revokeObjectURL(url);
  };

 return (
    <div style={{ textAlign: 'center', height: '300px' }}>
      <h1>Protect a Document with a Specified Type</h1>
      <button onClick={protectWithSpecifiedType}>Generate</button>
    </div>
  );
}
export default App;
Une fois le document protégé avec le type AllowOnlyReading, son contenu peut uniquement être consulté et les commandes de modification du ruban sont restreintes.
Verrouiller uniquement les sections spécifiées
Protéger uniformément l’ensemble du document fonctionne bien pour des livrables simples, mais de nombreux documents réels nécessitent une approche plus fine. Un modèle de devis, par exemple, peut comporter des conditions fixes qui doivent rester verrouillées à côté d’une section où le client saisit ses informations. Spire.Doc for JavaScript gère cela en combinant une protection de l’ensemble du document avec des exceptions par section.
La stratégie est la suivante : protéger d’abord l’ensemble du document avec AllowOnlyFormFields, puis définir la propriété ProtectForm de toute section qui doit rester modifiable sur false. Cela libère sélectivement certaines sections tandis que le reste du document reste verrouillé.
Le flux de travail comporte trois étapes : charger les fichiers de police dans le système de fichiers virtuel WASM via FetchFileToVFS ; instancier un Document, créer des sections avec AddSection et y écrire du contenu, appeler Protect pour verrouiller tout le document aux seuls champs de formulaire, et définir ProtectForm sur false pour la section à libérer ; puis enregistrer le document, lire le fichier généré depuis le VFS, l’encapsuler dans un Blob et déclencher un téléchargement dans le navigateur.
function App() {
  const lockSpecifiedSections = async () => {
    const docModule = window.wasmModule?.spiredoc;
    if (!docModule) {
      alert('Spire.Doc is not ready yet');
      return;
    }

    // Create a new document and add two sections
    const doc = new docModule.Document();
    let s1 = doc.AddSection();
    let s2 = doc.AddSection();

    // Write content into each of the two sections
    s1.AddParagraph().AppendText("Spire.Doc demo, section 1");
    s2.AddParagraph().AppendText("Spire.Doc demo, section 2");

    // Protect the whole document for form fields only
    doc.Protect({ type: docModule.ProtectionType.AllowOnlyFormFields, password: "123" });

    // Release section 2 on its own so that it can be edited
    s2.ProtectForm = false;

    // Define the output file name and save
    const outputFileName = 'LockSpecifiedSections.docx';
    doc.SaveToFile({ fileName: outputFileName, fileFormat: docModule.FileFormat.Docx2013 });
    doc.Dispose();

    const modifiedFileArray = window.dotnetRuntime.Module.FS.readFile(outputFileName);
    const blob = new Blob([modifiedFileArray], { type: 'application/vnd.openxmlformats-officedocument.wordprocessingml.document' });
    const url = URL.createObjectURL(blob);
    const a = document.createElement('a');
    a.href = url;
    a.download = outputFileName;
    a.click();
    URL.revokeObjectURL(url);
  };

 return (
    <div style={{ textAlign: 'center', height: '300px' }}>
      <h1>Lock Specified Sections of a Word Document</h1>
      <button onClick={lockSpecifiedSections}>Generate</button>
    </div>
  );
}
export default App;
Une fois la section 2 libérée, seule la section 1 conserve sa restriction de modification dans le document.
FAQ
Une section n’est toujours pas modifiable après ProtectForm = false
La propriété ProtectForm ne prend effet que lorsque le document a été protégé avec AllowOnlyFormFields. Si un autre type de protection tel que AllowOnlyReading est actif, définir ProtectForm sur false pour une section individuelle ne la libérera pas — la restriction de l’ensemble du document est prioritaire.
Pour corriger cela, assurez-vous que le type de protection transmis à Protect est AllowOnlyFormFields avant de libérer des sections individuelles :
doc.Protect({ type: wasmModule.ProtectionType.AllowOnlyFormFields, password: "123" });
s2.ProtectForm = false;
Un document protégé peut toujours être sélectionné et copié
Les cinq types de protection restreignent le comportement de modification, pas le comportement de lecture. AllowOnlyReading, par exemple, empêche les modifications du corps du texte mais ne bloque pas la sélection, la copie ou la recherche de texte. C’est intentionnel — les restrictions de modification contrôlent ce que les utilisateurs peuvent modifier, pas ce qu’ils peuvent consulter ou extraire.
Si le contenu ne doit pas pouvoir être copié ou consulté par des utilisateurs non autorisés, utilisez le chiffrement du document (un mot de passe à l’ouverture) plutôt qu’une restriction de modification. Les deux approches répondent à des menaces différentes et peuvent être combinées lorsque la confidentialité et le contrôle des modifications sont tous deux requis :
doc.Protect({ type: wasmModule.ProtectionType.AllowOnlyReading, password: "123456" });
Voir aussi
Proteger documentos de Word con JavaScript: restringir la edición
Cuando los desarrolladores oyen "proteger un documento de Word", lo primero que suele venir a la mente es el cifrado: establecer una contraseña para que nadie pueda abrir el archivo. Pero existe una segunda capa de seguridad de documentos, igualmente importante: restringir lo que un lector puede hacer una vez que el documento está abierto. Una plantilla de contrato enviada a un cliente debería permitirle rellenar los espacios en blanco sin alterar los términos acordados. Un borrador final que se distribuye para su revisión debería permitir comentarios pero bloquear las ediciones directas del cuerpo del texto. Estos escenarios requieren restricciones de edición, no cifrado con contraseña de apertura.
Spire.Doc for JavaScript lleva esta capacidad directamente al navegador mediante WebAssembly. Utilizando un sistema de archivos virtual (VFS) para gestionar fuentes y recursos de archivos, procesa documentos de Word completamente en el lado del cliente: sin servidor backend, sin carga de archivos, sin latencia de ida y vuelta. El método Protect acepta un valor de enumeración ProtectionType junto con una contraseña, y aplica la restricción de edición correspondiente al documento.
Este artículo repasa los cinco tipos de protección disponibles en Spire.Doc for JavaScript, los compara en una única tabla de referencia y, a continuación, muestra cómo aplicar un tipo de protección a todo el documento y cómo bloquear solo secciones específicas dejando otras editables.
Protección vs. cifrado: dos objetivos diferentes
Antes de profundizar en los tipos de protección, conviene trazar una línea clara entre dos conceptos que con frecuencia se confunden:
- El cifrado (contraseña de apertura) controla quién puede abrir el documento. Sin la contraseña, no se puede acceder al contenido del archivo.
- Las restricciones de edición (tipo de protección) controlan qué puede cambiar un lector una vez que el documento ya está abierto. El lector puede ver el contenido libremente; la restricción limita qué acciones de edición están disponibles.
Las restricciones de edición no impiden la selección, la copia ni la búsqueda: solo bloquean las modificaciones. Si tu objetivo es evitar que el contenido se extraiga, necesitas cifrado. Si tu objetivo es evitar que el contenido se modifique sin dejar de permitir su lectura, necesitas una restricción de edición. Ambos mecanismos son complementarios y pueden usarse juntos, pero cumplen propósitos distintos.
Tipos de protección de un vistazo
Spire.Doc for JavaScript expone cinco valores de enumeración ProtectionType. Cada uno define un ámbito editable diferente, desde totalmente abierto hasta totalmente bloqueado. La siguiente tabla resume los cinco para que puedas elegir el adecuado de un vistazo.
| ProtectionType | Efecto en el documento | Caso de uso típico |
|---|---|---|
NoProtection |
No se aplica ninguna restricción; todas las acciones de edición están disponibles. | Eliminar una restricción existente o comenzar desde un estado limpio. |
AllowOnlyReading |
El documento se puede ver pero no editar. Los comandos de edición de la cinta de opciones están deshabilitados. | Informes finales, avisos publicados o cualquier entregable de solo lectura. |
AllowOnlyComments |
Los lectores pueden añadir comentarios pero no modificar el cuerpo del texto. | Ciclos de revisión en los que los revisores deben dejar comentarios sin alterar el contenido. |
AllowOnlyFormFields |
Solo los campos de formulario son editables; el resto del documento está bloqueado. | Contratos, encuestas y plantillas con áreas para rellenar espacios en blanco. |
AllowOnlyRevisions |
Todas las ediciones se aceptan como cambios registrados y pueden revisarse posteriormente. | Redacción colaborativa en la que cada cambio debe ser visible y reversible. |
Cómo elegir: Si el lector no debe cambiar nada, usa AllowOnlyReading. Si el lector solo debe rellenar espacios designados, usa AllowOnlyFormFields. Si el lector debe dejar comentarios sin tocar el texto, usa AllowOnlyComments. Si cada cambio debe registrarse para revisarlo posteriormente, usa AllowOnlyRevisions. Si necesitas eliminar una restricción aplicada previamente, usa NoProtection.
Aplicar un tipo de protección a todo el documento
El enfoque más directo es proteger todo el documento con un único valor de ProtectionType. El flujo de trabajo tiene tres etapas: cargar los archivos de fuentes y el documento de Word de destino en el sistema de archivos virtual de WASM mediante FetchFileToVFS; instanciar un Document, cargar el archivo y llamar a Protect con el tipo de protección deseado y la contraseña que posteriormente levantará la restricción; luego guardar el documento, leer el archivo generado desde el VFS, envolverlo como un Blob y desencadenar una descarga en el navegador.
El ejemplo siguiente usa AllowOnlyReading, pero puedes sustituirlo por cualquiera de los cinco valores de ProtectionType de la tabla anterior.
function App() {
  const protectWithSpecifiedType = async () => {
    const docModule = window.wasmModule?.spiredoc;
    if (!docModule) {
      alert('Spire.Doc is not ready yet');
      return;
    }

    const inputFileName = 'Template.docx';
    await window.spire.FetchFileToVFS(inputFileName, '', `${process.env.PUBLIC_URL}/data/`);

    // Load the document
    const doc = new docModule.Document();
    doc.LoadFromFile(inputFileName);

    // Protect the document with the "AllowOnlyReading" type; the password lifts the restriction
    doc.Protect({ type: docModule.ProtectionType.AllowOnlyReading, password: "123456" });

    // Define the output file name and save
    const outputFileName = "SpecifiedProtectionType.docx";
    doc.SaveToFile({ fileName: outputFileName, fileFormat: docModule.FileFormat.Docx2013 });
    doc.Dispose();

    const modifiedFileArray = window.dotnetRuntime.Module.FS.readFile(outputFileName);
    const blob = new Blob([modifiedFileArray], { type: 'application/vnd.openxmlformats-officedocument.wordprocessingml.document' });
    const url = URL.createObjectURL(blob);
    const a = document.createElement('a');
    a.href = url;
    a.download = outputFileName;
    a.click();
    URL.revokeObjectURL(url);
  };

 return (
    <div style={{ textAlign: 'center', height: '300px' }}>
      <h1>Protect a Document with a Specified Type</h1>
      <button onClick={protectWithSpecifiedType}>Generate</button>
    </div>
  );
}
export default App;
Una vez que el documento está protegido con el tipo AllowOnlyReading, su contenido solo se puede visualizar y los comandos de edición de la cinta de opciones quedan restringidos.
Bloquear solo secciones específicas
Proteger todo el documento de forma uniforme funciona bien para entregables sencillos, pero muchos documentos del mundo real necesitan un ajuste más fino. Una plantilla de presupuesto, por ejemplo, puede tener términos fijos que deben permanecer bloqueados junto a una sección donde el cliente introduce sus datos. Spire.Doc for JavaScript lo resuelve combinando la protección de todo el documento con anulaciones por sección.
La estrategia es: primero proteger todo el documento con AllowOnlyFormFields, y luego establecer en false la propiedad ProtectForm de cualquier sección que deba permanecer editable. Esto libera selectivamente secciones individuales mientras el resto del documento permanece bloqueado.
El flujo de trabajo tiene tres etapas: cargar los archivos de fuentes en el sistema de archivos virtual de WASM mediante FetchFileToVFS; instanciar un Document, crear secciones con AddSection y escribir contenido en ellas, llamar a Protect para bloquear todo el documento solo para campos de formulario, y establecer ProtectForm en false en la sección que se va a liberar; luego guardar el documento, leer el archivo generado desde el VFS, envolverlo como un Blob y desencadenar una descarga en el navegador.
function App() {
  const lockSpecifiedSections = async () => {
    const docModule = window.wasmModule?.spiredoc;
    if (!docModule) {
      alert('Spire.Doc is not ready yet');
      return;
    }

    // Create a new document and add two sections
    const doc = new docModule.Document();
    let s1 = doc.AddSection();
    let s2 = doc.AddSection();

    // Write content into each of the two sections
    s1.AddParagraph().AppendText("Spire.Doc demo, section 1");
    s2.AddParagraph().AppendText("Spire.Doc demo, section 2");

    // Protect the whole document for form fields only
    doc.Protect({ type: docModule.ProtectionType.AllowOnlyFormFields, password: "123" });

    // Release section 2 on its own so that it can be edited
    s2.ProtectForm = false;

    // Define the output file name and save
    const outputFileName = 'LockSpecifiedSections.docx';
    doc.SaveToFile({ fileName: outputFileName, fileFormat: docModule.FileFormat.Docx2013 });
    doc.Dispose();

    const modifiedFileArray = window.dotnetRuntime.Module.FS.readFile(outputFileName);
    const blob = new Blob([modifiedFileArray], { type: 'application/vnd.openxmlformats-officedocument.wordprocessingml.document' });
    const url = URL.createObjectURL(blob);
    const a = document.createElement('a');
    a.href = url;
    a.download = outputFileName;
    a.click();
    URL.revokeObjectURL(url);
  };

 return (
    <div style={{ textAlign: 'center', height: '300px' }}>
      <h1>Lock Specified Sections of a Word Document</h1>
      <button onClick={lockSpecifiedSections}>Generate</button>
    </div>
  );
}
export default App;
Una vez liberada la sección 2, solo la sección 1 conserva su restricción de edición en el documento.
Preguntas frecuentes
Una sección sigue sin ser editable después de ProtectForm = false
La propiedad ProtectForm solo surte efecto cuando el documento se ha protegido con AllowOnlyFormFields. Si está activo un tipo de protección diferente, como AllowOnlyReading, establecer ProtectForm en false en una sección individual no la liberará: la restricción de todo el documento tiene prioridad.
Para solucionarlo, asegúrate de que el tipo de protección pasado a Protect sea AllowOnlyFormFields antes de liberar secciones individuales:
doc.Protect({ type: wasmModule.ProtectionType.AllowOnlyFormFields, password: "123" });
s2.ProtectForm = false;
Un documento protegido todavía se puede seleccionar y copiar
Los cinco tipos de protección restringen el comportamiento de edición, no el de lectura. AllowOnlyReading, por ejemplo, impide cambios en el cuerpo del texto pero no bloquea la selección, la copia ni la búsqueda de texto. Es algo deliberado: las restricciones de edición controlan lo que los usuarios pueden modificar, no lo que pueden ver o extraer.
Si el contenido no debe poder copiarse ni ser visto por usuarios no autorizados, utiliza el cifrado de documentos (una contraseña de apertura) en lugar de una restricción de edición. Ambos enfoques abordan amenazas distintas y pueden combinarse cuando se requiere tanto confidencialidad como control de edición:
doc.Protect({ type: wasmModule.ProtectionType.AllowOnlyReading, password: "123456" });
Ver también
Word-Dokumente mit JavaScript schützen: Bearbeitung einschränken
Wenn Entwickler von „ein Word-Dokument schützen“ hören, denken sie zuerst meist an Verschlüsselung – ein Passwort festlegen, damit niemand die Datei öffnen kann. Doch es gibt eine zweite, ebenso wichtige Ebene der Dokumentsicherheit: einzuschränken, was ein Leser tun kann, nachdem das Dokument geöffnet wurde. Eine an einen Kunden gesendete Vertragsvorlage sollte es ihm ermöglichen, die Lücken auszufüllen, ohne die vereinbarten Bedingungen zu ändern. Ein zur Überprüfung verteilter finaler Entwurf sollte Kommentare zulassen, aber direkte Änderungen am Fließtext blockieren. Solche Szenarien erfordern Bearbeitungseinschränkungen, nicht eine Öffnungs-Passwort-Verschlüsselung.
Spire.Doc for JavaScript bringt diese Fähigkeit über WebAssembly direkt in den Browser. Mithilfe eines virtuellen Dateisystems (VFS) zur Verwaltung von Schriftarten und Dateiressourcen verarbeitet es Word-Dokumente vollständig auf der Client-Seite – kein Backend-Server, kein Datei-Upload, keine Roundtrip-Verzögerung. Die Methode Protect akzeptiert einen ProtectionType-Enum-Wert zusammen mit einem Passwort und wendet die entsprechende Bearbeitungseinschränkung auf das Dokument an.
Dieser Artikel führt durch die fünf Schutztypen, die in Spire.Doc for JavaScript verfügbar sind, vergleicht sie in einer einzigen Referenztabelle und zeigt dann, wie man einen Schutztyp auf das gesamte Dokument anwendet und wie man nur bestimmte Abschnitte sperrt, während andere bearbeitbar bleiben.
Schutz vs. Verschlüsselung: Zwei unterschiedliche Ziele
Bevor wir in die Schutztypen eintauchen, lohnt es sich, klar zwischen zwei Konzepten zu unterscheiden, die häufig verwechselt werden:
- Verschlüsselung (Öffnungspasswort) steuert, wer das Dokument öffnen kann. Ohne das Passwort sind die Dateiinhalte nicht zugänglich.
- Bearbeitungseinschränkungen (Schutztyp) steuern, was ein Leser ändern kann, nachdem das Dokument bereits geöffnet ist. Der Leser kann den Inhalt frei anzeigen; die Einschränkung begrenzt, welche Bearbeitungsaktionen verfügbar sind.
Bearbeitungseinschränkungen verhindern nicht das Markieren, Kopieren oder Suchen – sie blockieren nur Änderungen. Wenn Ihr Ziel darin besteht, zu verhindern, dass der Inhalt entnommen wird, benötigen Sie Verschlüsselung. Wenn Ihr Ziel darin besteht, zu verhindern, dass der Inhalt geändert wird, während er weiterhin gelesen werden kann, benötigen Sie eine Bearbeitungseinschränkung. Die beiden Mechanismen ergänzen sich und können zusammen verwendet werden, erfüllen aber unterschiedliche Zwecke.
Schutztypen im Überblick
Spire.Doc for JavaScript stellt fünf ProtectionType-Enum-Werte bereit. Jeder definiert einen anderen bearbeitbaren Bereich – von vollständig offen bis vollständig gesperrt. Die folgende Tabelle fasst alle fünf zusammen, damit Sie auf einen Blick den richtigen auswählen können.
| ProtectionType | Auswirkung auf das Dokument | Typischer Anwendungsfall |
|---|---|---|
NoProtection |
Keine Einschränkung angewendet; alle Bearbeitungsaktionen sind verfügbar. | Entfernen einer bestehenden Einschränkung oder Start von einem unbelasteten Zustand aus. |
AllowOnlyReading |
Das Dokument kann angezeigt, aber nicht bearbeitet werden. Bearbeitungsbefehle im Menüband sind deaktiviert. | Abschlussberichte, veröffentlichte Bekanntmachungen oder jedes schreibgeschützte Ergebnis. |
AllowOnlyComments |
Leser können Kommentare hinzufügen, aber den Fließtext nicht ändern. | Überprüfungszyklen, in denen Prüfer Feedback hinterlassen sollen, ohne den Inhalt zu verändern. |
AllowOnlyFormFields |
Nur Formularfelder sind bearbeitbar; der Rest des Dokuments ist gesperrt. | Verträge, Umfragen und Vorlagen mit auszufüllenden Lücken. |
AllowOnlyRevisions |
Alle Änderungen werden als nachverfolgte Änderungen übernommen und können später überprüft werden. | Gemeinsames Verfassen, bei dem jede Änderung sichtbar und umkehrbar sein muss. |
Wie man wählt: Wenn der Leser nichts ändern soll, verwenden Sie AllowOnlyReading. Wenn der Leser nur die vorgesehenen Lücken ausfüllen soll, verwenden Sie AllowOnlyFormFields. Wenn der Leser Feedback hinterlassen soll, ohne den Text anzutasten, verwenden Sie AllowOnlyComments. Wenn jede Änderung für eine spätere Überprüfung nachverfolgt werden soll, verwenden Sie AllowOnlyRevisions. Wenn Sie eine zuvor angewendete Einschränkung entfernen müssen, verwenden Sie NoProtection.
Einen Schutztyp auf das gesamte Dokument anwenden
Der geradlinigste Ansatz besteht darin, das gesamte Dokument mit einem einzigen ProtectionType-Wert zu schützen. Der Ablauf hat drei Phasen: Laden Sie die Schriftartdateien und das Ziel-Word-Dokument über FetchFileToVFS in das virtuelle WASM-Dateisystem; instanziieren Sie ein Document, laden Sie die Datei und rufen Sie Protect mit dem gewünschten Schutztyp und dem Passwort auf, mit dem die Einschränkung später aufgehoben wird; speichern Sie anschließend das Dokument, lesen Sie die erzeugte Datei aus dem VFS, verpacken Sie sie als Blob und lösen Sie einen Browser-Download aus.
Das folgende Beispiel verwendet AllowOnlyReading, aber Sie können jeden der fünf ProtectionType-Werte aus der obigen Tabelle einsetzen.
function App() {
  const protectWithSpecifiedType = async () => {
    const docModule = window.wasmModule?.spiredoc;
    if (!docModule) {
      alert('Spire.Doc is not ready yet');
      return;
    }

    const inputFileName = 'Template.docx';
    await window.spire.FetchFileToVFS(inputFileName, '', `${process.env.PUBLIC_URL}/data/`);

    // Load the document
    const doc = new docModule.Document();
    doc.LoadFromFile(inputFileName);

    // Protect the document with the "AllowOnlyReading" type; the password lifts the restriction
    doc.Protect({ type: docModule.ProtectionType.AllowOnlyReading, password: "123456" });

    // Define the output file name and save
    const outputFileName = "SpecifiedProtectionType.docx";
    doc.SaveToFile({ fileName: outputFileName, fileFormat: docModule.FileFormat.Docx2013 });
    doc.Dispose();

    const modifiedFileArray = window.dotnetRuntime.Module.FS.readFile(outputFileName);
    const blob = new Blob([modifiedFileArray], { type: 'application/vnd.openxmlformats-officedocument.wordprocessingml.document' });
    const url = URL.createObjectURL(blob);
    const a = document.createElement('a');
    a.href = url;
    a.download = outputFileName;
    a.click();
    URL.revokeObjectURL(url);
  };

 return (
    <div style={{ textAlign: 'center', height: '300px' }}>
      <h1>Protect a Document with a Specified Type</h1>
      <button onClick={protectWithSpecifiedType}>Generate</button>
    </div>
  );
}
export default App;
Sobald das Dokument mit dem Typ AllowOnlyReading geschützt ist, kann sein Inhalt nur angezeigt werden und die Bearbeitungsbefehle im Menüband sind eingeschränkt.
Nur bestimmte Abschnitte sperren
Das gesamte Dokument einheitlich zu schützen, funktioniert gut für einfache Ergebnisse, aber viele reale Dokumente benötigen ein feineres Vorgehen. Eine Angebotsvorlage beispielsweise kann feste Bedingungen enthalten, die gesperrt bleiben müssen, neben einem Abschnitt, in dem der Kunde seine Angaben einträgt. Spire.Doc for JavaScript löst dies, indem es den Schutz des gesamten Dokuments mit Überschreibungen pro Abschnitt kombiniert.
Die Strategie lautet: Schützen Sie zuerst das gesamte Dokument mit AllowOnlyFormFields und setzen Sie dann die ProtectForm-Eigenschaft jedes Abschnitts, der bearbeitbar bleiben soll, auf false. Dadurch werden einzelne Abschnitte gezielt freigegeben, während der Rest des Dokuments gesperrt bleibt.
Der Ablauf hat drei Phasen: Laden Sie die Schriftartdateien über FetchFileToVFS in das virtuelle WASM-Dateisystem; instanziieren Sie ein Document, erstellen Sie Abschnitte mit AddSection und schreiben Sie Inhalte hinein, rufen Sie Protect auf, um das gesamte Dokument nur für Formularfelder zu sperren, und setzen Sie ProtectForm für den freizugebenden Abschnitt auf false; speichern Sie anschließend das Dokument, lesen Sie die erzeugte Datei aus dem VFS, verpacken Sie sie als Blob und lösen Sie einen Browser-Download aus.
function App() {
  const lockSpecifiedSections = async () => {
    const docModule = window.wasmModule?.spiredoc;
    if (!docModule) {
      alert('Spire.Doc is not ready yet');
      return;
    }

    // Create a new document and add two sections
    const doc = new docModule.Document();
    let s1 = doc.AddSection();
    let s2 = doc.AddSection();

    // Write content into each of the two sections
    s1.AddParagraph().AppendText("Spire.Doc demo, section 1");
    s2.AddParagraph().AppendText("Spire.Doc demo, section 2");

    // Protect the whole document for form fields only
    doc.Protect({ type: docModule.ProtectionType.AllowOnlyFormFields, password: "123" });

    // Release section 2 on its own so that it can be edited
    s2.ProtectForm = false;

    // Define the output file name and save
    const outputFileName = 'LockSpecifiedSections.docx';
    doc.SaveToFile({ fileName: outputFileName, fileFormat: docModule.FileFormat.Docx2013 });
    doc.Dispose();

    const modifiedFileArray = window.dotnetRuntime.Module.FS.readFile(outputFileName);
    const blob = new Blob([modifiedFileArray], { type: 'application/vnd.openxmlformats-officedocument.wordprocessingml.document' });
    const url = URL.createObjectURL(blob);
    const a = document.createElement('a');
    a.href = url;
    a.download = outputFileName;
    a.click();
    URL.revokeObjectURL(url);
  };

 return (
    <div style={{ textAlign: 'center', height: '300px' }}>
      <h1>Lock Specified Sections of a Word Document</h1>
      <button onClick={lockSpecifiedSections}>Generate</button>
    </div>
  );
}
export default App;
Sobald Abschnitt 2 freigegeben wurde, behält nur Abschnitt 1 seine Bearbeitungseinschränkung im Dokument.
FAQ
Ein Abschnitt ist nach ProtectForm = false immer noch nicht bearbeitbar
Die ProtectForm-Eigenschaft wirkt nur, wenn das Dokument mit AllowOnlyFormFields geschützt wurde. Wenn ein anderer Schutztyp wie AllowOnlyReading aktiv ist, gibt das Setzen von ProtectForm auf false für einen einzelnen Abschnitt diesen nicht frei – die Einschränkung des gesamten Dokuments hat Vorrang.
Um dies zu beheben, stellen Sie sicher, dass der an Protect übergebene Schutztyp AllowOnlyFormFields ist, bevor Sie einzelne Abschnitte freigeben:
doc.Protect({ type: wasmModule.ProtectionType.AllowOnlyFormFields, password: "123" });
s2.ProtectForm = false;
Ein geschütztes Dokument kann weiterhin markiert und kopiert werden
Alle fünf Schutztypen schränken das Bearbeitungsverhalten ein, nicht das Leseverhalten. AllowOnlyReading beispielsweise verhindert Änderungen am Fließtext, blockiert aber nicht das Markieren, Kopieren oder Suchen von Text. Das ist beabsichtigt – Bearbeitungseinschränkungen steuern, was Benutzer ändern können, nicht, was sie anzeigen oder entnehmen können.
Wenn der Inhalt für unbefugte Benutzer nicht kopierbar oder einsehbar sein darf, verwenden Sie stattdessen Dokumentverschlüsselung (ein Öffnungspasswort) anstelle einer Bearbeitungseinschränkung. Die beiden Ansätze adressieren unterschiedliche Bedrohungen und können kombiniert werden, wenn sowohl Vertraulichkeit als auch Bearbeitungskontrolle erforderlich sind:
doc.Protect({ type: wasmModule.ProtectionType.AllowOnlyReading, password: "123456" });
Siehe auch
Защита документов Word с помощью JavaScript: ограничение редактирования
Когда разработчики слышат «защитить документ Word», первое, что часто приходит на ум, — это шифрование: установить пароль, чтобы никто не мог открыть файл. Но существует второй, не менее важный уровень защиты документа: ограничение действий, которые может выполнять читатель после открытия документа. Шаблон договора, отправленный клиенту, должен позволять ему заполнять пропуски, не меняя согласованные условия. Чистовик, разосланный на проверку, должен разрешать комментарии, но блокировать прямое редактирование основного текста. В таких сценариях нужны ограничения редактирования, а не шифрование с паролем на открытие.
Spire.Doc for JavaScript предоставляет эту возможность непосредственно в браузере через WebAssembly. Используя виртуальную файловую систему (VFS) для управления шрифтами и файловыми ресурсами, он обрабатывает документы Word полностью на стороне клиента — без серверной части, без загрузки файлов, без задержек на обмен данными. Метод Protect принимает значение перечисления ProtectionType вместе с паролем и применяет соответствующее ограничение редактирования к документу.
В этой статье рассматриваются пять типов защиты, доступных в Spire.Doc for JavaScript, они сравниваются в одной справочной таблице, а затем демонстрируется, как применить тип защиты ко всему документу и как заблокировать только определённые разделы, оставив остальные редактируемыми.
Защита и шифрование: две разные цели
Прежде чем переходить к типам защиты, стоит чётко разграничить два понятия, которые часто путают:
- Шифрование (пароль на открытие) определяет, кто может открыть документ. Без пароля содержимое файла недоступно.
- Ограничения редактирования (тип защиты) определяют, что читатель может изменить после того, как документ уже открыт. Читатель может свободно просматривать содержимое; ограничение определяет, какие действия редактирования доступны.
Ограничения редактирования не препятствуют выделению, копированию или поиску — они блокируют только изменения. Если ваша цель — не дать забрать содержимое, нужно шифрование. Если ваша цель — не дать изменить содержимое, но по-прежнему разрешить его чтение, нужно ограничение редактирования. Эти два механизма дополняют друг друга и могут использоваться вместе, но служат разным целям.
Типы защиты: краткий обзор
Spire.Doc for JavaScript предоставляет пять значений перечисления ProtectionType. Каждое из них определяет свою область редактирования — от полностью открытой до полностью заблокированной. В таблице ниже приведены все пять, чтобы вы могли сразу выбрать подходящее.
| ProtectionType | Влияние на документ | Типичный сценарий использования |
|---|---|---|
NoProtection |
Ограничения не применяются; доступны все действия редактирования. | Снятие существующего ограничения или начало с чистого состояния. |
AllowOnlyReading |
Документ можно просматривать, но нельзя редактировать. Команды редактирования на ленте отключены. | Итоговые отчёты, опубликованные уведомления или любые материалы только для чтения. |
AllowOnlyComments |
Читатели могут добавлять комментарии, но не могут изменять основной текст. | Циклы проверки, где рецензенты должны оставить отзыв, не изменяя содержимое. |
AllowOnlyFormFields |
Редактировать можно только поля формы; остальная часть документа заблокирована. | Договоры, опросы и шаблоны с полями для заполнения. |
AllowOnlyRevisions |
Все правки принимаются как отслеживаемые изменения и могут быть проверены позже. | Совместная работа над черновиком, где каждое изменение должно быть видимым и обратимым. |
Как выбрать: Если читатель не должен ничего менять, используйте AllowOnlyReading. Если читатель должен заполнять только отведённые пустые поля, используйте AllowOnlyFormFields. Если читатель должен оставить отзыв, не трогая текст, используйте AllowOnlyComments. Если каждое изменение должно отслеживаться для последующей проверки, используйте AllowOnlyRevisions. Если нужно снять ранее применённое ограничение, используйте NoProtection.
Применение типа защиты ко всему документу
Самый простой подход — защитить весь документ одним значением ProtectionType. Рабочий процесс состоит из трёх этапов: загрузить файлы шрифтов и целевой документ Word в виртуальную файловую систему WASM с помощью FetchFileToVFS; создать экземпляр Document, загрузить файл и вызвать Protect с нужным типом защиты и паролем, который позже снимет ограничение; затем сохранить документ, прочитать созданный файл из VFS, обернуть его в Blob и запустить скачивание в браузере.
В приведённом ниже примере используется AllowOnlyReading, но вы можете подставить любое из пяти значений ProtectionType из таблицы выше.
function App() {
  const protectWithSpecifiedType = async () => {
    const docModule = window.wasmModule?.spiredoc;
    if (!docModule) {
      alert('Spire.Doc is not ready yet');
      return;
    }

    const inputFileName = 'Template.docx';
    await window.spire.FetchFileToVFS(inputFileName, '', `${process.env.PUBLIC_URL}/data/`);

    // Load the document
    const doc = new docModule.Document();
    doc.LoadFromFile(inputFileName);

    // Protect the document with the "AllowOnlyReading" type; the password lifts the restriction
    doc.Protect({ type: docModule.ProtectionType.AllowOnlyReading, password: "123456" });

    // Define the output file name and save
    const outputFileName = "SpecifiedProtectionType.docx";
    doc.SaveToFile({ fileName: outputFileName, fileFormat: docModule.FileFormat.Docx2013 });
    doc.Dispose();

    const modifiedFileArray = window.dotnetRuntime.Module.FS.readFile(outputFileName);
    const blob = new Blob([modifiedFileArray], { type: 'application/vnd.openxmlformats-officedocument.wordprocessingml.document' });
    const url = URL.createObjectURL(blob);
    const a = document.createElement('a');
    a.href = url;
    a.download = outputFileName;
    a.click();
    URL.revokeObjectURL(url);
  };

 return (
    <div style={{ textAlign: 'center', height: '300px' }}>
      <h1>Protect a Document with a Specified Type</h1>
      <button onClick={protectWithSpecifiedType}>Generate</button>
    </div>
  );
}
export default App;
После защиты документа типом AllowOnlyReading его содержимое можно только просматривать, а команды редактирования на ленте ограничены.
Блокировка только указанных разделов
Равномерная защита всего документа хорошо подходит для простых материалов, но многие реальные документы требуют более тонкой настройки. Например, шаблон коммерческого предложения может содержать фиксированные условия, которые должны оставаться заблокированными, наряду с разделом, где клиент вводит свои данные. Spire.Doc for JavaScript решает эту задачу, сочетая защиту всего документа с переопределениями для отдельных разделов.
Стратегия такова: сначала защитить весь документ с помощью AllowOnlyFormFields, затем установить свойство ProtectForm любого раздела, который должен оставаться редактируемым, в false. Это выборочно освобождает отдельные разделы, пока остальная часть документа остаётся заблокированной.
Рабочий процесс состоит из трёх этапов: загрузить файлы шрифтов в виртуальную файловую систему WASM с помощью FetchFileToVFS; создать экземпляр Document, создать разделы с помощью AddSection и записать в них содержимое, вызвать Protect, чтобы заблокировать весь документ только для полей формы, и установить ProtectForm в false для раздела, который нужно освободить; затем сохранить документ, прочитать созданный файл из VFS, обернуть его в Blob и запустить скачивание в браузере.
function App() {
  const lockSpecifiedSections = async () => {
    const docModule = window.wasmModule?.spiredoc;
    if (!docModule) {
      alert('Spire.Doc is not ready yet');
      return;
    }

    // Create a new document and add two sections
    const doc = new docModule.Document();
    let s1 = doc.AddSection();
    let s2 = doc.AddSection();

    // Write content into each of the two sections
    s1.AddParagraph().AppendText("Spire.Doc demo, section 1");
    s2.AddParagraph().AppendText("Spire.Doc demo, section 2");

    // Protect the whole document for form fields only
    doc.Protect({ type: docModule.ProtectionType.AllowOnlyFormFields, password: "123" });

    // Release section 2 on its own so that it can be edited
    s2.ProtectForm = false;

    // Define the output file name and save
    const outputFileName = 'LockSpecifiedSections.docx';
    doc.SaveToFile({ fileName: outputFileName, fileFormat: docModule.FileFormat.Docx2013 });
    doc.Dispose();

    const modifiedFileArray = window.dotnetRuntime.Module.FS.readFile(outputFileName);
    const blob = new Blob([modifiedFileArray], { type: 'application/vnd.openxmlformats-officedocument.wordprocessingml.document' });
    const url = URL.createObjectURL(blob);
    const a = document.createElement('a');
    a.href = url;
    a.download = outputFileName;
    a.click();
    URL.revokeObjectURL(url);
  };

 return (
    <div style={{ textAlign: 'center', height: '300px' }}>
      <h1>Lock Specified Sections of a Word Document</h1>
      <button onClick={lockSpecifiedSections}>Generate</button>
    </div>
  );
}
export default App;
После освобождения раздела 2 только раздел 1 сохраняет ограничение редактирования в документе.
Часто задаваемые вопросы
Раздел всё ещё не редактируется после ProtectForm = false
Свойство ProtectForm действует только тогда, когда документ был защищён с помощью AllowOnlyFormFields. Если активен другой тип защиты, например AllowOnlyReading, установка ProtectForm в false для отдельного раздела не освободит его — ограничение всего документа имеет приоритет.
Чтобы исправить это, убедитесь, что в Protect передаётся тип защиты AllowOnlyFormFields, прежде чем освобождать отдельные разделы:
doc.Protect({ type: wasmModule.ProtectionType.AllowOnlyFormFields, password: "123" });
s2.ProtectForm = false;
Защищённый документ всё ещё можно выделять и копировать
Все пять типов защиты ограничивают редактирование, а не чтение. Например, AllowOnlyReading предотвращает изменения основного текста, но не блокирует выделение, копирование или поиск текста. Так и задумано — ограничения редактирования управляют тем, что пользователи могут изменять, а не тем, что они могут просматривать или извлекать.
Если содержимое не должно быть доступно для копирования или просмотра неавторизованными пользователями, используйте шифрование документа (пароль на открытие) вместо ограничения редактирования. Эти два подхода решают разные задачи и могут сочетаться, когда требуются и конфиденциальность, и контроль редактирования:
doc.Protect({ type: wasmModule.ProtectionType.AllowOnlyReading, password: "123456" });
См. также
Controle Quebras de Página em Documentos do Word com JavaScript
Índice
Qualquer pessoa que já formatou um documento longo do Word no navegador conhece a dor: um título de seção fica órfão na parte inferior de uma página enquanto seu texto começa na página seguinte, ou conteúdo colado de outro arquivo arrasta consigo uma sequência de páginas em branco indesejadas. Ambos os problemas quase sempre remontam a quebras de página — ou ausentes onde deveriam estar, ou deixadas onde não deveriam.
O Spire.Doc for JavaScript é executado inteiramente no navegador por meio de WebAssembly, usando um sistema de arquivos virtual (VFS) para lidar com E/S de arquivos. Isso significa que você pode inserir e remover quebras de página sem nenhuma ida e volta ao backend. Este guia cobre ambas as operações e aborda dois casos extremos que surgem frequentemente com documentos do mundo real:
- Inserir uma quebra de página em um parágrafo específico
- Remover todas as quebras de página em uma única passagem
- Corrigir a linha em branco extra que aparece após inserir uma quebra
- Corrigir o documento que ainda é paginado após as quebras serem removidas
Para instalação e configuração do projeto, consulte Integrando o Spire.Doc for JavaScript em um Projeto React. Os exemplos abaixo pressupõem que o módulo WASM já esteja inicializado.
Inserir uma Quebra de Página em um Parágrafo Específico
O fluxo de trabalho consiste em três etapas: carregar o documento de destino no sistema de arquivos virtual do WASM por meio de FetchFileToVFS, abri-lo como um objeto Document e, em seguida, localizar o parágrafo onde você deseja que a divisão aconteça e chamar AppendBreak com BreakType.PageBreak. A quebra é anexada como um objeto filho ao final desse parágrafo, de modo que tudo após ela flui para a próxima página. Por fim, leia o arquivo salvo do VFS, envolva-o como um Blob e dispare um download pelo navegador.
function App() {
  const InsertPageBreak = async () => {
    const docModule = window.wasmModule?.spiredoc;
    if (!docModule) {
      alert('Spire.Doc is not ready yet');
      return;
    }

    // Load the target Word document into VFS
    const inputFileName = "Template_Docx_1.docx";
    await window.spire.FetchFileToVFS(inputFileName, "", `${process.env.PUBLIC_URL}static/data/`);

    // Create a Document instance and load the document
    const doc = new docModule.Document();
    doc.LoadFromFile(inputFileName);

    // Locate the fourth paragraph of the first section and append a page break to its end
    doc.Sections.get_Item(0).Paragraphs.get_Item(3).AppendBreak(docModule.BreakType.PageBreak);

    // Define the output file name
    const outputFileName = "InsertPageBreak_out.docx";

    // Save the document to VFS
    doc.SaveToFile({ fileName: outputFileName, fileFormat: docModule.FileFormat.Docx2013 });

    doc.Dispose();

    const modifiedFileArray = window.dotnetRuntime.Module.FS.readFile(outputFileName);
    const blob = new Blob([modifiedFileArray], { type: 'application/vnd.openxmlformats-officedocument.wordprocessingml.document' });
    const url = URL.createObjectURL(blob);
    const a = document.createElement('a');
    a.href = url;
    a.download = outputFileName;
    a.click();
    URL.revokeObjectURL(url);
  };

 return (
    <div style={{ textAlign: 'center', height: '300px' }}>
      <h1>Insert a Page Break into a Word Document</h1>
      <button onClick={InsertPageBreak}>Generate</button>
    </div>
  );
}
export default App;
O documento após uma quebra de página ser anexada ao final do quarto parágrafo
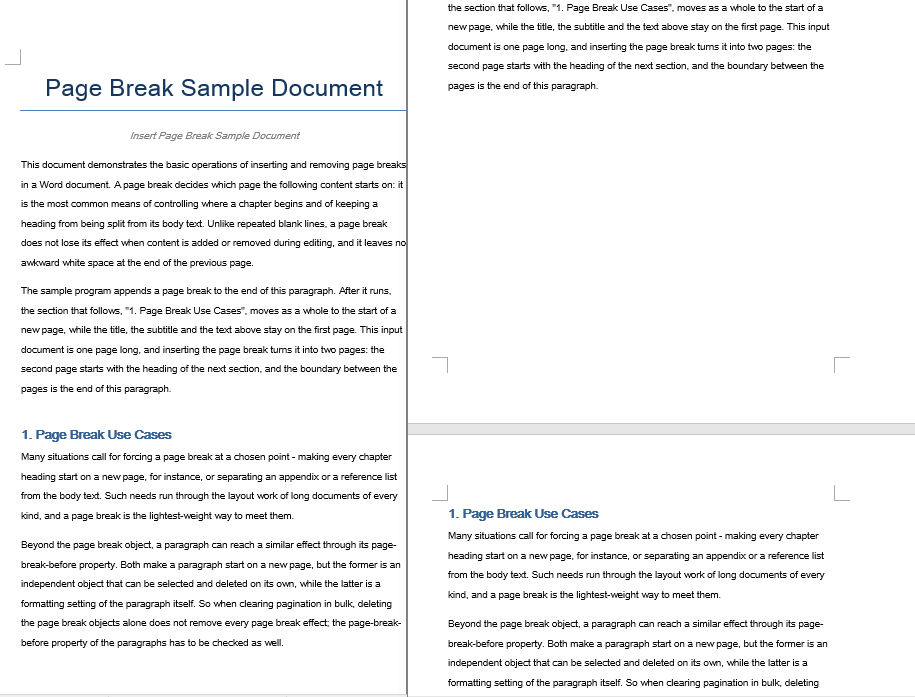
Remover Todas as Quebras de Página em Uma Única Passagem
Quando um documento acumula quebras de página de edições repetidas ou operações de copiar e colar, muitas vezes você precisa removê-las todas e deixar o conteúdo fluir naturalmente. A abordagem: iterar sobre cada parágrafo na seção de destino e inspecionar cada objeto filho. Quando um filho é identificado como um Break com BreakType.PageBreak, remova-o por meio de ChildObjects.Remove.
Um detalhe crítico no laço interno — os objetos filhos são percorridos de trás para frente, do último índice até zero. Remover um elemento de uma coleção percorrida para frente desloca os índices de todos os elementos subsequentes, o que pode causar itens ignorados ou acesso fora dos limites. A travessia reversa contorna esse problema inteiramente, porque cada remoção afeta apenas índices que você já processou.
function App() {
  const RemovePageBreaks = async () => {
    const docModule = window.wasmModule?.spiredoc;
    if (!docModule) {
      alert('Spire.Doc is not ready yet');
      return;
    }

    // Load the target Word document into VFS
    const inputFileName = "Template_Docx_4.docx";
    await window.spire.FetchFileToVFS(inputFileName, "", `${process.env.PUBLIC_URL}static/data/`);

    // Create a Document instance and load the document
    const doc = new docModule.Document();
    doc.LoadFromFile(inputFileName);

    // Get the first section
    const section = doc.Sections.get_Item(0);

    // Walk through every paragraph in the section
    for (let j = 0; j < section.Paragraphs.Count; j++) {
        const p = section.Paragraphs.get_Item(j);

        // Walk the paragraph's child objects backwards, so that removing an element does not shift the indices still to come
        for (let i = p.ChildObjects.Count - 1; i >= 0; i--) {
            const obj = p.ChildObjects.get_Item(i);

            // Test whether the object is a page break
            if (obj.DocumentObjectType == docModule.DocumentObjectType.Break
                && obj.BreakType == docModule.BreakType.PageBreak) {
                // Remove the page break from the paragraph
                p.ChildObjects.Remove(obj);
            }
        }
    }

    // Define the output file name
    const outputFileName = "RemovePageBreaks_out.docx";

    // Save the document to VFS
    doc.SaveToFile({ fileName: outputFileName, fileFormat: docModule.FileFormat.Docx2013 });
    doc.Dispose();

    const modifiedFileArray = window.dotnetRuntime.Module.FS.readFile(outputFileName);
    const blob = new Blob([modifiedFileArray], { type: 'application/vnd.openxmlformats-officedocument.wordprocessingml.document' });
    const url = URL.createObjectURL(blob);
    const a = document.createElement('a');
    a.href = url;
    a.download = outputFileName;
    a.click();
    URL.revokeObjectURL(url);
  };

 return (
    <div style={{ textAlign: 'center', height: '300px' }}>
      <h1>Remove Page Breaks from a Word Document</h1>
      <button onClick={RemovePageBreaks}>Generate</button>
    </div>
  );
}
export default App;
O documento após todas as quebras de página terem sido removidas
Linha em Branco Extra Após Inserir uma Quebra de Página
Após chamar AppendBreak, você pode notar uma faixa em branco indesejada no topo da nova página. Isso ocorre porque AppendBreak anexa a quebra ao final do parágrafo de destino, e a configuração de "espaçamento após" desse parágrafo é transportada para o início da próxima página. Quando o espaçamento automático está habilitado, a lacuna ainda escala com o tamanho da fonte — tornando-a especialmente visível após títulos grandes.
A correção é neutralizar o espaçamento final do parágrafo antes de anexar a quebra:
const para = document.Sections.get_Item(0).Paragraphs.get_Item(3);

// Turn off automatic spacing after the paragraph and set the space after it to 0
para.Format.AfterAutoSpacing = false;
para.Format.AfterSpacing = 0;

// Then insert the page break
para.AppendBreak(wasmModule.BreakType.PageBreak);
Definir AfterAutoSpacing como false e AfterSpacing como 0 garante que o parágrafo não contribua com nenhuma lacuna vertical após a quebra, de modo que a nova página comece rente à margem superior.
Documento Ainda Paginado Após Remover as Quebras
Mesmo após remover com sucesso todos os objetos de quebra de página, o documento ainda pode se dividir nas mesmas posições. O motivo: a paginação também pode se originar de uma propriedade em nível de parágrafo chamada "quebra de página antes". Quando esse sinalizador está definido em um parágrafo, esse parágrafo sempre começa em uma nova página — independentemente de existir ou não um objeto Break. O laço de remoção acima visa apenas objetos de quebra, portanto os parágrafos que carregam esse sinalizador permanecem intactos.
Para eliminar completamente a paginação forçada, redefina o sinalizador PageBreakBefore em cada parágrafo junto com a limpeza dos objetos de quebra:
const section = document.Sections.get_Item(0);

for (let j = 0; j < section.Paragraphs.Count; j++) {
  const p = section.Paragraphs.get_Item(j);

  // Clear the page-break-before property set on the paragraph
  if (p.Format.PageBreakBefore) {
    p.Format.PageBreakBefore = false;
  }
}
Você pode executar este laço na mesma passagem da remoção dos objetos de quebra ou como uma etapa separada depois — a ordem não importa, pois as duas operações visam propriedades independentes.
Perguntas Frequentes
Como obtenho uma licença gratuita do Spire.Doc for JavaScript?
O Spire.Doc for JavaScript oferece uma licença de avaliação gratuita de 30 dias com todos os recursos e sem limitações funcionais. Você pode solicitar aqui para avaliar o produto antes de comprá-lo.
Veja Também
JavaScript로 Word 문서의 페이지 나누기 제어하기
브라우저에서 긴 Word 문서의 서식을 지정해 본 사람이라면 누구나 그 고충을 압니다: 섹션 제목이 페이지 하단에 외롭게 남아 있고 본문 텍스트는 다음 페이지에서 시작하거나, 다른 파일에서 붙여넣은 내용이 원치 않는 빈 페이지 체인을 끌고 오는 경우입니다. 두 문제 모두 거의 항상 페이지 나누기 때문입니다. 있어야 할 곳에 없거나, 없어야 할 곳에 남아 있는 것입니다.
Spire.Doc for JavaScript는 WebAssembly를 통해 전적으로 브라우저에서 실행되며, 파일 I/O를 처리하기 위해 VFS(가상 파일 시스템)를 사용합니다. 즉, 백엔드 왕복 없이 페이지 나누기를 삽입하고 제거할 수 있습니다. 이 가이드에서는 두 작업을 모두 다루고 실제 문서에서 자주 나타나는 두 가지 에지 케이스를 해결합니다:
설치 및 프로젝트 설정은 React 프로젝트에 Spire.Doc for JavaScript 통합하기를 참조하세요. 아래 예제는 WASM 모듈이 이미 초기화되었다고 가정합니다.
특정 단락에 페이지 나누기 삽입
워크플로는 세 단계입니다: FetchFileToVFS를 통해 대상 문서를 WASM 가상 파일 시스템에 로드하고, Document 개체로 연 다음, 분할할 단락을 찾아 BreakType.PageBreak와 함께 AppendBreak를 호출합니다. 나누기는 해당 단락의 끝에 자식 개체로 추가되므로 그 뒤의 모든 내용이 다음 페이지로 흘러갑니다. 마지막으로 VFS에서 저장된 파일을 읽어 Blob으로 감싸고 브라우저 다운로드를 트리거합니다.
function App() {
  const InsertPageBreak = async () => {
    const docModule = window.wasmModule?.spiredoc;
    if (!docModule) {
      alert('Spire.Doc is not ready yet');
      return;
    }

    // Load the target Word document into VFS
    const inputFileName = "Template_Docx_1.docx";
    await window.spire.FetchFileToVFS(inputFileName, "", `${process.env.PUBLIC_URL}static/data/`);

    // Create a Document instance and load the document
    const doc = new docModule.Document();
    doc.LoadFromFile(inputFileName);

    // Locate the fourth paragraph of the first section and append a page break to its end
    doc.Sections.get_Item(0).Paragraphs.get_Item(3).AppendBreak(docModule.BreakType.PageBreak);

    // Define the output file name
    const outputFileName = "InsertPageBreak_out.docx";

    // Save the document to VFS
    doc.SaveToFile({ fileName: outputFileName, fileFormat: docModule.FileFormat.Docx2013 });

    doc.Dispose();

    const modifiedFileArray = window.dotnetRuntime.Module.FS.readFile(outputFileName);
    const blob = new Blob([modifiedFileArray], { type: 'application/vnd.openxmlformats-officedocument.wordprocessingml.document' });
    const url = URL.createObjectURL(blob);
    const a = document.createElement('a');
    a.href = url;
    a.download = outputFileName;
    a.click();
    URL.revokeObjectURL(url);
  };

 return (
    <div style={{ textAlign: 'center', height: '300px' }}>
      <h1>Insert a Page Break into a Word Document</h1>
      <button onClick={InsertPageBreak}>Generate</button>
    </div>
  );
}
export default App;
페이지 나누기가 네 번째 단락 끝에 추가된 후의 문서
한 번에 모든 페이지 나누기 제거
문서가 반복된 편집이나 복사-붙여넣기 작업으로 페이지 나누기를 수집한 경우, 종종 모두 제거하고 콘텐츠가 자연스럽게 다시 흐르도록 해야 합니다. 접근 방식은 다음과 같습니다: 대상 섹션의 모든 단락을 반복하고 각 자식 개체를 검사합니다. 자식이 BreakType.PageBreak인 Break로 식별되면 ChildObjects.Remove를 통해 제거합니다.
내부 루프의 중요한 세부 사항 — 자식 개체는 마지막 인덱스부터 0까지 역방향으로 순회됩니다. 앞으로 순회되는 컬렉션에서 요소를 제거하면 이후 모든 요소의 인덱스가 이동하여 항목 건너뛰기나 범위를 벗어난 접근이 발생할 수 있습니다. 역방향 순회는 각 제거가 이미 처리한 인덱스에만 영향을 미치므로 이 문제를 완전히 피할 수 있습니다.
function App() {
  const RemovePageBreaks = async () => {
    const docModule = window.wasmModule?.spiredoc;
    if (!docModule) {
      alert('Spire.Doc is not ready yet');
      return;
    }

    // Load the target Word document into VFS
    const inputFileName = "Template_Docx_4.docx";
    await window.spire.FetchFileToVFS(inputFileName, "", `${process.env.PUBLIC_URL}static/data/`);

    // Create a Document instance and load the document
    const doc = new docModule.Document();
    doc.LoadFromFile(inputFileName);

    // Get the first section
    const section = doc.Sections.get_Item(0);

    // Walk through every paragraph in the section
    for (let j = 0; j < section.Paragraphs.Count; j++) {
        const p = section.Paragraphs.get_Item(j);

        // Walk the paragraph's child objects backwards, so that removing an element does not shift the indices still to come
        for (let i = p.ChildObjects.Count - 1; i >= 0; i--) {
            const obj = p.ChildObjects.get_Item(i);

            // Test whether the object is a page break
            if (obj.DocumentObjectType == docModule.DocumentObjectType.Break
                && obj.BreakType == docModule.BreakType.PageBreak) {
                // Remove the page break from the paragraph
                p.ChildObjects.Remove(obj);
            }
        }
    }

    // Define the output file name
    const outputFileName = "RemovePageBreaks_out.docx";

    // Save the document to VFS
    doc.SaveToFile({ fileName: outputFileName, fileFormat: docModule.FileFormat.Docx2013 });
    doc.Dispose();

    const modifiedFileArray = window.dotnetRuntime.Module.FS.readFile(outputFileName);
    const blob = new Blob([modifiedFileArray], { type: 'application/vnd.openxmlformats-officedocument.wordprocessingml.document' });
    const url = URL.createObjectURL(blob);
    const a = document.createElement('a');
    a.href = url;
    a.download = outputFileName;
    a.click();
    URL.revokeObjectURL(url);
  };

 return (
    <div style={{ textAlign: 'center', height: '300px' }}>
      <h1>Remove Page Breaks from a Word Document</h1>
      <button onClick={RemovePageBreaks}>Generate</button>
    </div>
  );
}
export default App;
모든 페이지 나누기가 제거된 후의 문서
페이지 나누기 삽입 후 추가된 빈 줄
AppendBreak를 호출한 후 새 페이지 상단에 원치 않는 빈 띠가 보일 수 있습니다. 이는 AppendBreak가 나누기를 대상 단락의 끝에 연결하고, 해당 단락의 "단락 뒤 간격" 설정이 다음 페이지 시작 부분으로 이어지기 때문에 발생합니다. 자동 간격이 활성화된 경우 간격은 글꼴 크기에 따라 조정되어 큰 제목 뒤에서 특히 눈에 띕니다.
해결 방법은 나누기를 추가하기 전에 단락의 뒤쪽 간격을 무효화하는 것입니다:
const para = document.Sections.get_Item(0).Paragraphs.get_Item(3);

// Turn off automatic spacing after the paragraph and set the space after it to 0
para.Format.AfterAutoSpacing = false;
para.Format.AfterSpacing = 0;

// Then insert the page break
para.AppendBreak(wasmModule.BreakType.PageBreak);
AfterAutoSpacing를 false로, AfterSpacing을 0으로 설정하면 단락이 나누기 뒤에 수직 간격을 추가하지 않도록 하므로 새 페이지가 위쪽 여백에 딱 맞게 시작됩니다.
나누기 제거 후에도 문서가 여전히 페이지로 나뉨
모든 페이지 나누기 개체를 성공적으로 제거한 후에도 문서가 동일한 위치에서 계속 나뉠 수 있습니다. 그 이유는 페이지 나누기가 "앞에 페이지 나누기"라는 단락 수준 속성에서 비롯될 수도 있기 때문입니다. 이 플래그가 단락에 설정되면 해당 단락은 Break 개체가 있는지 여부에 관계없이 항상 새 페이지에서 시작합니다. 위의 제거 루프는 나누기 개체만 대상으로 하므로 이 플래그가 있는 단락은 그대로 남습니다.
강제 페이지 나누기를 완전히 제거하려면 나누기 개체 정리와 함께 모든 단락의 PageBreakBefore 플래그를 재설정하세요:
const section = document.Sections.get_Item(0);

for (let j = 0; j < section.Paragraphs.Count; j++) {
  const p = section.Paragraphs.get_Item(j);

  // Clear the page-break-before property set on the paragraph
  if (p.Format.PageBreakBefore) {
    p.Format.PageBreakBefore = false;
  }
}
이 루프는 나누기 개체 제거와 동일한 패스에서 실행하거나 이후 별도 단계로 실행할 수 있습니다. 두 작업은 서로 독립적인 속성을 대상으로 하므로 순서는 중요하지 않습니다.
자주 묻는 질문
Spire.Doc for JavaScript의 무료 라이선스는 어떻게 받나요?
Spire.Doc for JavaScript는 기능 제한 없이 30일 동안 모든 기능을 사용할 수 있는 무료 평가판 라이선스를 제공합니다. 구매 전에 제품을 평가하려면 여기에서 신청할 수 있습니다.