Controllare le interruzioni di pagina nei documenti Word con JavaScript
Indice dei contenuti
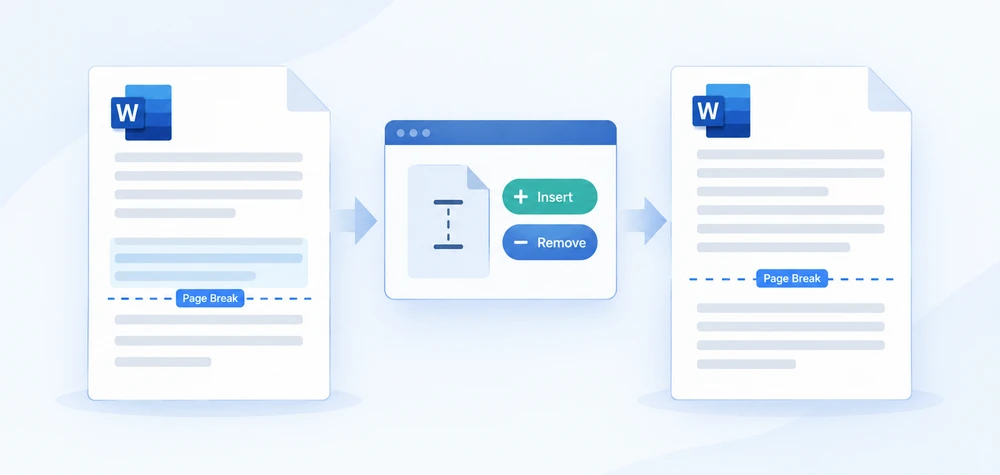
Chiunque abbia formattato un lungo documento Word nel browser conosce il problema: il titolo di una sezione rimane orfano in fondo a una pagina mentre il suo testo inizia in quella successiva, oppure il contenuto incollato da un altro file si porta dietro una catena di pagine bianche indesiderate. Entrambi i problemi quasi sempre risalgono alle interruzioni di pagina: assenti dove dovrebbero esserci, o lasciate dove non dovrebbero esserci.
Spire.Doc for JavaScript funziona interamente nel browser tramite WebAssembly, utilizzando un file system virtuale (VFS) per gestire l'I/O dei file. Ciò significa che puoi inserire e rimuovere interruzioni di pagina senza alcun passaggio a un backend. Questa guida copre entrambe le operazioni e affronta due casi limite che emergono frequentemente con documenti reali:
- Inserire un'interruzione di pagina in un paragrafo specifico
- Rimuovere tutte le interruzioni di pagina in un'unica operazione
- Correggere la riga vuota extra che compare dopo l'inserimento di un'interruzione
- Correggere il documento che rimane paginato dopo la rimozione delle interruzioni
Per l'installazione e la configurazione del progetto, consulta Integrare Spire.Doc for JavaScript in un progetto React. Gli esempi seguenti presuppongono che il modulo WASM sia già inizializzato.
Inserire un'interruzione di pagina in un paragrafo specifico
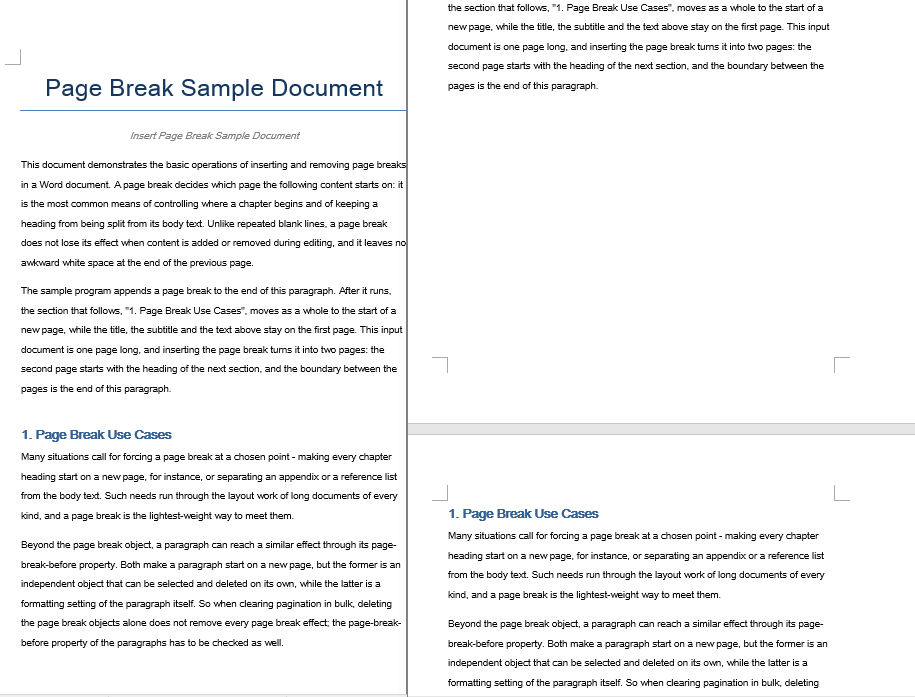
Il flusso di lavoro si articola in tre passaggi: caricare il documento di destinazione nel file system virtuale WASM tramite FetchFileToVFS, aprirlo come oggetto Document, quindi individuare il paragrafo in cui si desidera che avvenga la divisione e chiamare AppendBreak con BreakType.PageBreak. L'interruzione viene aggiunta come oggetto figlio alla fine di quel paragrafo, quindi tutto ciò che segue scorre sulla pagina successiva. Infine, leggi il file salvato dal VFS, avvolgilo come Blob e attiva il download dal browser.
function App() {
  const InsertPageBreak = async () => {
    const docModule = window.wasmModule?.spiredoc;
    if (!docModule) {
      alert('Spire.Doc is not ready yet');
      return;
    }

    // Load the target Word document into VFS
    const inputFileName = "Template_Docx_1.docx";
    await window.spire.FetchFileToVFS(inputFileName, "", `${process.env.PUBLIC_URL}static/data/`);

    // Create a Document instance and load the document
    const doc = new docModule.Document();
    doc.LoadFromFile(inputFileName);

    // Locate the fourth paragraph of the first section and append a page break to its end
    doc.Sections.get_Item(0).Paragraphs.get_Item(3).AppendBreak(docModule.BreakType.PageBreak);

    // Define the output file name
    const outputFileName = "InsertPageBreak_out.docx";

    // Save the document to VFS
    doc.SaveToFile({ fileName: outputFileName, fileFormat: docModule.FileFormat.Docx2013 });

    doc.Dispose();

    const modifiedFileArray = window.dotnetRuntime.Module.FS.readFile(outputFileName);
    const blob = new Blob([modifiedFileArray], { type: 'application/vnd.openxmlformats-officedocument.wordprocessingml.document' });
    const url = URL.createObjectURL(blob);
    const a = document.createElement('a');
    a.href = url;
    a.download = outputFileName;
    a.click();
    URL.revokeObjectURL(url);
  };

 return (
    <div style={{ textAlign: 'center', height: '300px' }}>
      <h1>Insert a Page Break into a Word Document</h1>
      <button onClick={InsertPageBreak}>Generate</button>
    </div>
  );
}
export default App;
Il documento dopo che un'interruzione di pagina è stata aggiunta alla fine del quarto paragrafo
Rimuovere tutte le interruzioni di pagina in un'unica operazione
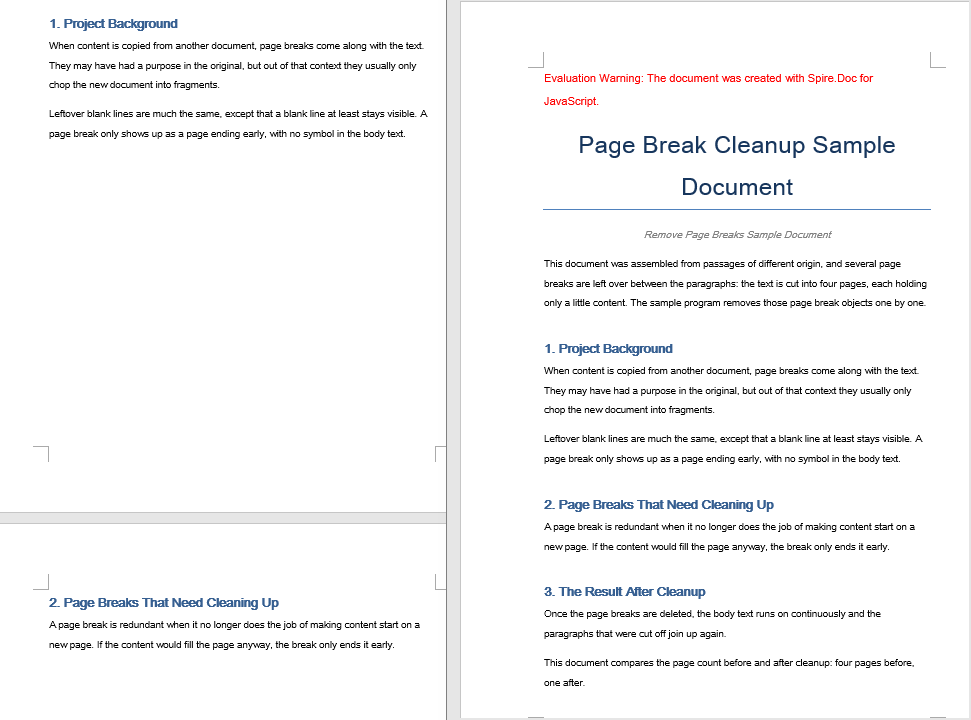
Quando un documento accumula interruzioni di pagina a causa di modifiche ripetute o operazioni di copia-incolla, spesso è necessario eliminarle tutte e lasciare che il contenuto si ridisponi naturalmente. L'approccio: scorrere ogni paragrafo della sezione di destinazione e ispezionare ciascun oggetto figlio. Quando un figlio viene identificato come Break con BreakType.PageBreak, rimuovilo tramite ChildObjects.Remove.
Un dettaglio fondamentale nel ciclo interno: gli oggetti figli vengono percorsi all'indietro, dall'ultimo indice fino a zero. Rimuovere un elemento da una collezione percorsa in avanti sposta gli indici di ogni elemento successivo, il che può causare elementi saltati o accessi fuori dai limiti. Il percorso inverso evita completamente questo problema perché ogni rimozione influisce solo sugli indici già elaborati.
function App() {
  const RemovePageBreaks = async () => {
    const docModule = window.wasmModule?.spiredoc;
    if (!docModule) {
      alert('Spire.Doc is not ready yet');
      return;
    }

    // Load the target Word document into VFS
    const inputFileName = "Template_Docx_4.docx";
    await window.spire.FetchFileToVFS(inputFileName, "", `${process.env.PUBLIC_URL}static/data/`);

    // Create a Document instance and load the document
    const doc = new docModule.Document();
    doc.LoadFromFile(inputFileName);

    // Get the first section
    const section = doc.Sections.get_Item(0);

    // Walk through every paragraph in the section
    for (let j = 0; j < section.Paragraphs.Count; j++) {
        const p = section.Paragraphs.get_Item(j);

        // Walk the paragraph's child objects backwards, so that removing an element does not shift the indices still to come
        for (let i = p.ChildObjects.Count - 1; i >= 0; i--) {
            const obj = p.ChildObjects.get_Item(i);

            // Test whether the object is a page break
            if (obj.DocumentObjectType == docModule.DocumentObjectType.Break
                && obj.BreakType == docModule.BreakType.PageBreak) {
                // Remove the page break from the paragraph
                p.ChildObjects.Remove(obj);
            }
        }
    }

    // Define the output file name
    const outputFileName = "RemovePageBreaks_out.docx";

    // Save the document to VFS
    doc.SaveToFile({ fileName: outputFileName, fileFormat: docModule.FileFormat.Docx2013 });
    doc.Dispose();

    const modifiedFileArray = window.dotnetRuntime.Module.FS.readFile(outputFileName);
    const blob = new Blob([modifiedFileArray], { type: 'application/vnd.openxmlformats-officedocument.wordprocessingml.document' });
    const url = URL.createObjectURL(blob);
    const a = document.createElement('a');
    a.href = url;
    a.download = outputFileName;
    a.click();
    URL.revokeObjectURL(url);
  };

 return (
    <div style={{ textAlign: 'center', height: '300px' }}>
      <h1>Remove Page Breaks from a Word Document</h1>
      <button onClick={RemovePageBreaks}>Generate</button>
    </div>
  );
}
export default App;
Il documento dopo che ogni interruzione di pagina è stata rimossa
Riga vuota extra dopo l'inserimento di un'interruzione di pagina
Dopo aver chiamato AppendBreak, potresti notare una striscia vuota indesiderata nella parte superiore della nuova pagina. Ciò accade perché AppendBreak collega l'interruzione alla fine del paragrafo di destinazione, e l'impostazione di "spazio dopo" di quel paragrafo si trasferisce all'inizio della pagina successiva. Quando la spaziatura automatica è attiva, lo spazio si adatta persino alla dimensione del carattere, rendendolo particolarmente visibile dopo titoli di grandi dimensioni.
La soluzione consiste nel neutralizzare la spaziatura finale del paragrafo prima di aggiungere l'interruzione:
const para = document.Sections.get_Item(0).Paragraphs.get_Item(3);

// Turn off automatic spacing after the paragraph and set the space after it to 0
para.Format.AfterAutoSpacing = false;
para.Format.AfterSpacing = 0;

// Then insert the page break
para.AppendBreak(wasmModule.BreakType.PageBreak);
Impostare AfterAutoSpacing su false e AfterSpacing su 0 assicura che il paragrafo non contribuisca con alcuno spazio verticale dopo l'interruzione, così la nuova pagina inizia a filo del margine superiore.
Il documento rimane paginato dopo la rimozione delle interruzioni
Anche dopo aver eliminato con successo ogni oggetto interruzione di pagina, il documento potrebbe ancora dividersi nelle stesse posizioni. Il motivo: la paginazione può derivare anche da una proprietà a livello di paragrafo chiamata "interruzione di pagina prima". Quando questo flag è impostato su un paragrafo, quel paragrafo inizia sempre su una nuova pagina, indipendentemente dall'esistenza di un oggetto Break. Il ciclo di rimozione precedente prende di mira solo gli oggetti interruzione, quindi i paragrafi che portano questo flag rimangono invariati.
Per eliminare completamente la paginazione forzata, reimposta il flag PageBreakBefore su ogni paragrafo insieme alla pulizia degli oggetti interruzione:
const section = document.Sections.get_Item(0);

for (let j = 0; j < section.Paragraphs.Count; j++) {
  const p = section.Paragraphs.get_Item(j);

  // Clear the page-break-before property set on the paragraph
  if (p.Format.PageBreakBefore) {
    p.Format.PageBreakBefore = false;
  }
}
Puoi eseguire questo ciclo nella stessa passata della rimozione degli oggetti interruzione oppure come passaggio separato successivo: l'ordine non ha importanza perché le due operazioni agiscono su proprietà indipendenti.
Domande frequenti
Come posso ottenere una licenza gratuita per Spire.Doc for JavaScript?
Spire.Doc for JavaScript offre una licenza di prova gratuita di 30 giorni con tutte le funzionalità e senza limitazioni funzionali. Puoi richiederla qui per valutare il prodotto prima dell'acquisto.
Vedi anche
Contrôler les sauts de page dans les documents Word avec JavaScript
Table des matières
Quiconque a déjà mis en forme un long document Word dans le navigateur connaît cette souffrance : un titre de section reste orphelin en bas d'une page tandis que son corps de texte commence sur la suivante, ou bien du contenu collé depuis un autre fichier traîne derrière lui une série de pages blanches indésirables. Ces deux problèmes remontent presque toujours aux sauts de page — soit absents là où ils devraient être, soit laissés là où ils ne devraient pas être.
Spire.Doc for JavaScript s'exécute entièrement dans le navigateur via WebAssembly, en utilisant un système de fichiers virtuel (VFS) pour gérer les entrées/sorties de fichiers. Cela signifie que vous pouvez insérer et supprimer des sauts de page sans aucun aller-retour vers un serveur. Ce guide couvre les deux opérations et aborde deux cas limites qui apparaissent fréquemment avec des documents réels :
- Insérer un saut de page à un paragraphe spécifique
- Supprimer tous les sauts de page en une seule passe
- Corriger la ligne vide supplémentaire qui apparaît après l'insertion d'un saut
- Corriger le document qui reste encore paginé après la suppression des sauts
Pour l'installation et la configuration du projet, consultez Intégrer Spire.Doc for JavaScript dans un projet React. Les exemples ci-dessous supposent que le module WASM est déjà initialisé.
Insérer un saut de page à un paragraphe spécifique
Le flux de travail comporte trois étapes : charger le document cible dans le système de fichiers virtuel WASM via FetchFileToVFS, l'ouvrir en tant qu'objet Document, puis localiser le paragraphe où vous souhaitez que la coupure se produise et appeler AppendBreak avec BreakType.PageBreak. Le saut est ajouté en tant qu'objet enfant à la fin de ce paragraphe, de sorte que tout ce qui suit passe sur la page suivante. Enfin, lisez le fichier enregistré depuis le VFS, encapsulez-le dans un Blob et déclenchez un téléchargement dans le navigateur.
function App() {
  const InsertPageBreak = async () => {
    const docModule = window.wasmModule?.spiredoc;
    if (!docModule) {
      alert('Spire.Doc is not ready yet');
      return;
    }

    // Load the target Word document into VFS
    const inputFileName = "Template_Docx_1.docx";
    await window.spire.FetchFileToVFS(inputFileName, "", `${process.env.PUBLIC_URL}static/data/`);

    // Create a Document instance and load the document
    const doc = new docModule.Document();
    doc.LoadFromFile(inputFileName);

    // Locate the fourth paragraph of the first section and append a page break to its end
    doc.Sections.get_Item(0).Paragraphs.get_Item(3).AppendBreak(docModule.BreakType.PageBreak);

    // Define the output file name
    const outputFileName = "InsertPageBreak_out.docx";

    // Save the document to VFS
    doc.SaveToFile({ fileName: outputFileName, fileFormat: docModule.FileFormat.Docx2013 });

    doc.Dispose();

    const modifiedFileArray = window.dotnetRuntime.Module.FS.readFile(outputFileName);
    const blob = new Blob([modifiedFileArray], { type: 'application/vnd.openxmlformats-officedocument.wordprocessingml.document' });
    const url = URL.createObjectURL(blob);
    const a = document.createElement('a');
    a.href = url;
    a.download = outputFileName;
    a.click();
    URL.revokeObjectURL(url);
  };

 return (
    <div style={{ textAlign: 'center', height: '300px' }}>
      <h1>Insert a Page Break into a Word Document</h1>
      <button onClick={InsertPageBreak}>Generate</button>
    </div>
  );
}
export default App;
Le document après qu'un saut de page a été ajouté à la fin du quatrième paragraphe
Supprimer tous les sauts de page en une seule passe
Lorsqu'un document accumule des sauts de page à force de modifications répétées ou d'opérations de copier-coller, vous devez souvent les supprimer tous et laisser le contenu se réorganiser naturellement. L'approche : parcourir chaque paragraphe de la section cible et inspecter chaque objet enfant. Lorsqu'un enfant est identifié comme un Break avec BreakType.PageBreak, le supprimer via ChildObjects.Remove.
Un détail crucial dans la boucle interne — les objets enfants sont parcourus en sens inverse, du dernier index jusqu'à zéro. Supprimer un élément d'une collection parcourue vers l'avant décale les index de tous les éléments suivants, ce qui peut entraîner des éléments ignorés ou des accès hors limites. Le parcours inversé contourne entièrement ce problème, car chaque suppression n'affecte que des index que vous avez déjà traités.
function App() {
  const RemovePageBreaks = async () => {
    const docModule = window.wasmModule?.spiredoc;
    if (!docModule) {
      alert('Spire.Doc is not ready yet');
      return;
    }

    // Load the target Word document into VFS
    const inputFileName = "Template_Docx_4.docx";
    await window.spire.FetchFileToVFS(inputFileName, "", `${process.env.PUBLIC_URL}static/data/`);

    // Create a Document instance and load the document
    const doc = new docModule.Document();
    doc.LoadFromFile(inputFileName);

    // Get the first section
    const section = doc.Sections.get_Item(0);

    // Walk through every paragraph in the section
    for (let j = 0; j < section.Paragraphs.Count; j++) {
        const p = section.Paragraphs.get_Item(j);

        // Walk the paragraph's child objects backwards, so that removing an element does not shift the indices still to come
        for (let i = p.ChildObjects.Count - 1; i >= 0; i--) {
            const obj = p.ChildObjects.get_Item(i);

            // Test whether the object is a page break
            if (obj.DocumentObjectType == docModule.DocumentObjectType.Break
                && obj.BreakType == docModule.BreakType.PageBreak) {
                // Remove the page break from the paragraph
                p.ChildObjects.Remove(obj);
            }
        }
    }

    // Define the output file name
    const outputFileName = "RemovePageBreaks_out.docx";

    // Save the document to VFS
    doc.SaveToFile({ fileName: outputFileName, fileFormat: docModule.FileFormat.Docx2013 });
    doc.Dispose();

    const modifiedFileArray = window.dotnetRuntime.Module.FS.readFile(outputFileName);
    const blob = new Blob([modifiedFileArray], { type: 'application/vnd.openxmlformats-officedocument.wordprocessingml.document' });
    const url = URL.createObjectURL(blob);
    const a = document.createElement('a');
    a.href = url;
    a.download = outputFileName;
    a.click();
    URL.revokeObjectURL(url);
  };

 return (
    <div style={{ textAlign: 'center', height: '300px' }}>
      <h1>Remove Page Breaks from a Word Document</h1>
      <button onClick={RemovePageBreaks}>Generate</button>
    </div>
  );
}
export default App;
Le document après la suppression de tous les sauts de page
Ligne vide supplémentaire après l'insertion d'un saut de page
Après avoir appelé AppendBreak, vous pouvez remarquer une bande blanche indésirable en haut de la nouvelle page. Cela se produit parce que AppendBreak attache le saut à la fin du paragraphe cible, et que le paramètre « espace après » de ce paragraphe se répercute au début de la page suivante. Lorsque l'espacement automatique est activé, l'écart s'adapte même à la taille de police — ce qui le rend particulièrement visible après de grands titres.
La solution consiste à neutraliser l'espacement de fin du paragraphe avant d'ajouter le saut :
const para = document.Sections.get_Item(0).Paragraphs.get_Item(3);

// Turn off automatic spacing after the paragraph and set the space after it to 0
para.Format.AfterAutoSpacing = false;
para.Format.AfterSpacing = 0;

// Then insert the page break
para.AppendBreak(wasmModule.BreakType.PageBreak);
Définir AfterAutoSpacing sur false et AfterSpacing sur 0 garantit que le paragraphe n'ajoute aucun espace vertical après le saut, de sorte que la nouvelle page commence au ras de la marge supérieure.
Le document reste paginé après la suppression des sauts
Même après avoir supprimé avec succès chaque objet de saut de page, le document peut encore se scinder aux mêmes endroits. La raison : la pagination peut également provenir d'une propriété au niveau du paragraphe appelée « saut de page avant ». Lorsque cet indicateur est activé sur un paragraphe, ce paragraphe commence toujours sur une nouvelle page — indépendamment de l'existence d'un objet Break. La boucle de suppression ci-dessus ne cible que les objets de saut, de sorte que les paragraphes portant cet indicateur restent inchangés.
Pour éliminer complètement la pagination forcée, réinitialisez l'indicateur PageBreakBefore sur chaque paragraphe en même temps que le nettoyage des objets de saut :
const section = document.Sections.get_Item(0);

for (let j = 0; j < section.Paragraphs.Count; j++) {
  const p = section.Paragraphs.get_Item(j);

  // Clear the page-break-before property set on the paragraph
  if (p.Format.PageBreakBefore) {
    p.Format.PageBreakBefore = false;
  }
}
Vous pouvez exécuter cette boucle dans la même passe que la suppression des objets de saut, ou comme étape distincte par la suite — l'ordre n'a pas d'importance, car les deux opérations ciblent des propriétés indépendantes.
FAQ
Comment obtenir une licence gratuite pour Spire.Doc for JavaScript ?
Spire.Doc for JavaScript propose une licence d'essai gratuite de 30 jours avec toutes les fonctionnalités et sans limitation fonctionnelle. Vous pouvez faire une demande ici pour évaluer le produit avant de l'acheter.
Voir aussi
Controlar saltos de página en documentos de Word con JavaScript
Tabla de contenido
Cualquiera que haya dado formato a un documento de Word extenso en el navegador conoce el problema: un encabezado de sección queda huérfano al final de una página mientras que su texto de cuerpo comienza en la siguiente, o el contenido pegado desde otro archivo arrastra consigo una cadena de páginas en blanco no deseadas. Ambos problemas casi siempre se remontan a los saltos de página: ya sea ausentes donde deberían estar, o dejados atrás donde no deberían.
Spire.Doc for JavaScript se ejecuta por completo en el navegador mediante WebAssembly, utilizando un sistema de archivos virtual (VFS) para gestionar la E/S de archivos. Eso significa que puede insertar y eliminar saltos de página sin ninguna ida y vuelta al backend. Esta guía cubre ambas operaciones y aborda dos casos límite que suelen aparecer con documentos del mundo real:
- Insertar un salto de página en un párrafo específico
- Eliminar todos los saltos de página en una sola pasada
- Corregir la línea en blanco adicional que aparece después de insertar un salto
- Corregir el documento que sigue paginándose después de eliminar los saltos
Para la instalación y la configuración del proyecto, consulte Integrar Spire.Doc for JavaScript en un proyecto de React. Los ejemplos a continuación asumen que el módulo WASM ya está inicializado.
Insertar un salto de página en un párrafo específico
El flujo de trabajo consta de tres pasos: cargar el documento de destino en el sistema de archivos virtual de WASM mediante FetchFileToVFS, abrirlo como un objeto Document y, a continuación, localizar el párrafo donde desea que se produzca la división y llamar a AppendBreak con BreakType.PageBreak. El salto se añade como un objeto hijo al final de ese párrafo, por lo que todo lo que le sigue fluye a la página siguiente. Por último, lea el archivo guardado desde el VFS, envuélvalo como un Blob y active una descarga en el navegador.
function App() {
  const InsertPageBreak = async () => {
    const docModule = window.wasmModule?.spiredoc;
    if (!docModule) {
      alert('Spire.Doc is not ready yet');
      return;
    }

    // Load the target Word document into VFS
    const inputFileName = "Template_Docx_1.docx";
    await window.spire.FetchFileToVFS(inputFileName, "", `${process.env.PUBLIC_URL}static/data/`);

    // Create a Document instance and load the document
    const doc = new docModule.Document();
    doc.LoadFromFile(inputFileName);

    // Locate the fourth paragraph of the first section and append a page break to its end
    doc.Sections.get_Item(0).Paragraphs.get_Item(3).AppendBreak(docModule.BreakType.PageBreak);

    // Define the output file name
    const outputFileName = "InsertPageBreak_out.docx";

    // Save the document to VFS
    doc.SaveToFile({ fileName: outputFileName, fileFormat: docModule.FileFormat.Docx2013 });

    doc.Dispose();

    const modifiedFileArray = window.dotnetRuntime.Module.FS.readFile(outputFileName);
    const blob = new Blob([modifiedFileArray], { type: 'application/vnd.openxmlformats-officedocument.wordprocessingml.document' });
    const url = URL.createObjectURL(blob);
    const a = document.createElement('a');
    a.href = url;
    a.download = outputFileName;
    a.click();
    URL.revokeObjectURL(url);
  };

 return (
    <div style={{ textAlign: 'center', height: '300px' }}>
      <h1>Insert a Page Break into a Word Document</h1>
      <button onClick={InsertPageBreak}>Generate</button>
    </div>
  );
}
export default App;
El documento después de que se añade un salto de página al final del cuarto párrafo
Eliminar todos los saltos de página en una sola pasada
Cuando un documento acumula saltos de página por ediciones repetidas u operaciones de copiar y pegar, a menudo es necesario eliminarlos todos y dejar que el contenido se refluya de forma natural. El enfoque: recorrer cada párrafo de la sección de destino e inspeccionar cada objeto hijo. Cuando un hijo se identifica como un Break con BreakType.PageBreak, se elimina mediante ChildObjects.Remove.
Un detalle crítico en el bucle interno: los objetos hijos se recorren hacia atrás, desde el último índice hasta cero. Eliminar un elemento de una colección recorrida hacia adelante desplaza los índices de todos los elementos siguientes, lo que puede provocar que se omitan elementos o accesos fuera de los límites. El recorrido inverso evita por completo este problema, porque cada eliminación solo afecta a índices que ya se han procesado.
function App() {
  const RemovePageBreaks = async () => {
    const docModule = window.wasmModule?.spiredoc;
    if (!docModule) {
      alert('Spire.Doc is not ready yet');
      return;
    }

    // Load the target Word document into VFS
    const inputFileName = "Template_Docx_4.docx";
    await window.spire.FetchFileToVFS(inputFileName, "", `${process.env.PUBLIC_URL}static/data/`);

    // Create a Document instance and load the document
    const doc = new docModule.Document();
    doc.LoadFromFile(inputFileName);

    // Get the first section
    const section = doc.Sections.get_Item(0);

    // Walk through every paragraph in the section
    for (let j = 0; j < section.Paragraphs.Count; j++) {
        const p = section.Paragraphs.get_Item(j);

        // Walk the paragraph's child objects backwards, so that removing an element does not shift the indices still to come
        for (let i = p.ChildObjects.Count - 1; i >= 0; i--) {
            const obj = p.ChildObjects.get_Item(i);

            // Test whether the object is a page break
            if (obj.DocumentObjectType == docModule.DocumentObjectType.Break
                && obj.BreakType == docModule.BreakType.PageBreak) {
                // Remove the page break from the paragraph
                p.ChildObjects.Remove(obj);
            }
        }
    }

    // Define the output file name
    const outputFileName = "RemovePageBreaks_out.docx";

    // Save the document to VFS
    doc.SaveToFile({ fileName: outputFileName, fileFormat: docModule.FileFormat.Docx2013 });
    doc.Dispose();

    const modifiedFileArray = window.dotnetRuntime.Module.FS.readFile(outputFileName);
    const blob = new Blob([modifiedFileArray], { type: 'application/vnd.openxmlformats-officedocument.wordprocessingml.document' });
    const url = URL.createObjectURL(blob);
    const a = document.createElement('a');
    a.href = url;
    a.download = outputFileName;
    a.click();
    URL.revokeObjectURL(url);
  };

 return (
    <div style={{ textAlign: 'center', height: '300px' }}>
      <h1>Remove Page Breaks from a Word Document</h1>
      <button onClick={RemovePageBreaks}>Generate</button>
    </div>
  );
}
export default App;
El documento después de que se haya eliminado cada salto de página
Línea en blanco adicional después de insertar un salto de página
Después de llamar a AppendBreak, es posible que observe una franja en blanco no deseada en la parte superior de la nueva página. Esto ocurre porque AppendBreak adjunta el salto al final del párrafo de destino, y la configuración de "espacio después" de ese párrafo se traslada al comienzo de la página siguiente. Cuando el espaciado automático está habilitado, el hueco incluso escala con el tamaño de la fuente, lo que lo hace especialmente visible después de encabezados grandes.
La solución consiste en neutralizar el espaciado final del párrafo antes de añadir el salto:
const para = document.Sections.get_Item(0).Paragraphs.get_Item(3);

// Turn off automatic spacing after the paragraph and set the space after it to 0
para.Format.AfterAutoSpacing = false;
para.Format.AfterSpacing = 0;

// Then insert the page break
para.AppendBreak(wasmModule.BreakType.PageBreak);
Establecer AfterAutoSpacing en false y AfterSpacing en 0 garantiza que el párrafo no aporte ningún hueco vertical después del salto, de modo que la nueva página comience al ras del margen superior.
El documento sigue paginado después de eliminar los saltos
Incluso después de eliminar correctamente cada objeto de salto de página, el documento puede seguir dividiéndose en las mismas posiciones. La razón: la paginación también puede originarse en una propiedad a nivel de párrafo llamada "salto de página anterior". Cuando esta marca está establecida en un párrafo, ese párrafo siempre comienza en una página nueva, independientemente de si existe un objeto Break. El bucle de eliminación anterior solo apunta a los objetos de salto, por lo que los párrafos que llevan esta marca permanecen intactos.
Para eliminar por completo la paginación forzada, restablezca la marca PageBreakBefore en cada párrafo junto con la limpieza de los objetos de salto:
const section = document.Sections.get_Item(0);

for (let j = 0; j < section.Paragraphs.Count; j++) {
  const p = section.Paragraphs.get_Item(j);

  // Clear the page-break-before property set on the paragraph
  if (p.Format.PageBreakBefore) {
    p.Format.PageBreakBefore = false;
  }
}
Puede ejecutar este bucle en la misma pasada que la eliminación de los objetos de salto o como un paso separado posteriormente; el orden no importa porque las dos operaciones afectan a propiedades independientes.
Preguntas frecuentes
¿Cómo obtengo una licencia gratuita de Spire.Doc for JavaScript?
Spire.Doc for JavaScript ofrece una licencia de prueba gratuita de 30 días con todas las funciones y sin limitaciones funcionales. Puede solicitarla aquí para evaluar el producto antes de comprarlo.
Véase también
Seitenumbrüche in Word-Dokumenten mit JavaScript steuern
Inhaltsverzeichnis
Jeder, der ein langes Word-Dokument im Browser formatiert hat, kennt das Problem: Eine Abschnittsüberschrift steht verwaist am unteren Rand einer Seite, während ihr Fließtext auf der nächsten Seite beginnt, oder aus einer anderen Datei eingefügter Inhalt zieht eine Kette unerwünschter leerer Seiten mit sich. Beide Probleme lassen sich fast immer auf Seitenumbrüche zurückführen – entweder fehlen sie dort, wo sie sein sollten, oder sie bleiben dort zurück, wo sie nicht sein sollten.
Spire.Doc for JavaScript läuft vollständig im Browser über WebAssembly und verwendet ein virtuelles Dateisystem (VFS) für Datei-Ein-/Ausgabe. Das bedeutet, Sie können Seitenumbrüche einfügen und entfernen, ohne einen Umweg über das Backend. Dieser Leitfaden behandelt beide Vorgänge und geht auf zwei Randfälle ein, die bei realen Dokumenten häufig auftreten:
- Einen Seitenumbruch an einem bestimmten Absatz einfügen
- Alle Seitenumbrüche in einem Durchgang entfernen
- Die zusätzliche leere Zeile beheben, die nach dem Einfügen eines Umbruchs auftritt
- Das Dokument beheben, das nach dem Entfernen der Umbrüche weiterhin paginiert wird
Informationen zur Installation und Projekteinrichtung finden Sie unter Integrieren von Spire.Doc for JavaScript in ein React-Projekt. Die folgenden Beispiele gehen davon aus, dass das WASM-Modul bereits initialisiert ist.
Einen Seitenumbruch an einem bestimmten Absatz einfügen
Der Ablauf besteht aus drei Schritten: Laden Sie das Zieldokument über FetchFileToVFS in das virtuelle Dateisystem von WASM, öffnen Sie es als Document-Objekt, suchen Sie dann den Absatz, an dem der Umbruch erfolgen soll, und rufen Sie AppendBreak mit BreakType.PageBreak auf. Der Umbruch wird als untergeordnetes Objekt am Ende dieses Absatzes angefügt, sodass alles danach auf die nächste Seite fließt. Lesen Sie schließlich die gespeicherte Datei aus dem VFS, verpacken Sie sie als Blob und lösen Sie einen Browser-Download aus.
function App() {
  const InsertPageBreak = async () => {
    const docModule = window.wasmModule?.spiredoc;
    if (!docModule) {
      alert('Spire.Doc is not ready yet');
      return;
    }

    // Load the target Word document into VFS
    const inputFileName = "Template_Docx_1.docx";
    await window.spire.FetchFileToVFS(inputFileName, "", `${process.env.PUBLIC_URL}static/data/`);

    // Create a Document instance and load the document
    const doc = new docModule.Document();
    doc.LoadFromFile(inputFileName);

    // Locate the fourth paragraph of the first section and append a page break to its end
    doc.Sections.get_Item(0).Paragraphs.get_Item(3).AppendBreak(docModule.BreakType.PageBreak);

    // Define the output file name
    const outputFileName = "InsertPageBreak_out.docx";

    // Save the document to VFS
    doc.SaveToFile({ fileName: outputFileName, fileFormat: docModule.FileFormat.Docx2013 });

    doc.Dispose();

    const modifiedFileArray = window.dotnetRuntime.Module.FS.readFile(outputFileName);
    const blob = new Blob([modifiedFileArray], { type: 'application/vnd.openxmlformats-officedocument.wordprocessingml.document' });
    const url = URL.createObjectURL(blob);
    const a = document.createElement('a');
    a.href = url;
    a.download = outputFileName;
    a.click();
    URL.revokeObjectURL(url);
  };

 return (
    <div style={{ textAlign: 'center', height: '300px' }}>
      <h1>Insert a Page Break into a Word Document</h1>
      <button onClick={InsertPageBreak}>Generate</button>
    </div>
  );
}
export default App;
Das Dokument, nachdem am Ende des vierten Absatzes ein Seitenumbruch angefügt wurde
Alle Seitenumbrüche in einem Durchgang entfernen
Wenn ein Dokument durch wiederholte Bearbeitungen oder Kopier- und Einfügevorgänge Seitenumbrüche ansammelt, müssen Sie sie oft alle entfernen und den Inhalt natürlich neu fließen lassen. Der Ansatz: Durchlaufen Sie jeden Absatz im Zielabschnitt und prüfen Sie jedes untergeordnete Objekt. Wenn ein untergeordnetes Objekt als Break mit BreakType.PageBreak identifiziert wird, entfernen Sie es über ChildObjects.Remove.
Ein kritisches Detail in der inneren Schleife – die untergeordneten Objekte werden rückwärts durchlaufen, vom letzten Index bis null. Das Entfernen eines Elements aus einer vorwärts durchlaufenen Sammlung verschiebt die Indizes jedes nachfolgenden Elements, was zu übersprungenen Elementen oder Zugriffen außerhalb des gültigen Bereichs führen kann. Die Rückwärtsdurchquerung umgeht dieses Problem vollständig, da sich jede Entfernung nur auf Indizes auswirkt, die bereits verarbeitet wurden.
function App() {
  const RemovePageBreaks = async () => {
    const docModule = window.wasmModule?.spiredoc;
    if (!docModule) {
      alert('Spire.Doc is not ready yet');
      return;
    }

    // Load the target Word document into VFS
    const inputFileName = "Template_Docx_4.docx";
    await window.spire.FetchFileToVFS(inputFileName, "", `${process.env.PUBLIC_URL}static/data/`);

    // Create a Document instance and load the document
    const doc = new docModule.Document();
    doc.LoadFromFile(inputFileName);

    // Get the first section
    const section = doc.Sections.get_Item(0);

    // Walk through every paragraph in the section
    for (let j = 0; j < section.Paragraphs.Count; j++) {
        const p = section.Paragraphs.get_Item(j);

        // Walk the paragraph's child objects backwards, so that removing an element does not shift the indices still to come
        for (let i = p.ChildObjects.Count - 1; i >= 0; i--) {
            const obj = p.ChildObjects.get_Item(i);

            // Test whether the object is a page break
            if (obj.DocumentObjectType == docModule.DocumentObjectType.Break
                && obj.BreakType == docModule.BreakType.PageBreak) {
                // Remove the page break from the paragraph
                p.ChildObjects.Remove(obj);
            }
        }
    }

    // Define the output file name
    const outputFileName = "RemovePageBreaks_out.docx";

    // Save the document to VFS
    doc.SaveToFile({ fileName: outputFileName, fileFormat: docModule.FileFormat.Docx2013 });
    doc.Dispose();

    const modifiedFileArray = window.dotnetRuntime.Module.FS.readFile(outputFileName);
    const blob = new Blob([modifiedFileArray], { type: 'application/vnd.openxmlformats-officedocument.wordprocessingml.document' });
    const url = URL.createObjectURL(blob);
    const a = document.createElement('a');
    a.href = url;
    a.download = outputFileName;
    a.click();
    URL.revokeObjectURL(url);
  };

 return (
    <div style={{ textAlign: 'center', height: '300px' }}>
      <h1>Remove Page Breaks from a Word Document</h1>
      <button onClick={RemovePageBreaks}>Generate</button>
    </div>
  );
}
export default App;
Das Dokument, nachdem jeder Seitenumbruch entfernt wurde
Zusätzliche leere Zeile nach dem Einfügen eines Seitenumbruchs
Nach dem Aufruf von AppendBreak können Sie oben auf der neuen Seite einen unerwünschten leeren Streifen bemerken. Dies geschieht, weil AppendBreak den Umbruch an das Ende des Zielabsatzes anhängt und die Einstellung „Abstand danach“ dieses Absatzes auf den Anfang der nächsten Seite übertragen wird. Wenn der automatische Abstand aktiviert ist, skaliert die Lücke sogar mit der Schriftgröße – was besonders nach großen Überschriften sichtbar wird.
Die Lösung besteht darin, den nachfolgenden Abstand des Absatzes vor dem Anfügen des Umbruchs zu neutralisieren:
const para = document.Sections.get_Item(0).Paragraphs.get_Item(3);

// Turn off automatic spacing after the paragraph and set the space after it to 0
para.Format.AfterAutoSpacing = false;
para.Format.AfterSpacing = 0;

// Then insert the page break
para.AppendBreak(wasmModule.BreakType.PageBreak);
Wenn Sie AfterAutoSpacing auf false und AfterSpacing auf 0 setzen, wird sichergestellt, dass der Absatz nach dem Umbruch keinen vertikalen Abstand beiträgt, sodass die neue Seite bündig am oberen Rand beginnt.
Dokument ist nach dem Entfernen der Umbrüche weiterhin paginiert
Selbst nachdem alle Seitenumbruch-Objekte erfolgreich entfernt wurden, kann das Dokument weiterhin an denselben Stellen geteilt werden. Der Grund: Die Paginierung kann auch von einer Absatzeigenschaft namens „Seitenumbruch davor“ stammen. Wenn dieses Kennzeichen für einen Absatz gesetzt ist, beginnt dieser Absatz immer auf einer neuen Seite – unabhängig davon, ob ein Break-Objekt vorhanden ist. Die oben genannte Entfernungsschleife zielt nur auf Umbruch-Objekte ab, sodass Absätze mit diesem Kennzeichen unverändert bleiben.
Um erzwungene Paginierung vollständig zu beseitigen, setzen Sie das Kennzeichen PageBreakBefore bei jedem Absatz zusammen mit der Bereinigung der Umbruch-Objekte zurück:
const section = document.Sections.get_Item(0);

for (let j = 0; j < section.Paragraphs.Count; j++) {
  const p = section.Paragraphs.get_Item(j);

  // Clear the page-break-before property set on the paragraph
  if (p.Format.PageBreakBefore) {
    p.Format.PageBreakBefore = false;
  }
}
Sie können diese Schleife im selben Durchgang wie das Entfernen der Umbruch-Objekte ausführen oder als separaten Schritt danach – die Reihenfolge spielt keine Rolle, da die beiden Vorgänge auf unabhängige Eigenschaften abzielen.
FAQ
Wie erhalte ich eine kostenlose Lizenz für Spire.Doc for JavaScript?
Spire.Doc for JavaScript bietet eine 30-tägige kostenlose Testlizenz mit vollem Funktionsumfang und ohne funktionale Einschränkungen. Sie können hier beantragen, um das Produkt vor dem Kauf zu testen.
Siehe auch
Управление разрывами страниц в документах Word с помощью JavaScript
Содержание
Каждый, кому доводилось форматировать длинный документ Word в браузере, знает эту боль: заголовок раздела остаётся одиноко висеть внизу страницы, а его основной текст начинается на следующей, или же вставленное из другого файла содержимое тянет за собой целую цепочку нежелательных пустых страниц. Обе проблемы почти всегда связаны с разрывами страниц — либо их нет там, где они должны быть, либо они остались там, где их быть не должно.
Spire.Doc for JavaScript полностью работает в браузере через WebAssembly, используя виртуальную файловую систему (VFS) для операций ввода-вывода файлов. Это значит, что вы можете вставлять и удалять разрывы страниц без каких-либо обращений к серверу. В этом руководстве рассматриваются обе операции и два особых случая, которые часто возникают при работе с реальными документами:
- Вставить разрыв страницы в определённом абзаце
- Удалить все разрывы страниц за один проход
- Исправить лишнюю пустую строку, появляющуюся после вставки разрыва
- Исправить документ, который всё ещё разбивается на страницы после удаления разрывов
По вопросам установки и настройки проекта обратитесь к разделу Интеграция Spire.Doc for JavaScript в проект React. Примеры ниже предполагают, что модуль WASM уже инициализирован.
Вставка разрыва страницы в определённом абзаце
Процесс состоит из трёх шагов: загрузите целевой документ в виртуальную файловую систему WASM с помощью FetchFileToVFS, откройте его как объект Document, затем найдите абзац, в котором нужно сделать разрыв, и вызовите AppendBreak с BreakType.PageBreak. Разрыв добавляется как дочерний объект в конец этого абзаца, поэтому всё после него переносится на следующую страницу. Наконец, прочитайте сохранённый файл из VFS, оберните его в Blob и инициируйте скачивание в браузере.
function App() {
  const InsertPageBreak = async () => {
    const docModule = window.wasmModule?.spiredoc;
    if (!docModule) {
      alert('Spire.Doc is not ready yet');
      return;
    }

    // Load the target Word document into VFS
    const inputFileName = "Template_Docx_1.docx";
    await window.spire.FetchFileToVFS(inputFileName, "", `${process.env.PUBLIC_URL}static/data/`);

    // Create a Document instance and load the document
    const doc = new docModule.Document();
    doc.LoadFromFile(inputFileName);

    // Locate the fourth paragraph of the first section and append a page break to its end
    doc.Sections.get_Item(0).Paragraphs.get_Item(3).AppendBreak(docModule.BreakType.PageBreak);

    // Define the output file name
    const outputFileName = "InsertPageBreak_out.docx";

    // Save the document to VFS
    doc.SaveToFile({ fileName: outputFileName, fileFormat: docModule.FileFormat.Docx2013 });

    doc.Dispose();

    const modifiedFileArray = window.dotnetRuntime.Module.FS.readFile(outputFileName);
    const blob = new Blob([modifiedFileArray], { type: 'application/vnd.openxmlformats-officedocument.wordprocessingml.document' });
    const url = URL.createObjectURL(blob);
    const a = document.createElement('a');
    a.href = url;
    a.download = outputFileName;
    a.click();
    URL.revokeObjectURL(url);
  };

 return (
    <div style={{ textAlign: 'center', height: '300px' }}>
      <h1>Insert a Page Break into a Word Document</h1>
      <button onClick={InsertPageBreak}>Generate</button>
    </div>
  );
}
export default App;
Документ после добавления разрыва страницы в конец четвёртого абзаца
Удаление всех разрывов страниц за один проход
Когда в документе накапливаются разрывы страниц из-за многократного редактирования или операций копирования и вставки, часто требуется удалить их все и позволить содержимому перестроиться естественным образом. Подход таков: переберите все абзацы в целевом разделе и проверьте каждый дочерний объект. Если дочерний объект определён как Break с BreakType.PageBreak, удалите его с помощью ChildObjects.Remove.
Важная деталь во внутреннем цикле — дочерние объекты перебираются в обратном порядке, от последнего индекса до нуля. Удаление элемента из коллекции, обходимой в прямом порядке, сдвигает индексы всех последующих элементов, что может привести к пропуску элементов или выходу за границы. Обратный обход полностью устраняет эту проблему, поскольку каждое удаление затрагивает только уже обработанные индексы.
function App() {
  const RemovePageBreaks = async () => {
    const docModule = window.wasmModule?.spiredoc;
    if (!docModule) {
      alert('Spire.Doc is not ready yet');
      return;
    }

    // Load the target Word document into VFS
    const inputFileName = "Template_Docx_4.docx";
    await window.spire.FetchFileToVFS(inputFileName, "", `${process.env.PUBLIC_URL}static/data/`);

    // Create a Document instance and load the document
    const doc = new docModule.Document();
    doc.LoadFromFile(inputFileName);

    // Get the first section
    const section = doc.Sections.get_Item(0);

    // Walk through every paragraph in the section
    for (let j = 0; j < section.Paragraphs.Count; j++) {
        const p = section.Paragraphs.get_Item(j);

        // Walk the paragraph's child objects backwards, so that removing an element does not shift the indices still to come
        for (let i = p.ChildObjects.Count - 1; i >= 0; i--) {
            const obj = p.ChildObjects.get_Item(i);

            // Test whether the object is a page break
            if (obj.DocumentObjectType == docModule.DocumentObjectType.Break
                && obj.BreakType == docModule.BreakType.PageBreak) {
                // Remove the page break from the paragraph
                p.ChildObjects.Remove(obj);
            }
        }
    }

    // Define the output file name
    const outputFileName = "RemovePageBreaks_out.docx";

    // Save the document to VFS
    doc.SaveToFile({ fileName: outputFileName, fileFormat: docModule.FileFormat.Docx2013 });
    doc.Dispose();

    const modifiedFileArray = window.dotnetRuntime.Module.FS.readFile(outputFileName);
    const blob = new Blob([modifiedFileArray], { type: 'application/vnd.openxmlformats-officedocument.wordprocessingml.document' });
    const url = URL.createObjectURL(blob);
    const a = document.createElement('a');
    a.href = url;
    a.download = outputFileName;
    a.click();
    URL.revokeObjectURL(url);
  };

 return (
    <div style={{ textAlign: 'center', height: '300px' }}>
      <h1>Remove Page Breaks from a Word Document</h1>
      <button onClick={RemovePageBreaks}>Generate</button>
    </div>
  );
}
export default App;
Документ после удаления всех разрывов страниц
Лишняя пустая строка после вставки разрыва страницы
После вызова AppendBreak вы можете заметить нежелательную пустую полосу в верхней части новой страницы. Это происходит потому, что AppendBreak прикрепляет разрыв к концу целевого абзаца, и настройка «интервал после» этого абзаца переносится на начало следующей страницы. Когда включён автоматический интервал, промежуток даже масштабируется вместе с размером шрифта — это особенно заметно после крупных заголовков.
Решение — обнулить конечный интервал абзаца перед добавлением разрыва:
const para = document.Sections.get_Item(0).Paragraphs.get_Item(3);

// Turn off automatic spacing after the paragraph and set the space after it to 0
para.Format.AfterAutoSpacing = false;
para.Format.AfterSpacing = 0;

// Then insert the page break
para.AppendBreak(wasmModule.BreakType.PageBreak);
Установка AfterAutoSpacing в false и AfterSpacing в 0 гарантирует, что абзац не добавит вертикального промежутка после разрыва, поэтому новая страница начнётся ровно от верхнего поля.
Документ всё ещё разбивается на страницы после удаления разрывов
Даже после успешного удаления всех объектов разрывов страниц документ может по-прежнему разбиваться в тех же местах. Причина: разбиение на страницы также может возникать из-за свойства уровня абзаца под названием «разрыв страницы перед». Когда этот флаг установлен для абзаца, этот абзац всегда начинается с новой страницы — независимо от того, существует ли объект Break. Приведённый выше цикл удаления нацелен только на объекты разрывов, поэтому абзацы с этим флагом остаются нетронутыми.
Чтобы полностью устранить принудительное разбиение на страницы, сбросьте флаг PageBreakBefore для каждого абзаца вместе с очисткой объектов разрывов:
const section = document.Sections.get_Item(0);

for (let j = 0; j < section.Paragraphs.Count; j++) {
  const p = section.Paragraphs.get_Item(j);

  // Clear the page-break-before property set on the paragraph
  if (p.Format.PageBreakBefore) {
    p.Format.PageBreakBefore = false;
  }
}
Вы можете выполнить этот цикл в том же проходе, что и удаление объектов разрывов, или отдельным этапом после него — порядок не важен, поскольку эти две операции воздействуют на независимые свойства.
Часто задаваемые вопросы
Как получить бесплатную лицензию для Spire.Doc for JavaScript?
Spire.Doc for JavaScript предлагает 30-дневную полнофункциональную бесплатную пробную лицензию без ограничений по функциональности. Вы можете оставить заявку здесь, чтобы оценить продукт перед покупкой.
См. также
Protect Word Documents with JavaScript: Restrict Editing
When developers hear "protect a Word document," the first thing that often comes to mind is encryption — setting a password so that nobody can open the file. But there is a second, equally important layer of document security: restricting what a reader can do once the document is open. A contract template sent to a client should let them fill in the blanks without altering the agreed terms. A final draft circulated for review should permit comments but block direct edits to the body text. These scenarios call for editing restrictions, not open-password encryption.
Spire.Doc for JavaScript brings this capability directly into the browser through WebAssembly. Using a virtual file system (VFS) to manage fonts and file resources, it processes Word documents entirely on the client side — no backend server, no file upload, no round-trip latency. The Protect method accepts a ProtectionType enum value together with a password, and applies the corresponding editing restriction to the document.
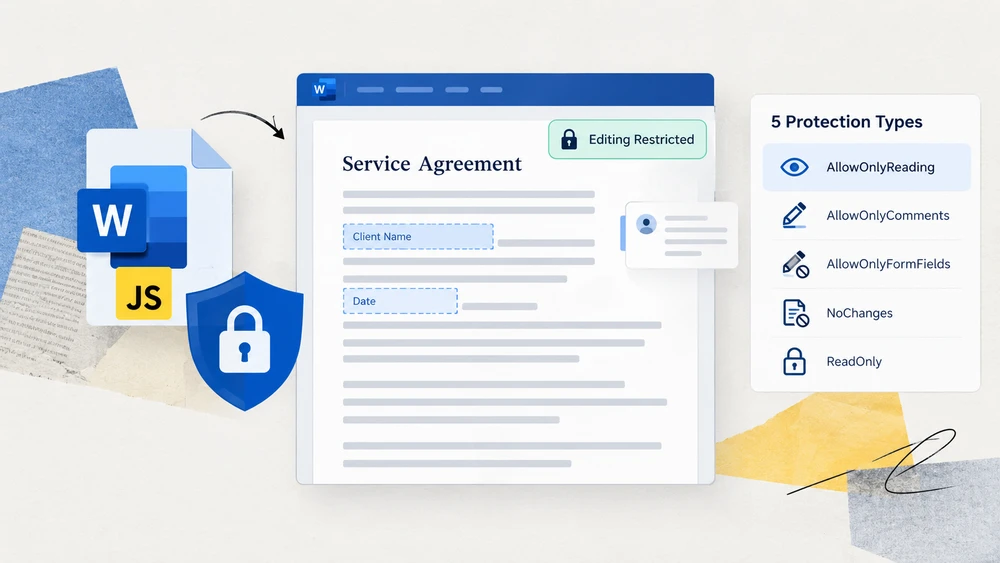
This article walks through the five protection types available in Spire.Doc for JavaScript, compares them in a single reference table, and then demonstrates how to apply a protection type to the whole document and how to lock only specific sections while leaving others editable.
Protection vs. Encryption: Two Different Goals
Before diving into the protection types, it is worth drawing a clear line between two concepts that are frequently conflated:
- Encryption (open password) controls who can open the document. Without the password, the file contents are inaccessible.
- Editing restrictions (protection type) control what a reader can change after the document is already open. The reader can view the content freely; the restriction limits which editing actions are available.
Editing restrictions do not prevent selection, copying, or searching — they only block modifications. If your goal is to stop the content from being taken away, you need encryption. If your goal is to stop the content from being changed while still allowing it to be read, you need an editing restriction. The two mechanisms are complementary and can be used together, but they serve distinct purposes.
Protection Types at a Glance
Spire.Doc for JavaScript exposes five ProtectionType enum values. Each one defines a different editable scope — from fully open to fully locked. The table below summarizes all five so you can pick the right one at a glance.
| ProtectionType | Effect on the Document | Typical Use Case |
|---|---|---|
NoProtection |
No restriction applied; all editing actions are available. | Removing an existing restriction or starting from a clean state. |
AllowOnlyReading |
The document can be viewed but not edited. Ribbon editing commands are disabled. | Final reports, published notices, or any read-only deliverable. |
AllowOnlyComments |
Readers can add comments but cannot modify the body text. | Review cycles where reviewers should leave feedback without altering content. |
AllowOnlyFormFields |
Only form fields are editable; the rest of the document is locked. | Contracts, surveys, and templates with fill-in-the-blank areas. |
AllowOnlyRevisions |
All edits are accepted as tracked changes and can be reviewed later. | Collaborative drafting where every change must be visible and reversible. |
How to choose: If the reader should not change anything, use AllowOnlyReading. If the reader should only fill in designated blanks, use AllowOnlyFormFields. If the reader should leave feedback without touching the text, use AllowOnlyComments. If every change should be tracked for later review, use AllowOnlyRevisions. If you need to remove a previously applied restriction, use NoProtection.
Apply a Protection Type to the Whole Document
The most straightforward approach is to protect the entire document with a single ProtectionType value. The workflow has three stages: load the font files and the target Word document into the WASM virtual file system via FetchFileToVFS; instantiate a Document, load the file, and call Protect with the desired protection type and the password that will later lift the restriction; then save the document, read the generated file from VFS, wrap it as a Blob, and trigger a browser download.
The example below uses AllowOnlyReading, but you can swap in any of the five ProtectionType values from the table above.
function App() {
  const protectWithSpecifiedType = async () => {
    const docModule = window.wasmModule?.spiredoc;
    if (!docModule) {
      alert('Spire.Doc is not ready yet');
      return;
    }

    const inputFileName = 'Template.docx';
    await window.spire.FetchFileToVFS(inputFileName, '', `${process.env.PUBLIC_URL}/data/`);

    // Load the document
    const doc = new docModule.Document();
    doc.LoadFromFile(inputFileName);

    // Protect the document with the "AllowOnlyReading" type; the password lifts the restriction
    doc.Protect({ type: docModule.ProtectionType.AllowOnlyReading, password: "123456" });

    // Define the output file name and save
    const outputFileName = "SpecifiedProtectionType.docx";
    doc.SaveToFile({ fileName: outputFileName, fileFormat: docModule.FileFormat.Docx2013 });
    doc.Dispose();

    const modifiedFileArray = window.dotnetRuntime.Module.FS.readFile(outputFileName);
    const blob = new Blob([modifiedFileArray], { type: 'application/vnd.openxmlformats-officedocument.wordprocessingml.document' });
    const url = URL.createObjectURL(blob);
    const a = document.createElement('a');
    a.href = url;
    a.download = outputFileName;
    a.click();
    URL.revokeObjectURL(url);
  };

 return (
    <div style={{ textAlign: 'center', height: '300px' }}>
      <h1>Protect a Document with a Specified Type</h1>
      <button onClick={protectWithSpecifiedType}>Generate</button>
    </div>
  );
}
export default App;
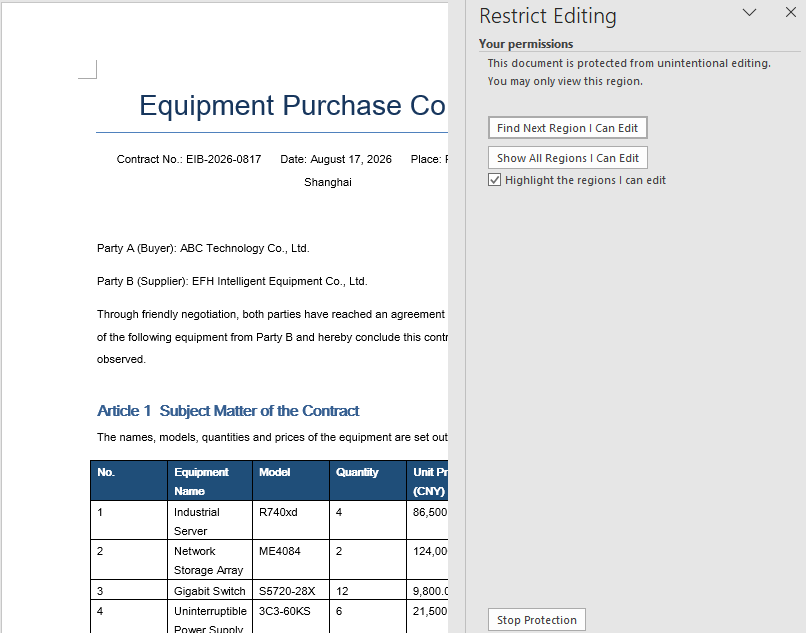
Once the document is protected with the AllowOnlyReading type, its content can only be viewed and the editing commands on the ribbon are restricted.
Lock Only Specified Sections
Protecting the entire document uniformly works well for simple deliverables, but many real-world documents need a finer touch. A quotation template, for instance, may have fixed terms that must stay locked alongside a section where the client enters their details. Spire.Doc for JavaScript handles this by combining whole-document protection with per-section overrides.
The strategy is: first protect the whole document with AllowOnlyFormFields, then set the ProtectForm property of any section that should remain editable to false. This selectively releases individual sections while the rest of the document stays locked.
The workflow has three stages: load the font files into the WASM virtual file system via FetchFileToVFS; instantiate a Document, create sections with AddSection and write content into them, call Protect to lock the whole document for form fields only, and set ProtectForm to false on the section to be released; then save the document, read the generated file from VFS, wrap it as a Blob, and trigger a browser download.
function App() {
  const lockSpecifiedSections = async () => {
    const docModule = window.wasmModule?.spiredoc;
    if (!docModule) {
      alert('Spire.Doc is not ready yet');
      return;
    }

    // Create a new document and add two sections
    const doc = new docModule.Document();
    let s1 = doc.AddSection();
    let s2 = doc.AddSection();

    // Write content into each of the two sections
    s1.AddParagraph().AppendText("Spire.Doc demo, section 1");
    s2.AddParagraph().AppendText("Spire.Doc demo, section 2");

    // Protect the whole document for form fields only
    doc.Protect({ type: docModule.ProtectionType.AllowOnlyFormFields, password: "123" });

    // Release section 2 on its own so that it can be edited
    s2.ProtectForm = false;

    // Define the output file name and save
    const outputFileName = 'LockSpecifiedSections.docx';
    doc.SaveToFile({ fileName: outputFileName, fileFormat: docModule.FileFormat.Docx2013 });
    doc.Dispose();

    const modifiedFileArray = window.dotnetRuntime.Module.FS.readFile(outputFileName);
    const blob = new Blob([modifiedFileArray], { type: 'application/vnd.openxmlformats-officedocument.wordprocessingml.document' });
    const url = URL.createObjectURL(blob);
    const a = document.createElement('a');
    a.href = url;
    a.download = outputFileName;
    a.click();
    URL.revokeObjectURL(url);
  };

 return (
    <div style={{ textAlign: 'center', height: '300px' }}>
      <h1>Lock Specified Sections of a Word Document</h1>
      <button onClick={lockSpecifiedSections}>Generate</button>
    </div>
  );
}
export default App;
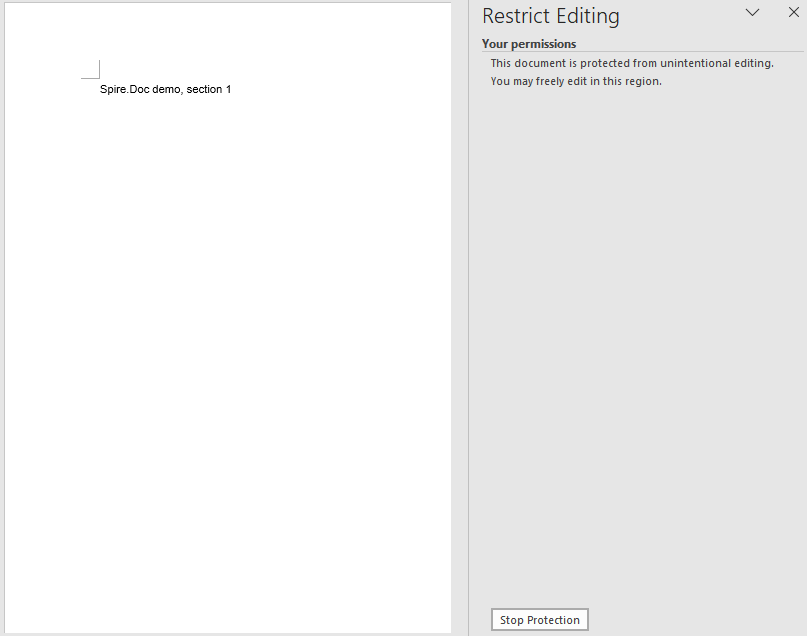
Once section 2 has been released, only section 1 keeps its editing restriction in the document.
FAQ
A section is still not editable after ProtectForm = false
The ProtectForm property only takes effect when the document has been protected with AllowOnlyFormFields. If a different protection type such as AllowOnlyReading is active, setting ProtectForm to false on an individual section will not release it — the whole-document restriction takes precedence.
To fix this, make sure the protection type passed to Protect is AllowOnlyFormFields before releasing individual sections:
doc.Protect({ type: wasmModule.ProtectionType.AllowOnlyFormFields, password: "123" });
s2.ProtectForm = false;
A protected document can still be selected and copied
All five protection types restrict editing behavior, not reading behavior. AllowOnlyReading, for example, prevents changes to the body text but does not block text selection, copying, or searching. This is by design — editing restrictions control what users can modify, not what they can view or extract.
If the content must not be copyable or viewable by unauthorized users, use document encryption (an open password) instead of an editing restriction. The two approaches address different threats and can be combined when both confidentiality and edit control are required:
doc.Protect({ type: wasmModule.ProtectionType.AllowOnlyReading, password: "123456" });
See Also
Convert Word Documents to HTML in the Browser with JavaScript
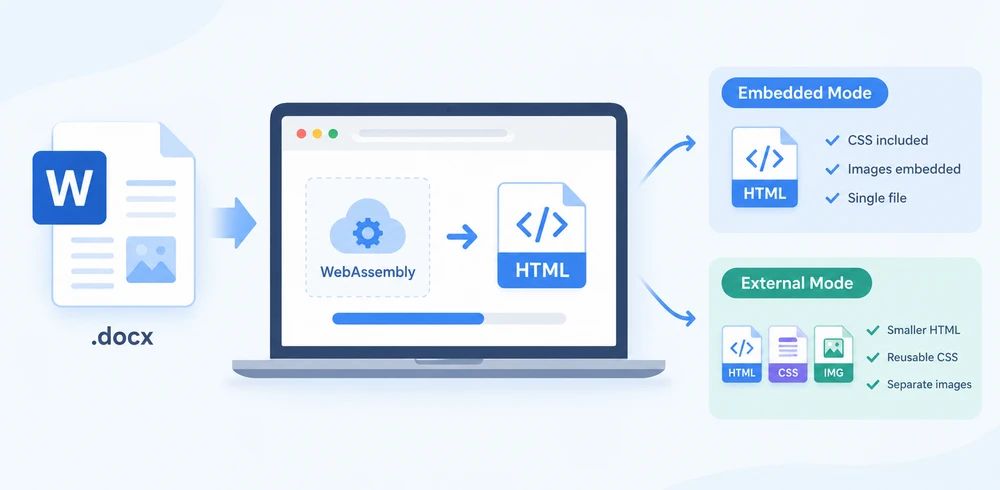
Word documents are often the starting point for web content — articles, product specs, and compliance docs all need to live on a website eventually. Getting from .docx to clean HTML without a backend conversion service is the challenge. Spire.Doc for JavaScript makes this possible by running a full document-processing engine on WebAssembly, reading the Word file through a virtual file system (VFS), performing the conversion locally, and letting you download the resulting HTML — all client-side, with no server round-trip.
Two export strategies dominate the workflow, and choosing between them is the real decision:
- Embedded mode bundles CSS and images directly into the HTML file, producing a single self-contained document that opens anywhere.
- External mode writes CSS and images to separate files, giving you smaller HTML, reusable stylesheets, and individual image assets you can manage independently.
This article walks through both approaches in a React project and compares them side by side. For setup, refer to Integrating Spire.Doc for JavaScript in a React Project. The examples below assume Spire.Doc is installed and the WebAssembly module is initialized.
Basic Conversion: Embed Everything in One File
The simplest way to publish a Word document as a web page is to produce a single HTML file that contains everything — markup, styles, and images — in one self-contained package. This is ideal when you need a portable artifact that renders correctly no matter where it is opened, with no missing-file references or broken links.
The conversion follows three steps. First, load the font file and the source Word document into the WASM virtual file system using FetchFileToVFS. Second, create a Document instance, load the file, configure HtmlExportOptions to embed both CSS and images, and call SaveToFile to write the HTML. Third, read the generated file back from VFS, wrap it in a Blob, and trigger a browser download.
function App() {
  const wordToHtml = async () => {
    // Get the Spire.Doc WASM module
    const docModule = window.wasmModule?.spiredoc;

    // Check if the module is ready
    if (!docModule) {
      alert('Spire.Doc is not ready yet');
      return;
    }

    // Load fonts and the Word file into VFS
    await window.spire.FetchFileToVFS('ARIALUNI.TTF', '/Library/Fonts/', `${process.env.PUBLIC_URL}/static/font/`);
    const inputFileName = 'ToHtml.docx';
    await window.spire.FetchFileToVFS(inputFileName, '', `${process.env.PUBLIC_URL}/static/data/`);

    // Load the Word document
    const wordDocument = new docModule.Document();
    wordDocument.LoadFromFile(inputFileName);

    // Embed the CSS styles into the HTML and embed images as Base64
    wordDocument.HtmlExportOptions.CssStyleSheetType = docModule.CssStyleSheetType.Internal;
    wordDocument.HtmlExportOptions.ImageEmbedded = true;

    // Convert the document to HTML
    const outputFileName = 'ToHtml-result.html';
    wordDocument.SaveToFile({ fileName: outputFileName, fileFormat: docModule.FileFormat.Html });

    // Read the converted file from VFS and trigger download
    const fileArray = window.dotnetRuntime.Module.FS.readFile(outputFileName);
    const blob = new Blob([fileArray], { type: 'text/html;charset=utf-8' });
    const url = URL.createObjectURL(blob);
    const a = window.document.createElement('a');
    a.href = url;
    a.download = outputFileName;
    a.click();
    URL.revokeObjectURL(url);

    // Release resources
    wordDocument.Dispose();
  };

  return (
    <div style={{ textAlign: 'center', height: '300px' }}>
      <h1>Convert Word To HTML</h1>
      <button onClick={wordToHtml}>
        Generate
      </button>
    </div>
  );
}

export default App;
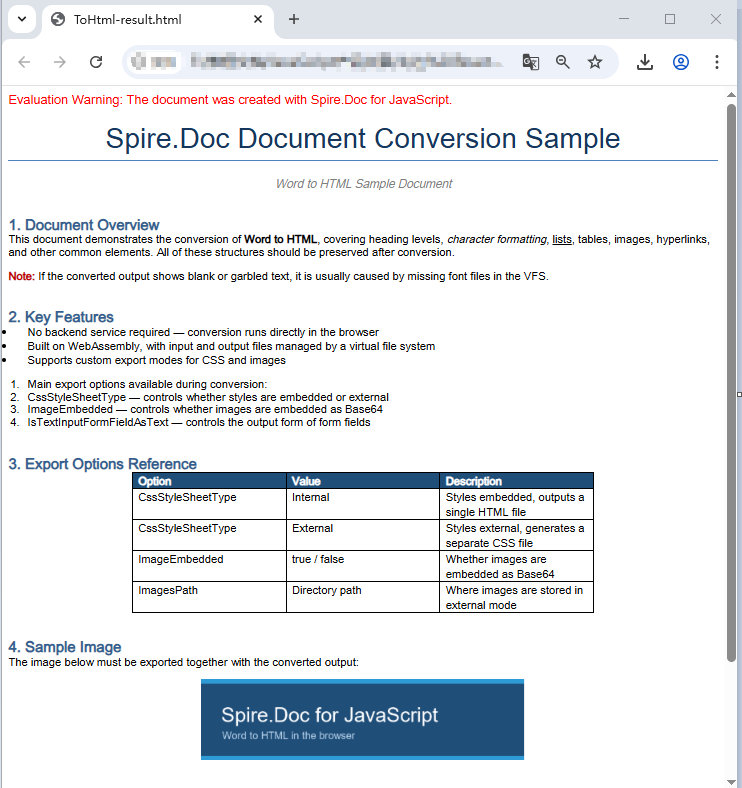
HTML page generated from a Word document via SaveToFile
Export Options: Separate CSS and Images
Embedding everything into one file is convenient, but it has trade-offs. A large document with many images produces a very big HTML file, and every page that shares the same styling carries its own duplicate copy of the CSS. When you want to maintain styles centrally, reuse image assets across pages, or keep the HTML payload small for faster initial rendering, you should export CSS and images as separate files instead.
HtmlExportOptions gives you fine-grained control over how each resource type is written. You can direct the CSS to a named stylesheet file, send images to a dedicated directory, and even control how form fields are serialized. The result is no longer a single file but a directory structure containing the HTML, the stylesheet, and the image files.
The workflow mirrors the embedded approach, with two additions. Before conversion, create an output directory in VFS and use CssStyleSheetFileName and ImagesPath to tell Spire.Doc where to write each resource type. After conversion, read the entire output directory recursively, package everything into a zip archive using JSZip, and download it in one operation.
import JSZip from 'jszip';

function App() {
  const wordToHtmlWithOptions = async () => {
    // Get the Spire.Doc WASM module
    const docModule = window.wasmModule?.spiredoc;

    // Check if the module is ready
    if (!docModule) {
      alert('Spire.Doc is not ready yet');
      return;
    }

    // Load fonts and the Word file into VFS
    await window.spire.FetchFileToVFS('ARIALUNI.TTF', '/Library/Fonts/', `${process.env.PUBLIC_URL}/static/font/`);
    const inputFileName = 'ToHtml.docx';
    await window.spire.FetchFileToVFS(inputFileName, '', `${process.env.PUBLIC_URL}/static/data/`);

    // Create the output directory in VFS
    const outputDirectoryName = 'ToHTMLFolder/';
    window.dotnetRuntime.Module.FS.mkdirTree(outputDirectoryName);

    // Load the Word document
    const wordDocument = new docModule.Document();
    wordDocument.LoadFromFile(inputFileName);

    // Export the CSS styles to a separate file
    wordDocument.HtmlExportOptions.CssStyleSheetFileName = outputDirectoryName + 'sample.css';
    wordDocument.HtmlExportOptions.CssStyleSheetType = docModule.CssStyleSheetType.External;

    // Export images to a separate directory
    wordDocument.HtmlExportOptions.ImageEmbedded = false;
    wordDocument.HtmlExportOptions.ImagesPath = outputDirectoryName + 'Demo/';

    // Export form fields as plain text
    wordDocument.HtmlExportOptions.IsTextInputFormFieldAsText = true;

    // Convert the document to HTML
    const outputFileName = 'ToHtmlExportOption-out.html';
    wordDocument.SaveToFile({ fileName: outputFileName, fileFormat: docModule.FileFormat.Html });

    // Release resources
    wordDocument.Dispose();

    // Read the output directory recursively and write each level of files into the zip
    const zip = new JSZip();
    const addFilesToZip = async (folderPath, zipFolder) => {
      let items = await window.dotnetRuntime.Module.FS.readdir(folderPath);
      items = items.filter((item) => item !== '.' && item !== '..');
      for (const item of items) {
        const itemPath = `${folderPath}/${item}`;
        try {
          const fileData = await window.dotnetRuntime.Module.FS.readFile(itemPath);
          zipFolder.file(item, fileData);
        } catch (error) {
          const zipSubFolder = zipFolder.folder(item);
          await addFilesToZip(itemPath, zipSubFolder);
        }
      }
    };

    // Package the HTML file together with the resource directory
    zip.file(outputFileName, window.dotnetRuntime.Module.FS.readFile(outputFileName));
    await addFilesToZip(outputDirectoryName, zip);
    const zipBlob = await zip.generateAsync({ type: 'blob' });
    const url = URL.createObjectURL(zipBlob);

    // Trigger download
    const a = window.document.createElement('a');
    a.href = url;
    a.download = 'ToHTMLFolder.zip';
    a.click();
    URL.revokeObjectURL(url);
  };

  return (
    <div style={{ textAlign: 'center', height: '300px' }}>
      <h1>Convert Word To HTML With Export Options</h1>
      <button onClick={wordToHtmlWithOptions}>
        Generate
      </button>
    </div>
  );
}

export default App;
HTML, CSS, and image files generated after configuring the export options
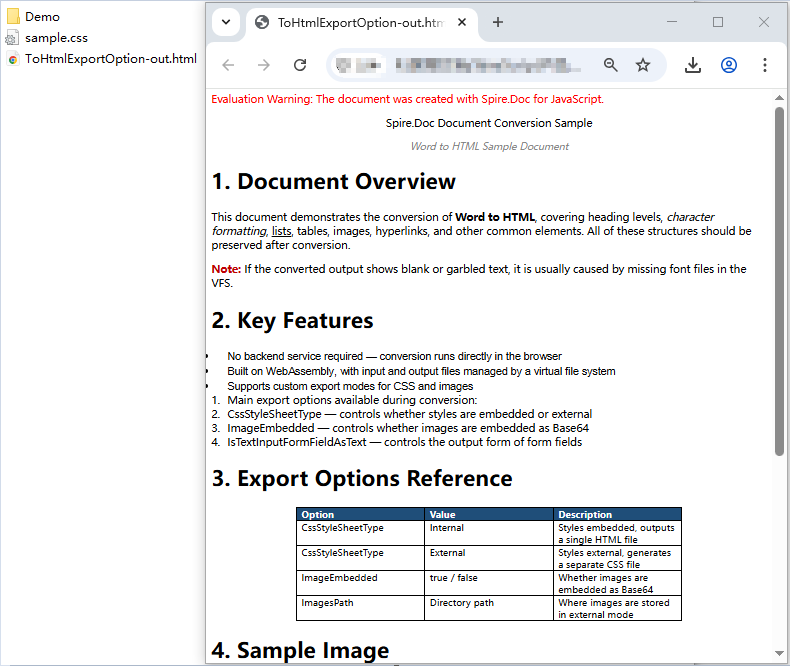
One detail worth noting: Spire.Doc does not place images directly in the directory specified by ImagesPath. Instead, it creates an external_images subfolder inside that directory to hold the image files. The resulting structure looks like Demo/external_images/*.png, which is why addFilesToZip walks the directory tree recursively rather than reading a flat list of files.
Embedded vs. External: Choosing the Right Strategy
Both export modes produce valid HTML from the same Word document, but they serve different publishing needs. The table below summarizes the key differences to help you decide which approach fits your workflow.
| Aspect | Embedded (Single File) | External (Separate Files) |
|---|---|---|
| Output | One .html file with inline CSS and Base64 images |
HTML + .css + image files in a directory |
| File size | Larger — all assets are Base64-encoded into the HTML | Smaller HTML; total size is similar but assets are individual files |
| Portability | Fully self-contained; opens correctly anywhere with no dependencies | Requires all files to stay together; relative paths must be preserved |
| Download mechanism | Single file download via Blob | Zip archive download (e.g., with JSZip) |
| Style reuse | Each document carries its own copy of the CSS | Multiple pages can share one stylesheet file |
| Image management | Images are Base64 strings inside the HTML; cannot be referenced or cached separately | Images are individual files that can be cached, lazy-loaded, or reused |
| Initial render speed | Slower for large documents — the browser must parse one big file | Faster initial HTML parse; CSS and images load in parallel |
| Best for | Email attachments, one-off previews, archival snapshots, sharing a single document | CMS content migration, multi-page publishing, knowledge bases, sites with shared styling |
| Maintainability | Low — changing a style means regenerating the entire file | High — edit the CSS file once and all linked pages update |
Quick decision guide:
- Choose embedded when you need a single, portable artifact — for example, generating a preview that a user downloads and opens offline, or attaching a converted document to an email.
- Choose external when you are publishing to a web platform where multiple documents share the same design system, where you want to cache or lazy-load images, or where the HTML file size matters for performance.
FAQ
Fonts in the exported HTML do not match the original document
If the fonts in your converted HTML look different from the source Word file, the cause is almost always missing font data in the WASM virtual file system. Spire.Doc relies on fonts loaded into VFS to perform accurate layout calculations and font-name resolution during conversion. When a required font is not available, the engine substitutes a fallback font, and the font-family declarations in the output CSS will not match what the original document specifies. For documents that use symbol fonts such as Wingdings, the affected characters may also render as garbled text.
The fix is straightforward: preload the necessary font files into VFS via FetchFileToVFS before you run the conversion. For documents containing Chinese, Japanese, or Korean text, use a font with broad Unicode coverage such as ARIALUNI.TTF:
await window.spire.FetchFileToVFS(
  'ARIALUNI.TTF', '/Library/Fonts/', '/'
);
Exported HTML loses its styles and images when opened
When you use external mode (CssStyleSheetType.External with ImageEmbedded = false), the CSS and image files are written to separate locations, and the HTML references them through relative paths. If you download only the HTML file without its accompanying resources, the browser cannot resolve those paths and the page falls back to unstyled plain text with broken images.
To avoid this, always package the HTML together with its resource directory — the addFilesToZip approach shown in the export-options section handles this by bundling everything into a single zip download. Alternatively, if you do not actually need separate resource files, switch to embedded mode so everything stays in one self-contained HTML file:
wordDocument.HtmlExportOptions.CssStyleSheetType = docModule.CssStyleSheetType.Internal;
wordDocument.HtmlExportOptions.ImageEmbedded = true;
See Also
Set Word Document Backgrounds with JavaScript

Every contract, official letter, and brand collateral piece carries an implicit visual identity. A plain white page gets the job done, but it says nothing about the organization behind it. The moment you add a soft tint, a subtle two-tone gradient, or a tiled background image, the entire document shifts from a generic file into a recognizable branded artifact — and your readers notice, even if they cannot articulate why.
Spire.Doc for JavaScript brings this visual styling directly into the browser through WebAssembly. There is no server round-trip, no Office automation dependency, and no desktop install requirement. You load a Word file into the WASM virtual file system (VFS), pick one of three background modes, and export the styled document — all client-side in a React application.
This guide walks through each of the three background options not as an API catalog, but as a set of design decisions. We start with a quick comparison so you can match the right technique to your use case, then dive into the implementation details for each one.
Three Background Approaches at a Glance
Before writing any code, it helps to understand what each background type brings to the table from a design perspective. The table below summarizes the visual outcome, the amount of configuration involved, and the scenarios where each approach shines.
| Approach | Visual Effect | Configuration Effort | Best Suited For |
|---|---|---|---|
| Solid Color | A single uniform color fills every page | Low — set BackgroundType.Color and assign one color |
Contracts, internal memos, official letters that need a clean, professional base tone |
| Gradient | A two-color directional blend across the page | Medium — define Color1, Color2, plus ShadingStyle and ShadingVariant |
Cover pages, certificates, marketing templates that benefit from subtle depth |
| Picture | A background image tiled across the entire page | Medium — load the image into VFS, then call SetPicture |
Branded stationery, letterhead with decorative elements, themed document templates |
All three share the same overall workflow: load the source document into the VFS, configure the Background property on a Document instance, save the result, and trigger a browser download. The differences lie entirely in how you configure that Background property — which is where the design choices come in.
For project setup and installation instructions, see Integrating Spire.Doc for JavaScript in a React Project. The code examples below assume the WASM module is already initialized and available on window.wasmModule.
Solid Color Background
A solid color is the most restrained background choice — and often the most effective. A warm cream or pale gray behind black text reduces eye strain without competing for attention. For formal documents like contracts and policy papers, a subtle tint signals "this document belongs to a specific organization" without crossing into decoration.
The implementation follows three clean steps. First, use FetchFileToVFS to load the target Word file (and font files) into the WASM virtual file system. Second, create a Document, load the file, set Background.Type to BackgroundType.Color, and assign a built-in color to Background.Color. Third, save the document back to the VFS with SaveToFile, read the resulting file as a byte array, wrap it in a Blob, and initiate a download.
function App() {
  const SetSolidColorBackground = async () => {
    const docModule = window.wasmModule?.spiredoc;
    if (!docModule) {
      alert('Spire.Doc is not ready yet');
      return;
    }
    // Load the sample file into the virtual file system (VFS)
    let inputFileName = "ScienceTemplate.docx";
    await window.spire.FetchFileToVFS(inputFileName, "", `${process.env.PUBLIC_URL}static/data/`);

    // Create Word document
    let doc = new docModule.Document();

    // Load the file
    doc.LoadFromFile(inputFileName);

    // Set the background type as Color
    doc.Background.Type = docModule.BackgroundType.Color;

    // Set the background color
    doc.Background.Color = docModule.Color.get_LightYellow();

    // Define the output file name
    const outputFileName = "SetSolidColorBackground_out.docx";

    // Save the document to the specified path
    doc.SaveToFile({ fileName: outputFileName, fileFormat: docModule.FileFormat.Docx2013 });

    doc.Dispose();

    const modifiedFileArray = window.dotnetRuntime.Module.FS.readFile(outputFileName);
    const blob = new Blob([modifiedFileArray], { type: 'application/vnd.openxmlformats-officedocument.wordprocessingml.document' });
    const url = URL.createObjectURL(blob);
    const a = document.createElement('a');
    a.href = url;
    a.download = outputFileName;
    a.click();
    URL.revokeObjectURL(url);
  };

 return (
    <div style={{ textAlign: 'center', height: '300px' }}>
      <h1>Set a Solid Color Background for a Word Document</h1>
      <button onClick={SetSolidColorBackground}>Generate</button>
    </div>
  );
}
export default App;
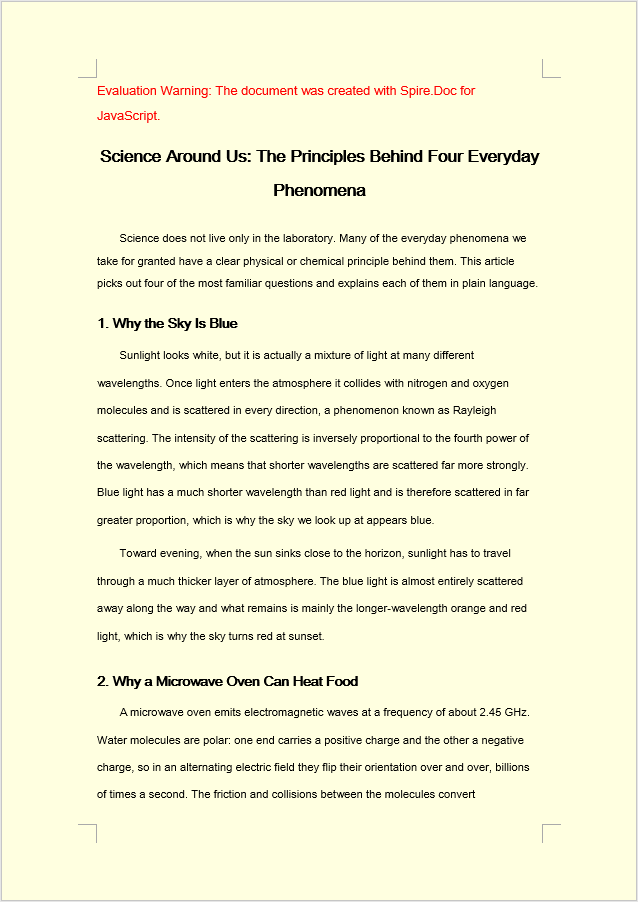
Once Background.Color is applied, every page in the document is filled with the chosen built-in color — in this case, LightYellow.
Gradient Background
Gradients introduce a sense of dimension that flat colors cannot. A top-to-bottom transition from white to pale blue, for example, evokes sky and openness — useful for certificates, award letters, or any document where a touch of ceremony is appropriate. The key is restraint: pick two closely related colors and let the gradient do the work quietly.
The code mirrors the solid color workflow, but the middle step expands. After setting Background.Type to BackgroundType.Gradient, you retrieve the gradient object via Background.Gradient and configure four properties: Color1 (start color), Color2 (end color), ShadingVariant (transition direction), and ShadingStyle (axis of the gradient).
function App() {
  const SetGradientBackground = async () => {
    const docModule = window.wasmModule?.spiredoc;
    if (!docModule) {
      alert('Spire.Doc is not ready yet');
      return;
    }
    // Load the sample file into the virtual file system (VFS)
    let inputFileName = "ScienceTemplate.docx";
    await window.spire.FetchFileToVFS(inputFileName, "", `${process.env.PUBLIC_URL}static/data/`);

    // Create Word document
    let doc = new docModule.Document();

    // Load the file
    doc.LoadFromFile(inputFileName);

    // Set the background type as Gradient
    doc.Background.Type = docModule.BackgroundType.Gradient;
    let gradient = doc.Background.Gradient;

    // Set the start color and the end color of the gradient
    gradient.Color1 = docModule.Color.get_White();
    gradient.Color2 = docModule.Color.get_LightBlue();

    // Set the shading style and variant of the gradient
    gradient.ShadingVariant = docModule.GradientShadingVariant.ShadingDown;
    gradient.ShadingStyle = docModule.GradientShadingStyle.Horizontal;

    // Define the output file name
    const outputFileName = "SetGradientBackground_out.docx";

    // Save the document to the specified path
    doc.SaveToFile({ fileName: outputFileName, fileFormat: docModule.FileFormat.Docx2013 });

    doc.Dispose();

    const modifiedFileArray = window.dotnetRuntime.Module.FS.readFile(outputFileName);
    const blob = new Blob([modifiedFileArray], { type: 'application/vnd.openxmlformats-officedocument.wordprocessingml.document' });
    const url = URL.createObjectURL(blob);
    const a = document.createElement('a');
    a.href = url;
    a.download = outputFileName;
    a.click();
    URL.revokeObjectURL(url);
  };

 return (
    <div style={{ textAlign: 'center', height: '300px' }}>
      <h1>Set a Gradient Background for a Word Document</h1>
      <button onClick={SetGradientBackground}>Generate</button>
    </div>
  );
}
export default App;
After applying Background.Gradient, the page is filled with a smooth horizontal transition from white to light blue, flowing downward.
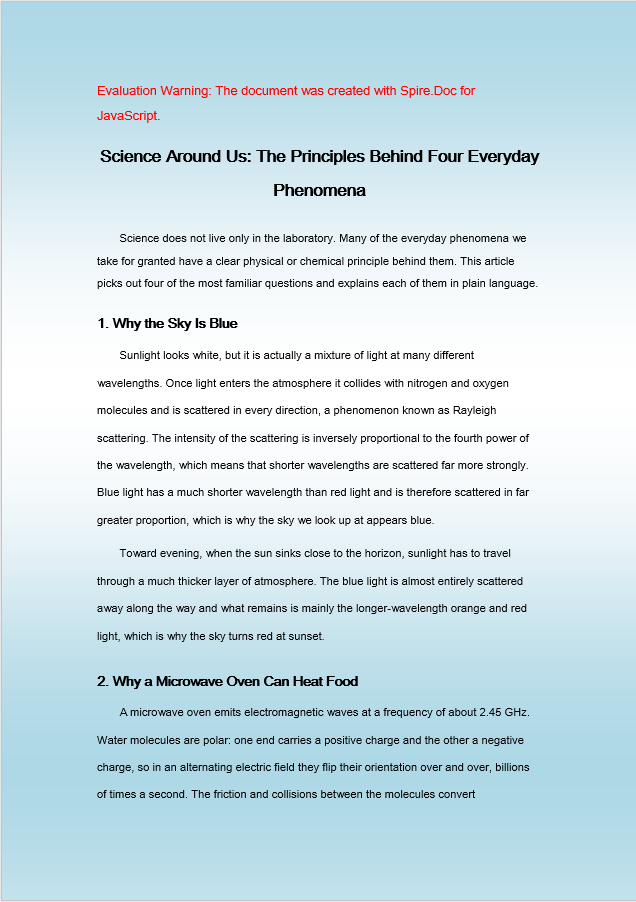
Picture Background
A picture background is the most expressive option. Whether it is a subtle watermark pattern, a corporate texture, or a decorative motif for event programs, a tiled image can carry branding elements that color and gradient simply cannot. The trade-off is file weight — the image must be loaded into the VFS alongside the document — so reserve this approach for templates where the visual payoff justifies the extra resource.
The setup differs from the previous two methods in one important way: the background image must also be loaded into the VFS using FetchFileToVFS before it can be referenced. Once both the document and the image are in the VFS, set Background.Type to BackgroundType.Picture and call Background.SetPicture with the image's VFS path. The image is then tiled across every page as the background.
function App() {
  const SetImageBackground = async () => {
    const docModule = window.wasmModule?.spiredoc;
    if (!docModule) {
      alert('Spire.Doc is not ready yet');
      return;
    }
    // Load the sample file into the virtual file system (VFS)
    let inputFileName1 = "ScienceTemplate.docx";
    await window.spire.FetchFileToVFS(inputFileName1, "", `${process.env.PUBLIC_URL}static/data/`);

    // Load the background image into the virtual file system (VFS)
    let inputFileName2 = "Background.png";
    await window.spire.FetchFileToVFS(inputFileName2, "", `${process.env.PUBLIC_URL}static/data/`);

    // Load a Word document
    let doc = new docModule.Document();
    doc.LoadFromFile(inputFileName1);

    // Set the background type as Picture
    doc.Background.Type = docModule.BackgroundType.Picture;

    // Set the background picture
    doc.Background.SetPicture(inputFileName2);

    // Define the output file name
    const outputFileName = "SetImageBackground_out.docx";

    // Save the document to the specified path
    doc.SaveToFile({ fileName: outputFileName, fileFormat: docModule.FileFormat.Docx2013 });

    doc.Dispose();

    const modifiedFileArray = window.dotnetRuntime.Module.FS.readFile(outputFileName);
    const blob = new Blob([modifiedFileArray], { type: 'application/vnd.openxmlformats-officedocument.wordprocessingml.document' });
    const url = URL.createObjectURL(blob);
    const a = document.createElement('a');
    a.href = url;
    a.download = outputFileName;
    a.click();
    URL.revokeObjectURL(url);
  };

 return (
    <div style={{ textAlign: 'center', height: '300px' }}>
      <h1>Set a Picture Background in a Word Document</h1>
      <button onClick={SetImageBackground}>Generate</button>
    </div>
  );
}
export default App;
After calling Background.SetPicture, the specified image is tiled across the entire page surface as the document background.
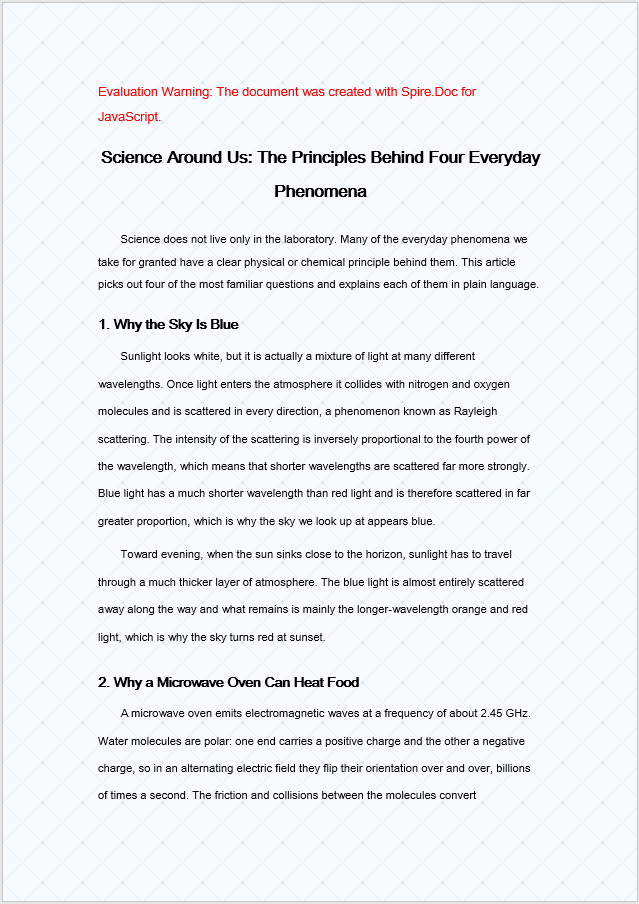
Printing Considerations
There is one practical caveat that catches many developers off guard: Microsoft Word does not print page backgrounds by default. This is not a bug in your code or a limitation of Spire.Doc — the background is correctly stored in the document and displays normally on screen. Word simply omits it from printed output unless you explicitly tell it otherwise.
To ensure backgrounds appear in printed copies, the end user needs to enable a specific setting in their Word client:
- Open the document in Microsoft Word.
- Go to File > Options > Display.
- Check Print background colors and images.
- Print as usual.
If you need the background to render in every output environment regardless of the reader's Word settings, consider an alternative approach: place a full-page shape in the document header or use a watermark to simulate the background effect. These techniques are treated as content rather than page formatting, so they print reliably across all configurations.
FAQ
Why does the background not show up when I print the document?
This is expected behavior. Word suppresses page backgrounds in print output by default — the setting is stored correctly and renders on screen, but the Word client's print options filter it out. The background has not been lost; it is simply not included in the print stream.
To fix this, enable Print background colors and images under File > Options > Display in Word before printing. For environments where you cannot control the reader's print settings, use a full-page shape in the header or a watermark to replicate the visual effect, as those elements are treated as printable content.
Why does the picture background have no effect?
This typically happens for one of two reasons: either Background.Type was not set to BackgroundType.Picture before calling SetPicture, or the image file was never loaded into the VFS via FetchFileToVFS, so SetPicture cannot locate it.
Make sure you set the background type first and pass the exact filename of an image that has already been loaded into the virtual file system:
document.Background.Type = wasmModule.BackgroundType.Picture;
document.Background.SetPicture("Background.png");
See Also
Control Page Breaks in Word Documents with JavaScript
Anyone who has formatted a long Word document in the browser knows the pain: a section heading sits orphaned at the bottom of a page while its body text begins on the next, or content pasted from another file drags along a chain of unwanted blank pages. Both problems almost always trace back to page breaks — either absent where they should be, or left behind where they should not.
Spire.Doc for JavaScript runs entirely in the browser through WebAssembly, using a virtual file system (VFS) to handle file I/O. That means you can insert and remove page breaks without any backend round-trip. This guide covers both operations and tackles two edge cases that frequently surface with real-world documents:
- Insert a page break at a specific paragraph
- Remove all page breaks in one pass
- Fix the extra blank line that appears after inserting a break
- Fix the document that still paginates after breaks are removed
For installation and project setup, refer to Integrating Spire.Doc for JavaScript in a React Project. The examples below assume the WASM module is already initialized.
Insert a Page Break at a Specific Paragraph
The workflow is three steps: load the target document into the WASM virtual file system via FetchFileToVFS, open it as a Document object, then locate the paragraph where you want the split to happen and call AppendBreak with BreakType.PageBreak. The break is appended as a child object at the end of that paragraph, so everything after it flows onto the next page. Finally, read the saved file from VFS, wrap it as a Blob, and trigger a browser download.
function App() {
  const InsertPageBreak = async () => {
    const docModule = window.wasmModule?.spiredoc;
    if (!docModule) {
      alert('Spire.Doc is not ready yet');
      return;
    }

    // Load the target Word document into VFS
    const inputFileName = "Template_Docx_1.docx";
    await window.spire.FetchFileToVFS(inputFileName, "", `${process.env.PUBLIC_URL}static/data/`);

    // Create a Document instance and load the document
    const doc = new docModule.Document();
    doc.LoadFromFile(inputFileName);

    // Locate the fourth paragraph of the first section and append a page break to its end
    doc.Sections.get_Item(0).Paragraphs.get_Item(3).AppendBreak(docModule.BreakType.PageBreak);

    // Define the output file name
    const outputFileName = "InsertPageBreak_out.docx";

    // Save the document to VFS
    doc.SaveToFile({ fileName: outputFileName, fileFormat: docModule.FileFormat.Docx2013 });

    doc.Dispose();

    const modifiedFileArray = window.dotnetRuntime.Module.FS.readFile(outputFileName);
    const blob = new Blob([modifiedFileArray], { type: 'application/vnd.openxmlformats-officedocument.wordprocessingml.document' });
    const url = URL.createObjectURL(blob);
    const a = document.createElement('a');
    a.href = url;
    a.download = outputFileName;
    a.click();
    URL.revokeObjectURL(url);
  };

 return (
    <div style={{ textAlign: 'center', height: '300px' }}>
      <h1>Insert a Page Break into a Word Document</h1>
      <button onClick={InsertPageBreak}>Generate</button>
    </div>
  );
}
export default App;
The document after a page break is appended to the end of the fourth paragraph
Remove All Page Breaks in One Pass
When a document collects page breaks from repeated edits or copy-paste operations, you often need to strip them all out and let the content reflow naturally. The approach: iterate over every paragraph in the target section and inspect each child object. When a child is identified as a Break with BreakType.PageBreak, remove it via ChildObjects.Remove.
A critical detail in the inner loop — the child objects are traversed backwards, from the last index down to zero. Removing an element from a forward-traversed collection shifts the indices of every subsequent element, which can cause skipped items or out-of-bounds access. Reverse traversal sidesteps this problem entirely because each removal only affects indices you have already processed.
function App() {
  const RemovePageBreaks = async () => {
    const docModule = window.wasmModule?.spiredoc;
    if (!docModule) {
      alert('Spire.Doc is not ready yet');
      return;
    }

    // Load the target Word document into VFS
    const inputFileName = "Template_Docx_4.docx";
    await window.spire.FetchFileToVFS(inputFileName, "", `${process.env.PUBLIC_URL}static/data/`);

    // Create a Document instance and load the document
    const doc = new docModule.Document();
    doc.LoadFromFile(inputFileName);

    // Get the first section
    const section = doc.Sections.get_Item(0);

    // Walk through every paragraph in the section
    for (let j = 0; j < section.Paragraphs.Count; j++) {
        const p = section.Paragraphs.get_Item(j);

        // Walk the paragraph's child objects backwards, so that removing an element does not shift the indices still to come
        for (let i = p.ChildObjects.Count - 1; i >= 0; i--) {
            const obj = p.ChildObjects.get_Item(i);

            // Test whether the object is a page break
            if (obj.DocumentObjectType == docModule.DocumentObjectType.Break
                && obj.BreakType == docModule.BreakType.PageBreak) {
                // Remove the page break from the paragraph
                p.ChildObjects.Remove(obj);
            }
        }
    }

    // Define the output file name
    const outputFileName = "RemovePageBreaks_out.docx";

    // Save the document to VFS
    doc.SaveToFile({ fileName: outputFileName, fileFormat: docModule.FileFormat.Docx2013 });
    doc.Dispose();

    const modifiedFileArray = window.dotnetRuntime.Module.FS.readFile(outputFileName);
    const blob = new Blob([modifiedFileArray], { type: 'application/vnd.openxmlformats-officedocument.wordprocessingml.document' });
    const url = URL.createObjectURL(blob);
    const a = document.createElement('a');
    a.href = url;
    a.download = outputFileName;
    a.click();
    URL.revokeObjectURL(url);
  };

 return (
    <div style={{ textAlign: 'center', height: '300px' }}>
      <h1>Remove Page Breaks from a Word Document</h1>
      <button onClick={RemovePageBreaks}>Generate</button>
    </div>
  );
}
export default App;
The document after every page break has been removed
Extra Blank Line After Inserting a Page Break
After calling AppendBreak, you may spot an unwanted blank strip at the top of the new page. This occurs because AppendBreak attaches the break to the end of the target paragraph, and that paragraph's "space after" setting carries over to the beginning of the next page. When automatic spacing is enabled, the gap even scales with the font size — making it especially visible after large headings.
The fix is to neutralize the paragraph's trailing spacing before appending the break:
const para = document.Sections.get_Item(0).Paragraphs.get_Item(3);

// Turn off automatic spacing after the paragraph and set the space after it to 0
para.Format.AfterAutoSpacing = false;
para.Format.AfterSpacing = 0;

// Then insert the page break
para.AppendBreak(wasmModule.BreakType.PageBreak);
Setting AfterAutoSpacing to false and AfterSpacing to 0 ensures the paragraph contributes no vertical gap after the break, so the new page starts flush at the top margin.
Document Still Paginated After Removing Breaks
Even after successfully stripping every page break object, the document may still split at the same positions. The reason: pagination can also originate from a paragraph-level property called "page break before." When this flag is set on a paragraph, that paragraph always starts on a new page — regardless of whether a Break object exists. The removal loop above only targets break objects, so paragraphs carrying this flag remain untouched.
To fully eliminate forced pagination, reset the PageBreakBefore flag on every paragraph alongside the break-object cleanup:
const section = document.Sections.get_Item(0);

for (let j = 0; j < section.Paragraphs.Count; j++) {
  const p = section.Paragraphs.get_Item(j);

  // Clear the page-break-before property set on the paragraph
  if (p.Format.PageBreakBefore) {
    p.Format.PageBreakBefore = false;
  }
}
You can run this loop in the same pass as the break-object removal or as a separate step afterward — the order does not matter because the two operations target independent properties.
FAQ
How do I get a free license for Spire.Doc for JavaScript?
Spire.Doc for JavaScript offers a 30-day full-featured free trial license with no functional limitations. You can apply here to evaluate the product before purchasing.
See Also
Lock Down Editable Areas in Word Documents with JavaScript
Table of Contents
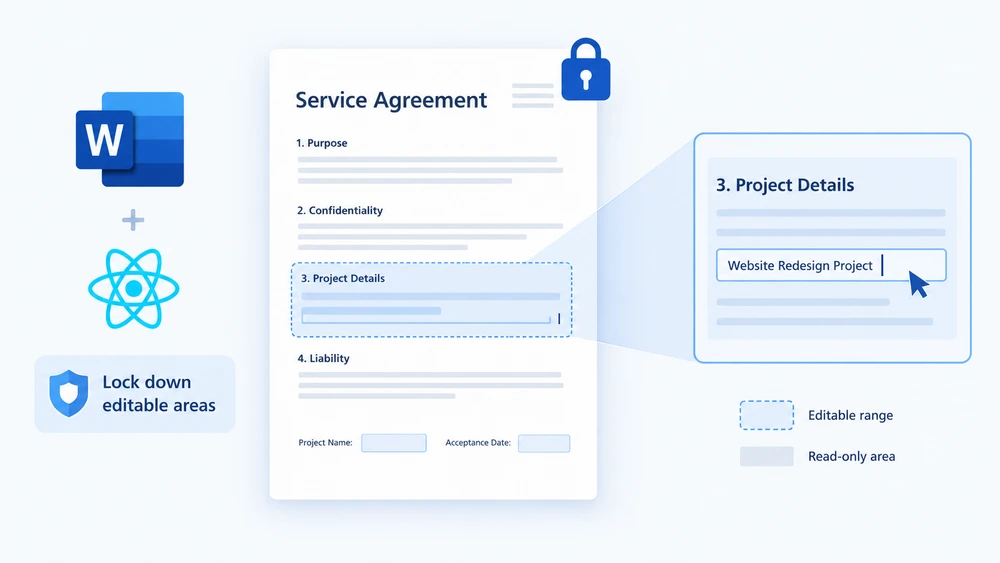
Picture a contract template that gets sent to dozens of clients. The legal team has carefully drafted every clause, and the only things each recipient should touch are the signature block, the project name, and the acceptance date. Hand them a fully editable Word file and someone will inevitably reword a penalty clause or delete a liability section. Lock the entire document and nobody can fill in the fields at all. What you really need is selective editing — a way to say "these specific paragraphs are fair game, everything else is frozen."
That is exactly what editable ranges give you. You protect the whole document as read-only, then drop a pair of permission markers around the paragraphs you want to keep open. Anyone opening the file in Word can type inside the marked region but cannot alter a single character outside it. Spire.Doc for JavaScript brings this capability to the browser through WebAssembly, so you can generate protected documents from a React app with no server round-trip — fonts and input files are managed through an in-memory virtual file system (VFS).
This guide walks through both halves of the workflow:
- Set an editable range — protect the document and mark the open area
- Remove an editable range — strip the markers and lift the restriction
If you have not yet wired Spire.Doc into your project, start with Integrating Spire.Doc for JavaScript in a React Project. The snippets below assume the WebAssembly module is loaded and ready.
Set an Editable Range
The process has three stages. First, pull the font files and the target Word document into the WASM virtual file system with FetchFileToVFS. Next, instantiate a Document, load the file, call Protect to lock the entire document as read-only, and then create a PermissionStart / PermissionEnd pair that shares the same id — these two markers bracket the paragraph you want to leave editable. Finally, save the file, read it back from VFS, wrap it in a Blob, and trigger a download.
function App() {
  const SetEditableRange = async () => {
    const docModule = window.wasmModule?.spiredoc;
    if (!docModule) {
      alert('Spire.Doc is not ready yet');
      return;
    }

    // Load the input document into VFS
    const inputFileName = "SetEditableRange.docx";
    await window.spire.FetchFileToVFS(inputFileName, "", `${process.env.PUBLIC_URL}static/data/`);

    // Create a document object and load the document
    const doc = new docModule.Document();
    doc.LoadFromFile(inputFileName);

    // Protect the whole document: everything outside the editable range is read-only
    doc.Protect({ type: docModule.ProtectionType.AllowOnlyReading, password: "password" });

    // Create the permission markers: a start and an end with the same id form one editable range
    const start = new docModule.PermissionStart(doc, "testID");
    const end = new docModule.PermissionEnd(doc, "testID");

    // Insert the markers into the first paragraph: the start at the beginning, the end appended at the end
    doc.Sections.get_Item(0).Paragraphs.get_Item(0).ChildObjects.Insert(0, start);
    doc.Sections.get_Item(0).Paragraphs.get_Item(0).ChildObjects.Add(end);

    // Save the document
    const outputFileName = "Set Editable Range.docx";
    doc.SaveToFile({ fileName: outputFileName, fileFormat: docModule.FileFormat.Docx2013 });
    doc.Dispose();

    const modifiedFileArray = window.dotnetRuntime.Module.FS.readFile(outputFileName);
    const blob = new Blob([modifiedFileArray], { type: 'application/vnd.openxmlformats-officedocument.wordprocessingml.document' });
    const url = URL.createObjectURL(blob);
    const a = document.createElement('a');
    a.href = url;
    a.download = outputFileName;
    a.click();
    URL.revokeObjectURL(url);
  };

 return (
    <div style={{ textAlign: 'center', height: '300px' }}>
      <h1>Set Editable Range in a Word Document</h1>
      <button onClick={SetEditableRange}>
        Generate
      </button>
    </div>
  );
}
export default App;
In the sample file, the fields a reviewer is allowed to fill in carry light shading — that is purely a visual cue for the reader and has no bearing on how the editable range is defined in code. Once the markers are in place, Word treats the shaded paragraph as editable and every other paragraph as locked.
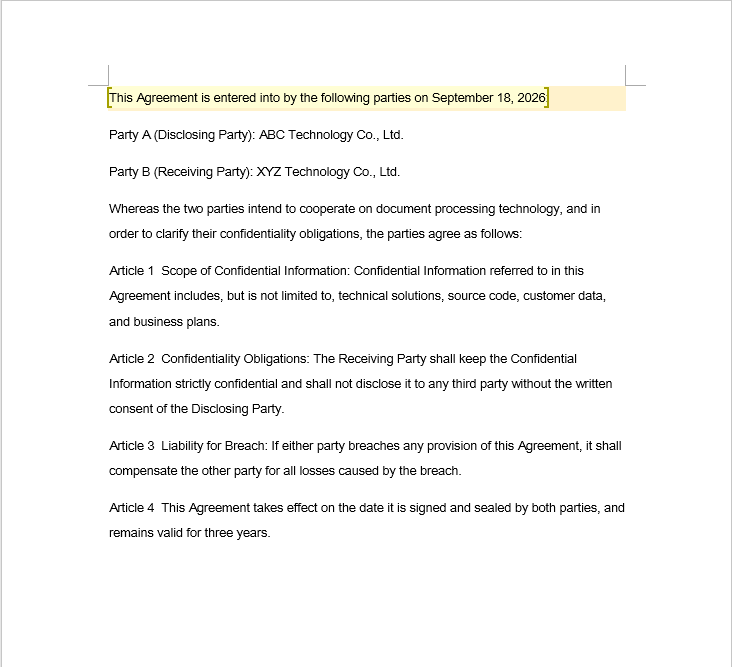
Remove an Editable Range
Stripping the editable range is a single traversal: loop through every section and every paragraph, inspect each object in the paragraph's ChildObjects collection, and yank out anything that is a PermissionStart or PermissionEnd.
One subtlety catches people off guard: ChildObjects.Remove shrinks the collection on the spot, so every element after the removed one slides forward by one index. If you increment your loop counter while deleting, each removal causes the very next marker to be skipped — and the more markers you have, the more survivors you leave behind.
function App() {
  const RemoveEditableRange = async () => {
    const docModule = window.wasmModule?.spiredoc;
    if (!docModule) {
      alert('Spire.Doc is not ready yet');
      return;
    }

      // Load the input document into VFS
      const inputFileName = "RemoveEditableRange.docx";
      await window.spire.FetchFileToVFS(inputFileName, "", `${process.env.PUBLIC_URL}static/data/`);

      // Create a document object and load the document
      const doc = new docModule.Document();
      doc.LoadFromFile(inputFileName);

      // Iterate over every section and paragraph and delete the permission markers
      for (let i = 0; i < doc.Sections.Count; i++) {
        const section = doc.Sections.get_Item(i);
        for (let j = 0; j < section.Body.Paragraphs.Count; j++) {
          const paragraph = section.Body.Paragraphs.get_Item(j);

          // Remove on a match; the collection shrinks, so the index is not incremented
          for (let k = 0; k < paragraph.ChildObjects.Count;) {
            const obj = paragraph.ChildObjects.get_Item(k);
            if (obj instanceof docModule.PermissionStart || obj instanceof docModule.PermissionEnd) {
              paragraph.ChildObjects.Remove(obj);
            } else {
              k++;
            }
          }
        }
      }

      // Save the document
      const outputFileName = "Remove Editable Range.docx";
      doc.SaveToFile({ fileName: outputFileName, fileFormat: docModule.FileFormat.Docx2013 });

    // Release resources
    doc.Dispose();

    const modifiedFileArray = window.dotnetRuntime.Module.FS.readFile(outputFileName);
    const blob = new Blob([modifiedFileArray], { type: 'application/vnd.openxmlformats-officedocument.wordprocessingml.document' });
    const url = URL.createObjectURL(blob);
    const a = document.createElement('a');
    a.href = url;
    a.download = outputFileName;
    a.click();
    URL.revokeObjectURL(url);
  };

 return (
    <div style={{ textAlign: 'center', height: '300px' }}>
      <h1>Remove Editable Ranges from a Word Document</h1>
      <button onClick={RemoveEditableRange}>
        Generate
      </button>
    </div>
  );
}
export default App;
Deleting the markers only redraws the boundary of what is editable — the text itself and all formatting remain untouched.
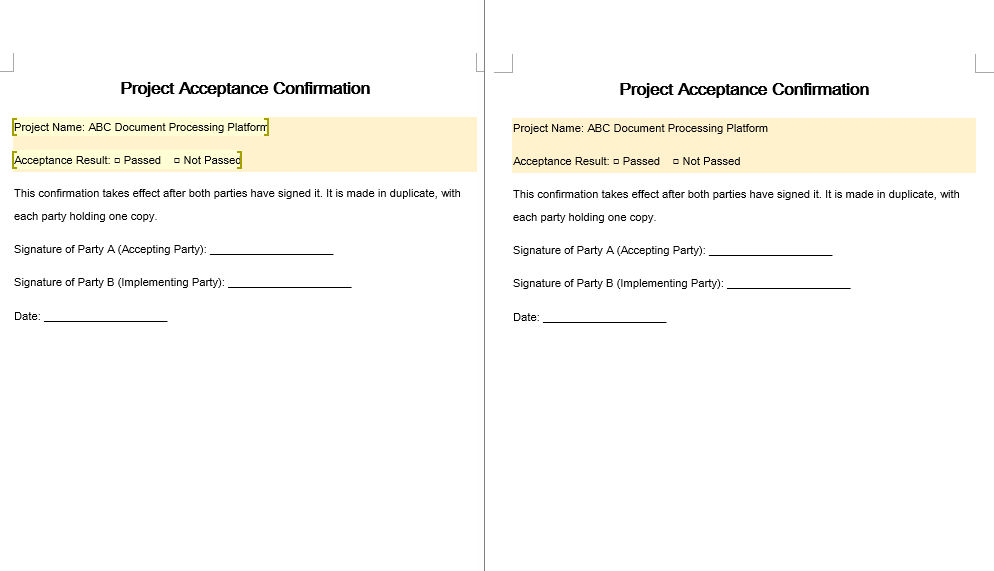
The Complete Protection Lifecycle
In a real approval workflow you rarely do just one thing. A typical round-trip looks like this:
- Protect — Call
doc.ProtectwithAllowOnlyReading(orAllowOnlyFormFields) and a password. The entire document is now locked. - Mark — Wrap each reviewer-editable paragraph in a
PermissionStart/PermissionEndpair sharing one id. Those regions become the only places a reviewer can type. - Unmark — When the review round is over, walk the document and remove every permission marker. The regions rejoin the read-only body.
- Unprotect — Call
doc.Unprotect("password")to release the document entirely, returning it to a fully editable state for the next stage of processing.
The key insight is that protection and editable ranges are two independent layers. Protection decides whether the document is locked at all; the marker pair decides which slivers are exempt from that lock. You can add and remove markers as many times as you like without touching the protection state, and you can toggle protection on or off without disturbing the markers — but the markers only have teeth while protection is active.
FAQ
The editable range is set, but the content inside it still cannot be edited
Why it happens: Permission markers are inert on their own. They only carve out exceptions to a document-wide restriction, so if Protect was never called, there is no restriction to be exempt from and the markers do nothing. A second requirement is that the PermissionStart and PermissionEnd must carry the same id string — Word treats them as a pair only when the ids match.
Fix: Turn on the editing restriction first, then create both markers with an identical id:
// Enable protection first so that the markers mean something
document.Protect({ type: wasmModule.ProtectionType.AllowOnlyReading, password: "password" });

// The start and the end must use the same id
const start = new wasmModule.PermissionStart(document, "testID");
const end = new wasmModule.PermissionEnd(document, "testID");
Some markers are missed when removing editable ranges
Why it happens: Each call to ChildObjects.Remove collapses the collection by one, shifting every subsequent element's index down. If the loop counter advances on the same iteration as a removal, the element that slid into the current position is never examined — it gets bypassed, and the problem compounds with every additional marker.
Fix: Either hold the index steady while removing (advance it only when no removal occurred), or gather the target objects first and delete them in reverse order:
for (let k = 0; k < paragraph.ChildObjects.Count;) {
  const obj = paragraph.ChildObjects.get_Item(k);
  if (obj instanceof wasmModule.PermissionStart || obj instanceof wasmModule.PermissionEnd) {
    paragraph.ChildObjects.Remove(obj);
    // Do not increment k here: check the new object at the current index
  } else {
    k++;
  }
}
The document is still read-only after the markers are removed
Why it happens: The markers only define which areas are exempt from the lock — they are not the lock itself. Removing them simply removes the exemptions; the underlying protection that Protect established is still in force, so the whole document stays read-only.
Fix: Once the markers are gone and you no longer need the restriction, call Unprotect with the original password:
document.Unprotect("password");