7 Best Free PDF Rotator Tools in 2026: Compared & Ranked
Table of Contents
Scanned a document upside down. Got a landscape PDF mixed with portrait pages. Your phone saved a receipt sideways. Fixing it should take about 10 seconds — but picking the wrong tool can eat your afternoon.
We compared 7 free PDF rotate tools — online rotators, an AI agent, your browser, desktop apps, and a Python library — so you can pick the right one in under a minute. Below is the full comparison table, followed by detailed reviews organized by what you actually need to do.
Quick answer: Need it done in 10 seconds? → Free online tools. Don't want to learn a UI? → CloudXDocs Agent. File is confidential? → Your browser or Adobe Reader. Rotating 100+ files? → Spire.PDF for Python.
Comparison: 7 PDF rotator tools at a glance
| # | Tool | Best for | Single-page | Batch | Stays local | Account needed | Platform |
|---|---|---|---|---|---|---|---|
| 1 | Free online tools (PDF24, iLovePDF, Smallpdf) | Quickest one-off fix | Yes | Yes | No | Varies | Web |
| 2 | CloudXDocs Agent | AI-assisted rotation | Yes | Yes | No | Yes (free) | Web |
| 3 | Edge / Chrome | Zero-install offline | No | No | Yes | No | Built-in |
| 4 | macOS Preview | Mac built-in | Yes | No | Yes | No | Mac only |
| 5 | Adobe Acrobat Reader | Enterprise trust | No | No | Yes | No | Windows, Mac |
| 6 | PDF-XChange Editor | Single-page control (Windows) | Yes | Yes | Yes | No | Windows |
| 7 | Spire.PDF for Python | Developers, batch | Yes | Yes | Yes | No | Python |
Note: Most tools here rotate by clicking buttons or using a UI. When you'd rather describe the rotation in plain language — or apply it across many files — CloudXDocs Agent lets you type the instruction instead of clicking through an editor.
What we looked at
Not every "free" PDF rotator is equally free. Before diving in, here's what separates a good rotation tool from a frustrating one:
- Does it save permanently? In many free PDF viewers, including Chrome and free Adobe Reader workflows, rotation may only affect the view unless you save a new PDF copy.
- Single-page or all-pages? Most free tools rotate the whole document. If only page 3 is sideways, you need one that handles individual pages.
- Upload or local? Online tools send your file to a server. Fine for a receipt, risky for a contract.
- Free limits. "Free" can mean 2 tasks/day, a 100 MB file cap, or genuinely unlimited. We call out each one.
For a quick one-off fix
You have 1–2 PDFs, they're not sensitive, and you want this over with.
This is where free online PDF rotators shine. No install, no account (usually), upload and go. Three solid options:
| PDF24 | iLovePDF | Smallpdf | |
|---|---|---|---|
| Free limit | Unlimited usage | Limited free tasks | 2 tasks/day |
| Single-page rotate | Yes | Yes | Yes |
| Batch rotate | Yes | Yes | Yes |
| Max file size | No stated limit | 100 MB (free) | ~100 MB (free) |
| Account needed | No | No | No for basic use |
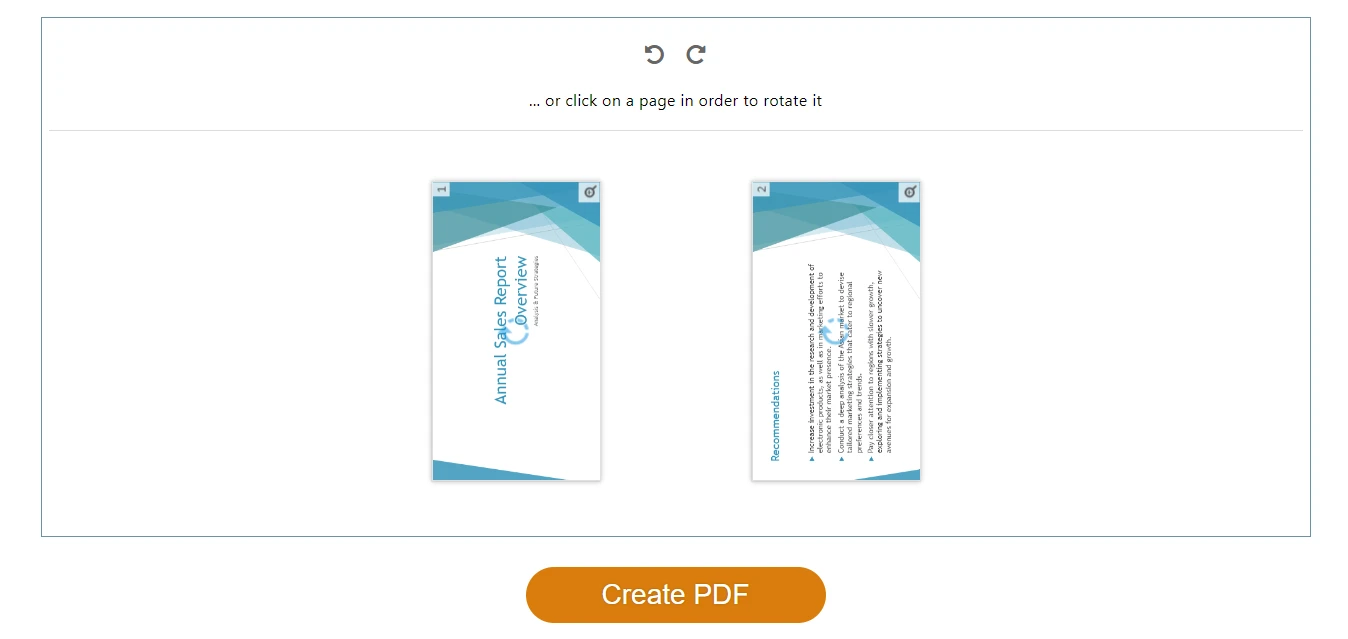
How it works (same flow for all three):
- Open the tool in your browser.
- Upload your PDF.
- Click Rotate — 90° clockwise or counterclockwise — on individual pages or all pages at once.
- Download the rotated file. Done.
The general workflow of rotating a PDF using a free online tool — upload, rotate, and download.
Our pick: PDF24 if you want truly unlimited free use. iLovePDF if you're on mobile (their app is better). Smallpdf if you only need to rotate one file today and appreciate the cleanest interface.
For hands-off AI rotation
You'd rather describe what you want than click through a UI.
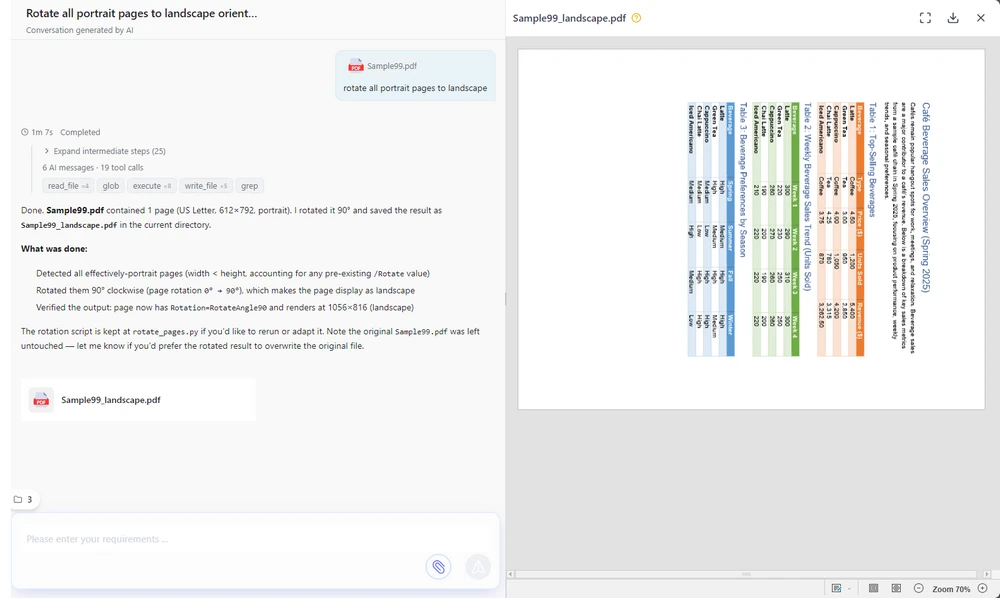
CloudXDocs Agent takes a different approach from traditional PDF rotators: instead of clicking through a rotation UI, you describe what you want in natural language and the AI agent applies it. It handles text-based, scanned, and image-heavy PDFs.
Where AI rotation earns its keep:
- Rotating many pages by description (e.g. "rotate all landscape pages to portrait").
- Rotation as one step in a larger task (e.g. "rotate page 3, then merge with another PDF").
- When you don't want to learn a tool's UI — just type what you need.
How it works:
- Open CloudXDocs Agent and sign in with a free account.
- Upload your PDF (or paste a link).
- Type your rotation command.
- Review the preview and download.
Here's the CloudXDocs Agent interface with a rotate command typed and the preview ready to download.
Free to use: A free account includes 600 credits, with 50 more every day you check in. A typical PDF rotation uses about 15 credits, so the free allowance covers plenty of everyday tasks.
Pros: Natural-language rotation — no UI to learn; single-page or batch via description; handles multi-step document tasks; browser-based. Cons: Cloud-based (files processed server-side — for fully offline privacy use Edge/Chrome or Adobe Reader); requires a free login.
For sensitive files: stay local
Contracts, medical records, financial statements — anything you wouldn't upload to a random website.
Online PDF rotators upload your file to their server. For a sideways receipt, no big deal. For an NDA or tax return, you want the file to stay on your machine. Two good options:
Your browser (zero install, zero account)
Your computer already has a PDF viewer with rotation built in — the absolute lowest-friction offline option.
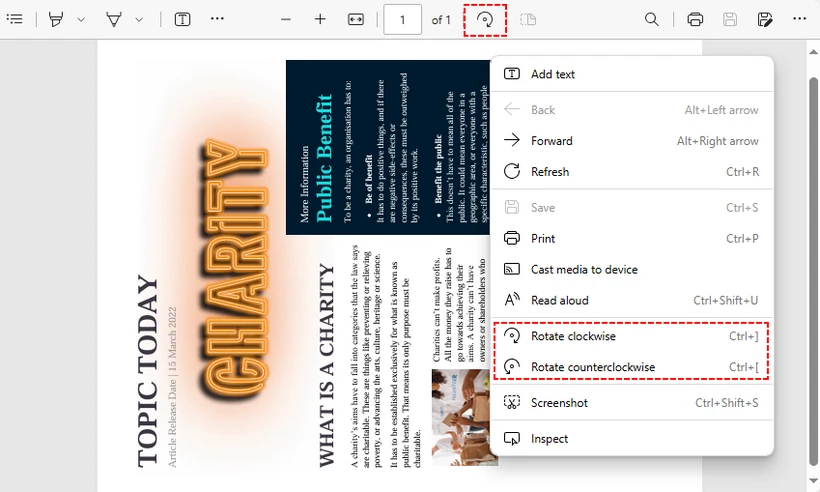
Microsoft Edge:
- Right-click your PDF → Open with → Microsoft Edge.
- Click the Rotate button (circular arrow) in the toolbar.
- Click Save as to save the rotated PDF.
Rotating a PDF using Microsoft Edge's built-in PDF viewer — zero install required.
Chrome / Firefox: These rotate the view only. To save permanently: rotate → Ctrl + P → choose "Save as PDF" as the printer → Print.
Adobe Acrobat Reader (the enterprise default)
If your company already has Adobe Reader on every machine, rotation is built in:
- Open your PDF in Adobe Acrobat Reader DC (free).
- View → Rotate View → Clockwise / Counterclockwise.
- File → Print → select "Microsoft Print to PDF" → Print to save the rotated version.
⚠️ Common mistake: Both Chrome and the free Adobe Reader rotate the view temporarily. If you just close the file without saving, the rotation disappears. The Print → Save as PDF workaround is how you make it permanent for free.
Pros: Both keep files on your machine; Adobe is pre-installed on many work machines. Cons: Both rotate all pages at once in their free versions; the "save permanently" step is a workaround, not a one-click save. For single-page rotation on Windows, see PDF-XChange Editor below.
For single-page rotation on Windows
You need to rotate specific pages, not the whole document.
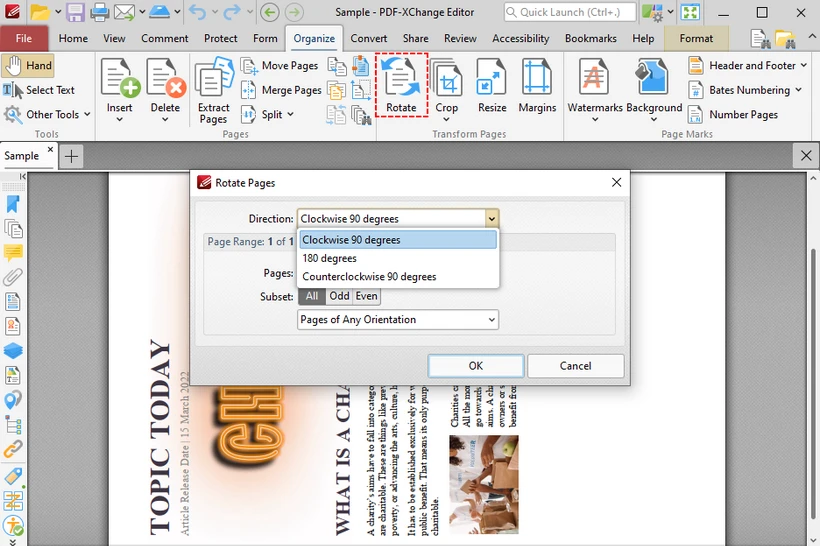
PDF-XChange Editor (free version) is one of the few free desktop tools that lets you rotate individual pages or a custom page range — a feature most free rotators lack.
- Download and install PDF-XChange Editor (select the "Free Version" during setup).
- Open your PDF → Organize tab → Rotate.
- In the dialog: choose direction, then select Current page, All pages, or a custom range (e.g.
1,3,5-8). - Click OK → File → Save As.
Rotating specific PDF pages using the free PDF-XChange Editor — the Rotate Pages dialog with page range selection.
Pros: Free; page-specific rotation (rare in free tools); fully offline; saves permanently. Cons: Windows only; requires installation.
Mac users: Preview has you
If you're on macOS, you don't need any of the above. Preview handles rotation natively and — unlike Chrome or free Adobe Reader — saves permanently when you close the file.
- Double-click the PDF (opens in Preview by default).
- View → Thumbnails → select the page(s) to rotate.
- Tools → Rotate Left or Rotate Right (
Cmd + L/Cmd + R). - Close the file — done. Preview auto-saves.
Heads up: Because Preview auto-saves, duplicate the file first (File → Duplicate) if you want to keep the original orientation.
Pros: Built into macOS; offline; saves permanently; supports single-page rotation. Cons: Mac only.
Common mistakes when rotating PDFs
Three things that trip people up:
1. "I rotated it but it went back to normal." You rotated the view, not the file. In many free PDF viewers, including Chrome, Firefox, and free Adobe Reader workflows, rotation only changes the display. Use "Save as" (Edge), Print → Save as PDF, or a tool that saves permanently (CloudXDocs Agent, PDF24, Preview, PDF-XChange Editor).
2. "I can't rotate just one page." Most free tools rotate all pages at once. For single-page rotation, use CloudXDocs Agent (type "rotate page 3"), iLovePDF (click individual thumbnails), macOS Preview (select pages in sidebar), PDF-XChange Editor (custom page range), or Spire.PDF (code).
3. "The rotated file is blurry." Rotation itself never reduces quality — it's a metadata change. If your output looks blurry, you likely re-printed through a lossy PDF printer. Use "Save as" instead of "Print" when possible, or download directly from the online tool.
For batch rotation and developers
You need to rotate 50, 500, or 5,000 PDFs. Online tools won't cut it.
Spire.PDF for Python is a free library that rotates PDFs programmatically — no upload, no browser, no clicking.
Install:
pip install Spire.Pdf.Free
Rotate a single page:
from spire.pdf.common import *
from spire.pdf import *

# Create a PdfDocument object
pdf = PdfDocument()

# Load a PDF document
pdf.LoadFromFile("Sample.pdf")

# Get the first page
page = pdf.Pages.get_Item(0)

# Get the original rotation angle
rotation = int(page.Rotation.value)

# Rotate 90 degrees clockwise
rotation += int(PdfPageRotateAngle.RotateAngle90.value)
page.Rotation = PdfPageRotateAngle(rotation)

# Save the result
pdf.SaveToFile("RotatePDFPage.pdf")
pdf.Close()
To rotate all pages in a batch, loop through each page:
for i in range(pdf.Pages.Count):
    page = pdf.Pages.get_Item(i)
    rotation = int(page.Rotation.value)
    rotation += int(PdfPageRotateAngle.RotateAngle90.value)
    page.Rotation = PdfPageRotateAngle(rotation)
See the full Spire.PDF Python rotation tutorial for more examples, including rotating all pages, specific ranges, and combining rotation with other PDF operations.
You may also be interested in: Converting PDF to HTML or Extracting text from PDF after rotation.
Pros: Rotate specific or all pages; batch any number of PDFs with a loop; no upload (fully local); free for commercial use. Cons: Requires basic Python knowledge; free version limited to 10 pages per PDF.
How to rotate a PDF on any device
On Windows
- Quickest: Free online PDF rotators (PDF24, iLovePDF) — upload, rotate, download.
- No upload: Edge built-in viewer — right-click → Open with Edge → Rotate → Save as.
- Single-page control: PDF-XChange Editor (free install).
- Enterprise: Adobe Acrobat Reader.
On Mac
- Built-in: Preview → Tools → Rotate. Auto-saves. No install needed.
- Online: Same web tools as Windows, or CloudXDocs Agent for AI-assisted rotation.
On iPhone / Android
- Easiest: Upload to CloudXDocs Agent in your mobile browser and describe the rotation — no app install, and AI handling beats fiddly touch controls.
- Alternative: iLovePDF mobile app or Smallpdf from the browser.
FAQ
Can I rotate a PDF for free? Yes. Every tool in this guide is free: PDF24, iLovePDF, Smallpdf (online); Edge/Chrome (built-in); macOS Preview; Adobe Reader (offline); PDF-XChange Editor (Windows); CloudXDocs Agent (AI, free credits); Spire.PDF (Python library).
Can I rotate a PDF without Adobe? Absolutely. Online tools, browser viewers, macOS Preview, CloudXDocs Agent, PDF-XChange Editor, and Python scripts all rotate PDFs without any Adobe software.
How do I rotate a PDF permanently? Tools that save permanently: CloudXDocs Agent, PDF24, iLovePDF, macOS Preview, Edge ("Save as"), PDF-XChange Editor. Chrome and Firefox need Print → Save as PDF. Adobe Reader free version only rotates the view — use the Print workaround for a permanent file.
What's the best way to rotate multiple PDF pages? For a handful: CloudXDocs Agent (describe in words) or iLovePDF. For hundreds or thousands: Spire.PDF for Python with a batch loop.
Will rotating a PDF reduce its quality? No. Rotation is a metadata-only change — text, images, and formatting stay exactly the same.
Which free PDF rotator is best in 2026? PDF24 for unlimited online use; CloudXDocs Agent for AI-assisted rotation without manual clicking; Edge/Chrome for zero-install convenience; macOS Preview for Mac users.
Can I rotate just one page of a PDF? Yes. CloudXDocs Agent, iLovePDF, macOS Preview, PDF-XChange Editor, and Spire.PDF all support single-page rotation. Adobe Reader and Edge/Chrome rotate all pages at once only.
Related: rotate PDFs in code (developers)
If you're building a document workflow, server-side PDF processing is more reliable than online tools for repetitive or high-volume jobs:
- Batch PDF processing — rotate thousands of files on a schedule.
- Automated reports — fix orientation of auto-generated statements.
- Document pipelines — rotate as one step in a larger convert/merge/extract flow.
- Enterprise applications — embed rotation in your own product or service.
Spire.PDF supports programmatic rotation in C#, Java, Python, and more. See the Spire.PDF rotation guide for code samples.
See Also
6 Best PDF Croppers in 2026: Free Online, AI & Offline Tools
Table of Contents
- How we tested
- Comparison: 6 PDF croppers at a glance
- 1. CloudXDocs Agent — Best AI-powered PDF cropper
- 2. PDF24 — Best free offline
- 3. Smallpdf — Best for beginners
- 4. iLovePDF — Best for quick online workflows
- 5. Sejda — Best for flexible crop settings
- 6. Adobe Acrobat Online — Best for trusted PDF workflows
- How to crop a PDF on any device
- FAQ
- Related: crop PDFs in code (developers)
- See Also
White margins on a scanned contract. A stubborn header band across 40 pages. A screenshot saved as PDF that you just want trimmed to the content. Cropping a PDF is one of those tasks that sounds simple and then eats your afternoon.
We compared the free options that actually show up when you search "crop pdf" — online tools, desktop apps, and one AI agent that lets you describe the crop in plain language. Below are the 6 best PDF croppers in 2026, each named best for a specific job, plus step-by-step methods for Windows, Mac, and phone.
Quick answer: For a quick online trim, tools like Smallpdf or iLovePDF crop in the browser in a few clicks. Prefer to describe the crop in plain language instead of dragging a box? CloudXDocs Agent handles that — you type the crop, it does the work. Want zero install and zero account? Use PDF24 (Best free offline) or Preview on Mac. The full category breakdown is below.
How we tested
To keep this a real comparison rather than a list, we scored each tool on:
- Crop accuracy — can it hit an exact margin or measurement?
- Batch processing — does it handle many pages at once?
- Free limits — what can you actually do without paying?
- Signup requirement — does it work with no account?
- Privacy — are files processed in your browser/device or uploaded?
- Supported platforms — web, desktop, mobile.
Comparison: 6 PDF croppers at a glance
| # | Tool | Best for | How it works | Free? | Account needed? | Precision control |
|---|---|---|---|---|---|---|
| 1 | CloudXDocs Agent | AI-assisted cropping | Natural-language commands | Free (credits) | Yes (free account) | Measurement-based instructions |
| 2 | PDF24 | Best free offline | Crop box + margin settings | Free desktop, no account | No | Numeric margins |
| 3 | Smallpdf | Best for beginners | Visual crop editor | Free (daily cap) | For extra features | Crop-box adjustment |
| 4 | iLovePDF | Best for quick online workflows | Visual crop tool | Free | No | Crop-area adjustment |
| 5 | Sejda | Best for flexible crop settings | Crop box + presets | Free (hourly cap) | No | Multiple page modes |
| 6 | Adobe Acrobat Online | Best for trusted PDF workflows | Online crop tool | Free basic | Adobe account | Standard crop controls |
Note: Most tools here crop via a draggable crop box and/or numeric margin/measurement entry. When a crop is easier to describe in words — or needs to be applied across many pages by description — CloudXDocs Agent lets you do it by typing the instruction instead of working inside an editor.
1. CloudXDocs Agent — Best AI-powered PDF cropper
CloudXDocs Agent takes a different approach from traditional PDF croppers: instead of manually adjusting a crop box in an editor, you describe the result you want in natural language, and it applies precise, measurement-based cropping consistently across your document. It handles a wide range of PDF types, including text-based, scanned, and image-heavy files. [VERIFY: match wording to actual CloudXDocs promotion]
Where AI cropping earns its keep:
- Repeating one crop across many pages (e.g. "crop pages 2–50 to content area + 5 mm padding").
- Hitting an exact measurement you'd struggle to eyeball ("trim 2.54 cm / 1 inch off the left margin").
- Cropping as one step in a larger document task.
How to crop a PDF with CloudXDocs Agent:
- Open the CloudXDocs Agent and sign in with a free account.
- Upload your PDF (or paste a link).
- Type a command, for example:
- "Crop 1.5 cm from the bottom margin of every page."
- "Remove the top 1 inch (72 pt) header band from all pages."
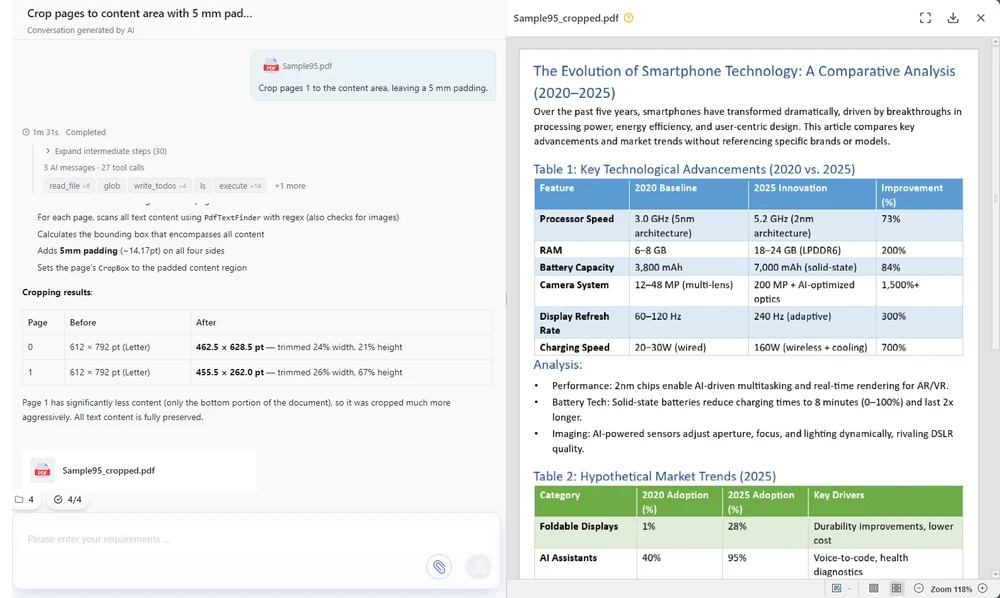
- "Crop pages 2–10 to the content area, leaving a 5 mm padding."
- Review the preview and download the cropped file.
Here's the CloudXDocs Agent interface with a crop command typed and the preview ready to download.
Free to use: A free account includes credits you can spend on everyday cropping tasks. (See the FAQ for the exact allowance.)
Pros: Natural-language cropping — no crop box to drag; consistent batch crops across many pages; works on any device via browser.
Cons: Cloud-based (files are processed server-side — for fully offline privacy use PDF24 desktop or Mac Preview); requires a free login.
2. PDF24 — Best free offline
PDF24 is a genuinely free PDF cropper with no account required — the desktop app is fully free for typical use. It runs both online and as a desktop app; the desktop version keeps files on your machine, which is the better pick if privacy matters. You can crop either by dragging a rectangle or by entering margins numerically.
How to crop (desktop app):
- Open PDF24 Creator / PDF24 Tools desktop.
- Load your PDF and choose Crop.
- Drag the crop rectangle, or enter margins.
- Save.
The PDF24 desktop crop screen, with the margin fields and drag handles visible.

Pros: No sign-up, no watermark, real offline option; supports both drag-box and typed margins.
Cons: Interface is plainer than polished online tools.
3. Smallpdf — Best for beginners
Smallpdf feels more like a lightweight PDF editor than a single-purpose crop tool. Its clean, attractive interface makes basic cropping fast and approachable for everyday users. The free plan has a daily task cap.
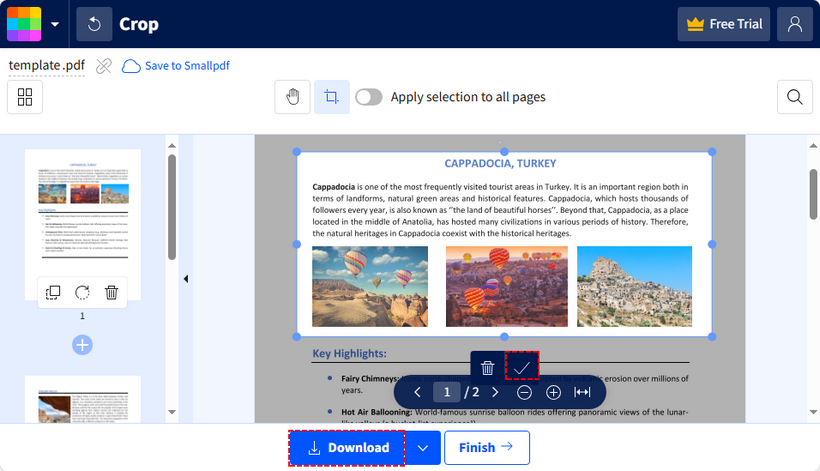
How to crop: Upload → Crop → adjust the box → apply → download.
The Smallpdf crop editor with the adjustment box placed around the page.
Pros: Polished UI, simple workflow, familiar editing feel.
Cons: Free plan limits daily tasks; some actions need an account.
4. iLovePDF — Best for quick online workflows
iLovePDF is a mature, all-in-one online PDF workspace; cropping is one of many tools, and it handles several files in one pass. Good for quick, repeatable online jobs without installing anything.
How to crop: Upload → Crop PDF → drag the box per page (or apply to all) → download.
Pros: Broad toolset, smooth batch workflow.
Cons: Free tier has usage limits; files are uploaded for processing rather than processed entirely on your device.
5. Sejda — Best for flexible crop settings
Sejda offers more crop configuration than many basic online croppers: page selection, an overlap preview, and different settings for odd/even pages, plus margin or drag-box entry. A strong pick when you need control without paying. The free tier is hourly-capped and size-limited but adds no watermark.
How to crop: Upload → Crop → set margins or drag, choose page modes → download.
Pros: Rich crop options, no watermark on free crops.
Cons: Free use is hourly-capped (≈3 tasks/hour) and limited to ~200 pages / 50 MB.
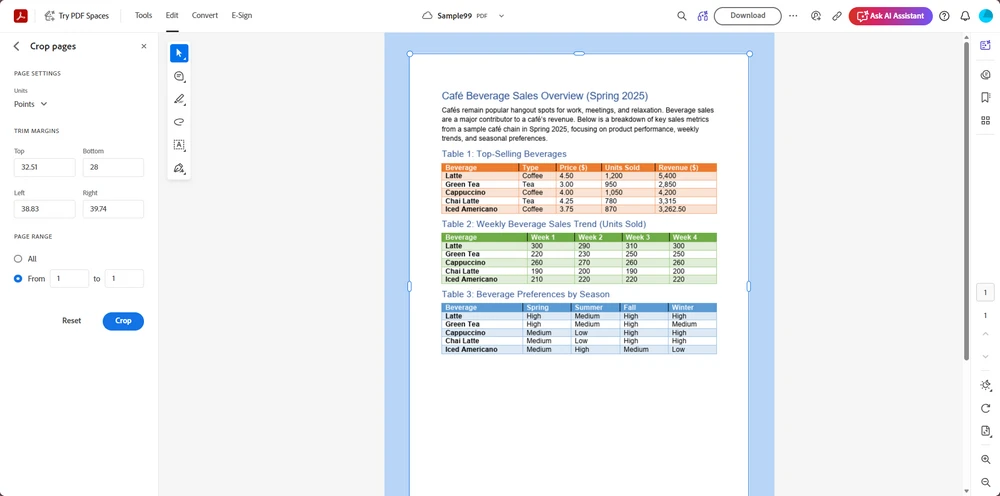
6. Adobe Acrobat Online — Best for trusted PDF workflows
Adobe Acrobat Online provides a free basic crop among its web tools, backed by the Adobe name. Best when trust and brand familiarity matter more than advanced options. You'll need an Adobe account.
How to crop: Sign in → Crop PDF → drag → download.
The Adobe Acrobat Online crop tool with the page selected for trimming.
Pros: Trusted brand, secure perception, decent free basics.
Cons: Free uses are limited; full features need a paid plan.
How to crop a PDF on any device
On Windows
- Online (any browser): Use a web cropper such as Smallpdf, iLovePDF, Sejda, Adobe Acrobat Online, or CloudXDocs Agent — upload (or describe the crop in plain language), crop, download.
- Offline / private: Install PDF24 desktop and crop locally with no account.
On Mac
- Built-in (free, offline): Open the PDF in Preview → Tools → Crop (or drag a selection and press
Command + K). Perfect for privacy. - Online: Smallpdf, iLovePDF, Sejda, Adobe Acrobat Online, and CloudXDocs Agent all crop in the browser.
On iPhone / Android
- Easiest: Upload the PDF to CloudXDocs Agent in your mobile browser and describe the crop — no app install, and AI handling beats fiddly on-screen editing.
- Alternative: Use the Files app + a mobile PDF editor, or an online tool like iLovePDF from the browser.
FAQ
Can I crop a PDF for free without installing software?
Yes. Online tools (CloudXDocs Agent, iLovePDF, Smallpdf, Sejda, Adobe Acrobat Online) crop in the browser. For no-install and no-account, use PDF24's desktop app or Mac Preview.
Which free tool allows precise PDF cropping?
CloudXDocs Agent lets you describe the crop in plain language — "crop 1.5 cm from the bottom" — and applies the result without manually dragging a crop box, which is especially handy across many pages. Most other tools also accept numeric margin entry, but you work inside their editor rather than just typing a request.
Can I crop all pages at once?
Yes — CloudXDocs Agent and iLovePDF both support batch/all-page crops. PDF24 and Sejda let you apply one crop rectangle to all pages too.
How much does CloudXDocs Agent cost?
It's free to start: a new account includes 600 credits, and you get 50 more credits every day you check in. A complex document task typically uses 20–40 credits, so the free allowance is enough for trying multiple PDF tasks.
Does cropping a PDF delete the cropped content?
No. Standard cropping only hides the area with a viewer clip; the original data may remain in the file. To truly remove content for privacy/redaction, use a redact tool, not crop.
Does cropping reduce PDF file size?
Usually only slightly. Cropping trims the visible area but often keeps the underlying objects. For real size reduction, also compress/optimize the PDF after cropping.
Related: crop PDFs in code (developers)
If you're building a document workflow, server-side PDF processing is usually more reliable than online tools for repetitive or high-volume jobs. Common cases where a library beats a web tool:
- Batch PDF processing — crop thousands of files on a schedule.
- Automated reports — trim generated statements to a clean content area.
- Document pipelines — crop as one step in a larger convert/merge/redact flow.
- Enterprise applications — embed cropping in your own product or service.
Programmatic cropping gives developers direct control over PDF page coordinates (the CropBox), while AI agents provide a simpler natural-language interface for common operations. Spire.PDF lets you set crop boxes per page in C#, Java, Python, and more. See the Spire.PDF cropping guide for code samples.
See Also
How to Export PowerPoint Slides as High-Quality Images
Table of Contents
- 1. Export slides using PowerPoint's "Save As" (fastest)
- 2. Export PowerPoint slides at higher resolution (fix blurry images)
- 3. Convert PowerPoint slides to images online (no PowerPoint required)
- 4. Automate PowerPoint image export (VBA & APIs)
- 5. Capture a slide as an image (screenshot)
- Decision support
- FAQ
- Related: export PowerPoint slides in code (developers)
- See Also
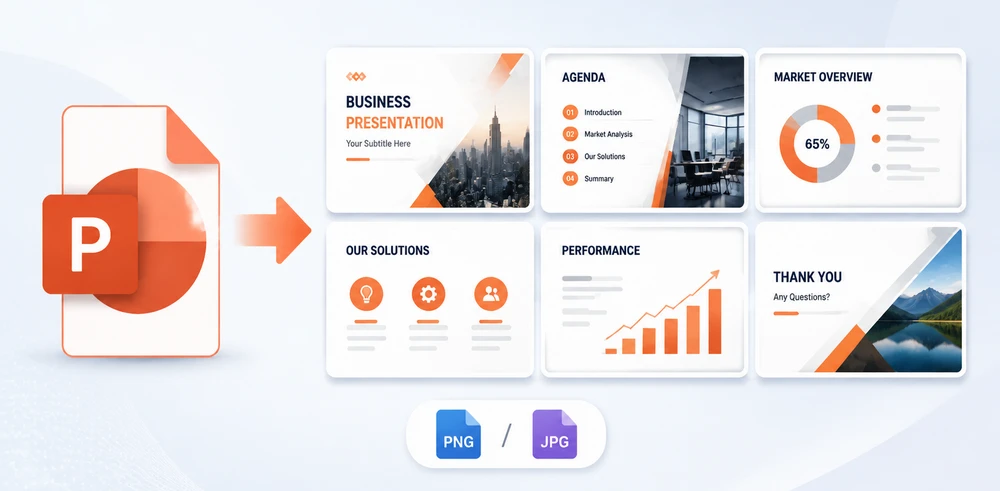
You finished the deck. Now someone needs it as images for a website, a handout, or a slide inside another document. You click Save As, send the PNGs, and they come back: "These look blurry."
That's the catch. PowerPoint's default slide export is about 96 pixels per inch (PPI), so slides that look crisp on screen turn soft the moment they're enlarged or printed. This guide covers every practical way to turn PowerPoint slides into PNG or JPG files — and, just as important, how to make those images actually sharp.
Quick answer: For a fast one-off, use PowerPoint's Save As (PNG/JPG, a few clicks). If the result looks blurry, raise the export resolution — no registry edits required. No PowerPoint installed? Use the free CloudXDocs online converter. Need to process many decks or build export into your own software? Automate with VBA or the Spire.Presentation API. The full comparison is below.
1. Export slides using PowerPoint's "Save As" (fastest)
PowerPoint's built-in Save As is the lowest-effort way to turn a deck into images, and it's the right pick when PowerPoint is already open and you just need a quick export. PNG is the safer default for slides with text, diagrams, or charts — see PNG vs JPG for when JPG fits.
- Open the presentation and go to File → Save As (or Save a Copy on OneDrive/SharePoint).
- Choose a folder and file name.
- Open the Save as type dropdown and pick PNG or JPEG.
- Click Save, then choose All Slides (each slide as its own file) or Just This One.
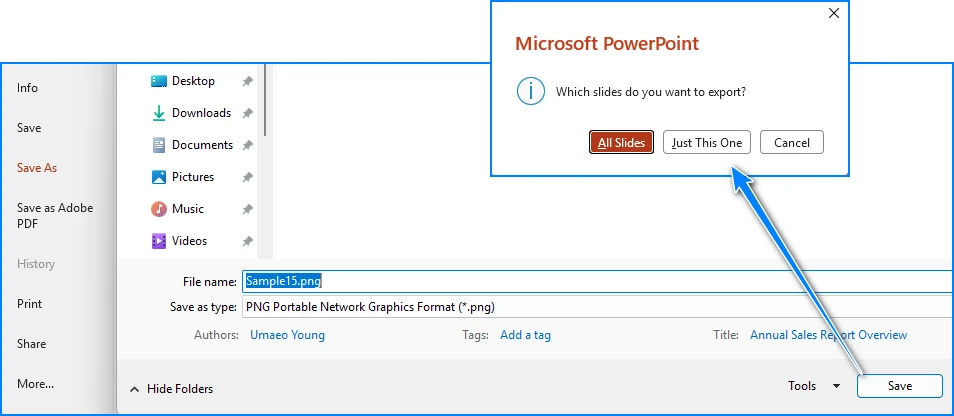
Why results can look soft: this method exports at ~96 PPI (1280×720 on a widescreen slide). Fine for web, too low for print or large displays — see Method 2.
Pros: No extra software, no account, the official method, fastest for one-off jobs.
Cons: Fixed at ~96 PPI by default, so images can look blurry when enlarged or printed; one file at a time.
2. Export PowerPoint slides at higher resolution (fix blurry images)
Best for: print, posters, or any use where 96 PPI looks blurry. This is the core fix for low-quality exports.
PowerPoint's default export resolution is 96 PPI. Microsoft's official fix is editing the Windows registry (ExportBitmapResolution) — risky and easy to get wrong. You don't have to. Here are the alternatives — all avoid the registry: a no-Office default, a no-Office high-resolution option, and a fully scripted route:
| Target resolution | Pixel size (16:9 widescreen) | Good for |
|---|---|---|
| 96 PPI | 1280 × 720 | Web, email, in-slide use |
| 150 PPI | 2000 × 1125 | Projectors, large monitors |
| 200 PPI | 2667 × 1500 | A4 handouts |
| 300 PPI | 4000 × 2250 | Posters, professional print |
PPI (pixels per inch) is the on-screen measure; for print, aim for 200–300 PPI. PowerPoint's default is 96 PPI.
- No Office, default quality: CloudXDocs converts in the browser at the same default (~96 PPI) — see Method 3.
- No Office, higher resolution: CloudConvert (also in Method 3) renders online at ~1920×1080 and lets you raise the DPI — comfortably above 96 PPI.
- Custom size (most control): script the export at any pixel size with VBA or an API — Method 4.
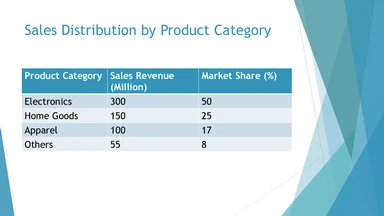
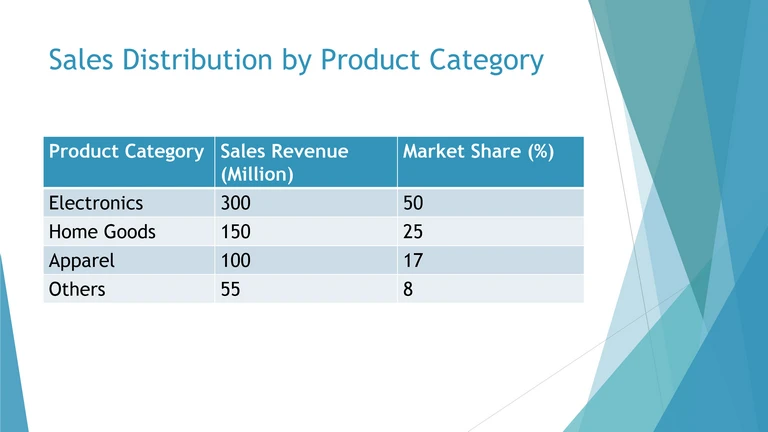
Both images are the same 16:9 slide, each scaled to 30% of its original pixel size so the difference is easy to compare at the same on-page width. At 96 PPI (top) the text and thin lines look softer; at 192 PPI (bottom) they stay noticeably sharper.
If you do use the registry method: go to
HKEY_CURRENT_USER\Software\Microsoft\Office\<ver>\PowerPoint\Options, add aDWORDnamedExportBitmapResolution, set its decimal value (e.g.,300). Back up the registry first; proceed at your own risk.
Best for: anyone who hits the 96 PPI quality ceiling and needs sharper output for print or large displays.
Keep in mind: the built-in Save As can't exceed its default without the registry tweak or a different tool. The VBA/API route and CloudConvert both get past that ceiling; CloudXDocs stays at the default but needs no Office.
3. Convert PowerPoint slides to images online (no PowerPoint required)
Best for: users without PowerPoint installed, or anyone who wants a browser-based converter when Office isn't available or multiple files need processing quickly.
CloudXDocs is a browser-based converter by the same team behind Spire. It needs no Microsoft Office and no installation.
- Open the CloudXDocs PPT to Image Converter in any browser.
- Click or drag your
.pptx/.pptfile into the upload area. - Wait for CloudXDocs to render and convert automatically (usually seconds).
- Download the resulting
.zipand unzip to get every slide as a separate image.
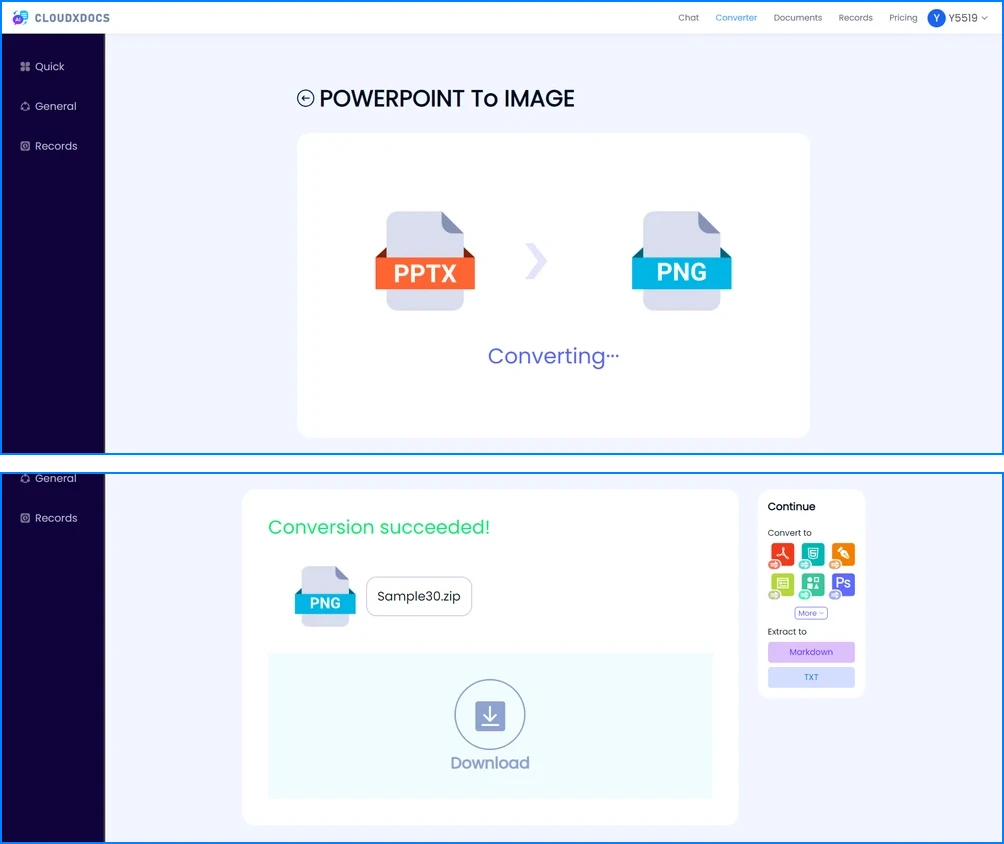
Why it is useful: CloudXDocs provides a convenient browser-based way to convert presentations when PowerPoint is unavailable or when you need to process multiple files quickly. Uploaded files are automatically deleted after 24 hours according to the service policy. [VERIFY: confirm CloudXDocs 24h auto-delete policy wording]
Pros: No Office, no install, no desktop software; handles a whole deck as a zip; works on any device.
Cons: Requires an internet connection; output quality follows the converter's rendering rather than a setting you control.
If you need sharper output but can't install Office, some online converters let you choose the export resolution. CloudConvert, for example, defaults to about 1920×1080 and lets you raise the DPI further — comfortably above PowerPoint's 96 PPI default.
The steps are essentially the same as above: upload your .pptx → pick JPG or PNG → raise the DPI in the options → convert → download the zip.
That makes an online converter a genuine fix for blurry exports when no desktop tool is available, though files do pass through a third-party server, so avoid confidential decks.
4. Automate PowerPoint image export (VBA & APIs)
Best for: many decks, scheduled jobs, or building export into an internal tool. Two routes depending on who you are.
Option A — VBA macro (for Office power users on Windows)
If you work in PowerPoint on Windows and need a custom export size, a short macro automates the whole deck. Press Alt + F11, Insert → Module, paste, then Macros → Run ExportSlidesHighRes (create C:\Exports\ first):
Sub ExportSlidesHighRes()
    Dim sld As Slide, i As Integer
    i = 1
    For Each sld In ActivePresentation.Slides
        sld.Export "C:\Exports\Slide_" & i & ".png", "PNG", 3000, 1688  ' ~200 PPI
        i = i + 1
    Next sld
End Sub
Adjust 3000, 1688 to hit your target (see Method 2 table).
Option B — Spire.Presentation API (for .NET developers)
Need server-side or fully programmable export? Spire.Presentation for .NET renders every slide to an image with a few lines of code — no Microsoft PowerPoint, no registry edits, output size set in code. For a full walkthrough, see our Spire.Presentation tutorial for converting slides to images.
using Spire.Presentation;
using System.Drawing;
using System.Drawing.Imaging;

class Program
{
    static void Main(string[] args)
    {
        using (Presentation ppt = new Presentation())
        {
            ppt.LoadFromFile("Sample.pptx");
            for (int i = 0; i < ppt.Slides.Count; i++)
            {
                Image img = ppt.Slides[i].SaveAsImage(1280 * 2, 720 * 2);
                img.Save(string.Format("Slide_{0}.png", i), ImageFormat.Png);
            }
        }
    }
}
SaveAsImage(width, height) sets the exact pixel size, so the API renders at the resolution you specify — no registry, no Office. Here 1280 * 2, 720 * 2 produces 2560×1440 (about 192 PPI); change the two numbers to any size in the Method 2 table.
Enterprise Tip: run headless on Linux, set exact output dimensions, and pipe exports into a larger document workflow — no Office, no registry tweaks. Download the complete sample project →
[VERIFY: link to current sample project]
Pros: Full control over pixel size, true batch/headless processing, no manual steps; Spire runs without Office installed.
Cons: VBA only on Windows with PowerPoint; the API is a paid library for production use.
5. Capture a slide as an image (screenshot)
Best for: grabbing one slide exactly as shown on screen, or when you can't open the file in an editor.
- Windows: Snipping Tool / Snip & Sketch (
Win + Shift + S) → select the slide → save as PNG. - macOS:
Cmd + Shift + 4then spacebar to capture a window. - Third-party: ShareX, Lightshot, or Snagit for annotated captures.
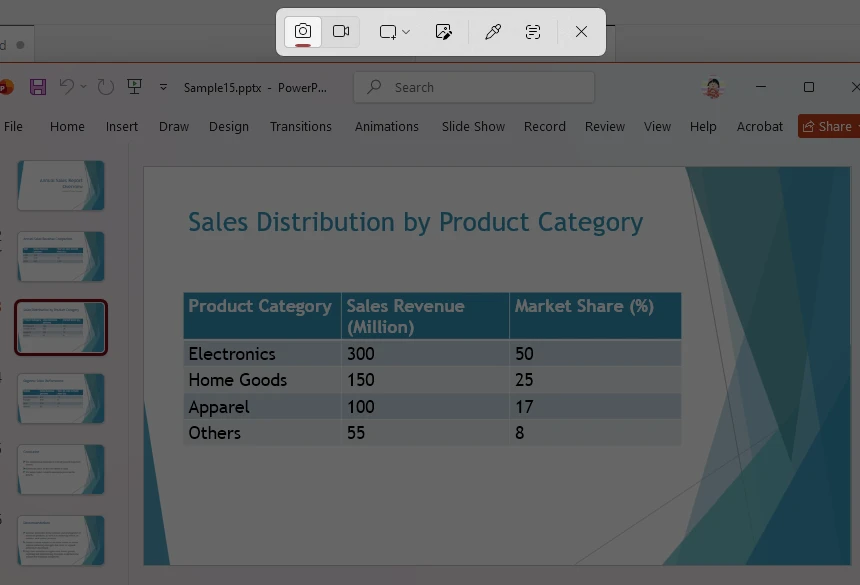
Caveat: screenshots inherit your screen's resolution and may include UI chrome. For clean, full-slide images at a controllable size, prefer Methods 1–4.
Pros: Zero setup, works on any machine, perfect for "grab exactly what's on screen."
Cons: Resolution capped by your display; not a real export; can't batch.
Decision support
The sections below help you compare methods, choose a format, and fix quality issues. Working from a PDF instead of PowerPoint? See how to convert PDF pages to images.
Comparison & how to choose
| # | Method | Best for | Resolution | Install needed | Batch? |
|---|---|---|---|---|---|
| 1 | PowerPoint Save As | Quick one-off | 96 PPI | PowerPoint | Per-file |
| 2 | Higher resolution | Fix blurry / print | Up to 300 PPI* | — | Per-file |
| 3 | CloudXDocs online | No Office / quick | Same as default (~96 PPI) | No (browser) | Yes (zip) |
| 4 | VBA / Spire API | Dev / batch / server | Custom px | VBA: PowerPoint; Spire: NuGet | Yes |
| 5 | Screenshot | Single slide on screen | Screen-limited | No | No |
| — | Google Slides / LibreOffice | No PowerPoint | Native app | App | Per-file |
*Achieved via VBA or the Spire API; online tools render at the slide's native dimensions.
Pick by situation:
- Need one or two images quickly → PowerPoint Save As
- Result looks blurry → Higher-resolution export
- No PowerPoint installed → CloudXDocs online
- Hundreds of slides / server-side → VBA or Spire API
- Exact on-screen capture → Screenshot
How to export slides as images without PowerPoint
If Microsoft PowerPoint isn't installed, you still have options — the CloudXDocs converter above, plus two free office suites:
- Google Slides: open the deck, then File → Download → PNG image (.png) or JPEG image (.jpg). Each download exports the current slide; repeat per slide, or use CloudXDocs for a whole deck at once.
- LibreOffice Impress: open the file, then File → Export, choose PNG or JPG, and select the slides to export.
These are handy when PowerPoint isn't available, though they offer less control over resolution than Method 2 or Method 4.
PNG vs JPG: which format should you export?
| Format | Best for | Advantages |
|---|---|---|
| PNG | Text, diagrams, charts, UI screenshots | Lossless quality, sharper edges |
| JPG | Photos, image-heavy slides | Smaller file size |
For most business presentations, PNG is usually the better choice because slides often contain text and diagrams that need sharp edges. Use JPG only when a slide is dominated by photographs and file size matters more than pixel-perfect text.
Why do exported images look blurry? (and how to fix it)
PowerPoint's default export is about 96 PPI, so slides look soft once they're enlarged or printed. If your images still aren't sharp enough:
- Use the higher-resolution routes in Method 2 — no registry edits needed.
- Avoid screenshots for print or large displays; their resolution is capped by your screen (Method 5).
- Prefer PNG for slides with text or diagrams (PNG vs JPG).
- For full control over pixel size or server-side export, automate with VBA or the Spire API (Method 4).
For print, aim for 200–300 PPI. The full resolution table shows the pixel size for each target.
FAQ
How do I save all PowerPoint slides as separate images at once?
File → Save As → PNG/JPEG, then choose "All Slides" when prompted. For a no-install batch, use the CloudXDocs converter; for scripted batch, the VBA macro or Spire API.
Which image format is best — PNG or JPG?
PNG for slides with text, charts, or sharp lines (lossless). JPG for photo-heavy slides where smaller file size matters.
Can I export slides without Microsoft PowerPoint installed?
Yes. The CloudXDocs PPT to Image Converter runs in any browser with no install, and Spire.Presentation (Method 4) converts server-side without Office. Google Slides and LibreOffice Impress can also export slides — see without PowerPoint.
How do I export just one slide instead of the whole deck?
In the Save As prompt, select "Just This One." With a screenshot tool, capture only the visible slide.
Why do my exported slides look blurry, and how do I get high-quality images?
PowerPoint saves at ~96 PPI by default, so images look soft when enlarged or printed. To improve quality, export at a higher resolution (see the resolution table) — either with a tool that renders slides at larger dimensions, or by automating the export with VBA or a presentation API (Method 4) for full control over pixel size.
Is it safe to upload my presentation to an online converter?
With CloudXDocs, uploaded files are automatically deleted from the server 24 hours after conversion and are not retained or reused. [VERIFY: confirm CloudXDocs 24h auto-delete policy] Avoid converters that don't state a deletion policy.
Can I export PowerPoint slides as images without losing quality?
Yes. Use PNG format and export at a larger pixel size when possible. Avoid screenshots for professional output, because screen resolution limits image quality — use Method 2 (higher resolution) or Method 4 (custom pixel size) instead.
What is the best image size for PowerPoint slides?
For a 16:9 presentation, 1920 × 1080 pixels is usually suitable for screens. Higher resolutions such as 2560 × 1440 or 3840 × 2160 are better for large displays or printing.
Related: export PowerPoint slides in code (developers)
If you're building a document workflow, server-side processing is usually more reliable than online tools for repetitive or high-volume jobs. Common cases where a library beats a web tool:
- Batch processing — convert thousands of decks on a schedule.
- Automated reports — export generated decks to clean images.
- Document pipelines — render slides as one step in a larger convert/merge/build flow.
- Enterprise applications — embed slide export in your own product or service.
For PDF sources in the same workflow, you can also crop a PDF or merge PDF files.
Spire.Presentation for .NET renders every slide to PNG/JPG with the exact dimensions you set, on Windows or Linux, with no Microsoft Office. See the Spire.Presentation sample project for runnable code. [VERIFY: link to current sample/tutorial]
After export, open the images (or the original .pptx) in CloudXDocs AI Chat to auto-generate speaker notes, a bilingual glossary, or a meeting-minutes to-do list — a fast way to repurpose exported content, no design or coding required. The AI works with the content; it does not create the images.