Comment ajouter des images à un PDF en JavaScript (React)
Sommaire
Lorsque votre application React génère des PDF à la volée — une facture qui doit comporter le logo d’une entreprise, un rapport avec un graphique intégré, un certificat portant une signature — vous devez placer des images raster sur la page par programmation. Le JavaScript standard ne peut pas écrire dans la structure interne d’un PDF, et mettre en place un backend uniquement pour ajouter un logo est excessif pour ce qui est en réalité une tâche côté client.
Spire.PDF pour JavaScript compile un moteur PDF complet en WebAssembly, ce qui permet à votre application React de créer, modifier et enregistrer des PDF entièrement dans le navigateur. Les fichiers transitent par un système de fichiers virtuel (VFS) dans le navigateur, ce qui évite tout aller-retour réseau. Avec PdfImage et la méthode DrawImage du canevas de la page, vous contrôlez précisément où et comment chaque image apparaît.
Dans cet article, vous apprendrez à :
- Charger une image dans le VFS et la transformer en objet
PdfImage - La dessiner sur une page PDF à une position et une taille choisies
- Ajouter des images à des documents PDF entièrement nouveaux et existants
- Mettre à l’échelle, centrer et répéter des images sur plusieurs pages
- Déclencher le téléchargement du PDF final dans le navigateur
Pourquoi générer des PDF dans le navigateur
L’alternative habituelle est une bibliothèque côté serveur (iText, PDFBox, etc.) : le navigateur envoie les ressources, le serveur effectue le rendu, puis le résultat revient. Cela fonctionne, mais pour l’ajout d’images, cela ajoute des frictions :
- Latence — chaque rendu attend un aller-retour, ce qui est pénalisant pour les fichiers volumineux ou les connexions lentes.
- Confidentialité — les documents et images sources quittent la machine de l’utilisateur, un problème pour toute donnée sensible.
- Coût — le rendu PDF est très gourmand en CPU et ne passe pas à l’échelle sans frais.
Avec Spire.PDF pour JavaScript, tout le travail s’exécute dans le navigateur via WebAssembly. Une fois le module WASM chargé, le rendu est local et instantané, le fichier ne quitte jamais l’appareil et aucun temps serveur n’est facturé.
Prérequis
Cette procédure suppose que vous disposez déjà d’un projet React avec Spire.PDF pour JavaScript installé et le module WASM initialisé. Dans le cas contraire, suivez d’abord Intégrer Spire.PDF pour JavaScript dans un projet React.
Vous aurez besoin de :
- Les fichiers
spire.pdf.base.jsetspire.pdf.base.wasmdans le dossierpublicde votre projet - Le module WASM accessible via
window.wasmModule.spirepdf - Une image à incorporer (PNG, JPEG, etc.) placée là où le VFS peut la charger
Ajouter une image à un nouveau PDF
Le scénario le plus simple consiste à créer un tout nouveau document PDF et à dessiner une image sur sa première page. Les étapes clés sont :
- Charger l’image dans le VFS à l’aide de
window.spire.FetchFileToVFS - Créer un
PdfDocumentet ajouter une page vierge - Créer un
PdfImageà partir du fichier chargé avecPdfImage.FromFile - Dessiner l’image sur le canevas de la page avec
page.Canvas.DrawImage - Enregistrer et télécharger le résultat
function App() {
  const addImageToPdf = async () => {
    // Get the Spire.PDF WASM module
    const pdfModule = window.wasmModule?.spirepdf;

    // Check if the WASM module is ready
    if (!pdfModule) {
      alert('Spire.PDF is not ready yet');
      return;
    }

    // Load the image into VFS
    const inputImageName = 'TreePic.png';
    await window.spire.FetchFileToVFS(inputImageName, "", `${process.env.PUBLIC_URL}/data/`);

    // Create a PdfDocument object
    let doc = new pdfModule.PdfDocument();

    // Add a page
    let page = doc.Pages.Add();

    // Load the image and scale its display size proportionally
    let image = pdfModule.PdfImage.FromFile(inputImageName);
    let width = image.Width * 0.6;
    let height = image.Height * 0.6;

    // Calculate the horizontal center position and set the vertical position
    let x = (page.Canvas.ClientSize.Width - width) / 2;
    let y = 60;

    // Draw the image at the specified position on the page
    page.Canvas.DrawImage({ image: image, x: x, y: y, width: width, height: height });

    // Define the output file name in PDF format
    const outputFileName = 'AddImage.pdf';

    // Save as PDF format
    doc.SaveToFile({ fileName: outputFileName });
    doc.Close();

    // Read the generated PDF file from VFS and trigger download
    const fileArray = window.dotnetRuntime.Module.FS.readFile(outputFileName);
    const blob = new Blob([fileArray], { type: 'application/pdf' });
    const url = URL.createObjectURL(blob);
    const a = document.createElement('a');
    a.href = url;
    a.download = outputFileName;
    a.click();
    URL.revokeObjectURL(url);
  };

  return (
    <div style={{ textAlign: 'center', height: '300px' }}>
      <h1>Add Image To PDF</h1>
      <button onClick={addImageToPdf}>
        Generate
      </button>
    </div>
  );
}

export default App;
Document PDF généré après ajout d’une image

Ce que fait ce code :
PdfImage.FromFile(inputImageName)lit l’image depuis le VFS et crée un objetPdfImage. Les dimensions d’origine en pixels sont disponibles viaimage.Widthetimage.Height.page.Canvas.DrawImage(...)rend l’image sur la page. Les paramètresxetydéfinissent la position du coin supérieur gauche, etwidthetheightcontrôlent la taille d’affichage.- L’image est mise à l’échelle à 60 % de sa taille d’origine (
* 0.6) et centrée horizontalement à l’aide de(page.Canvas.ClientSize.Width - width) / 2.
Ajouter une image à un PDF existant
L’ajout d’une image à un document existant suit le même modèle — la seule différence est qu’au lieu de créer un nouveau PdfDocument, vous en chargez un depuis le VFS et sélectionnez la page cible.
const addImageToExistingPdf = async () => {
  const pdfModule = window.wasmModule?.spirepdf;
  if (!pdfModule) return;

  // Load both the PDF and the image into VFS
  await window.spire.FetchFileToVFS('Report.pdf', "", `${process.env.PUBLIC_URL}/data/`);
  await window.spire.FetchFileToVFS('Logo.png', "", `${process.env.PUBLIC_URL}/data/`);

  // Load the existing PDF
  let doc = new pdfModule.PdfDocument();
  doc.LoadFromFile('Report.pdf');

  // Get the first page (or any page you want)
  let page = doc.Pages.get_Item(0);

  // Load the image and draw it at the top-right corner
  let image = pdfModule.PdfImage.FromFile('Logo.png');
  let imgWidth = 80;
  let imgHeight = 40;
  let x = page.Canvas.ClientSize.Width - imgWidth - 30; // 30pt margin from right edge
  let y = 30; // 30pt from top

  page.Canvas.DrawImage({ image: image, x: x, y: y, width: imgWidth, height: imgHeight });

  // Save and download
  const outputFileName = 'ReportWithLogo.pdf';
  doc.SaveToFile({ fileName: outputFileName });
  doc.Close();

  const fileArray = window.dotnetRuntime.Module.FS.readFile(outputFileName);
  const blob = new Blob([fileArray], { type: 'application/pdf' });
  const url = URL.createObjectURL(blob);
  const a = document.createElement('a');
  a.href = url;
  a.download = outputFileName;
  a.click();
  URL.revokeObjectURL(url);
};
Principale différence avec l’exemple du nouveau document : doc.LoadFromFile('Report.pdf') charge un PDF existant au lieu de partir de zéro, et doc.Pages.get_Item(0) récupère une page du document chargé. Le reste de la logique de dessin est identique.
Lorsque la page contient déjà une image que vous devez modifier plutôt que d’en superposer une nouvelle, consultez Remplacer et supprimer des images dans des PDF en JavaScript (React).
Mise à l’échelle et positionnement
La méthode DrawImage vous donne un contrôle total sur l’emplacement et la taille de l’image. Voici les modèles les plus courants :
Mise à l’échelle proportionnelle — multipliez les deux dimensions par le même facteur pour préserver le ratio hauteur/largeur :
let scale = 0.5; // 50% of original size
let width = image.Width * scale;
let height = image.Height * scale;
Largeur fixe, hauteur automatique — définissez la largeur et calculez la hauteur pour préserver le ratio :
let targetWidth = 200;
let width = targetWidth;
let height = image.Height * (targetWidth / image.Width);
Centrage horizontal — placez l’image à égale distance des marges gauche et droite de la page :
let x = (page.Canvas.ClientSize.Width - width) / 2;
Centrage vertical — placez l’image à égale distance du haut et du bas de la page :
let y = (page.Canvas.ClientSize.Height - height) / 2;
Position personnalisée — utilisez des coordonnées absolues (l’origine est en haut à gauche, les unités sont des points ; 1 point = 1/72 pouce) :
let x = 72;  // 1 inch from left
let y = 144; // 2 inches from top
Ajouter des images à plusieurs pages
Pour ajouter la même image (par exemple, un logo ou un filigrane) à chaque page d’un document, parcourez la collection Pages :
const addImageToAllPages = async () => {
  const pdfModule = window.wasmModule?.spirepdf;
  if (!pdfModule) return;

  await window.spire.FetchFileToVFS('Business_Data_Overview.pdf', "", `${process.env.PUBLIC_URL}/data/`);
  await window.spire.FetchFileToVFS('Logo.png', "", `${process.env.PUBLIC_URL}/data/`);

  let doc = new pdfModule.PdfDocument();
  doc.LoadFromFile('Business_Data_Overview.pdf');

  let image = pdfModule.PdfImage.FromFile('Logo.png');
  let imgWidth = 60;
  let imgHeight = 30;

  // Loop through all pages and draw the logo in the top-right corner
  for (let i = 0; i < doc.Pages.Count; i++) {
    let page = doc.Pages.get_Item(i);
    let x = page.Canvas.ClientSize.Width - imgWidth - 20;
    let y = 20;
    page.Canvas.DrawImage({ image: image, x: x, y: y, width: imgWidth, height: imgHeight });
  }

  const outputFileName = 'AllPagesWithLogo.pdf';
  doc.SaveToFile({ fileName: outputFileName });
  doc.Close();

  const fileArray = window.dotnetRuntime.Module.FS.readFile(outputFileName);
  const blob = new Blob([fileArray], { type: 'application/pdf' });
  const url = URL.createObjectURL(blob);
  const a = document.createElement('a');
  a.href = url;
  a.download = outputFileName;
  a.click();
  URL.revokeObjectURL(url);
};
Ce modèle est utile pour ajouter uniformément des filigranes, des logos d’entreprise ou des tampons de page à un document multipage.
Télécharger le résultat
Après avoir enregistré le PDF dans le VFS avec doc.SaveToFile(), vous devez le relire et déclencher son téléchargement dans le navigateur. Ce modèle en deux étapes — enregistrer dans le VFS, puis lire depuis le VFS — est utilisé dans chaque exemple Spire.PDF pour JavaScript :
// 1. Save the PDF to the VFS
doc.SaveToFile({ fileName: 'Output.pdf' });
doc.Close();

// 2. Read the file from VFS as a byte array
const fileArray = window.dotnetRuntime.Module.FS.readFile('Output.pdf');

// 3. Create a Blob and trigger download
const blob = new Blob([fileArray], { type: 'application/pdf' });
const url = URL.createObjectURL(blob);
const a = document.createElement('a');
a.href = url;
a.download = 'Output.pdf';
a.click();
URL.revokeObjectURL(url);
Le même modèle s’applique lors de l’enregistrement d’images (utilisez type: 'image/png' ou type: 'image/jpeg' dans le constructeur Blob).
FAQ
Comment contrôler précisément la position et la taille d’une image ?
Les paramètres x et y de DrawImage définissent les coordonnées du coin supérieur gauche de l’image (en points, où 1 point = 1/72 pouce). Les paramètres width et height définissent la taille d’affichage. Pour une mise à l’échelle proportionnelle, lisez image.Width et image.Height et multipliez les deux par le même facteur. Pour centrer horizontalement, calculez x = (page.Canvas.ClientSize.Width - width) / 2.
Puis-je ajouter plusieurs images sur la même page ?
Oui. Appelez page.Canvas.DrawImage(...) une fois pour chaque image, avec des coordonnées x/y différentes. Les images sont dessinées dans l’ordre où vous appelez la méthode ; ainsi, si elles se chevauchent, les images suivantes apparaissent au-dessus des précédentes.
Quels formats d’image sont pris en charge ?
Spire.PDF pour JavaScript prend en charge les formats raster courants, notamment PNG, JPEG, BMP et GIF. Utilisez PdfImage.FromFile(filename) pour charger l’un de ces formats depuis le VFS.
L’ajout d’une image affecte-t-il le contenu existant de la page ?
Non. DrawImage ajoute un nouvel objet image à la page sans modifier le texte, les graphiques ou les autres images existants. L’image est dessinée par-dessus le contenu existant aux coordonnées spécifiées. Pour extraire une image d’un PDF existant afin de la réutiliser ailleurs, consultez Extraire des images d’un PDF en JavaScript (React).
Voir aussi
Cómo agregar imágenes a un PDF en JavaScript (React)
Tabla de contenido
Cuando tu aplicación React genera PDFs sobre la marcha —una factura que necesita el logo de la empresa, un informe con un gráfico incrustado, un certificado que lleva una firma— tienes que colocar imágenes de mapa de bits en la página de forma programática. El JavaScript puro no puede escribir en la estructura interna de un PDF, y levantar un backend solo para estampar un logo es excesivo para lo que en realidad es una tarea del lado del cliente.
Spire.PDF for JavaScript compila un motor PDF completo a WebAssembly, por lo que tu aplicación React puede crear, editar y guardar PDFs enteramente en el navegador. Los archivos se mueven por un sistema de archivos virtual (VFS) dentro del navegador, por lo que no hay ningún viaje de ida y vuelta a la red. Con PdfImage y el método DrawImage del lienzo de la página, controlas exactamente dónde y con qué tamaño aparece cada imagen.
En este artículo aprenderás a:
- Cargar una imagen en el VFS y convertirla en un objeto
PdfImage - Dibujarla en una página PDF en una posición y tamaño elegidos
- Añadir imágenes tanto a documentos PDF nuevos como existentes
- Escalar, centrar y repetir imágenes en varias páginas
- Provocar la descarga en el navegador del PDF final
¿Por qué generar PDFs en el navegador?
La alternativa habitual es una biblioteca del lado del servidor (iText, PDFBox y similares): el navegador sube los archivos, el servidor los procesa y el resultado regresa. Eso funciona, pero para la inserción de imágenes añade fricción:
- Latencia — cada renderizado espera una ida y vuelta a la red, algo que penaliza en el caso de archivos grandes o conexiones lentas.
- Privacidad — los documentos e imágenes de origen salen del equipo del usuario, un problema para cualquier información sensible.
- Costo — el renderizado de PDF consume mucha CPU y no escala de forma gratuita.
Con Spire.PDF for JavaScript, todo el trabajo se ejecuta en el navegador gracias a WebAssembly. Una vez cargado el módulo WASM, el renderizado es local e instantáneo, el archivo nunca sale del dispositivo y no pagas nada por tiempo de servidor.
Requisitos previos
Este tutorial asume que ya tienes un proyecto React con Spire.PDF for JavaScript instalado y el módulo WASM inicializado. Si no es así, sigue primero la guía Integración de Spire.PDF for JavaScript en un proyecto React.
Necesitarás:
- Los archivos
spire.pdf.base.jsyspire.pdf.base.wasmen la carpetapublicde tu proyecto - El módulo WASM accesible a través de
window.wasmModule.spirepdf - Una imagen para incrustar (PNG, JPEG, etc.) colocada donde el VFS pueda cargarla
Añadir una imagen a un PDF nuevo
El escenario más sencillo: crear un documento PDF nuevo y dibujar una imagen en su primera página. Los pasos principales son:
- Cargar la imagen en el VFS usando
window.spire.FetchFileToVFS - Crear un
PdfDocumenty añadir una página en blanco - Crear un
PdfImagea partir del archivo cargado conPdfImage.FromFile - Dibujar la imagen en el lienzo de la página con
page.Canvas.DrawImage - Guardar y descargar el resultado
function App() {
  const addImageToPdf = async () => {
    // Get the Spire.PDF WASM module
    const pdfModule = window.wasmModule?.spirepdf;

    // Check if the WASM module is ready
    if (!pdfModule) {
      alert('Spire.PDF is not ready yet');
      return;
    }

    // Load the image into VFS
    const inputImageName = 'TreePic.png';
    await window.spire.FetchFileToVFS(inputImageName, "", `${process.env.PUBLIC_URL}/data/`);

    // Create a PdfDocument object
    let doc = new pdfModule.PdfDocument();

    // Add a page
    let page = doc.Pages.Add();

    // Load the image and scale its display size proportionally
    let image = pdfModule.PdfImage.FromFile(inputImageName);
    let width = image.Width * 0.6;
    let height = image.Height * 0.6;

    // Calculate the horizontal center position and set the vertical position
    let x = (page.Canvas.ClientSize.Width - width) / 2;
    let y = 60;

    // Draw the image at the specified position on the page
    page.Canvas.DrawImage({ image: image, x: x, y: y, width: width, height: height });

    // Define the output file name in PDF format
    const outputFileName = 'AddImage.pdf';

    // Save as PDF format
    doc.SaveToFile({ fileName: outputFileName });
    doc.Close();

    // Read the generated PDF file from VFS and trigger download
    const fileArray = window.dotnetRuntime.Module.FS.readFile(outputFileName);
    const blob = new Blob([fileArray], { type: 'application/pdf' });
    const url = URL.createObjectURL(blob);
    const a = document.createElement('a');
    a.href = url;
    a.download = outputFileName;
    a.click();
    URL.revokeObjectURL(url);
  };

  return (
    <div style={{ textAlign: 'center', height: '300px' }}>
      <h1>Add Image To PDF</h1>
      <button onClick={addImageToPdf}>
        Generate
      </button>
    </div>
  );
}

export default App;
Documento PDF generado después de añadir una imagen
Qué hace el código:
PdfImage.FromFile(inputImageName)lee la imagen del VFS y crea un objetoPdfImage. Las dimensiones originales en píxeles están disponibles medianteimage.Widthyimage.Height.page.Canvas.DrawImage(...)dibuja la imagen en la página. Los parámetrosxeyestablecen la posición de la esquina superior izquierda, ywidthyheightcontrolan el tamaño de visualización.- La imagen se escala al 60% de su tamaño original (
* 0.6) y se centra horizontalmente usando(page.Canvas.ClientSize.Width - width) / 2.
Añadir una imagen a un PDF existente
Añadir una imagen a un documento existente sigue el mismo patrón: la única diferencia es que, en lugar de crear un PdfDocument nuevo, cargas uno desde el VFS y seleccionas la página de destino.
const addImageToExistingPdf = async () => {
  const pdfModule = window.wasmModule?.spirepdf;
  if (!pdfModule) return;

  // Load both the PDF and the image into VFS
  await window.spire.FetchFileToVFS('Report.pdf', "", `${process.env.PUBLIC_URL}/data/`);
  await window.spire.FetchFileToVFS('Logo.png', "", `${process.env.PUBLIC_URL}/data/`);

  // Load the existing PDF
  let doc = new pdfModule.PdfDocument();
  doc.LoadFromFile('Report.pdf');

  // Get the first page (or any page you want)
  let page = doc.Pages.get_Item(0);

  // Load the image and draw it at the top-right corner
  let image = pdfModule.PdfImage.FromFile('Logo.png');
  let imgWidth = 80;
  let imgHeight = 40;
  let x = page.Canvas.ClientSize.Width - imgWidth - 30; // 30pt margin from right edge
  let y = 30; // 30pt from top

  page.Canvas.DrawImage({ image: image, x: x, y: y, width: imgWidth, height: imgHeight });

  // Save and download
  const outputFileName = 'ReportWithLogo.pdf';
  doc.SaveToFile({ fileName: outputFileName });
  doc.Close();

  const fileArray = window.dotnetRuntime.Module.FS.readFile(outputFileName);
  const blob = new Blob([fileArray], { type: 'application/pdf' });
  const url = URL.createObjectURL(blob);
  const a = document.createElement('a');
  a.href = url;
  a.download = outputFileName;
  a.click();
  URL.revokeObjectURL(url);
};
Diferencia clave con respecto al ejemplo de documento nuevo: doc.LoadFromFile('Report.pdf') carga un PDF existente en lugar de empezar de cero, y doc.Pages.get_Item(0) obtiene una página del documento cargado. El resto de la lógica de dibujo es idéntica.
Si la página ya contiene una imagen que necesitas cambiar en lugar de superponer una nueva, consulta Reemplazo y eliminación de imágenes de PDF en JavaScript (React).
Escalado y posición
El método DrawImage te da control total sobre dónde y con qué tamaño aparece la imagen. Estos son los patrones más comunes:
Escalado proporcional — multiplica ambas dimensiones por el mismo factor para mantener la relación de aspecto:
let scale = 0.5; // 50% of original size
let width = image.Width * scale;
let height = image.Height * scale;
Ancho fijo, altura automática — establece el ancho y calcula la altura para mantener la relación de aspecto:
let targetWidth = 200;
let width = targetWidth;
let height = image.Height * (targetWidth / image.Width);
Centrado horizontal — coloca la imagen a la misma distancia de los márgenes izquierdo y derecho de la página:
let x = (page.Canvas.ClientSize.Width - width) / 2;
Centrado vertical — coloca la imagen a la misma distancia de la parte superior e inferior de la página:
let y = (page.Canvas.ClientSize.Height - height) / 2;
Posición personalizada — usa coordenadas absolutas (el origen está en la esquina superior izquierda; las unidades son puntos; 1 punto = 1/72 pulgada):
let x = 72;  // 1 inch from left
let y = 144; // 2 inches from top
Añadir imágenes a varias páginas
Para añadir la misma imagen (por ejemplo, un logo o una marca de agua) a todas las páginas de un documento, recorre la colección Pages:
const addImageToAllPages = async () => {
  const pdfModule = window.wasmModule?.spirepdf;
  if (!pdfModule) return;

  await window.spire.FetchFileToVFS('Business_Data_Overview.pdf', "", `${process.env.PUBLIC_URL}/data/`);
  await window.spire.FetchFileToVFS('Logo.png', "", `${process.env.PUBLIC_URL}/data/`);

  let doc = new pdfModule.PdfDocument();
  doc.LoadFromFile('Business_Data_Overview.pdf');

  let image = pdfModule.PdfImage.FromFile('Logo.png');
  let imgWidth = 60;
  let imgHeight = 30;

  // Loop through all pages and draw the logo in the top-right corner
  for (let i = 0; i < doc.Pages.Count; i++) {
    let page = doc.Pages.get_Item(i);
    let x = page.Canvas.ClientSize.Width - imgWidth - 20;
    let y = 20;
    page.Canvas.DrawImage({ image: image, x: x, y: y, width: imgWidth, height: imgHeight });
  }

  const outputFileName = 'AllPagesWithLogo.pdf';
  doc.SaveToFile({ fileName: outputFileName });
  doc.Close();

  const fileArray = window.dotnetRuntime.Module.FS.readFile(outputFileName);
  const blob = new Blob([fileArray], { type: 'application/pdf' });
  const url = URL.createObjectURL(blob);
  const a = document.createElement('a');
  a.href = url;
  a.download = outputFileName;
  a.click();
  URL.revokeObjectURL(url);
};
Este patrón es útil para añadir marcas de agua, logos corporativos o sellos de página de manera uniforme a un documento con varias páginas.
Descargar el resultado
Después de guardar el PDF en el VFS con doc.SaveToFile(), debes leerlo de nuevo y activar la descarga en el navegador. Este patrón de dos pasos —guardar en el VFS y luego leer desde el VFS— se usa en todos los ejemplos de Spire.PDF for JavaScript:
// 1. Save the PDF to the VFS
doc.SaveToFile({ fileName: 'Output.pdf' });
doc.Close();

// 2. Read the file from VFS as a byte array
const fileArray = window.dotnetRuntime.Module.FS.readFile('Output.pdf');

// 3. Create a Blob and trigger download
const blob = new Blob([fileArray], { type: 'application/pdf' });
const url = URL.createObjectURL(blob);
const a = document.createElement('a');
a.href = url;
a.download = 'Output.pdf';
a.click();
URL.revokeObjectURL(url);
El mismo patrón se aplica al guardar imágenes (usa type: 'image/png' o type: 'image/jpeg' en el constructor del Blob).
Preguntas frecuentes
¿Cómo controlo con precisión la posición y el tamaño de una imagen?
Los parámetros x e y de DrawImage establecen las coordenadas de la esquina superior izquierda de la imagen (en puntos, donde 1 punto = 1/72 pulgada). Los parámetros width y height definen el tamaño de visualización. Para escalar proporcionalmente, lee image.Width y image.Height y multiplica ambos por el mismo factor. Para centrar horizontalmente, calcula x = (page.Canvas.ClientSize.Width - width) / 2.
¿Puedo añadir varias imágenes a la misma página?
Sí. Llama a page.Canvas.DrawImage(...) una vez por cada imagen, con coordenadas x/y diferentes. Las imágenes se dibujan en el orden en que llamas al método, por lo que las imágenes posteriores aparecen encima de las anteriores si se superponen.
¿Qué formatos de imagen son compatibles?
Spire.PDF for JavaScript admite formatos de mapa de bits comunes, incluyendo PNG, JPEG, BMP y GIF. Usa PdfImage.FromFile(filename) para cargar cualquiera de ellos desde el VFS.
¿Afecta añadir una imagen al contenido existente de la página?
No. DrawImage añade un nuevo objeto de imagen a la página sin modificar el texto, los gráficos ni otras imágenes existentes. La imagen se dibuja encima del contenido existente en las coordenadas especificadas. Para extraer una imagen de un PDF existente y poder reutilizarla en otro lugar, consulta Extracción de imágenes de un PDF en JavaScript (React).
Ver también
So fügen Sie Bilder zu einer PDF in JavaScript (React) hinzu
Inhaltsverzeichnis
Wenn Ihre React-App PDFs spontan erstellt – eine Rechnung mit Firmenlogo, ein Bericht mit eingebettetem Diagramm, ein Zertifikat mit Signatur – müssen Sie Rasterbilder programmatisch auf der Seite platzieren. Reines JavaScript kann nicht in die interne Struktur einer PDF-Datei schreiben, und nur für das Aufbringen eines Logos einen Backend-Server aufzusetzen, ist für eine eigentlich clientseitige Aufgabe übertrieben.
Spire.PDF for JavaScript kompiliert eine vollständige PDF-Engine zu WebAssembly, sodass Ihre React-App PDFs vollständig im Browser erstellen, bearbeiten und speichern kann. Dateien werden über ein In-Browser-Virtual-Dateisystem (VFS) bewegt, sodass kein Netzwerk-Roundtrip nötig ist. Mit PdfImage und der DrawImage-Methode der Seiten-Canvas legen Sie genau fest, wo und in welcher Größe jedes Bild erscheint.
In diesem Artikel erfahren Sie, wie Sie:
- Ein Bild in das VFS laden und in ein
PdfImage-Objekt umwandeln - Es an einer gewählten Position und Größe auf einer PDF-Seite zeichnen
- Bilder sowohl zu brandneuen als auch zu vorhandenen PDF-Dokumenten hinzufügen
- Bilder über mehrere Seiten hinweg skalieren, zentrieren und wiederholen
- Einen Browser-Download des fertigen PDFs auslösen
Warum PDFs im Browser erzeugen
Die übliche Alternative ist eine serverseitige Bibliothek (iText, PDFBox und Ähnliche): Der Browser lädt die Assets hoch, der Server rendert und das Ergebnis kommt zurück. Das funktioniert, bringt aber beim Aufbringen von Bildern zusätzliche Hürden mit sich:
- Latenz – jedes Rendern wartet auf einen Roundtrip, was bei großen Dateien oder langsamen Verbindungen schmerzt.
- Datenschutz – Quelldokumente und Bilder verlassen den Rechner des Benutzers, ein Problem bei sensiblen Inhalten.
- Kosten – PDF-Rendering ist rechenintensiv und lässt sich nicht kostenlos skalieren.
Mit Spire.PDF for JavaScript läuft die gesamte Aufgabe per WebAssembly im Browser. Sobald das WASM-Modul geladen ist, erfolgt das Rendern lokal und sofort; die Datei verlässt das Gerät nicht und Sie zahlen keine Serverzeit.
Voraussetzungen
Dieser Leitfaden setzt voraus, dass Sie bereits ein React-Projekt mit installiertem Spire.PDF for JavaScript und initialisiertem WASM-Modul haben. Falls nicht, folgen Sie zuerst Integrieren von Spire.PDF for JavaScript in ein React-Projekt.
Sie benötigen:
- Die Dateien
spire.pdf.base.jsundspire.pdf.base.wasmimpublic-Ordner Ihres Projekts - Das über
window.wasmModule.spirepdferreichbare WASM-Modul - Ein einzubettendes Bild (PNG, JPEG usw.), das an einem Ort abgelegt ist, von dem das VFS es laden kann
Ein Bild zu einem neuen PDF hinzufügen
Das einfachste Szenario: Erstellen Sie ein brandneues PDF-Dokument und zeichnen Sie ein Bild auf seine erste Seite. Die wichtigsten Schritte sind:
- Laden Sie das Bild in das VFS mit
window.spire.FetchFileToVFS - Erstellen Sie ein
PdfDocumentund fügen Sie eine leere Seite hinzu - Erstellen Sie aus der geladenen Datei ein
PdfImagemitPdfImage.FromFile - Zeichnen Sie das Bild mit
page.Canvas.DrawImageauf die Seiten-Canvas - Speichern und laden Sie das Ergebnis herunter
function App() {
  const addImageToPdf = async () => {
    // Get the Spire.PDF WASM module
    const pdfModule = window.wasmModule?.spirepdf;

    // Check if the WASM module is ready
    if (!pdfModule) {
      alert('Spire.PDF is not ready yet');
      return;
    }

    // Load the image into VFS
    const inputImageName = 'TreePic.png';
    await window.spire.FetchFileToVFS(inputImageName, "", `${process.env.PUBLIC_URL}/data/`);

    // Create a PdfDocument object
    let doc = new pdfModule.PdfDocument();

    // Add a page
    let page = doc.Pages.Add();

    // Load the image and scale its display size proportionally
    let image = pdfModule.PdfImage.FromFile(inputImageName);
    let width = image.Width * 0.6;
    let height = image.Height * 0.6;

    // Calculate the horizontal center position and set the vertical position
    let x = (page.Canvas.ClientSize.Width - width) / 2;
    let y = 60;

    // Draw the image at the specified position on the page
    page.Canvas.DrawImage({ image: image, x: x, y: y, width: width, height: height });

    // Define the output file name in PDF format
    const outputFileName = 'AddImage.pdf';

    // Save as PDF format
    doc.SaveToFile({ fileName: outputFileName });
    doc.Close();

    // Read the generated PDF file from VFS and trigger download
    const fileArray = window.dotnetRuntime.Module.FS.readFile(outputFileName);
    const blob = new Blob([fileArray], { type: 'application/pdf' });
    const url = URL.createObjectURL(blob);
    const a = document.createElement('a');
    a.href = url;
    a.download = outputFileName;
    a.click();
    URL.revokeObjectURL(url);
  };

  return (
    <div style={{ textAlign: 'center', height: '300px' }}>
      <h1>Add Image To PDF</h1>
      <button onClick={addImageToPdf}>
        Generate
      </button>
    </div>
  );
}

export default App;
PDF-Dokument, das nach dem Hinzufügen eines Bildes erzeugt wurde
Was der Code bewirkt:
PdfImage.FromFile(inputImageName)liest das Bild aus dem VFS und erstellt einPdfImage-Objekt. Die ursprünglichen Pixelmaße sind überimage.Widthundimage.Heightverfügbar.page.Canvas.DrawImage(...)rendert das Bild auf die Seite. Die Parameterxundysetzen die Position der oberen linken Ecke, undwidthundheightsteuern die Anzeigegröße.- Das Bild wird auf 60 % seiner Originalgröße skaliert (
* 0.6) und mit(page.Canvas.ClientSize.Width - width) / 2horizontal zentriert.
Ein Bild zu einem vorhandenen PDF hinzufügen
Das Hinzufügen eines Bilds zu einem vorhandenen Dokument folgt demselben Muster – der einzige Unterschied besteht darin, dass Sie statt eines neuen PdfDocument ein vorhandenes aus dem VFS laden und die Zielseite auswählen.
const addImageToExistingPdf = async () => {
  const pdfModule = window.wasmModule?.spirepdf;
  if (!pdfModule) return;

  // Load both the PDF and the image into VFS
  await window.spire.FetchFileToVFS('Report.pdf', "", `${process.env.PUBLIC_URL}/data/`);
  await window.spire.FetchFileToVFS('Logo.png', "", `${process.env.PUBLIC_URL}/data/`);

  // Load the existing PDF
  let doc = new pdfModule.PdfDocument();
  doc.LoadFromFile('Report.pdf');

  // Get the first page (or any page you want)
  let page = doc.Pages.get_Item(0);

  // Load the image and draw it at the top-right corner
  let image = pdfModule.PdfImage.FromFile('Logo.png');
  let imgWidth = 80;
  let imgHeight = 40;
  let x = page.Canvas.ClientSize.Width - imgWidth - 30; // 30pt margin from right edge
  let y = 30; // 30pt from top

  page.Canvas.DrawImage({ image: image, x: x, y: y, width: imgWidth, height: imgHeight });

  // Save and download
  const outputFileName = 'ReportWithLogo.pdf';
  doc.SaveToFile({ fileName: outputFileName });
  doc.Close();

  const fileArray = window.dotnetRuntime.Module.FS.readFile(outputFileName);
  const blob = new Blob([fileArray], { type: 'application/pdf' });
  const url = URL.createObjectURL(blob);
  const a = document.createElement('a');
  a.href = url;
  a.download = outputFileName;
  a.click();
  URL.revokeObjectURL(url);
};
Hauptunterschied zum Beispiel für neue Dokumente: doc.LoadFromFile('Report.pdf') lädt ein vorhandenes PDF, statt bei null zu beginnen, und doc.Pages.get_Item(0) ruft eine Seite aus dem geladenen Dokument ab. Die übrige Zeichenlogik ist identisch.
Wenn die Seite bereits ein Bild enthält, das Sie ändern müssen, statt ein neues darüberzulegen, lesen Sie Ersetzen und Entfernen von Bildern aus PDFs in JavaScript (React).
Skalierung und Positionierung
Die DrawImage-Methode bietet Ihnen volle Kontrolle darüber, wo und wie groß das Bild erscheint. Hier sind die gängigsten Muster:
Proportionale Skalierung – multiplizieren Sie beide Abmessungen mit demselben Faktor, um das Seitenverhältnis beizubehalten:
let scale = 0.5; // 50% of original size
let width = image.Width * scale;
let height = image.Height * scale;
Feste Breite, automatische Höhe – Breite festlegen und Höhe so berechnen, dass das Seitenverhältnis erhalten bleibt:
let targetWidth = 200;
let width = targetWidth;
let height = image.Height * (targetWidth / image.Width);
Horizontale Zentrierung – Bild mit gleichem Abstand zu den linken und rechten Seitenrändern platzieren:
let x = (page.Canvas.ClientSize.Width - width) / 2;
Vertikale Zentrierung – Bild mit gleichem Abstand zu oben und unten auf der Seite platzieren:
let y = (page.Canvas.ClientSize.Height - height) / 2;
Benutzerdefinierte Position – absolute Koordinaten verwenden (Ursprung ist oben links, Einheiten sind Punkte; 1 Punkt = 1/72 Zoll):
let x = 72;  // 1 inch from left
let y = 144; // 2 inches from top
Bilder zu mehreren Seiten hinzufügen
Um dasselbe Bild (z. B. ein Logo oder Wasserzeichen) auf jeder Seite eines Dokuments zu platzieren, durchlaufen Sie die Pages-Auflistung in einer Schleife:
const addImageToAllPages = async () => {
  const pdfModule = window.wasmModule?.spirepdf;
  if (!pdfModule) return;

  await window.spire.FetchFileToVFS('Business_Data_Overview.pdf', "", `${process.env.PUBLIC_URL}/data/`);
  await window.spire.FetchFileToVFS('Logo.png', "", `${process.env.PUBLIC_URL}/data/`);

  let doc = new pdfModule.PdfDocument();
  doc.LoadFromFile('Business_Data_Overview.pdf');

  let image = pdfModule.PdfImage.FromFile('Logo.png');
  let imgWidth = 60;
  let imgHeight = 30;

  // Loop through all pages and draw the logo in the top-right corner
  for (let i = 0; i < doc.Pages.Count; i++) {
    let page = doc.Pages.get_Item(i);
    let x = page.Canvas.ClientSize.Width - imgWidth - 20;
    let y = 20;
    page.Canvas.DrawImage({ image: image, x: x, y: y, width: imgWidth, height: imgHeight });
  }

  const outputFileName = 'AllPagesWithLogo.pdf';
  doc.SaveToFile({ fileName: outputFileName });
  doc.Close();

  const fileArray = window.dotnetRuntime.Module.FS.readFile(outputFileName);
  const blob = new Blob([fileArray], { type: 'application/pdf' });
  const url = URL.createObjectURL(blob);
  const a = document.createElement('a');
  a.href = url;
  a.download = outputFileName;
  a.click();
  URL.revokeObjectURL(url);
};
Dieses Muster ist nützlich, um Wasserzeichen, Firmenlogos oder Seitenstempel gleichmäßig über ein mehrseitiges Dokument zu verteilen.
Ergebnis herunterladen
Nachdem Sie das PDF mit doc.SaveToFile() im VFS gespeichert haben, müssen Sie es zurücklesen und einen Browser-Download auslösen. Dieses zweistufige Muster – erst ins VFS speichern, dann aus dem VFS lesen – wird in jedem Spire.PDF-for-JavaScript-Beispiel verwendet:
// 1. Save the PDF to the VFS
doc.SaveToFile({ fileName: 'Output.pdf' });
doc.Close();

// 2. Read the file from VFS as a byte array
const fileArray = window.dotnetRuntime.Module.FS.readFile('Output.pdf');

// 3. Create a Blob and trigger download
const blob = new Blob([fileArray], { type: 'application/pdf' });
const url = URL.createObjectURL(blob);
const a = document.createElement('a');
a.href = url;
a.download = 'Output.pdf';
a.click();
URL.revokeObjectURL(url);
Das gleiche Muster gilt beim Speichern von Bildern (verwenden Sie type: 'image/png' oder type: 'image/jpeg' im Blob-Konstruktor).
FAQ
Wie kann ich Position und Größe eines Bildes präzise steuern?
Die Parameter x und y von DrawImage legen die Koordinaten der oberen linken Ecke des Bildes fest (in Punkten, wobei 1 Punkt = 1/72 Zoll). Die Parameter width und height bestimmen die Anzeigegröße. Für eine proportionale Skalierung lesen Sie image.Width und image.Height und multiplizieren beide mit demselben Faktor. Für die horizontale Zentrierung berechnen Sie x = (page.Canvas.ClientSize.Width - width) / 2.
Kann ich einer Seite mehrere Bilder hinzufügen?
Ja. Rufen Sie page.Canvas.DrawImage(...) für jedes Bild einmal mit unterschiedlichen x/y-Koordinaten auf. Die Bilder werden in der Reihenfolge gezeichnet, in der Sie die Methode aufrufen, sodass spätere Bilder über früheren liegen, wenn sie sich überlappen.
Welche Bildformate werden unterstützt?
Spire.PDF for JavaScript unterstützt gängige Rasterformate wie PNG, JPEG, BMP und GIF. Verwenden Sie PdfImage.FromFile(filename), um eines dieser Formate aus dem VFS zu laden.
Beeinflusst das Hinzufügen eines Bildes vorhandene Inhalte auf der Seite?
Nein. DrawImage fügt der Seite ein neues Bildobjekt hinzu, ohne vorhandenen Text, Grafiken oder andere Bilder zu verändern. Das Bild wird an den angegebenen Koordinaten über den vorhandenen Inhalt gezeichnet. Wenn Sie ein Bild aus einem vorhandenen PDF herauslösen möchten, um es anderweitig wiederzuverwenden, lesen Sie Bilder aus einem PDF in JavaScript (React) extrahieren.
Siehe auch
Как добавить изображения в PDF на JavaScript (React)
Оглавление
Когда ваше React-приложение создаёт PDF-файлы на лету — счёт-фактуру, на которую нужно поместить логотип компании, отчёт со встроенной диаграммой или сертификат с подписью, — вам приходится программно размещать растровые изображения на странице. Обычный JavaScript не умеет записывать данные во внутреннюю структуру PDF, а поднимать бэкенд только ради добавления логотипа — избыточно для задачи, которая на самом деле решается на клиентской стороне.
Spire.PDF для JavaScript компилирует полноценный PDF-движок в WebAssembly, поэтому ваше React-приложение может создавать, редактировать и сохранять PDF-файлы полностью в браузере. Файлы передаются через встроенную в браузер виртуальную файловую систему (VFS), благодаря чему не требуется сетевой обмен данными. Используя PdfImage и метод DrawImage на холсте страницы, вы управляете точным расположением и размером каждого изображения.
В этой статье вы узнаете, как:
- Загрузить изображение в VFS и преобразовать его в объект
PdfImage - Нарисовать его на странице PDF в выбранной позиции и с заданным размером
- Добавлять изображения как в новые, так и в существующие PDF-документы
- Масштабировать, центрировать и повторять изображения на нескольких страницах
- Запустить скачивание готового PDF-файла в браузере
Зачем создавать PDF-файлы в браузере
Обычная альтернатива — серверная библиотека (iText, PDFBox и т. п.): браузер загружает ресурсы на сервер, сервер выполняет рендеринг, а результат возвращается обратно. Такой подход работает, но при встраивании изображений создаёт дополнительные трудности:
- Задержка — каждый рендер требует обмена данными по сети, что особенно ощутимо для больших файлов или медленных соединений.
- Конфиденциальность — исходные документы и изображения покидают устройство пользователя, что критично для любых чувствительных данных.
- Стоимость — рендеринг PDF требует значительных вычислительных ресурсов и не масштабируется бесплатно.
С помощью Spire.PDF для JavaScript вся задача выполняется в браузере через WebAssembly. После загрузки WASM-модуля рендеринг происходит локально и мгновенно, файл не покидает устройство, а серверное время не расходуется.
Предварительные требования
В этом руководстве предполагается, что у вас уже создан React-проект с установленным Spire.PDF для JavaScript и инициализированным WASM-модулем. Если нет, сначала выполните инструкции из статьи Интеграция Spire.PDF для JavaScript в проект React.
Вам понадобятся:
- Файлы
spire.pdf.base.jsиspire.pdf.base.wasmв папкеpublicвашего проекта - Модуль WASM, доступный через
window.wasmModule.spirepdf - Изображение, которое нужно встроить (PNG, JPEG и т. д.), расположенное там, откуда VFS сможет его загрузить
Добавление изображения в новый PDF
Самый простой сценарий: создать абсолютно новый PDF-документ и нарисовать изображение на его первой странице. Основные шаги выглядят так:
- Загрузите изображение в VFS, используя
window.spire.FetchFileToVFS - Создайте объект
PdfDocumentи добавьте пустую страницу - Создайте объект
PdfImageиз загруженного файла с помощьюPdfImage.FromFile - Нарисуйте изображение на холсте страницы с помощью
page.Canvas.DrawImage - Сохраните и скачайте результат
function App() {
  const addImageToPdf = async () => {
    // Get the Spire.PDF WASM module
    const pdfModule = window.wasmModule?.spirepdf;

    // Check if the WASM module is ready
    if (!pdfModule) {
      alert('Spire.PDF is not ready yet');
      return;
    }

    // Load the image into VFS
    const inputImageName = 'TreePic.png';
    await window.spire.FetchFileToVFS(inputImageName, "", `${process.env.PUBLIC_URL}/data/`);

    // Create a PdfDocument object
    let doc = new pdfModule.PdfDocument();

    // Add a page
    let page = doc.Pages.Add();

    // Load the image and scale its display size proportionally
    let image = pdfModule.PdfImage.FromFile(inputImageName);
    let width = image.Width * 0.6;
    let height = image.Height * 0.6;

    // Calculate the horizontal center position and set the vertical position
    let x = (page.Canvas.ClientSize.Width - width) / 2;
    let y = 60;

    // Draw the image at the specified position on the page
    page.Canvas.DrawImage({ image: image, x: x, y: y, width: width, height: height });

    // Define the output file name in PDF format
    const outputFileName = 'AddImage.pdf';

    // Save as PDF format
    doc.SaveToFile({ fileName: outputFileName });
    doc.Close();

    // Read the generated PDF file from VFS and trigger download
    const fileArray = window.dotnetRuntime.Module.FS.readFile(outputFileName);
    const blob = new Blob([fileArray], { type: 'application/pdf' });
    const url = URL.createObjectURL(blob);
    const a = document.createElement('a');
    a.href = url;
    a.download = outputFileName;
    a.click();
    URL.revokeObjectURL(url);
  };

  return (
    <div style={{ textAlign: 'center', height: '300px' }}>
      <h1>Add Image To PDF</h1>
      <button onClick={addImageToPdf}>
        Generate
      </button>
    </div>
  );
}

export default App;
PDF-документ, созданный после добавления изображения
Что делает этот код:
PdfImage.FromFile(inputImageName)читает изображение из VFS и создаёт объектPdfImage. Исходные размеры в пикселях доступны черезimage.Widthиimage.Height.page.Canvas.DrawImage(...)выводит изображение на страницу. Параметрыxиyзадают позицию верхнего левого угла, аwidthиheight— размер отображения.- Изображение масштабируется до 60% исходного размера (
* 0.6) и центрируется по горизонтали с помощью выражения(page.Canvas.ClientSize.Width - width) / 2.
Добавление изображения в существующий PDF
Добавление изображения в существующий документ выполняется по той же схеме — единственное отличие состоит в том, что вместо создания нового PdfDocument вы загружаете документ из VFS и выбираете нужную страницу.
const addImageToExistingPdf = async () => {
  const pdfModule = window.wasmModule?.spirepdf;
  if (!pdfModule) return;

  // Load both the PDF and the image into VFS
  await window.spire.FetchFileToVFS('Report.pdf', "", `${process.env.PUBLIC_URL}/data/`);
  await window.spire.FetchFileToVFS('Logo.png', "", `${process.env.PUBLIC_URL}/data/`);

  // Load the existing PDF
  let doc = new pdfModule.PdfDocument();
  doc.LoadFromFile('Report.pdf');

  // Get the first page (or any page you want)
  let page = doc.Pages.get_Item(0);

  // Load the image and draw it at the top-right corner
  let image = pdfModule.PdfImage.FromFile('Logo.png');
  let imgWidth = 80;
  let imgHeight = 40;
  let x = page.Canvas.ClientSize.Width - imgWidth - 30; // 30pt margin from right edge
  let y = 30; // 30pt from top

  page.Canvas.DrawImage({ image: image, x: x, y: y, width: imgWidth, height: imgHeight });

  // Save and download
  const outputFileName = 'ReportWithLogo.pdf';
  doc.SaveToFile({ fileName: outputFileName });
  doc.Close();

  const fileArray = window.dotnetRuntime.Module.FS.readFile(outputFileName);
  const blob = new Blob([fileArray], { type: 'application/pdf' });
  const url = URL.createObjectURL(blob);
  const a = document.createElement('a');
  a.href = url;
  a.download = outputFileName;
  a.click();
  URL.revokeObjectURL(url);
};
Ключевое отличие от примера с новым документом: doc.LoadFromFile('Report.pdf') загружает существующий PDF вместо создания пустого документа, а doc.Pages.get_Item(0) получает страницу из загруженного документа. Вся остальная логика отрисовки идентична.
Если на странице уже есть изображение, которое нужно изменить, а не наложить поверх новое, обратитесь к статье Замена и удаление изображений из PDF на JavaScript (React).
Масштабирование и позиционирование
Метод DrawImage даёт полный контроль над тем, где и в каком размере будет отображаться изображение. Ниже приведены самые частые сценарии:
Пропорциональное масштабирование — умножьте обе стороны на один и тот же коэффициент, чтобы сохранить пропорции:
let scale = 0.5; // 50% of original size
let width = image.Width * scale;
let height = image.Height * scale;
Фиксированная ширина и автоматическая высота — задайте ширину и вычислите высоту, сохранив соотношение сторон:
let targetWidth = 200;
let width = targetWidth;
let height = image.Height * (targetWidth / image.Width);
Центрирование по горизонтали — поместите изображение на одинаковом расстоянии от левого и правого краёв страницы:
let x = (page.Canvas.ClientSize.Width - width) / 2;
Центрирование по вертикали — поместите изображение на одинаковом расстоянии от верхнего и нижнего краёв страницы:
let y = (page.Canvas.ClientSize.Height - height) / 2;
Произвольное положение — используйте абсолютные координаты (начало координат — в верхнем левом углу, единицы измерения — пункты; 1 пункт = 1/72 дюйма):
let x = 72;  // 1 inch from left
let y = 144; // 2 inches from top
Добавление изображений на несколько страниц
Чтобы добавить одинаковое изображение (например, логотип или водяной знак) на каждую страницу документа, выполните перебор коллекции Pages:
const addImageToAllPages = async () => {
  const pdfModule = window.wasmModule?.spirepdf;
  if (!pdfModule) return;

  await window.spire.FetchFileToVFS('Business_Data_Overview.pdf', "", `${process.env.PUBLIC_URL}/data/`);
  await window.spire.FetchFileToVFS('Logo.png', "", `${process.env.PUBLIC_URL}/data/`);

  let doc = new pdfModule.PdfDocument();
  doc.LoadFromFile('Business_Data_Overview.pdf');

  let image = pdfModule.PdfImage.FromFile('Logo.png');
  let imgWidth = 60;
  let imgHeight = 30;

  // Loop through all pages and draw the logo in the top-right corner
  for (let i = 0; i < doc.Pages.Count; i++) {
    let page = doc.Pages.get_Item(i);
    let x = page.Canvas.ClientSize.Width - imgWidth - 20;
    let y = 20;
    page.Canvas.DrawImage({ image: image, x: x, y: y, width: imgWidth, height: imgHeight });
  }

  const outputFileName = 'AllPagesWithLogo.pdf';
  doc.SaveToFile({ fileName: outputFileName });
  doc.Close();

  const fileArray = window.dotnetRuntime.Module.FS.readFile(outputFileName);
  const blob = new Blob([fileArray], { type: 'application/pdf' });
  const url = URL.createObjectURL(blob);
  const a = document.createElement('a');
  a.href = url;
  a.download = outputFileName;
  a.click();
  URL.revokeObjectURL(url);
};
Этот приём удобно использовать для добавления водяных знаков, логотипов компании или штампов на все страницы многостраничного PDF-документа.
Скачивание результата
После сохранения PDF в VFS с помощью doc.SaveToFile() необходимо прочитать его обратно и инициировать скачивание в браузере. Эта двухэтапная схема — сохранение в VFS, затем чтение из VFS — используется во всех примерах Spire.PDF для JavaScript:
// 1. Save the PDF to the VFS
doc.SaveToFile({ fileName: 'Output.pdf' });
doc.Close();

// 2. Read the file from VFS as a byte array
const fileArray = window.dotnetRuntime.Module.FS.readFile('Output.pdf');

// 3. Create a Blob and trigger download
const blob = new Blob([fileArray], { type: 'application/pdf' });
const url = URL.createObjectURL(blob);
const a = document.createElement('a');
a.href = url;
a.download = 'Output.pdf';
a.click();
URL.revokeObjectURL(url);
Та же схема применяется при сохранении изображений (в конструкторе Blob укажите type: 'image/png' или type: 'image/jpeg').
Часто задаваемые вопросы
Как точно контролировать положение и размер изображения?
Параметры x и y метода DrawImage задают координаты верхнего левого угла изображения (в пунктах, где 1 пункт = 1/72 дюйма). Параметры width и height задают размер отображения. Чтобы масштабировать пропорционально, прочитайте image.Width и image.Height и умножьте оба значения на один и тот же коэффициент. Для центрирования по горизонтали вычислите x = (page.Canvas.ClientSize.Width - width) / 2.
Можно ли добавить на одну страницу несколько изображений?
Да. Вызывайте page.Canvas.DrawImage(...) для каждого изображения по отдельности, задавая разные координаты x/y. Изображения рисуются в том порядке, в котором вы вызываете метод, поэтому при перекрытии последующие изображения будут поверх предыдущих.
Какие форматы изображений поддерживаются?
Spire.PDF для JavaScript поддерживает распространённые растровые форматы: PNG, JPEG, BMP и GIF. Для загрузки любого из них из VFS используйте PdfImage.FromFile(filename).
Влияет ли добавление изображения на существующее содержимое страницы?
Нет. Метод DrawImage добавляет на страницу новый объект изображения, не изменяя существующий текст, графику и другие изображения. Изображение наносится поверх текущего содержимого в указанных координатах. Чтобы извлечь изображение из существующего PDF и использовать его в другом месте, обратитесь к статье Извлечение изображений из PDF на JavaScript (React).
См. также
How to Add Images to a PDF in JavaScript (React)
When your React app builds PDFs on the fly — an invoice that needs a company logo, a report with an embedded chart, a certificate carrying a signature — you have to place raster images onto the page programmatically. Plain JavaScript can't write into a PDF's internal structure, and standing up a backend just to stamp a logo is overkill for what is really a client-side task.
Spire.PDF for JavaScript compiles a full PDF engine to WebAssembly, so your React app can create, edit, and save PDFs entirely in the browser. Files move through an in-browser Virtual File System (VFS), so there's no network round-trip. With PdfImage and the page canvas's DrawImage method, you control exactly where and how large each image appears.
In this article, you will learn how to:
- Load an image into the VFS and turn it into a
PdfImageobject - Draw it onto a PDF page at a chosen position and size
- Add images to both brand-new and existing PDF documents
- Scale, center, and repeat images across multiple pages
- Trigger a browser download of the finished PDF
Why generate PDFs in the browser
The usual alternative is a server-side library (iText, PDFBox, and the like): the browser uploads the assets, the server renders, and the result comes back. That works, but for image stamping it adds friction:
- Latency — every render waits on a round-trip, which stings for large files or slow connections.
- Privacy — source documents and images leave the user's machine, a problem for anything sensitive.
- Cost — PDF rendering is CPU-heavy and doesn't scale for free.
With Spire.PDF for JavaScript the whole job runs in the browser via WebAssembly. Once the WASM module is loaded, rendering is local and instant, the file never leaves the device, and you pay nothing in server time.
Prerequisites
This walkthrough assumes you already have a React project with Spire.PDF for JavaScript installed and the WASM module initialized. If not, follow Integrating Spire.PDF for JavaScript in a React Project first.
You'll need:
- The
spire.pdf.base.jsandspire.pdf.base.wasmfiles in your project'spublicfolder - The WASM module reachable via
window.wasmModule.spirepdf - An image to embed (PNG, JPEG, etc.) placed where the VFS can load it
Add an image to a new PDF
The simplest scenario: create a brand-new PDF document and draw an image onto its first page. The core steps are:
- Load the image into the VFS using
window.spire.FetchFileToVFS - Create a
PdfDocumentand add a blank page - Create a
PdfImagefrom the loaded file withPdfImage.FromFile - Draw the image onto the page canvas with
page.Canvas.DrawImage - Save and download the result
function App() {
  const addImageToPdf = async () => {
    // Get the Spire.PDF WASM module
    const pdfModule = window.wasmModule?.spirepdf;

    // Check if the WASM module is ready
    if (!pdfModule) {
      alert('Spire.PDF is not ready yet');
      return;
    }

    // Load the image into VFS
    const inputImageName = 'TreePic.png';
    await window.spire.FetchFileToVFS(inputImageName, "", `${process.env.PUBLIC_URL}/data/`);

    // Create a PdfDocument object
    let doc = new pdfModule.PdfDocument();

    // Add a page
    let page = doc.Pages.Add();

    // Load the image and scale its display size proportionally
    let image = pdfModule.PdfImage.FromFile(inputImageName);
    let width = image.Width * 0.6;
    let height = image.Height * 0.6;

    // Calculate the horizontal center position and set the vertical position
    let x = (page.Canvas.ClientSize.Width - width) / 2;
    let y = 60;

    // Draw the image at the specified position on the page
    page.Canvas.DrawImage({ image: image, x: x, y: y, width: width, height: height });

    // Define the output file name in PDF format
    const outputFileName = 'AddImage.pdf';

    // Save as PDF format
    doc.SaveToFile({ fileName: outputFileName });
    doc.Close();

    // Read the generated PDF file from VFS and trigger download
    const fileArray = window.dotnetRuntime.Module.FS.readFile(outputFileName);
    const blob = new Blob([fileArray], { type: 'application/pdf' });
    const url = URL.createObjectURL(blob);
    const a = document.createElement('a');
    a.href = url;
    a.download = outputFileName;
    a.click();
    URL.revokeObjectURL(url);
  };

  return (
    <div style={{ textAlign: 'center', height: '300px' }}>
      <h1>Add Image To PDF</h1>
      <button onClick={addImageToPdf}>
        Generate
      </button>
    </div>
  );
}

export default App;
PDF document generated after adding an image
What the code does:
PdfImage.FromFile(inputImageName)reads the image from the VFS and creates aPdfImageobject. The original pixel dimensions are available viaimage.Widthandimage.Height.page.Canvas.DrawImage(...)renders the image onto the page. Thexandyparameters set the top-left corner position, andwidthandheightcontrol the display size.- The image is scaled to 60% of its original size (
* 0.6) and horizontally centered using(page.Canvas.ClientSize.Width - width) / 2.
Add an image to an existing PDF
Adding an image to an existing document follows the same pattern — the only difference is that instead of creating a new PdfDocument, you load one from the VFS and select the target page.
const addImageToExistingPdf = async () => {
  const pdfModule = window.wasmModule?.spirepdf;
  if (!pdfModule) return;

  // Load both the PDF and the image into VFS
  await window.spire.FetchFileToVFS('Report.pdf', "", `${process.env.PUBLIC_URL}/data/`);
  await window.spire.FetchFileToVFS('Logo.png', "", `${process.env.PUBLIC_URL}/data/`);

  // Load the existing PDF
  let doc = new pdfModule.PdfDocument();
  doc.LoadFromFile('Report.pdf');

  // Get the first page (or any page you want)
  let page = doc.Pages.get_Item(0);

  // Load the image and draw it at the top-right corner
  let image = pdfModule.PdfImage.FromFile('Logo.png');
  let imgWidth = 80;
  let imgHeight = 40;
  let x = page.Canvas.ClientSize.Width - imgWidth - 30; // 30pt margin from right edge
  let y = 30; // 30pt from top

  page.Canvas.DrawImage({ image: image, x: x, y: y, width: imgWidth, height: imgHeight });

  // Save and download
  const outputFileName = 'ReportWithLogo.pdf';
  doc.SaveToFile({ fileName: outputFileName });
  doc.Close();

  const fileArray = window.dotnetRuntime.Module.FS.readFile(outputFileName);
  const blob = new Blob([fileArray], { type: 'application/pdf' });
  const url = URL.createObjectURL(blob);
  const a = document.createElement('a');
  a.href = url;
  a.download = outputFileName;
  a.click();
  URL.revokeObjectURL(url);
};
Key difference from the new-document example: doc.LoadFromFile('Report.pdf') loads an existing PDF instead of starting from scratch, and doc.Pages.get_Item(0) retrieves a page from the loaded document. The rest of the drawing logic is identical.
When the page already holds an image you need to change rather than layer a new one on top, see Replacing and Removing Images from PDFs in JavaScript (React).
Scaling and positioning
The DrawImage method gives you full control over where and how large the image appears. Here are the most common patterns:
Proportional scaling — multiply both dimensions by the same factor to preserve the aspect ratio:
let scale = 0.5; // 50% of original size
let width = image.Width * scale;
let height = image.Height * scale;
Fixed width, auto height — set the width and calculate height to preserve the aspect ratio:
let targetWidth = 200;
let width = targetWidth;
let height = image.Height * (targetWidth / image.Width);
Horizontal centering — place the image equidistant from the left and right page margins:
let x = (page.Canvas.ClientSize.Width - width) / 2;
Vertical centering — place the image equidistant from the top and bottom of the page:
let y = (page.Canvas.ClientSize.Height - height) / 2;
Custom position — use absolute coordinates (origin is top-left, units are points; 1 point = 1/72 inch):
let x = 72;  // 1 inch from left
let y = 144; // 2 inches from top
Add images to multiple pages
To add the same image (e.g., a logo or watermark) to every page in a document, loop through the Pages collection:
const addImageToAllPages = async () => {
  const pdfModule = window.wasmModule?.spirepdf;
  if (!pdfModule) return;

  await window.spire.FetchFileToVFS('Business_Data_Overview.pdf', "", `${process.env.PUBLIC_URL}/data/`);
  await window.spire.FetchFileToVFS('Logo.png', "", `${process.env.PUBLIC_URL}/data/`);

  let doc = new pdfModule.PdfDocument();
  doc.LoadFromFile('Business_Data_Overview.pdf');

  let image = pdfModule.PdfImage.FromFile('Logo.png');
  let imgWidth = 60;
  let imgHeight = 30;

  // Loop through all pages and draw the logo in the top-right corner
  for (let i = 0; i < doc.Pages.Count; i++) {
    let page = doc.Pages.get_Item(i);
    let x = page.Canvas.ClientSize.Width - imgWidth - 20;
    let y = 20;
    page.Canvas.DrawImage({ image: image, x: x, y: y, width: imgWidth, height: imgHeight });
  }

  const outputFileName = 'AllPagesWithLogo.pdf';
  doc.SaveToFile({ fileName: outputFileName });
  doc.Close();

  const fileArray = window.dotnetRuntime.Module.FS.readFile(outputFileName);
  const blob = new Blob([fileArray], { type: 'application/pdf' });
  const url = URL.createObjectURL(blob);
  const a = document.createElement('a');
  a.href = url;
  a.download = outputFileName;
  a.click();
  URL.revokeObjectURL(url);
};
This pattern is useful for adding watermarks, company logos, or page stamps uniformly across a multi-page document.
Download the result
After saving the PDF to the VFS with doc.SaveToFile(), you need to read it back and trigger a browser download. This two-step pattern — save to VFS, then read from VFS — is used in every Spire.PDF for JavaScript example:
// 1. Save the PDF to the VFS
doc.SaveToFile({ fileName: 'Output.pdf' });
doc.Close();

// 2. Read the file from VFS as a byte array
const fileArray = window.dotnetRuntime.Module.FS.readFile('Output.pdf');

// 3. Create a Blob and trigger download
const blob = new Blob([fileArray], { type: 'application/pdf' });
const url = URL.createObjectURL(blob);
const a = document.createElement('a');
a.href = url;
a.download = 'Output.pdf';
a.click();
URL.revokeObjectURL(url);
The same pattern applies when saving images (use type: 'image/png' or type: 'image/jpeg' in the Blob constructor).
FAQ
How do I precisely control the position and size of an image?
The x and y parameters of DrawImage set the coordinates of the image's top-left corner (in points, where 1 point = 1/72 inch). The width and height parameters set the display size. To scale proportionally, read image.Width and image.Height and multiply both by the same factor. To center horizontally, calculate x = (page.Canvas.ClientSize.Width - width) / 2.
Can I add multiple images to the same page?
Yes. Call page.Canvas.DrawImage(...) once for each image, with different x/y coordinates. The images are drawn in the order you call the method, so later images appear on top of earlier ones if they overlap.
What image formats are supported?
Spire.PDF for JavaScript supports common raster formats including PNG, JPEG, BMP, and GIF. Use PdfImage.FromFile(filename) to load any of these from the VFS.
Does adding an image affect existing content on the page?
No. DrawImage adds a new image object to the page without modifying existing text, graphics, or other images. The image is drawn on top of the existing content at the specified coordinates. To pull an image out of an existing PDF so you can reuse it elsewhere, see Extract Images from a PDF in JavaScript (React).
See Also
Automate Invoice Processing with an AI Agent in .NET
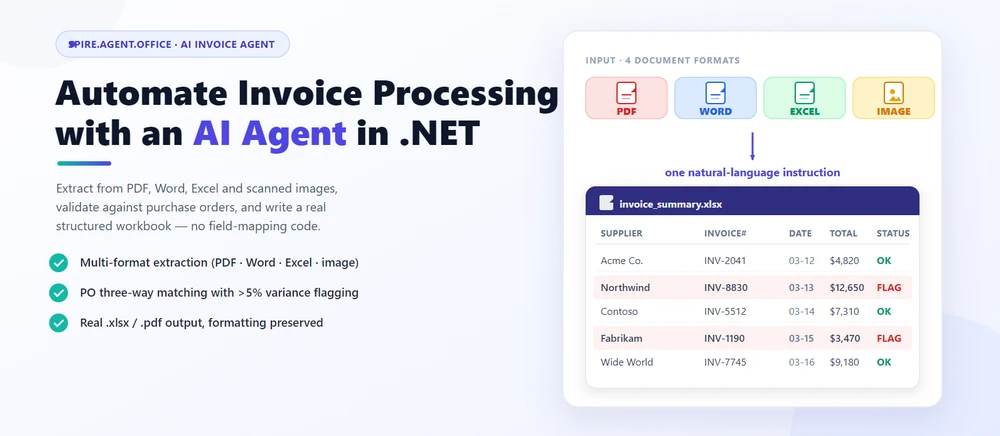
Automated invoice processing means reading incoming vendor invoices, extracting line items, validating them against purchase orders, and writing the results into a structured workbook your finance system can consume. In practice, this is document automation in .NET where a natural-language instruction replaces the field-mapping and layout code. Spire.Agent.Office is a document AI agent SDK that handles the language; a deterministic document layer guarantees real, well-formed Excel and PDF files.
Quick Navigation
- Why Invoice Processing Is a Good Fit for AI
- What an AI Invoice Agent Can and Cannot Do
- Common Invoice Processing Scenarios
- Three Ways to Automate Invoice Processing in .NET
- A Working Example: Extract, Validate, and Report in C#
- Why Use Spire.Agent.Office for AI Invoice Processing
- FAQ
1. Why Invoice Processing Is a Good Fit for AI
Invoice work in a developer's world is three repetitive jobs: reading (extracting vendor, date, line items, and totals from documents that arrive as PDFs, Word files, Excel sheets, or scanned images), checking (matching invoices against purchase orders and flagging discrepancies), and producing (writing the results into a structured workbook your accounting system can consume).
For .NET developers, the challenge is not only understanding invoice content; it is turning unstructured, multi-format documents into structured, repeatable workflows your application can own.
Three properties make these tasks ideal for a language model rather than hand-written rules:
- The input is multi-format. Incoming invoices arrive as PDF attachments, scanned images, Word documents, or Excel files — each with a different layout. Rules that handle one format break on the next; an LLM reads text directly regardless of file type.
- The output is document-shaped. The deliverable is a real
.xlsxor.pdfwith correct formatting, not a text blob. This is where a document layer earns its keep. - The volume changes constantly. Onboarding 50 new suppliers or reviewing 200 vendor invoices in a month means a config-driven solution, not re-coding per supplier.
In practice, extraction and validation go together: teams want invoices summarized and discrepancies flagged, and new invoices generated from a template plus structured data. For a deeper look at how a document AI agent is put together and where it fits in a content pipeline, see AI Agent for Document Processing: What It Is and How It Works.
2. What an AI Invoice Agent Can and Cannot Do
| Can do | Cannot do |
|---|---|
| Extract vendor, date, line items, totals from PDF, Word, Excel, and scanned images | Replace professional AP review for high-value or regulated transactions |
| Match invoices against purchase orders and flag discrepancies | Guarantee matching accuracy on intentionally ambiguous or fraudulent invoices |
| Generate structured workbooks or PDF reports in batch | Negotiate or accept terms on your behalf |
| Keep formatting, table styles, and fonts intact | Interpret new or ambiguous supplier terms; route to procurement |
| Run inside your own application (no cloud upload) | Guarantee output is error-free without review |
The division of labor: the agent automates the reading, extraction, and validation (the hours an AP clerk would spend), while a human reviewer owns the final sign-off. That boundary is what keeps the tool useful and the process defensible.
3. Common Invoice Processing Scenarios
Invoice processing spans more than one-off extraction. The same pattern (an instruction, invoice files, and optional reference data) covers the scenarios teams search for most:
| Scenario | Example instruction |
|---|---|
| Multi-format invoice extraction | "Extract vendor, date, line items, and totals from these invoices and merge into one worksheet." |
| PO three-way matching | "Compare each invoice against purchase orders and flag discrepancies over 5%." |
| Batch invoice reporting | "Generate a summary workbook with total amount by supplier, flagged discrepancies, and a printable report." |
| Duplicate detection | "Identify potential duplicate invoices by comparing vendor, date, and amount across the inbox." |
| Approval workflow routing | "Route invoices above $10,000 to the approval queue and below to auto-approve." |
Each scenario is the same architecture: an instruction in, a real document out.
4. Three Ways to Automate Invoice Processing in .NET
| Approach | Code volume | Format fidelity | Maintenance | Best for |
|---|---|---|---|---|
| Document AI agent (LLM + document layer) | One instruction + ~10 lines | High (real Excel/PDF files) | Low (change behavior by editing instructions) | Teams automating invoices without building an LLM pipeline |
| Raw LLM API (OpenAI/Claude + your own code) | High (prompts, parsing, file I/O) | Low (LLMs don't natively read/write Office files) | High (you own RAG, routing, errors) | Teams that already run an LLM stack |
| Traditional SDK (Spire.Office or similar) | Dozens of lines per document type | High (deterministic) | High (every mapping is code) | Fixed, well-specified invoices that rarely change |
The key point: an LLM cannot read a PDF invoice without a document-processing layer, and a traditional SDK cannot understand a natural-language request. A document AI agent combines both.
That is not to say the traditional route is wrong. For fixed, well-specified invoices that rarely change, a deterministic SDK is often the right call, and Spire.Office still serves that need. If that is your situation, Generate Word Documents from Excel Data in C# demonstrates the classic data-driven document generation workflow. The agent earns its place when supplier layouts, input formats, and validation rules change often enough that re-coding becomes the bottleneck.
Why a Raw LLM API Is Not Enough for Invoice Processing
Calling gpt-4 or claude directly to "extract data from this invoice" fails in three ways that matter in production:
- It cannot reliably read or write Office files. LLMs see text, not
.xlsxand.pdfstructure. Reading a PDF invoice, keeping a line-item table intact, or producing a valid Excel workbook usually requires a separate extraction and reconstruction pipeline you have to build yourself. - Formatting is not guaranteed. Invoice reports carry column headers, number formats, and conditional fills that matter to the accounting team. A raw LLM returns text, and the formatting you lose is exactly what AP departments care about.
- You reimplement the whole orchestration. Prompt design, field mapping, error handling, file I/O, and output validation become your code to own and maintain.
A document AI agent pairs the model's language understanding with deterministic document APIs: the model decides what to extract or match, and the document layer guarantees the file is real and well-formed. That is the difference between a demo and a workflow a team can ship.
5. A Working Example: Extract, Validate, and Report in C#
Below is a task the AP team repeats every month: processing incoming vendor invoices, extracting data from mismatched formats, validating against purchase orders, and producing a structured workbook. The implementation uses Spire.Agent.Office for .NET, an AI agent that processes Word, Excel, PowerPoint, and PDF documents through natural-language instructions. The example is designed around that workflow rather than copied from a tutorial; the official Getting Started and AI Contract Review in C# tutorials document the API setup step by step, while this section focuses on the C# integration patterns.
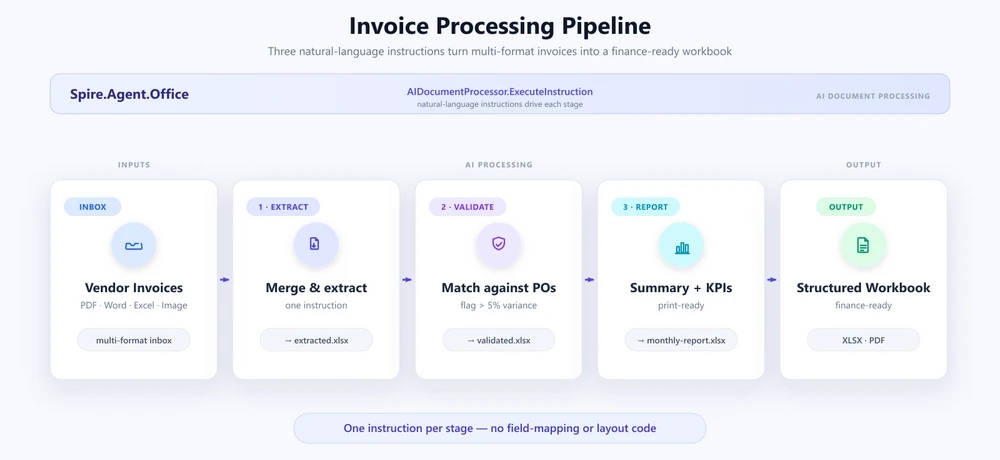
1. Extract data from every invoice in the inbox. Configure the agent once, then read the inbox folder and have each invoice parsed into a single merged table:
using System.IO;
using Spire.Agent.Office.AI;
using Spire.Agent.Office.Extensions;
using Spire.Doc;
using Spire.Pdf;
using Spire.Xls;

AIOptions agentOptions = new AIOptions();
agentOptions.WorkDir = @"C:\ap-invoices\output";
agentOptions.SpireToken = spireToken;

string extractPrompt =
    "Read every vendor invoice file in the inbox (PDF, Word, Excel, or images) and extract " +
    "each supplier's information: company name, invoice number, issue date, due date, line " +
    "items (description, quantity, unit price, amount), subtotal, tax, and total. Merge the " +
    "results into one worksheet with columns: Supplier, InvoiceNumber, IssueDate, DueDate, " +
    "Description, Quantity, UnitPrice, LineAmount, Subtotal, Tax, Total. Skip duplicate header " +
    "rows and save as a workbook.";

Directory.CreateDirectory(@"C:\ap-invoices\output");

string[] invoiceFiles = Directory.GetFiles(@"C:\ap-invoices\inbox", "*.*");
The agent handles the multi-format challenge — PDFs, scanned images, Word documents, and Excel files all flow through the same instruction without format-specific code:
using (Workbook extracted = new Workbook())
{
    AIResult result = extracted.AI(agentOptions).ExecuteInstruction(
        extracted,
        extractPrompt,
        @"C:\ap-invoices\output\extracted.xlsx",
        invoiceFiles);

    if (result == null || !result.Success)
        throw new InvalidOperationException(
            $"Extraction failed: {result?.ErrorMessage}");
}
Key API Calls
Workbook.AI(agentOptions)— attaches the AI document processor to a workbook objectExecuteInstruction(doc, instruction, savePath, attachments)— runs the extraction and writes the merged workbookAIResult.Success/AIResult.ErrorMessage— verifies the result and surfaces errors
Output
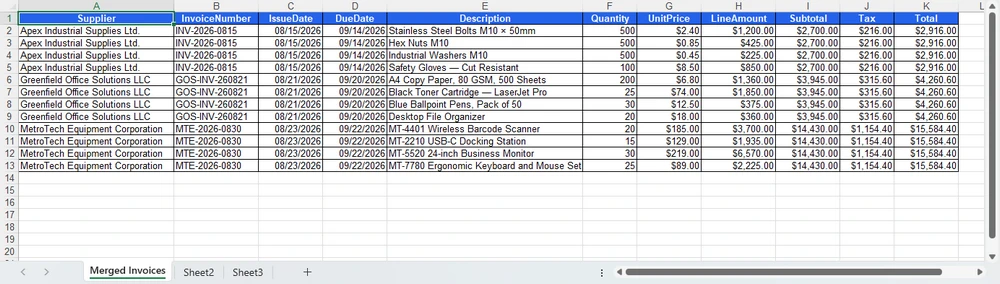
2. Validate against purchase orders. Load the extracted file and state the matching rule in plain English. The agent adds a Validation sheet and leaves the source data untouched:
using (Workbook validation = new Workbook())
{
    validation.LoadFromFile(@"C:\ap-invoices\output\extracted.xlsx");

    string[] poFiles = { @"C:\ap-invoices\data\purchase-orders.xlsx" };

    AIResult result = validation.AI(agentOptions).ExecuteInstruction(
        validation,
        "Add a 'Validation' sheet. Compare each invoice line item against the purchase orders " +
        "in the attachments, flag invoices where the total differs from the PO by more than 5%, " +
        "flag line items whose description does not match the PO. Highlight discrepancies in red " +
        "and add a 'Reason' column explaining each discrepancy. Leave the original data sheets unchanged.",
        @"C:\ap-invoices\output\validated.xlsx",
        poFiles);

    if (result == null || !result.Success)
        throw new InvalidOperationException(
            $"Validation failed: {result?.ErrorMessage}");
}
The Validation sheet lands alongside the source data, with the flagged rows, red fills, and Reason column applied by the instruction:
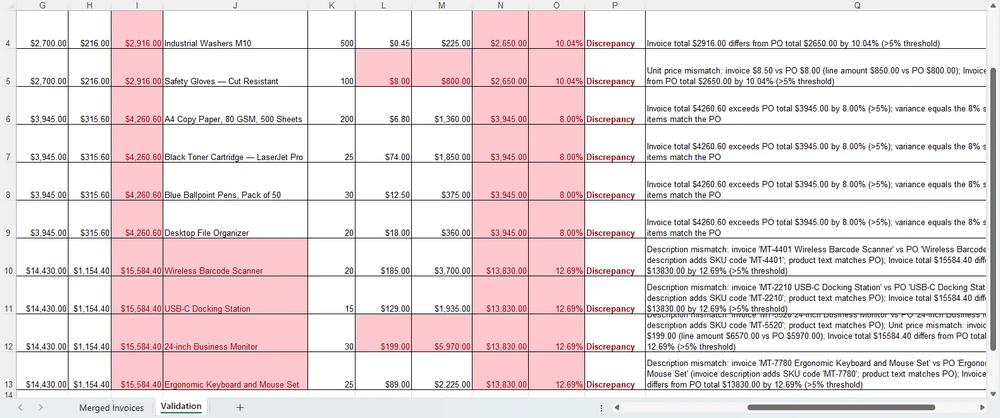
3. Report. Compose the summary from section 5 and export it. The savePath alone chooses the format — .xlsx here, .pdf for distribution:
using (Workbook report = new Workbook())
{
    report.LoadFromFile(@"C:\ap-invoices\output\validated.xlsx");

    AIResult result = report.AI(agentOptions).ExecuteInstruction(
        report,
        "Produce a processing report. Add a 'Summary' sheet at the front with a KPI block " +
        "(total invoices processed, total amount, count of flagged discrepancies, top supplier by " +
        "volume), a detail table grouped by supplier, and a discrepancy summary. Format it for print " +
        "and save the finished workbook.",
        @"C:\ap-invoices\output\monthly-report.xlsx");

    if (result == null || !result.Success)
        throw new InvalidOperationException(
            $"Report generation failed: {result?.ErrorMessage}");
}
The Summary sheet lands at the front of the workbook, ready for print or PDF export:
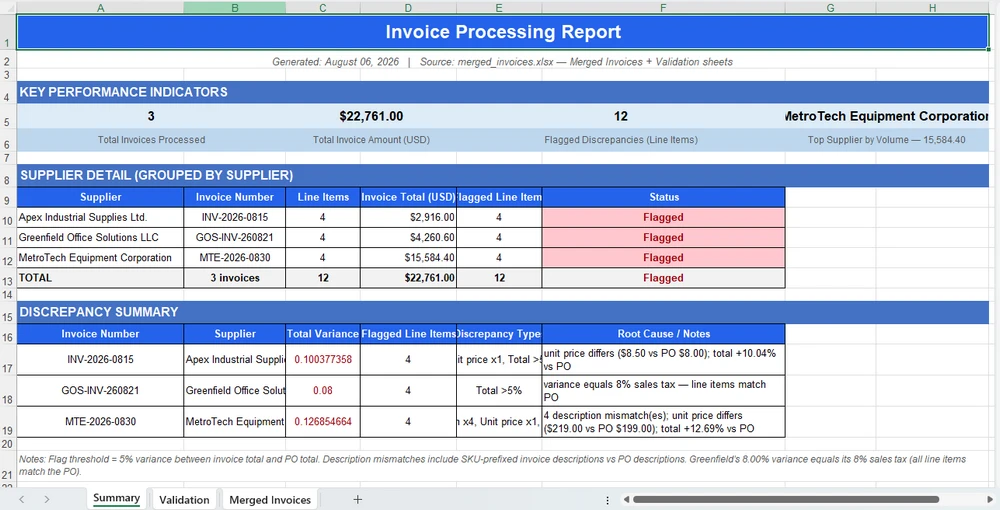
Why This Is Different: Traditional SDK vs. AI Agent
The value of the agent is clearest side by side. With the traditional SDK you locate each field by header string, hardcode every validation threshold, and write every cell by cell — and re-tune all of it when a supplier changes their layout or the rule changes. The sketch below (simplified for illustration) shows the shape of that work:
// Traditional SDK (illustrative): every field is located and extracted
// by header string, thresholds are hardcoded, and output is written cell by cell
foreach (string file in invoiceFiles)
{
    Workbook wb = new Workbook();
    wb.LoadFromFile(file);
    Worksheet sheet = wb.Worksheets[0];

    // Fails the moment a supplier changes "Total Due" to "Amount Payable".
    int totalCol = FindColumnByHeader(sheet, "Total Due");
    int vendorCol = FindColumnByHeader(sheet, "Vendor Name");

    for (int r = sheet.LastRow; r >= 2; r--)
    {
        double invoiceTotal = double.Parse(sheet.Range[r, totalCol].Text);
        double poTotal = GetPoTotal(sheet.Range[r, 1].Text);
        double diff = Math.Abs(invoiceTotal - poTotal) / poTotal;

        // One hardcoded threshold; a construction supplier triggers false alarms.
        if (diff > 0.05) sheet.Range[r, totalCol].Style.Color = Color.Red;
    }
    // ... then merge, then validate, then summary -- hundreds of lines per supplier and per month.
}
The AI agent replaces that orchestration with one instruction:
validation.AI(agentOptions).ExecuteInstruction(
    validation,
    "Add a 'Validation' sheet. Compare each invoice line item against the purchase orders " +
    "in the attachments, flag invoices where the total differs from the PO by more than 5%, " +
    "flag line items whose description does not match the PO. Highlight discrepancies in red " +
    "and add a 'Reason' column explaining each discrepancy. Leave the original data sheets unchanged.",
    @"C:\ap-invoices\output\validated.xlsx",
    poFiles);
Both produce the same validation workbook. Where the SDK grows a FindColumnByHeader call for every field, a threshold comparison for every rule, and a cell write for every fill, the agent absorbs the same work into one instruction. When a supplier changes their layout or the finance team changes the variance threshold, you edit the instruction, not the code.
6. Why Use Spire.Agent.Office for AI Invoice Processing
The three-way comparison above is deliberately product-neutral; the same pattern works with any capable LLM. Where Spire.Agent.Office earns its place for .NET teams is in three specific areas:
- Native multi-format invoice processing. PDFs, Word documents, Excel files, and scanned images are first-class citizens, not formats you bolt on. The agent reads and extracts from all four formats in a single instruction.
- Formatting is preserved. Invoice reports carry column headers, number formats, and conditional fills that must survive processing. The agent's document layer keeps them intact. Include "preserve the original document layout and styling" in your instruction and the output stays true to the template.
- Native .NET integration. It is a C# SDK that drops into an existing .NET application. No separate document-processing service to build or maintain, no cross-service plumbing. The example above is the whole integration surface.
If you already run Spire.Office for document processing, the agent is the natural next layer: the same Workbook object gains an AI() processor that turns instructions into executed workflows.
7. FAQ
Can AI invoice processing work with scanned images?
Yes. The extraction example above loads scanned image files alongside PDFs and Word documents, and the agent reads and analyzes each file in its native format. For scanned images with no extractable text layer, the agent works with the image content directly. If the scan quality is poor, consider running OCR first for best results.
Can invoice data stay inside my environment?
Yes, with one important nuance. Spire.Agent.Office runs from your own application, so the SDK, templates, and document processing stay inside your environment. Invoice files are not uploaded to a third-party document service for storage or conversion. To analyze invoice content, the AI needs the relevant text, and it is sent to the model for processing; that is an inherent step of any AI workflow. If you deploy your own model on your local network, the content stays entirely within your infrastructure. If you connect through a hosted model API such as OpenAI or Azure OpenAI, the relevant content is transmitted to that provider over the network per your configuration.
Can I use my own AI model with Spire.Agent.Office?
Yes. Spire.Agent.Office supports flexible AI model integration and is compatible with mainstream AI infrastructure, including hosted model APIs and privately deployed models. You can point the agent at your own endpoint. See the integration tutorial for setup details; for questions about which providers are supported in your deployment, contact your account team at [email protected].
Which model does Spire.Agent.Office use for invoice processing?
Spire.Agent.Office connects to a large language model behind a SpireToken key. You describe the extraction or validation task in natural language, and the agent orchestrates the underlying document-processing tools. The model handles understanding; the document layer guarantees formatting and file fidelity.
Can it process invoices in batch?
Yes. One instruction applied to a folder of invoice files, and the agent produces one consolidated workbook with all extracted data. Both field extraction and cross-document matching are supported. For the agent to pick up every invoice, keep the inbox folder organized and avoid blank files; if the number of processed invoices does not match the inbox count, check the data source first.
Will the AI change my workbook's formatting?
Not if you say so. Include a phrase like "preserve the original document layout, styling, and fonts" in your instruction; the official tutorial documents this exact fix.
How is this different from using a raw LLM API?
A raw LLM cannot reliably read, edit, or write Word and Excel files on its own; it needs a document-processing layer. A document AI agent pairs the LLM's language understanding with deterministic document APIs, so the output is a real, well-formed file.
Ready to Automate Your Invoice Processing?
Extraction, validation, and report composition are the fastest places to get value: point the agent at the inbox, describe the processing rules, and get a structured workbook or PDF out. Follow the Getting Started tutorial to run your first invoice workflow in .NET.
Further Reading
- Spire.Agent.Office product overview -- AI agent SDKs for every Office document format
- AI Agent for Document Processing: What It Is and How It Works -- the document AI agent concept explained
- Generate Word Documents from Excel Data in C# -- data-driven document generation with the deterministic SDK
- AI Contract Review in C# -- the same agent workflow applied to Word and PDF documents
Generate Word Documents from Excel Data in C#
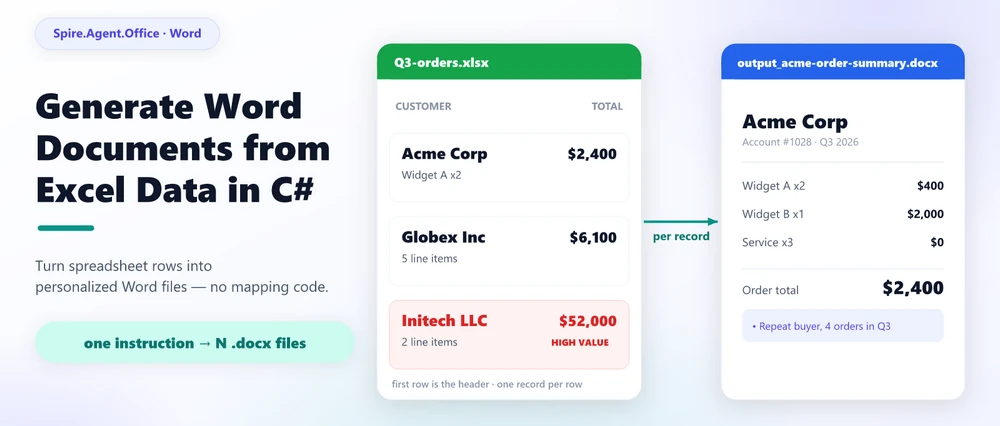
Generate Word documents from Excel data means using spreadsheet rows as the source for one or more structured Word files, usually by following a template or a document-generation workflow. Traditionally this job is handled with Word Mail Merge: you map Excel columns to fields in a .docx template and let Word emit one document per row. The same task can be automated in C# with a document SDK, or pushed further with an AI document agent that carries the requirement as a natural-language instruction. This article compares the routes, shows where mail merge stops coping, and walks a working C# example built on Spire.Agent.Office, an AI agent SDK for Office documents.
Quick Navigation
- What Does It Mean to Generate Word Documents from Excel?
- Mail Merge from Excel to Word
- Three Ways to Automate Word Generation from Excel in .NET
- Generate Personalized Word Documents from Excel in C#
- FAQ
1. What Does It Mean to Generate Word Documents from Excel Data?
The phrase sounds close to "convert Excel to Word," but the intent is different. Converting .xlsx to .docx changes a file's format and keeps its content roughly the same. Generating Word documents from Excel data builds new documents whose content is derived from cells in a spreadsheet: an order sheet per customer, a monthly report per region, a batch of letters or labels from an address list, a set of invoices from an orders sheet.
The recurring shape of the requirement is nearly always the same:
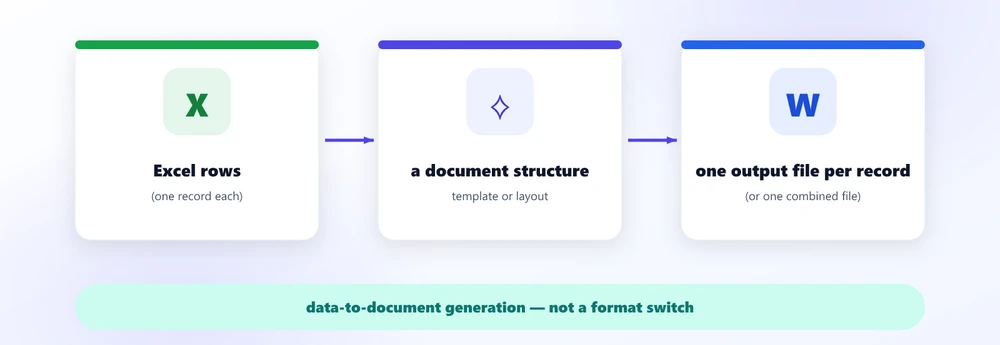
Sent as a real sentence it sounds like: "I have a list of customers and their orders in Excel; I need a Word document for each one with their information, their items, and a total." The word that matters is derived: the document content comes from data, so this is data-to-document generation, not a format switch.
That is the demand this article targets. Everything below is about the different ways to satisfy it and the point at which you should stop wiring fields by hand.
2. The Traditional Way: Mail Merge from Excel to Word
At the UI level, the default answer to "turn this Excel list into many Word documents" is Word Mail Merge. It is the feature most people are thinking of when they search for the task, and Microsoft ships a click-by-click guide for it. The mechanism is simple and well understood:
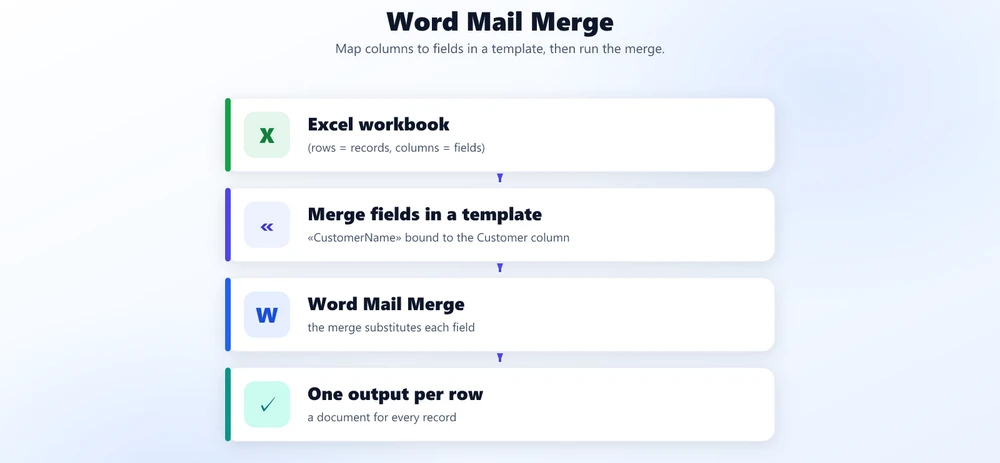
You place a field like «CustomerName» inside a letter template, bind it to the Customer column of the Excel source, run the merge, and Word writes one document per row with that value substituted. Because the row count can be thousands, it turns "open a file, copy the text, change the name" into a batch operation with zero code.
Mail merge is good at exactly one shape of work: put this column into that field, many times. Letters, envelopes, labels, and notices with a fixed layout are its home turf. It runs inside Office, needs no programming, and for those stable, field-only documents it is genuinely the right tool.
3. When Mail Merge Hits Its Limits
The limit arrives the moment the document stops being a fixed form with blank spots and becomes something that must depend on the data. Mail merge substitutes values; it does not decide structure, reason about content, or compose anything new.
Compare two requests. The first is what mail merge handles:
"Put the customer's name in the name spot, the address in the address spot, and the order into the order details."
The second is the request most real reporting turns out to be:
"Read this Excel workbook, analyze each customer's data, create a personalized report with their items and totals, add a summary of their buying pattern, and save each result as a separate Word document."
The second request fails on all three of mail merge's assumptions:
- The structure varies. A customer with three line items needs a different document body than one with thirty. Merge fields assume a fixed layout with fixed blanks; they do not grow a table by as many rows as the data requires.
- Content must be computed, not copied. "Summarize the buying pattern" and "flag high-value customers" produce text and decisions that no column holds. There is no source field to bind them to.
- The output is a batch of real files. Each record should be its own Word document with its own name, and the workflow should run unattended inside an application, not from an Office wizard.
That is the honest position of mail merge, stated fairly: it is excellent at field mapping, but it becomes less suitable when document structure, content, or output logic must vary with the data. The deeper requirement -- turn data into documents -- is a generation problem, and it is where the automation routes below start.
4. Turn the Requirement into an Instruction: the Agent Way
The alternative that fits the correct version of the problem is an AI document agent: a natural-language layer on top of a deterministic document engine. Instead of enumerating template fields and per-field code, you describe the output, and the agent can handle requirements that are difficult to express with traditional mail merge -- reading the data, shaping the structure, writing the analysis -- while the document engine guarantees a real, well-formed .docx (or PDF) comes out.
The value is easier to see as a chain:
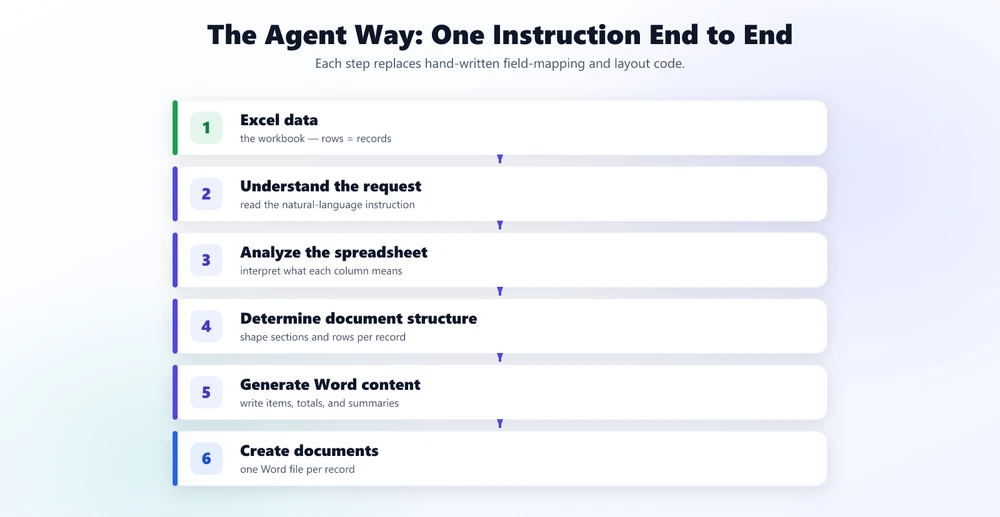
Steps that are difficult to express with traditional mail merge -- especially the middle three -- are exactly where an agent can earn its keep. It can interpret what a column means ("Total Amount," "Sales," and "Net" can name the same concept under three headers), shape a document structure to each record, and compose the summary paragraphs. What you provide is a sentence, not a field map.
The message to carry into the rest of this article: mail merge maps Excel columns to Word fields; an AI agent generates documents from a requirement. The former is a value-substitution step, the latter is what the request actually was.
5. Three Ways to Automate Word Generation from Excel in .NET
Settling on the right route matters more than the code, because each route has a different cost curve. For a .NET application that needs this workflow, the realistic choices are:
| Approach | What it takes | Flexibility | Best for |
|---|---|---|---|
| Word Mail Merge | A .docx template with merge fields + an Excel source; run the merge (or script it) | Maps one column to one field; stalls on variable structure, conditional content, analysis | Letters, labels, envelopes, notices with a fixed shape |
| SDK field binding | Load the template in code, open the workbook, loop rows, bind/find-replace per record, save each file | Deterministic and testable; you hand-maintain the column map and layout, every change recompiles | Repeating one stable document shape at scale |
| Natural-language AI agent | Pass the workbook as an attachment, describe the output, read the result | Handles variable structure, per-record analysis, conditional sections, summaries | Documents that vary with the data, or workflows that change month to month |
A shortcut that decides most cases:
- Shape never changes, one field per column, bulk letters -- mail merge is hard to beat.
- Shape never changes but you need it in code, deterministic and testable -- use an SDK field-binding loop.
- The document must vary with the data, include analysis, or change often -- that is where an AI agent pays for itself, because the cost of a change can often be reduced to updating the instruction rather than changing the mapping and layout logic in code.
6. Generate Personalized Word Documents from Excel in C#
A concrete, working version of the "one Word document per record" requirement is a customer order summary. The inputs are a workbook of customer orders and a light Word template; the output is one personalized document per customer. The full setup -- token, package, and project wiring -- is documented in the Getting Started tutorial; here we focus on the generation call itself.
using Spire.Doc;
using Spire.Agent.Office.AI;
using Spire.Agent.Office.Extensions;

AIOptions options = new AIOptions
{
    SpireToken = spireToken,
    WorkDir = @"C:\order-ops\output",   // folder the generated documents are written to
    TimeoutMs = 300000
};

using (Document doc = new Document())
{
    // The template supplies per-record anchors; the workbook is the data source.
    doc.LoadFromFile(@"C:\order-ops\templates\order-summary-template.docx");

    // savePath = null: one instruction produces one document per record,
    // written into the WorkDir output folder. No C# loop over the rows.
    AIResult result = doc.AI(options).ExecuteInstruction(
        doc,
        "Read the customer order data in Q3-orders.xlsx. Generate one independent " +
        "Word order summary per customer, row by row. Include their contact " +
        "information, every line item with quantity and amount, the order totals, " +
        "and a one-paragraph summary of their purchasing pattern. Flag customers " +
        "whose total exceeds 50,000 as high-value. Save each document as its own " +
        "file named output_ followed by the customer's name (for example " +
        "output_acme-order-summary.docx).",
        null,
        new[] { @"C:\order-ops\input\Q3-orders.xlsx" });

    if (result == null || !result.Success)
        throw new InvalidOperationException($"Generation failed: {result?.ErrorMessage}");
}
Three details matter when you run this yourself. First, the instruction is where the generation logic lives: the analysis ("summary of their purchasing pattern"), the conditional logic ("flag customers above 50,000"), and the per-record structure ("every line item"). Second, the workbook should be tidy: first row is the header, one record per row, no empty rows or merged header cells -- the same rules Word's own data source expects. Third, the base document anchors the output layout; a lightly structured one can give the agent a useful starting point for the structure of each record. With a fully empty base document, the same instruction produces a single composed document instead.
A naming rule matters here: documents the agent writes into WorkDir must start with the output_ prefix, or the SDK does not count them as generated files. That is why the instruction above asks for files like output_acme-order-summary.docx instead of bare customer names.
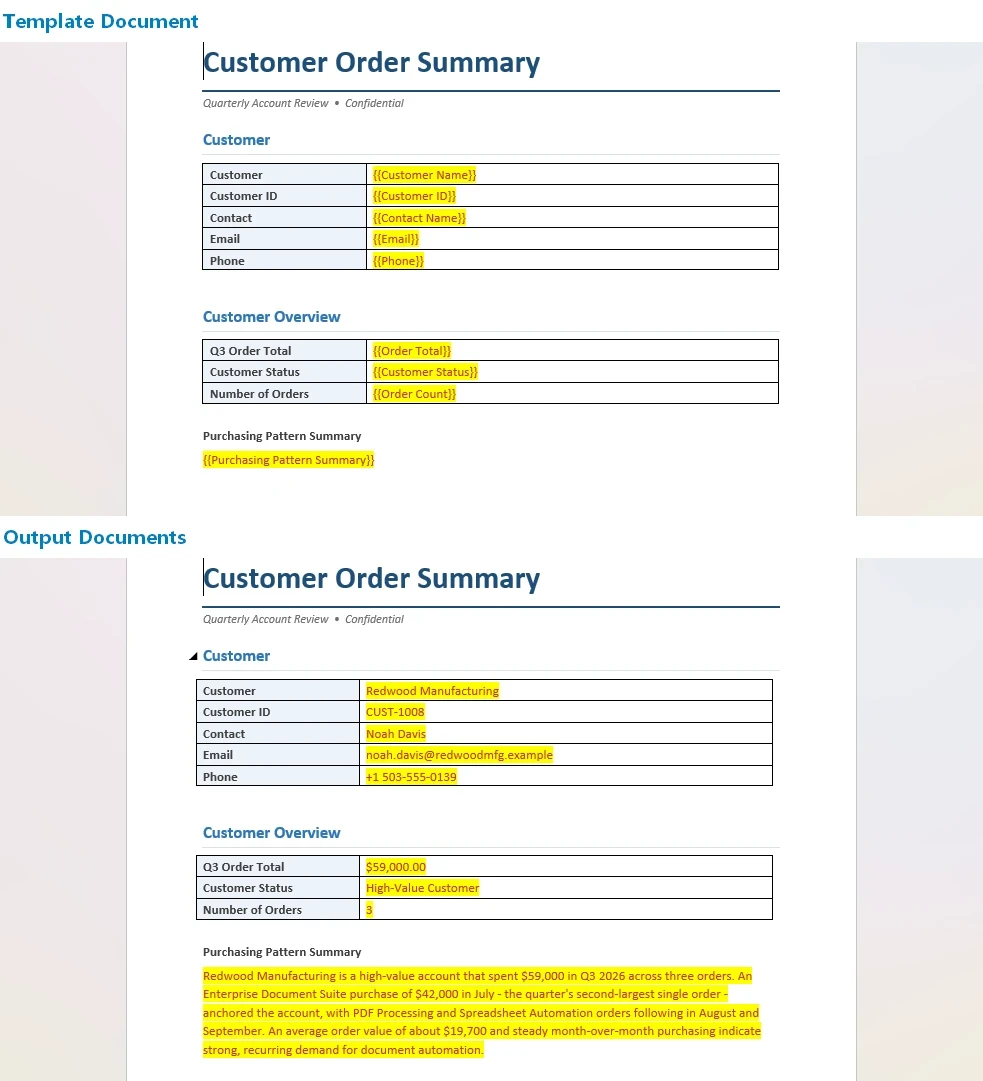
The .docx extension on your save target or file pattern picks the output format; point the same instruction at .pdf and the agent exports the identical documents for distribution, with no separate rendering step.
Key API Calls
Document.AI(options)-- attaches the AI document processor to a Word document objectExecuteInstruction(doc, instruction, savePath, attachments)-- runs the generation;nullsavePath means "write intoWorkDir", and the workbook rides along inattachmentPathsAIResult.Success/AIResult.ErrorMessage-- verifies the run and surfaces failures
7. What You Would Write Without an Agent
For contrast, the SDK-field-binding route for the same job does everything explicitly. The following is intentionally simplified to show the amount of application logic involved; a production implementation would also need to load and group the workbook data:
using Spire.Doc;
using Spire.Xls;

// A fixed shape is fine; every variation is more wiring.
foreach (DataRow row in customersTable.Rows)
{
    using (Document doc = new Document())
    {
        doc.LoadFromFile(@"templates\order-summary-template.docx");

        // Find-and-replace per anchor...
        doc.Replace("{{CustomerName}}", row["Customer"].ToString(), true, true);
        doc.Replace("{{TotalAmount}}", row["Amount"].ToString("C"), true, true);

        // Line items live in a second sheet: you hand-join them per customer,
        // build a table, and insert it at a bookmark...
        // The "flag high-value customers" rule is an if/else you maintain,
        // and the per-customer summary paragraph is a template you write by hand.
        doc.SaveToFile($@"out\{row["Customer"]}-order-summary.docx");
    }
    // ... and every new rule, column, or layout change means editing this and recompiling.
}
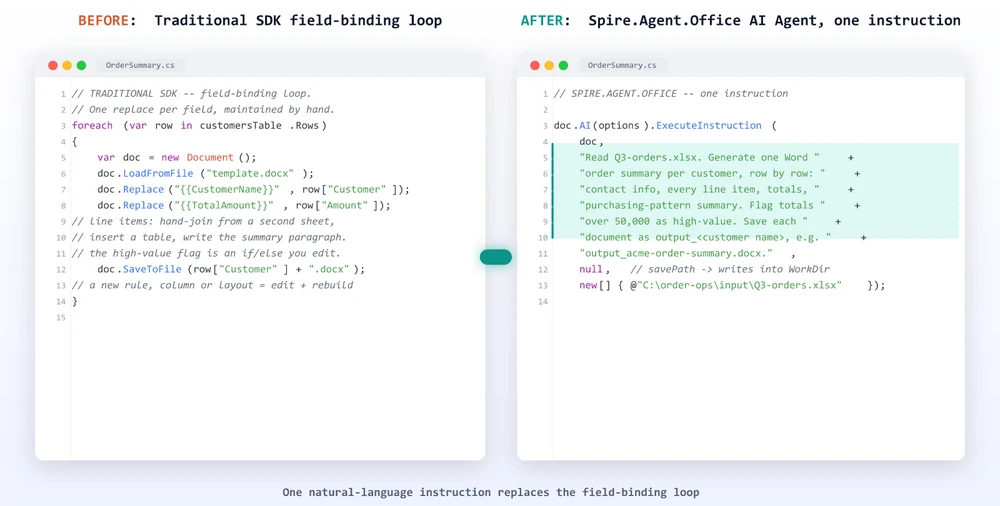
The agent does not remove the need for code -- it removes the need for mapping and layout code. The difference is where the logic lives: in a column index and a find-and-replace, or in a sentence the business can read and edit. When business rules or document structures change frequently, the natural-language approach can reduce the amount of mapping and layout code that must be maintained. The template-plus-data pattern scales beyond order summaries: Batch Contract Generation with Spire.Agent.Office walks the same one-instruction, one-document-per-record flow applied to contracts.
8. Where AI Stops and Application Logic Begins
A useful boundary is not "what AI can and cannot do" but what the application should keep owning. A document generation agent sits on top of deterministic code; it does not replace it.
Your application still owns the parts that have nothing to do with understanding the spreadsheet:
- File discovery and access -- finding the workbook, checking permissions, staging inputs
- Workflow scheduling -- when the job runs, on what trigger, in what order
- Data source control -- which workbook is an authorized input and where it came from
- Error handling and retries -- what happens when a file is missing or a run fails
- Final approval -- a human reviews the generated documents before they ship
The agent handles the semantic steps:
- Understanding -- reading what each column means from different workbooks
- Planning structure -- determining how many sections and rows the document needs
- Analysis -- turning order data into a summary and a high-value flag
- Composition -- assembling personalized Word documents from the requirement
Keep the deterministic plumbing in code, where it is testable and auditable, and hand the semantic generation to the agent. Each side does what it is good at. AI Contract Review in C# shows the same split from the other side: the agent handles the semantic step of reviewing a document's content while the application keeps the deterministic file handling around it.
9. FAQ
Is this a replacement for Word mail merge?
Not a drop-in replacement; it is the same job taken further. Mail merge maps Excel columns into fixed Word fields, which is enough for a letter with a stable shape. An AI agent can do that too, and can also read the workbook by content, shape structure per record, add analysis, and compose prose. For simple fixed-shape outputs, mail merge stays a fine tool; when the document must vary with the data, the agent carries more of the work.
How do I generate multiple Word documents from Excel data?
Pass the workbook as an attachment, set the save path to null, and point AIOptions.WorkDir at an output folder. One ExecuteInstruction with a row-by-row instruction makes the agent produce one independent document per record, each saved to that folder. No C# loop over the rows is needed for the per-record batch.
Can I generate Word documents from Excel without using Mail Merge?
Yes. In C# you can bind a template with the SDK directly, or hand the workbook to an AI agent that reads it from a natural-language instruction, and receive a real .docx or PDF in return. Mail merge is one route, not the only route, and it is the least flexible once the document needs analysis or conditional sections.
What is the difference between Mail Merge and AI document generation?
Mail merge binds defined fields to defined columns: Excel column in, Word field out. AI document generation interprets the request and the data together, so it can interpret what each column means and shape the document's structure accordingly, produce conditional or analytical content, and assemble several documents from one instruction. The former is a mapping step; the latter is a generation task.
Can I generate personalized Word documents from an Excel file in C#?
Yes. Load a Word template or a blank document into Spire.Doc, attach the Excel workbook, and call ExecuteInstruction with a description of the personalized output. The agent reads each record and composes a document tuned to it, saved per record or as one combined file, all inside your own .NET application.
Can an AI agent use Excel data to generate Word documents?
Yes. Spire.Agent.Office pairs a language model with a deterministic Word and Excel layer, so the instruction is understood and the result is still a real Word file your team can open, format, and distribute. The agent interprets the spreadsheet's content rather than relying on a fixed column mapping, which is what makes heterogeneous inputs work.
Ready to Automate Your Word Generation?
If your workflow is "Excel data becomes personalized Word documents," the fastest path is to describe the output and let the agent handle the rest. Follow the Getting Started tutorial to run your first instruction-driven Word workflow in .NET.
Further Reading
- Generate Various Word Templates with Spire.Agent.Office -- the same generation pattern applied to different Word templates
- Automating Student Score Analysis and Ranking with Spire.Agent.Office -- an Excel-side workflow that feeds the documents this article generates
- Spire.Agent.Office product overview -- AI agent SDKs for every Office document format
AI Agent for Document Processing: What It Is and How It Works
Table of Contents
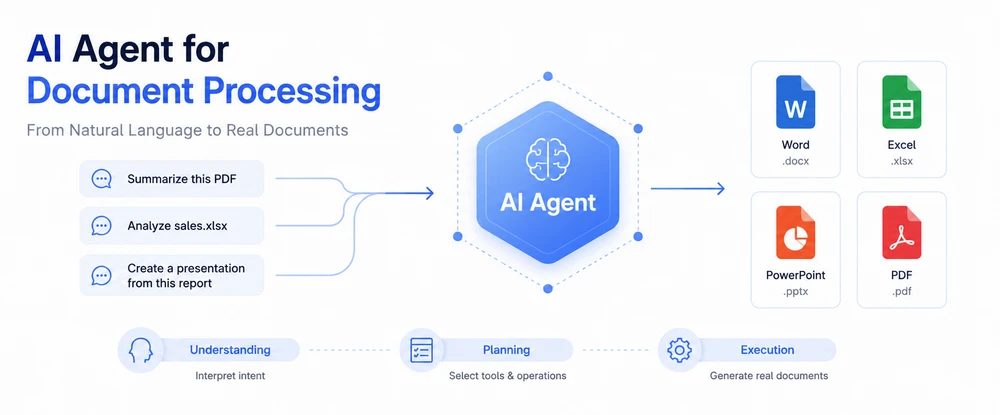
An AI agent for document processing is a software system that uses artificial intelligence models and tools to understand natural language instructions and perform tasks such as creating, editing, converting, analyzing, or extracting content from documents—without writing line-by-line code. An AI agent can work with Word, Excel, PowerPoint, and PDF files by interpreting user intent, selecting appropriate document-processing operations, and producing output that preserves the required file structure and formatting.
AI agents are one approach to automating document-related work. Other approaches include traditional programmatic APIs, raw language model endpoints used with custom code, and workflow engines that automate predefined steps. This article explains what AI-driven document processing is, how it differs from earlier methods, and when it makes sense to use it alongside other technologies.
1. What Is AI Document Processing?
Document processing—the activity of reading, creating, editing, converting, extracting information from, or analyzing digital documents—has always been one of the most common software tasks across industries. Email invoices arrive as PDFs. Sales reports sit inside Excel workbooks with inconsistent layouts. Employee handbooks live in Word templates that change every year. Legal agreements show up as scanned PDFs from external parties. For decades, organizations have written code to manage this variety.
Traditional document-processing approaches share a common pattern: someone defines what should happen to which documents using explicit rules. A template-fill script reads a CSV and populates a Word .docx by replacing predefined placeholders. A Python script iterates over Excel columns and calls layout functions to produce a styled report. A C# routine opens a PDF, searches for specific fields by position or regex pattern, and writes the results back into a database. These methods work well for stable, well-specified workflows—but they require programmatic instructions for every variation. When the template changes, when the input format shifts, or when new document types enter the pipeline, the code needs to be rewritten, tested, and redeployed.
AI-driven document processing extends those same operations by introducing a layer of language understanding. Instead of telling the software exactly which placeholder to replace or which cell range to read, you describe what result you want in natural language: "Summarize this contract and extract the payment terms," or "Compare last month's sales spreadsheet to this month's and save the analysis as a formatted report." The system uses an AI model to interpret that instruction, determines which document operations are needed, executes them against real file formats, and returns a properly structured output.
In practice, AI document processing does not replace traditional approaches—it augments them. Simple, predictable tasks may still be better handled by rule-based scripts because they are faster and fully deterministic. But when documents vary in structure, when inputs arrive in unpredictable formats, or when the question being asked of a document changes frequently, an AI-assisted approach saves engineering effort and adapts more naturally to shifting requirements.
2. What Is an AI Agent for Document Processing?
An AI agent for document processing is a system that combines language-model reasoning with document-oriented tools so a person can describe a task in conversational terms and have a real, well-formed document returned as output.
The defining characteristic of an agent—in this context—is that it bridges two capabilities that most individual components do not possess on their own:
- Understanding. The system interprets open-ended, high-level instructions about what to do with a document. "Review this agreement for risky clauses" or "Turn these quarterly figures into a presentation slide deck" are not structured queries; they require semantic comprehension.
- Action. After understanding the intent, the system selects and executes concrete document operations—reading a file, extracting text or tables, inserting content, changing layout, generating a new file—in formats like
.docx,.xlsx,.pptx, or.pdf.
Different vendors and research groups use slightly different terminology around these concepts. Some call these systems "AI assistants," others use "agentic workflows," "autonomous document pipelines," or "document intelligence platforms." The distinctions are subtle and often marketing-driven. What matters for evaluation is not the label but the capability: can the system both interpret unstructured instructions and manipulate document files through real APIs?
In practice, the term "document agent" covers several kinds of systems — including extraction-focused agents that ingest, classify, and route documents, and agents that directly interpret natural-language instructions and manipulate or generate documents. In this article the term refers specifically to agents that combine language-model reasoning with document-processing APIs. Below is a functional comparison that distinguishes an AI document agent from related technologies. These categories overlap significantly—many products combine several of them—but understanding where each approach excels helps clarify what an agent actually adds.
| Approach | Primary strength | How it handles instructions | Typical limitation |
|---|---|---|---|
| LLM endpoint only | Deep language understanding | Interprets natural language very effectively | Does not by itself provide deterministic, format-aware control over Office and PDF file structures; produces raw text or HTML unless combined with document-processing tools |
| Natural-language agent | Bridges understanding with tool execution | Takes high-level requests and chains appropriate tools together | Depends on quality of available tools and orchestration logic |
| Traditional SDK / API | Deterministic, precise file manipulation | Requires explicit programmatic commands; no language understanding | Rigid—every change in template or input format requires code updates |
| RPA (Robotic Process Automation) | Automates UI-level interactions across applications | Follows scripted workflows; some modern RPA includes vision and OCR | Struggles with ambiguous instructions that require semantic interpretation — RPA (Robotic Process Automation) is based on software robots that handle data across applications following predefined rules, whereas agents interpret open-ended natural-language requests |
| OCR (Optical Character Recognition) | Converts images / scans into machine-readable text | Operates on visual content; extracts characters and basic layout | Does not perform document generation, analysis, or multi-step workflows |
These capabilities often appear together in production systems. An enterprise document pipeline might use OCR to digitize scanned invoices, pass the extracted text through an LLM for semantic classification, route the result into an RPA workflow for data entry, and finally generate a branded report using a document API. An AI document agent sits at the center of such a pipeline as the component that understands the human request and coordinates whichever tools are needed to fulfill it.
When people search for "what is AI document processing" or "how AI document agents work," they are usually trying to understand whether buying or building such a system is different from combining off-the-shelf tools manually. The short answer: yes—when document variety, instruction variability, and formatting fidelity matter enough to justify a dedicated orchestration layer between language understanding and file manipulation.
3. How Does an AI Document Agent Work?
At a high level, an AI document agent follows five conceptual stages:
User provides natural language instruction
     ↓
AI model interprets intent and identifies needed operations
     ↓
Agent selects appropriate document-processing tools or APIs
     ↓
Document APIs execute file-level operations (read, modify, generate)
     ↓
Output document is generated using deterministic document-processing operations
Each stage introduces decisions that determine how accurate, reliable, and well-formatted the final output will be. Understanding these decisions clarifies why a pure LLM alone cannot reliably produce real Word or Excel files—and why a traditional SDK alone cannot understand a vague or open-ended request.
Architecture: From Intent to File
A typical implementation chains five layers, passing the document through each stage from intent to output:
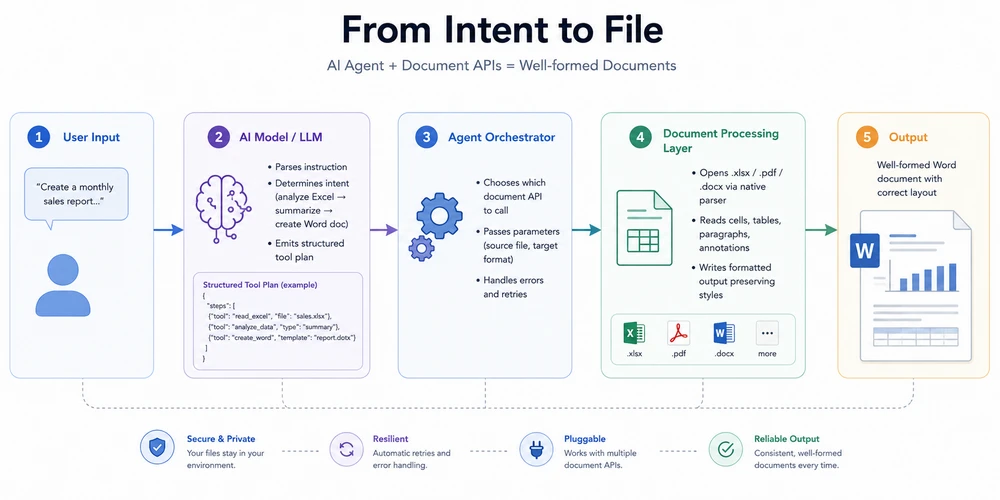
Example: From a Natural-Language Request to a Finished Document
Consider a scenario that many finance teams encounter every month: a manager sends a folder of regional sales workbooks and asks for a consolidated summary report in Word format.
A user's natural-language request might read something like:
"Read all the Q3 sales files in this folder, compare each region to the previous quarter, summarize the key trends and outliers, and save the results as a formatted Word document."
Behind the scenes, the agent decomposes that single sentence into a sequence of operations:
- Discover and open every
.xlsxfile in the specified directory. - Read summary rows or key sheets from each workbook.
- Compute period-over-period changes.
- Identify the highest-performing and underperforming regions.
- Compose a narrative summary describing the trends.
- Create a new Word document, insert the summary, add tables showing regional comparisons, and apply formatting consistent with corporate templates.
The finished deliverable—the consolidated Word report with the narrative summary and regional comparison tables:

Without an agent, a developer would typically need to build and orchestrate each of those six steps—writing code for file discovery, reading data, computing changes, calling an LLM for prose generation, parsing its response, and mapping it into a structured document layout. With an agent, steps 4–6 can be expressed in a single instruction, while step 1–3 still leverage the same file-parsing capabilities your application already owns.
This kind of cross-format workflow—where reading data from one type of file and producing output in another requires both semantic reasoning and precise file manipulation—is exactly where AI agents provide the most value. Tools like Spire.Agent.Office package the orchestration layer together with deterministic document APIs so developers get a natural-language interface without losing control over formatting, layout, or output fidelity.
4. What Can AI Agents Do With Documents?
Depending on the capabilities of the underlying document-processing tools, AI agents can potentially cover a broad range of document operations that developers traditionally implement with explicit code—only expressed through intent rather than syntax. The table below shows representative operation categories that many implementations support when their underlying document-processing tools provide those capabilities.
| Capability | Word (.docx/.doc) | Excel (.xlsx/.xls) | PowerPoint (.pptx/.ppt) | PDF (.pdf) |
|---|---|---|---|---|
| Create from scratch or data | Yes — paragraphs, tables, headings, styles | Yes — sheets, cells, formulas, charts | Yes — slides, layouts, themes | Yes — sections, text blocks, annotations |
| Edit existing documents | Yes — insert, replace, reflow content | Yes — update cells, rearrange rows/columns | Yes — modify slide content, reorder | Yes — add/remove pages, annotate, redact |
| Convert between formats | Yes ↔ PDF, HTML, XPS, Markdown | Yes ↔ CSV, PDF, HTML | Yes ↔ PDF | Yes ↔ DOCX, HTML, image formats |
| Analyze / Summarize content | Yes — extract clauses, identify structure | Yes — compare datasets, compute statistics | Yes — review slide narratives | Yes — classify pages, extract key information |
| Extract data (structured) | Yes — pull text from paragraphs and tables | Yes — read cell values, ranges, named ranges | Limited — slide text and notes | Yes — parse forms, tables, embedded text |
Actual capabilities depend on the underlying document-processing libraries and the specific agent implementation.
Common use cases that fall under these capabilities include:
- Contract and agreement review: Read incoming PDFs or Word files, flag unusual clauses or missing provisions, and produce a Markdown or Word summary brief.
- Report consolidation: Aggregate disparate spreadsheets from multiple regions, detect anomalies, and generate a management-ready Word or PDF report.
- Presentation generation: Feed a briefing document or dataset into a presentation template and produce a finished slide deck with charts and talking points.
- Invoice and form processing: Open scanned or digital invoices, extract line items and totals, verify against purchase orders, and populate downstream systems.
- Policy and handbook maintenance: Update employee documents by replacing names, dates, and department-specific language across dozens of templates.
For teams that already build document workflows today, these capabilities do not replace their existing logic—they extend it. An agent handles the parts of a workflow that depend on human communication (understanding what to do), while the underlying document APIs handle the parts that depend on precision (producing the right file with the right layout). See the official tutorials on batch contract generation and generating presentations from documents for examples of how these operations fit into real applications.
5. Approaches to Document Automation
Not every organization reaches for an AI agent when automating document workflows. The technology choice depends on what kinds of documents you handle, how frequently they change, and how much engineering effort you have available. Below is a comparison of the primary approaches you will encounter in practice.
| Approach | Strengths | Limitations | Best suited for |
|---|---|---|---|
| Natural-language agent | Human-friendly interaction; minimal boilerplate; adapts to varied input formats | Requires integration with a document-processing layer; depends on model accuracy for complex instructions | Teams that receive documents with inconsistent structures and want rapid iteration without recompiling |
| LLM API + custom code | Highly customizable; pick best-of-breed models for each task; full control over orchestration | Significant engineering effort for file I/O, error handling, formatting, and validation | Organizations already running an LLM stack who want maximum flexibility and have engineering bandwidth |
| Traditional document SDK / API | Fully deterministic; precise control over layout, styling, and output consistency; no model dependency at runtime | Requires explicit programmatic instructions for every scenario; rigid when templates or input structures change frequently | Fixed-format documents with predictable structure that rarely change, such as standardized forms or compliance reports |
| RPA / workflow engine | Good for automating repeatable, rule-based processes across systems; leverages existing infrastructure | Less flexible for ambiguous or open-ended tasks; struggles when document formats vary widely | Back-office processes with high volume and low variance, such as invoice entry into ERP systems |
None of these approaches is universally superior. A mature document-automation strategy often combines more than one. For example, an organization might use traditional SDK code for generating fixed compliance reports and reserve an AI agent for ad-hoc analysis tasks that vary from week to week.
Where a solution like Spire.Agent.Office differentiates itself is in offering a single SDK that provides both the natural-language interface and the deterministic document-processing capabilities required to turn instructions into real files. Rather than wiring together separate LLM services, custom formatting libraries, and orchestration logic, developers add an AI processor to their existing document objects — a single AI(options) call on any Document, Workbook, Presentation, or PdfDocument instance — and then issue plain-language instructions that return formatted output while preserving layout, fonts, tables, and styles.
If you already use a traditional document library for deterministic operations, adding an agent layer typically means wrapping the same Document or Spreadsheet object with an AI processor and replacing field-by-field replacement logic with declarative instructions. The learning curve centers on writing effective prompts rather than learning a new file format.
6. AI Document Processing vs Intelligent Document Processing (IDP)
If you have researched document automation professionally, you will encounter several overlapping terms: AI document processing, intelligent document processing (or IDP), document intelligence, AI document automation, and AI document agent. Understanding their relationship helps narrow down what you are actually looking for—and avoids confusion caused by vendor terminology that varies across markets.
In common usage:
- AI document processing is often used as a broad umbrella term—it refers to any approach that applies artificial intelligence techniques to understand, create, edit, convert, or analyze documents. However, how broadly or narrowly this term is defined varies depending on who you ask.
- Intelligent Document Processing (IDP) originated in enterprise document management with an emphasis on the capture-and-extract phase: scanning or ingesting documents, classifying them by type (invoice, receipt, contract), applying OCR, extracting fields, validating against business rules, and routing to downstream systems. Over time, the boundaries of what counts as IDP have shifted as vendors incorporate generative AI into their products.
- Document intelligence is sometimes used interchangeably with IDP but often carries a stronger emphasis on extraction and understanding over generation. Vendors in the legal-tech and financial-services spaces favor this terminology.
- AI document automation highlights the execution side—using AI to trigger workflows that produce, send, or modify documents based on triggers or user requests.
- AI document agent focuses on the orchestrator aspect: a system that receives natural-language intent, plans the necessary operations, and delegates to whichever tools are required to complete the job.
These definitions are conventional rather than formal. You will find different vendors placing boundaries at different points, and many products span multiple categories simultaneously. The key takeaway is not which label your chosen tool carries but whether the tool can do what you actually need: understand a request, pick the right operations, execute them against real files, and return structured output.
For example, a system labeled "document intelligence platform" might excel at classification and extraction but lack strong generation capabilities. An "AI document agent" may support generation in addition to extraction, classification, and routing, depending on its tools and intended workflow. In practice, the best solutions combine extraction, reasoning, and generation under one roof—which is why frameworks like Spire.Agent.Office position themselves as end-to-end agents rather than point solutions for a single stage of the pipeline.
7. Why AI Agents Are Useful for Document Processing
The core reason AI agents matter for document work is simple: most meaningful document tasks involve three requirements simultaneously.
First, the system needs to understand what the user wants. "Prepare a quarterly summary from these reports" is not a structured query—it leaves unspecified which files to read, which metrics to extract, how to structure the output, and which tone to use. A language model excels at resolving that ambiguity.
Second, the system needs to execute actions against actual files. Generating coherent text in a chat window is different from producing a .docx with correct paragraph styles, page margins, table borders, and embedded charts. A language model by itself does not provide deterministic, format-aware control over Office file structures.
Third, the system needs to ensure the output preserves structure and formatting. Business documents carry constraints that go beyond readable text: clause numbering, section hierarchies, footer headers, merge fields, conditional formatting rules. These are structural properties that belong to the file format itself, not to plain text.
A traditional SDK is designed to address #2 and #3 deterministically, but it does not provide the language-level intent understanding described in #1. A raw LLM API can address #1 effectively, but does not by itself provide deterministic control over #2 and #3. Combining the two—putting a language model behind a deterministic document-processing layer—is what makes an agent useful for real-world document work.
Organizations that process high volumes of documents often face the same fundamental tension: documents require both semantic understanding (to figure out what to do) and deterministic file manipulation (to produce correctly formatted output). AI agents address this tension by combining both capabilities under one interface.
Industry analysts expect this combination to become the norm rather than the exception. Gartner predicts that by 2028, 33% of enterprise software applications will include agentic AI, up from less than 1% in 2024, and that 15% of day-to-day work decisions will be made autonomously—a shift with direct implications for document-heavy business workflows.
8. Frequently Asked Questions
What is the difference between an AI document agent and a regular LLM?
An LLM (Large Language Model) is a neural network trained to generate and understand text. It operates on sequences of tokens. By itself, it does not provide deterministic, format-aware control over Office or PDF file structures — though LLM-powered systems can access these formats through separate tools and APIs. An AI document agent sits on top of an LLM (or similar model) and connects it to document-processing tools that can open .docx, .xlsx, .pptx, and .pdf files, execute operations on them, and produce well-formed output. The LLM provides understanding; the agent provides the bridge to real files.
Do I need to send documents to the cloud to use an AI document agent?
Not necessarily. Many AI document agents can run entirely within your own infrastructure—the SDK or service runs on-premise or in a private cloud, and documents stay inside your environment. To analyze content, the relevant text layers are transmitted to the underlying model, which may reside on a hosted API or locally depending on configuration. If data privacy is a concern, look for solutions that support local model deployment or allow you to configure where model calls originate.
Which document formats do AI agents support?
AI document agents can support a wide range of formats, but the exact set varies considerably by implementation. Some agents focus primarily on PDF and image-based OCR workflows, while others handle full Microsoft Office file formats including Word (.docx, .doc), Excel (.xlsx, .xls), and PowerPoint (.pptx, .ppt). Many also support intermediate formats such as HTML, Markdown, XPS, CSV, and common image types for conversion purposes. Check the documentation for any product-specific limitations around encrypted files, legacy binary formats, or specialized templates.
Can I use my own AI model with a document agent SDK?
Some document-agent SDKs support flexible model integration, allowing developers to configure the provider or endpoint used by the agent. You can often choose between hosted services like OpenAI or Azure OpenAI, open-source models running in your environment, or proprietary endpoints provided by the SDK vendor. Supported providers vary by implementation, so consult the integration guide for the specific product you evaluate.
How does an AI document agent differ from RPA or OCR tools?
RPA (Robotic Process Automation) primarily automates predefined workflows and interactions, while AI agents can interpret higher-level instructions and dynamically select tools or actions based on context. Modern RPA systems sometimes incorporate OCR, NLP, or even LLMs themselves, but their core paradigm remains rule-based process automation.
OCR (Optical Character Recognition) primarily converts visual document content into machine-readable text, while an AI document agent can use OCR as one component in a broader workflow that includes interpretation and document operations. In practice, agents frequently invoke OCR internally when dealing with scanned documents but go far beyond text extraction to generate, format, and structure new files from what they find.
Is AI document processing suitable for enterprise workflows?
AI document processing is increasingly suitable for enterprise use, but readiness depends on several practical factors. On the positive side, modern document agents provide deterministic file manipulation that ensures output matches corporate templates and brand guidelines. They run inside existing application stacks without requiring users to learn new interfaces.
Key considerations before deployment include data privacy (how and where document text is transmitted), model reliability (handling edge cases where instructions are ambiguous), human-in-the-loop review processes for sensitive documents, and the ability to configure fallback behavior when a model call fails. Enterprises that pilot an agent for low-risk tasks first—internal memos, draft summaries, non-compliant templates—usually reach production deployments faster than those attempting enterprise-wide rollout on day one.
What is the difference between AI document processing and Intelligent Document Processing (IDP)?
Intelligent Document Processing (IDP) typically refers to enterprise-focused systems that specialize in the capture-and-extract phase of document workflows: ingesting documents, classifying them by type, applying OCR, extracting structured fields, validating against business rules, and routing to downstream systems. AI document processing is a broader umbrella term that encompasses IDP but also includes generation, transformation, cross-format workflows, and interactive agent-based automation.
A useful way to think about the distinction is that IDP traditionally emphasizes document ingestion, classification, extraction, validation, and downstream workflow orchestration, while AI document processing is often used more broadly to include analysis, generation, transformation, and agent-based reasoning. The two categories increasingly overlap as vendors incorporate generative capabilities into IDP platforms and agents adopt structured extraction pipelines.
Ready to Try AI Document Processing?
AI-driven document processing spans a wide range of use cases, from simple report generation to complex cross-format workflows that combine data analysis, summarization, and structured output. If you are evaluating options for integrating AI agents into a .NET application, start with the official Getting Started tutorial, then explore topic-specific guides on contract generation and presentation automation.
Further Reading
- Spire.Agent.Office product overview — AI agent SDK for Word, Excel, PowerPoint, and PDF document processing
- Batch Contract Generation tutorial — generating contracts from templates and data sources
- Generate PPT from Documents — turning Word, PDF, and other formats into presentations
- Automate Student Score Analysis in Excel — data analysis and ranking with AI agents
- Generate Various Word Templates — building templates the agent can fill
Automate Excel Report Generation with an AI Agent in C#
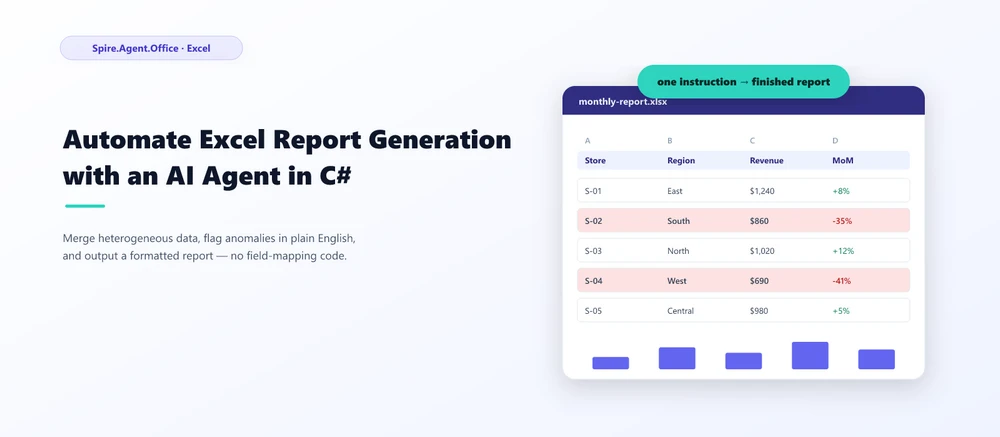
AI for Excel in C# means pairing a language model's judgment with a real Excel-processing library inside a .NET application, so the application can merge, normalize, analyze, and format spreadsheet data from natural-language instructions instead of column-by-column code. The hard part of Excel reporting has rarely been drawing the final chart — it is turning a pile of inconsistent source workbooks into data you can actually trust. With an AI agent you describe the reporting task ("merge these 20 store workbooks and flag stores whose revenue fell more than 30%") and get back a formatted workbook, not a chat answer. Spire.Agent.Office supplies both halves: the language understanding and a deterministic document layer that guarantees a real .xlsx (or PDF) comes out.
Quick Navigation
- From Heterogeneous Workbooks to a Common Data Model
- Turning Business Rules into Natural-Language Analysis
- From Analysis to a Management-Ready Report
- Building the Workflow in C#
- FAQ
1. The Real Bottleneck in Excel Report Automation
Take the recurring task behind most "monthly reporting" requests. An operations team runs 20 regional stores, and each store sends a sales workbook at month-end. In theory this is one report. In practice it is twenty different files that happen to share a filename pattern:
- The columns do not match. One store calls the figure
Revenue, anotherSales Amount, a thirdNet Sales. - The layout does not match. One store puts months across columns, another across rows, a third tacks a notes column in the middle.
- The data types do not match. Dates come in as text, numbers come in as thousands, and at least one store merges a title row into the header.
So before anyone can produce a chart for management, an analyst spends the week opening files, mapping columns, normalizing dates, hunting for typos, and only then checking for anomalies and assembling the report. None of that is the "report generation" part. It is all data preparation.
The point to internalize: the difficult part of Excel reporting is rarely creating the final chart. It is turning inconsistent source workbooks into data that can actually be trusted. A chart library will happily plot wrong data; what the team lacks is a reliable path from raw inbox files to a clean, comparable table. That path is exactly where an AI agent changes the economics.
2. What Changes When an AI Agent Enters the Workflow
Automation of this task is not new — it is just normally expensive. Compare the two workflows:
Traditional automation
Inspect files
→ map columns
→ normalize data
→ write rules
→ generate workbook
Every step before the last one is pre-defined: you write a column map for each known header, a date parser for each known format, and a threshold for each rule. The moment a store renames a column or a business rule changes, the map and the rules are wrong, and a human re-enters the loop.
Agent automation
Describe the reporting task
→ provide source workbooks
→ review result
The agent reads the meaning of each workbook rather than a fixed position, so the column map and the rule set no longer have to be enumerated up front. What it removes is precisely the expensive part: the work of pre-defining a schema and a rule set that will break on the next file.
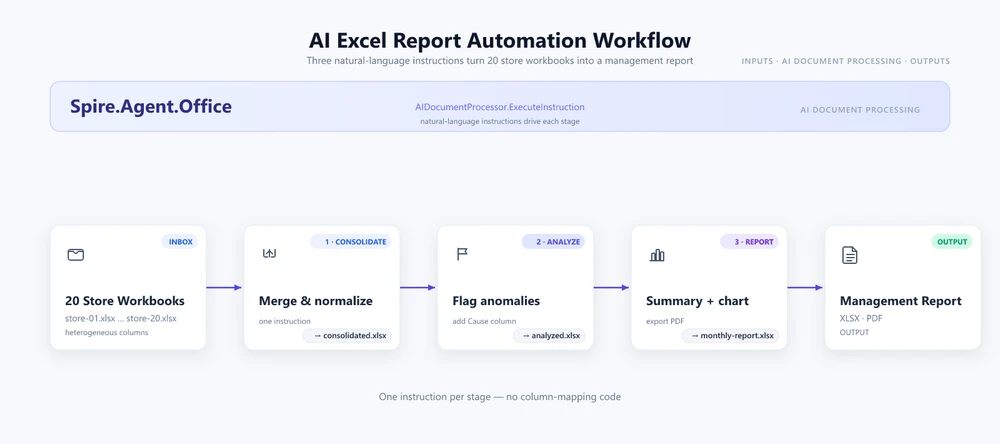
The rest of this article walks that pipeline once, from raw workbooks to a printed PDF, using the 20-store scenario as the running example. Sections 3 through 5 explain what the agent does at each stage; section 6 gives the complete C# that drives it.
3. From Heterogeneous Workbooks to a Common Data Model
The Excel-specific version of the problem is that different workbooks "look the same" without actually being the same. Three stores can each send a table with four columns and still give you no way to merge them without human interpretation:
| Store A | Store B | Store C |
|---|---|---|
| Revenue | Sales Amount | Net Sales |
| Month | Reporting Period | Date |
| Units | Quantity Sold | Qty |
There is no column index that maps these onto each other, because the mapping is semantic, not positional. Revenue, Sales Amount, and Net Sales are three names for the same concept, and only understanding the header means you can align them.
The agent's consolidation step turns that semantic alignment into a single schema:
Store / Region / SKU / UnitsSold / Revenue / Month
It reads each source workbook, resolves the header names against that target model, aligns rows and columns, skips duplicate header and title rows, and writes one normalized table. The developer never writes a FindColumnByHeader("Revenue") routine — the instruction names the target schema, and the agent works out the mapping from each file.
This is the stage with the largest one-off payoff, because it is the stage that currently consumes the most analyst time and breaks most often when a new store joins.
4. Turning Business Rules into Natural-Language Analysis
Once the data is in one place, reporting needs judgment, and judgment is where hardcoded rules fail. The running example uses a typical finance rule:
Flag rows where revenue fell by more than 30% or grew by more than 50% versus the prior month.
Notice how much is packed into that sentence, and how awkward each part is as code:
- Why 30% and 50%? Those are business thresholds with context — a seasonal store, a new SKU, or a promotion changes what "unusual" means. A hardcoded
if (change < -0.30)treats every store identically and fires false alarms on seasonality. - How do you change it? In code, you recompile and redeploy. In the instruction, the analyst edits one sentence: "fell by more than 20%," or "only for the East region," or "flag only SKUs with more than 100 units sold."
- Add a dimension? Want the rule applied per store and per region and per month? You add a clause to the instruction, not a nested loop.
- Explain the result? The agent can append a
Causecolumn with a one-sentence likely explanation for each flagged row — something a threshold comparison alone can never produce.
The principle that falls out of this section is worth stating plainly:
Code defines how; instructions define what.
The developer stops encoding the rule and starts describing the outcome. The rule stays readable, editable by the business, and survives a new store or a changed threshold without a code change.
For a complete worked example of the same instruction-driven analysis applied to a ranking workflow, see the Student Score Analysis and Ranking tutorial.
5. From Analysis to a Management-Ready Report
Finding anomalies is only half of reporting. The result still has to become a workbook someone can actually use — the analyst's spreadsheet is not the deliverable; the management summary is.
The pipeline completes like this:
Raw Workbooks
      ↓
Consolidated Data
      ↓
Anomalies
      ↓
Management Summary
      ↓
PDF
The final instruction composes the deliverable: a Summary sheet up front with a KPI block (total revenue, top store, bottom store, count of flagged anomalies), a monthly trend table, a bar chart of revenue by region, and print-ready formatting. Pointing the same instruction at a .pdf path exports the identical report as a PDF for distribution, with no separate rendering step.
The point to carry forward: analysis and composition are two different jobs, and the agent does both. The analyst's job becomes reviewing the flagged shortlist and signing off, not rebuilding the deck each month.
6. Building the Workflow in C#
All the pieces above are driven by one C# pipeline. Configure the agent once, then run three instructions in sequence: consolidate, analyze, report. The full setup — token, packages, and project wiring — is documented step by step in the Getting Started tutorial; here we focus on the workflow itself.
using System.IO;
using Spire.Xls;
using Spire.Agent.Office.AI;
using Spire.Agent.Office.Extensions;

AIOptions options = new AIOptions {
    SpireToken = spireToken,
    WorkDir = @"C:\retail-ops\output",
    TimeoutMs = 300000
};

string[] storeFiles = Directory.GetFiles(@"C:\retail-ops\inbox", "*.xlsx");
Directory.CreateDirectory(@"C:\retail-ops\output");
1. Consolidate. Pass the 20 inbox files as attachments and name the target schema. The normalization from section 3 happens here, driven by the instruction rather than any column map:
using (Workbook consolidated = new Workbook())
{
    AIResult result = consolidated.AI(options).ExecuteInstruction(
        consolidated,
        "Read every regional sales workbook in the inbox and merge them into one worksheet. " +
        "Each store names its columns differently (for example Sales vs Amount, Month vs Period); " +
        "normalize them to a single schema: Store, Region, SKU, UnitsSold, Revenue, Month. Skip " +
        "duplicate header rows and save the merged result as a workbook.",
        @"C:\retail-ops\output\consolidated.xlsx",
        storeFiles);

    if (result == null || !result.Success)
        throw new InvalidOperationException($"Consolidation failed: {result?.ErrorMessage}");
}
2. Analyze. Load the consolidated file and state the rule from section 4 in plain English. The agent adds an Anomalies sheet and leaves the source data untouched:
using (Workbook analysis = new Workbook())
{
    analysis.LoadFromFile(@"C:\retail-ops\output\consolidated.xlsx");

    AIResult result = analysis.AI(options).ExecuteInstruction(
        analysis,
        "Add an 'Anomalies' sheet. Compare each store and SKU's Revenue against the prior " +
        "month, flag rows where revenue fell by more than 30% or grew by more than 50%, apply " +
        "a red fill to declines and a green fill to jumps, and add a 'Cause' column with a " +
        "one-sentence likely explanation. Leave the original data sheets unchanged.",
        @"C:\retail-ops\output\analyzed.xlsx");

    if (result == null || !result.Success)
        throw new InvalidOperationException($"Analysis failed: {result?.ErrorMessage}");
}
The Anomalies sheet lands alongside the source data, with the flagged rows, fills, and Cause column applied by the instruction:
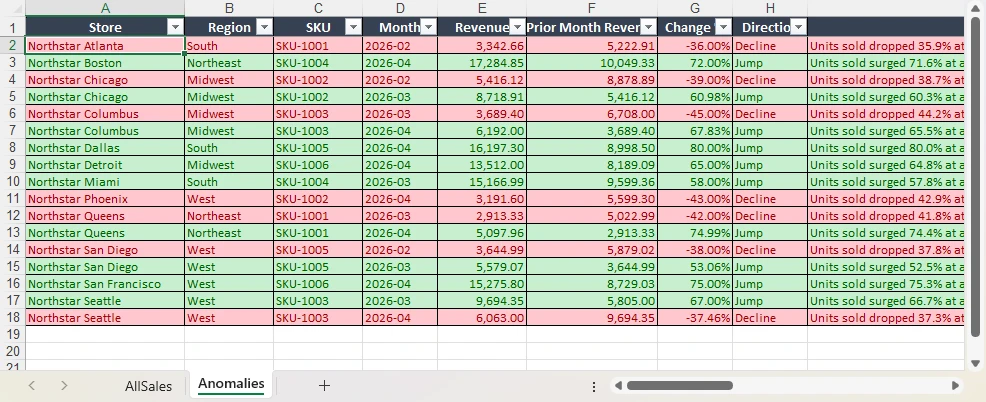
3. Report. Compose the management summary from section 5 and export it. The savePath alone chooses the format — .xlsx here, .pdf for distribution:
using (Workbook report = new Workbook())
{
    report.LoadFromFile(@"C:\retail-ops\output\analyzed.xlsx");

    AIResult result = report.AI(options).ExecuteInstruction(
        report,
        "Produce a management report. Add a 'Summary' sheet at the front with a KPI block " +
        "(total revenue, top store, bottom store, count of flagged anomalies), a monthly trend " +
        "table, and a bar chart of revenue by region. Format it for print and save the finished " +
        "workbook.",
        @"C:\retail-ops\output\monthly-report.xlsx");

    if (result == null || !result.Success)
        throw new InvalidOperationException($"Report generation failed: {result?.ErrorMessage}");
}
The Summary sheet lands at the front of the workbook, ready for print or PDF export:
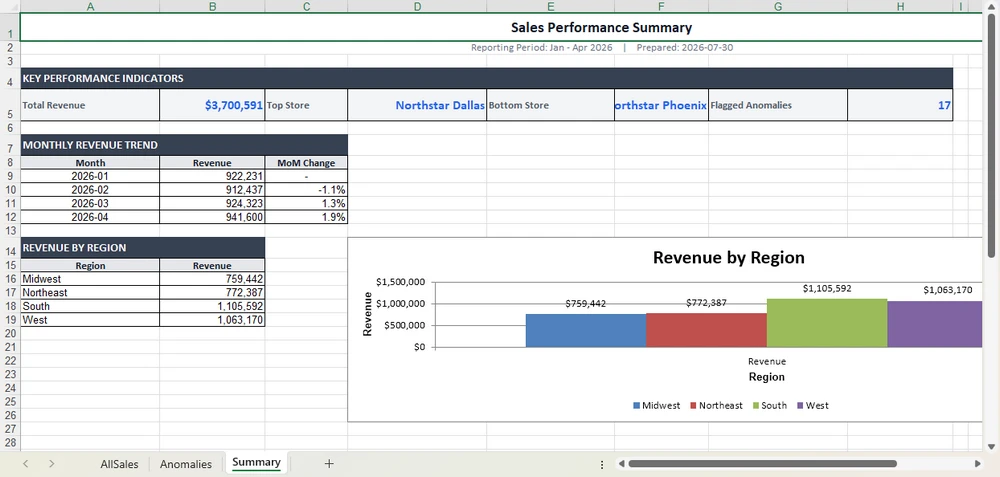
Key API Calls
Workbook.AI(options)— attaches the AI document processor to an existing workbook objectExecuteInstruction(doc, instruction, savePath, attachments)— runs one stage and writes the resultAIResult.Success/AIResult.ErrorMessage— verifies each stage and surfaces failures
What You Would Write Without the Agent
For contrast, the traditional SDK route for the same three stages locates each column by header string, hardcodes every threshold, and sets every fill cell by cell — and re-tunes all of it when a store renames a column or the rule changes:
foreach (string file in storeFiles)
{
    Workbook wb = new Workbook();
    wb.LoadFromFile(file);
    Worksheet sheet = wb.Worksheets[0];

    // Fails the moment a store names the column "Sales" instead of "Revenue".
    int revenueCol = FindColumnByHeader(sheet, "Revenue");
    int storeCol   = FindColumnByHeader(sheet, "Store");

    for (int r = sheet.LastRow; r >= 2; r--)
    {
        double current = double.Parse(sheet.Range[r, revenueCol].Text);
        double prior   = double.Parse(sheet.Range[r, revenueCol + 1].Text);
        double change  = (current - prior) / prior;

        // One hardcoded threshold; a seasonal store triggers false alarms.
        if (change < -0.30) sheet.Range[r, revenueCol].Style.Color = Color.Red;
    }
    // ... then merge, then summary, then chart -- hundreds of lines per store and per month.
}
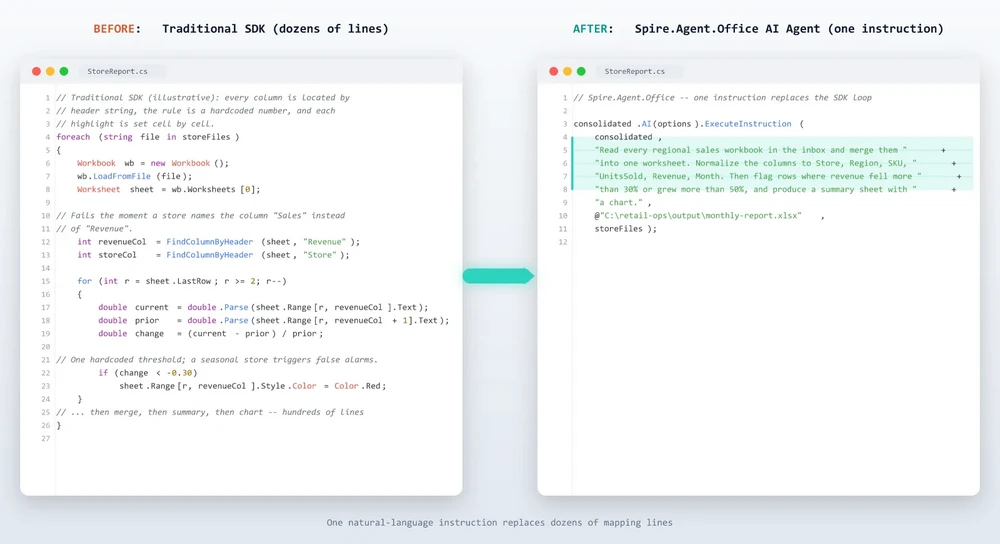
The agent does not remove the need for code — it removes the need for mapping code. The difference is where the logic lives: in a column finder and a threshold, or in a sentence the business can read and edit.
7. Where AI Stops and Application Logic Begins
A more honest way to think about the boundary than a list of "can and cannot": the agent does not eliminate deterministic application logic — it sits on top of it.
The application still owns everything that has nothing to do with understanding the spreadsheet:
- File discovery and access — finding the inbox files, checking permissions, and staging them
- Workflow scheduling — when the report runs, on what trigger, and in what order
- Data source control — which files are authorized inputs and where they come from
- Error handling and retries — what happens when a file is missing or a stage fails
- Final approval — a human reviews the flagged anomalies before sign-off
- External reconciliation — matching the report against a system of record
The agent owns the parts that are genuinely semantic:
- Understanding — reading what each column actually means
- Normalization — aligning heterogeneous schemas into one model
- Interpretation — applying a business rule to decide what is unusual
- Transformation — turning raw data into a summary, a chart, and formatting
- Composition — assembling the final workbook or PDF
This framing is more useful than a capability table because it tells you where to put your engineering effort. Keep the deterministic plumbing in code — where it is testable and auditable — and hand the semantic work to the agent. Each side does what it is good at.
8. Adding AI to an Existing .NET Excel Workflow
The last thing worth making explicit is how little you have to rebuild to get there. If your application already works with Excel through Spire.Xls, the document model you already hold is the integration point:
Workbook
   ↓
Workbook.AI(options)
   ↓
ExecuteInstruction(...)
You are not introducing a new document layer or a separate document-processing service. You are adding a natural-language execution layer onto the Workbook object you already have. The same object that opened, merged, and saved your files now accepts an instruction and carries out the workflow, with the deterministic Excel engine guaranteeing the output is a real, well-formed file — merged cells, number formats, and charts intact. The same ExecuteInstruction pattern extends to Word and PDF documents — see AI Contract Review in C#.
That is the value proposition for an Excel developer, stated in the terms you already think in: not "adopt an AI platform," but "teach the workbook you already use to take instructions." When a store renames a column or the finance team changes the flagging rule, the fix is an edit to a sentence, not a rebuild of the document pipeline.
9. FAQ
Do I need to send my Excel data to the cloud?
Not necessarily. Spire.Agent.Office runs from your own application, so the SDK and the document processing stay inside your environment; your files are not uploaded to a third-party service for storage or conversion. To analyze content, the AI needs the relevant data, and it is sent to the model for processing — an inherent step of any AI workflow. If you deploy your own model on your local network, the content stays entirely within your infrastructure. If you connect through a hosted model API such as OpenAI or Azure OpenAI, the relevant content is transmitted to that provider over the network per your configuration.
Which Excel formats does it support?
Input covers standard workbook files such as XLSX and XLS, and the agent reads the workbook directly in its native format. Output can be saved as XLSX, XLS, CSV, PDF, or HTML, so the finished report can go straight to an archive or a distribution list.
Can it replace my finance or operations review?
No. The agent automates the reading, normalization, analysis, and formatting — the hours an analyst spends each month — but the final sign-off stays with a human reviewer. Treat the flagged anomalies as a shortlist to verify, not a decision already made.
How is this different from pasting my data into ChatGPT?
A chat model can tell you what looks unusual but cannot place that answer into a styled workbook with a summary sheet, conditional formatting, and a chart, and it cannot export a PDF. An AI Excel agent pairs the language model's judgment with a deterministic Excel layer, so the output is a real, well-formed file your team can open and distribute.
Can I use my own AI model?
Yes. Spire.Agent.Office supports flexible AI model integration and is compatible with mainstream AI infrastructure, including hosted model APIs and privately deployed models. You can point the agent at your own endpoint. For questions about which providers are supported in your deployment, contact us.
Ready to Automate Your Excel Reporting?
Consolidation, anomaly analysis, and report generation are the fastest places to get value: point the agent at the inbox, describe the report, and get a formatted workbook or PDF out. Follow the Getting Started tutorial to run your first spreadsheet workflow in .NET.
Further Reading
- Automating Student Score Analysis and Ranking tutorial -- an Excel workflow the agent runs end to end
- AI Contract Review in C# -- the same instruction-driven pattern applied to Word and PDF documents
- Spire.Agent.Office product overview -- AI agent SDKs for every Office document format
AI Contract Review in C#: Automate Contract Processing in .NET
AI contract automation in C# means combining AI language understanding with document-processing capabilities inside your .NET application, so developers can review, extract, and generate contract documents by describing the task in natural language instead of writing field-mapping and layout code for every template. In practice, this is document automation in .NET where a natural-language instruction replaces the field-mapping code. Spire.Agent.Office is a document AI agent SDK that handles the language; a deterministic document layer guarantees real, well-formed Word and PDF files.
Quick Navigation
- Why Contract Review Is a Good Fit for AI
- What an AI Contract Agent Can and Cannot Do
- Common Contract Automation Scenarios
- Three Ways to Automate Contract Processing in .NET
- A Working Example: Contract Review and Generation in C#
- Why Use Spire.Agent.Office for AI Contract Automation
- FAQ
1. Why Contract Review Is a Good Fit for AI
Contract work in a developer's world is three repetitive jobs: reading (extracting parties, dates, payment terms, and obligations from agreements that arrive as PDFs and Word files), checking (spotting missing clauses or unusual language), and producing (turning a list of employees or vendors into signed-ready contracts).
For .NET developers, the challenge is not only understanding contract content; it is turning unstructured documents into structured, repeatable workflows your application can own.
Three properties make these tasks ideal for a language model rather than hand-written rules:
- The input is unstructured. Incoming contracts arrive in whatever format the other side sends. Rules that handle one layout break on the next; an LLM reads text directly.
- The output is document-shaped. The deliverable is a real
.docxor.pdfwith correct formatting, not a text blob. This is where a document layer earns its keep. - The volume changes constantly. Onboarding 50 employees or reviewing 200 vendor agreements in a month means a config-driven solution, not re-coding per template.
In practice, review and generation go together: teams want existing contracts summarized and red-flagged, and new contracts generated from a template plus structured data.
2. What an AI Contract Agent Can and Cannot Do
| Can do | Cannot do |
|---|---|
| Extract parties, effective dates, payment terms, obligations | Replace professional legal review for high-risk agreements |
| Summarize long agreements into a one-page brief | Guarantee compliance with local laws |
| Generate contracts in batches from a template + data source | Negotiate or accept terms on your behalf |
| Keep formatting, table styles, and fonts intact | Guarantee output is error-free without review |
| Run inside your own application (no cloud upload) | Interpret new or ambiguous regulations; route to counsel |
| Flag clauses that look unusual for a standard agreement | Reveal hidden risks in intentionally vague clauses |
The division of labor: the agent automates the reading, extraction, and drafting (the hours a paralegal would spend), while a human lawyer owns the final judgment. That boundary is what keeps the tool useful and the process defensible.
3. Common Contract Automation Scenarios
Contract automation spans more than hiring. The same pattern (an instruction, a template, and optional data) covers the scenarios teams search for most:
| Scenario | Example instruction |
|---|---|
| Vendor agreement review | "Review this vendor agreement and flag payment terms, liability caps, and termination conditions that differ from our standard terms." |
| Employment contract generation | "Generate one employment contract per row in 'employees.xlsx' using the template, preserving layout and styling." |
| NDA processing | "Summarize this NDA: confidentiality period, permitted disclosures, and remedies on breach." |
| Lease agreement analysis | "Extract rent, term, renewal options, and maintenance obligations from this lease, and list any unusual clauses." |
Each scenario is the same architecture: an instruction in, a real document out.
4. Three Ways to Automate Contract Processing in .NET
| Approach | Code volume | Format fidelity | Maintenance | Best for |
|---|---|---|---|---|
| Document AI agent (LLM + document layer) | One instruction + ~10 lines | High (real Word/PDF files) | Low (change behavior by editing instructions) | Teams automating contracts without building an LLM pipeline |
| Raw LLM API (OpenAI/Claude + your own code) | High (prompts, parsing, file I/O) | Low (LLMs don't natively read/write Office files) | High (you own RAG, routing, errors) | Teams that already run an LLM stack |
| Traditional SDK (Spire.Office or similar) | Dozens of lines per document type | High (deterministic) | High (every mapping is code) | Fixed, well-specified documents that rarely change |
The key point: an LLM cannot edit a contract template without a document-processing layer, and a traditional SDK cannot understand a natural-language request. A document AI agent combines both.
That is not to say the traditional route is wrong. For fixed, well-specified documents that rarely change, a deterministic SDK is often the right call, and Spire.Office still serves that need. The agent earns its place when templates, inputs, and requirements change often enough that re-coding becomes the bottleneck.
Why a Raw LLM API Is Not Enough for Contracts
Calling gpt-4 or claude directly to "generate a contract" fails in three ways that matter in production:
- It cannot reliably read or write Office files. LLMs see text, not
.docxand.pdfstructure. Reading a Word template, keeping a table intact, or producing a valid PDF usually requires a separate extraction and reconstruction pipeline you have to build yourself. - Formatting is not guaranteed. Contract templates carry clause numbering, tables, and fonts that matter to the recipient. A raw LLM returns text, and the formatting you lose is exactly what legal and HR departments care about.
- You reimplement the whole orchestration. Prompt design, field mapping, error handling, file I/O, and output validation become your code to own and maintain.
A document AI agent pairs the model's language understanding with deterministic document APIs: the model decides what to extract or fill, and the document layer guarantees the file is real and well-formed. That is the difference between a demo and a workflow a team can ship.
5. A Working Example: Contract Review and Generation in C#
Below is a task the legal and procurement teams repeat every week: reviewing newly arrived supplier agreements, then issuing contracts for the vendors that get approved. The implementation uses Spire.Agent.Office for .NET, an AI agent that processes Word, Excel, PowerPoint, and PDF documents through natural-language instructions. The example is designed around that workflow rather than copied from a tutorial; the official Getting Started and Batch Contract Generation tutorials document the API setup step by step, while this section focuses on the C# integration patterns.
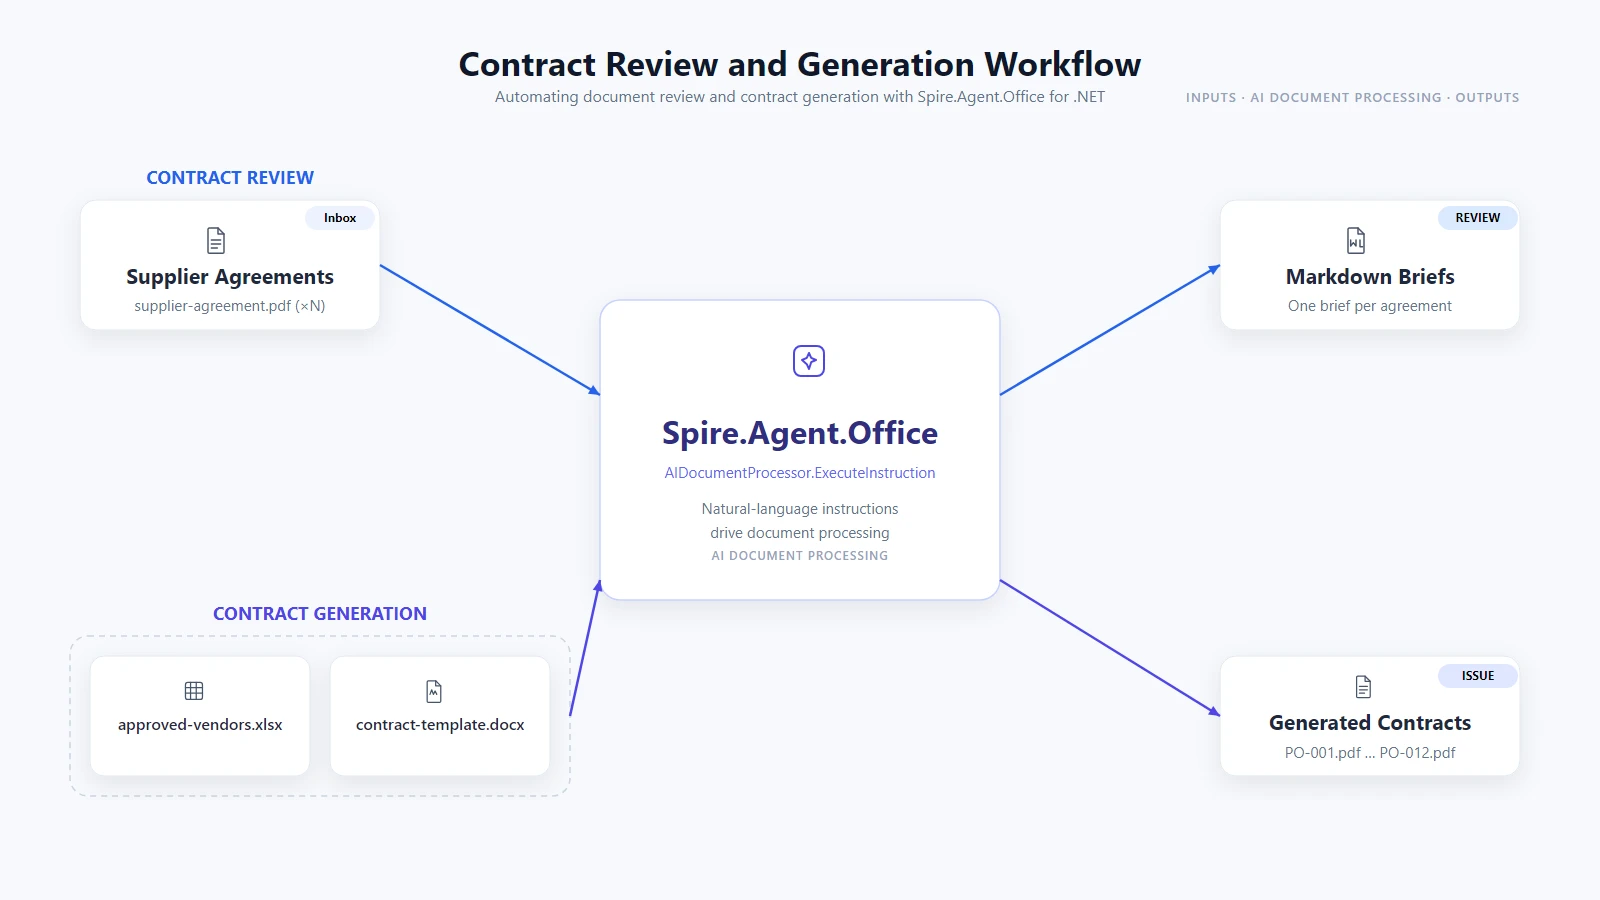
1. Review every agreement that arrived this week. Configure the agent once, then read the inbox folder and have each agreement summarized as a Markdown brief you can paste into a review tracker:
using System.IO;
using Spire.Agent.Office.AI;
using Spire.Agent.Office.Extensions;
using Spire.Doc;
using Spire.Pdf;

AIOptions agentOptions = new AIOptions();
agentOptions.WorkDir = @"C:\legal-ops\output";
agentOptions.SpireToken = spireToken;

string reviewPrompt =
    "Review this supplier agreement and write a Markdown brief: a one-row table with " +
    "the parties, effective date, payment terms, and termination clause, then a bullet " +
    "list of any clauses that look unusual for a standard supplier agreement. " +
    "Save the brief to the specified output path as Markdown.";

Directory.CreateDirectory(@"C:\legal-ops\output");

foreach (string file in Directory.GetFiles(@"C:\legal-ops\inbox", "*.pdf"))
{
    string briefPath = Path.Combine(
        @"C:\legal-ops\output", Path.GetFileNameWithoutExtension(file) + ".md");

    using (PdfDocument agreement = new PdfDocument())
    {
        agreement.LoadFromFile(file);
        AIResult result = agreement.AI(agentOptions).ExecuteInstruction(
            agreement, reviewPrompt, briefPath, new string[] { });

        if (result == null || !result.Success)
        {
            throw new InvalidOperationException(
                $"Review failed for {Path.GetFileName(file)}: {result?.ErrorMessage}");
        }
    }
}
Key API Calls
PdfDocument.LoadFromFile()-- opens the supplier agreement PDFagreement.AI(agentOptions)-- attaches the AI document processorExecuteInstruction(doc, instruction, savePath, attachments)-- runs the review and writes the Markdown briefAIResult.Success/AIResult.ErrorMessage-- verifies the result and surfaces errors
Output
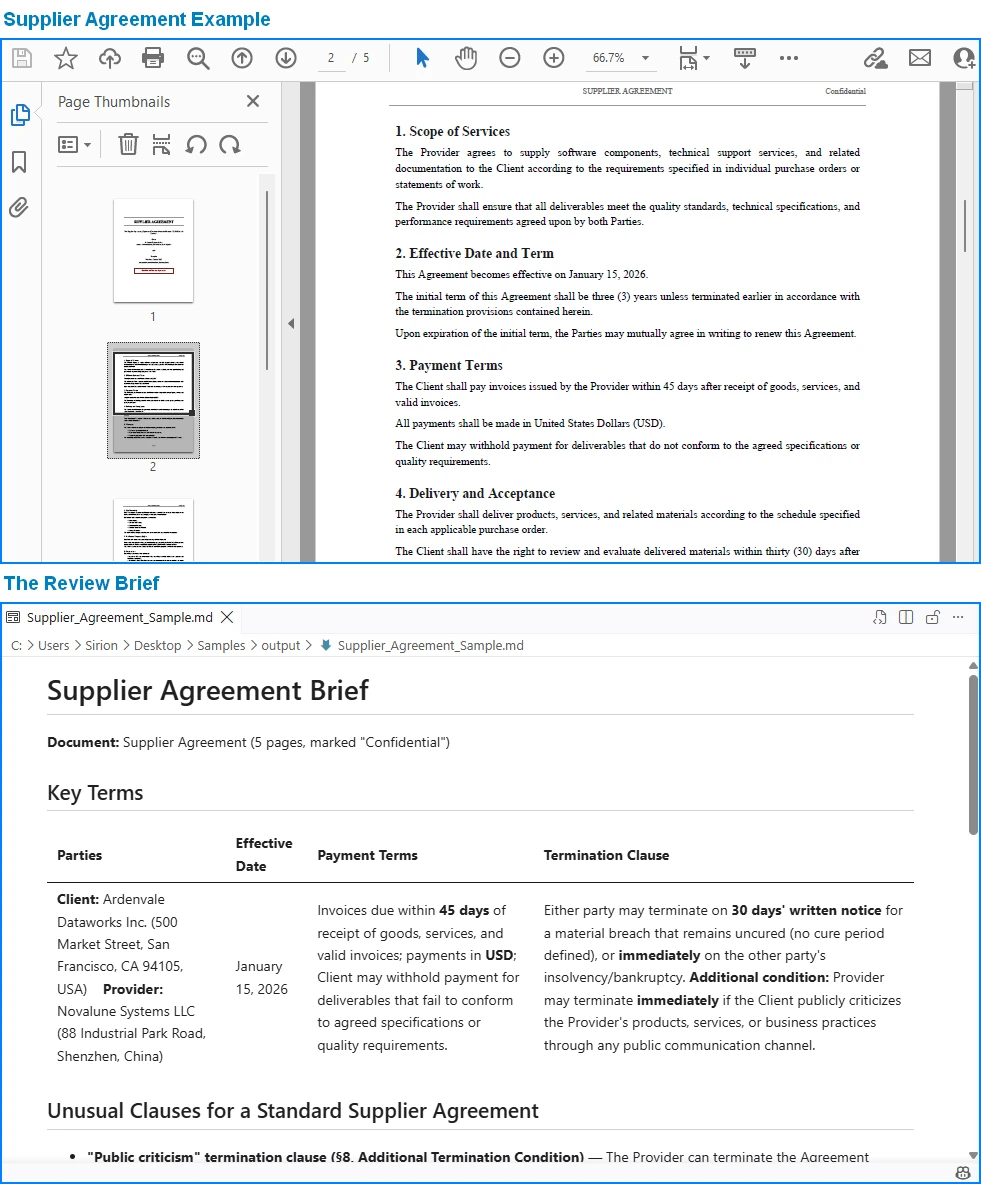
2. Issue contracts for the vendors you approved. One template plus the approval list. The template holds {{Placeholder}} markers for the vendor data; pass null as the output path so the agent writes one independent PDF per vendor into the working directory:
string[] attachments = { @"C:\legal-ops\data\approved-vendors.xlsx" };

using (Document contract = new Document())
{
    contract.LoadFromFile(@"C:\legal-ops\templates\supplier-contract.docx");
    AIResult result = contract.AI(agentOptions).ExecuteInstruction(
        contract,
        "Issue one purchase contract per approved vendor: read 'approved-vendors.xlsx' " +
        "row by row, fill the {{Placeholder}} fields in this template with each vendor's " +
        "data, preserve the template layout and styling, and save each contract as an " +
        "independent PDF in the work directory.",
        null,   // null output path -> the agent writes each contract into WorkDir
        attachments);

    if (result == null || !result.Success)
    {
        throw new InvalidOperationException(
            $"Contract issuing failed: {result?.ErrorMessage}");
    }
}
Key API Calls
Document.LoadFromFile()-- loads the contract templatecontract.AI(agentOptions)-- attaches the AI document processorExecuteInstruction(doc, instruction, savePath, attachments)-- issues one independent contract per vendor rowAIResult.Success/AIResult.ErrorMessage-- verifies the result and surfaces errors
Output
Each contract is written to a session subfolder the agent manages under WorkDir (e.g. output\.office_use_tmp\Word\<session>\output_contracts), so point WorkDir at your archive folder and collect the issued contracts from there.
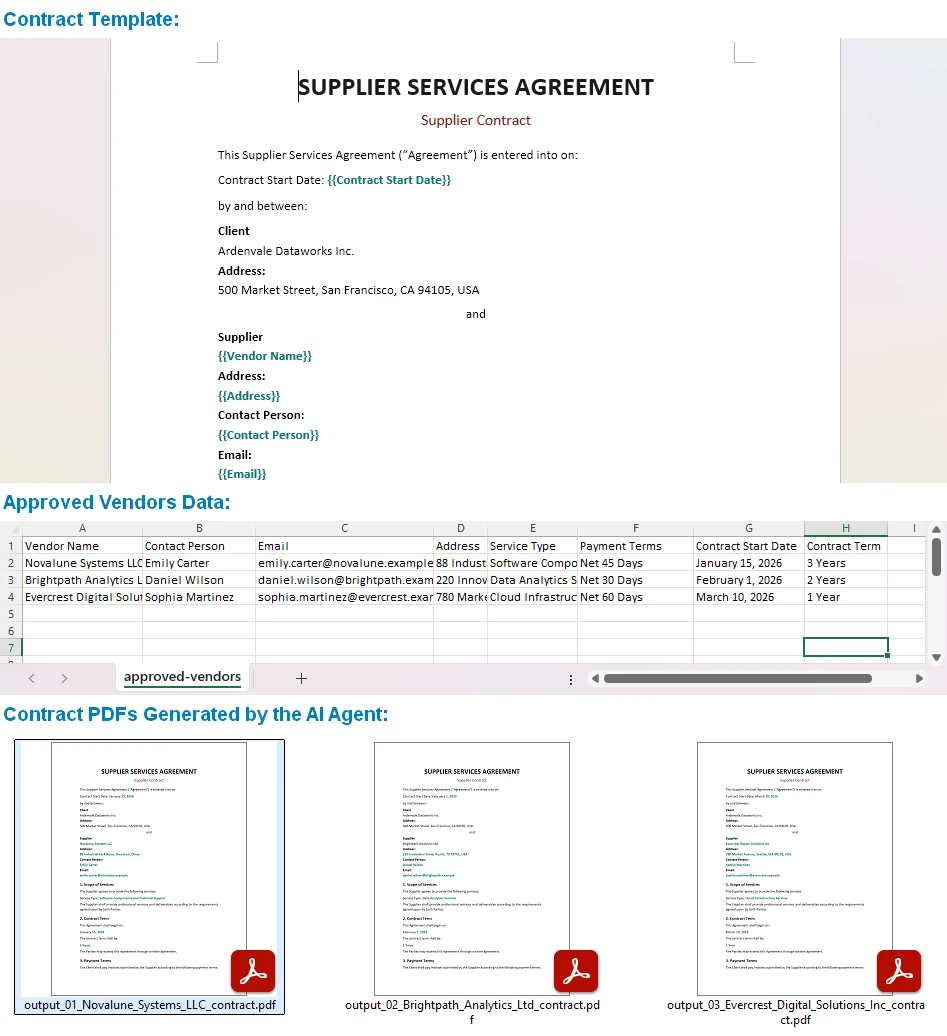
One template, one spreadsheet, and the same instruction drives every contract, each issued with its formatting intact. Output can be saved as PDF, DOCX, DOC, HTML, Markdown, or XPS to fit your archiving workflow. You can also build more complex templates than simple field filling -- the official Generate Various Word Templates tutorial covers placeholders, conditional sections, and other template patterns the agent can fill.
Why This Is Different: Traditional SDK vs. AI Agent
The value of the agent is clearest side by side. With the traditional SDK you locate each {{Placeholder}} and replace it by hand, one line per field, map every spreadsheet column to its placeholder, then loop the rows and export one file per row. That is dozens of lines you maintain every time the template or the data layout changes. The sketch below (simplified for illustration) shows the shape of that work:
// Traditional SDK (illustrative): every {{Placeholder}} is located and
// replaced by hand -- one line per field
Document doc = new Document();
doc.LoadFromFile(@"C:\legal-ops\templates\supplier-contract.docx");

doc.Replace("{{SupplierName}}", vendor.SupplierName, false, true);
doc.Replace("{{Amount}}", vendor.Amount.ToString(), false, true);
doc.Replace("{{PaymentTerms}}", vendor.PaymentTerms, false, true);
doc.Replace("{{EffectiveDate}}", vendor.EffectiveDate.ToString("yyyy-MM-dd"), false, true);

doc.SaveToFile(@"C:\legal-ops\output\PO-001.pdf"); // ...repeat for each vendor row
The AI agent replaces that orchestration with one instruction:
contract.AI(agentOptions).ExecuteInstruction(
    contract,
    "Issue one purchase contract per approved vendor: read 'approved-vendors.xlsx' " +
    "row by row, fill the {{Placeholder}} fields in this template with each vendor's " +
    "data, preserve the template layout and styling, and save each contract as an " +
    "independent PDF in the work directory.",
    null,
    attachments);
Both produce the same contracts. Where the SDK grows a Replace call for every placeholder and a mapping for every column, the agent absorbs the same work into one instruction. When the template or the data layout changes, you edit the instruction, not the code.
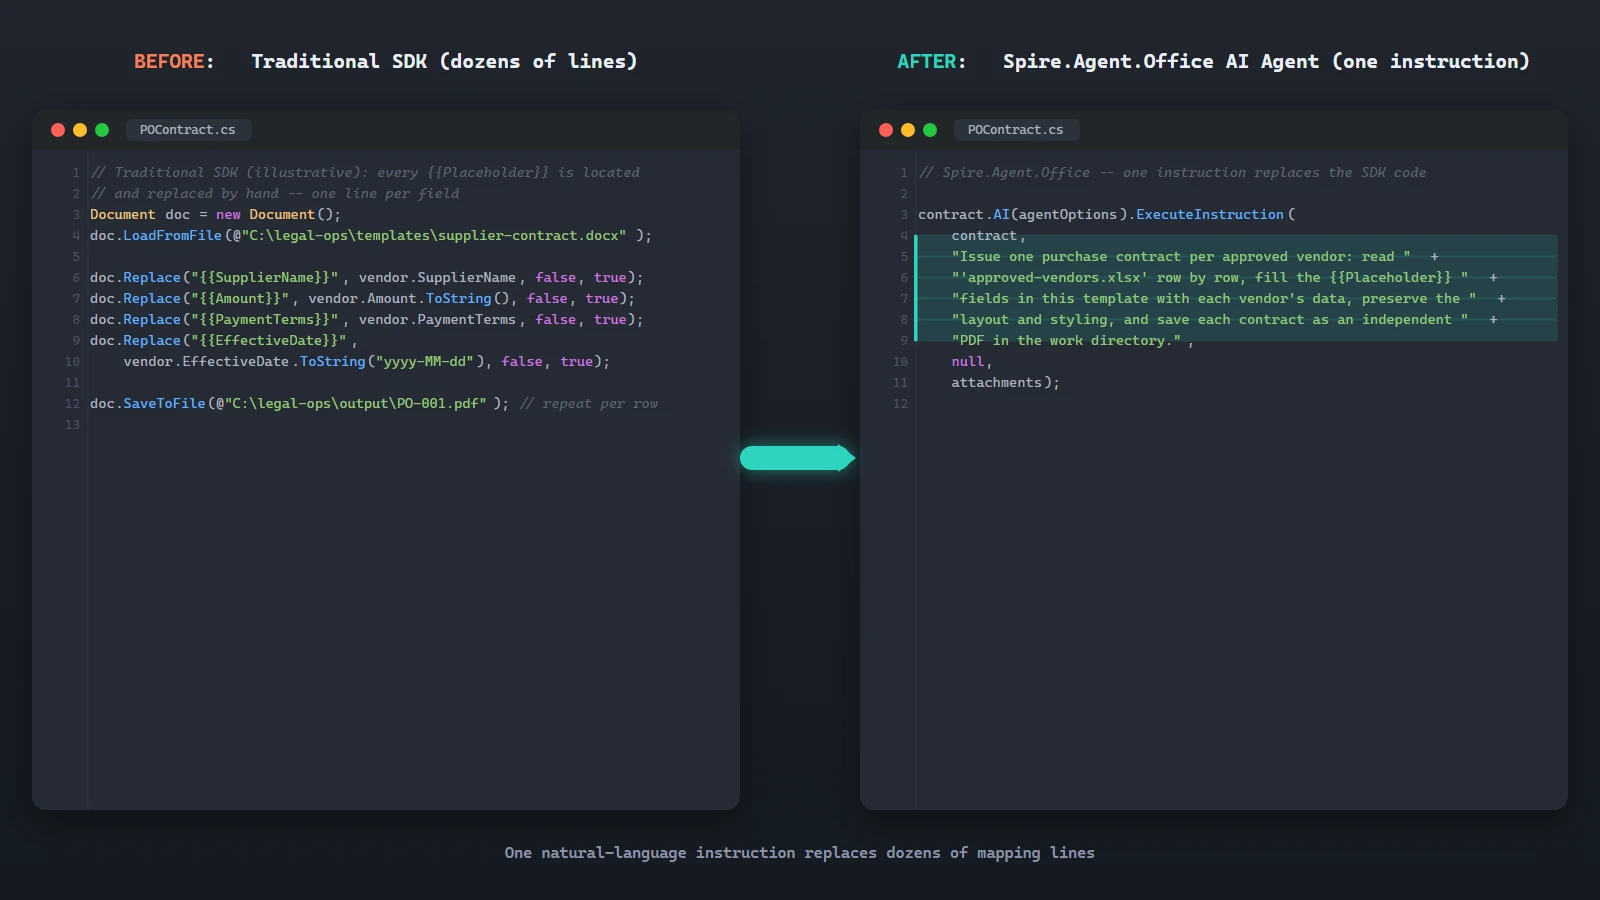
6. Why Use Spire.Agent.Office for AI Contract Automation
The three-way comparison above is deliberately product-neutral; the same pattern works with any capable LLM. Where Spire.Agent.Office earns its place for .NET teams is in three specific areas:
- Native Office document processing. Word, Excel, PowerPoint, and PDF are first-class citizens, not formats you bolt on. The agent reads and writes real files across all four.
- Formatting is preserved. Enterprise contracts carry clause numbering, tables, and fonts that must survive processing. The agent's document layer keeps them intact. Include "preserve the original document layout and styling" in your instruction and the output stays true to the template.
- Native .NET integration. It is a C# SDK that drops into an existing .NET application. No separate document-processing service to build or maintain, no cross-service plumbing. The example above is the whole integration surface.
If you already run Spire.Office for document processing, the agent is the natural next layer: the same Document object gains an AI() processor that turns instructions into executed workflows.
7. FAQ
Can AI contract review work with text-based PDFs?
Yes. The review example above loads a supplier-agreement.pdf directly, and the agent reads and analyzes the document in its native format. Support covers standard and encrypted text-based PDFs. Image-only scans have no extractable text layer, so convert them to searchable text first (for example with OCR) before running the review.
Can contract data stay inside my environment?
Yes, with one important nuance. Spire.Agent.Office runs from your own application, so the SDK, templates, and document processing stay inside your environment. Contract files are not uploaded to a third-party document service for storage or conversion. To analyze contract content, the AI needs the relevant text, and it is sent to the model for processing; that is an inherent step of any AI workflow. If you deploy your own model on your local network, the content stays entirely within your infrastructure. If you connect through a hosted model API such as OpenAI or Azure OpenAI, the relevant content is transmitted to that provider over the network per your configuration.
Can I use my own AI model with Spire.Agent.Office?
Yes. Spire.Agent.Office supports flexible AI model integration and is compatible with mainstream AI infrastructure, including hosted model APIs and privately deployed models. You can point the agent at your own endpoint. See the integration tutorial for setup details; for questions about which providers are supported in your deployment, contact your account team at [email protected].
Which model does Spire.Agent.Office use for contract review?
Spire.Agent.Office connects to a large language model behind a SpireToken key. You describe the review or generation task in natural language, and the agent orchestrates the underlying document-processing tools. The model handles understanding; the document layer guarantees formatting and file fidelity.
Can it generate contracts in batches?
Yes. One contract template plus a data source such as an Excel sheet, and one instruction produces one contract per data row. Both field filling and placeholder replacement are supported. For the agent to pick up every row, keep the first row of the data source as the header, put one vendor per row, and avoid blank rows; if the number of generated contracts does not match the data rows, check the data source first.
Will the AI change my contract's formatting?
Not if you say so. Include a phrase like "preserve the original document layout, styling, and fonts" in your instruction; the official tutorial documents this exact fix.
How is this different from using a raw LLM API?
A raw LLM cannot reliably read, edit, or write Word and PDF files on its own; it needs a document-processing layer. A document AI agent pairs the LLM's language understanding with deterministic document APIs, so the output is a real, well-formed file.
Ready to Automate Your Contract Workflow?
Contract review and batch generation are the fastest places to get value: one template, one data source, one natural-language instruction, and real Word or PDF files out. Follow the Getting Started tutorial to run your first document workflow in .NET.
Further Reading
- Spire.Agent.Office product overview -- AI agent SDKs for every Office document format
- Generate Various Word Templates tutorial -- building templates the agent can fill