C++: Merge Multiple PDF Files into a Single PDF
Merging multiple PDF files into a single PDF can help you reduce clutter and let you read, print, and share the files more easily. After merging, you only need to deal with one file instead of multiple files. In this article, you will learn how to merge multiple PDF files into a single PDF in C++ using Spire.PDF for C++.
- Merge Multiple PDF Files into a Single PDF in C++
- Merge Multiple PDF Files from Streams in C++
- Merge Selected Pages of PDF Files into a Single PDF in C++
Install Spire.PDF for C++
There are two ways to integrate Spire.PDF for C++ into your application. One way is to install it through NuGet, and the other way is to download the package from our website and copy the libraries into your program. Installation via NuGet is simpler and more recommended. You can find more details by visiting the following link.
Integrate Spire.PDF for C++ in a C++ Application
Merge Multiple PDF Files into a Single PDF in C++
Spire.PDF for C++ offers a static method - PdfDocument::MergeFiles(std::vector<LPCWSTR_S> inputFiles) which enables you to merge multiple PDF files into a single PDF file easily. The following are the detailed steps:
- Put the input PDF files' paths into a vector.
- Merge the PDF files specified by the paths in the vector using PdfDocument::MergeFiles(std::vector<LPCWSTR_S> inputFiles) method.
- Specify the output file path.
- Save the result PDF file using PdfDocumentBase->Save() method.
- C++
#include "Spire.Pdf.o.h"

using namespace Spire::Pdf;
using namespace std;

int main() {
	//Put the input PDF files' paths into a vector
	std::vector<LPCWSTR_S> files = { L"Input\\File_1.pdf", L"Input\\File_2.pdf", L"Input\\File_3.pdf" };

	//Merge the PDF files specified by the paths in the vector
    boost::intrusive_ptr <PdfDocumentBase>  doc = PdfDocument::MergeFiles(files);"

	//Specify the output file path
	wstring outputFile = L"Output\\MergePdfs.pdf";

	//Save the result PDF file
	doc->Save(outputFile.c_str(), FileFormat::PDF);
	doc->Close();
}
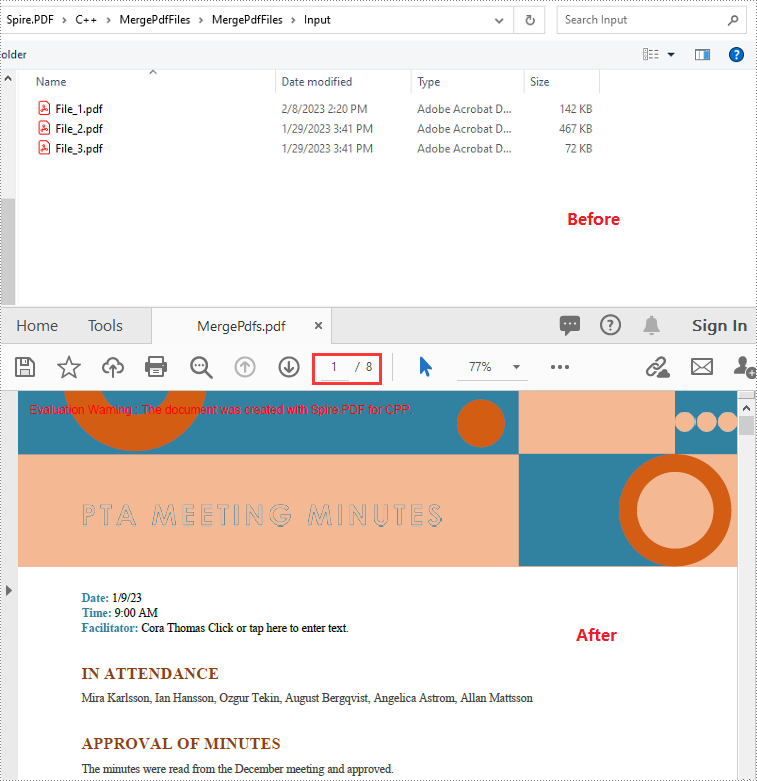
Merge Multiple PDF Files from Streams in C++
You can use the PdfDocument::MergeFiles(std::vector< Stream*> streams) method to merge multiple PDF streams into a single PDF. The following are the detailed steps:
- Read the input PDF files into streams.
- Put the streams into a vector.
- Merge the PDF streams using PdfDocument::MergeFiles(std::vector< Stream*> streams) method.
- Save the result PDF file using PdfDocumentBase->Save() method.
- C++
#include "Spire.Pdf.o.h"

using namespace Spire::Pdf;
using namespace std;

int main() {
	//Read the input PDF files into streams
	Stream* stream1 = new Stream(L"Input\\File_1.pdf");
	Stream* stream2 = new Stream(L"Input\\File_2.pdf");
	Stream* stream3 = new Stream(L"Input\\File_3.pdf");

    //Put the streams into a vector
	std::vector<boost::intrusive_ptr<Stream>> streams = { stream1, stream2, stream3 };
	//Merge the PDF streams
	boost::intrusive_ptr<PdfDocumentBase> doc = PdfDocument::MergeFiles(streams);


	//Specify the output file path
	wstring outputFile = L"Output\\MergePdfs.pdf";

	//Save the result PDF file
	doc->Save(outputFile.c_str(), FileFormat::PDF);
	doc->Close();
}
Merge Selected Pages of PDF Files into a Single PDF in C++
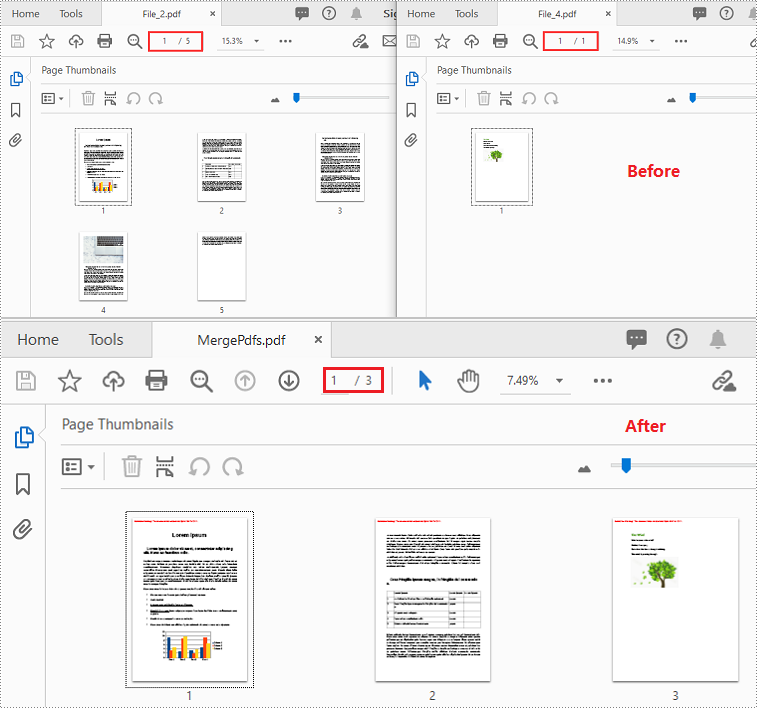
You can merge a specific page or a range of pages of multiple PDF files into a single PDF file using PdfDocument->InsertPage(PdfDocument ldDoc, int pageIndex) or PdfDocument->InsertPageRange(PdfDocument ldDoc, int startIndex, int endIndex) method. The following are the detailed steps:
- Put the input PDF files' paths into a vector.
- Create a vector of PdfDocument objects.
- Iterate through the paths in the vector.
- Load the PDF files specified by the paths using PdfDocument->LoadFromFile() method.
- Initialize an instance of PdfDocument class to create a new PDF document.
- Insert a specific page or a range of pages from the loaded PDF files into the new PDF using PdfDocument->InsertPage(PdfDocument ldDoc, int pageIndex) or PdfDocument->InsertPageRange(PdfDocument ldDoc, int startIndex, int endIndex) method.
- Save the result PDF using PdfDocument->SaveToFile() method.
- C++
#include "Spire.Pdf.o.h"

using namespace Spire::Pdf;
using namespace std;
using namespace Spire::Common;

int main() {

	//Put the input PDF files' paths into a vector
	std::vector<std::wstring> files = { L"Input\\File_2.pdf", L"Input\\File_4.pdf" };

	//Create a vector of PdfDocument objects
	std::vector<PdfDocument*> docs(files.size());

	//Iterate through the paths in the vector
	for (int i = 0; i < files.size(); i++)
	{
		//Load the PDF files specified by the paths
		docs[i] = new PdfDocument();
		docs[i]->LoadFromFile(files[i].c_str());
	}

	//Create a new PDF document
	PdfDocument* newDoc = new PdfDocument();

	//Insert pages 1-2 of the first PDF into the new PDF
	newDoc->InsertPageRange(docs[0], 0, 1);
	//Insert page 1 of the second PDF into the new PDF
	newDoc->InsertPage(docs[1], 0);

	//Specify the output file path
	wstring outputFile = L"Output\\MergePdfs.pdf";

	//Save the result pdf file
	newDoc->SaveToFile(outputFile.c_str());

	//Close the PdfDocument objects
	newDoc->Close();
	for (auto doc : docs)
	{
		doc->Close();
	}
}
Apply for a Temporary License
If you'd like to remove the evaluation message from the generated documents, or to get rid of the function limitations, please request a 30-day trial license for yourself.
How to Convert Word to Excel in C#

Word and Excel are designed for different types of content - Word focuses on documents, while Excel is better for structured data and analysis. Because of this, working with the same content across both formats isn't always straightforward.
If you have data in a Word document that you'd like to view or process in Excel, converting it manually can be tedious. With Spire.Doc for .NET, you can now convert Word directly to Excel, making it easier to reuse Word content in Excel.
In this tutorial, you'll learn how to convert Word to Excel in C#.
- Install Spire.Doc for .NET
- Basic Word to Excel Conversion in C#
- Advanced Word to Excel Conversion Scenarios
- Notes and Best Practices
- FAQs
- Get a Free License
Install Spire.Doc for .NET
To begin with, you need to add the DLL files included in the Spire.Doc for .NET package as references in your .NET project. The DLL files can be either downloaded from this link or installed via NuGet.
PM> Install-Package Spire.Doc
Basic Word to Excel Conversion in C#
Converting a Word document to Excel with Spire.Doc is straightforward:
-
Load a Word document using Document.LoadFromFile() method.
-
Save the document as an Excel file using Document.SaveToFile() method.
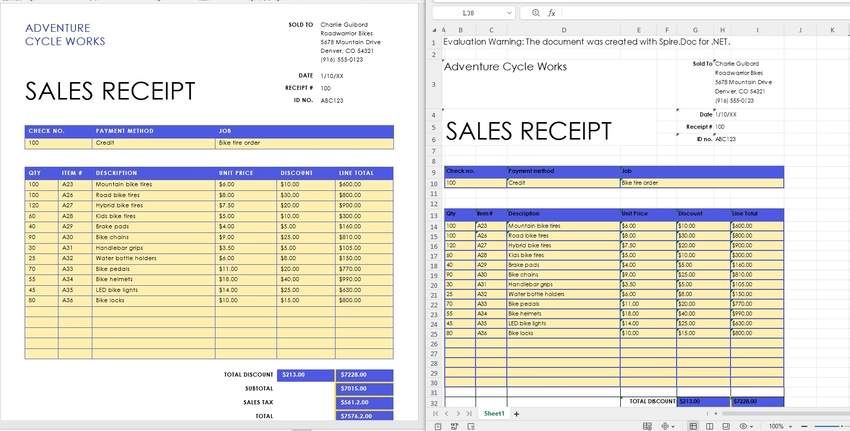
This works best when your Word document contains structured content, especially tables, which can be naturally mapped into spreadsheet cells.
using Spire.Doc;

namespace WordToExcel
{
    class Program
    {
        static void Main(string[] args)
        {
            // Load the Word document
            Document document = new Document();
            document.LoadFromFile("C:\\Users\\Tommy\\Desktop\\Sample.docx");

            // Save as Excel
            document.SaveToFile("C:\\Users\\Tommy\\Desktop\\Sample.xlsx", FileFormat.XLSX);

            document.Dispose();
        }
    }
}
Output Results:
What Gets Converted Well?
When converting Word to Excel, it's important to understand how content is interpreted:
- Tables in Word are converted into Excel worksheets with rows and columns preserved.
- Paragraph text may be inserted into cells, but without strict structure.
- Complex layouts (floating elements, multi-column sections) may not translate perfectly.
- By default, each Section in a Word document is converted into a separate worksheet in Excel.
For best results, ensure your Word document uses clear table structures before conversion.
Advanced Word to Excel Conversion Scenarios
Once you understand the basic conversion process, you can handle more advanced scenarios depending on your needs.
Convert Only Tables from Word to Excel
If you only need structured data, extracting tables from a Word document is often more useful than converting the entire file. By default, all tables within the same section are placed into a single worksheet. To output each table into a separate worksheet, you can place each table into its own section before conversion.
To do this, you can work with the document structure and table objects:
- Use section.Tables to access all tables within a section.
- Use table.Clone() to create a copy of each table.
- Create a new section for each table so that each one is mapped to a separate worksheet in Excel.
This approach gives you precise control over the output and ensures that only relevant data is included in the resulting Excel file.
using Spire.Doc;

class Program
{
    static void Main()
    {
        // Load the Word document
        Document doc = new Document();
        doc.LoadFromFile("G:/Documents/Sample84.docx");

        // Create a new document to store extracted tables
        Document tempDoc = new Document();

        // Iterate through all sections in the source document
        foreach (Section section in doc.Sections)
        {
            // Iterate through all tables in the current section
            foreach (Table table in section.Tables)
            {
                // Create a new section for each table (each section becomes a separate worksheet in Excel)
                Section tempSec = tempDoc.AddSection();

                // Clone the table and add it to the new section
                tempSec.Tables.Add(table.Clone());
            }
        }

        // Save as Excel file
        tempDoc.SaveToFile("Tables.xlsx", FileFormat.XLSX);

        // Close and release resources
        doc.Close();
        tempDoc.Close();
    }
}
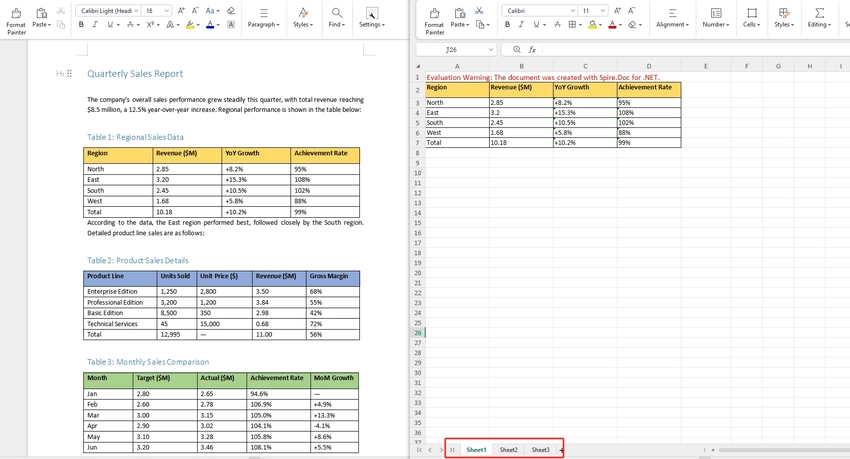
Note: Since each table is placed into its own section before conversion, each table will appear in a separate worksheet in the output Excel file.
Convert a Specific Page of a Word Document to Excel
In some cases, only a specific page contains the data you need — for example, a summary table on page 2 — use Document.ExtractPages() to isolate that page into a new Document object before converting. This avoids processing the entire file and gives you a cleaner, focused output. If you're only interested in structured data from that page, you can further extract tables from Word in C# before exporting.
using Spire.Doc;

namespace WordPageToExcel
{
    class Program
    {
        static void Main(string[] args)
        {
            // Load the Word document
            Document document = new Document();
            document.LoadFromFile("input.docx");

            // Extract the content of the specified page (e.g., page 1)
            Document pageDoc = document.ExtractPages(0, 1); // Retrieve page 1 (starting from index 0, retrieve page 1).

            // Save the extracted page as Excel
            pageDoc.SaveToFile("output.xlsx", FileFormat.XLSX);

            document.Dispose();
            pageDoc.Dispose();
        }
    }
}
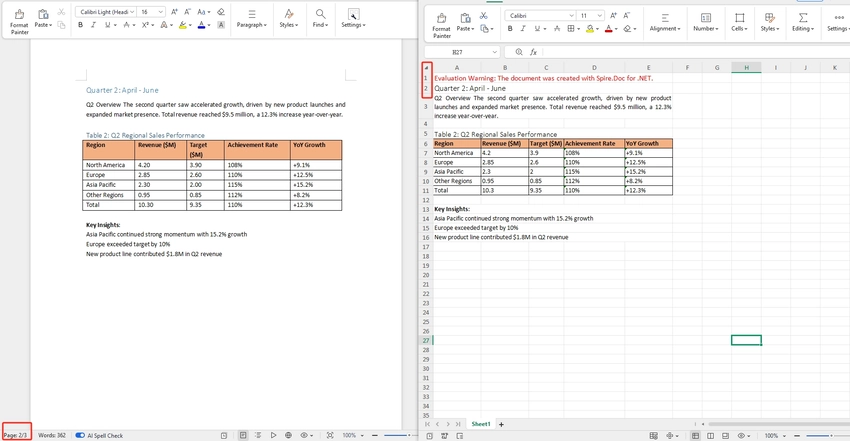
Note: Page boundaries in Word are flow-based and can shift depending on font rendering. If the extracted page doesn't match what you see in Word, verify the page index by testing with a few values around your target.
Batch Convert Multiple Word Documents to Excel
To convert an entire folder of Word files, loop through each .docx file and apply the same conversion. This is useful for bulk migrations or scheduled processing pipelines.
This approach can be easily integrated into background jobs or automation workflows.
using Spire.Doc;
using System.IO;

namespace BatchWordToExcel
{
    class Program
    {
        static void Main(string[] args)
        {
            // Get all Word files from the input folder
            string inputFolder = "inputDocs";
            string outputFolder = "outputExcels";
            Directory.CreateDirectory(outputFolder);

            string[] wordFiles = Directory.GetFiles(inputFolder, "*.docx");

            // Loop through each Word file and convert to Excel
            foreach (string filePath in wordFiles)
            {
                Document document = new Document();
                document.LoadFromFile(filePath);

                string fileName = Path.GetFileNameWithoutExtension(filePath);
                string outputPath = Path.Combine(outputFolder, fileName + ".xlsx");

                document.SaveToFile(outputPath, FileFormat.XLSX);
                document.Dispose();
            }
        }
    }
}
Tip: For large batches, consider wrapping the inner block in a try/catch so a single malformed file doesn't abort the entire run. If your workflow requires combining documents before conversion, learn how to merge Word documents in C#.
Notes and Best Practices
- For best results, use well-structured tables in Word.
- Avoid complex layouts like floating shapes or multi-column designs.
- For large-scale processing, consider handling files in batches to optimize memory usage.
FAQs
Q1: Which Word file formats are supported for conversion?
A: Spire.Doc for .NET supports both .doc and .docx formats as input. You can load either format using Document.LoadFromFile() and the library will handle the rest automatically.
Q2: Will the original formatting be preserved after conversion?
A: The conversion focuses on exporting content into a spreadsheet format. Structured content like tables is usually preserved with good readability, while complex layouts may not be retained exactly as in Word.
Q3: Is this feature suitable for large documents?
A: Yes, but performance may vary depending on document size and complexity. For large files, it is recommended to optimize memory usage and process documents efficiently in your code.
Q4: Can I further customize the Excel output after conversion?
A: Yes. After saving the converted .xlsx file, you can open it with Spire.XLS for .NET to further customize the output, such as adjusting cell styles, fonts, colors, column widths, or adding formulas. The two libraries are designed to work together seamlessly.
Conclusion
In this article, you learned how to convert Word to Excel in C# using Spire.Doc for .NET, from basic document conversion to more advanced scenarios like page extraction and table-focused processing. For more control over the output, such as adjusting fonts, colors, or cell formatting - you can combine it with Spire.XLS for .NET.
You can also explore other conversion features, such as exporting Word documents to PDF, HTML, or images.
Get a Free License
If you'd like to remove the evaluation message from the generated documents, or to get rid of the function limitations, please request a 30-day trial license for yourself.
Java: Convert Images (PNG, JPG, BMP, etc.) to PowerPoint
Picture files are among the most commonly used types of documents in people's lives. Sometimes, you may want to take all image files in a folder and convert them into slides for a PowerPoint presentation. Depending on your requirements, you can convert images to shapes or slide backgrounds. This article demonstrates how to convert images (in any common image format) to a PowerPoint document in Java using Spire.Presentation for Java.
- Convert Images to Backgrounds in PowerPoint in Java
- Convert Images to Shapes in PowerPoint in Java
- Convert Images to PowerPoint with Customized Slide Size in Java
Install Spire.Presentation for Java
First, you're required to add the Spire.Presentation.jar file as a dependency in your Java program. The JAR file can be downloaded from this link. If you use Maven, you can easily import the JAR file in your application by adding the following code to your project's pom.xml file.
<repositories>
    <repository>
        <id>com.e-iceblue</id>
        <name>e-iceblue</name>
        <url>https://repo.e-iceblue.com/nexus/content/groups/public/</url>
    </repository>
</repositories>
<dependencies>
    <dependency>
        <groupId>e-iceblue</groupId>
        <artifactId>spire.presentation</artifactId>
        <version>11.9.10</version>
    </dependency>
</dependencies>
Convert Images to Backgrounds in PowerPoint in Java
When images are converted as background of each slide in a PowerPoint document, they cannot be moved or scaled. The following are the steps to convert a set of images to a PowerPoint file as background images using Spire.Presentation for Java.
- Create a Presentation object.
- Set the slide size type to Sreen16x9.
- Get the image paths from a folder.
- Traverse through the images.
- Get a specific image and append it to the image collection of the document using Presentation.getImages().append() method.
- Add a slide to the document using Presentation.getSlides().append() method.
- Set the image as the background of the slide using the methods under SlideBackground object.
- Save the document to a PowerPoint file using Presentation.saveToFile() method.
- Java
import com.spire.presentation.*;
import com.spire.presentation.drawing.*;

import javax.imageio.ImageIO;
import java.awt.image.BufferedImage;
import java.io.File;
import java.io.FileInputStream;

public class ConvertImagesAsBackground {

    public static void main(String[] args) throws Exception {

        //Create a Presentation object
        Presentation presentation = new Presentation();

        //Set slide size type
        presentation.getSlideSize().setType(SlideSizeType.SCREEN_16_X_9);

        //Remove the default slide
        presentation.getSlides().removeAt(0);

        //Get image files from a folder
        File directoryPath = new File("C:\\Users\\Administrator\\Desktop\\Images");
        File[] picFiles  = directoryPath.listFiles();

        //Loop through the images
        for (int i = 0; i < picFiles.length; i++)
        {
            //Add a slide
            ISlide slide = presentation.getSlides().append();

            //Get a specific image
            String imageFile = picFiles[i].getAbsolutePath();

            //Append it to the image collection
            BufferedImage bufferedImage =  ImageIO.read(new FileInputStream(imageFile));
            IImageData imageData = presentation.getImages().append(bufferedImage);

            //Set the image as the background image of the slide
            slide.getSlideBackground().setType(BackgroundType.CUSTOM);
            slide.getSlideBackground().getFill().setFillType(FillFormatType.PICTURE);
            slide.getSlideBackground().getFill().getPictureFill().setFillType(PictureFillType.STRETCH);
            slide.getSlideBackground().getFill().getPictureFill().getPicture().setEmbedImage(imageData);
        }

        //Save to file
        presentation.saveToFile("output/ImagesToBackground.pptx", FileFormat.PPTX_2013);
    }
}
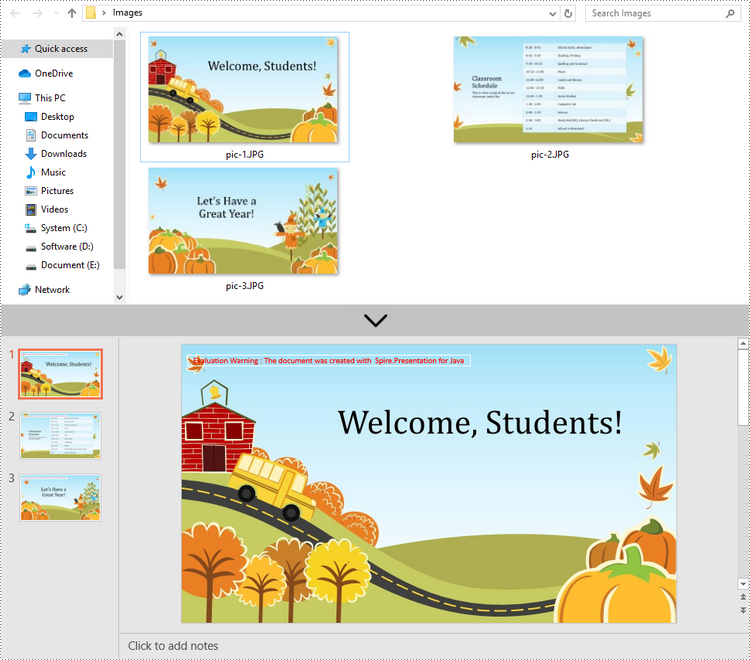
Convert Images to Shapes in PowerPoint in Java
If you would like the images are moveable and resizable in the PowerPoint file, you can convert them as shapes. Below are the steps to convert images to shapes in a PowerPoint document using Spire.Presentation for Java.
- Create a Presentation object.
- Set the slide size type to Sreen16x9.
- Get the image paths from a folder.
- Traverse through the images.
- Get a specific image and append it to the image collection of the document using Presentation.getImages().append() method.
- Add a slide to the document using Presentation.getSlides().append() method.
- Add a shape with the size equal to the slide using ISlide.getShapes().appendShape() method.
- Fill the shape with the image using the methods under FillFormat object.
- Save the document to a PowerPoint file using Presentation.saveToFile() method.
- Java
import com.spire.presentation.*;
import com.spire.presentation.drawing.*;

import javax.imageio.ImageIO;
import java.awt.geom.Rectangle2D;
import java.awt.image.BufferedImage;
import java.io.File;
import java.io.FileInputStream;

public class ConvertImageToShape {

    public static void main(String[] args) throws Exception {

        //Create a Presentation object
        Presentation presentation = new Presentation();

        //Set slide size type
        presentation.getSlideSize().setType(SlideSizeType.SCREEN_16_X_9);

        //Remove the default slide
        presentation.getSlides().removeAt(0);

        //Get image files from a folder
        File directoryPath = new File("C:\\Users\\Administrator\\Desktop\\Images");
        File[] picFiles  = directoryPath.listFiles();

        //Loop through the images
        for (int i = 0; i < picFiles.length; i++)
        {
            //Add a slide
            ISlide slide = presentation.getSlides().append();

            //Get a specific image
            String imageFile = picFiles[i].getAbsolutePath();

            //Append it to the image collection
            BufferedImage bufferedImage =  ImageIO.read(new FileInputStream(imageFile));
            IImageData imageData = presentation.getImages().append(bufferedImage);

            //Add a shape with the size equal to the slide
            IAutoShape shape = slide.getShapes().appendShape(ShapeType.RECTANGLE, new Rectangle2D.Float(0, 0, (float) presentation.getSlideSize().getSize().getWidth(), (float)presentation.getSlideSize().getSize().getHeight()));

            //Fill the shape with image
            shape.getLine().setFillType(FillFormatType.NONE);
            shape.getFill().setFillType(FillFormatType.PICTURE);
            shape.getFill().getPictureFill().setFillType(PictureFillType.STRETCH);
            shape.getFill().getPictureFill().getPicture().setEmbedImage(imageData);
        }

        //Save to file
        presentation.saveToFile("output/ImagesToShape.pptx", FileFormat.PPTX_2013);
    }
}
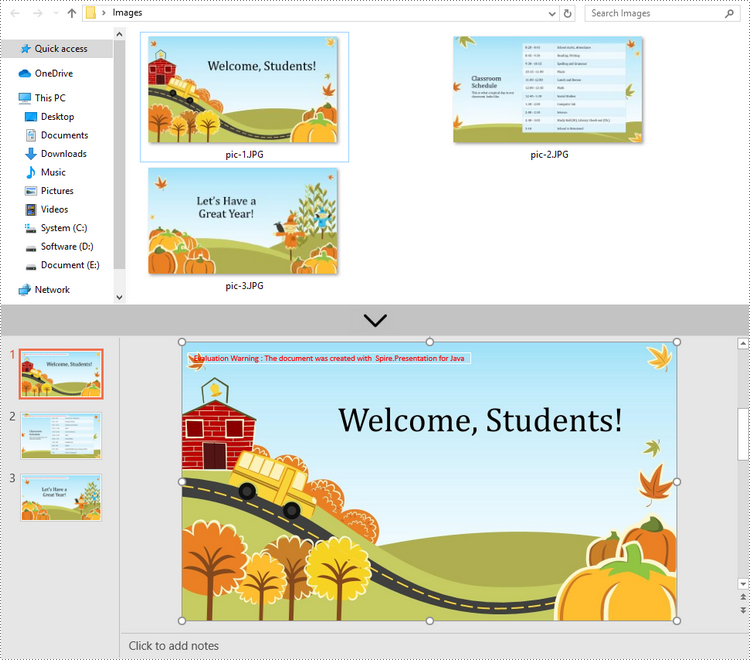
Convert Images to PowerPoint with Customized Slide Size in Java
If the aspect ratio of your images is not 16:9, or they are not in a standard slide size, you can create slides based on the actual size of the pictures. This will prevent the image from being over stretched or compressed. The following are the steps to convert images to a PowerPoint document with customized slide size using Spire.Presentation for Java.
- Create a Presentation object.
- Create a PdfUnitConvertor object, which is used to convert pixel to point.
- Get the image paths from a folder.
- Traverse through the images.
- Get a specific image and append it to the image collection of the document using Presentation.getImages().append() method.
- Get the image width and height, and convert them to point.
- Set the slide size of the presentation based on the image size using Presentation.getSlideSize().setSize() method.
- Add a slide to the document using Presentation.getSlides().append() method.
- Set the image as the background image of the slide using the methods under SlideBackground object.
- Save the document to a PowerPoint file using Presentation.saveToFile() method.
- Java
import com.spire.presentation.pdf.graphics.PdfGraphicsUnit;
import com.spire.presentation.pdf.graphics.PdfUnitConvertor;
import com.spire.presentation.*;
import com.spire.presentation.drawing.*;

import javax.imageio.ImageIO;
import java.awt.*;
import java.awt.image.BufferedImage;
import java.io.File;
import java.io.FileInputStream;

public class CustomizeSlideSize {

    public static void main(String[] args) throws Exception {

        //Create a Presentation object
        Presentation presentation = new Presentation();

        //Remove the default slide
        presentation.getSlides().removeAt(0);

        //Get image files from a folder
        File directoryPath = new File("C:\\Users\\Administrator\\Desktop\\Images");
        File[] picFiles  = directoryPath.listFiles();

        //Create a PdfUnitConvertor object
        PdfUnitConvertor convertor = new PdfUnitConvertor();

        //Loop through the images
        for (int i = 0; i < picFiles.length; i++)
        {
            //Get a specific image
            String imageFile = picFiles[i].getAbsolutePath();

            //Append it to the image collection
            BufferedImage bufferedImage =  ImageIO.read(new FileInputStream(imageFile));
            IImageData imageData = presentation.getImages().append(bufferedImage);

            //Get image height and width in pixel
            int height = imageData.getHeight();
            int width = imageData.getWidth();

            //Convert pixel to point
            float widthPoint = convertor.convertUnits(width, PdfGraphicsUnit.Pixel, PdfGraphicsUnit.Point);
            float heightPoint= convertor.convertUnits(height, PdfGraphicsUnit.Pixel, PdfGraphicsUnit.Point);

            //Set slide size
            presentation.getSlideSize().setSize(new Dimension((int)widthPoint, (int)heightPoint));

            //Add a slide
            ISlide slide = presentation.getSlides().append();

            //Set the image as the background image of the slide
            slide.getSlideBackground().setType(BackgroundType.CUSTOM);
            slide.getSlideBackground().getFill().setFillType(FillFormatType.PICTURE);
            slide.getSlideBackground().getFill().getPictureFill().setFillType(PictureFillType.STRETCH);
            slide.getSlideBackground().getFill().getPictureFill().getPicture().setEmbedImage(imageData);
        }

        //Save to file
        presentation.saveToFile("output/CustomizeSlideSize.pptx", FileFormat.PPTX_2013);
    }
}
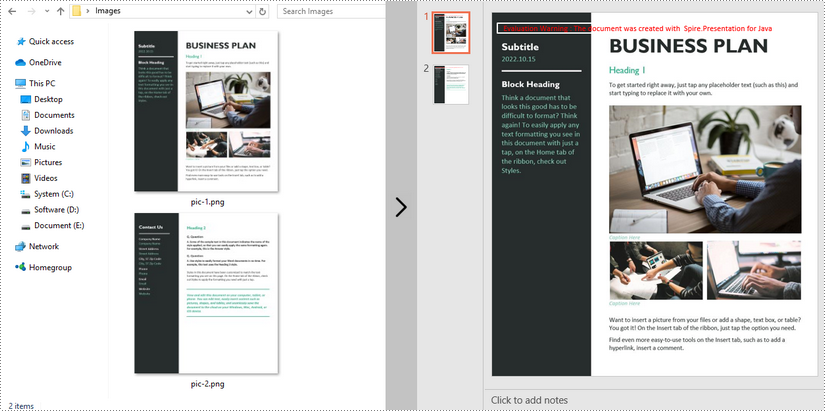
Apply for a Temporary License
If you'd like to remove the evaluation message from the generated documents, or to get rid of the function limitations, please request a 30-day trial license for yourself.
C#/VB.NET: Convert Images (PNG, JPG, BMP, etc.) to PowerPoint
There are times when you need to create a PowerPoint document from a group of pre-created image files. As an example, you have been provided with some beautiful flyers by your company, and you need to combine them into a single PowerPoint document in order to display each picture in an orderly manner. In this article, you will learn how to convert image files (in any popular image format) to a PowerPoint document in C# and VB.NET using Spire.Presentation for .NET.
- Convert Image to Background in PowerPoint in C# and VB.NET
- Convert Image to Shape in PowerPoint in C# and VB.NET
- Convert Image to PowerPoint with Customized Slide Size in C# and VB.NET
Install Spire.Presentation for .NET
To begin with, you need to add the DLL files included in the Spire.Presentation for.NET package as references in your .NET project. The DLL files can be either downloaded from this link or installed via NuGet.
PM> Install-Package Spire.Presentation
Convert Image to Background in PowerPoint in C# and VB.NET
When images are converted as background of each slide in a PowerPoint document, they cannot be moved or scaled. The following are the steps to convert a set of images to a PowerPoint file as background images using Spire.Presentation for .NET.
- Create a Presentation object.
- Set the slide size type to Sreen16x9.
- Get the image paths from a folder and save in a string array.
- Traverse through the images.
- Get a specific image and append it to the image collection of the document using Presentation.Images.Append() method.
- Add a slide to the document using Presentation.Slides.Append() method.
- Set the image as the background of the slide through the properties under ISlide.SlideBackground object.
- Save the document to a PowerPoint file using Presentation.SaveToFile() method.
- C#
- VB.NET
using Spire.Presentation;
using Spire.Presentation.Drawing;
using System.Drawing;
using System.IO;

namespace ConvertImageToBackground
{
    class Program
    {
        static void Main(string[] args)
        {
            //Create a Presentation object
            Presentation presentation = new Presentation();

            //Set slide size type
            presentation.SlideSize.Type = SlideSizeType.Screen16x9;

            //Remove the default slide
            presentation.Slides.RemoveAt(0);

            //Get file paths in a string array
            string[] picFiles = Directory.GetFiles(@"C:\Users\Administrator\Desktop\Images");

            //Loop through the images
            for (int i = 0; i < picFiles.Length; i++)
            {
                //Add a slide
                ISlide slide = presentation.Slides.Append();

                //Get a specific image
                string imageFile = picFiles[i];
                Image image = Image.FromFile(imageFile);

                //Append it to the image collection
                IImageData imageData = presentation.Images.Append(image);

                //Set the image as the background image of the slide
                slide.SlideBackground.Type = BackgroundType.Custom;
                slide.SlideBackground.Fill.FillType = FillFormatType.Picture;
                slide.SlideBackground.Fill.PictureFill.FillType = PictureFillType.Stretch;
                slide.SlideBackground.Fill.PictureFill.Picture.EmbedImage = imageData;
            }

            //Save to file
            presentation.SaveToFile("ImagesToBackground.pptx", FileFormat.Pptx2013);
        }
    }
}
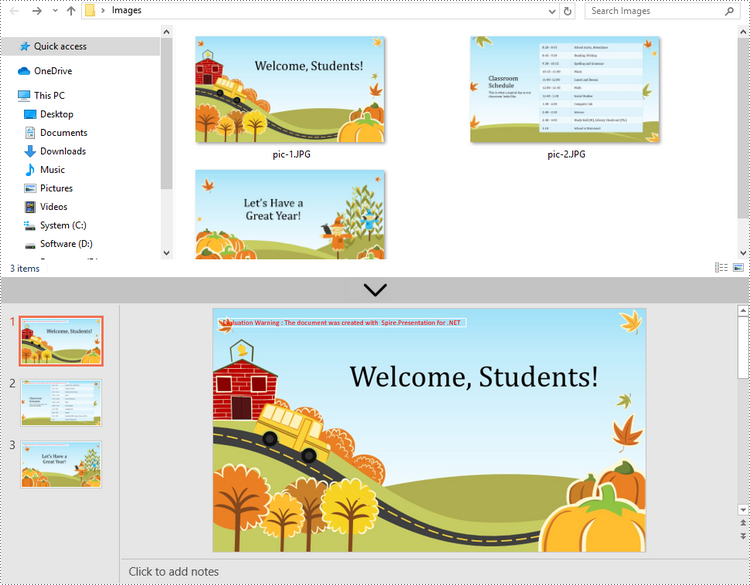
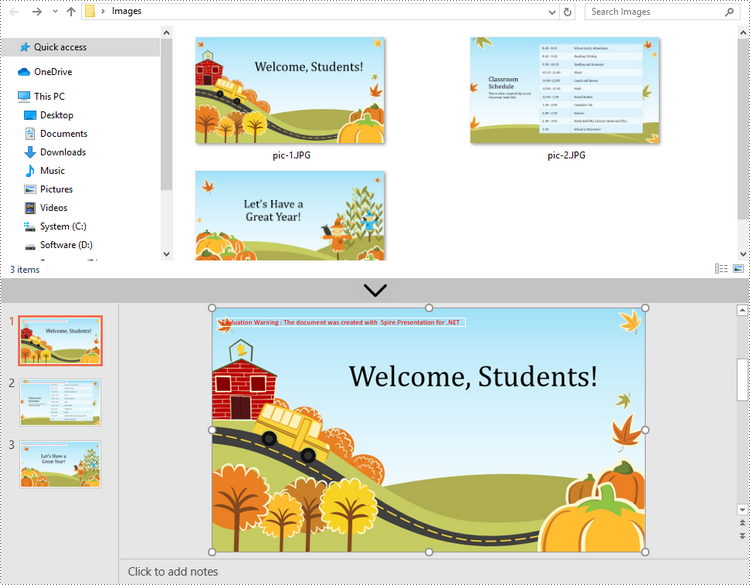
Convert Image to Shape in PowerPoint in C# and VB.NET
If you would like the images are moveable and resizable in the PowerPoint file, you can convert them as shapes. Below are the steps to convert images to shapes in a PowerPoint document using Spire.Presentation for .NET.
- Create a Presentation object.
- Set the slide size type to Sreen16x9.
- Get the image paths from a folder and save in a string array.
- Traverse through the images.
- Get a specific image and append it to the image collection of the document using Presentation.Images.Append() method.
- Add a slide to the document using Presentation.Slides.Append() method.
- Add a shape with the size equal to the slide using ISlide.Shapes.AppendShape() method.
- Fill the shape with the image through the properties under IAutoShape.Fill object.
- Save the document to a PowerPoint file using Presentation.SaveToFile() method.
- C#
- VB.NET
using Spire.Presentation;
using Spire.Presentation.Drawing;
using System.Drawing;
using System.IO;

namespace ConvertImageToShape
{
    class Program
    {
        static void Main(string[] args)
        {
            //Create a Presentation object
            Presentation presentation = new Presentation();

            //Set slide size type
            presentation.SlideSize.Type = SlideSizeType.Screen16x9;

            //Remove the default slide
            presentation.Slides.RemoveAt(0);

            //Get file paths in a string array
            string[] picFiles = Directory.GetFiles(@"C:\Users\Administrator\Desktop\Images");

            //Loop through the images
            for (int i = 0; i < picFiles.Length; i++)
            {
                //Add a slide
                ISlide slide = presentation.Slides.Append();

                //Get a specific image
                string imageFile = picFiles[i];
                Image image = Image.FromFile(imageFile);

                //Append it to the image collection
                IImageData imageData = presentation.Images.Append(image);

                //Add a shape with a size equal to the slide
                IAutoShape shape = slide.Shapes.AppendShape(ShapeType.Rectangle, new RectangleF(new PointF(0, 0), presentation.SlideSize.Size));

                //Fill the shape with image
                shape.Line.FillType = FillFormatType.None;
                shape.Fill.FillType = FillFormatType.Picture;
                shape.Fill.PictureFill.FillType = PictureFillType.Stretch;
                shape.Fill.PictureFill.Picture.EmbedImage = imageData;
            }

            //Save to file
            presentation.SaveToFile("ImageToShape.pptx", FileFormat.Pptx2013);
        }
    }
}
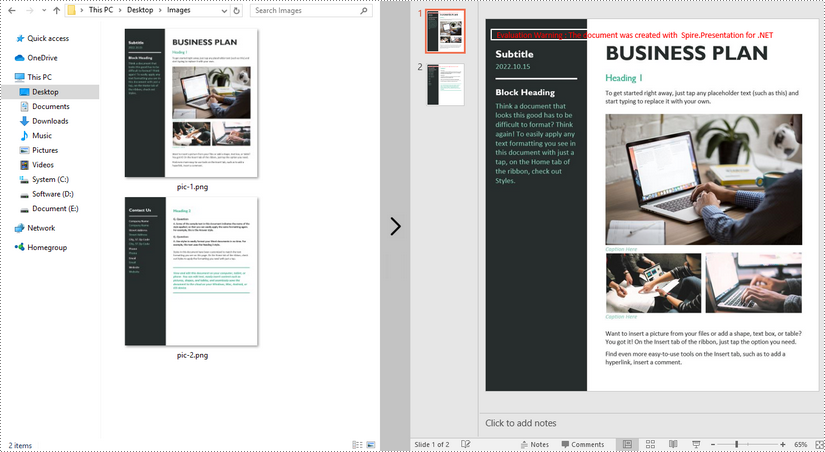
Convert Image to PowerPoint with Customized Slide Size in C# and VB.NET
If the aspect ratio of your images is not 16:9, or they are not in a standard slide size, you can create slides based on the actual size of the pictures. This will prevent the image from being over stretched or compressed. The following are the steps to convert images to a PowerPoint document with customized slide size using Spire.Presentation for .NET.
- Create a Presentation object.
- Create a PdfUnitConvertor object, which is used to convert pixel to point.
- Get the image paths from a folder and save in a string array.
- Traverse through the images.
- Get a specific image and append it to the image collection of the document using Presentation.Images.Append() method.
- Get the image width and height, and convert them to point.
- Set the slide size of the presentation based on the image size through Presentation.SlideSize.Size property.
- Add a slide to the document using Presentation.Slides.Append() method.
- Set the image as the background image of the slide through the properties under ISlide.SlideBackground object.
- Save the document to a PowerPoint file using Presentation.SaveToFile() method.
- C#
- VB.NET
using Spire.Pdf.Graphics;
using Spire.Presentation;
using Spire.Presentation.Drawing;
using System.Drawing;
using System.IO;

namespace CustomSlideSize
{
    class Program
    {
        static void Main(string[] args)
        {
            //Create a Presentation object
            Presentation presentation = new Presentation();

            //Remove the default slide
            presentation.Slides.RemoveAt(0);

            //Get file paths in a string array
            string[] picFiles = Directory.GetFiles(@""C:\Users\Administrator\Desktop\Images"");

            TextBox picBox = new TextBox();

            Graphics g = picBox.CreateGraphics();

            float dpiY = g.DpiY;

            //Loop through the images
            for (int i = 0; i < picFiles.Length; i++)
            {
                //Get a specific image
                string imageFile = picFiles[i];
                Image image = Image.FromFile(imageFile);

                //Append it to the image collection
                IImageData imageData = presentation.Images.Append(image);

                //Get image height and width in pixel
                int heightpixels = imageData.Height;
                int widthpixels = imageData.Width;

                //Convert pixel to point
                float widthPoint = widthpixels * 72.0f / dpiY;

                float heightPoint = heightpixels * 72.0f / dpiY;

                //Set slide size
                presentation.SlideSize.Size = new SizeF(widthPoint, heightPoint);

                //Add a slide
                ISlide slide = presentation.Slides.Append();

                //Set the image as the background image of the slide
                slide.SlideBackground.Type = BackgroundType.Custom;
                slide.SlideBackground.Fill.FillType = FillFormatType.Picture;
                slide.SlideBackground.Fill.PictureFill.FillType = PictureFillType.Stretch;
                slide.SlideBackground.Fill.PictureFill.Picture.EmbedImage = imageData;
            }

            //Save to file
            presentation.SaveToFile(""CustomizeSlideSize.pptx"", FileFormat.Pptx2013);
        }
    }
}
Apply for a Temporary License
If you'd like to remove the evaluation message from the generated documents, or to get rid of the function limitations, please request a 30-day trial license for yourself.
Java: Add Security Permissions to a PDF Document
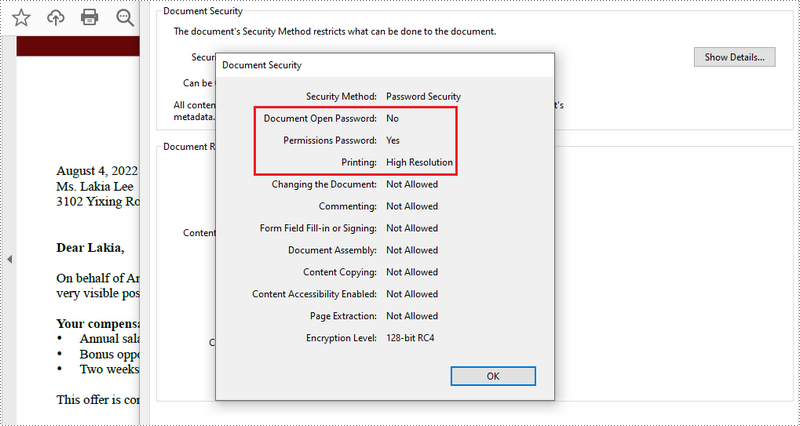
PDF documents can be secured in several ways. When PDFs are protected with a permission password, readers can open the document without needing to enter a password, but they may not have permission to further manipulate the document, such as printing or copying the content. In this article, you will learn how to set security permissions for a PDF document in Java using Spire.PDF for Java library.
Install Spire.PDF for Java
First, you're required to add the Spire.Pdf.jar file as a dependency in your Java program. The JAR file can be downloaded from this link. If you use Maven, you can easily import the JAR file in your application by adding the following code to your project's pom.xml file.
<repositories>
    <repository>
        <id>com.e-iceblue</id>
        <name>e-iceblue</name>
        <url>https://repo.e-iceblue.com/nexus/content/groups/public/</url>
    </repository>
</repositories>
<dependencies>
    <dependency>
        <groupId>e-iceblue</groupId>
        <artifactId>spire.pdf</artifactId>
        <version>12.9.0</version>
    </dependency>
</dependencies>
Add Security Permissions to a PDF Document in Java
Below are the steps to apply security permissions to a PDF document using Spire.PDF for Java.
- Create a PdfDocument object.
- Load a sample PDF file using PdfDocument.loadFileFile() method.
- Specify open password and permission password. The open password can be set to empty so that the generated document will not require a password to open.
- Encrypt the document with the open password and permission password, and set the security permissions using PdfDocument.getSecurity().encypt() method. This method takes PdfPermissionsFlags enumeration as a parameter, which defines user access permissions for an encrypted document.
- Save the document to another PDF file using PdfDocument.saveToFile() method.
- Java
//Create a PdfDocument object
PdfDocument pdf= new PdfDocument();

//Load a sample PDF file
pdf.loadFromFile("C:\\Users\\Administrator\\Desktop\\sample.pdf");
String output = "output/changeSecurityPermission_output.pdf";

// Create a PdfSecurityPolicy with the specified user password and owner password
PdfSecurityPolicy securityPolicy = new PdfPasswordSecurityPolicy("userpassword", "ownerpassword");

// Create a PdfDocumentPrivilege with desired permissions (e.g., allow filling form fields)
PdfDocumentPrivilege privilege = new PdfDocumentPrivilege();
privilege.setAllowFillFormFields(true);
privilege.setAllowPrint(true);

// Encrypt the PDF document using the specified security policy
pdf.encrypt(securityPolicy);

// Save the encrypted PDF document to the output file path
pdf.saveToFile(output, FileFormat.PDF);

// Close the PDF document to release resources
pdf.close();

// Dispose of the PDF document to free up system resources
pdf.dispose();
Apply for a Temporary License
If you'd like to remove the evaluation message from the generated documents, or to get rid of the function limitations, please request a 30-day trial license for yourself.
Java: Find and Extract Hyperlinks in Word Documents
Hyperlinks in Word documents can lead readers to a webpage, an external file, an email address, and a specific place of the document being read. They are commonly used in Word documents for their convenience. This article will teach you how to use Spire.Doc for Java to find and extract hyperlinks in Word documents, including hypertexts and links.
- Find and Extract a Specified Hyperlink in a Word Document
- Find and Extract All the Hyperlinks in a Word Document
Install Spire.Doc for Java
First, you're required to add the Spire.Doc.jar file as a dependency in your Java program. The JAR file can be downloaded from this link. If you use Maven, you can easily import the JAR file in your application by adding the following code to your project's pom.xml file.
<repositories>
    <repository>
        <id>com.e-iceblue</id>
        <name>e-iceblue</name>
        <url>https://repo.e-iceblue.com/nexus/content/groups/public/</url>
    </repository>
</repositories>
<dependencies>
    <dependency>
        <groupId>e-iceblue</groupId>
        <artifactId>spire.doc</artifactId>
        <version>14.9.5</version>
    </dependency>
</dependencies>
Find and Extract a Specified Hyperlink in a Word Document
The detailed steps are as follows:
- Create a Document instance and load a Word document from disk using Document.loadFromFile() method.
- Create an object of ArrayList<Field>.
- Iterate through the items in the sections to find all hyperlinks.
- Get the text of the first hyperlink using Field.get().getFieldText() method and get its link using Field.get().getValue() method.
- Save the text and the link of the first hyperlink to a TXT file using custom method writeStringToText().
- Java
import com.spire.doc.*;
import com.spire.doc.documents.*;
import com.spire.doc.fields.Field;
import java.io.*;
import java.util.ArrayList;
public class findHyperlinks {
public static void main(String[] args) throws IOException {
//Create a Document instance and load a Word document from file
String input = "D:/testp/test.docx";
Document doc = new Document();
doc.loadFromFile(input);
//Create an object of ArrayList
ArrayListField> hyperlinks = new ArrayList();
//Iterate through the items in the sections to find all hyperlinks
for (Section section : (IterableSection>) doc.getSections()) {
for (DocumentObject object : (IterableDocumentObject>) section.getBody().getChildObjects()) {
if (object.getDocumentObjectType().equals(DocumentObjectType.Paragraph)) {
Paragraph paragraph = (Paragraph) object;
for (DocumentObject cObject : (IterableDocumentObject>) paragraph.getChildObjects()) {
if (cObject.getDocumentObjectType().equals(DocumentObjectType.Field)) {
Field field = (Field) cObject;
if (field.getType().equals(FieldType.Field_Hyperlink)) {
hyperlinks.add(field);
}
}
}
}
}
}
//Get the text and the address of the first hyperlink
String hyperlinksText = hyperlinks.get(0).getFieldText();
String hyperlinkAddress = hyperlinks.get(0).getValue();
//Save the text and the link of the first hyperlink to a TXT file
String output = "D:/javaOutput/HyperlinkTextAndLink.txt";
writeStringToText("Text:\r\n" + hyperlinksText+ "\r\n" + "Link:\r\n" + hyperlinkAddress, output);
}
//Create a method to write the text and link of hyperlinks to a TXT file
public static void writeStringToText(String content, String textFileName) throws IOException {
File file = new File(textFileName);
if (file.exists())
{
file.delete();
}
FileWriter fWriter = new FileWriter(textFileName, true);
try {
fWriter.write(content);
} catch (IOException ex) {
ex.printStackTrace();
} finally {
try {
fWriter.flush();
fWriter.close();
} catch (IOException ex) {
ex.printStackTrace();
}
}
}
}
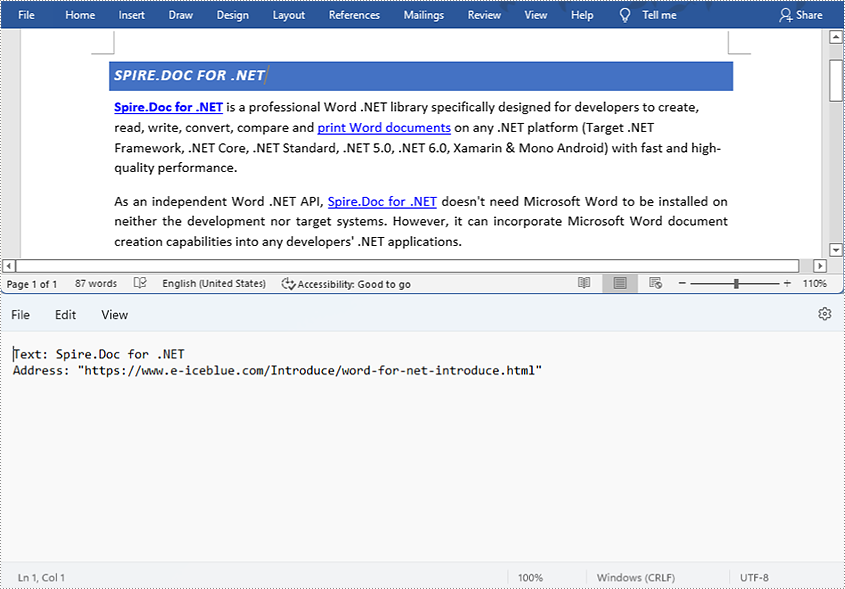
Find and Extract All the Hyperlinks in a Word Document
The detailed steps are as follows:
- Create a Document instance and load a Word document from disk using Document.loadFromFile() method.
- Create an object of ArrayList<Field>.
- Iterate through the items in the sections to find all hyperlinks.
- Get the texts of the hyperlinks using Field.get().getFieldText() method and get their links using Field.get().getValue() method.
- Save the text and the links of the hyperlinks to a TXT file using custom method writeStringToText().
- Java
import com.spire.doc.*;
import com.spire.doc.documents.*;
import com.spire.doc.fields.Field;
import java.io.*;
import java.util.ArrayList;
public class findHyperlinks {
public static void main(String[] args) throws IOException {
//Create a Document instance and load a Word document from file
String input = "D:/testp/test.docx";
Document doc = new Document();
doc.loadFromFile(input);
//Create an object of ArrayList
ArrayListField> hyperlinks = new ArrayList();
String hyperlinkText = "";
String hyperlinkAddress = "";
//Iterate through the items in the sections to find all hyperlinks
for (Section section : (IterableSection>) doc.getSections()) {
for (DocumentObject object : (IterableDocumentObject>) section.getBody().getChildObjects()) {
if (object.getDocumentObjectType().equals(DocumentObjectType.Paragraph)) {
Paragraph paragraph = (Paragraph) object;
for (DocumentObject cObject : (IterableDocumentObject>) paragraph.getChildObjects()) {
if (cObject.getDocumentObjectType().equals(DocumentObjectType.Field)) {
Field field = (Field) cObject;
if (field.getType().equals(FieldType.Field_Hyperlink)) {
hyperlinks.add(field);
}
}
}
}
}
}
//Save the texts and the links of the hyperlinks to a TXT file
String output = "D:/javaOutput/HyperlinksTextsAndLinks.txt";
writeStringToText("Text:\r\n " + hyperlinkText + "\r\n" + "Link:\r\n" + hyperlinkAddress + "\r\n", output);
}
//Create a method to write the text and link of hyperlinks to a TXT file
public static void writeStringToText(String content, String textFileName) throws IOException {
File file = new File(textFileName);
if (file.exists())
{
file.delete();
}
FileWriter fWriter = new FileWriter(textFileName, true);
try {
fWriter.write(content);
} catch (IOException ex) {
ex.printStackTrace();
} finally {
try {
fWriter.flush();
fWriter.close();
} catch (IOException ex) {
ex.printStackTrace();
}
}
}
}
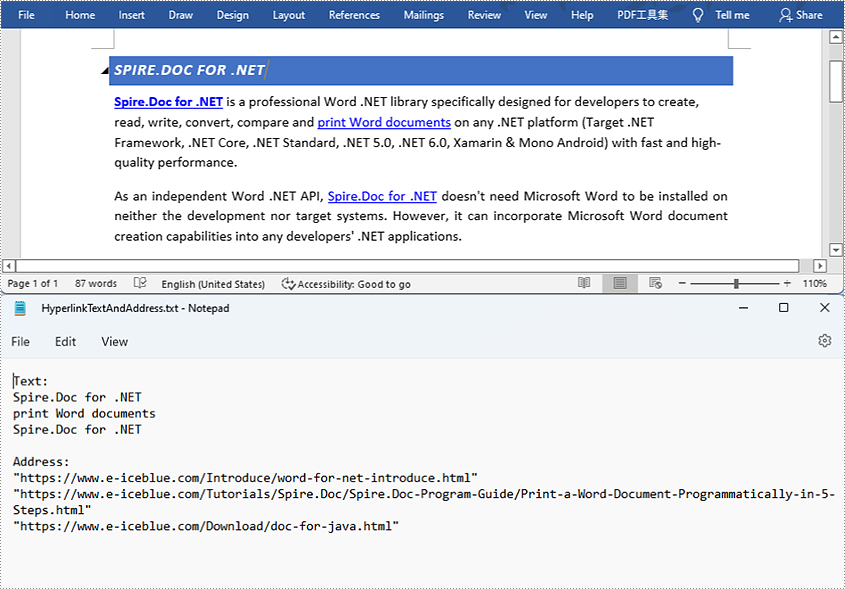
Apply for a Temporary License
If you'd like to remove the evaluation message from the generated documents, or to get rid of the function limitations, please request a 30-day trial license for yourself.
Java: Remove Hyperlinks in Word Documents
Hyperlinks usually appear on texts. By clicking on a hyperlink, we can access a website, a document, an email address, or other elements. Some Word documents, especially those that are generated from web content, may contain irritating hyperlinks, such as advertisements. This article shows you how to programmatically remove one hyperlink or all hyperlinks in a Word document using Spire.Doc for Java.
Install Spire.Doc for Java
First, you're required to add the Spire.Doc.jar file as a dependency in your Java program. The JAR file can be downloaded from this link. If you use Maven, you can easily import the JAR file in your application by adding the following code to your project's pom.xml file.
<repositories>
    <repository>
        <id>com.e-iceblue</id>
        <name>e-iceblue</name>
        <url>https://repo.e-iceblue.com/nexus/content/groups/public/</url>
    </repository>
</repositories>
<dependencies>
    <dependency>
        <groupId>e-iceblue</groupId>
        <artifactId>spire.doc</artifactId>
        <version>14.9.5</version>
    </dependency>
</dependencies>
Remove a Specified Hyperlink in a Word Document
The detailed steps to remove a specified hyperlink in a Word file are as follows:
- Create a Document object and load a Word document from disk using Document.loadFromFile() method.
- Find all the hyperlinks using custom method FindAllHyperlinks().
- Flatten the first hyperlink using custom method FlattenHyperlinks().
- Save the document using Document.saveToFile() method.
- Java
import com.spire.doc.*;
import com.spire.doc.documents.DocumentObjectType;
import com.spire.doc.documents.Paragraph;
import com.spire.doc.documents.UnderlineStyle;
import com.spire.doc.fields.Field;
import com.spire.doc.fields.TextRange;

import java.awt.*;
import java.util.ArrayList;

public class removeHyperlink {
    public static void main(String[] args) {
        //Create a Document object and load a Word document from disk
        String input = "D:/testp/test.docx";
        Document doc = new Document();
        doc.loadFromFile(input);

        //Find all hyperlinks
        ArrayList<Field> hyperlinks = FindAllHyperlinks(doc);

        //Flatten the first hyperlink
        FlattenHyperlinks(hyperlinks.get(0));

        //Save the document to file
        String output = "D:/javaOutput/RemoveHyperlinks.docx";
        doc.saveToFile(output, FileFormat.Docx);
    }

     //Iterate through the items in the sections to find all hyperlinks
        for (Section section : (Iterable<Section>)document.getSections())
        {
            for (DocumentObject object : (Iterable<DocumentObject>)section.getBody().getChildObjects())
            {
                if (object.getDocumentObjectType().equals(DocumentObjectType.Paragraph))
                {
                    Paragraph paragraph = (Paragraph) object;
                    for (DocumentObject cObject : (Iterable<DocumentObject>)paragraph.getChildObjects())
                    {
                    Paragraph paragraph = (Paragraph) object;
                    for (DocumentObject cObject : (Iterable)paragraph.getChildObjects())
                    {
                        if (cObject.getDocumentObjectType().equals(DocumentObjectType.Field))
                        {
                            Field field = (Field) cObject;
                            if (field.getType().equals(FieldType.Field_Hyperlink))
                            {
                                hyperlinks.add(field);
                            }
                        }
                    }
                }
            }
        }
        return hyperlinks;
    }

    //Create a method FlattenHyperlinks() to flatten the hyperlink field
    public static void FlattenHyperlinks(Field field)
    {
        int ownerParaIndex = field.getOwnerParagraph().getOwnerTextBody().getChildObjects().indexOf(field.getOwnerParagraph());
        int fieldIndex = field.getOwnerParagraph().getChildObjects().indexOf(field);
        Paragraph sepOwnerPara = field.getSeparator().getOwnerParagraph();
        int sepOwnerParaIndex = field.getSeparator().getOwnerParagraph().getOwnerTextBody().getChildObjects().indexOf(field.getSeparator().getOwnerParagraph());
        int sepIndex = field.getSeparator().getOwnerParagraph().getChildObjects().indexOf(field.getSeparator());
        int endIndex = field.getEnd().getOwnerParagraph().getChildObjects().indexOf(field.getEnd());
        int endOwnerParaIndex = field.getEnd().getOwnerParagraph().getOwnerTextBody().getChildObjects().indexOf(field.getEnd().getOwnerParagraph());
        FormatFieldResultText(field.getSeparator().getOwnerParagraph().getOwnerTextBody(), sepOwnerParaIndex, endOwnerParaIndex, sepIndex, endIndex);
        field.getEnd().getOwnerParagraph().getChildObjects().removeAt(endIndex);"
        for (int i = sepOwnerParaIndex; i >= ownerParaIndex; i--)
        {
            if (i == sepOwnerParaIndex && i == ownerParaIndex)
            {
                for (int j = sepIndex; j >= fieldIndex; j--)
                {
                    field.getOwnerParagraph().getChildObjects().removeAt(j);
                }
            }
            else if (i == ownerParaIndex)
            {
                for (int j = field.getOwnerParagraph().getChildObjects().getCount() - 1; j >= fieldIndex; j--)
                {
                    field.getOwnerParagraph().getChildObjects().removeAt(j);
                }
            }
            else if (i == sepOwnerParaIndex)
            {
                for (int j = sepIndex; j >= 0; j--)
                {
                    sepOwnerPara.getChildObjects().removeAt(j);
                }
            }
            else
            {
                field.getOwnerParagraph().ownerTextBody().getChildObjects().removeAt(i);
            }
        }
    }

    //Create a method FormatFieldResultText() to remove the font color and underline format of the hyperlinks
    private static void FormatFieldResultText(Body ownerBody, int sepOwnerParaIndex, int endOwnerParaIndex, int sepIndex, int endIndex)
    {
        for (int i = sepOwnerParaIndex; i <= endOwnerParaIndex; i++)
        {
            Paragraph para = (Paragraph) ownerBody.getChildObjects().get(i);
            if (i == sepOwnerParaIndex && i == endOwnerParaIndex)
            {
                for (int j = sepIndex + 1; j < endIndex; j++)
                {
                    FormatText((TextRange)para.getChildObjects().get(j));
                }
            }
            else if (i == sepOwnerParaIndex)
            {
                for (int j = sepIndex + 1; j < para.getChildObjects().getCount(); j++)
                {
                    FormatText((TextRange)para.getChildObjects().get(j));
                }
            }
            else if (i == endOwnerParaIndex)
            {
                for (int j = 0; j < endIndex; j++)
                {
                    FormatText((TextRange)para.getChildObjects().get(j));
                }
            }
            else
            {
                for (int j = 0; j < para.getChildObjects().getCount(); j++)
                {
                    FormatText((TextRange)para.getChildObjects().get(j));
                }
            }
        }
    }

    //Create a method FormatText() to change the color of the text to black and remove the underline
    private static void FormatText(TextRange tr)
    {
        //Set the text color to black
        tr.getCharacterFormat().setTextColor(Color.black);

        //Set the text underline style to none
        tr.getCharacterFormat().setUnderlineStyle(UnderlineStyle.None);
    }
}
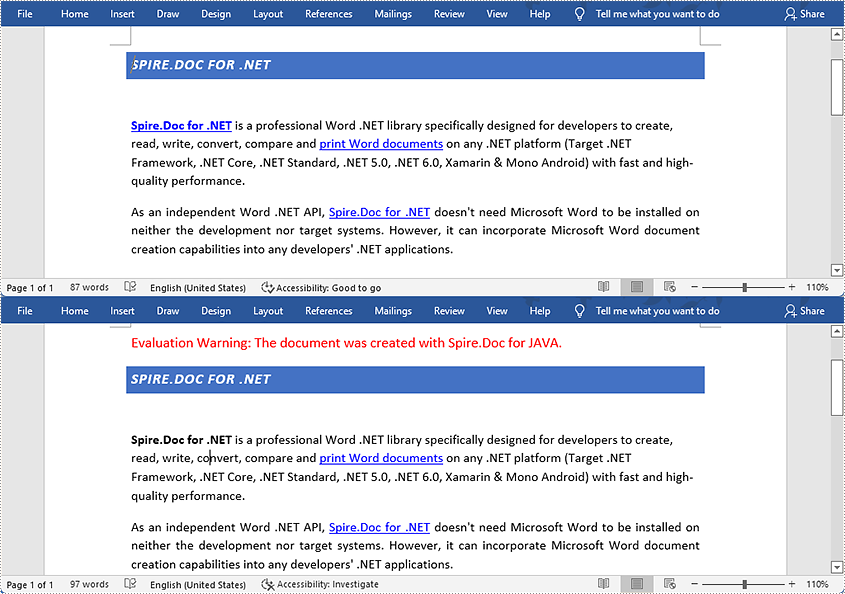
Remove All the Hyperlinks in a Word Document
The detailed steps to remove all the hyperlinks in a Word file are as follows:
- Create a Document object and load a Word document from disk using Document.loadFromFile() method.
- Find all the hyperlinks using custom method FindAllHyperlinks().
- Loop through the hyperlinks, and invoke the custom method FlattenHyperlinks() to flatten the specific hyperlink.
- Save the document using Document.saveToFile() method.
- Java
import com.spire.doc.*;
import com.spire.doc.documents.DocumentObjectType;
import com.spire.doc.documents.Paragraph;
import com.spire.doc.documents.UnderlineStyle;
import com.spire.doc.fields.Field;
import com.spire.doc.fields.TextRange;
import java.awt.*;
import java.util.ArrayList;
public class removeHyperlink {
public static void main(String[] args) {
//Create a Document object and load a Word document from disk
String input = "D:/testp/test.docx";
Document doc = new Document();
doc.loadFromFile(input);
//Find all the hyperlinks
ArrayList<Field> hyperlinks = FindAllHyperlinks(doc);
//Loop through the hyperlinks, and flatten the specific hyperlink.
for (int i = hyperlinks.size() -1; i >= 0; i--)
{
FlattenHyperlinks(hyperlinks.get(i));
}
//Save the document to file
String output = "D:/javaOutput/RemoveHyperlinks.docx";
doc.saveToFile(output, FileFormat.Docx);
}
//Create a method FindAllHyperlinks() to get all the hyperlinks from the sample document
private static ArrayList FindAllHyperlinks(Document document)
{
ArrayListField> hyperlinks = new ArrayList();
//Iterate through the items in the sections to find all hyperlinks
for (Section section : (Iterable<Section>)document.getSections())
{
for (DocumentObject object : (Iterable<DocumentObject>)section.getBody().getChildObjects())
{
if (object.getDocumentObjectType().equals(DocumentObjectType.Paragraph))
{
Paragraph paragraph = (Paragraph) object;
for (DocumentObject cObject : (Iterable<DocumentObject>)paragraph.getChildObjects())
{
if (cObject.getDocumentObjectType().equals(DocumentObjectType.Field))
{
Field field = (Field) cObject;
if (field.getType().equals(FieldType.Field_Hyperlink))
{
hyperlinks.add(field);
}
}
}
}
}
}
return hyperlinks;
}
//Create a method FlattenHyperlinks() to flatten the hyperlink field
public static void FlattenHyperlinks(Field field)
{
int ownerParaIndex = field.getOwnerParagraph().getOwnerTextBody().getChildObjects().indexOf(field.getOwnerParagraph());
int fieldIndex = field.getOwnerParagraph().getChildObjects().indexOf(field);
Paragraph sepOwnerPara = field.getSeparator().getOwnerParagraph();
int sepOwnerParaIndex = field.getSeparator().getOwnerParagraph().getOwnerTextBody().getChildObjects().indexOf(field.getSeparator().getOwnerParagraph());
int sepIndex = field.getSeparator().getOwnerParagraph().getChildObjects().indexOf(field.getSeparator());
int endIndex = field.getEnd().getOwnerParagraph().getChildObjects().indexOf(field.getEnd());
int endOwnerParaIndex = field.getEnd().getOwnerParagraph().getOwnerTextBody().getChildObjects().indexOf(field.getEnd().getOwnerParagraph());
FormatFieldResultText(field.getSeparator().getOwnerParagraph().getOwnerTextBody(), sepOwnerParaIndex, endOwnerParaIndex, sepIndex, endIndex);
field.getEnd().getOwnerParagraph().getChildObjects().removeAt(endIndex);"
for (int i = sepOwnerParaIndex; i >= ownerParaIndex; i--)
{
if (i == sepOwnerParaIndex && i == ownerParaIndex)
{
for (int j = sepIndex; j >= fieldIndex; j--)
{
field.getOwnerParagraph().getChildObjects().removeAt(j);
}
}
else if (i == ownerParaIndex)
{
for (int j = field.getOwnerParagraph().getChildObjects().getCount() - 1; j >= fieldIndex; j--)
{
field.getOwnerParagraph().getChildObjects().removeAt(j);
}
}
else if (i == sepOwnerParaIndex)
{
for (int j = sepIndex; j >= 0; j--)
{
sepOwnerPara.getChildObjects().removeAt(j);
}
}
else
{
field.getOwnerParagraph().ownerTextBody().getChildObjects().removeAt(i);
}
}
}
//Create a method FormatFieldResultText() to format the texts
private static void FormatFieldResultText(Body ownerBody, int sepOwnerParaIndex, int endOwnerParaIndex, int sepIndex, int endIndex)
{
for (int i = sepOwnerParaIndex; i <= endOwnerParaIndex; i++)
{
Paragraph para = (Paragraph) ownerBody.getChildObjects().get(i);
if (i == sepOwnerParaIndex && i == endOwnerParaIndex)
{
for (int j = sepIndex + 1; j < endIndex; j++)
{
FormatText((TextRange)para.getChildObjects().get(j));
}
}
else if (i == sepOwnerParaIndex)
{
for (int j = sepIndex + 1; j < para.getChildObjects().getCount(); j++)
{
FormatText((TextRange)para.getChildObjects().get(j));
}
}
else if (i == endOwnerParaIndex)
{
for (int j = 0; j < endIndex; j++)
{
FormatText((TextRange)para.getChildObjects().get(j));
}
}
else
{
for (int j = 0; j < para.getChildObjects().getCount(); j++)
{
FormatText((TextRange)para.getChildObjects().get(j));
}
}
}
}
//Create a method FormatText() to change the color of the text to black and remove the underline
private static void FormatText(TextRange tr)
{
//Set the text color to black
tr.getCharacterFormat().setTextColor(Color.black);
//Set the text underline style to none
tr.getCharacterFormat().setUnderlineStyle(UnderlineStyle.None);
}
}
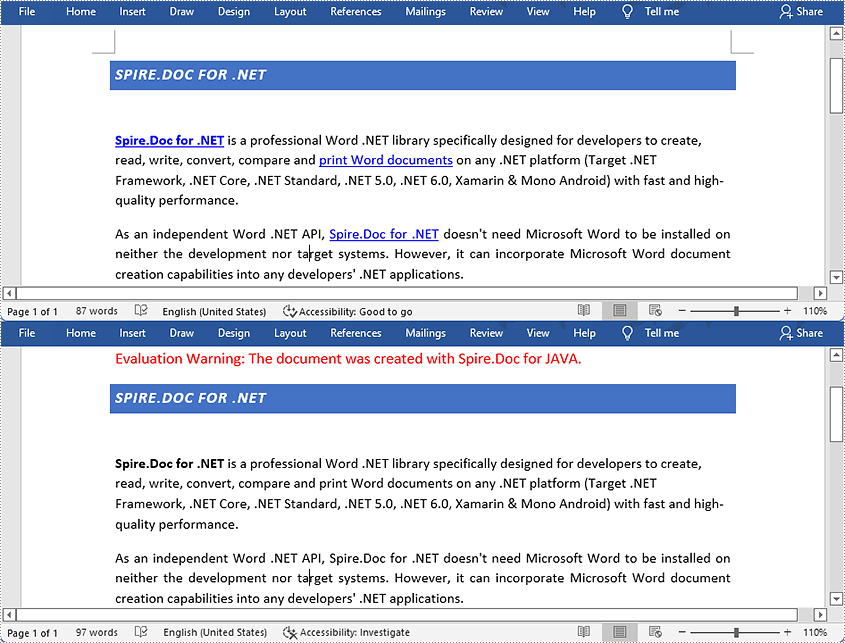
Apply for a Temporary License
If you'd like to remove the evaluation message from the generated documents, or to get rid of the function limitations, please request a 30-day trial license for yourself.
Embed Spire.Cloud.Office in Your Web Application
Spire.Cloud.Office is a JavaScript document editor which you can use to create, edit, convert, print, view and save MS Word and Excel documents in a browser on Windows, Linux and Mac. This article demonstrates how to incorporate Spire.Cloud.Office online editor (JavaScript) into a HTML document, so you can run the editor directly in your web application or cloud application.
Step 1. Install Spire.Cloud.Office
Before you can embed the document editor in your HTML file, you’ll need to install Spire.Cloud.Office on your system.
After installation, you can visit our sample file management system and editor on port 3000, and connect to our service via port 8000. In this tutorial, Spire.Cloud.Office is installed on our local server 192.168.0.111.
Step 2. Embed Editor in Your HTML Document
Below is a sample HTML in which our document editor is embedded. You can download it and modify some key parameters in it to run our editor in a HTML page.
    <html xmlns="http://www.w3.org/1999/xhtml">
<head><meta http-equiv="Content-Type" content="text/html; charset=utf-8" /><link rel="icon" href="https://cdn.e-iceblue.com/favicon.ico" type="image/x-icon" /><title>
	Spire.Office
</title>

    <style>
        html {
            height: 100%;
            width: 100%;
        }

        body {
            background: #fff;
            color: #333;
            font-family: Arial, Tahoma,sans-serif;
            font-size: 12px;
            font-weight: normal;
            height: 100%;
            margin: 0;
            overflow-y: hidden;
            padding: 0;
            text-decoration: none;
        }

        form {
            height: 100%;
        }

        div {
            margin: 0;
            padding: 0;
        }
    </style>

    <script language="javascript" type="text/javascript" src="http://192.168.4.77:8000/web/editors/spireapi/SpireCloudEditor.js"></script>

    <script type="text/javascript" language="javascript">

        var docEditor;
        var fileName = "";
        var lang = "zh";
        var fileType = "";
        var token = null;
        var appid = null;
        var appkey = null;

        var innerAlert = function (message) {
            if (console && console.log)
                console.log(message);
        };

        var onStart = function () {
            innerAlert("Document editor ready");

        };

        var onDocumentStateChange = function (event) {
            var title = document.title.replace(/\*$/g, "");
            document.title = title + (event.data ? "*" : "");
        };

        var onRequestEditRights = function () {
            location.href = location.href.replace(RegExp("action=view\&?", "i"), "");
        };

        var onError = function (event) {
            if (event)
                innerAlert(event.data);
        };

        var onOutdatedVersion = function (event) {
            location.reload(true);
        };
        function ajax(options) {
            options = options || {};
            var method = (options.type || "GET").toUpperCase(),
                url = options.url,
                queryString = null;
            if (!url)
                return;
            if (options.data) {
                queryString = [];
                for (var attr in options.data) {
                    queryString.push(attr + "=" + options.data[attr]);
                }
                queryString = queryString.join("&");
            }
            if (method === "GET" && queryString) {
                url += "?" + queryString;
                queryString = "";
            }
            var xhr = new XMLHttpRequest();
            xhr.open(method, url, true);
            if (method === "POST")
                xhr.setRequestHeader("Content-Type", "application/x-www-form-urlencoded");
            xhr.send(queryString);
            xhr.onreadystatechange = function () {
                if (xhr.readyState === 4) {
                    if (xhr.status === 200) {
                        var data = xhr.responseText;
                        if (options.dataType === "json")
                            data = JSON.parse(data);
                        options.success && options.success(data);
                    } else {
                        options.error && options.error(xhr.status);
                    }
                }
            }
        }
        var callbackfn = function (result) {
            if (result && result.data) {
                var data = result.data,
                    fileName = data[0],
                    url = data[1];
                if (fileName.indexOf('=') > -1)
                    fileName = fileName.split('=')[1];
                var host1 = location.hostname;
                var host ='http://192.168.4.77:8000';
                ajax({
                    url: 'http://' + host + '/webeditor.ashx?type=save',
                    type: 'post',
                    data: { 'filename': fileName, 'fileuri': url },
                    dataType: 'json',
                    async: false,
                    success: function (json) {
                        if (json.code == 200 || json.code == '200') {
                            alert('Successfully saved');
                        } else {
                            this.error(json, 'Failed to save');
                        }
                    },
                    error: function (json, msg) {
                        alert(+msg);
                    }
                });
            }
        };
        var connectEditor = function () {
            var type = 'desktop';
            if (type == "desktop") {
                var app = navigator.appVersion;
                if (app.toLowerCase().indexOf('window') != -1) {
                    type = "desktop";
                } else {
                    type = "mobile";
                }
            };
            var urlString ="https://cloud.e-iceblue.cn/demo/demo.docx";
            var arrfn = urlString.split(".");
            var strp= arrfn[arrfn.length - 1];
            var documentTypeValue=null;
            switch(strp){
                case "xls":
                case "xlsx":
                case "xlsm":
                case "xlt":
                case "xltx":
                case "xltm":
                case "ods":
                case "fods":
                case "ots":
                case "csv":
                    documentTypeValue="spreadsheet";
                    break;
                case "pps":
                case "ppsx":
                case "ppsm":
                case "ppt":
                case "pptx":
                case "pptm":
                case "pot":
                case "potx":
                case "potm":
                case "odp":
                case "fodp":
                case "otp":
                    documentTypeValue="presentation";
                    break;
                default:
                    documentTypeValue="document";
                    break;
            }

            docEditor = new SpireCloudEditor.OpenApi("iframeEditor",
                {
                    fileAttrs: {
                        fileInfo: {
                            name: '',
                            ext: '',
                            primary: '',
                            creator: '',
                            createTime: new Date('20210505')
                        },
                        sourceUrl: urlString,
                        createUrl: '',
                        callbackUrl: 'http://192.168.4.77:3000/save?filename=demo.docx&useraddress=__ffff_192.168.3.121',////This item can be empty, but only if the 'onSave' callback function must be defined in events. If the callback function is undefined and this item is empty, Cloud Editor will not provide save function.
                        verification: null,//If the user file system requires validation of token-like data when downloading files, it can be implemented here.
                        canEdit: true,
                        canDownload: false
                    },
                    user: {
                        primary: '',
                        name: '',
                        canSave: true,
                        customization: {
                            public: {
                                common: {
                                    whiteLabel: false,
                                    defaultZoom: 1,
                                    openReviewChanges: false,
                                    permGroups: ['everyone'],//Restrict Group Editing
                                    viewVersion: false,
                                    canForcesave: false,
                                    header: {
                                        hideTitle: false,
                                        defToolbar: 'full'
                                    }
                                },
                                document: null,
                                powerpoint: null,
                                excel: null
                            }
                        }
                    },
                    editorAttrs: { // Editor configuration
                        editorWidth: '100%',
                        editorHeight: '100%',
                        editorType: 'document', // Editor type (optional). The program will determine based on file type. Possible values: document, presentation, spreadsheet
                        platform: 'desktop', // Editor platform type. Options: desktop, mobile, embedded
                        viewLanguage: 'en', // UI display language. Options: en (English), zh (Chinese)
                        canChat: true, // Whether chat feature is enabled
                        canComment: true, // Whether commenting feature is enabled
                        canReview: true, // Whether review feature is enabled
                        events: {
                            'onStart': onStart,
                            'onDocumentStateChange': onDocumentStateChange,
                            'onError': onError,
                            'onSave': ''
                        }
                    }
                }
            );
        };
        if (window.addEventListener) {
            window.addEventListener("load", connectEditor);
        } else if (window.attachEvent) {
            window.attachEvent("load", connectEditor);
        }

    </script>
</head>
<body>
    <form name="form1" method="post" action="./docEditor.aspx?fileID=demo+(2).docx&lang=zh" id="form1">
<div>
<input type="hidden" name="__VIEWSTATE" id="__VIEWSTATE" value="/wEPDwUKMTkyMjc5MTU4M2RkBQQQBsVcOHQbzTlwYapiES2Trc9Z/U4CC+r9rluZubc=" />
</div>
<div>
	<input type="hidden" name="__VIEWSTATEGENERATOR" id="__VIEWSTATEGENERATOR" value="C2EAC0DE" />
</div>
        <div id="iframeEditor">
        </div>
    </form>
</body>
</html>
Key Parameters
| Configuration Parameters | Example Value Explanation | Set Value | |||||
| fileAttrs | File configuration object | ||||||
| fileInfo | File information object | ||||||
| name | File name | Can be empty | |||||
| ext | Document name | docx, xlsx, pptx | |||||
| primary | Document unique identifier | Can be empty | |||||
| creator | Document creator | Can be empty | |||||
| createTime | Document creation time | Can be empty | |||||
| sourceUrl | Document URL | Cannot be empty, must have access permissions | |||||
| createUrl | Template document URL when creating a new document | Can be empty | |||||
| callbackUrl | Callback URL | Can be empty. If online editing save functionality is required, either callback URL or callback event must be defined | |||||
| verification | Verification information | Can be empty. When downloading files from user file system requires verification data like token, it can be written here | |||||
| templates | Document templates | Can be empty | |||||
| canEdit | Whether the document can be edited | Default is true. When set to false, saving is not allowed | |||||
| canDownload | Whether the document can be downloaded | Default is true. When set to false, downloading is not allowed | |||||
| user | User configuration object | ||||||
| primary | User ID | Can be empty | |||||
| name | Username | Can be empty | |||||
| canSave | Whether the user can save the document | Default is true. When set to false, saving is not allowed | |||||
| canSaveByShortcut | Whether the user can save the document via shortcut | Default is true. When set to false, saving via shortcut is not allowed | |||||
| customization | Custom parameters object | ||||||
| public | Public parameters | ||||||
| common | Common parameters object | ||||||
| whiteLabel | White label | Default is false. When set to true, the E-iceblue Logo icon will not be displayed | |||||
| defaultZoom | Zoom value | Can be empty. Set range is 0.5-5 | |||||
| openReviewChagnes | Whether to open revisions | Default is false. When set to true, revisions are opened | |||||
| openNavigation | Open navigation bar | Default is false. When set to true, the navigation bar is displayed | |||||
| openAllComments | Open comments list | Default is false. When set to true, the comments list is displayed | |||||
| collaborationModeIsFast | Set editing mode | Whether collaborative editing mode is fast. When true, mode is fast; when false, mode is strict. When this parameter is not set, the last value from editor cache is used. If no cache, it's set to fast | |||||
| CollaborationModeOnlyFast | Disable strict mode | Whether mode is fast only. Default is false. When true, sets to fast mode and disables strict mode | |||||
| viewVersion | View mode | Default is false. When true, saving is not allowed | |||||
| canDownloadInView | Whether download is allowed in view mode | Default is false. When true, download is allowed in view mode | |||||
| canPrintInView | Whether printing is allowed in view mode | Default is false. When true, printing is allowed in view mode | |||||
| openReviewPanel | Open revisions list | Default is false. When true, shows revisions list | |||||
| hideRuler | Hide ruler | Default gets value from browser cache. When true, hides ruler; when false, shows ruler | |||||
| hideStatusBar | Hide status bar | Default is false. When true, hides status bar | |||||
| showBookmarks | Show bookmarks indicator | Default is true. When false, hides bookmarks indicator | |||||
| keepTextOnly | Paste text only by default | Default is false. When true, only pastes text | |||||
| permGroups | Current user's group membership (this is an array) | Default is all users, can input custom groups | |||||
| socket_url | Custom socket_url, mainly to solve port mismatch issues when using Nginx as reverse proxy after private deployment | Can be empty | |||||
| header | |||||||
| hideTitle | Hide title | Default is false. When true, hides title | |||||
| defToolbar | Toolbar view | Default is "full", can be set to "full" or "short" | |||||
| goback | Back navigation object | ||||||
| url | Back navigation URL | Can be empty | |||||
| btnPermissions | Button permission control | View button permission control table | |||||
| previewShowCursor | Show cursor in preview mode | Default is true. When false, hides cursor | |||||
| showCursor | Show cursor | Default is true. When false, hides cursor | |||||
| cusWaterMarkJs | Custom watermark JS | Should be a URL address | |||||
| canChangeProduct | Whether product can be switched | Default is false. When true, switching is allowed | |||||
| showTableline | Whether to show dotted lines for borderless tables | Default is true. When false, hides dotted lines | |||||
| document | Word customization | View corresponding customer's customization documentation | |||||
| excel | Excel customization | View corresponding customer's customization documentation | |||||
| powerpoint | PPT customization | View corresponding customer's customization documentation | |||||
| aiCommon | Public cloud id, key, and TokenUrl required for AI functionality | View corresponding AI configuration documentation | |||||
| aiAttars_WordAI | Appkey and productType required for Word's AI functionality | View corresponding AI configuration documentation | |||||
| aiAttars_ExcelAI | Appkey and productType required for Excel's AI functionality | View corresponding AI configuration documentation | |||||
| aiAttars_PowerPointAI | Appkey and productType required for PPT's AI functionality | View corresponding AI configuration documentation | |||||
| editorAttrs | Editor configuration object | ||||||
| editorMode | Edit mode Can be 'edit' (edit) or 'view' (view) |
Can be empty, defaults to 'edit' | |||||
| editorWidth | Width | Can be empty, default value 100% | |||||
| editorHeight | Height | Can be empty, default value 100% | |||||
| editorType | File editor type | Can be unconfigured, program gets from file type. Must be set to document or spreadsheet or presentation | |||||
| platform | Editor platform type 'desktop' (desktop display), 'mobile' (mobile display), 'embedded' (embedded display) |
Cannot be empty, must be set to one of desktop, mobile or embedded | |||||
| viewLanguage | Platform interface display language | Can be empty, "en" or "zh". If empty, matches browser default language | |||||
| canChat | Whether chat is enabled | Default is true. When false, chat is disabled | |||||
| canComment | Whether comments are enabled | Default is true. When false, comments are disabled | |||||
| canReview | Whether revisions are enabled | Default is true. When false, revisions are disabled | |||||
| canForcesave | Whether document can be force-saved | Default is true. When false, force-saving is not allowed | |||||
| unMarked | Enable unmarked mode (accept revisions) | Can be empty, default is false. When true, enables unmarked mode (accepts revisions) | |||||
| canSignature | Whether to enable signature/seal functionality | Can be empty, default is false. When true, enables signature/seal functionality | |||||
| canWordAI | Whether to enable Word's AI functionality | Can be empty, default is false. When true, enables Word's AI functionality | |||||
| canExcelAI | Whether to enable Excel's AI functionality | Can be empty, default is false. When true, enables Excel's AI functionality | |||||
| canPowerPointAI | Whether to enable PPT's AI functionality | Can be empty, default is false. When true, enables PPT's AI functionality | |||||
| events | Events | ||||||
| onStart | Triggered when editor initialization completes and starts loading/parsing document | ||||||
| onDocumentContentReady | Triggered when document loading completes | ||||||
| onSave | Triggered when saving | ||||||
| onDocumentStateChange | Triggered when document state changes (document has saved and unsaved states) | ||||||
| onError | Triggered when error occurs | ||||||
| onErrorCallback | Callback when clicking error popup | Normally, clicking error popup navigates to page specified by fileAttrs.customization.public.common.goback.url. If user customizes this function, calls the function instead and URL becomes invalid | |||||
Java: Find Text and Add Hyperlinks for Them in PDF
A hyperlink refers to an icon, graphic, or text that links to another file or object. It is one of the most commonly used features for manipulating documents. Spire.PDF for Java supports creating a new PDF document and adding various hyperlinks to it, including ordinary links, hypertext links, email links and document links. This article will show you how to add hyperlinks to specific text in an existing PDF.
Install Spire.PDF for Java
First of all, you need to add the Spire.Pdf.jar file as a dependency in your Java program. The JAR file can be downloaded from this link. If you use Maven, you can easily import the JAR file by adding the following code to your project's pom.xml file.
<repositories>
    <repository>
        <id>com.e-iceblue</id>
        <name>e-iceblue</name>
        <url>https://repo.e-iceblue.com/nexus/content/groups/public/</url>
    </repository>
</repositories>
<dependencies>
    <dependency>
        <groupId>e-iceblue</groupId>
        <artifactId>spire.pdf</artifactId>
        <version>12.9.0</version>
    </dependency>
</dependencies>
Find Text and Add Hyperlinks for Them in PDF
With Spire PDF for Java, you can find all matched text in a specific PDF page and add hyperlinks to them. Here are the detailed steps to follow.
- Create a PdfDocument instance and load a sample PDF document using PdfDocument.loadFromFile()method.
- Get a specific page of the document using PdfDocument.getPages().get() method.
- Find all matched text in the page using PdfPageBase.findText(String searchPatternText, boolean isSearchWholeWord) method, and return a PdfTextFindCollection object.
- Create a PdfUriAnnotation instance based on the bounds of a specific find result.
- Set a URL address for the annotation using PdfUriAnnotation.set(String value) method and set its border and color as well.
- Add the URL annotation to the PDF annotation collection as a new annotation using PdfPageBase.getAnnotationWidget().add() method.
- Save the document using PdfDocument.saveToFile() method.
- Java
import com.spire.pdf.*;
import com.spire.pdf.annotations.*;
import com.spire.pdf.general.find.*;
import com.spire.pdf.graphics.PdfRGBColor;
import java.awt.*;
public class SearchTextAndAddHyperlink {
public static void main(String[] args) {
//Create a PdfDocument instance
PdfDocument pdf = new PdfDocument();
//Load a sample PDF document
pdf.loadFromFile("C:\\Users\\Test1\\Desktop\\sample.pdf");
//Get the first page
PdfPageBase page = pdf.getPages().get(0);
// Find all matched strings and return the reesult oject
ListPdfTextFragment> results = null;
PdfTextFindOptions findOptions = new PdfTextFindOptions();
findOptions.setTextFindParameter(EnumSet.of(TextFindParameter.WholeWord));
//loop through the find collection
for(PdfTextFragment find : results)
{
// Create a PdfUriAnnotation instance to add hyperlinks for the searched text
Rectangle2D[] linkBounds = find.getBounds();
PdfUriAnnotation uri = new PdfUriAnnotation(linkBounds[0]);
uri.setUri("https://www.e-iceblue.com/Introduce/pdf-for-java.html");
uri.setBorder(new PdfAnnotationBorder(1f));
uri.setColor(new PdfRGBColor(Color.blue));
page.getAnnotationsWidget().add(uri);
}
//Save the document
pdf.saveToFile("output/searchTextAndAddHyperlink.pdf");
}
}
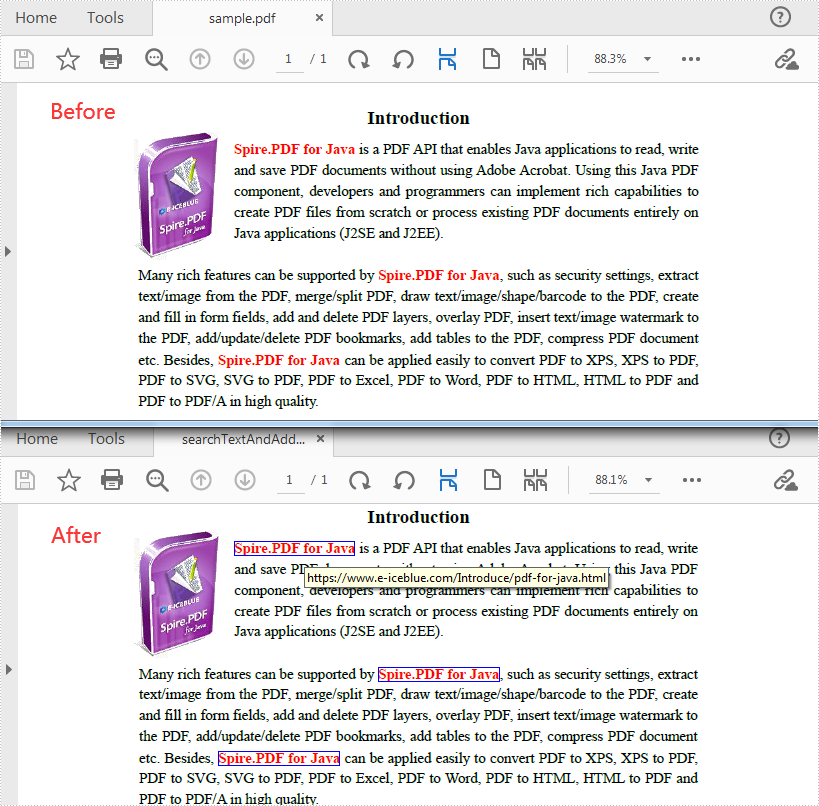
Apply for a Temporary License
If you'd like to remove the evaluation message from the generated documents, or to get rid of the function limitations, please request a 30-day trial license for yourself.
C#/VB.NET: Replace a Picture in Excel
Sometimes after you have finished an Excel workbook, you may need to replace some of the existing pictures with better ones for the purpose of making the workbook more appealing and persuasive. In this tutorial, you will learn how to replace a picture in Excel using Spire.XLS for .NET.
Install Spire.XLS for .NET
To begin with, you need to add the DLL files included in the Spire.XLS for .NET package as references in your .NET project. The DLLs files can be either downloaded from this link or installed via NuGet.
- Package Manager
PM> Install-Package Spire.XLS
Replace a Picture in Excel
The following are the detailed steps to replace a picture with another one using Spire.XLS for .NET.
- Create a Workbook object.
- Load a sample file using Workbook.LoadFromFile() method.
- Use Workbook.Worksheets[0] to get the first worksheet.
- Use Worksheet.Pictures[0] property to get the first picture from the first worksheet
- Use Image.FromFile() method to load an image from the specified file, and set it as a new value of ExcelPicture.Picture property. To do so, the original picture will be replaced with the new one.
- Save the document using Workbook.SaveToFile() method.
- C#
- VB.NET
using Spire.Xls;
using Spire.Xls.Collections;
namespace ReplacePictureinExcel
{
    class Program
    {
        static void Main(string[] args)
        {
            //Create a Workbook instance
            Workbook workbook = new Workbook();
            //Load the Excel file
            workbook.LoadFromFile("input.xls");

            //Get the first sheet
            Worksheet sheet = workbook.Worksheets[0];

            //Get Excel picture collection
            PicturesCollection pictureCollection = sheet.Pictures;

            //Get the first picture from the collection
            ExcelPicture excelPicture = pictureCollection[0];

            // Creates an Image from the specified file.
            excelPicture.Picture = System.Drawing.Image.FromFile("input.png");

            //Save the document
            workbook.SaveToFile("ReplaceImage.xlsx", ExcelVersion.Version2013);
        }
    }
}
Imports Spire.Xls
Imports Spire.Xls.Collections
Imports System.Drawing

Namespace ReplacePictureinExcel
	Class Program
		Private Shared Sub Main(args As String())

			'Create a Workbook instance
			Dim workbook As New Workbook()
			'Load the Excel file
			workbook.LoadFromFile(Input.xls)

			'Get the first sheet
			Dim sheet As Worksheet = workbook.Worksheets(0)

			'Get Excel picture collection
			Dim pictureCollection As PicturesCollection = sheet.Pictures

			'Get the first picture from the collection
			Dim excelPicture As ExcelPicture = pictureCollection(0)

			' Creates an Image from the specified file.
			excelPicture.Picture = Image.FromFile(image)

			'Save the document
			workbook.SaveToFile("ReplaceImage.xlsx", ExcelVersion.Version2013)
		End Sub
	End Class
End Namespace
The original file:
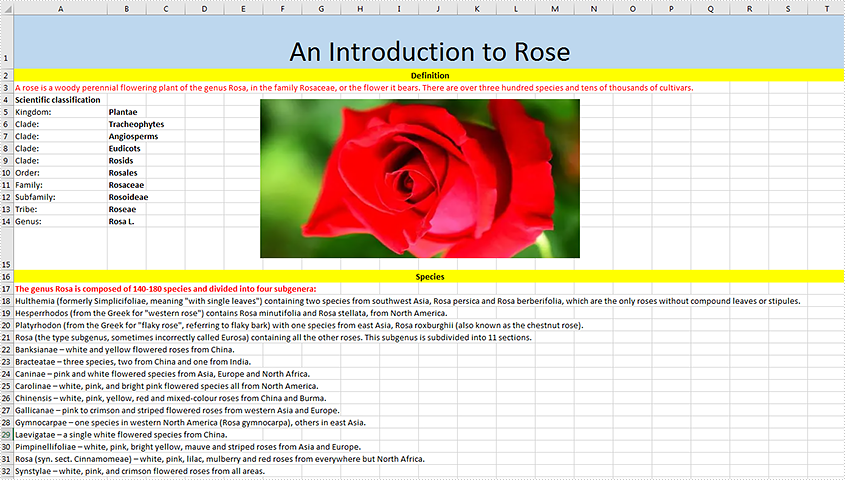
The generated file:

Apply for a Temporary License
If you'd like to remove the evaluation message from the generated documents, or to get rid of the function limitations, please request a 30-day trial license for yourself.