Copy PowerPoint Slides with JavaScript in React
The same template gets reused again and again: change the title and it becomes a new version. The framework slides of a quarterly report and the conclusion slide of a project review are often carried over from an earlier deck. Selecting a slide and copying it in desktop software is easy enough, but fitting that into a batch web workflow means moving files back and forth between the browser and a server.
This article shows how to copy PowerPoint slides in the browser with Spire.Presentation for JavaScript. It covers copying within the same presentation and copying to another presentation. Everything runs in the browser on WebAssembly, with no Office installation and no backend, and the files stay on the user's device.
It covers two core features:
For installation and project setup, see Integrate Spire.Presentation for JavaScript in a React project. The examples below assume Spire.Presentation is installed and the WebAssembly module is initialized.
Copy a slide within the same presentation
Spire.Presentation for JavaScript provides Slides.Append() and Slides.Insert() to duplicate an existing slide. Pass { slide } and that slide is copied, along with its content, shapes, and formatting; the copy and the original are independent of each other.
| Call | Effect |
|---|---|
Slides.Append({ slide }) |
Appends the copy to the end of the presentation |
Slides.Insert({ index, slide }) |
Inserts the copy at index; the slides after it shift down |
index is zero-based; pass 0 to insert at the very beginning.
The steps are:
- Get the Spire.Presentation WASM module and make sure it is ready.
- Load the source presentation and the font, create a
Presentationobject, and load the file. - Get the slide to copy with
Presentation.Slides.get_Item(). - Copy it to the end with
Slides.Append(), or to a specific position withSlides.Insert(). - Save the result with
Presentation.SaveToFile(), then read it from the VFS and trigger the browser download.
The code for copying a slide within the same presentation is:
function App() {
  const copySlide = async () => {
    // Get the Spire.Presentation WASM module
    const pptModule = window.wasmModule?.spirepresentation;

    // Check that the module is ready
    if (!pptModule) {
      alert('Spire.Presentation is not ready yet');
      return;
    }

    // Load the source presentation and the font
    await window.spire.FetchFileToVFS('SourcePresentation.pptx', "", `${process.env.PUBLIC_URL}/data/`);
    await window.spire.FetchFileToVFS('ARIALUNI.TTF', "/Library/Fonts/", `${process.env.PUBLIC_URL}/font/`);

    // Create a Presentation instance and load the source document
    const ppt = new pptModule.Presentation();
    ppt.LoadFromFile('SourcePresentation.pptx');

    // Get the first slide
    const slide = ppt.Slides.get_Item(0);

    // Copy it to the end
    ppt.Slides.Append({ slide: slide });

    // Copy it to the second position; the index is zero-based
    ppt.Slides.Insert({ index: 1, slide: slide });

    // Save the result
    const outputFileName = 'CopiedPresentation.pptx';
    ppt.SaveToFile({ file: outputFileName, fileFormat: pptModule.FileFormat.Pptx2013 });
    ppt.Dispose();

    // Read the generated file from the VFS and trigger the download
    const fileArray = window.dotnetRuntime.Module.FS.readFile(outputFileName);
    const blob = new Blob([fileArray], { type: 'application/vnd.openxmlformats-officedocument.presentationml.presentation' });
    const url = URL.createObjectURL(blob);
    const a = document.createElement('a');
    a.href = url;
    a.download = outputFileName;
    a.click();
    URL.revokeObjectURL(url);
  };

  return (
    <div style={{ textAlign: 'center', height: '300px' }}>
      <h1>Copy PowerPoint Slides</h1>
      <button onClick={copySlide}>
        Copy slides
      </button>
    </div>
  );
}

export default App;
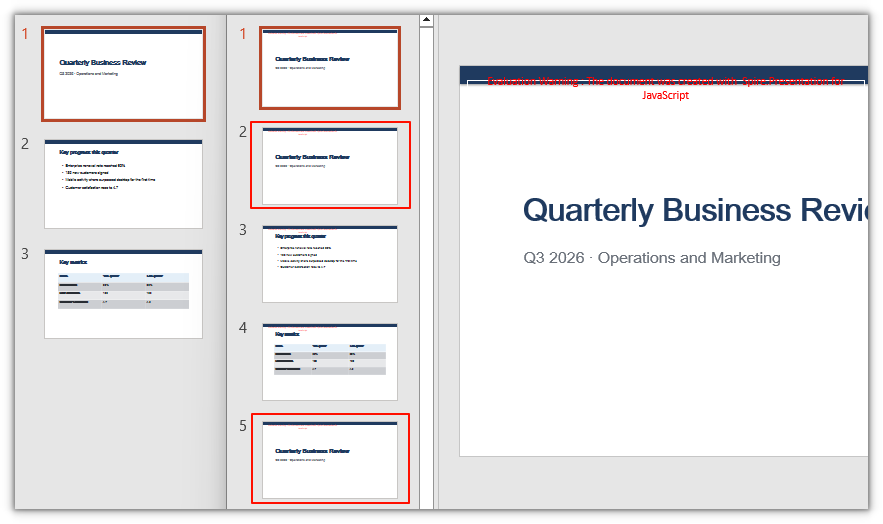
The presentation after copying the first slide to the end and to the second position:
Copy a slide to another presentation
The slide passed to Append() and Insert() does not have to come from the same document. Hand an ISlide taken from the source document to the target document, and the copy lands in the target presentation together with the source document's master and layout; the target document's existing pages and masters are not affected.
The steps are:
- Get the Spire.Presentation WASM module and make sure it is ready.
- Load the source document, the target document, and the font, and create separate
Presentationobjects for them. - Get the slide to copy with the source document's
Slides.get_Item(). - Insert the slide at a specific position with the target document's
Slides.Insert(), or append it withSlides.Append(). - Save the target document with
Presentation.SaveToFile(), then read it from the VFS and trigger the browser download.
The code for copying a slide to another presentation is:
function App() {
  const copySlideToAnother = async () => {
    // Get the Spire.Presentation WASM module
    const pptModule = window.wasmModule?.spirepresentation;

    // Check that the module is ready
    if (!pptModule) {
      alert('Spire.Presentation is not ready yet');
      return;
    }

    // Load the source document, the target document, and the font
    await window.spire.FetchFileToVFS('SourcePresentation.pptx', "", `${process.env.PUBLIC_URL}/data/`);
    await window.spire.FetchFileToVFS('TargetPresentation.pptx', "", `${process.env.PUBLIC_URL}/data/`);
    await window.spire.FetchFileToVFS('ARIALUNI.TTF', "/Library/Fonts/", `${process.env.PUBLIC_URL}/font/`);

    // Create Presentation instances and load the source and target documents
    const ppt1 = new pptModule.Presentation();
    ppt1.LoadFromFile('SourcePresentation.pptx');
    const ppt2 = new pptModule.Presentation();
    ppt2.LoadFromFile('TargetPresentation.pptx');

    // Get the first slide from the source document
    const slide = ppt1.Slides.get_Item(0);

    // Insert it at the second position of the target document; the index is zero-based
    ppt2.Slides.Insert({ index: 1, slide: slide });

    // Save the target document
    const outputFileName = 'CopiedAcrossPresentations.pptx';
    ppt2.SaveToFile({ file: outputFileName, fileFormat: pptModule.FileFormat.Pptx2013 });
    ppt2.Dispose();
    ppt1.Dispose();

    // Read the generated file from the VFS and trigger the download
    const fileArray = window.dotnetRuntime.Module.FS.readFile(outputFileName);
    const blob = new Blob([fileArray], { type: 'application/vnd.openxmlformats-officedocument.presentationml.presentation' });
    const url = URL.createObjectURL(blob);
    const a = document.createElement('a');
    a.href = url;
    a.download = outputFileName;
    a.click();
    URL.revokeObjectURL(url);
  };

  return (
    <div style={{ textAlign: 'center', height: '300px' }}>
      <h1>Copy PowerPoint Slides Across Presentations</h1>
      <button onClick={copySlideToAnother}>
        Copy slides
      </button>
    </div>
  );
}

export default App;
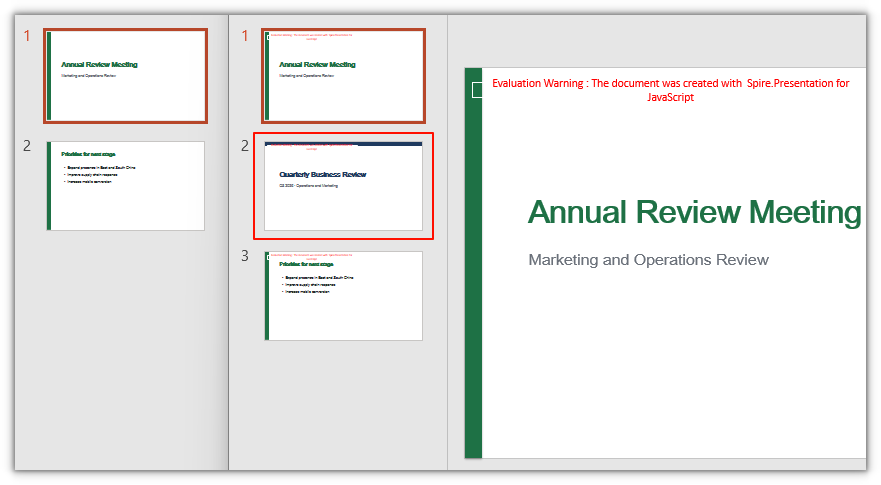
The target presentation after inserting the first slide of the source document:
Copy all slides of a presentation at once
To carry over not one slide but every slide in the source document, call Append() in a loop. Iterate the indexes from 0 upward and the copies land at the end of the target document in their original order:
// Loop over every slide in the source document and append them to the target in order
for (let i = 0; i < ppt1.Slides.Count; i++) {
  ppt2.Slides.Append({ slide: ppt1.Slides.get_Item(i) });
}
FAQ
Do a copied slide and the original affect each other
No. Append({ slide }) and Insert({ index, slide }) copy the slide; the copy and the original are independent, so changing the text or shapes on one does not carry over to the other.
What is the difference between Append and Insert when copying a slide
Append() only puts the copy at the end, so you do not have to think about its position. Insert() takes an extra index, the copy goes to that index, and the slide at that position and all following slides shift down. index is zero-based.
Why do the layout and fonts change after copying between presentations
When you copy across documents, the copy brings the source document's master and layout with it, so the target document gains an extra master from the source. Existing pages keep their original master and are unaffected, and the copy looks the same as it did in the source. To make the copy use the target document's styling instead, adjust that slide's layout after copying, or use the same template in both documents. If a font is missing, load it into /Library/Fonts/ with FetchFileToVFS.
Will the page order get mixed up when copying several slides at once
With Append(), loop from index 0 to Slides.Count - 1 and the copies reach the end of the target in their original order. With Insert() in a loop, every insertion shifts the following indexes, so the positions have to be accumulated as you go.
Do I need to upload the file to a server to copy slides
No. Spire.Presentation for JavaScript runs in the browser on WebAssembly, and presentations are read and written locally through a virtual file system (VFS); copying and saving happen locally. Whether the file eventually leaves the device depends on other code you add to the page.
Get a free license
To remove the evaluation message from the result documents or lift feature restrictions, contact sales for a 30-day temporary license.
Adjust PowerPoint Slide Order with JavaScript in React
The same deck often needs a different running order for each audience: conclusions first for management, case studies first for customers, step-by-step instructions first for training. With dozens of slides, dragging thumbnails in desktop software becomes tedious and does not fit a web-based publishing flow. Uploading the file to a server also takes it off the user's device.
This article shows how to adjust PowerPoint slide order with Spire.Presentation for JavaScript. It runs in the browser on WebAssembly and reads and writes files locally through a virtual file system (VFS), with no Office installation and no backend.
For installation and project setup, see Integrate Spire.Presentation for JavaScript in a React project. The examples assume Spire.Presentation is installed and the WebAssembly module is initialized.
Change the position of a PowerPoint slide
The ISlide.SlideNumber property is the slide's position in the presentation, counted from 1. Assign a target slide number and the slide moves to that position; the slide that occupied it and the slides after it shift down. Reading the property returns the current slide number.
Step 1: Load the PowerPoint file
Get the Spire.Presentation WASM module and check that it is ready, then load the sample presentation and font into the virtual file system (VFS) for Presentation. The font renders the placeholder text on the slides. Both the file and the font are read locally and are never sent to a server.
// Get the Spire.Presentation WASM module
const pptModule = window.wasmModule?.spirepresentation;

// Check that the module is ready
if (!pptModule) {
  alert('Spire.Presentation is not ready yet');
  return;
}

// Load the sample presentation and font
await window.spire.FetchFileToVFS('test.pptx', "", `${process.env.PUBLIC_URL}/data/`);
await window.spire.FetchFileToVFS('ARIALUNI.TTF', "/Library/Fonts/", `${process.env.PUBLIC_URL}/font/`);

// Create a Presentation instance and load the file
const ppt = new pptModule.Presentation();
ppt.LoadFromFile('test.pptx');
Step 2: Move the slide to the target position
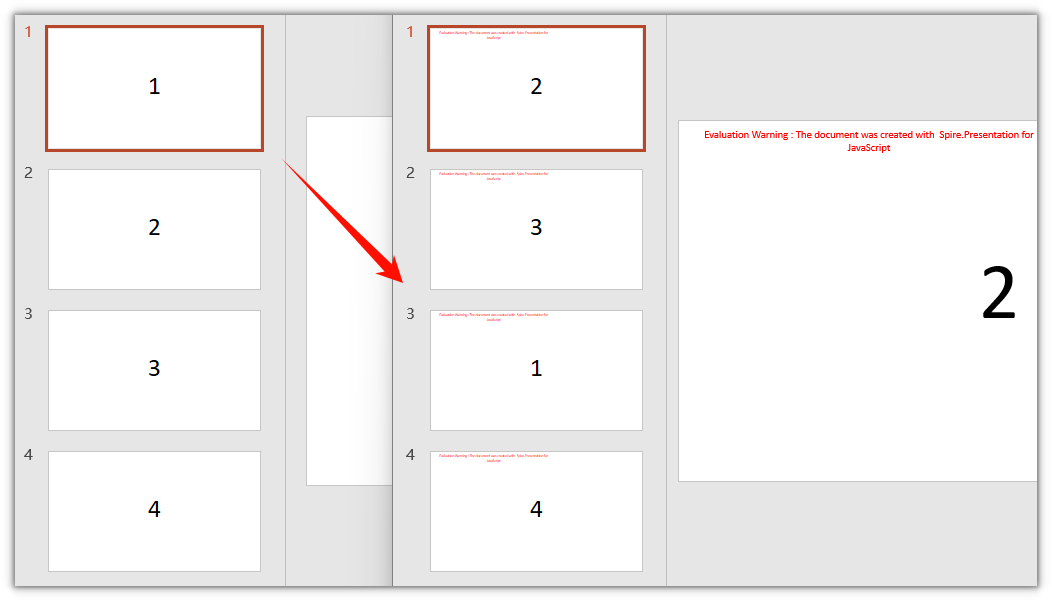
Slide numbers start at 1; the index passed to Slides.get_Item() starts at 0. Pass 0 for the first slide and set its SlideNumber to 3. The slide moves to position 3, and the former second and third slides each move up one place.
// Get the first slide and set its slide number to 3
const slide = ppt.Slides.get_Item(0);
slide.SlideNumber = 3;
Step 3: Save the result and download it
After saving, the file stays in the VFS. Read its bytes, wrap them in a Blob, and hand it to the browser for download. Call Dispose() before saving to release the presentation's resources.
// Save the result
const outputFileName = 'ReorderedPresentation.pptx';
ppt.SaveToFile({ file: outputFileName, fileFormat: pptModule.FileFormat.Pptx2013 });
ppt.Dispose();

// Read the generated file from the VFS and trigger the download
const fileArray = window.dotnetRuntime.Module.FS.readFile(outputFileName);
const blob = new Blob([fileArray], { type: 'application/vnd.openxmlformats-officedocument.presentationml.presentation' });
const url = URL.createObjectURL(blob);
const a = document.createElement('a');
a.href = url;
a.download = outputFileName;
a.click();
URL.revokeObjectURL(url);
Complete code
Put the three steps back into one App component to get a complete, runnable example.
function App() {
  const moveSlideToPosition = async () => {
    // Get the Spire.Presentation WASM module
    const pptModule = window.wasmModule?.spirepresentation;

    // Check that the module is ready
    if (!pptModule) {
      alert('Spire.Presentation is not ready yet');
      return;
    }

    // Load the sample presentation and font
    await window.spire.FetchFileToVFS('test.pptx', "", `${process.env.PUBLIC_URL}/data/`);
    await window.spire.FetchFileToVFS('ARIALUNI.TTF', "/Library/Fonts/", `${process.env.PUBLIC_URL}/font/`);

    // Create a Presentation instance and load the file
    const ppt = new pptModule.Presentation();
    ppt.LoadFromFile('test.pptx');

    // Get the first slide and set its slide number to 3
    const slide = ppt.Slides.get_Item(0);
    slide.SlideNumber = 3;

    // Save the result
    const outputFileName = 'ReorderedPresentation.pptx';
    ppt.SaveToFile({ file: outputFileName, fileFormat: pptModule.FileFormat.Pptx2013 });
    ppt.Dispose();

    // Read the generated file from the VFS and trigger the download
    const fileArray = window.dotnetRuntime.Module.FS.readFile(outputFileName);
    const blob = new Blob([fileArray], { type: 'application/vnd.openxmlformats-officedocument.presentationml.presentation' });
    const url = URL.createObjectURL(blob);
    const a = document.createElement('a');
    a.href = url;
    a.download = outputFileName;
    a.click();
    URL.revokeObjectURL(url);
  };

  return (
    <div style={{ textAlign: 'center', height: '300px' }}>
      <h1>Slide Order</h1>
      <button onClick={moveSlideToPosition}>
        Reorder slides
      </button>
    </div>
  );
}

export default App;
The presentation after moving the first slide to position 3:
FAQ
Does the slide number start at 0 or 1?
Cause: The sample uses two numbering schemes. SlideNumber is the slide number shown to users and starts at 1; the index passed to Slides.get_Item() starts at 0.
Solution: Locate the slide object with Slides.get_Item(index) using a 0-based index, and set the final position with slide.SlideNumber = position using a 1-based position. To move the first slide to position 3, write ppt.Slides.get_Item(0).SlideNumber = 3.
What happens if the target is 0 or greater than the slide count?
Cause: The valid range of SlideNumber is 1 to Slides.Count. A value of 0 or a value above the slide count falls outside that range, Spire.Presentation throws an Index range. error, and saving and downloading stop.
Solution: Check the target against ppt.Slides.Count before assigning. To move a slide to the end, use ppt.Slides.Count rather than a hard-coded estimate.
How do I reorder several slides at once?
Cause: Every assignment to SlideNumber immediately shifts the other slides, so indexes calculated in advance can become stale.
Solution: Plan the final order first, then set target positions one slide at a time. After each move, the current numbers of the remaining slides have changed. Locate the next slide by its new position instead of reusing the old index.
Does reordering change the content of the slides?
Cause: SlideNumber changes a slide's position in the deck; it does not touch the shapes, text, or images on the slide.
Solution: Content and styling stay the same after a move; only the order changes. To delete a slide, use Slides.RemoveAt(). To change content, edit the corresponding shapes after the move.
Get a free license
To remove the evaluation message from the result document or lift feature restrictions, contact sales for a 30-day temporary license.
Add, Read, or Delete PowerPoint Document Properties with JavaScript in React
Presentations carry titles, subjects, authors, companies, keywords, and other descriptive fields — these are document properties. Editing them one by one in desktop software is tedious, and there is no quick way to verify them across a batch. Uploading files to a server for processing means the content leaves the user's device.
This article shows how to add, read, and remove built-in PowerPoint document properties with Spire.Presentation for JavaScript. It loads, edits, and saves pptx files directly in the browser via WebAssembly, reading and writing files through a virtual file system (VFS), so everything stays on the local machine and no backend is required.
This article covers three core features:
- Add document properties to a PowerPoint file
- Read document properties from a PowerPoint file
- Remove document properties from a PowerPoint file
For installation and project setup, see Integrate Spire.Presentation for JavaScript in a React project. The examples below assume Spire.Presentation is installed and the WebAssembly module is initialized.
Add Document Properties to a PowerPoint File
Spire.Presentation for JavaScript writes document properties through DocumentProperty: assign a value directly to members such as Title, Subject, and Author.
The steps are as follows:
- Get the Spire.Presentation WASM module and confirm it is ready.
- Load the sample presentation and create a
Presentationobject from it. - Use
DocumentPropertyto write built-in properties such asTitle,Subject, andAuthor. - Save the result with the
Presentation.SaveToFile()method. - Read the result file from the VFS and trigger a browser download.
The code to add document properties to a PowerPoint file is as follows:
function App() {
  const addDocumentProperties = async () => {
    // Get the Spire.Presentation WASM module
    const pptModule = window.wasmModule?.spirepresentation;

    // Check whether the module is ready
    if (!pptModule) {
      alert('Spire.Presentation is not ready yet');
      return;
    }

    // Load the sample presentation
    await window.spire.FetchFileToVFS('SamplePresentation.pptx', "", `${process.env.PUBLIC_URL}/data/`);

    // Create a Presentation instance and load the file
    const ppt = new pptModule.Presentation();
    ppt.LoadFromFile('SamplePresentation.pptx');
    const dp = ppt.DocumentProperty;

    // Write built-in document properties
    dp.Title = 'Annual Sales Briefing';
    dp.Subject = 'Company performance and sales strategy';
    dp.Author = 'John Smith';
    dp.Manager = 'Jane Doe';
    dp.Company = 'IceBlue Tech';
    dp.Category = 'Business';
    dp.Keywords = 'sales, strategy, performance';
    dp.Comments = 'Please review and provide feedback by Friday';

    // Save the result file
    const outputFileName = 'PresentationWithProperties.pptx';
    ppt.SaveToFile({ file: outputFileName, fileFormat: pptModule.FileFormat.Pptx2013 });
    ppt.Dispose();

    // Read the generated file from the VFS and trigger a download
    const fileArray = window.dotnetRuntime.Module.FS.readFile(outputFileName);
    const blob = new Blob([fileArray], { type: 'application/vnd.openxmlformats-officedocument.presentationml.presentation' });
    const url = URL.createObjectURL(blob);
    const a = document.createElement('a');
    a.href = url;
    a.download = outputFileName;
    a.click();
    URL.revokeObjectURL(url);
  };

  return (
    <div style={{ textAlign: 'center', height: '300px' }}>
      <h1>Add Document Properties</h1>
      <button onClick={addDocumentProperties}>
        Add document properties
      </button>
    </div>
  );
}

export default App;
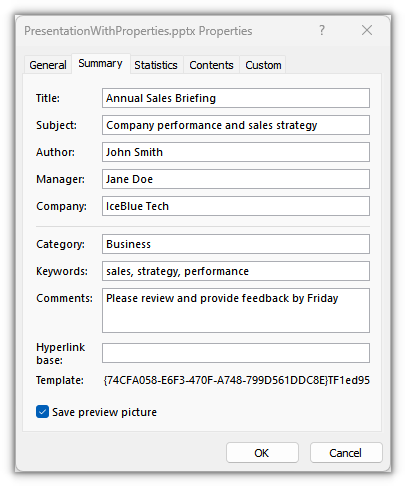
The written built-in properties appear in PowerPoint's properties panel:
Read Document Properties from a PowerPoint File
Spire.Presentation for JavaScript reads document properties through DocumentProperty: read the members such as Title, Subject, and Author directly.
The steps are as follows:
- Get the Spire.Presentation WASM module and confirm it is ready.
- Load the presentation generated in the first section and create a
Presentationobject from it. - Use
DocumentPropertyto read built-in properties such asTitle,Subject, andAuthor. - Write the read values into a txt file.
- Read the result file from the VFS and trigger a browser download.
The code to read document properties from a PowerPoint file is as follows:
function App() {
  const readDocumentProperties = async () => {
    // Get the Spire.Presentation WASM module
    const pptModule = window.wasmModule?.spirepresentation;

    // Check whether the module is ready
    if (!pptModule) {
      alert('Spire.Presentation is not ready yet');
      return;
    }

    // Load the presentation generated in the first section
    const inputFileName = 'PresentationWithProperties.pptx';

    // Create a Presentation instance and load the file
    const ppt = new pptModule.Presentation();
    ppt.LoadFromFile(inputFileName);
    const dp = ppt.DocumentProperty;

    // Read built-in document properties
    const lines = [
      `Title: ${dp.Title}`,
      `Subject: ${dp.Subject}`,
      `Author: ${dp.Author}`,
      `Manager: ${dp.Manager}`,
      `Company: ${dp.Company}`,
      `Category: ${dp.Category}`,
      `Keywords: ${dp.Keywords}`,
      `Comments: ${dp.Comments}`,
    ];

    // Write the read values into a txt file
    const outputFileName = 'DocumentProperties.txt';
    window.dotnetRuntime.Module.FS.writeFile(outputFileName, lines.join('\n'));
    ppt.Dispose();

    // Read the generated file from the VFS and trigger a download
    const fileArray = window.dotnetRuntime.Module.FS.readFile(outputFileName);
    const blob = new Blob([fileArray], { type: 'text/plain' });
    const url = URL.createObjectURL(blob);
    const a = document.createElement('a');
    a.href = url;
    a.download = outputFileName;
    a.click();
    URL.revokeObjectURL(url);
  };

  return (
    <div style={{ textAlign: 'center', height: '300px' }}>
      <h1>Read Document Properties</h1>
      <button onClick={readDocumentProperties}>
        Read document properties
      </button>
    </div>
  );
}

export default App;
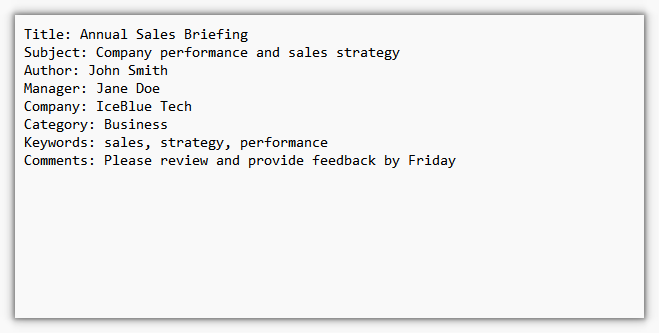
The exported txt file lists the built-in properties in order:
Remove Document Properties from a PowerPoint File
Spire.Presentation for JavaScript removes document properties through DocumentProperty: assign an empty string to members such as Title, Subject, and Author to clear them.
The steps are as follows:
- Get the Spire.Presentation WASM module and confirm it is ready.
- Load the presentation generated in the first section and create a
Presentationobject from it. - Use
DocumentPropertyto assign empty strings to built-in properties such asTitle,Subject, andAuthor. - Save the result with the
Presentation.SaveToFile()method. - Read the result file from the VFS and trigger a browser download.
The code to remove document properties from a PowerPoint file is as follows:
function App() {
  const removeDocumentProperties = async () => {
    // Get the Spire.Presentation WASM module
    const pptModule = window.wasmModule?.spirepresentation;

    // Check whether the module is ready
    if (!pptModule) {
      alert('Spire.Presentation is not ready yet');
      return;
    }

    // Load the presentation generated in the first section
    const inputFileName = 'PresentationWithProperties.pptx';

    // Create a Presentation instance and load the file
    const ppt = new pptModule.Presentation();
    ppt.LoadFromFile(inputFileName);
    const dp = ppt.DocumentProperty;

    // Clear built-in document properties
    dp.Title = '';
    dp.Subject = '';
    dp.Author = '';
    dp.Manager = '';
    dp.Company = '';
    dp.Category = '';
    dp.Keywords = '';
    dp.Comments = '';

    // Save the result file
    const outputFileName = 'PresentationWithoutProperties.pptx';
    ppt.SaveToFile({ file: outputFileName, fileFormat: pptModule.FileFormat.Pptx2013 });
    ppt.Dispose();

    // Read the generated file from the VFS and trigger a download
    const fileArray = window.dotnetRuntime.Module.FS.readFile(outputFileName);
    const blob = new Blob([fileArray], { type: 'application/vnd.openxmlformats-officedocument.presentationml.presentation' });
    const url = URL.createObjectURL(blob);
    const a = document.createElement('a');
    a.href = url;
    a.download = outputFileName;
    a.click();
    URL.revokeObjectURL(url);
  };

  return (
    <div style={{ textAlign: 'center', height: '300px' }}>
      <h1>Remove Document Properties</h1>
      <button onClick={removeDocumentProperties}>
        Remove document properties
      </button>
    </div>
  );
}

export default App;
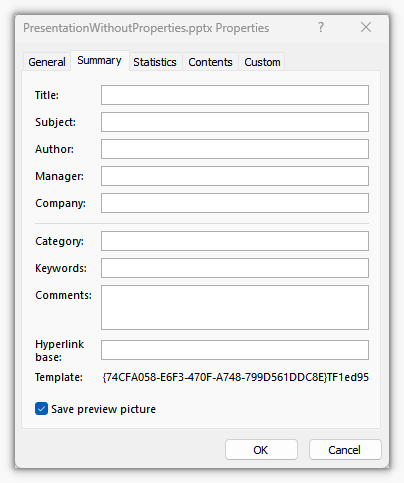
After clearing, the built-in fields in the properties panel are empty:
FAQ
Where are built-in document properties stored in the file
Cause: Built-in properties such as Title and Author are defined by the Office specification and stored in the property parts under the docProps directory inside the pptx package, separately from the slide content.
Solution: Read and write them through the same-named members of DocumentProperty; there is no need to touch the underlying XML.
What is returned when reading a built-in property that was never set
Cause: Built-in fields always exist. When unset, they return an empty string rather than an error.
Solution: An empty string means the item has not been set.
How to clear a single built-in property
Cause: Built-in fields have fixed keys, so they cannot be removed from a collection like entries.
Solution: Assign an empty string to the corresponding member:
ppt.DocumentProperty.Author = '';
Do built-in properties support non-ASCII text
Cause: Built-in properties are stored as Unicode text.
Solution: Assign the string directly; it is returned as-is when read.
How are built-in properties different from text on a slide
Cause: Built-in properties are document-level metadata and are not shown on the page; text on a slide is body content.
Solution: Put explanations for readers on the slides; put information for search and archiving in the document properties.
Get a Free License
To remove the evaluation message from the resulting documents or lift the feature limits, contact sales for a 30-day temporary license.
Change PowerPoint Slide Size Using JavaScript in React
The same presentation often needs a different page size: on a meeting room display, at a print shop, or as a vertical layout for phones. Adjusting files one by one in desktop software means someone has to sit through every batch; moving the work to a server means the files leave the user's device once uploaded.
This article shows how to change PowerPoint slide size in the browser with Spire.Presentation for JavaScript. It runs on WebAssembly, controls page width and height through SlideSize, requires no Office installation and no backend, and keeps the file on the user's device.
This article covers two core features:
For installation and project setup, see Integrate Spire.Presentation for JavaScript in a React project. The examples below assume Spire.Presentation is installed and the WebAssembly module is initialized.
Change Slide Size Using Preset Sizes
Spire.Presentation for JavaScript provides the ppt.SlideSize.Type property to switch the page to common screen or paper formats. Once a value is assigned, the page width and height follow the preset, so no dimensions are needed:
| Value | Page size (points) |
|---|---|
SlideSizeType.Screen16x9 |
960 × 540 |
SlideSizeType.Screen4x3 |
720 × 540 |
SlideSizeType.A4 |
780 × 540 |
SlideSizeType also includes Letter, A3, and other formats; pick a value from this enum for the target page.
The steps are as follows:
- Get the Spire.Presentation WASM module and confirm it is ready.
- Load the sample presentation and font into the VFS, create a
Presentationobject and load the file. - Set
Presentation.SlideSize.Typeto the target preset. - Save the result with the
Presentation.SaveToFile()method. - Read the result file from the VFS and trigger a browser download.
The code to change the slide size with a preset is as follows:
function App() {
  const changeTo4x3 = async () => {
    // Get the Spire.Presentation WASM module
    const pptModule = window.wasmModule?.spirepresentation;

    // Check whether the module is ready
    if (!pptModule) {
      alert('Spire.Presentation is not ready yet');
      return;
    }

    // Load the sample presentation and font into the VFS
    await window.spire.FetchFileToVFS('SamplePresentation.pptx', "", `${process.env.PUBLIC_URL}/data/`);
    await window.spire.FetchFileToVFS('ARIALUNI.TTF', "/Library/Fonts/", `${process.env.PUBLIC_URL}/font/`);

    // Create a Presentation instance and load the file
    const ppt = new pptModule.Presentation();
    ppt.LoadFromFile('SamplePresentation.pptx');

    // Switch the page from 16:9 to 4:3; the preset sets 720 × 540 pt
    ppt.SlideSize.Type = pptModule.SlideSizeType.Screen4x3;

    // Save the result file
    const outputFileName = 'SlideSize4x3.pptx';
    ppt.SaveToFile({ file: outputFileName, fileFormat: pptModule.FileFormat.Pptx2013 });
    ppt.Dispose();

    // Read the generated file from the VFS and trigger a download
    const fileArray = window.dotnetRuntime.Module.FS.readFile(outputFileName);
    const blob = new Blob([fileArray], { type: 'application/vnd.openxmlformats-officedocument.presentationml.presentation' });
    const url = URL.createObjectURL(blob);
    const a = document.createElement('a');
    a.href = url;
    a.download = outputFileName;
    a.click();
    URL.revokeObjectURL(url);
  };

  return (
    <div style={{ textAlign: 'center', height: '300px' }}>
      <h1>Change the slide size with a preset</h1>
      <button onClick={changeTo4x3}>
        Use 4:3
      </button>
    </div>
  );
}

export default App;
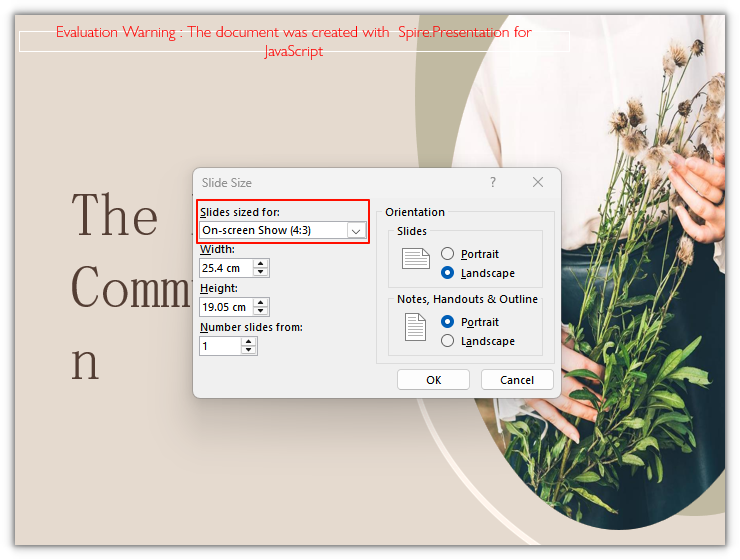
The page after switching a 16:9 presentation to 4:3:
Set a Custom Slide Size
Spire.Presentation for JavaScript also provides the ppt.SlideSize.Size property to specify any width and height. It takes a SizeF object in points. After Size is assigned, the page type automatically becomes SlideSizeType.Custom.
The steps are as follows:
- Get the Spire.Presentation WASM module and confirm it is ready.
- Load the sample presentation and font into the VFS, create a
Presentationobject and load the file. - Build the target width and height with a
SizeFobject and assign it toPresentation.SlideSize.Size. - Save the result with the
Presentation.SaveToFile()method. - Read the result file from the VFS and trigger a browser download.
The code to set a custom slide size is as follows:
function App() {
  const setCustomSize = async () => {
    // Get the Spire.Presentation WASM module
    const pptModule = window.wasmModule?.spirepresentation;

    // Check whether the module is ready
    if (!pptModule) {
      alert('Spire.Presentation is not ready yet');
      return;
    }

    // Load the sample presentation and font into the VFS
    await window.spire.FetchFileToVFS('SamplePresentation.pptx', "", `${process.env.PUBLIC_URL}/data/`);
    await window.spire.FetchFileToVFS('ARIALUNI.TTF', "/Library/Fonts/", `${process.env.PUBLIC_URL}/font/`);

    // Create a Presentation instance and load the file
    const ppt = new pptModule.Presentation();
    ppt.LoadFromFile('SamplePresentation.pptx');

    // 600 × 900 pt: both width and height are custom, so the page switches to Custom
    ppt.SlideSize.Size = new pptModule.SizeF(600, 900);

    // Save the result file
    const outputFileName = 'SlideSizeCustom.pptx';
    ppt.SaveToFile({ file: outputFileName, fileFormat: pptModule.FileFormat.Pptx2013 });
    ppt.Dispose();

    // Read the generated file from the VFS and trigger a download
    const fileArray = window.dotnetRuntime.Module.FS.readFile(outputFileName);
    const blob = new Blob([fileArray], { type: 'application/vnd.openxmlformats-officedocument.presentationml.presentation' });
    const url = URL.createObjectURL(blob);
    const a = document.createElement('a');
    a.href = url;
    a.download = outputFileName;
    a.click();
    URL.revokeObjectURL(url);
  };

  return (
    <div style={{ textAlign: 'center', height: '300px' }}>
      <h1>Set a custom slide size</h1>
      <button onClick={setCustomSize}>
        Set a custom size
      </button>
    </div>
  );
}

export default App;
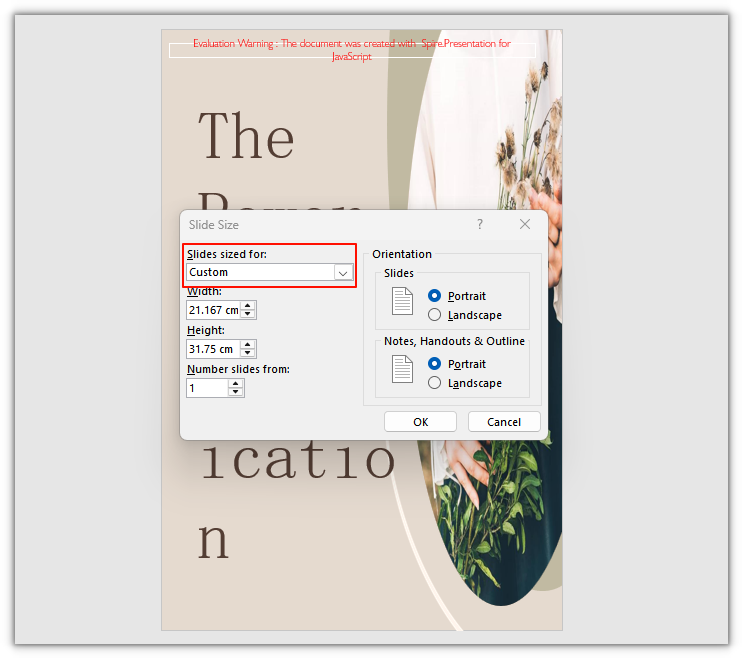
The page after setting a 600 × 900 pt size:
FAQ
What unit does SlideSize.Size use
Cause: SlideSize width and height are measured in points, with 72 points to an inch. new SizeF(600, 900) corresponds to 8.33 × 12.5 inches, not 600 × 900 pixels.
Solution: Pass the width and height in points. A common 16:9 page is 960 × 540 and 4:3 is 720 × 540; when converting from centimeters or millimeters, go through inches first and multiply by 72.
Why does SlideSize.Type become Custom when I only set Size
Cause: Size is the entry point for custom dimensions. After it is assigned, the library sets SlideSize.Type to SlideSizeType.Custom and derives Orientation from the width and height relationship.
Solution: Set only Size for a custom size. If you then set Type to a preset, the page width and height are overwritten by that preset; do not mix presets with custom dimensions.
Does the content on a slide scale when the slide size changes
Cause: Shapes are repositioned according to the ratio between the new and old sizes: x and width follow the width ratio, y and height follow the height ratio. Text boxes re-wrap to the new width, so pages with dense text or elements near the edges may look crowded.
Solution: Check text-heavy slides after resizing and reduce the font size or move shapes if needed. The library already scales once; do not multiply by the same ratio again, or the content will be scaled twice.
Get a Free License
To remove the evaluation message from the result document or lift feature limits, contact sales for a 30-day temporary license.
Modify or Extract PowerPoint Slide Titles in React with JavaScript
The same deck gets reused for different projects, quarters, and audiences, and its titles have to change with them. The reverse case is just as common: a deck runs dozens of slides, and turning every title into an agenda or a list means copying them one by one. Doing this on a server means uploading the file first, and it stops being local to the user.
This article modifies and extracts slide titles in the browser with Spire.Presentation for JavaScript. ISlide.Title reads and writes the title placeholder on a single slide. To collect every title in a deck at once, walk the shapes on each slide and filter by placeholder type. Everything runs in the browser via WebAssembly, with no Office install and no backend.
This article covers two core tasks:
For installation and project setup, see How to Integrate Spire.Presentation for JavaScript in a React Project. The examples below assume Spire.Presentation is installed and the WebAssembly module is initialized.
Modify PowerPoint slide titles
Spire.Presentation for JavaScript provides the ISlide.Title property to read and write the title of a single slide. Assigning a value replaces the text in the title placeholder; the placeholder keeps its position and font size. If the slide has no title placeholder, the assignment adds one.
Title works on the title placeholder and leaves other shapes alone:
| Placeholder type | Does Title apply |
|---|---|
PlaceholderType.Title |
Yes |
PlaceholderType.CenteredTitle |
Yes |
PlaceholderType.Subtitle |
No |
The steps are:
- Get the Spire.Presentation WASM module and make sure it is ready.
- Load the sample presentation and fonts, create a
Presentationobject, and open the file. - Get the target slides with
Presentation.Slides.get_Item()and assign the new title toISlide.Title. - Save the result with
Presentation.SaveToFile(). - Read the result file from the VFS and trigger a browser download.
The code to modify PowerPoint slide titles is as follows:
function App() {
  const modifyTitles = async () => {
    // Get the Spire.Presentation WASM module
    const pptModule = window.wasmModule?.spirepresentation;

    // Check that the module is ready
    if (!pptModule) {
      alert('Spire.Presentation is not ready yet');
      return;
    }

    // Load the presentation and fonts
    await window.spire.FetchFileToVFS('Annual Business Report.pptx', "", `${process.env.PUBLIC_URL}/data/`);
    await window.spire.FetchFileToVFS('ARIALUNI.TTF', "/Library/Fonts/", `${process.env.PUBLIC_URL}/font/`);

    // Create a Presentation instance and load the presentation
    const ppt = new pptModule.Presentation();
    ppt.LoadFromFile('Annual Business Report.pptx');

    // Get slides by index and assign new titles
    ppt.Slides.get_Item(0).Title = '2026 Annual Business Report';
    ppt.Slides.get_Item(1).Title = 'Key Metrics (Revised)';
    ppt.Slides.get_Item(3).Title = 'Next Steps';

    // Save the result file
    const outputFileName = 'Titles Modified.pptx';
    ppt.SaveToFile({ file: outputFileName, fileFormat: pptModule.FileFormat.Pptx2013 });
    ppt.Dispose();

    // Read the generated file from the VFS and trigger a download
    const fileArray = window.dotnetRuntime.Module.FS.readFile(outputFileName);
    const blob = new Blob([fileArray], { type: 'application/vnd.openxmlformats-officedocument.presentationml.presentation' });
    const url = URL.createObjectURL(blob);
    const a = document.createElement('a');
    a.href = url;
    a.download = outputFileName;
    a.click();
    URL.revokeObjectURL(url);
  };

  return (
    <div style={{ textAlign: 'center', height: '300px' }}>
      <h1>Modify PowerPoint slide titles</h1>
      <button onClick={modifyTitles}>
        Modify titles
      </button>
    </div>
  );
}

export default App;
After the change, the titles on the cover, metrics, and closing slides are all replaced:

Extract PowerPoint slide titles
Spire.Presentation for JavaScript can also collect titles by placeholder: walk the shapes on each slide, keep the ones whose placeholder type is Title, CenteredTitle, or Subtitle, and read TextFrame.Text. The subtitle on the cover is included; body text and ordinary text boxes are not.
| Placeholder type | Description |
|---|---|
PlaceholderType.Title |
The title on a content slide |
PlaceholderType.CenteredTitle |
The centered main title on a cover slide |
PlaceholderType.Subtitle |
The subtitle on a cover slide |
The steps are:
- Get the Spire.Presentation WASM module and make sure it is ready.
- Load the sample presentation and fonts, create a
Presentationobject, and open the file. - Walk
Presentation.Slidesand theShapeson each slide, filtering withshape.IsPlaceholderandshape.Placeholder.Type. - Push the
TextFrame.Textof each matching shape into an array. - Write the title list with
FS.writeFile()and trigger a browser download.
The code to extract PowerPoint slide titles is as follows:
function App() {
  const extractTitles = async () => {
    // Get the Spire.Presentation WASM module
    const pptModule = window.wasmModule?.spirepresentation;

    // Check that the module is ready
    if (!pptModule) {
      alert('Spire.Presentation is not ready yet');
      return;
    }

    // Load the presentation and fonts
    await window.spire.FetchFileToVFS('Annual Business Report.pptx', "", `${process.env.PUBLIC_URL}/data/`);
    await window.spire.FetchFileToVFS('ARIALUNI.TTF', "/Library/Fonts/", `${process.env.PUBLIC_URL}/font/`);

    // Create a Presentation instance and load the presentation
    const ppt = new pptModule.Presentation();
    ppt.LoadFromFile('Annual Business Report.pptx');

    // Walk every shape on every slide and collect titles by placeholder type
    const titles = [];
    for (let i = 0; i < ppt.Slides.Count; i++) {
      const slide = ppt.Slides.get_Item(i);
      for (let j = 0; j < slide.Shapes.Count; j++) {
        const shape = slide.Shapes.get_Item(j);
        if (!shape.IsPlaceholder) continue;
        const type = shape.Placeholder.Type;
        if (type === pptModule.PlaceholderType.Title ||
            type === pptModule.PlaceholderType.CenteredTitle ||
            type === pptModule.PlaceholderType.Subtitle) {
          titles.push(shape.TextFrame.Text);
        }
      }
    }

    // Write the title list, one title per line
    const outputFileName = 'Slide Titles.txt';
    window.dotnetRuntime.Module.FS.writeFile(outputFileName, titles.join('\n'));
    ppt.Dispose();

    // Read the text from the VFS and trigger a browser download
    const txtArray = window.dotnetRuntime.Module.FS.readFile(outputFileName);
    const txtBlob = new Blob([txtArray], { type: 'text/plain' });
    const txtUrl = URL.createObjectURL(txtBlob);
    const txtLink = document.createElement('a');
    txtLink.href = txtUrl;
    txtLink.download = outputFileName;
    txtLink.click();
    URL.revokeObjectURL(txtUrl);
  };

  return (
    <div style={{ textAlign: 'center', height: '300px' }}>
      <h1>Extract PowerPoint slide titles</h1>
      <button onClick={extractTitles}>
        Extract titles
      </button>
    </div>
  );
}

export default App;
The extracted title list, one title per line, subtitle included:

FAQ
What is the difference between a title and an ordinary text box on a slide
Cause: ISlide.Title only recognizes title placeholders (Title, CenteredTitle). Some templates build the title as a plain text box for layout reasons; those shapes have no placeholder, so Title can neither read nor change them.
Solution: Check that the title shape is a placeholder before using Title. When it is not, locate the text box by shape name or position and change its TextFrame.Text directly.
What does Title return when a slide has no title placeholder
Cause: Title reads the text in the title placeholder. When the slide has no such placeholder, it returns the slide's default name (for example, Slide 1), not the body text on the slide. Writing still works: assigning Title to such a slide adds a title placeholder and writes the text into it.
Solution: To check whether a slide has a title, walk its shapes and look at shape.IsPlaceholder and shape.Placeholder.Type instead of relying on the return value of Title.
Why does the extraction include subtitles
Cause: The filter includes PlaceholderType.Subtitle, so the subtitle on the cover is collected along with the main title.
Solution: To get only the main title of each slide, drop Subtitle from the condition:
if (type === pptModule.PlaceholderType.Title ||
    type === pptModule.PlaceholderType.CenteredTitle) {
  titles.push(shape.TextFrame.Text);
}
Why does accessing shape.Placeholder.Type throw an error
Cause: Text boxes expose a Placeholder property too, but its type is null. The wrapper object is still truthy, so skipping the null check and reading .Type throws Arg_NullReferenceException.
Solution: Filter with shape.IsPlaceholder first, then read shape.Placeholder.Type:
if (!shape.IsPlaceholder) continue;
const type = shape.Placeholder.Type;
Do the font size and position change after I modify a title
Cause: Title replaces the text inside the title placeholder. The placeholder itself keeps its position, size, and text formatting.
Solution: When the slide already has a title placeholder, no extra formatting is needed. If the placeholder was added by the assignment, it uses the default position and font size; set its Frame and text formatting if needed.
Get a Free License
If you want to remove the evaluation message from the result documents or lift feature limits, contact sales for a temporary license valid for 30 days.
Add or Remove PowerPoint Sections with JavaScript in React
Once a deck grows past a dozen slides, finding your way around becomes painful: which slides are the opening, which are the appendix, is left to memory. PowerPoint sections group slides so the thumbnail pane collapses per section, and presenting, copying, and handing off all get easier. On the desktop you can right-click to build sections slide by slide, but that does not scale to batches of files or to a web workflow.
This article uses Spire.Presentation for JavaScript to add and remove PowerPoint sections in the browser. It runs on WebAssembly, needs no Office installation and no backend, and reads and writes files locally through a virtual file system (VFS).
This article covers four core tasks:
- Append a section to the end of a PowerPoint document
- Insert a section before a specific section
- Insert a section before a specific slide
- Remove sections from a PowerPoint document
For installation and project setup, see Integrate Spire.Presentation for JavaScript in a React project. The examples below assume Spire.Presentation is installed and the WebAssembly module is initialized.
Append a section to the end of a PowerPoint document
SectionList.Append() adds a section to the end of the section list. Its argument is the section name. The new section holds no slides by default and appears as a standalone section header in PowerPoint's section pane. This empty section does not change the page numbers or the grouping of existing slides.
Steps:
- Get the Spire.Presentation WASM module and make sure it is ready.
- Read the sample presentation and font, create a
Presentationobject, and load the file. - Call
Presentation.SectionList.Append()to add a section at the end. - Save the result with
Presentation.SaveToFile(). - Read the result from the VFS and trigger a browser download.
The code for appending a section:
function App() {
  const appendSection = async () => {
    // Get the Spire.Presentation WASM module
    const pptModule = window.wasmModule?.spirepresentation;

    // Check that the module is ready
    if (!pptModule) {
      alert('Spire.Presentation is not ready yet');
      return;
    }

    // Load the sample presentation and font
    await window.spire.FetchFileToVFS('PresentationWithSections.pptx', "", `${process.env.PUBLIC_URL}/data/`);
    await window.spire.FetchFileToVFS('ARIALUNI.TTF', "/Library/Fonts/", `${process.env.PUBLIC_URL}/font/`);

    // Create a Presentation instance and load the document
    const ppt = new pptModule.Presentation();
    ppt.LoadFromFile('PresentationWithSections.pptx');

    // Append an "Appendix" section to the end of the section list
    ppt.SectionList.Append('Appendix');

    // Save the result
    const outputFileName = 'AppendedSection.pptx';
    ppt.SaveToFile({ file: outputFileName, fileFormat: pptModule.FileFormat.Pptx2013 });
    ppt.Dispose();

    // Read the generated file from the VFS and trigger a download
    const fileArray = window.dotnetRuntime.Module.FS.readFile(outputFileName);
    const blob = new Blob([fileArray], { type: 'application/vnd.openxmlformats-officedocument.presentationml.presentation' });
    const url = URL.createObjectURL(blob);
    const a = document.createElement('a');
    a.href = url;
    a.download = outputFileName;
    a.click();
    URL.revokeObjectURL(url);
  };

  return (
    <div style={{ textAlign: 'center', height: '300px' }}>
      <h1>Append Section</h1>
      <button onClick={appendSection}>
        Append section
      </button>
    </div>
  );
}

export default App;
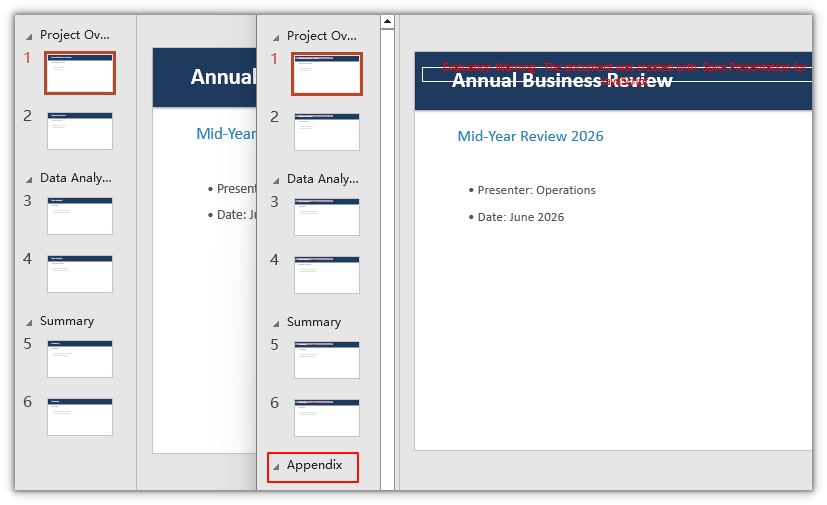
An "Appendix" section now sits at the end of the section list:
Insert a section before a specific section
SectionList.Insert() inserts a section at a given position. The first argument is the section index, starting at 0. The new section is placed before that index, and the existing sections shift back one position.
Steps:
- Get the Spire.Presentation WASM module and make sure it is ready.
- Read the sample presentation and font, create a
Presentationobject, and load the file. - Call
Presentation.SectionList.Insert()to insert a new section before the "Data Analysis" section. - Save the result with
Presentation.SaveToFile(). - Read the result from the VFS and trigger a browser download.
The code for inserting a section before a specific section:
function App() {
  const insertSectionBeforeSection = async () => {
    // Get the Spire.Presentation WASM module
    const pptModule = window.wasmModule?.spirepresentation;

    // Check that the module is ready
    if (!pptModule) {
      alert('Spire.Presentation is not ready yet');
      return;
    }

    // Load the sample presentation and font
    await window.spire.FetchFileToVFS('PresentationWithSections.pptx', "", `${process.env.PUBLIC_URL}/data/`);
    await window.spire.FetchFileToVFS('ARIALUNI.TTF', "/Library/Fonts/", `${process.env.PUBLIC_URL}/font/`);

    // Create a Presentation instance and load the document
    const ppt = new pptModule.Presentation();
    ppt.LoadFromFile('PresentationWithSections.pptx');

    // Insert a new section at index 1, that is, before the "Data Analysis" section
    ppt.SectionList.Insert(1, 'Product Planning');

    // Save the result
    const outputFileName = 'InsertedSectionBeforeSection.pptx';
    ppt.SaveToFile({ file: outputFileName, fileFormat: pptModule.FileFormat.Pptx2013 });
    ppt.Dispose();

    // Read the generated file from the VFS and trigger a download
    const fileArray = window.dotnetRuntime.Module.FS.readFile(outputFileName);
    const blob = new Blob([fileArray], { type: 'application/vnd.openxmlformats-officedocument.presentationml.presentation' });
    const url = URL.createObjectURL(blob);
    const a = document.createElement('a');
    a.href = url;
    a.download = outputFileName;
    a.click();
    URL.revokeObjectURL(url);
  };

  return (
    <div style={{ textAlign: 'center', height: '300px' }}>
      <h1>Insert Section Before Section</h1>
      <button onClick={insertSectionBeforeSection}>
        Insert section
      </button>
    </div>
  );
}

export default App;
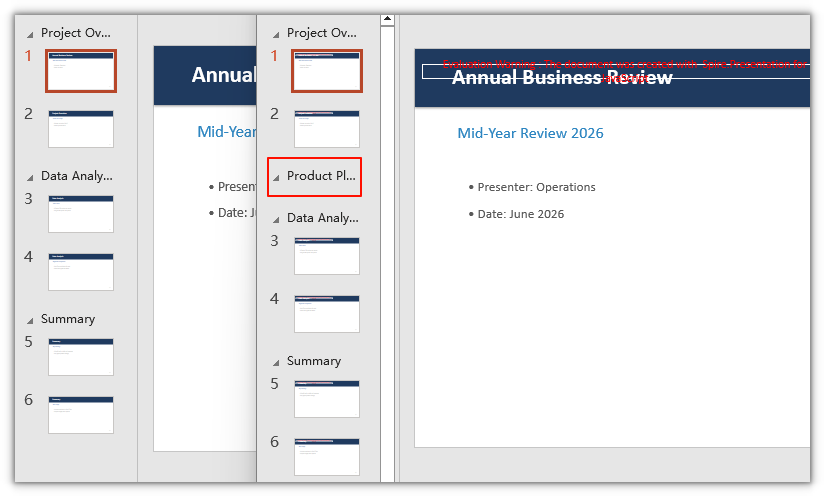
A "Product Planning" section is inserted before "Data Analysis":
Insert a section before a specific slide
When you have a slide in hand but do not know which section it belongs to, the overload of SectionList.Add() that takes a slide solves it directly: pass the target slide, and the section boundary falls before that slide, so the slide and the slides after it in its original section move into the new section. The slide count does not change, and neither do the content or the order.
Steps:
- Get the Spire.Presentation WASM module and make sure it is ready.
- Read the sample presentation and font, create a
Presentationobject, and load the file. - Call
Presentation.SectionList.Add()to start a new section at the target slide. - Save the result with
Presentation.SaveToFile(). - Read the result from the VFS and trigger a browser download.
The code for inserting a section before a specific slide:
function App() {
  const insertSectionBeforeSlide = async () => {
    // Get the Spire.Presentation WASM module
    const pptModule = window.wasmModule?.spirepresentation;

    // Check that the module is ready
    if (!pptModule) {
      alert('Spire.Presentation is not ready yet');
      return;
    }

    // Load the sample presentation and font
    await window.spire.FetchFileToVFS('PresentationWithSections.pptx', "", `${process.env.PUBLIC_URL}/data/`);
    await window.spire.FetchFileToVFS('ARIALUNI.TTF', "/Library/Fonts/", `${process.env.PUBLIC_URL}/font/`);

    // Create a Presentation instance and load the document
    const ppt = new pptModule.Presentation();
    ppt.LoadFromFile('PresentationWithSections.pptx');

    // Target slide: the fourth slide (zero-based index 3)
    // Start a "Market Insights" section here, creating a new section boundary before this slide
    ppt.SectionList.Add('Market Insights', ppt.Slides.get_Item(3));

    // Save the result
    const outputFileName = 'InsertedSectionBeforeSlide.pptx';
    ppt.SaveToFile({ file: outputFileName, fileFormat: pptModule.FileFormat.Pptx2013 });
    ppt.Dispose();

    // Read the generated file from the VFS and trigger a download
    const fileArray = window.dotnetRuntime.Module.FS.readFile(outputFileName);
    const blob = new Blob([fileArray], { type: 'application/vnd.openxmlformats-officedocument.presentationml.presentation' });
    const url = URL.createObjectURL(blob);
    const a = document.createElement('a');
    a.href = url;
    a.download = outputFileName;
    a.click();
    URL.revokeObjectURL(url);
  };

  return (
    <div style={{ textAlign: 'center', height: '300px' }}>
      <h1>Insert Section Before Slide</h1>
      <button onClick={insertSectionBeforeSlide}>
        Insert section
      </button>
    </div>
  );
}

export default App;
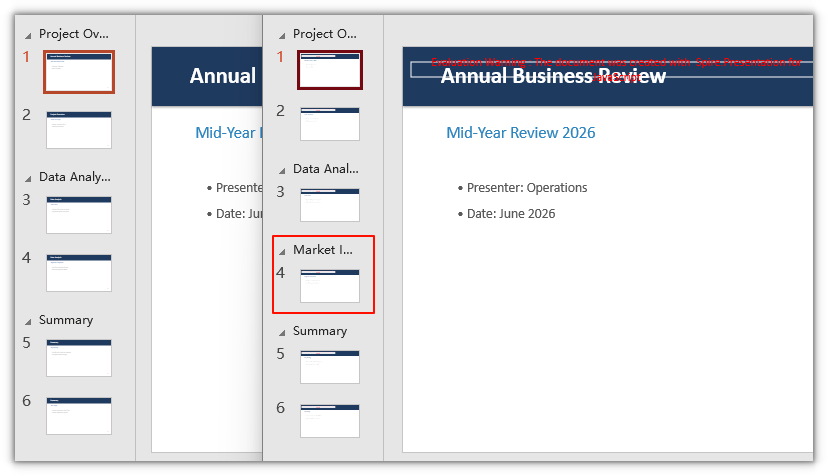
A "Market Insights" section is split out starting at the fourth slide, while the first three slides stay in their original section:
Remove sections from a PowerPoint document
Use SectionList.RemoveAt() to remove a section by its position index; SectionList.RemoveAll() clears every section at once and returns the presentation to a section-free structure. Removing a section does not delete its slides: those pages merge into an adjacent section, and page numbers stay the same.
| Method | Purpose |
|---|---|
SectionList.RemoveAt(index) |
Remove the section at the given position |
SectionList.RemoveAll() |
Remove all sections |
Steps:
- Get the Spire.Presentation WASM module and make sure it is ready.
- Read the sample presentation and font, create a
Presentationobject, and load the file. - Call
Presentation.SectionList.RemoveAt()to remove the "Data Analysis" section. - Save the result with
Presentation.SaveToFile(). - Read the result from the VFS and trigger a browser download.
The code for removing a section:
function App() {
  const removeSection = async () => {
    // Get the Spire.Presentation WASM module
    const pptModule = window.wasmModule?.spirepresentation;

    // Check that the module is ready
    if (!pptModule) {
      alert('Spire.Presentation is not ready yet');
      return;
    }

    // Load the sample presentation and font
    await window.spire.FetchFileToVFS('PresentationWithSections.pptx', "", `${process.env.PUBLIC_URL}/data/`);
    await window.spire.FetchFileToVFS('ARIALUNI.TTF', "/Library/Fonts/", `${process.env.PUBLIC_URL}/font/`);

    // Create a Presentation instance and load the document
    const ppt = new pptModule.Presentation();
    ppt.LoadFromFile('PresentationWithSections.pptx');

    // Remove the "Data Analysis" section at index 1
    ppt.SectionList.RemoveAt(1);

    // Save the result
    const outputFileName = 'RemovedSection.pptx';
    ppt.SaveToFile({ file: outputFileName, fileFormat: pptModule.FileFormat.Pptx2013 });
    ppt.Dispose();

    // Read the generated file from the VFS and trigger a download
    const fileArray = window.dotnetRuntime.Module.FS.readFile(outputFileName);
    const blob = new Blob([fileArray], { type: 'application/vnd.openxmlformats-officedocument.presentationml.presentation' });
    const url = URL.createObjectURL(blob);
    const a = document.createElement('a');
    a.href = url;
    a.download = outputFileName;
    a.click();
    URL.revokeObjectURL(url);
  };

  return (
    <div style={{ textAlign: 'center', height: '300px' }}>
      <h1>Remove Section</h1>
      <button onClick={removeSection}>
        Remove section
      </button>
    </div>
  );
}

export default App;
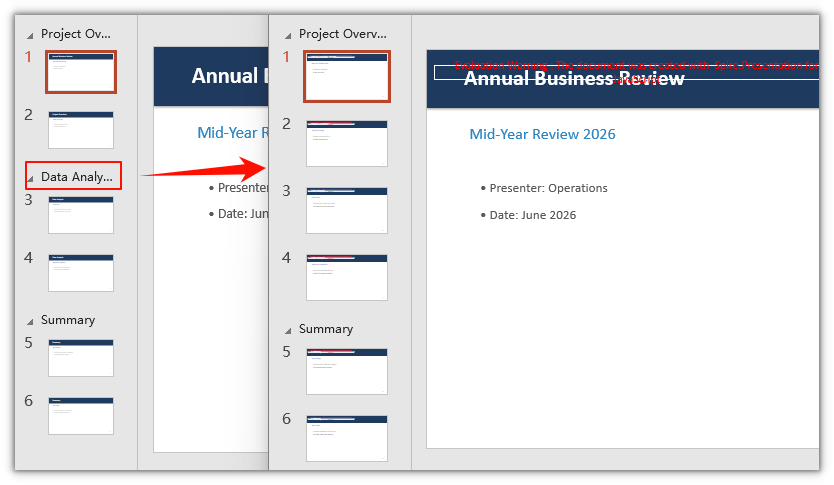
The example above removes one section. To clear all sections at once, use RemoveAll(); the slide count stays the same:
// Remove the second section
ppt.SectionList.RemoveAt(1)

// Remove every section
ppt.SectionList.RemoveAll()
FAQ
Is the section index zero-based or one-based
Cause: The indexes for SectionList.Insert() and SectionList.RemoveAt() are zero-based, the same as for Slides; the PowerPoint UI shows them as section 1, section 2, so the two differ by one.
Solution: Handle everything zero-based in code. To act on the second section you see in the UI, pass 1 to the method. When unsure, loop over SectionList.Count and print each section name by index to confirm the position.
Why does a newly added section have no slides
Cause: Append() and Insert() only create a section's name and grouping boundary; they do not place slides into it. A section is a grouping of slides, so a new section can start empty and shows as a section header with no thumbnails in the section pane.
Solution: Empty sections persist when you save and reopen the file. If you need slides in it, drag them under the section header in PowerPoint. To have a new section carry slides right away, use the overload with a slide argument, SectionList.Add(name, slide): the slide you pass becomes the first slide of the new section, the boundary falls before it, and the total slide count stays the same.
Does removing a section delete its slides
Cause: A section is only grouping information, so removing a section does not remove the slides. After RemoveAt() drops the group, the slides that belonged to it merge into an adjacent section, and the total number of slides stays the same.
Solution: If you only want to regroup, remove the section and the slides remain. To actually remove slide content, use Slides.RemoveAt() or Slides.Remove() to delete slides.
Can I remove several sections at once
Cause: RemoveAt() removes one section at a time, and each removal shifts the indexes of the sections after it forward by one.
Solution: When removing several, go from the end toward the front, or always remove index 0, to avoid index drift. To clear all sections, use RemoveAll() directly:
// Clear every section and keep the slides
ppt.SectionList.RemoveAll();
Get a Free License
If you want to remove the evaluation message from the output documents or lift the feature limits, contact sales for a 30-day temporary license.
Hide or Unhide PowerPoint Slides in React with JavaScript
Some slides in a deck are not meant to be shown on the spot: internal figures, backup plans, or leftover content from the previous version. Deleting them means redoing the work for the next review. Leaving them in means a stray click can land on them during a presentation. Desktop software lets you right-click and hide one slide at a time, but in a web workflow that scattered clicking cannot join batch processing and is hard to hand off to a program.
This article uses Spire.Presentation for JavaScript to manage slide visibility in the browser: ISlide.Hidden hides or unhides a specific slide, and iterating over Slides unhides all of them at once. It runs on WebAssembly in the browser, needs no Office installation, does not depend on a backend, and reads and writes files locally through a virtual file system (VFS).
This article covers three core features:
For installation and project setup, see Integrate Spire.Presentation for JavaScript in a React project. The examples below assume Spire.Presentation is installed and the WebAssembly module is initialized.
Hide a Specific Slide
To handle a single slide, take it out by index and set Hidden.
The steps are:
- Get the Spire.Presentation WASM module and make sure it is ready.
- Load the sample presentation and fonts, create a
Presentationobject, and load the file. - Use
Slides.get_Item()to locate the slide by index and setHiddentotrue. - Use
Presentation.SaveToFile()to save the result. - Read the result from the VFS and trigger a browser download.
The code to hide a specific slide:
function App() {
  const hideSlide = async () => {
    // Get the Spire.Presentation WASM module
    const pptModule = window.wasmModule?.spirepresentation;

    // Check that the module is ready
    if (!pptModule) {
      alert('Spire.Presentation is not ready yet');
      return;
    }

    // Load the sample presentation and fonts
    await window.spire.FetchFileToVFS('DataBriefing.pptx', "", `${process.env.PUBLIC_URL}/data/`);
    await window.spire.FetchFileToVFS('ARIALUNI.TTF', "/Library/Fonts/", `${process.env.PUBLIC_URL}/font/`);

    // Create a Presentation instance and load the presentation
    const ppt = new pptModule.Presentation();
    ppt.LoadFromFile('DataBriefing.pptx');

    // Mark the 2nd slide as hidden
    ppt.Slides.get_Item(1).Hidden = true;

    // Save the result
    const outputFileName = 'HiddenSlideResult.pptx';
    ppt.SaveToFile({ file: outputFileName, fileFormat: pptModule.FileFormat.Pptx2013 });
    ppt.Dispose();

    // Read the generated file from the VFS and trigger a download
    const fileArray = window.dotnetRuntime.Module.FS.readFile(outputFileName);
    const blob = new Blob([fileArray], { type: 'application/vnd.openxmlformats-officedocument.presentationml.presentation' });
    const url = URL.createObjectURL(blob);
    const a = document.createElement('a');
    a.href = url;
    a.download = outputFileName;
    a.click();
    URL.revokeObjectURL(url);
  };

  return (
    <div style={{ textAlign: 'center', height: '300px' }}>
      <h1>Hide a Specific Slide</h1>
      <button onClick={hideSlide}>
        Hide the 2nd Slide
      </button>
    </div>
  );
}

export default App;
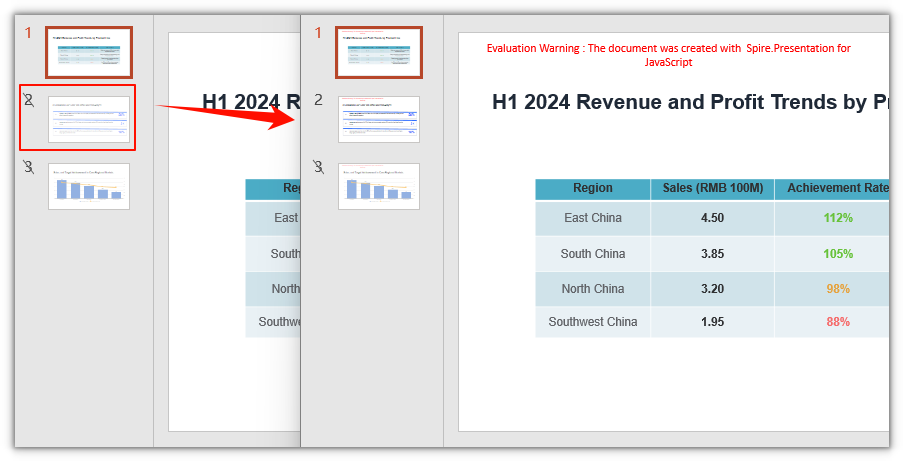
The 2nd slide's thumbnail carries a hidden marker, and the slide is skipped during a slideshow:

Unhide a Specific Slide
To restore a slide, locate it by index the same way and set Hidden back to false. To check whether a slide is currently hidden, read the boolean value of slide.Hidden:
slide.Hidden |
Meaning |
|---|---|
true |
Hidden; skipped by default in a slideshow and export |
false |
Shown normally |
The steps are:
- Get the Spire.Presentation WASM module and make sure it is ready.
- Load the presentation with hidden slides and fonts, create a
Presentationobject, and load the file. - Use
Slides.get_Item()to locate the slide by index and setHiddentofalse. - Use
Presentation.SaveToFile()to save the result. - Read the result from the VFS and trigger a browser download.
The code to unhide a specific slide:
function App() {
  const unhideSlide = async () => {
    // Get the Spire.Presentation WASM module
    const pptModule = window.wasmModule?.spirepresentation;

    // Check that the module is ready
    if (!pptModule) {
      alert('Spire.Presentation is not ready yet');
      return;
    }

    // Load the presentation with hidden slides and fonts
    await window.spire.FetchFileToVFS('PresentationWithHiddenSlides.pptx', "", `${process.env.PUBLIC_URL}/data/`);
    await window.spire.FetchFileToVFS('ARIALUNI.TTF', "/Library/Fonts/", `${process.env.PUBLIC_URL}/font/`);

    // Create a Presentation instance and load the presentation
    const ppt = new pptModule.Presentation();
    ppt.LoadFromFile('PresentationWithHiddenSlides.pptx');

    // Restore the 2nd slide to visible
    ppt.Slides.get_Item(1).Hidden = false;

    // Save the result
    const outputFileName = 'UnhiddenSlideResult.pptx';
    ppt.SaveToFile({ file: outputFileName, fileFormat: pptModule.FileFormat.Pptx2013 });
    ppt.Dispose();

    // Read the generated file from the VFS and trigger a download
    const fileArray = window.dotnetRuntime.Module.FS.readFile(outputFileName);
    const blob = new Blob([fileArray], { type: 'application/vnd.openxmlformats-officedocument.presentationml.presentation' });
    const url = URL.createObjectURL(blob);
    const a = document.createElement('a');
    a.href = url;
    a.download = outputFileName;
    a.click();
    URL.revokeObjectURL(url);
  };

  return (
    <div style={{ textAlign: 'center', height: '300px' }}>
      <h1>Unhide a Specific Slide</h1>
      <button onClick={unhideSlide}>
        Unhide the 2nd Slide
      </button>
    </div>
  );
}

export default App;
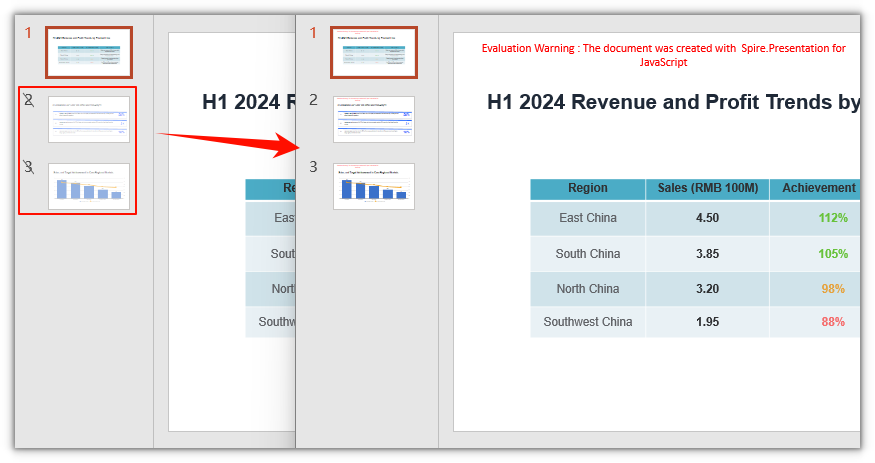
After the 2nd slide is restored, the 3rd slide stays hidden:
Unhide All Slides
When a deck hides several slides, hard-coding each index is tedious and easy to miss. Use Slides.Count to get the total, loop from 0 to Count - 1, and set Hidden to false on every slide to restore them all in one pass.
The steps are:
- Get the Spire.Presentation WASM module and make sure it is ready.
- Load the presentation with hidden slides and fonts, create a
Presentationobject, and load the file. - Loop over
Slidesand setHiddentofalseon every slide. - Use
Presentation.SaveToFile()to save the result. - Read the result from the VFS and trigger a browser download.
The code to unhide all slides:
function App() {
  const unhideAllSlides = async () => {
    // Get the Spire.Presentation WASM module
    const pptModule = window.wasmModule?.spirepresentation;

    // Check that the module is ready
    if (!pptModule) {
      alert('Spire.Presentation is not ready yet');
      return;
    }

    // Load the presentation with hidden slides and fonts
    await window.spire.FetchFileToVFS('PresentationWithHiddenSlides.pptx', "", `${process.env.PUBLIC_URL}/data/`);
    await window.spire.FetchFileToVFS('ARIALUNI.TTF', "/Library/Fonts/", `${process.env.PUBLIC_URL}/font/`);

    // Create a Presentation instance and load the presentation
    const ppt = new pptModule.Presentation();
    ppt.LoadFromFile('PresentationWithHiddenSlides.pptx');

    // Loop over all slides and unhide each one
    for (let i = 0; i < ppt.Slides.Count; i++) {
      ppt.Slides.get_Item(i).Hidden = false;
    }

    // Save the result
    const outputFileName = 'AllSlidesUnhiddenResult.pptx';
    ppt.SaveToFile({ file: outputFileName, fileFormat: pptModule.FileFormat.Pptx2013 });
    ppt.Dispose();

    // Read the generated file from the VFS and trigger a download
    const fileArray = window.dotnetRuntime.Module.FS.readFile(outputFileName);
    const blob = new Blob([fileArray], { type: 'application/vnd.openxmlformats-officedocument.presentationml.presentation' });
    const url = URL.createObjectURL(blob);
    const a = document.createElement('a');
    a.href = url;
    a.download = outputFileName;
    a.click();
    URL.revokeObjectURL(url);
  };

  return (
    <div style={{ textAlign: 'center', height: '300px' }}>
      <h1>Unhide All Slides</h1>
      <button onClick={unhideAllSlides}>
        Unhide All Slides
      </button>
    </div>
  );
}

export default App;
After restoring everything, none of the three slides carries a hidden marker:
FAQ
What is the difference between hiding and deleting a slide
Cause: Deleting removes the slide from the file entirely: the total drops by one, the later slides shift up, and the content cannot be recovered. Hiding only writes a state flag; the slide, its number, and its content all stay in place.
Solution: Use Hidden when you just do not want to show a slide for now. If the slide is truly no longer needed, delete it with Slides.RemoveAt() instead. A hidden slide can always be shown again by setting Hidden back to false.
Does a hidden slide appear during a slideshow
Cause: The hidden marker makes the slideshow skip the slide; it normally does not appear when playing from the start or in a loop.
Solution: No extra handling is needed. To show a hidden slide on stage, open it directly from the thumbnail pane, or temporarily unhide it before presenting. Hiding is not access control; it does not stop someone from deliberately opening the file.
Can I hide several slides at once
Cause: Hidden is a property of a single slide, and there is no API to set several at once.
Solution: Loop over the indexes. To hide non-adjacent slides, put the indexes in an array and iterate:
// Hide the 2nd, 4th, and 6th slides in order
for (const index of [1, 3, 5]) {
  ppt.Slides.get_Item(index).Hidden = true;
}
Do hidden slides appear in an exported PDF
Cause: When converting to PDF, hidden slides are exported by default; the hidden marker does not make the slide disappear.
Solution: To keep hidden slides out of the PDF, set Presentation.SaveToPdfOption.ContainHiddenSlides to false before export, so only visible slides are converted:
ppt.SaveToPdfOption.ContainHiddenSlides = false;
ppt.SaveToFile({ file: 'VisibleSlides.pdf', fileFormat: pptModule.FileFormat.PDF });
PDF pages have no hidden state, so every page can be flipped to normally after conversion. To keep the hidden state, keep the original PPTX.
Get a Free License
If you want to remove the evaluation message from the result, or lift the feature limits, contact sales for a 30-day temporary license.
Split PowerPoint Slides with JavaScript in React
Once a presentation is finished, the way its pages are organized often changes with the situation: when sending materials out, each slide may need to stand alone; when preparing an excerpt, only a few consecutive pages are needed. Saving extra copies and copying slides by hand takes time and can easily lose charts, speaker notes, or layout details. Handling it on a server means the file must first be uploaded to a third-party environment.
This article uses Spire.Presentation for JavaScript to split PowerPoint slides in the browser. The whole process runs locally on the user's device through WebAssembly, requires no Office installation and no back-end service, and keeps the presentation from leaving the browser.
This article covers two core features:
For installation and project configuration, see Integrating Spire.Presentation for JavaScript in a React Project. The examples below assume that Spire.Presentation is installed and the WebAssembly module has been initialized.
Split a PowerPoint presentation into single slides
When distributing materials, each slide sometimes needs to stand alone so it can be sent, annotated, or used as image material separately. Splitting a presentation into multiple files means copying the content page by page and creating an independent presentation instance for each slide.
| Code | Result |
|---|---|
new pptModule.Presentation() |
Creates a presentation instance with one blank slide by default |
sourcePpt.Slides.Count |
Total number of slides in the source presentation |
sourcePpt.Slides.get_Item(i) |
The (i+1)-th slide (index starts at 0) |
singlePpt.Slides.RemoveAt(0) |
Removes the blank slide created with the new presentation |
singlePpt.Slides.Append({ slide }) |
Copies the given slide to the end of the current presentation |
singlePpt.SaveToFile({ file, fileFormat }) |
Writes a standalone PPTX file in the specified format |
The steps are:
- Load the font file and the sample presentation
Presentation.pptxinto the VFS withwindow.spire.FetchFileToVFS, then create an instance withnew pptModule.Presentation()and load the source file withLoadFromFile. - Read
sourcePpt.Slides.Countas the loop count and visit each source slide withsourcePpt.Slides.get_Item(i). - In each iteration, create a new
Presentation, callSlides.RemoveAt(0)to remove the default blank page, and copy the current slide withSlides.Append({ slide }). - Save the new presentation as
SplitSlide-<index>.pptxwithSaveToFile, then release the instance withDispose(). - Read every output file through
window.dotnetRuntime.Module.FS.readFile, build aBlob, and trigger the browser download.
function App() {
  const splitIntoSlides = async () => {
    // Get the Spire.Presentation WASM module
    const pptModule = window.wasmModule?.spirepresentation;

    // Check if the module is ready
    if (!pptModule) {
      alert('Spire.Presentation is not ready yet');
      return;
    }

    // Load the font and the sample presentation into the VFS
    await window.spire.FetchFileToVFS('ARIAL.TTF', '/Library/Fonts/', `${process.env.PUBLIC_URL}/font/`);
    const inputFileName = 'Presentation.pptx';
    await window.spire.FetchFileToVFS(inputFileName, '', `${process.env.PUBLIC_URL}data/`);

    // Load the source presentation
    const sourcePpt = new pptModule.Presentation();
    sourcePpt.LoadFromFile(inputFileName);

    const splitFiles = [];

    // Split the slides one by one
    for (let i = 0; i < sourcePpt.Slides.Count; i++) {
      // Create a new presentation and remove its built-in blank slide
      const singlePpt = new pptModule.Presentation();
      singlePpt.Slides.RemoveAt(0);

      // Copy the i-th slide of the source presentation into the new one
      singlePpt.Slides.Append({ slide: sourcePpt.Slides.get_Item(i) });

      // Save it as a standalone PPTX file
      const outputFileName = `SplitSlide-${i + 1}.pptx`;
      singlePpt.SaveToFile({ file: outputFileName, fileFormat: pptModule.FileFormat.Pptx2013 });
      splitFiles.push(outputFileName);

      singlePpt.Dispose();
    }

    sourcePpt.Dispose();

    // Read the split results from the VFS and trigger the downloads
    for (const fileName of splitFiles) {
      const fileArray = window.dotnetRuntime.Module.FS.readFile(fileName);
      const blob = new Blob([fileArray], { type: 'application/vnd.openxmlformats-officedocument.presentationml.presentation' });
      const url = URL.createObjectURL(blob);
      const a = document.createElement('a');
      a.href = url;
      a.download = fileName;
      a.click();
      URL.revokeObjectURL(url);
    }
  };

  return (
    <div style={{ textAlign: 'center', height: '300px' }}>
      <h1>Split PowerPoint Slides</h1>
      <button onClick={splitIntoSlides}>
        Split into Single Slides
      </button>
    </div>
  );
}

export default App;
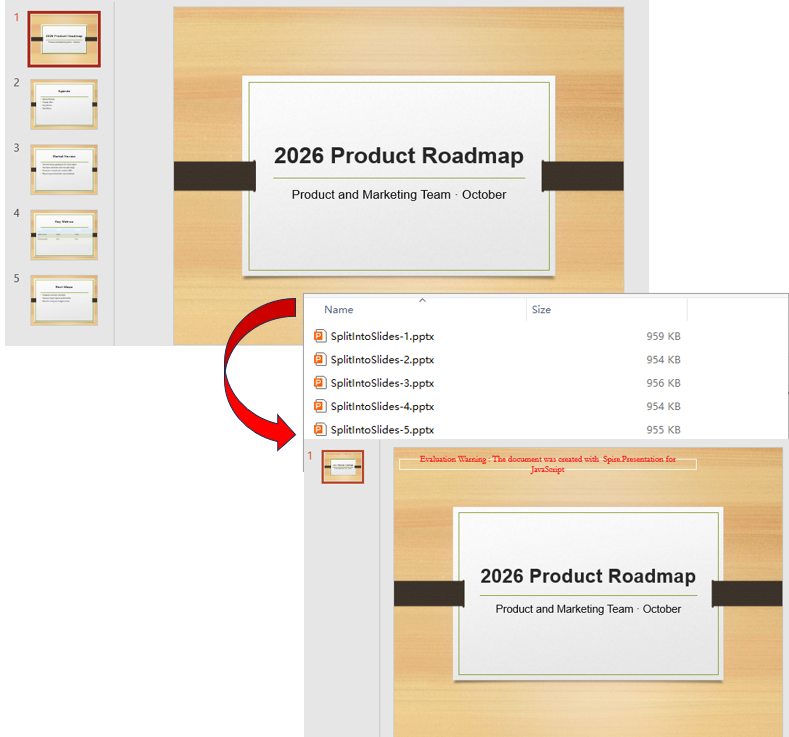
Presentation files after splitting into single slides:
Split PowerPoint slides by page range
Not every split needs one file per page. A report often only needs one section extracted, for example saving slides 2 to 4 as a separate brief. There is no need to copy the whole presentation and delete pages; determine the start and end indexes and append only the slides inside that range to a new presentation.
The steps are:
- Load the font and
Presentation.pptxwithwindow.spire.FetchFileToVFS, then create aPresentationinstance and load the file withLoadFromFile. - Create a new presentation with
new pptModule.Presentation()and remove the default blank page withSlides.RemoveAt(0). - Set
startIndexandendIndex(indexes start at 0 and the range includes both ends), take each slide withSlides.get_Item(i)in a loop, and append it withSlides.Append({ slide }). - Save the result as
SplitRange.pptxwithSaveToFile, and release both presentation instances withDispose(). - Read the file through
window.dotnetRuntime.Module.FS.readFile, build aBlob, and trigger the download.
function App() {
  const splitByRange = async () => {
    // Get the Spire.Presentation WASM module
    const pptModule = window.wasmModule?.spirepresentation;

    // Check if the module is ready
    if (!pptModule) {
      alert('Spire.Presentation is not ready yet');
      return;
    }

    // Load the font and the sample presentation into the VFS
    await window.spire.FetchFileToVFS('ARIAL.TTF', '/Library/Fonts/', `${process.env.PUBLIC_URL}/font/`);
    const inputFileName = 'Presentation.pptx';
    await window.spire.FetchFileToVFS(inputFileName, '', `${process.env.PUBLIC_URL}data/`);

    // Load the source presentation
    const sourcePpt = new pptModule.Presentation();
    sourcePpt.LoadFromFile(inputFileName);

    // Keep slides 2 to 4 (indexes start from 0)
    const startIndex = 1;
    const endIndex = 3;

    // Create a new presentation and remove its built-in blank slide
    const rangePpt = new pptModule.Presentation();
    rangePpt.Slides.RemoveAt(0);

    // Copy the slides inside the range one by one
    for (let i = startIndex; i <= endIndex; i++) {
      rangePpt.Slides.Append({ slide: sourcePpt.Slides.get_Item(i) });
    }

    const outputFileName = 'SplitRange.pptx';
    rangePpt.SaveToFile({ file: outputFileName, fileFormat: pptModule.FileFormat.Pptx2013 });

    // Release resources
    rangePpt.Dispose();
    sourcePpt.Dispose();

    // Read the result file from the VFS and trigger the download
    const fileArray = window.dotnetRuntime.Module.FS.readFile(outputFileName);
    const blob = new Blob([fileArray], { type: 'application/vnd.openxmlformats-officedocument.presentationml.presentation' });
    const url = URL.createObjectURL(blob);
    const a = document.createElement('a');
    a.href = url;
    a.download = outputFileName;
    a.click();
    URL.revokeObjectURL(url);
  };

  return (
    <div style={{ textAlign: 'center', height: '300px' }}>
      <h1>Split PowerPoint Slides by Page Range</h1>
      <button onClick={splitByRange}>
        Split by Page Range
      </button>
    </div>
  );
}

export default App;
Presentation after splitting slides by page range:

FAQ
Why does a split result contain an extra blank slide
Cause: The presentation created by new pptModule.Presentation() contains one blank slide by default. If the source slides are appended directly, that blank page stays at the beginning of the result.
Solution: Call Slides.RemoveAt(0) before appending slides to remove the default page, for example:
const singlePpt = new pptModule.Presentation();
singlePpt.Slides.RemoveAt(0);
singlePpt.Slides.Append({ slide: sourcePpt.Slides.get_Item(i) });
Why does an index return the wrong slide
Cause: The index of Slides.get_Item(index) starts at 0, so the first slide corresponds to index 0. Using a page number directly shifts the selection by one.
Solution: Use zero-based indexes consistently. To take slides 2 to 4, set startIndex to 1 and endIndex to 3.
Why is the last slide missing after splitting by page range
Cause: If the loop condition is written as i < endIndex, the slide at endIndex is never visited; the index range includes both ends.
Solution: Use i <= endIndex as the loop condition and make sure endIndex does not exceed sourcePpt.Slides.Count - 1.
Get a Free License
Spire.Presentation for JavaScript offers a 30-day full-featured free trial license with no functional limitations. Apply here to evaluate before purchasing.
Merge PowerPoint Slides with JavaScript in React
Combining several presentations into one is a common step when organizing report materials: a main report and a topic appendix may be prepared by different team members, and finally need to sit in one file in a consistent order; sometimes only a few conclusion pages from the appendix are needed. Copying and pasting by hand takes time and may break the layout, charts, or text styles of the original slides. Handling it on a server also requires uploading the files to a third-party environment first.
This article uses Spire.Presentation for JavaScript to merge PowerPoint slides in the browser. The whole process runs locally on the user's device through WebAssembly, requires no Office installation and no back-end service, and keeps the presentation from leaving the browser.
This article covers two core features:
For installation and project configuration, see Integrating Spire.Presentation for JavaScript in a React Project. The examples below assume that Spire.Presentation is installed and the WebAssembly module has been initialized.
Merge multiple PowerPoint presentations
A complete report often consists of materials from several sources, for example a main report and a topic appendix prepared by different members that finally need to be combined into one file. To merge multiple presentations, load each source file in turn, then append all of its slides to one new presentation to obtain a merged result that contains every page.
| Code | Result |
|---|---|
new pptModule.Presentation() |
Creates a presentation instance with one blank slide by default |
mergedPpt.Slides.RemoveAt(0) |
Removes the blank slide created with the new presentation |
sourcePpt.Slides.Count |
Total number of slides in the current source presentation |
sourcePpt.Slides.get_Item(i) |
The (i+1)-th slide (index starts at 0) |
mergedPpt.Slides.Append({ slide }) |
Appends the source slide to the end of the merged result |
mergedPpt.SaveToFile({ file, fileFormat }) |
Writes the merged PPTX file in the specified format |
The steps are:
- Load
Presentation.pptxandSlidesToMerge.pptxinto the VFS withwindow.spire.FetchFileToVFS. - Create a new presentation with
new pptModule.Presentation()and remove the default blank page withSlides.RemoveAt(0). - For each source file, create a
Presentationinstance and load it withLoadFromFile, loop overSlides.Count, take each slide withSlides.get_Item(i), and append it to the merged result withSlides.Append({ slide }). - Release each source instance with
Dispose()when it has been processed; after all slides are appended, save the result asMergedPresentation.pptxwithSaveToFile. - Read the merged result through
window.dotnetRuntime.Module.FS.readFile, build aBlob, and trigger the browser download.
function App() {
  const mergePresentations = async () => {
    // Get the Spire.Presentation WASM module
    const pptModule = window.wasmModule?.spirepresentation;

    // Check if the module is ready
    if (!pptModule) {
      alert('Spire.Presentation is not ready yet');
      return;
    }

    // Load the font and the two sample presentations into the VFS
    await window.spire.FetchFileToVFS('ARIAL.TTF', '/Library/Fonts/', `${process.env.PUBLIC_URL}/font/`);
    const sourceFileNames = ['Presentation.pptx', 'SlidesToMerge.pptx'];
    for (const fileName of sourceFileNames) {
      await window.spire.FetchFileToVFS(fileName, '', `${process.env.PUBLIC_URL}data/`);
    }

    // Create a new presentation and remove its built-in blank slide
    const mergedPpt = new pptModule.Presentation();
    mergedPpt.Slides.RemoveAt(0);

    // Append all slides of every source presentation to the merged result
    for (const fileName of sourceFileNames) {
      const sourcePpt = new pptModule.Presentation();
      sourcePpt.LoadFromFile(fileName);

      for (let i = 0; i < sourcePpt.Slides.Count; i++) {
        mergedPpt.Slides.Append({ slide: sourcePpt.Slides.get_Item(i) });
      }

      sourcePpt.Dispose();
    }

    const outputFileName = 'MergedPresentation.pptx';
    mergedPpt.SaveToFile({ file: outputFileName, fileFormat: pptModule.FileFormat.Pptx2013 });
    mergedPpt.Dispose();

    // Read the result file from the VFS and trigger the download
    const fileArray = window.dotnetRuntime.Module.FS.readFile(outputFileName);
    const blob = new Blob([fileArray], { type: 'application/vnd.openxmlformats-officedocument.presentationml.presentation' });
    const url = URL.createObjectURL(blob);
    const a = document.createElement('a');
    a.href = url;
    a.download = outputFileName;
    a.click();
    URL.revokeObjectURL(url);
  };

  return (
    <div style={{ textAlign: 'center', height: '300px' }}>
      <h1>Merge PowerPoint Presentations</h1>
      <button onClick={mergePresentations}>
        Merge Multiple Presentations
      </button>
    </div>
  );
}

export default App;
Presentation after merging multiple presentations:
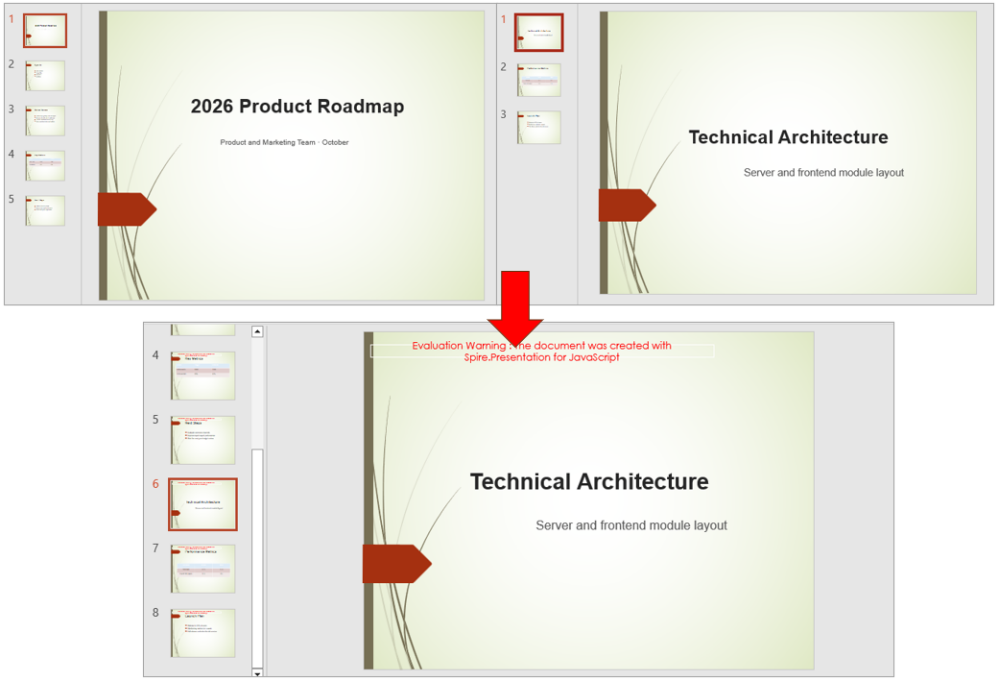
Merge selected PowerPoint slides
A merge does not always need every page of a source file. For example, the main report keeps its full structure, while only the two conclusion pages of the topic appendix are required. In this case, merge all slides of the main report first, then pick pages from the other presentation by index, so unrelated content is not carried over.
| Code | Result |
|---|---|
mergedPpt.Slides.Append({ slide }) |
Appends one slide to the end of the merged result |
mainPpt.Slides.Count |
Total number of slides in the main report |
mainPpt.Slides.get_Item(i) |
The (i+1)-th slide of the main report (index starts at 0) |
extraPpt.Slides.get_Item(index) |
The slide at the given index in the appendix |
selectedIndexes |
Indexes of the appendix slides that take part in the merge |
The steps are:
- Load the font,
Presentation.pptx, andSlidesToMerge.pptxwithwindow.spire.FetchFileToVFS. - Create two
Presentationinstances and load both source files withLoadFromFile; create the merged result withnew pptModule.Presentation()and remove the default blank page withSlides.RemoveAt(0). - Loop over
mainPpt.Slides.Countand append every slide of the main report withSlides.get_Item(i)andSlides.Append({ slide }). - Set
selectedIndexes(indexes start at 0) and append only those slides withextraPpt.Slides.get_Item(index); all other slides do not take part in the merge. - Save the result as
MergedSelectedSlides.pptxwithSaveToFile, then read the file throughwindow.dotnetRuntime.Module.FS.readFileand trigger the download.
function App() {
  const mergeSelectedSlides = async () => {
    // Get the Spire.Presentation WASM module
    const pptModule = window.wasmModule?.spirepresentation;

    // Check if the module is ready
    if (!pptModule) {
      alert('Spire.Presentation is not ready yet');
      return;
    }

    // Load the font and the two sample presentations into the VFS
    await window.spire.FetchFileToVFS('ARIAL.TTF', '/Library/Fonts/', `${process.env.PUBLIC_URL}/font/`);
    for (const fileName of ['Presentation.pptx', 'SlidesToMerge.pptx']) {
      await window.spire.FetchFileToVFS(fileName, '', `${process.env.PUBLIC_URL}data/`);
    }

    // Load the main report and the appendix
    const mainPpt = new pptModule.Presentation();
    mainPpt.LoadFromFile('Presentation.pptx');

    const extraPpt = new pptModule.Presentation();
    extraPpt.LoadFromFile('SlidesToMerge.pptx');

    // Create a new presentation and remove its built-in blank slide
    const mergedPpt = new pptModule.Presentation();
    mergedPpt.Slides.RemoveAt(0);

    // Append all slides of the main report
    for (let i = 0; i < mainPpt.Slides.Count; i++) {
      mergedPpt.Slides.Append({ slide: mainPpt.Slides.get_Item(i) });
    }

    // Append only the selected slides of the appendix (indexes start from 0)
    const selectedIndexes = [1, 2];
    for (const index of selectedIndexes) {
      mergedPpt.Slides.Append({ slide: extraPpt.Slides.get_Item(index) });
    }

    const outputFileName = 'MergedSelectedSlides.pptx';
    mergedPpt.SaveToFile({ file: outputFileName, fileFormat: pptModule.FileFormat.Pptx2013 });

    // Release resources
    mergedPpt.Dispose();
    mainPpt.Dispose();
    extraPpt.Dispose();

    // Read the result file from the VFS and trigger the download
    const fileArray = window.dotnetRuntime.Module.FS.readFile(outputFileName);
    const blob = new Blob([fileArray], { type: 'application/vnd.openxmlformats-officedocument.presentationml.presentation' });
    const url = URL.createObjectURL(blob);
    const a = document.createElement('a');
    a.href = url;
    a.download = outputFileName;
    a.click();
    URL.revokeObjectURL(url);
  };

  return (
    <div style={{ textAlign: 'center', height: '300px' }}>
      <h1>Merge Selected PowerPoint Slides</h1>
      <button onClick={mergeSelectedSlides}>
        Merge Selected Slides
      </button>
    </div>
  );
}

export default App;
Presentation after merging selected slides:
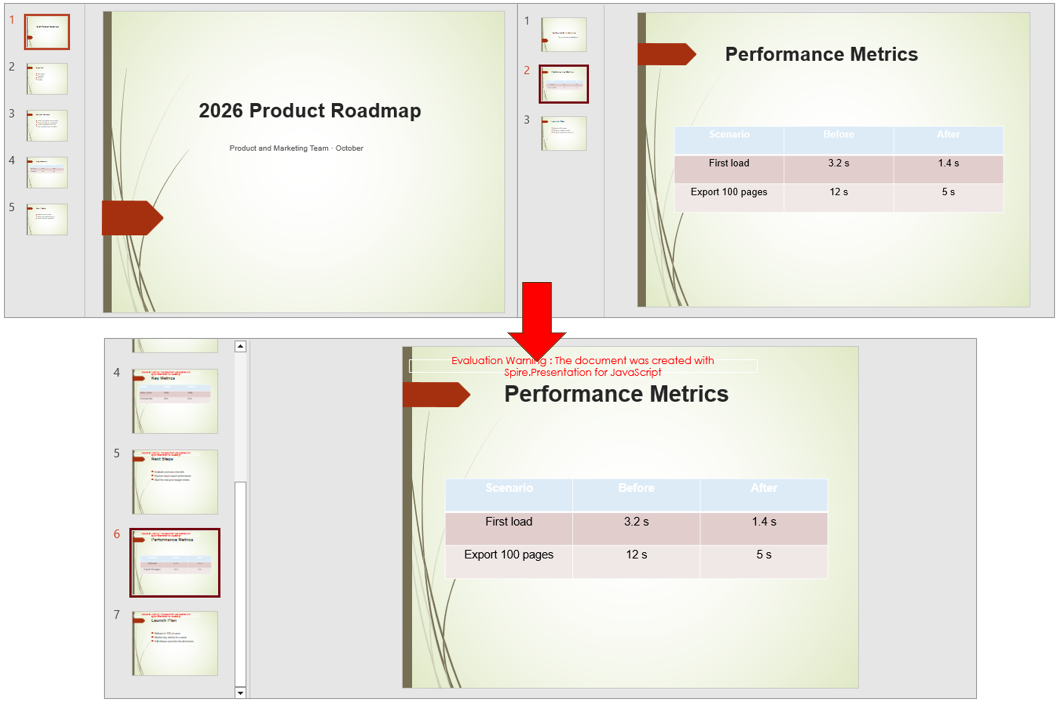
FAQ
Why is the slide order in the merged result different from the expected order
Cause: The append order follows the loop order, so files processed first come first. If the file list or loop order differs from the expected order, the page order in the result changes as well.
Solution: Arrange sourceFileNames in the required order and keep the Append loop running from the first slide to the last; the merged result then follows that order.
Why does the merged result contain an extra blank slide
Cause: The presentation created by new pptModule.Presentation() contains one blank slide by default. If the source slides are appended directly, that blank page stays at the beginning of the merged result.
Solution: Call Slides.RemoveAt(0) before the first append to remove the default page, for example:
const mergedPpt = new pptModule.Presentation();
mergedPpt.Slides.RemoveAt(0);
Are images, tables, and hyperlinks lost after merging
Cause: Slides.Append({ slide }) copies the whole slide, and images, tables, and hyperlinks are content of the slide itself, so they enter the merged result together with the slide.
Solution: No extra handling is needed. After merging, check the images and tables directly in the result file; if a hyperlink points to an external address, make sure that address is still reachable.
Get a Free License
Spire.Presentation for JavaScript offers a 30-day full-featured free trial license with no functional limitations. Apply here to evaluate before purchasing.
Add or Delete PowerPoint Slides Using JavaScript in React
The same deck often needs more or fewer slides for different occasions: add two case-study pages for a client meeting, then drop the outdated ones after the previous version has been used. Doing this by hand in desktop software means someone babysitting the file, and it is hard to fold into a batch Web workflow; doing it server-side means uploading the file first, which takes it off the user's device.
This article shows how to add and delete PowerPoint slides directly in the browser with Spire.Presentation for JavaScript. Everything runs in the browser on WebAssembly — no Office install, no backend, and the file stays on the user's device.
The article covers three features:
- Add PowerPoint slides at the end
- Insert PowerPoint slides at a specific position
- Delete PowerPoint slides
For installation and project setup, see How to Integrate Spire.Presentation for JavaScript in a React Project. The examples below assume Spire.Presentation is installed and the WebAssembly module is initialized.
Add PowerPoint Slides at the End
Spire.Presentation for JavaScript adds a new slide at the end of a presentation with the Slides.Append() method. What gets added depends on the arguments:
| Call | What it appends |
|---|---|
Slides.Append() |
A new slide with the default (blank) layout |
Slides.Append({ template: <layout object> }) |
A new slide built from the given layout |
Slides.Append({ slide }) |
A copy of an existing slide |
To build a slide from a specific layout, get the layout object first: ppt.Masters.get_Item(0).Layouts.get_Item(i) — the i-th layout under the first slide master (i is 0-based).
The steps are as follows:
- Get the Spire.Presentation WASM module and confirm it is ready.
- Read the sample presentation and the font into the VFS, create a
Presentationobject, and load the file. - Add slides at the end with
Presentation.Slides.Append()(passtemplateorslideto choose the content). - Save the result with
Presentation.SaveToFile(). - Read the result back from the VFS and trigger a browser download.
The code for adding PowerPoint slides:
function App() {
  const addSlides = async () => {
    // Get the Spire.Presentation WASM module
    const pptModule = window.wasmModule?.spirepresentation;

    // Check whether the module is ready
    if (!pptModule) {
      alert('Spire.Presentation is not ready yet');
      return;
    }

    // Load the sample presentation and the font
    await window.spire.FetchFileToVFS('SamplePresentation.pptx', "", `${process.env.PUBLIC_URL}/data/`);
    await window.spire.FetchFileToVFS('ARIALUNI.TTF', "/Library/Fonts/", `${process.env.PUBLIC_URL}/font/`);

    // Create a Presentation instance and load the presentation
    const ppt = new pptModule.Presentation();
    ppt.LoadFromFile('SamplePresentation.pptx');

    // Append in turn: default layout, a chosen layout, a clone of the first slide
    ppt.Slides.Append();
    ppt.Slides.Append({ template: ppt.Masters.get_Item(0).Layouts.get_Item(1) });
    ppt.Slides.Append({ slide: ppt.Slides.get_Item(0) });

    // Save the result
    const outputFileName = 'SlidesAdded.pptx';
    ppt.SaveToFile({ file: outputFileName, fileFormat: pptModule.FileFormat.Pptx2013 });
    ppt.Dispose();

    // Read the generated file from the VFS and trigger a download
    const fileArray = window.dotnetRuntime.Module.FS.readFile(outputFileName);
    const blob = new Blob([fileArray], { type: 'application/vnd.openxmlformats-officedocument.presentationml.presentation' });
    const url = URL.createObjectURL(blob);
    const a = document.createElement('a');
    a.href = url;
    a.download = outputFileName;
    a.click();
    URL.revokeObjectURL(url);
  };

  return (
    <div style={{ textAlign: 'center', height: '300px' }}>
      <h1>Add PowerPoint Slides</h1>
      <button onClick={addSlides}>
        Add Slides
      </button>
    </div>
  );
}

export default App;
After appending three slides to the end:
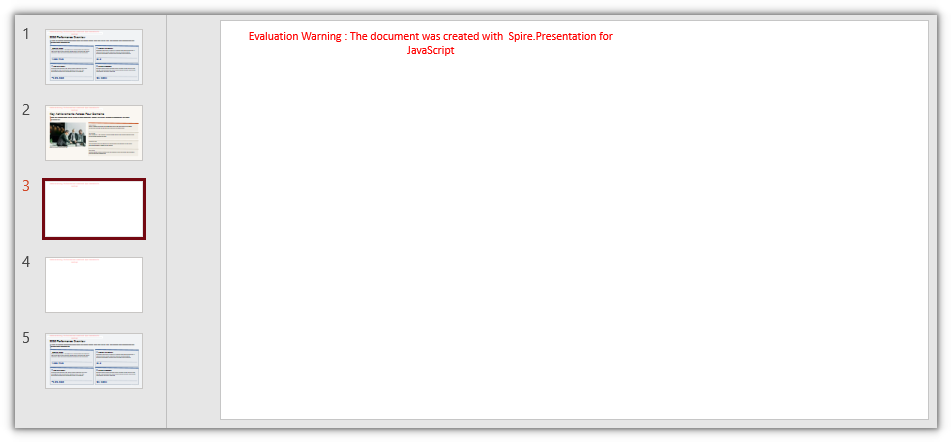
Insert PowerPoint Slides at a Specific Position
Slides.Insert() takes an index that sets where the slide goes: it is inserted at that index and the slides after it shift back. The content is again decided by the arguments:
| Call | What it inserts |
|---|---|
Slides.Insert({ index, template: <layout object> }) |
A new slide built from the given layout, inserted at index |
Slides.Insert({ index, slide }) |
A copy of an existing slide inserted at index |
The layout object is obtained the same way as for Slides.Append().
The steps are as follows:
- Get the Spire.Presentation WASM module and confirm it is ready.
- Read the sample presentation and the font into the VFS, create a
Presentationobject, and load the file. - Insert slides at the given positions with
Presentation.Slides.Insert(). - Save the result with
Presentation.SaveToFile(). - Read the result back from the VFS and trigger a browser download.
The code for inserting PowerPoint slides:
function App() {
  const insertSlides = async () => {
    // Get the Spire.Presentation WASM module
    const pptModule = window.wasmModule?.spirepresentation;

    // Check whether the module is ready
    if (!pptModule) {
      alert('Spire.Presentation is not ready yet');
      return;
    }

    // Load the sample presentation and the font
    await window.spire.FetchFileToVFS('SamplePresentation.pptx', "", `${process.env.PUBLIC_URL}/data/`);
    await window.spire.FetchFileToVFS('ARIALUNI.TTF', "/Library/Fonts/", `${process.env.PUBLIC_URL}/font/`);

    // Create a Presentation instance and load the presentation
    const ppt = new pptModule.Presentation();
    ppt.LoadFromFile('SamplePresentation.pptx');

    // Insert in turn: a chosen layout, a clone of the first slide
    ppt.Slides.Insert({ index: 1, template: ppt.Masters.get_Item(0).Layouts.get_Item(1) });
    ppt.Slides.Insert({ index: 2, slide: ppt.Slides.get_Item(0) });

    // Save the result
    const outputFileName = 'SlidesInserted.pptx';
    ppt.SaveToFile({ file: outputFileName, fileFormat: pptModule.FileFormat.Pptx2013 });
    ppt.Dispose();

    // Read the generated file from the VFS and trigger a download
    const fileArray = window.dotnetRuntime.Module.FS.readFile(outputFileName);
    const blob = new Blob([fileArray], { type: 'application/vnd.openxmlformats-officedocument.presentationml.presentation' });
    const url = URL.createObjectURL(blob);
    const a = document.createElement('a');
    a.href = url;
    a.download = outputFileName;
    a.click();
    URL.revokeObjectURL(url);
  };

  return (
    <div style={{ textAlign: 'center', height: '300px' }}>
      <h1>Insert PowerPoint Slides</h1>
      <button onClick={insertSlides}>
        Insert Slides
      </button>
    </div>
  );
}

export default App;
After inserting two slides in the middle:
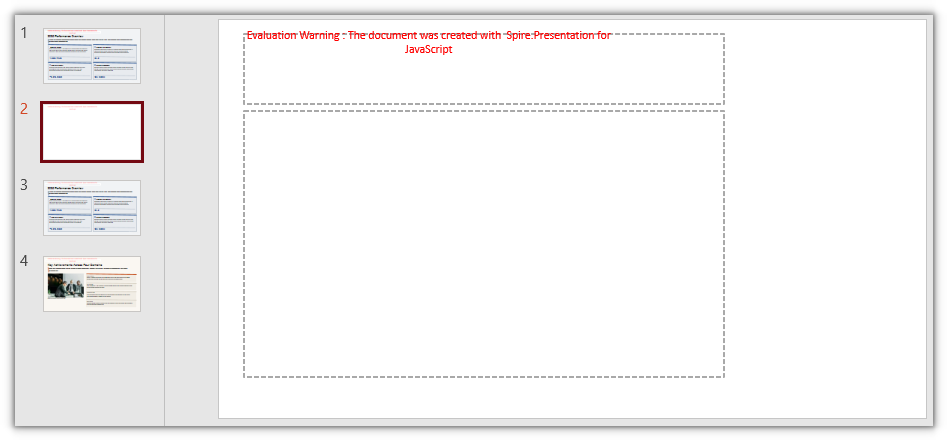
Delete PowerPoint Slides
Spire.Presentation for JavaScript can delete slides too, with Slides.RemoveAt() or Slides.Remove(). They target a slide differently:
| Method | Based on |
|---|---|
Slides.RemoveAt(index) |
The position of the slide (0-based index) |
Slides.Remove(slide) |
The slide object itself |
Each removal shifts the index of every later slide back by one.
The steps are as follows:
- Get the Spire.Presentation WASM module and confirm it is ready.
- Read the sample presentation and the font into the VFS, create a
Presentationobject, and load the file. - Delete a slide by index with
Presentation.Slides.RemoveAt(). - Save the result with
Presentation.SaveToFile(). - Read the result back from the VFS and trigger a browser download.
The code for deleting PowerPoint slides:
function App() {
  const removeSlides = async () => {
    // Get the Spire.Presentation WASM module
    const pptModule = window.wasmModule?.spirepresentation;

    // Check whether the module is ready
    if (!pptModule) {
      alert('Spire.Presentation is not ready yet');
      return;
    }

    // Load the sample presentation and the font
    await window.spire.FetchFileToVFS('SamplePresentation.pptx', "", `${process.env.PUBLIC_URL}/data/`);
    await window.spire.FetchFileToVFS('ARIALUNI.TTF', "/Library/Fonts/", `${process.env.PUBLIC_URL}/font/`);

    // Create a Presentation instance and load the presentation
    const ppt = new pptModule.Presentation();
    ppt.LoadFromFile('SamplePresentation.pptx');

    // RemoveAt deletes by index: once the first slide is gone, the slides after it shift back
    ppt.Slides.RemoveAt(0);

    // Save the result
    const outputFileName = 'SlidesRemoved.pptx';
    ppt.SaveToFile({ file: outputFileName, fileFormat: pptModule.FileFormat.Pptx2013 });
    ppt.Dispose();

    // Read the generated file from the VFS and trigger a download
    const fileArray = window.dotnetRuntime.Module.FS.readFile(outputFileName);
    const blob = new Blob([fileArray], { type: 'application/vnd.openxmlformats-officedocument.presentationml.presentation' });
    const url = URL.createObjectURL(blob);
    const a = document.createElement('a');
    a.href = url;
    a.download = outputFileName;
    a.click();
    URL.revokeObjectURL(url);
  };

  return (
    <div style={{ textAlign: 'center', height: '300px' }}>
      <h1>Delete PowerPoint Slides</h1>
      <button onClick={removeSlides}>
        Remove Slides
      </button>
    </div>
  );
}

export default App;
After deleting a slide:
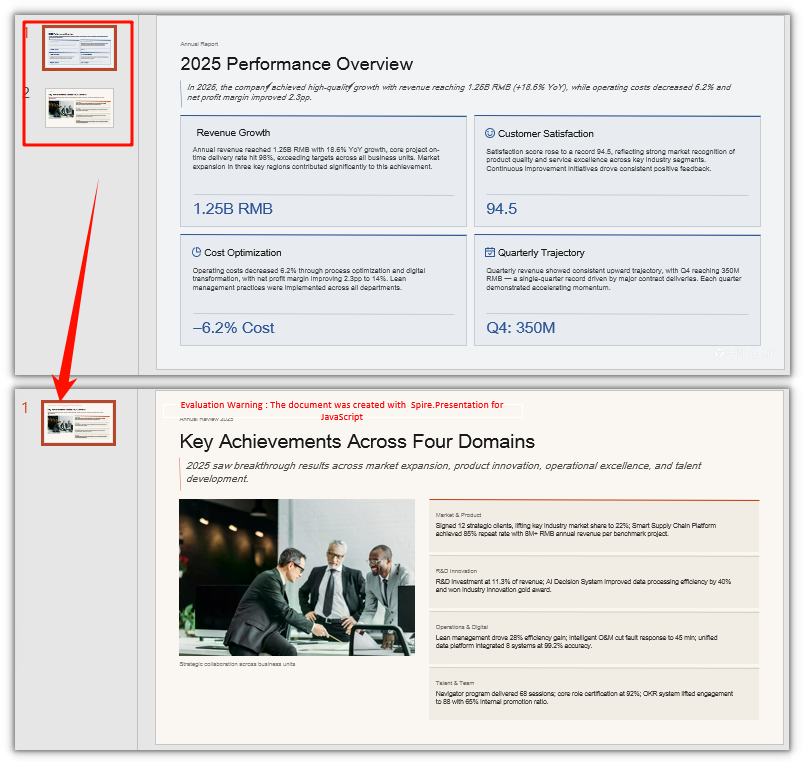
Delete a Slide by Object
Slides.RemoveAt() above deletes by index; Slides.Remove() takes a slide object instead. To point at a page, fetch it with Slides.get_Item(index) and hand it to Slides.Remove():
// Delete by object: fetch the second slide, then remove it
ppt.Slides.Remove(ppt.Slides.get_Item(1));
FAQ
Do the files need to be uploaded to a server
Not with the usage in this article. Spire.Presentation for JavaScript runs in the browser on WebAssembly, and presentations are read and written locally through a virtual file system (VFS) — adding, deleting, and saving all happen locally, and the library itself does not send files to a server. Whether a file leaves the device in the end depends on the other code you add to the page.
Can I add or delete several slides at once
Yes, just call in a loop: call Slides.Append() / Slides.Insert() several times to add or insert; when deleting several slides, handle the indices in order, or it is easy to delete the wrong slide or go out of range (see the last question).
Why does a new Presentation already contain a blank slide
Cause: A presentation created with new Presentation() already contains one blank slide; Append() only adds to the end and does not replace it.
Fix: To start from empty, remove it first, then append the slides you need:
let ppt = new pptModule.Presentation();

// Remove the blank slide it comes with
ppt.Slides.RemoveAt(0);

// Then append as needed
ppt.Slides.Append({ template: ppt.Masters.get_Item(0).Layouts.get_Item(1) });
Why is Append() without arguments a blank page
Cause: With no arguments it creates a slide with the default (blank) layout, so there are no ready-made title or body placeholders and it looks like an empty page.
Fix: To get ready-made placeholders, pass a layout that has them, or clone an existing slide; you can also add content yourself on the new page with Shapes.AppendShape():
// Build from a layout, so the page comes with title and content placeholders
ppt.Slides.Append({ template: ppt.Masters.get_Item(0).Layouts.get_Item(1) });

// Clone the first slide, and its content comes along
ppt.Slides.Append({ slide: ppt.Slides.get_Item(0) });
Why do I delete the wrong slide, or hit an index-out-of-range error, when removing several slides
Cause: Slides is indexed by position, and every removal shifts the index of the slides after it back by one. When you delete "front to back" with fixed indices (RemoveAt(0), RemoveAt(1), …), the second step no longer deletes the slides you meant; and once an index goes past the current count (Slides.Count - 1), RemoveAt throws.
Fix: Do not use increasing fixed indices for several deletions; delete the current first slide (index 0) every time — the slides after it fill in automatically:
// Delete the first three slides: always remove index 0 and the following slides shift up
for (let i = 0; i < 3; i++) {
  ppt.Slides.RemoveAt(0);
}
Get a Free License
If you want to remove the evaluation message from the result document or lift the feature limits, contact sales for a temporary license valid for 30 days.