
Java: Detect if a PDF Document is Password Protected
When opening a password-protected PDF, we must enter the password. But sometimes we need to know whether a PDF is password-protected before opening it. Spire.PDF for Java offers a method PdfDocument.isPasswordProtected() to verify if a PDF document is password protected or not.
Install Spire.PDF for Java
First of all, you need to add the Spire.PDF.jar file as a dependency in your Java program. The JAR file can be downloaded from this link. If you use Maven, you can easily import the JAR file by adding the following code to your project's pom.xml file.
<repositories>
    <repository>
        <id>com.e-iceblue</id>
        <name>e-iceblue</name>
        <url>https://repo.e-iceblue.com/nexus/content/groups/public/</url>
    </repository>
</repositories>
<dependencies>
    <dependency>
        <groupId>e-iceblue</groupId>
        <artifactId>spire.pdf</artifactId>
        <version>11.6.2</version>
    </dependency>
</dependencies>
Detect if a PDF Document is Password Protected or Not
- Get the file path
- Detect whether the PDF is password protected or not by using PdfDocument.isPasswordProtected() method.
- Print results
- Java
import com.spire.pdf.PdfDocument;
public class DetectIfPDFIsPasswordProtected {
public static void main(String[] args) throws Exception {
//Define the file path
String filePath ="Sample.pdf";
//Detect if the PDF document is password protected
boolean isProtected =PdfDocument.isPasswordProtected(filePath);
//Print results
if(isProtected)
{
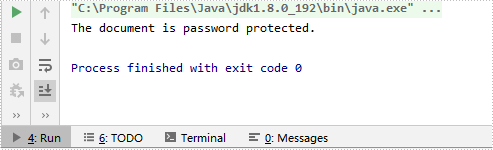
System.out.println("The document is password protected.");
}
else
{
System.out.println("The document is not password protected.");
}
}
}
Apply for a Temporary License
If you'd like to remove the evaluation message from the generated documents, or to get rid of the function limitations, please request a 30-day trial license for yourself.
Java: Count the Number of Worksheets in Excel
In Microsoft Excel, suppose a workbook contains lots of worksheets and you need to count them, you can use the Sheets Function, the Define Name Command or a simple VBA code to achieve it. Within this tutorial, I’ll show you how to programmatically count the number of worksheets in Excel using Spire.XLS for Java.
Install Spire.XLS for Java
First of all, you're required to add the Spire.Xls.jar file as a dependency in your Java program. The JAR file can be downloaded from this link. If you use Maven, you can easily import the JAR file in your application by adding the following code to your project's pom.xml file.
<repositories>
    <repository>
        <id>com.e-iceblue</id>
        <name>e-iceblue</name>
        <url>https://repo.e-iceblue.com/nexus/content/groups/public/</url>
    </repository>
</repositories>
<dependencies>
    <dependency>
        <groupId>e-iceblue</groupId>
        <artifactId>spire.xls</artifactId>
        <version>15.6.3</version>
    </dependency>
</dependencies>
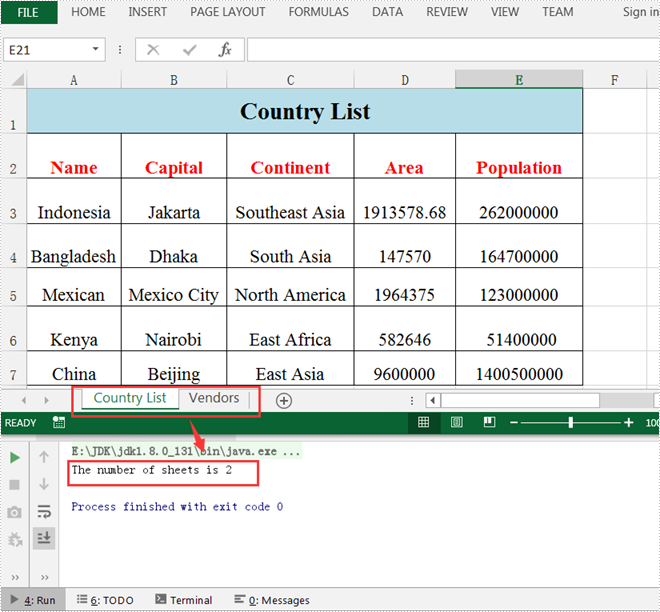
Count the Number of Worksheets in Excel
Spire.XLS for Java supports counting the number of worksheets in Excel using the getCount() method provided by the IWorksheets interface. The following are detailed steps.
- Create a Workbook instance.
- Load a sample Excel document using Workbook.loadFromFile() method.
- Get a collection of worksheets using Workbook.getWorksheets() method and obtain the number of worksheets in the collection using the getCount() method.
- Java
import com.spire.xls.Workbook;

public class CountNumberOfWorsheets {
    public static void main(String[] args) {
        //Create a Workbook instance
        Workbook workbook = new Workbook();

        //Load a sample Excel file
        workbook.loadFromFile("C:\\Users\\Test1\\Desktop\\Sample.xlsx");

        //Get the number of worksheets
        int sheetCount=workbook.getWorksheets().getCount();

        //Output the result
        System.out.println("The number of sheets is "+sheetCount);
    }
}
Apply for a Temporary License
If you'd like to remove the evaluation message from the generated documents, or to get rid of the function limitations, please request a 30-day trial license for yourself.
Spire.Office 7.1 is released
We are excited to announce the release of Spire.Office 7.1. This version brings some new features, for example, Spire.Presentation supports creating "BoxAndWhisker" chart, "Funnel" chart. "Histogram" chart, "Pareto" chart, "SunBurst" chart, "TreeMap" chart, "WaterFall" chart;Spire.XLS supports setting Html string for cell range, adding conditional formatting for the existing PivotTable and file stream to IsPasswordProtected(), also supports getting the linked cell name of IprstGeomShape, as well as supports calculating a single sheet or a cell range; Spire.Doc enhances the conversion from Word to PDF and HTML to Word. Meanwhile, a lot of bugs have been successfully fixed. More details are listed as follow.
In this version, the most recent versions of Spire.Doc, Spire.PDF, Spire.XLS, Spire.Presentation, Spire.Email, Spire.DocViewer, Spire.PDFViewer, Spire.Spreadsheet, Spire.OfficeViewer, Spire.DataExport, Spire.Barcode are included.
DLL Versions:
- Spire.License.dll 1.4.0
- Spire.Barcode.dll 6.1.1
- Spire.Email.dll 5.1.0
- Spire.DataExport.dll 4.1.9
- Spire.Pdf.dll 8.1.6
- Spire.PdfViewer.Forms.dll 7.1.4
- Spire.Doc.dll 10.1.11
- Spire.DocViewer.Forms.dll 7.1.1
- Spire.Presentation.dll 7.1.4
- Spire.Spreadsheet.dll 6.1.3
- Spire.XLS.dll 12.1.7
- Spire.OfficeViewer.Forms.dll 7.1.4
Here is a list of changes made in this release
Spire.Presentation
| Category | ID | Description |
| New feature | SPIREPPT-1163 | Supports creating "BoxAndWhisker" chart.
Presentation ppt = new Presentation();
IChart chart = ppt.Slides[0].Shapes.AppendChart(ChartType.BoxAndWhisker, new RectangleF(50, 50, 500, 400), false);
string[] seriesLabel = { "Series 1", "Series 2", "Series 3" };
for (int i = 0; i < seriesLabel.Length; i++)
{
    chart.ChartData[0, i + 1].Text = "Series 1";
}
string[] categories = {"Category 1", "Category 1", "Category 1", "Category 1", "Category 1", "Category 1", "Category 1",
                "Category 2", "Category 2", "Category 2", "Category 2", "Category 2", "Category 2",
                "Category 3", "Category 3", "Category 3", "Category 3", "Category 3"};
for (int i = 0; i < categories.Length; i++)
{
    chart.ChartData[i + 1, 0].Text = categories[i];
}
double[,] values = new double[18, 3]{{-7,-3,-24},{-10,1,11},{-28,-6,34},{47,2,-21},{35,17,22},{-22,15,19},{17,-11,25},
                            {-30,18,25},{49,22,56},{37,22,15},{-55,25,31},{14,18,22},{18,-22,36},{-45,25,-17},
                            {-33,18,22},{18,2,-23},{-33,-22,10},{10,19,22}};
for (int i = 0; i < seriesLabel.Length; i++)
{
    for (int j = 0; j < categories.Length; j++)
    {
        chart.ChartData[j + 1, i + 1].NumberValue = values[j, i];
    }
}
chart.Series.SeriesLabel = chart.ChartData[0, 1, 0, seriesLabel.Length];
chart.Categories.CategoryLabels = chart.ChartData[1, 0, categories.Length, 0];
chart.Series[0].Values = chart.ChartData[1, 1, categories.Length, 1];
chart.Series[1].Values = chart.ChartData[1, 2, categories.Length, 2];
chart.Series[2].Values = chart.ChartData[1, 3, categories.Length, 3];
chart.Series[0].ShowInnerPoints = false;
chart.Series[0].ShowOutlierPoints = true;
chart.Series[0].ShowMeanMarkers = true;
chart.Series[0].ShowMeanLine = true;
chart.Series[0].QuartileCalculationType = QuartileCalculation.ExclusiveMedian;
chart.Series[1].ShowInnerPoints = false;
chart.Series[1].ShowOutlierPoints = true;
chart.Series[1].ShowMeanMarkers = true;
chart.Series[1].ShowMeanLine = true;
chart.Series[1].QuartileCalculationType = QuartileCalculation.InclusiveMedian;
chart.Series[2].ShowInnerPoints = false;
chart.Series[2].ShowOutlierPoints = true;
chart.Series[2].ShowMeanMarkers = true;
chart.Series[2].ShowMeanLine = true;
chart.Series[2].QuartileCalculationType = QuartileCalculation.ExclusiveMedian;
chart.HasLegend = true;
chart.ChartTitle.TextProperties.Text = "BoxAndWhisker";
chart.ChartLegend.Position = ChartLegendPositionType.Top;
ppt.SaveToFile(outputFile, FileFormat.Pptx2013);
ppt.Dispose();
|
| New feature | SPIREPPT-1163 | Supports creating "Funnel" chart.
Presentation ppt = new Presentation();
IChart chart = ppt.Slides[0].Shapes.AppendChart(ChartType.Funnel, new RectangleF(50, 50, 550, 400), false);
chart.ChartData[0, 1].Text = "Series 1";
string[] categories = { "Website Visits	", "Download", "Uploads", "Requested price", "Invoice sent", "Finalized" };
for (int i = 0; i < categories.Length; i++)
{
    chart.ChartData[i + 1, 0].Text = categories[i];
}
double[] values = { 50000, 47000, 30000, 15000, 9000, 5600 };
for (int i = 0; i < values.Length; i++)
{
    chart.ChartData[i + 1, 1].NumberValue = values[i];
}
chart.Series.SeriesLabel = chart.ChartData[0, 1, 0, 1];
chart.Categories.CategoryLabels = chart.ChartData[1, 0, categories.Length, 0];
chart.Series[0].Values = chart.ChartData[1, 1, values.Length, 1];
chart.ChartTitle.TextProperties.Text = "Funnel";
ppt.SaveToFile(outputFile, FileFormat.PPT);
ppt.Dispose();
|
| New feature | SPIREPPT-1163 | Supports creating "Histogram" chart.
Presentation ppt = new Presentation();
IChart chart = ppt.Slides[0].Shapes.AppendChart(ChartType.Histogram, new RectangleF(50, 50, 500, 400), false);
chart.ChartData[0, 0].Text = "Series 1";
double[] values = { 1, 1, 1, 3, 3, 3, 3, 5, 5, 5, 8, 8, 8, 9, 9, 9, 12, 12, 13, 13, 17, 17, 17, 19, 19, 19, 25, 25, 25, 25, 25, 25, 25, 25, 29, 29, 29, 29, 32, 32, 33, 33, 35, 35, 41, 41, 44, 45, 49, 49 };
for (int i = 0; i < values.Length; i++)
{
    chart.ChartData[i + 1, 1].NumberValue = values[i];
}
chart.Series.SeriesLabel = chart.ChartData[0, 0, 0, 0];
chart.Series[0].Values = chart.ChartData[1, 0, values.Length, 0];
chart.PrimaryCategoryAxis.NumberOfBins = 7;
chart.PrimaryCategoryAxis.GapWidth = 20;
chart.ChartTitle.TextProperties.Text = "Histogram";
chart.ChartLegend.Position = ChartLegendPositionType.Bottom;
ppt.SaveToFile(outputFile, FileFormat.PPT);
|
| New feature | SPIREPPT-1163 | Supports creating "Pareto" chart.
Presentation ppt = new Presentation();
IChart chart = ppt.Slides[0].Shapes.AppendChart(ChartType.Pareto, new RectangleF(50, 50, 500, 400), false);
chart.ChartData[0, 1].Text = "Series 1";
string[] categories = { "Category 1", "Category 2", "Category 4", "Category 3", "Category 4", "Category 2", "Category 1",
    "Category 1", "Category 3", "Category 2", "Category 4", "Category 2", "Category 3",
    "Category 1", "Category 3", "Category 2", "Category 4", "Category 1", "Category 1",
    "Category 3", "Category 2", "Category 4", "Category 1", "Category 1", "Category 3",
    "Category 2", "Category 4", "Category 1"};
for (int i = 0; i < categories.Length; i++)
{
    chart.ChartData[i + 1, 0].Text = categories[i];
}
double[] values = { 1, 1, 1, 1, 1, 1, 1, 1, 1, 1, 1, 1, 1, 1, 1, 1, 1, 1, 1, 1, 1, 1, 1, 1, 1, 1, 1, 1 };
for (int i = 0; i < values.Length; i++)
{
    chart.ChartData[i + 1, 1].NumberValue = values[i];
}
chart.Series.SeriesLabel = chart.ChartData[0, 1, 0, 1];
chart.Categories.CategoryLabels = chart.ChartData[1, 0, categories.Length, 0];
chart.Series[0].Values = chart.ChartData[1, 1, values.Length, 1];
chart.PrimaryCategoryAxis.IsBinningByCategory = true;
chart.Series[1].Line.FillFormat.FillType = FillFormatType.Solid;
chart.Series[1].Line.FillFormat.SolidFillColor.Color = Color.Red;
chart.ChartTitle.TextProperties.Text = "Pareto";
chart.HasLegend = true;
chart.ChartLegend.Position = ChartLegendPositionType.Bottom;
ppt.SaveToFile(outputFile, FileFormat.PPT);
ppt.Dispose();
|
| New feature | SPIREPPT-1163 | Supports creating "SunBurst" chart.
Presentation ppt = new Presentation();
IChart chart = ppt.Slides[0].Shapes.AppendChart(ChartType.SunBurst, new RectangleF(50, 50, 500, 400), false);
chart.ChartData[0, 3].Text = "Series 1";
string[,] categories = {{"Branch 1","Stem 1","Leaf 1"},{"Branch 1","Stem 1","Leaf 2"},{"Branch 1","Stem 1", "Leaf 3"},
      {"Branch 1","Stem 2","Leaf 4"},{"Branch 1","Stem 2","Leaf 5"},{"Branch 1","Leaf 6",null},{"Branch 1","Leaf 7", null},
      {"Branch 2","Stem 3","Leaf 8"},{"Branch 2","Leaf 9",null},{"Branch 2","Stem 4","Leaf 10"},{"Branch 2","Stem 4","Leaf 11"},
      {"Branch 2","Stem 5","Leaf 12"},{"Branch 3","Stem 5","Leaf 13"},{"Branch 3","Stem 6","Leaf 14"},{"Branch 3","Leaf 15",null}};
for (int i = 0; i < 15; i++)
{
     for (int j = 0; j < 3; j++)
         chart.ChartData[i + 1, j].Value = categories[i, j];
}
double[] values = { 17, 23, 48, 22, 76, 54, 77, 26, 44, 63, 10, 15, 48, 15, 51 };
for (int i = 0; i < values.Length; i++)
{
     chart.ChartData[i + 1, 3].NumberValue = values[i];
}
chart.Series.SeriesLabel = chart.ChartData[0, 3, 0, 3];
chart.Categories.CategoryLabels = chart.ChartData[1, 0, values.Length, 2];
chart.Series[0].Values = chart.ChartData[1, 3, values.Length, 3];
chart.Series[0].DataLabels.CategoryNameVisible = true;
chart.ChartTitle.TextProperties.Text = "SunBurst";
chart.HasLegend = true;
chart.ChartLegend.Position = ChartLegendPositionType.Top;
ppt.SaveToFile(outputFile, FileFormat.PPT);
ppt.Dispose();
|
| New feature | SPIREPPT-1163 | Supports creating "TreeMap" chart.
Presentation ppt = new Presentation();
IChart chart = ppt.Slides[0].Shapes.AppendChart(ChartType.TreeMap, new RectangleF(50, 50, 500, 400), false);
chart.ChartData[0, 3].Text = "Series 1";
string[,] categories = {{"Branch 1","Stem 1","Leaf 1"},{"Branch 1","Stem 1","Leaf 2"},{"Branch 1","Stem 1", "Leaf 3"},
     {"Branch 1","Stem 2","Leaf 4"},{"Branch 1","Stem 2","Leaf 5"},{"Branch 1","Stem 2","Leaf 6"},{"Branch 1","Stem 2","Leaf 7"},
     {"Branch 2","Stem 3","Leaf 8"},{"Branch 2","Stem 3","Leaf 9"},{"Branch 2","Stem 4","Leaf 10"},{"Branch 2","Stem 4","Leaf 11"},
     {"Branch 2","Stem 5","Leaf 12"},{"Branch 3","Stem 5","Leaf 13"},{"Branch 3","Stem 6","Leaf 14"},{"Branch 3","Stem 6","Leaf 15"}};
for (int i = 0; i < 15; i++)
{
    for (int j = 0; j < 3; j++)
        chart.ChartData[i + 1, j].Text = categories[i, j];
}
double[] values = { 17, 23, 48, 22, 76, 54, 77, 26, 44, 63, 10, 15, 48, 15, 51 };
for (int i = 0; i < values.Length; i++)
{
    chart.ChartData[i + 1, 3].NumberValue = values[i];
}
chart.Series.SeriesLabel = chart.ChartData[0, 3, 0, 3];
chart.Categories.CategoryLabels = chart.ChartData[1, 0, values.Length, 2];
chart.Series[0].Values = chart.ChartData[1, 3, values.Length, 3];
chart.Series[0].DataLabels.CategoryNameVisible = true;
chart.Series[0].TreeMapLabelOption = TreeMapLabelOption.Banner;
chart.ChartTitle.TextProperties.Text = "TreeMap";
chart.HasLegend = true;
chart.ChartLegend.Position = ChartLegendPositionType.Top;
ppt.SaveToFile(outputFile, FileFormat.PPT);
|
| New feature | SPIREPPT-1163 | Supports creating "WaterFall" chart.
Presentation ppt = new Presentation();
IChart chart = ppt.Slides[0].Shapes.AppendChart(ChartType.WaterFall, new RectangleF(50, 50, 500, 400), false);
chart.ChartData[0, 1].Text = "Series 1";
string[] categories = { "Category 1", "Category 2", "Category 3", "Category 4", "Category 5", "Category 6", "Category 7" };
for (int i = 0; i < categories.Length; i++)
{
    chart.ChartData[i + 1, 0].Text = categories[i];
}
double[] values = { 100, 20, 50, -40, 130, -60, 70 };
for (int i = 0; i < values.Length; i++)
{
    chart.ChartData[i + 1, 1].NumberValue = values[i];
}
chart.Series.SeriesLabel = chart.ChartData[0, 1, 0, 1];
chart.Categories.CategoryLabels = chart.ChartData[1, 0, categories.Length, 0];
chart.Series[0].Values = chart.ChartData[1, 1, values.Length, 1];
ChartDataPoint chartDataPoint = new ChartDataPoint(chart.Series[0]);
chartDataPoint.Index = 2;
chartDataPoint.SetAsTotal = true;
chart.Series[0].DataPoints.Add(chartDataPoint);
ChartDataPoint chartDataPoint2 = new ChartDataPoint(chart.Series[0]);
chartDataPoint2.Index = 5;
chartDataPoint2.SetAsTotal = true;
chart.Series[0].DataPoints.Add(chartDataPoint2);
chart.Series[0].ShowConnectorLines = true;
chart.Series[0].DataLabels.LabelValueVisible = true;
chart.ChartLegend.Position = ChartLegendPositionType.Right;
chart.ChartTitle.TextProperties.Text = "WaterFall";
ppt.SaveToFile(outputFile, FileFormat.PPT);
ppt.Dispose();
|
| Bug | SPIREPPT-643 | Fixes the issue that the bullets were lost after converting PowerPoint to PDF. |
| Bug | SPIREPPT-1765 SPIREPPT-1802 SPIREPPT-1814 |
Fixes the issue that the content was incorrect after saving shape to image. |
| Bug | SPIREPPT-1773 | Fixes the issue that the obtained text font of the table cell was incorrect. |
| Bug | SPIREPPT-1782 | Optimized the cost time of converting PowerPoint file to image. |
| Bug | SPIREPPT-1784 | Fixes the issue that the application threw "System.NullReferenceException" when loading PowerPoint file. |
| Bug | SPIREPPT-1795 | Fixes the issue that the obtained text font was incorrect. |
| Bug | SPIREPPT-1815 | Fixes the issue that the obtained duration of Animation was incorrect. |
| Bug | SPIREPPT-1816 | Fixes the issue that the application threw "System.NullReferenceException" when saving shape to image. |
| Bug | SPIREPPT-1817 | Fixes the issue that the memory had not been released when using IsPasswordProtected. |
| Bug | SPIREPPT-1819 | Fixes the issue that the application threw "OutOfMemoryException" when loading PowerPoint file. |
| Bug | SPIREPPT-1824 | Fixes the issue that the application threw "System.NullReferenceException" when saving chart to image. |
| Bug | SPIREPPT-1829 | Fixes the issue that the license validation was affected when setting "false" for "generatePublisherEvidence". |
Spire.XLS
| Category | ID | Description |
| New feature | SPIREXLS-1845 | Supports setting Html string for cell range.
Workbook workbook = new Workbook(); workbook.LoadFromFile(@"input.xlsx"); Worksheet sheet = workbook.Worksheets[0]; sheet.Range["A1"].HtmlString = "<div>xxxx<br>yyyy</div>"; |
| New feature | SPIREXLS-3586 | Supports adding conditional formatting for the existing PivotTable.
Workbook workbook = new Workbook(); workbook.LoadFromFile(@"input.xlsx"); Worksheet worksheet = workbook.Worksheets[0]; PivotTable table = worksheet.PivotTables[0] as PivotTable; PivotConditionalFormatCollection pcfs = table.PivotConditionalFormats; PivotConditionalFormat pc = pcfs.AddPivotConditionalFormat(); IConditionalFormat cf = pc.AddCondition(); cf.FormatType = ConditionalFormatType.ContainsBlanks; cf.FillPattern = ExcelPatternType.Solid; cf.BackColor = Color.Red; |
| New feature | SPIREXLS-3598 | Supports adding file stream to IsPasswordProtected().
bool havepwd = Workbook.IsPasswordProtected(File.OpenRead(inputFile)); var docBytes = File.ReadAllBytes(inputFile); MemoryStream ms = new MemoryStream(docBytes); bool havepwd = Workbook.IsPasswordProtected(ms); |
| New feature | SPIREXLS-3614 | Supports getting the linked cell name of IPrstGeomShape.
Workbook book = new Workbook();
book.LoadFromFile("input.xlsx");
Worksheet sheet = book.Worksheets["sheet1"];
PrstGeomShapeCollection prstGeomShapeCollection = sheet.PrstGeomShapes;
IPrstGeomShape shape = prstGeomShapeCollection["a"];
shape.LinkedCell.RangeAddressLocal;
|
| New feature | SPIREXLS-3630 | Supports calculating a single sheet or a cell range.
Workbook workbook = new Workbook();
workbook.LoadFromFile("input.xlsx");
workbook.Worksheets[0].CalculateAllValue();
workbook.Worksheets[0].Range["A1:C3"].CalculateAllValue();
|
| Bug | SPIREXLS-3199 SPIREXLS-3217 SPIREXLS-3573 |
Fixes the issue that the content was incorrect after saving chart to image. |
| Bug | SPIREXLS-3330 | Fixes the issue that the content format was incorrect when converting html file to excel. |
| Bug | SPIREXLS-3489 SPIREXLS-3601 SPIREXLS-3619 SPIREXLS-3643 |
Fixes the issue that the content was incorrect after converting excel file to PDF. |
| Bug | SPIREXLS-3546 | Fixes the issue that the result file has opening error after copying a pivot table sheet to another sheet |
| Bug | SPIREXLS-3551 | Fixes the issue that the boder lost after converting excel file to ODF. |
| Bug | SPIREXLS-3552 | Optimizes the time consumption when saving chart to image. |
| Bug | SPIREXLS-3558 | Fixes the issue that the content was incorrect after saving sheet to Html. |
| Bug | SPIREXLS-3559 | Fixes the issue that the application threw "System.FormatException" when converting Excel file to PDF. |
| Bug | SPIREXLS-3572 | Fixes the issue that the result file was blank after converting Html to Excel. |
| Bug | SPIREXLS-3577 | Fixes the issue that the table column width setting didn't take effect when converting Excel to PDF. |
| Bug | SPIREXLS-3588 | Fixes the issue that the row height changed after merged the cells that have been set a row height. |
| Bug | SPIREXLS-3589 | Fixes the issue that the content was incorrect after converting Excel to Html. |
| Bug | SPIREXLS-3597 | Fixes the issue that the application threw an Exception when converting Excel file to PDF in multi-threading. |
| Bug | SPIREXLS-3603 | Fixes the issue that the content format was incorrect after converting Excel to Html. |
| Bug | SPIREXLS-3606 | Fixes the issue that the application hung a long time when adding two subtotal for worksheet. |
| Bug | SPIREXLS-3610 | Fixes the issue that the application threw "System.ArgumentOutOfRangeException" when adding SparklineGroup. |
| Bug | SPIREXLS-3613 | Fixes the issue that only the last signature remained after doing multiple signatures. |
| Bug | SPIREXLS-3615 | Fixes the issue that the application threw "IOException" when using IsPasswordProtected(). |
| Bug | SPIREXLS-3616 | Fixes the issue that the obtained value of IPrstGeomShape was incorrect. |
Spire.Doc
| Category | ID | Description |
| Bug | SPIREDOC-6775 | Fixes the issue that the position of the formula was deformed after combine Word files. |
| Bug | SPIREDOC-7117 | Fixes the issue that the position of the formula in the generated file was incorrect after insert the formula to Word file through HTML string |
| Bug | SPIREDOC-7130 | Fixes the issue that the table has extra borders in the generated file after converting the HTML to Word |
| Bug | SPIREDOC-7180 | Fixes the issue that the format of the content in the generated file was incorrect after converting the Word file to PDF |
| Bug | SPIREDOC-7233 | Fixes the issue that the generated file did not effective after accepting the changes of the Word file. |
| Bug | SPIREDOC-7235 | Fixes the issue that the program threw exception "System.NullReferenceException" when setting the BuiltinStyle property of the Word file. |
| Bug | SPIREDOC-7247 | Fixes the issue that the program threw exception "System.NullReferenceException" when using the AppendHTML method |
Spire.Doc 10.1 enhances the conversion from Word to PDF and HTML to Word
We are pleased to announce the release of Spire.Doc 10.1. This version enhances the conversion from Word to PDF and HTML to Word. In addition, it fixes some known issues such as the position of the formula was deformed after combine Word files. More details are listed below.
Here is a list of changes made in this release
| Category | ID | Description |
| Bug | SPIREDOC-6775 | Fixes the issue that the position of the formula was deformed after combine Word files. |
| Bug | SPIREDOC-7117 | Fixes the issue that the position of the formula in the generated file was incorrect after insert the formula to Word file through HTML string |
| Bug | SPIREDOC-7130 | Fixes the issue that the table has extra borders in the generated file after converting the HTML to Word |
| Bug | SPIREDOC-7180 | Fixes the issue that the format of the content in the generated file was incorrect after converting the Word file to PDF |
| Bug | SPIREDOC-7233 | Fixes the issue that the generated file did not effective after accepting the changes of the Word file. |
| Bug | SPIREDOC-7235 | Fixes the issue that the program threw exception "System.NullReferenceException" when setting the BuiltinStyle property of the Word file. |
| Bug | SPIREDOC-7247 | Fixes the issue that the program threw exception "System.NullReferenceException" when using the AppendHTML method |
C#/VB.NET: Create a PowerPoint Document
PowerPoint is a presentation document that is typically used for product introductions, performance reports, teaching, and other purposes. Since the design of PowerPoint is a visual behavior and needs constant fine-tuning, it is not recommended to create PowerPoint from scratch programmatically. But if you do have the requirement to create PowerPoint documents in C# or VB.NET, you can try this solution provided by Spire.Presentation for .NET.
Install Spire.Presentation for .NET
To begin with, you need to add the DLL files included in the Spire.Presentation for.NET package as references in your .NET project. The DLL files can be either downloaded from this link or installed via NuGet.
PM> Install-Package Spire.Presentation
Create a Simple PowerPoint Document
Spire.Presentation for .NET offers the Presentation class and the ISlide interface to represent a PowerPoint document and a slide respectively. It is quite straightforward and simple for developers to use the properties and methods under them to create or manipulate PowerPoint files. The following are the steps to generate a simple PowerPoint document using it.
- Create a Presentation object, and set the slide size type to screen 16x9 through the Presentation.SlideSize.Type property.
- Get the first slide through the Presentation.Slides[] property.
- Set the background image of the slide using ISlide.SlideBackground property.
- Add a rectangle to the slide using ISlide.Shapes.AppendShape() method, positioning the shape at the center of the slide using IAutoShape.SetShapeAlignment() method.
- Set the fill color, line style, font color, and text of the shape through other properties under the IAutoShape object.
- Save the presentation to a .pptx file using Presentation.SaveToFile() method.
- C#
- VB.NET
using System.Drawing;
using Spire.Presentation;
using Spire.Presentation.Drawing;
namespace CreatePowerPoint
{
class Program
{
static void Main(string[] args)
{
//Create a Presentation object
Presentation presentation = new Presentation();
//Set the slide size type to screen 16x9
presentation.SlideSize.Type = SlideSizeType.Screen16x9;
//Get the first slide
ISlide slide = presentation.Slides[0];
//Set the background image
string imgPath = @"C:\Users\Administrator\Desktop\bgImage.jpg";
IImageData imageData = presentation.Images.Append(Image.FromFile(imgPath));
slide.SlideBackground.Type = Spire.Presentation.Drawing.BackgroundType.Custom;
slide.SlideBackground.Fill.FillType = Spire.Presentation.Drawing.FillFormatType.Picture;
slide.SlideBackground.Fill.PictureFill.FillType = PictureFillType.Stretch;
slide.SlideBackground.Fill.PictureFill.Picture.EmbedImage = imageData;
//Insert a rectangle shape
Rectangle rect = new Rectangle(100, 100, 500, 80);
IAutoShape shape = slide.Shapes.AppendShape(ShapeType.Rectangle, rect);
//Position the shape at the center of the slide
shape.SetShapeAlignment(ShapeAlignment.AlignCenter);
shape.SetShapeAlignment(ShapeAlignment.DistributeVertically);
//Set the fill color, line style and font color of the shape
shape.Fill.FillType = FillFormatType.Solid;
shape.Fill.SolidColor.Color = Color.BlueViolet;
shape.ShapeStyle.LineStyleIndex = 0;//no line
shape.ShapeStyle.FontColor.Color = Color.White;
//Set the text of the shape
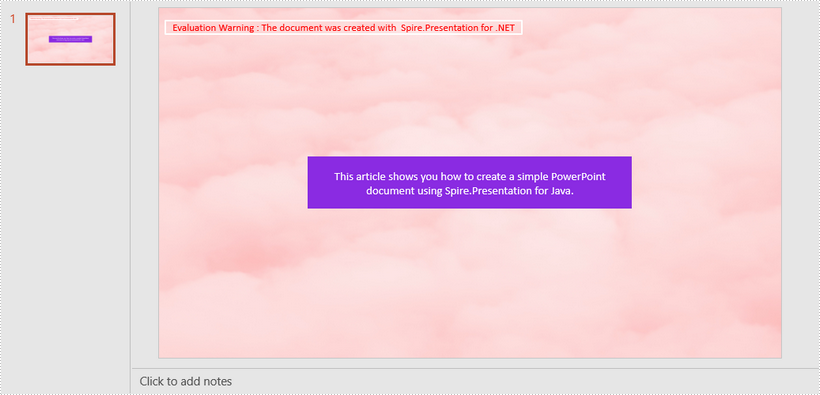
shape.TextFrame.Text = "This article shows you how to create a simple PowerPoint document using Spire.Presentation for Java.";
//Save to file
presentation.SaveToFile("CreatePowerPoint.pptx", FileFormat.Pptx2013);
}
}
}
Apply for a Temporary License
If you'd like to remove the evaluation message from the generated documents, or to get rid of the function limitations, please request a 30-day trial license for yourself.
Spire.XLS 12.1 supports setting Html string for cell range
We are happy to announce the release of Spire.XLS 12.1. This version supports setting Html string for cell range, adding conditional formatting for the existing PivotTable and file stream to IsPasswordProtected(), also supports getting the linked cell name of IprstGeomShape, as well as supports calculating a single sheet or a cell range. Besides, it enhances the conversion from Excel to PDF, Excel to HTML, Excel to ODF and HTML to Excel. In addition, it fixes some known issues such as the content was incorrect after saving chart to image. More details are listed below.
Here is a list of changes made in this release
| Category | ID | Description |
| New feature | SPIREXLS-1845 | Supports setting Html string for cell range.
Workbook workbook = new Workbook(); workbook.LoadFromFile(@"input.xlsx"); Worksheet sheet = workbook.Worksheets[0]; sheet.Range["A1"].HtmlString = "<div>xxxx<br>yyyy</div>"; |
| New feature | SPIREXLS-3586 | Supports adding conditional formatting for the existing PivotTable.
Workbook workbook = new Workbook(); workbook.LoadFromFile(@"input.xlsx"); Worksheet worksheet = workbook.Worksheets[0]; PivotTable table = worksheet.PivotTables[0] as PivotTable; PivotConditionalFormatCollection pcfs = table.PivotConditionalFormats; PivotConditionalFormat pc = pcfs.AddPivotConditionalFormat(); IConditionalFormat cf = pc.AddCondition(); cf.FormatType = ConditionalFormatType.ContainsBlanks; cf.FillPattern = ExcelPatternType.Solid; cf.BackColor = Color.Red; |
| New feature | SPIREXLS-3598 | Supports adding file stream to IsPasswordProtected().
bool havepwd = Workbook.IsPasswordProtected(File.OpenRead(inputFile)); var docBytes = File.ReadAllBytes(inputFile); MemoryStream ms = new MemoryStream(docBytes); bool havepwd = Workbook.IsPasswordProtected(ms); |
| New feature | SPIREXLS-3614 | Supports getting the linked cell name of IPrstGeomShape.
Workbook book = new Workbook();
book.LoadFromFile("input.xlsx");
Worksheet sheet = book.Worksheets["sheet1"];
PrstGeomShapeCollection prstGeomShapeCollection = sheet.PrstGeomShapes;
IPrstGeomShape shape = prstGeomShapeCollection["a"];
shape.LinkedCell.RangeAddressLocal;
|
| New feature | SPIREXLS-3630 | Supports calculating a single sheet or a cell range.
Workbook workbook = new Workbook();
workbook.LoadFromFile("input.xlsx");
workbook.Worksheets[0].CalculateAllValue();
workbook.Worksheets[0].Range["A1:C3"].CalculateAllValue();
|
| Bug | SPIREXLS-3199 SPIREXLS-3217 SPIREXLS-3573 |
Fixes the issue that the content was incorrect after saving chart to image. |
| Bug | SPIREXLS-3330 | Fixes the issue that the content format was incorrect when converting html file to excel. |
| Bug | SPIREXLS-3489 SPIREXLS-3601 SPIREXLS-3619 SPIREXLS-3643 |
Fixes the issue that the content was incorrect after converting excel file to PDF. |
| Bug | SPIREXLS-3546 | Fixes the issue that the result file has opening error after copying a pivot table sheet to another sheet |
| Bug | SPIREXLS-3551 | Fixes the issue that the boder lost after converting excel file to ODF. |
| Bug | SPIREXLS-3552 | Optimizes the time consumption when saving chart to image. |
| Bug | SPIREXLS-3558 | Fixes the issue that the content was incorrect after saving sheet to Html. |
| Bug | SPIREXLS-3559 | Fixes the issue that the application threw "System.FormatException" when converting Excel file to PDF. |
| Bug | SPIREXLS-3572 | Fixes the issue that the result file was blank after converting Html to Excel. |
| Bug | SPIREXLS-3577 | Fixes the issue that the table column width setting didn't take effect when converting Excel to PDF. |
| Bug | SPIREXLS-3588 | Fixes the issue that the row height changed after merged the cells that have been set a row height. |
| Bug | SPIREXLS-3589 | Fixes the issue that the content was incorrect after converting Excel to Html. |
| Bug | SPIREXLS-3597 | Fixes the issue that the application threw an Exception when converting Excel file to PDF in multi-threading. |
| Bug | SPIREXLS-3603 | Fixes the issue that the content format was incorrect after converting Excel to Html. |
| Bug | SPIREXLS-3606 | Fixes the issue that the application hung a long time when adding two subtotal for worksheet. |
| Bug | SPIREXLS-3610 | Fixes the issue that the application threw "System.ArgumentOutOfRangeException" when adding SparklineGroup. |
| Bug | SPIREXLS-3613 | Fixes the issue that only the last signature remained after doing multiple signatures. |
| Bug | SPIREXLS-3615 | Fixes the issue that the application threw "IOException" when using IsPasswordProtected(). |
| Bug | SPIREXLS-3616 | Fixes the issue that the obtained value of IPrstGeomShape was incorrect. |
Spire.Office for Java 5.1.5 is released
We are excited to announce the release of Spire.Office for Java 5.1.5. This version brings some new features, for instance, Spire.Doc for Java supports setting "Allow Latin text to wrap in the middle of a word" for paragraphs; Spire.Presentation for Java supports converting PowerPoint file to OFD as well as supports getting the image path of the PowerPoint file; Spire.PDF for Java supports getting PDF PieceInfo dictionary information as well as supports printing by a specified printer. In addition, Spire.XLS for Java enhances the conversion from Excel to PDF/HTML/images, as well as HTML to Excel. Meanwhile, a lot of bugs have been successfully fixed. More details are listed as follow.
Here is a list of changes made in this release
Spire.Doc for Java
| Category | ID | Description |
| New feature | SPIREDOC-5499 | Supports setting "Allow Latin text to wrap in the middle of a word" for paragraphs.
Paragraph pa = document.getSections().get(0).getParagraphs().get(0); pa.getFormat().setWordWrap(false); pa.getFormat().getWordWrap(); |
| Bug | SPIREDOC-6592 | Fixes the issue that the objects name were inconsistent while openning the saved Word document via WPS. |
| Bug | SPIREDOC-6932 | Fixes the issue that the content format was incorrect when converting Word file to PDF. |
| Bug | SPIREDOC-6958 | Fixes the issue that the application threw "OutOfMemoryError" when converting Word file to PDF. |
| Bug | SPIREDOC-6961 SPIREDOC-7022 |
Fixes the issue that the text obtained were incorrect. |
| Bug | SPIREDOC-6967 | Fixes the issue that the content was overlapped after converting Word file to PDF. |
| Bug | SPIREDOC-6985 | Fixes the issue that the content was incorrect after converting xml file to PDF. |
| Bug | SPIREDOC-6988 SPIREDOC-7072 |
Fixes the issue that the application hung a long time but no output file when converting Word file to PDF. |
| Bug | SPIREDOC-7048 | Fixes the issue that the application threw "ArrayIndexOutOfBoundException" when converting a Word document that was inserted table data to PDF. |
| Bug | SPIREDOC-7052 | Fixes the issue that the table column width setting didn't take effect after converting a Word document to PDF. |
| Bug | SPIREDOC-7073 | Fixes the issue that the application threw ""IllegalArgumentException"" when loading the Word document that after doing compare. |
| Bug | SPIREDOC-7075 | Fixes the issue that the picture position was wrong after converting a Word document to PDF. |
| Bug | SPIREDOC-7127 | Fixes the issue that the application threw "ClassCastException" when converting the Word document which was embedded OpenType fonts to PDF. |
| Bug | SPIREDOC-7128 | Fixes the issue that the text position was incorrect after accept changes. |
| Bug | SPIREDOC-7145 | Fixes the issue that the application threw "Item has already been added" error when loading a Word document. |
| Bug | SPIREDOC-7150 | Fixes the issue that the application threw "NullPointerException" when loading a Word document. |
| Bug | SPIREDOC-6464 SPIREDOC-7067 |
Fixes the issue that the application threw "IndexOutOfBoundsException" when updating the table of content of the Word document. |
| Bug | SPIREDOC-6921 SPIREDOC-7107 |
Fixes the issue that the generated file has extra blank pages after converting the Word file to PDF. |
| Bug | SPIREDOC-6954 | Fixes the issue that the generated file cannot be opened after converting the Word file to PDF. |
| Bug | SPIREDOC-6980 | Fixes the issue that the generated file has duplicate images after converting the Word file to PDF. |
| Bug | SPIREDOC-7026 | Fixes the issue that the font of the generated file was changed after converting the Word file to HTML. |
| Bug | SPIREDOC-7041 | Fixes the issue that the location of the table in the generated file has changed after converting the Word file to PDF. |
| Bug | SPIREDOC-7045 | Fixes the issue that the value of the list in the generated file was incorrect after converting the Word file to HTML. |
| Bug | SPIREDOC-7047 | Fixes the issue that the application was out of memory when updating the table of content of the Word document. |
| Bug | SPIREDOC-7064 | Fixes the issue that the application threw "NullPointerException" when comparing the Word files. |
| Bug | SPIREDOC-7099 | Fixes the issue that the menclose label displayed incorrectly in the generated file after adding ML math code to the Word file. |
| Bug | SPIREDOC-7101 | Fixes the issue that the application took long time when updating the table of content of the Word document. |
| Bug | SPIREDOC-7106 SPIREDOC-7156 SPIREDOC-7159 |
Fixes the issue that the location of the content in the generated file was incorrect after converting the Word file to PDF. |
| Bug | SPIREDOC-7110 | Fixes the issue that the frame of the image in the generated file was disappeared after converting the Word file to PDF. |
| Bug | SPIREDOC-7119 | Fixes the issue that the generated file has an extra content after accepting the track changes of the Word file. |
| Bug | SPIREDOC-7125 | Fixes the issue that the tap size of the table in the generated file was changed after combining the Word files. |
| Bug | SPIREDOC-7137 | Fixes the issue that the content of the generated file is different with the original file after converting the Word file to Images. |
| Bug | SPIREDOC-7149 | Fixes the issue that the application threw "NullPointerException" when converting the Word file to HTML. |
| Bug | SPIREDOC-7151 | Fixes the issue that the application threw "Item has already been added" when loading the Word file. |
| Bug | SPIREDOC-7160 | Fixes the issue that the content of the page number of the footer in the generated file was incorrect after converting the Word file to PDF. |
| Bug | SPIREDOC-7171 | Optimizes the speed of converting the Word file to PDF. |
| Bug | SPIREDOC-7176 | Fixes the issue that the value of the list in the generated file was incorrect after converting a Doc format Word file to Docx format. |
| Bug | SPIREDOC-7178 | Fixes the issue that the result was incorrect after splitting the table cell of the Word file. |
| Bug | SPIREDOC-7184 | Fixes the issue that the effect of the generated file was different with the MS Word generated after updating the table of content of the Word file. |
| Bug | SPIREDOC-7206 | Fixes the issue that the content of the math formula was incorrect when recognizing formulas in Word. |
Spire.Presentation for Java
| Category | ID | Description |
| New feature | SPIREPPT-1778 | Supports getting the image path of the PowerPoint file.
ImageCollection images = ppt.getImages();
for (int i = 0; i < images.size(); i++)
{
    IImageData imageData = images.get(i);
    String path = imageData.getRelativePath();
}
|
| New feature | SPIREPPT-1780 | Supports converting PPT file to OFD.
Presentation ppt = new Presentation(); ppt.loadFromFile(inputFile); //Save the PowerPoint to OFD file format ppt.saveToFile(outputFile, FileFormat.OFD); ppt.dispose(); |
| Bug | SPIREPPT-1777 | Fixes the issue that the application threw "ArrayIndexOutOfBoundException" when getting Chart data. |
| Bug | SPIREPPT-1781 | Fixes the issue that the content was lost after saving a slide to image. |
| Bug | SPIREPPT-1461 | Fixes the issue that the application threw "Error reading WMF metafile" when saving shape to image. |
| Bug | SPIREPPT-1818 | Fixes the issue that the application threw "ArrayIndexOutOfBoundsException" when loading a PowerPoint file which was set water mark. |
| Bug | SPIREPPT-1831 | Fixes the issue that the application threw "ArrayIndexOutOfBoundsException" when loading a PowerPoint file. |
| Bug | SPIREPPT-1798 | Fixes the issue that the application threw "NullPointerException" when loading a PowerPoint document. |
Spire.PDF for Java
| Category | ID | Description |
| New feature | SPIREPDF-4782 | Supports printing by a specified printer.
//Specify the printer name to print
PrintSettings setting = pdf.getPrintSettings(); setting.setPrinter("Adobe PDF");
//Getsystem default printer
PrinterJob loPrinterJob = PrinterJob.getPrinterJob();
PrintService printer = loPrinterJob.getPrintService();
String PrinterName = printer.getName();
//set to use the current printer
loPrinterJob.setPrintService(printer);
|
| New feature | SPIREPDF-4829 | Supports getting PDF PieceInfo dictionary information.
    PdfDocument pdf = new PdfDocument();
    pdf.loadFromFile(inputFile);
    StringBuilder sb = new StringBuilder();
    PdfPieceInfo info = pdf.getDocumentPieceInfo();
    ArrayList<Object> values = new ArrayList<Object>();
    HashMap<String, PdfApplicationData> dic = info.getApplicationDatas();
    for (Map.Entry<String, PdfApplicationData> item : dic.entrySet())
    {
        PdfApplicationData data = item.getValue();
        values.add(data.getPrivate());
        String content = data.getPrivate().toString();
    }
    PdfPageBase page = pdf.getPages().get(0);
    PdfPieceInfo infor2 = page.getPagePieceInfo();
    HashMap<String, PdfApplicationData> dic2 = infor2.getApplicationDatas();
    for (Map.Entry<String, PdfApplicationData> item2 : dic2.entrySet())
    {
        PdfApplicationData data2 = item2.getValue();
        if (data2.getPrivate() instanceof String) {
        String content = data2.getPrivate().toString();
    }
}
|
| Bug | SPIREPDF-4546 | Optimized the the bold font was blurred after printing PDF. |
| Bug | SPIREPDF-4788 | Fixes the issue that the application threw "ArrayIndexOutOfBoundsException" when loading PDF document. |
| Bug | SPIREPDF-4798 SPIREPDF-4799 SPIREPDF-4800 SPIREPDF-4812 |
Fixes the issue that the content format was incorrect when converting PDF to Word document. |
| Bug | SPIREPDF-4816 | Fixes the issue that the picture of PDF file was not displayed correctly after compressing. |
| Bug | SPIREPDF-4817 | Fixes the issue that the saved stream was incorrect when converting PDF to SVG. |
| Bug | SPIREPDF-4841 | Fixes the issue that it needed an open password when using WPS to open the PDF that only set a permission password. |
| Bug | SPIREPDF-4842 | Fixes the issue that it was unable to get the PDF used fonts. |
Spire.XLS for Java
| Category | ID | Description |
| Bug | SPIREXLS-3540 | Fixes the issue that the application threw an exception when loading excel file. |
| Bug | SPIREXLS-3561 | Fixes the issue that the page number position was incorrect after converting excel file to PDF. |
| Bug | SPIREXLS-3574 | Fixes the issue that some chart data lost after converting excel file to PDF. |
| Bug | SPIREXLS-3587 | Fixes the issue that the application threw "NullPointerException" when converting Html to excel. |
| Bug | SPIREXLS-3600 | Fixes the issue that the OLE object obtained was incorrect. |
| Bug | SPIREXLS-3603 | Fixes the issue that the content format was incorrect after converting excel file to Html. |
| Bug | SPIREXLS-3607 | Fixes the issue that the content was incorrect after converting excel file to image. |
| Bug | SPIREXLS-3608 | Fixes the issue that the application threw error ("utf-8 http-equiv=Content-Type is not a supported encoding") when loading a Html file. |
| Bug | SPIREXLS-3609 | Fixes the issue that the application threw "NullPointerException" when getting excel cell formula value. |
Spire.Presentation for Java 5.1.7 fixes the issue that the application threw "Error reading WMF metafile" when saving shape to image
We are glad to announce the release of Spire.Presentation for Java 5.1.7. This version fixes some issues such as the application threw "Error reading WMF metafile" when saving shape to image. More details are listed below.
Here is a list of changes made in this release
| Category | ID | Description |
| Bug | SPIREPPT-1461 | Fixes the issue that the application threw "Error reading WMF metafile" when saving shape to image. |
| Bug | SPIREPPT-1818 | Fixes the issue that the application threw "ArrayIndexOutOfBoundsException" when loading a PowerPoint file which was set water mark. |
| Bug | SPIREPPT-1831 | Fixes the issue that the application threw "ArrayIndexOutOfBoundsException" when loading a PowerPoint file. |
Spire.Barcode 6.1 fixes the issue that the license validation was affected when setting "false" for "generatePublisherEvidence"
We are glad to announce the release of Spire.Barcode 6.1. This version fixes the issue that the license validation was affected when setting "false" for "generatePublisherEvidence". More details are listed below.
Here is a list of changes made in this release
| Category | ID | Description |
| Bug | SPIREBARCODE-210 | Fixes the issue that the license validation was affected when setting "false" for "generatePublisherEvidence". |
Spire.Presentation 7.1 supports creating new charts
We are glad to announce the release of Spire.Presentation 7.1. This version supports creating "BoxAndWhisker" chart, "Funnel" chart. "Histogram" chart, "Pareto" chart, "SunBurst" chart, "TreeMap" chart, "WaterFall" chart. It also enhances the conversion from PowerPoint to PDF. In addition, it fixes some known issues such as the content was incorrect after saving shape to image. More details are listed below.
Here is a list of changes made in this release
| Category | ID | Description |
| New feature | SPIREPPT-1163 | Supports creating "BoxAndWhisker" chart.
Presentation ppt = new Presentation();
IChart chart = ppt.Slides[0].Shapes.AppendChart(ChartType.BoxAndWhisker, new RectangleF(50, 50, 500, 400), false);
string[] seriesLabel = { "Series 1", "Series 2", "Series 3" };
for (int i = 0; i < seriesLabel.Length; i++)
{
    chart.ChartData[0, i + 1].Text = "Series 1";
}
string[] categories = {"Category 1", "Category 1", "Category 1", "Category 1", "Category 1", "Category 1", "Category 1",
                "Category 2", "Category 2", "Category 2", "Category 2", "Category 2", "Category 2",
                "Category 3", "Category 3", "Category 3", "Category 3", "Category 3"};
for (int i = 0; i < categories.Length; i++)
{
    chart.ChartData[i + 1, 0].Text = categories[i];
}
double[,] values = new double[18, 3]{{-7,-3,-24},{-10,1,11},{-28,-6,34},{47,2,-21},{35,17,22},{-22,15,19},{17,-11,25},
                            {-30,18,25},{49,22,56},{37,22,15},{-55,25,31},{14,18,22},{18,-22,36},{-45,25,-17},
                            {-33,18,22},{18,2,-23},{-33,-22,10},{10,19,22}};
for (int i = 0; i < seriesLabel.Length; i++)
{
    for (int j = 0; j < categories.Length; j++)
    {
        chart.ChartData[j + 1, i + 1].NumberValue = values[j, i];
    }
}
chart.Series.SeriesLabel = chart.ChartData[0, 1, 0, seriesLabel.Length];
chart.Categories.CategoryLabels = chart.ChartData[1, 0, categories.Length, 0];
chart.Series[0].Values = chart.ChartData[1, 1, categories.Length, 1];
chart.Series[1].Values = chart.ChartData[1, 2, categories.Length, 2];
chart.Series[2].Values = chart.ChartData[1, 3, categories.Length, 3];
chart.Series[0].ShowInnerPoints = false;
chart.Series[0].ShowOutlierPoints = true;
chart.Series[0].ShowMeanMarkers = true;
chart.Series[0].ShowMeanLine = true;
chart.Series[0].QuartileCalculationType = QuartileCalculation.ExclusiveMedian;
chart.Series[1].ShowInnerPoints = false;
chart.Series[1].ShowOutlierPoints = true;
chart.Series[1].ShowMeanMarkers = true;
chart.Series[1].ShowMeanLine = true;
chart.Series[1].QuartileCalculationType = QuartileCalculation.InclusiveMedian;
chart.Series[2].ShowInnerPoints = false;
chart.Series[2].ShowOutlierPoints = true;
chart.Series[2].ShowMeanMarkers = true;
chart.Series[2].ShowMeanLine = true;
chart.Series[2].QuartileCalculationType = QuartileCalculation.ExclusiveMedian;
chart.HasLegend = true;
chart.ChartTitle.TextProperties.Text = "BoxAndWhisker";
chart.ChartLegend.Position = ChartLegendPositionType.Top;
ppt.SaveToFile(outputFile, FileFormat.Pptx2013);
ppt.Dispose();
|
| New feature | SPIREPPT-1163 | Supports creating "Funnel" chart.
Presentation ppt = new Presentation();
IChart chart = ppt.Slides[0].Shapes.AppendChart(ChartType.Funnel, new RectangleF(50, 50, 550, 400), false);
chart.ChartData[0, 1].Text = "Series 1";
string[] categories = { "Website Visits	", "Download", "Uploads", "Requested price", "Invoice sent", "Finalized" };
for (int i = 0; i < categories.Length; i++)
{
    chart.ChartData[i + 1, 0].Text = categories[i];
}
double[] values = { 50000, 47000, 30000, 15000, 9000, 5600 };
for (int i = 0; i < values.Length; i++)
{
    chart.ChartData[i + 1, 1].NumberValue = values[i];
}
chart.Series.SeriesLabel = chart.ChartData[0, 1, 0, 1];
chart.Categories.CategoryLabels = chart.ChartData[1, 0, categories.Length, 0];
chart.Series[0].Values = chart.ChartData[1, 1, values.Length, 1];
chart.ChartTitle.TextProperties.Text = "Funnel";
ppt.SaveToFile(outputFile, FileFormat.PPT);
ppt.Dispose();
|
| New feature | SPIREPPT-1163 | Supports creating "Histogram" chart.
Presentation ppt = new Presentation();
IChart chart = ppt.Slides[0].Shapes.AppendChart(ChartType.Histogram, new RectangleF(50, 50, 500, 400), false);
chart.ChartData[0, 0].Text = "Series 1";
double[] values = { 1, 1, 1, 3, 3, 3, 3, 5, 5, 5, 8, 8, 8, 9, 9, 9, 12, 12, 13, 13, 17, 17, 17, 19, 19, 19, 25, 25, 25, 25, 25, 25, 25, 25, 29, 29, 29, 29, 32, 32, 33, 33, 35, 35, 41, 41, 44, 45, 49, 49 };
for (int i = 0; i < values.Length; i++)
{
    chart.ChartData[i + 1, 1].NumberValue = values[i];
}
chart.Series.SeriesLabel = chart.ChartData[0, 0, 0, 0];
chart.Series[0].Values = chart.ChartData[1, 0, values.Length, 0];
chart.PrimaryCategoryAxis.NumberOfBins = 7;
chart.PrimaryCategoryAxis.GapWidth = 20;
chart.ChartTitle.TextProperties.Text = "Histogram";
chart.ChartLegend.Position = ChartLegendPositionType.Bottom;
ppt.SaveToFile(outputFile, FileFormat.PPT);
|
| New feature | SPIREPPT-1163 | Supports creating "Pareto" chart.
Presentation ppt = new Presentation();
IChart chart = ppt.Slides[0].Shapes.AppendChart(ChartType.Pareto, new RectangleF(50, 50, 500, 400), false);
chart.ChartData[0, 1].Text = "Series 1";
string[] categories = { "Category 1", "Category 2", "Category 4", "Category 3", "Category 4", "Category 2", "Category 1",
    "Category 1", "Category 3", "Category 2", "Category 4", "Category 2", "Category 3",
    "Category 1", "Category 3", "Category 2", "Category 4", "Category 1", "Category 1",
    "Category 3", "Category 2", "Category 4", "Category 1", "Category 1", "Category 3",
    "Category 2", "Category 4", "Category 1"};
for (int i = 0; i < categories.Length; i++)
{
    chart.ChartData[i + 1, 0].Text = categories[i];
}
double[] values = { 1, 1, 1, 1, 1, 1, 1, 1, 1, 1, 1, 1, 1, 1, 1, 1, 1, 1, 1, 1, 1, 1, 1, 1, 1, 1, 1, 1 };
for (int i = 0; i < values.Length; i++)
{
    chart.ChartData[i + 1, 1].NumberValue = values[i];
}
chart.Series.SeriesLabel = chart.ChartData[0, 1, 0, 1];
chart.Categories.CategoryLabels = chart.ChartData[1, 0, categories.Length, 0];
chart.Series[0].Values = chart.ChartData[1, 1, values.Length, 1];
chart.PrimaryCategoryAxis.IsBinningByCategory = true;
chart.Series[1].Line.FillFormat.FillType = FillFormatType.Solid;
chart.Series[1].Line.FillFormat.SolidFillColor.Color = Color.Red;
chart.ChartTitle.TextProperties.Text = "Pareto";
chart.HasLegend = true;
chart.ChartLegend.Position = ChartLegendPositionType.Bottom;
ppt.SaveToFile(outputFile, FileFormat.PPT);
ppt.Dispose();
|
| New feature | SPIREPPT-1163 | Supports creating "SunBurst" chart.
Presentation ppt = new Presentation();
IChart chart = ppt.Slides[0].Shapes.AppendChart(ChartType.SunBurst, new RectangleF(50, 50, 500, 400), false);
chart.ChartData[0, 3].Text = "Series 1";
string[,] categories = {{"Branch 1","Stem 1","Leaf 1"},{"Branch 1","Stem 1","Leaf 2"},{"Branch 1","Stem 1", "Leaf 3"},
      {"Branch 1","Stem 2","Leaf 4"},{"Branch 1","Stem 2","Leaf 5"},{"Branch 1","Leaf 6",null},{"Branch 1","Leaf 7", null},
      {"Branch 2","Stem 3","Leaf 8"},{"Branch 2","Leaf 9",null},{"Branch 2","Stem 4","Leaf 10"},{"Branch 2","Stem 4","Leaf 11"},
      {"Branch 2","Stem 5","Leaf 12"},{"Branch 3","Stem 5","Leaf 13"},{"Branch 3","Stem 6","Leaf 14"},{"Branch 3","Leaf 15",null}};
for (int i = 0; i < 15; i++)
{
     for (int j = 0; j < 3; j++)
         chart.ChartData[i + 1, j].Value = categories[i, j];
}
double[] values = { 17, 23, 48, 22, 76, 54, 77, 26, 44, 63, 10, 15, 48, 15, 51 };
for (int i = 0; i < values.Length; i++)
{
     chart.ChartData[i + 1, 3].NumberValue = values[i];
}
chart.Series.SeriesLabel = chart.ChartData[0, 3, 0, 3];
chart.Categories.CategoryLabels = chart.ChartData[1, 0, values.Length, 2];
chart.Series[0].Values = chart.ChartData[1, 3, values.Length, 3];
chart.Series[0].DataLabels.CategoryNameVisible = true;
chart.ChartTitle.TextProperties.Text = "SunBurst";
chart.HasLegend = true;
chart.ChartLegend.Position = ChartLegendPositionType.Top;
ppt.SaveToFile(outputFile, FileFormat.PPT);
ppt.Dispose();
|
| New feature | SPIREPPT-1163 | Supports creating "TreeMap" chart.
Presentation ppt = new Presentation();
IChart chart = ppt.Slides[0].Shapes.AppendChart(ChartType.TreeMap, new RectangleF(50, 50, 500, 400), false);
chart.ChartData[0, 3].Text = "Series 1";
string[,] categories = {{"Branch 1","Stem 1","Leaf 1"},{"Branch 1","Stem 1","Leaf 2"},{"Branch 1","Stem 1", "Leaf 3"},
     {"Branch 1","Stem 2","Leaf 4"},{"Branch 1","Stem 2","Leaf 5"},{"Branch 1","Stem 2","Leaf 6"},{"Branch 1","Stem 2","Leaf 7"},
     {"Branch 2","Stem 3","Leaf 8"},{"Branch 2","Stem 3","Leaf 9"},{"Branch 2","Stem 4","Leaf 10"},{"Branch 2","Stem 4","Leaf 11"},
     {"Branch 2","Stem 5","Leaf 12"},{"Branch 3","Stem 5","Leaf 13"},{"Branch 3","Stem 6","Leaf 14"},{"Branch 3","Stem 6","Leaf 15"}};
for (int i = 0; i < 15; i++)
{
    for (int j = 0; j < 3; j++)
        chart.ChartData[i + 1, j].Text = categories[i, j];
}
double[] values = { 17, 23, 48, 22, 76, 54, 77, 26, 44, 63, 10, 15, 48, 15, 51 };
for (int i = 0; i < values.Length; i++)
{
    chart.ChartData[i + 1, 3].NumberValue = values[i];
}
chart.Series.SeriesLabel = chart.ChartData[0, 3, 0, 3];
chart.Categories.CategoryLabels = chart.ChartData[1, 0, values.Length, 2];
chart.Series[0].Values = chart.ChartData[1, 3, values.Length, 3];
chart.Series[0].DataLabels.CategoryNameVisible = true;
chart.Series[0].TreeMapLabelOption = TreeMapLabelOption.Banner;
chart.ChartTitle.TextProperties.Text = "TreeMap";
chart.HasLegend = true;
chart.ChartLegend.Position = ChartLegendPositionType.Top;
ppt.SaveToFile(outputFile, FileFormat.PPT);
|
| New feature | SPIREPPT-1163 | Supports creating "WaterFall" chart.
Presentation ppt = new Presentation();
IChart chart = ppt.Slides[0].Shapes.AppendChart(ChartType.WaterFall, new RectangleF(50, 50, 500, 400), false);
chart.ChartData[0, 1].Text = "Series 1";
string[] categories = { "Category 1", "Category 2", "Category 3", "Category 4", "Category 5", "Category 6", "Category 7" };
for (int i = 0; i < categories.Length; i++)
{
    chart.ChartData[i + 1, 0].Text = categories[i];
}
double[] values = { 100, 20, 50, -40, 130, -60, 70 };
for (int i = 0; i < values.Length; i++)
{
    chart.ChartData[i + 1, 1].NumberValue = values[i];
}
chart.Series.SeriesLabel = chart.ChartData[0, 1, 0, 1];
chart.Categories.CategoryLabels = chart.ChartData[1, 0, categories.Length, 0];
chart.Series[0].Values = chart.ChartData[1, 1, values.Length, 1];
ChartDataPoint chartDataPoint = new ChartDataPoint(chart.Series[0]);
chartDataPoint.Index = 2;
chartDataPoint.SetAsTotal = true;
chart.Series[0].DataPoints.Add(chartDataPoint);
ChartDataPoint chartDataPoint2 = new ChartDataPoint(chart.Series[0]);
chartDataPoint2.Index = 5;
chartDataPoint2.SetAsTotal = true;
chart.Series[0].DataPoints.Add(chartDataPoint2);
chart.Series[0].ShowConnectorLines = true;
chart.Series[0].DataLabels.LabelValueVisible = true;
chart.ChartLegend.Position = ChartLegendPositionType.Right;
chart.ChartTitle.TextProperties.Text = "WaterFall";
ppt.SaveToFile(outputFile, FileFormat.PPT);
ppt.Dispose();
|
| Bug | SPIREPPT-643 | Fixes the issue that the bullets were lost after converting PowerPoint to PDF. |
| Bug | SPIREPPT-1765 SPIREPPT-1802 SPIREPPT-1814 |
Fixes the issue that the content was incorrect after saving shape to image. |
| Bug | SPIREPPT-1773 | Fixes the issue that the obtained text font of the table cell was incorrect. |
| Bug | SPIREPPT-1782 | Optimized the cost time of converting PowerPoint file to image. |
| Bug | SPIREPPT-1784 | Fixes the issue that the application threw "System.NullReferenceException" when loading PowerPoint file. |
| Bug | SPIREPPT-1795 | Fixes the issue that the obtained text font was incorrect. |
| Bug | SPIREPPT-1815 | Fixes the issue that the obtained duration of Animation was incorrect. |
| Bug | SPIREPPT-1816 | Fixes the issue that the application threw "System.NullReferenceException" when saving shape to image. |
| Bug | SPIREPPT-1817 | Fixes the issue that the memory had not been released when using IsPasswordProtected. |
| Bug | SPIREPPT-1819 | Fixes the issue that the application threw "OutOfMemoryException" when loading PowerPoint file. |
| Bug | SPIREPPT-1824 | Fixes the issue that the application threw "System.NullReferenceException" when saving chart to image. |
| Bug | SPIREPPT-1829 | Fixes the issue that the license validation was affected when setting "false" for "generatePublisherEvidence". |