
Spire.PDF for Java 5.4.0 enhances the conversion from PDF to Word and PDF to PDFA
We are happy to announce the release of Spire.PDF for Java 5.4.0. This version enhances the conversion from PDF to Word, PDF to PDFA. In addition, it fixes some known issues such as the application threw " NullPointerException" when getting PDF first page. More details are listed below.
Here is a list of changes made in this release
| Category | ID | Description |
| Bug | SPIREPDF-4966 SPIREPDF-5003 |
Fixes the issue that the Chinese characters were garbled after converting PDF to PDFA. |
| Bug | SPIREPDF-4969 | Fixes the issue that the application threw "NullPointerException" when converting PDF to word. |
| Bug | SPIREPDF-4971 | Fixes the issue that the application threw "ArrayIndexOutOfBoundsException" when converting PDF to PDFA repeatedly. |
| Bug | SPIREPDF-4973 | Fixes the issue that the application threw " Can't append a node created by another document" when converting PDF to OFD with multithreads. |
| Bug | SPIREPDF-4978 | Fixes the issue that the application threw " NullPointerException" when getting PDF first page. |
| Bug | SPIREPDF-4992 | Fixes the issue that the content format was incorrect after converting PDF to PDFA. |
| Bug | SPIREPDF-5010 | Fixes the issue that it was unable to set font for PdfCode128ABarcode bottom text. |
Spire.Doc for Java 5.4.2 enhances the conversion from Word to PDF and Word to HTML
We are pleased to announce the release of Spire.Doc for Java 5.4.2. This version enhances the conversion from Word to PDF, Word to HTML, Word to OFD, XML to Word and Word to image. In addition, it fixes some known issues such as the mailMerge was failed when setting the property access to "private". More details are listed below.
Here is a list of changes made in this release
| Category | ID | Description |
| Bug | SPIREDOC-4270 | Fixes the issue that the content was overlapped after converting word file to PDF. |
| Bug | SPIREDOC-6749 | Fixes the issue that the application threw "Specified argument was out of the range" when converting word file to PDF. |
| Bug | SPIREDOC-7198 SPIREDOC-7415 |
Fixes the issue that the content format was incorrect after converting word file to PDF. |
| Bug | SPIREDOC-7243 | The NewEngine method fixes the issue that the content position was incorrect after converting word file to PDF. |
| Bug | SPIREDOC-7259 | Fixes the issue that the table position was incorrect after converting word file to PDF. |
| Bug | SPIREDOC-7274 | Fixes the issue that the font was incorrect after converting word file to PDF. |
| Bug | SPIREDOC-7376 | Fixes the issue that the table borders were lost after converting word file to PDF. |
| Bug | SPIREDOC-7399 SPIREDOC-7487 |
Fixes the issue that the pagination was incorrect after converting word file to PDF. |
| Bug | SPIREDOC-7426 | Fixes the issue that there was extra underline after converting word file to Html. |
| Bug | SPIREDOC-7436 SPIREDOC-7516 |
Fixes the issue that the table content was incorrect after converting word file to Html. |
| Bug | SPIREDOC-7479 | Fixes the issue that the application threw "NullPointerException" when converting word file to PDF. |
| Bug | SPIREDOC-7480 | Fixes the issue that the application threw "NullPointerException" when converting word file to Html. |
| Bug | SPIREDOC-7484 | Fixes the issue that there were extra black lines after converting word file to image. |
| Bug | SPIREDOC-7486 | Fixes the issue that the application threw "The string contains invalid characters" when converting xml to word. |
| Bug | SPIREDOC-7488 | Fixes the issue that the content was lost after converting word file to PDF. |
| Bug | SPIREDOC-7492 | Fixes the issue that the image path was unable to be found when setting setImagesPath to convert word to Html in Linux system. |
| Bug | SPIREDOC-7513 | Fixes the issue that the application threw "span' is expected Line 1, position 1160331" when loading a word file. |
| Bug | SPIREDOC-7518 | Fixes the issue that the mailMerge was failed when setting the property access to "private". |
| Bug | SPIREDOC-7527 | Fixes the issue that the application threw "StackOverflowError" when comparing word files. |
| Bug | SPIREDOC-7532 | Fixes the issue that the content format was incorrect after converting word file to OFD. |
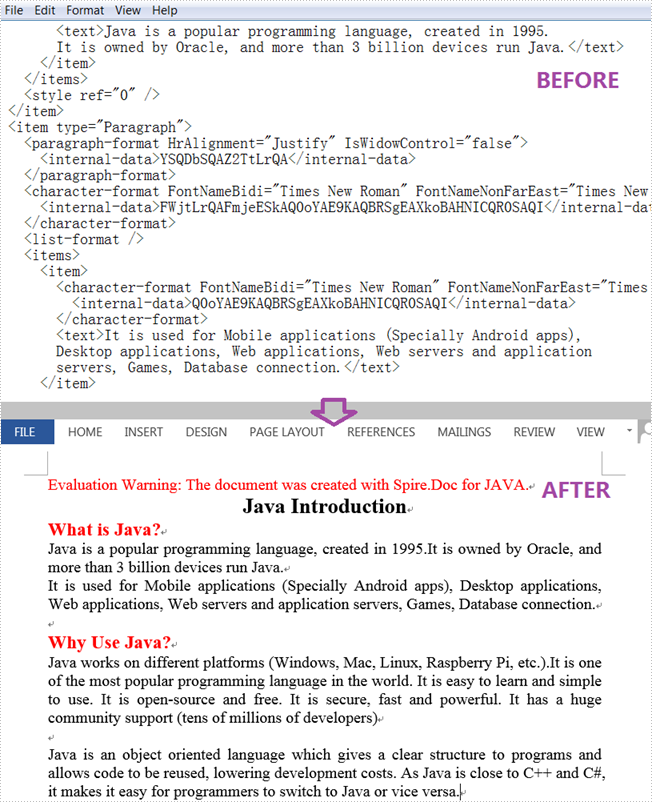
Java: Convert XML to Word
An XML file is a plain text file that uses custom tags to display a document's structure and other features. In daily work, you sometimes need to convert Word to XML for storing and organizing data, or convert XML to Word for working on them more easily and efficiently. This article will demonstrate how to programmatically convert XML to Word using Spire.Doc for Java.
Install Spire.Doc for Java
First of all, you're required to add the Spire.Doc.jar file as a dependency in your Java program. The JAR file can be downloaded from this link. If you use Maven, you can easily import the JAR file in your application by adding the following code to your project's pom.xml file.
<repositories>
    <repository>
        <id>com.e-iceblue</id>
        <name>e-iceblue</name>
        <url>https://repo.e-iceblue.com/nexus/content/groups/public/</url>
    </repository>
</repositories>
<dependencies>
    <dependency>
        <groupId>e-iceblue</groupId>
        <artifactId>spire.doc</artifactId>
        <version>13.6.2</version>
    </dependency>
</dependencies>
Convert XML to Word
The following are steps to convert XML to Word using Spire.Doc for Java.
- Create a Document instance.
- Load an XML sample document using Document.loadFromFile() method.
- Save the document as a Word file using Document.saveToFile() method.
- Java
import com.spire.doc.Document;
import com.spire.doc.FileFormat;

public class XMLToWord {
    public static void main(String[] args) {
        //Create a Document instance
        Document document = new Document();

        //Load an XML sample document
        document.loadFromFile(sample.xml");

        //Save the document to Word
        document.saveToFile("output/XMLToWord.docx", FileFormat.Docx );
    }
}
Apply for a Temporary License
If you'd like to remove the evaluation message from the generated documents, or to get rid of the function limitations, please request a 30-day trial license for yourself.
Spire.Doc for Java 5.4.0 supports converting Word documents using NewEngine
We are pleased to announce the release of Spire.Doc for Java 5.4.0. This version supports converting Word documents using NewEngine. The NewEngine method fixes a lot of issues occurred when converting Word to PDF. More details are listed below.
Here is a list of changes made in this release
| Category | ID | Description |
| New feature | - | Supports converting Word documents using NewEngine.
Document doc = new Document(); doc.loadFromFile(inputFile); doc.setUseNewEngine(true); |
| Bug | SPIREDOC-6385 SPIREDOC-7011 SPIREDOC-7380 |
The NewEngine method fixes the issue that the image position offset after converting Word file to PDF. |
| Bug | SPIREDOC-6863 SPIREDOC-6879 SPIREDOC-6918 SPIREDOC-6989 SPIREDOC-6993 SPIREDOC-7004 SPIREDOC-7043 SPIREDOC-7152 SPIREDOC-7219 SPIREDOC-7319 SPIREDOC-7368 SPIREDOC-7371 SPIREDOC-7438 SPIREDOC-7481 SPIREDOC-7483 SPIREDOC-7537 |
The NewEngine method fixes the issue that the content format was incorrect after converting Word file to PDF. |
| Bug | SPIREDOC-6956 | The NewEngine method fixes the issue that the application threw "Exception in thread "main" class com.spire.office.packages.sprpfe" when converting Word file to PDF. |
| Bug | SPIREDOC-6996 | The NewEngine method fixes the issue that the application threw "An element with the same key already exists in the dictionary" when converting Word file to PDF. |
| Bug | SPIREDOC-7028 | The NewEngine method fixes the issue that the application threw "IllegalArgumentException" when converting Word file to PDF. |
| Bug | SPIREDOC-7071 | The NewEngine method fixes the issue that the application hanged a long time when converting Word file to PDF. |
| Bug | SPIREDOC-7111 SPIREDOC-7569 |
The NewEngine method fixes the pagination was incorrect after converting Word file to PDF. |
| Bug | SPIREDOC-7246 | The NewEngine method fixes the content was lost after converting Word file to PDF. |
| Bug | SPIREDOC-7249 | The NewEngine method fixes the issue that the application threw "StackOverflowError" when converting Word file to PDF. |
| Bug | SPIREDOC-7255 SPIREDOC-7271 SPIREDOC-7418 |
The NewEngine method fixes the text wrap was incorrect after converting Word file to PDF. |
| Bug | SPIREDOC-7277 SPIREDOC-7369 SPIREDOC-7408 |
The NewEngine method optimizes the time consumption when converting Word file to PDF. |
| Bug | SPIREDOC-7308 | The NewEngine method fixes the image was overlapped after converting Word file to PDF. |
| Bug | SPIREDOC-7360 | The NewEngine method fixes the image was lost after converting Word file to PDF. |
| Bug | SPIREDOC-7519 | The NewEngine method fixes the issue that there was an extra blank pages after converting Word file to PDF. |
Spire.Presentation for Java 5.4.0 enhances the conversion from PPT to PDF
We are excited to announce the release of Spire.Presentation for Java 5.4.0. This version enhances the conversion from PPT to PDF. Meanwhile, it fixes some known issues such as the application threw "NullPointerException" when getting the numbers of chart Categories. More details are given below.
Here is a list of changes made in this release
| Category | ID | Description |
| Bug | SPIREPPT-1884 | Fixes the issue that the application threw "ExecutionException" when converting PPT to PDF in Mac system. |
| Bug | SPIREPPT-1888 | Optimizes the time consumption when converting PPT file to PDF. |
| Bug | SPIREPPT-1894 | Fixes the issue that the application threw "NullPointerException" when getting the numbers of chart Categories. |
Java: Insert Page Break into Word Documents
By inserting a page break into your Word document, you can end a page at the place you want and begin a new page at once without hitting the enter key repeatedly. In this article, we will demonstrate how to insert page breaks into a Word document in Java using Spire.Doc for Java library.
Install Spire.Doc for Java
First of all, you're required to add the Spire.Doc.jar file as a dependency in your Java program. The JAR file can be downloaded from this link. If you use Maven, you can easily import the JAR file in your application by adding the following code to your project's pom.xml file.
<repositories>
    <repository>
        <id>com.e-iceblue</id>
        <name>e-iceblue</name>
        <url>https://repo.e-iceblue.com/nexus/content/groups/public/</url>
    </repository>
</repositories>
<dependencies>
    <dependency>
        <groupId>e-iceblue</groupId>
        <artifactId>spire.doc</artifactId>
        <version>13.6.2</version>
    </dependency>
</dependencies>
Insert Page Break after a Specific Paragraph
The following are the steps to insert page break after a specific paragraph:
- Create a Document instance.
- Load a Word document using Document.loadFromFile() method.
- Get the desired section using Document.getSections().get(sectionIndex) method.
- Get the desired paragraph using Section.getParagraphs().get(paragraphIndex) method.
- Add a page break to the paragraph using Paragraph.appendBreak(BreakType.Page_Break) method.
- Save the result document using Document.saveToFile() method.
- Java
import com.spire.doc.Document;
import com.spire.doc.Section;
import com.spire.doc.documents.BreakType;
import com.spire.doc.documents.Paragraph;
import com.spire.doc.FileFormat;

public class InsertPageBreakAfterParagraph {
    public static void main(String[] args){
        //Create a Document instance
        Document document = new Document();
        //Load a Word document
        document.loadFromFile("Sample.docx");

        //Get the first section
        Section section = document.getSections().get(0);
        //Get the 2nd paragraph in the section
        Paragraph paragraph = section.getParagraphs().get(1);

        //Append a page break to the paragraph
        paragraph.appendBreak(BreakType.Page_Break);

        //Save the result document
        document.saveToFile("InsertPageBreak.docx", FileFormat.Docx_2013);
    }
}
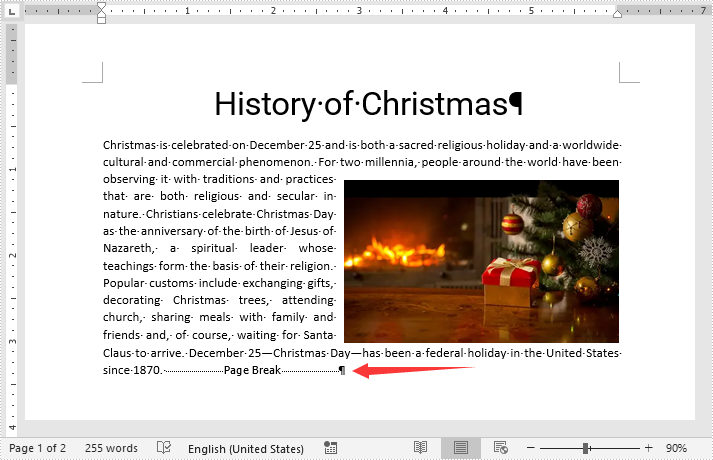
Insert Page Break after a Specific Text
The following are the steps to insert a page break after a specific text:
- Create a Document instance.
- Load a Word document using Document.loadFromFile() method.
- Find a specific text using Document.findString() method.
- Access the text range of the searched text using TextSelection.getAsOneRange() method.
- Get the paragraph where the text range is located using ParagraphBase.getOwnerParagraph() method.
- Get the position index of the text range in the paragraph using Paragraph.getChildObjects().indexOf() method.
- Initialize an instance of Break class to create a page break.
- Insert the page break after the searched text using Paragraph.getChildObjects().insert() method.
- Save the result document using Document.saveToFile() method.
- Java
import com.spire.doc.Break;
import com.spire.doc.Document;
import com.spire.doc.FileFormat;
import com.spire.doc.documents.BreakType;
import com.spire.doc.documents.Paragraph;
import com.spire.doc.documents.TextSelection;
import com.spire.doc.fields.TextRange;

public class InsertPageBreakAfterText {
    public static void main(String[] args){
        //Create a Document instance
        Document document = new Document();

        //Load a Word document
        document.loadFromFile("Sample.docx");

        //Search a specific text
        TextSelection selection = document.findString("celebration", true, true);
        //Get the text range of the seached text
        TextRange range = selection.getAsOneRange();
        //Get the paragraph where the text range is located
        Paragraph paragraph = range.getOwnerParagraph();
        //Get the position index of the text range in the paragraph
        int index = paragraph.getChildObjects().indexOf(range);

        //Create a page break
        Break pageBreak = new Break(document, BreakType.Page_Break);
        //Insert the page break after the searched text
        paragraph.getChildObjects().insert(index + 1, pageBreak);

        //Save the result document
        document.saveToFile("InsertPageBreakAfterText.docx", FileFormat.Docx_2013);
    }
}
Apply for a Temporary License
If you'd like to remove the evaluation message from the generated documents, or to get rid of the function limitations, please request a 30-day trial license for yourself.
Spire.Barcode 6.3.1 fixes the issue that the generated BarCode is incorrect when the data contains '-'
We are glad to announce the release of Spire.Barcode 6.3.1. This version fixes the issue that the generated BarCode is incorrect when the data contains '-'. More details are listed below.
Here is a list of changes made in this release
| Category | ID | Description |
| Bug | SPIREBARCODE-213 | Fixes the issue that the generated BarCode is incorrect when the data contains '-'. |
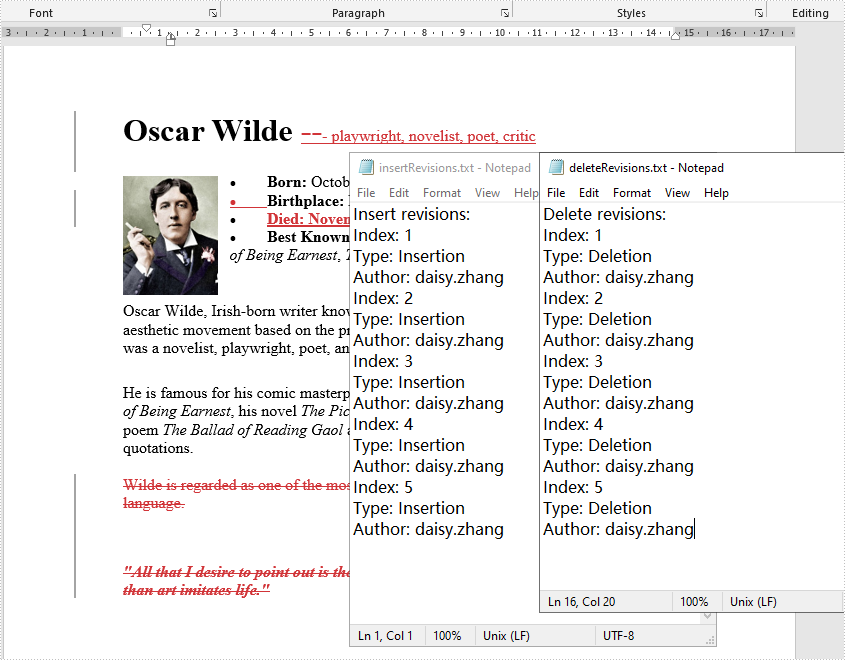
Java: Get All Revisions from Word
After you enable the Track Changes feature in a Word document, it records all the edits in the document, such as insertions, deletions, replacements, and format changes. Track Changes is a great feature allowing you to see what changes have been made to a document. This tutorial shows how to get all revisions from a Word document by using Spire.Doc for Java.
Install Spire.Doc for Java
First of all, you're required to add the Spire.Doc.jar file as a dependency in your Java program. The JAR file can be downloaded from this link. If you use Maven, you can easily import the JAR file in your application by adding the following code to your project's pom.xml file.
<repositories>
    <repository>
        <id>com.e-iceblue</id>
        <name>e-iceblue</name>
        <url>https://repo.e-iceblue.com/nexus/content/groups/public/</url>
    </repository>
</repositories>
<dependencies>
    <dependency>
        <groupId>e-iceblue</groupId>
        <artifactId>spire.doc</artifactId>
        <version>13.6.2</version>
    </dependency>
</dependencies>
Get All Revisions from Word
The detailed steps are as follows.
- Create a Document instance and load a sample Word document using Document.loadFromFile() method.
- Create a StringBuilder object and then using StringBuilder.append() method to log data.
- Traverse all the sections and every element under body in the section.
- Determine if the paragraph is an insertion revision or not using Paragraph.isInsertRevision() method. If yes, use Paragraph.getInsertRevision() method to get the insertion revision. Then get the revision type and author using EditRevision.getType() method and EditRevision.getAuthor() method.
- Determine if the paragraph is a delete revision or not using Paragraph.inDeleteRevision() method. If yes, use Paragraph.getDeleteRevision() method to get the delete revision. Then get the revision type and author using EditRevision.getType() method and EditRevision.getAuthor() method.
- Traverse all the elements in the paragraphs to get the text ranges' revisions.
- Write the content of StringBuilder to a txt document using FileWriter.write() method.
- Java
import com.spire.doc.*;
import com.spire.doc.documents.*;
import com.spire.doc.fields.*;
import com.spire.doc.formatting.revisions.*;

import java.io.FileWriter;

public class getRevisions {
    public static void main(String[] args) throws Exception {

        //Load the sample Word document
        Document document = new Document();
        document.loadFromFile("test file.docx");

        //Create a StringBuilder object to get the insertions
        StringBuilder insertRevision = new StringBuilder();
        insertRevision.append("Insert revisions:"+"\n");
        int index_insertRevision = 0;

        //Create a StringBuilder object to get the deletions
        StringBuilder deleteRevision = new StringBuilder();
        deleteRevision.append("Delete revisions:"+"\n");
        int index_deleteRevision = 0;

        //Traverse all the sections
        for (Section sec : (Iterable<Section>) document.getSections())
        {
            //Iterate through the element under body in the section
            for(DocumentObject docItem : (Iterable<DocumentObject>)sec.getBody().getChildObjects())
            {
                if (docItem instanceof Paragraph)
                {
                    Paragraph para = (Paragraph)docItem;
                    //Determine if the paragraph is an insertion revision
                    if (para.isInsertRevision())
                    {
                        index_insertRevision++;
                        insertRevision.append("Index: " + index_insertRevision+"\n");
                        //Get insertion revision
                        EditRevision insRevison = para.getInsertRevision();

                        //Get insertion revision type
                        EditRevisionType insType = insRevison.getType();
                        insertRevision.append("Type: " + insType+"\n");
                        //Get insertion revision author
                        String insAuthor = insRevison.getAuthor();
                        insertRevision.append("Author: " + insAuthor + "\n");

                    }
                    //Determine if the paragraph is a delete revision
                    else if (para.isDeleteRevision())
                    {
                        index_deleteRevision++;
                        deleteRevision.append("Index: " + index_deleteRevision +"\n");
                        EditRevision delRevison = para.getDeleteRevision();
                        EditRevisionType delType = delRevison.getType();
                        deleteRevision.append("Type: " + delType+ "\n");
                        String delAuthor = delRevison.getAuthor();
                        deleteRevision.append("Author: " + delAuthor + "\n");
                    }
                    //Iterate through the element in the paragraph
                    for(DocumentObject obj : (Iterable<DocumentObject>)para.getChildObjects())
                    {
                        if (obj instanceof TextRange)
                        {
                            TextRange textRange = (TextRange)obj;
                            //Determine if the textrange is an insertion revision
                            if (textRange.isInsertRevision())
                            {
                                index_insertRevision++;
                                insertRevision.append("Index: " + index_insertRevision +"\n");
                                EditRevision insRevison = textRange.getInsertRevision();
                                                                EditRevisionType insType = insRevison.getType();
                                insertRevision.append("Type: " + insType + "\n");
                                String insAuthor = insRevison.getAuthor();
                                insertRevision.append("Author: " + insAuthor + "\n");
                            }
                            else if (textRange.isDeleteRevision())
                            {
                                index_deleteRevision++;
                                deleteRevision.append("Index: " + index_deleteRevision +"\n");
                                //Determine if the textrange is a delete revision
                                EditRevision delRevison = textRange.getDeleteRevision();
                                EditRevisionType delType = delRevison.getType();
                                deleteRevision.append("Type: " + delType+"\n");
                                String delAuthor = delRevison.getAuthor();
                                deleteRevision.append("Author: " + delAuthor+"\n");
                            }
                        }
                    }
                }
            }
        }

        //Save to a .txt file
        FileWriter writer1 = new FileWriter("insertRevisions.txt");
        writer1.write(insertRevision.toString());
        writer1.flush();
        writer1.close();

        //Save to a .txt file
        FileWriter writer2 = new FileWriter("deleteRevisions.txt");
        writer2.write(deleteRevision.toString());
        writer2.flush();
        writer2.close();
    }
}
Apply for a Temporary License
If you'd like to remove the evaluation message from the generated documents, or to get rid of the function limitations, please request a 30-day trial license for yourself.
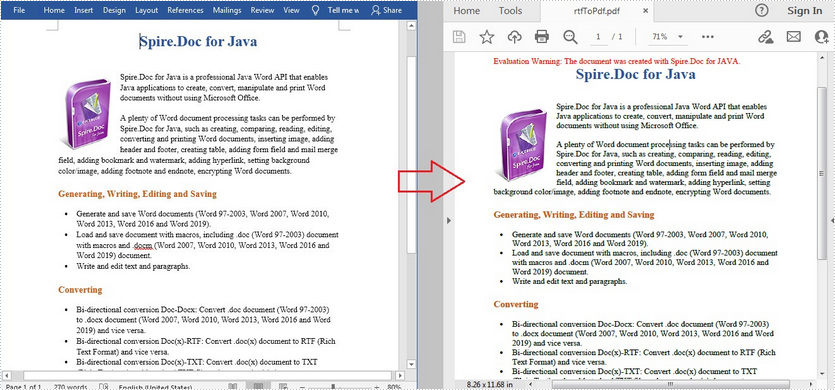
Java: Convert RTF to PDF
RTF (Rich Text Format) is a proprietary file format developed by Microsoft for cross-platform document interchange. RTF files have good compatibility and they can be opened by most word processors on any operating system such as Unix, Macintosh, and Windows. In some cases, you may need to convert RTF to other file formats to meet different requirements. In this article, you will learn how to convert RTF to PDF programmatically using Spire.Doc for Java.
Install Spire.Doc for Java
First of all, you're required to add the Spire.Doc.jar file as a dependency in your Java program. The JAR file can be downloaded from this link. If you use Maven, you can easily import the JAR file in your application by adding the following code to your project's pom.xml file.
<repositories>
    <repository>
        <id>com.e-iceblue</id>
        <name>e-iceblue</name>
        <url>https://repo.e-iceblue.com/nexus/content/groups/public/</url>
    </repository>
</repositories>
<dependencies>
    <dependency>
        <groupId>e-iceblue</groupId>
        <artifactId>spire.doc</artifactId>
        <version>13.6.2</version>
    </dependency>
</dependencies>
Convert RTF to PDF in Java
The detailed steps are as follows.
- Create a Document instance.
- Load a sample RTF document using Document.loadFromFile() method.
- Save the RTF to PDF using Document.saveToFile() method.
- Java
import com.spire.doc.*;

public class RTFToPDF {
    public static void main(String[] args) {

        //Create Document instance.
        Document document = new Document();

        //Load a sample RTF document
        document.loadFromFile("sample.rtf", FileFormat.Rtf);

        //Save the document to PDF
        document.saveToFile("rtfToPdf.pdf", FileFormat.PDF);
    }
}
Apply for a Temporary License
If you'd like to remove the evaluation message from the generated documents, or to get rid of the function limitations, please request a 30-day trial license for yourself.
Spire.Office 7.3.2 is released
We are excited to announce the release of Spire.Office 7.3.2. In this version, Spire.Email implements LinkedResource interface to add image in message; Spire.Presentation supports creating "Map" chart and modifying the number format for chart source data; Spire.PDF supports filling XFA image field; Spire.XLS supports setting content to fit page width when converting Excel to PDF. Meanwhile, a lot of bugs have been successfully fixed. More details are listed as follows.
In this version, the most recent versions of Spire.Doc, Spire.PDF, Spire.XLS, Spire.Email, Spire.DocViewer, Spire.PDFViewer, Spire.Presentation, Spire.Spreadsheet, Spire.OfficeViewer, Spire.Barcode, Spire.DataExport are included.
DLL Versions:
- Spire.Doc.dll v10.3.7
- Spire.Pdf.dll v8.3.9
- Spire.XLS.dll v12.3.8
- Spire.Email.dll v5.2.0
- Spire.DocViewer.Forms.dll v7.2.1
- Spire.PdfViewer.Forms.dll v7.2.5
- Spire.PdfViewer.Asp.dll v7.2.5
- Spire.Presentation.dll v7.3.1
- Spire.Spreadsheet.dll v6.1.3
- Spire.OfficeViewer.Forms.dll v7.3.2
- Spire.Barcode.dll v6.3.0
- Spire.DataExport.dll v4.1.10
- Spire.DataExport.ResourceMgr.dll v2.1.0
- Spire.License.dll v1.4.0
Here is a list of changes made in this release
Spire.Email
| Category | ID | Description |
| New feature | SPIREEMAIL-16 | Implement LinkedResource interface to add image in message
MailMessage mail = new MailMessage("[email protected]", "[email protected]");
// Add TO recipients
mail.To.Add("[email protected]");
// Specify ReplyTo
mail.ReplyTo.Add("[email protected]");
// Add CC recipients
mail.Cc.Add("[email protected]");
// Add BCC recipients
mail.Bcc.Add("[email protected]");
mail.Subject = "New message created by Spire.Email for .NET";
//How to Reference the resource in html
//example:<body background='cid:ice.png'>
LinkedResource resource = new LinkedResource(@"../../../../../Data/TestData/ice.png");
resource.ContentId = "ice.png";
mail.LinkedResources.Add(resource);
// Set body html
string htmlString = @"
<html>
<body background='cid:ice.png'>
<p> Hello everyone!</p>
<p> Thank you very much for inviting me to the year-end party at your headquarters on Friday, February 10th at 8pm. I would love to attend and look forward to seeing you and your colleagues at the party.</p>
<p> I wish the company's annual meeting a complete success.<br>Nina<br>January 12, 2022 </p>
</body>
</html>";
mail.BodyHtml = htmlString;
// Save message
mail.Save("CreateNewEmail.msg", MailMessageFormat.Msg);
|
Spire.Presentation
| Category | ID | Description |
| New feature | SPIREPPT-1837 | Supports creating "Map" chart.
Presentation ppt = new Presentation();
 IChart chart = ppt.Slides[0].Shapes.AppendChart(ChartType.Map, new RectangleF(50, 50, 450, 450), false);
 chart.ChartData[0, 1].Text = "series";
 string[] countries = { "China", "Russia", "France", "Mexico", "United States", "India", "Australia" };
 for (int i = 0; i < countries.Length; i++)
 {
     chart.ChartData[i + 1, 0].Text = countries[i];
 }
 int[] values = { 32, 20, 23, 17, 18, 6, 11 };
 for (int i = 0; i < values.Length; i++)
 {
     chart.ChartData[i + 1, 1].NumberValue = values[i];
 }
 chart.Series.SeriesLabel = chart.ChartData[0, 1, 0, 1];
 chart.Categories.CategoryLabels = chart.ChartData[1, 0, 7, 0];
 chart.Series[0].Values = chart.ChartData[1, 1, 7, 1];
 ppt.SaveToFile("output.pptx", Spire.Presentation.FileFormat.Pptx2013);
|
| New feature | SPIREPPT-1845 | Supports modifying the number format for chart source data.
Presentation ppt = new Presentation();
 ppt.LoadFromFile(@"input.pptx");

 ISlide slide = ppt.Slides[2];
 foreach (IShape shape in slide.Shapes)
 {
     if (shape is IChart)
     {
         IChart chart = shape as IChart;
         if (chart.Type.Equals(ChartType.BarClustered))
         {
             for (int i = 1; i < 5; i++)
             {
                 chart.ChartData[i, 1].NumberFormat = "#,##0.00";
             }
         }
     }
 }
 ppt.SaveToFile("result.pptx", Spire.Presentation.FileFormat.Pptx2013);
|
| Bug | SPIREPPT-1383 | Fixes the issue that the converted PDF file content was not correct after modifying the shape text. |
| Bug | SPIREPPT-1833 | Fixes the issue that some content was incorrect after converting PPT to PDF. |
| Bug | SPIREPPT-861 | Fixes the issue that the effect of animation effect was incorrect after adding it for a chart shape. |
| Bug | SPIREPPT-1828 | Fixes the issue that the Arabic text displayed incorrectly after converting PPTX to PDF. |
| Bug | SPIREPPT-1838 | Fixes the issue that the content was incorrect after converting PPTX to PDF. |
| Bug | SPIREPPT-1858 | Fixes the issue that the application threw "DocumentReadException" when loading a PPTX file. |
| Bug | SPIREPPT-1860 | Fixes the issue that the application threw "InvalidOperationException" when converting a slide to image in Linux system. |
| Bug | SPIREPPT-1861 | Fixes the issue that the generated PPTX file was unable to be opened after changing the chart data. |
Spire.XLS
| Category | ID | Description |
| New feature | SPIREXLS-3727 | Supported that setting content to fit page width when converting Excel to PDF.
workbook.ConverterSetting.SheetFitToWidth = true; |
| Bug | SPIREXLS-1625 | Fixed the incorrect pagination issue when converting Excel to PDF. |
| Bug | SPIREXLS-3682 | Fixed the incorrect pagination issue when printing Excel. |
| Bug | SPIREXLS-3690 | Fixed the issue that the program threw NullReferenceException when setting the active cell (sheet.SetActiveCell(cell)). |
| Bug | SPIREXLS-3705 | Fixed the issue that it was inconsistent between converted date format and system settings when converting Excel to PDF. |
| Bug | SPIREXLE-3708 | Fixed the issue that the program threw IndexOutOfRangeException when assigning a value to a cell. |
| Bug | SPIREXLS-3715 | Fixed the issue that there were extra blank lines in cell when converting Excel to PDF. |
| Bug | SPIREXLS-3605 | Fixes the issue that the lines were thicker after converting Excel to PDF. |
| Bug | SPIREXLS-3639 | Fixes the issue that the font size and borders were changed after converting Excel to PDF. |
| Bug | SPIREXLS-3644 SPIREXLS-3670 SPIREXLS-3678 |
Fixes the issue that the content was incorrect after converting Excel to PDF. |
| Bug | SPIREXLS-3648 | Fixes the issue that the application was interrupted even it catched the “NullReferenceException” |
| Bug | SPIREXLS-3649 | Fixes the issue that some text did not apply the set default font and size. |
| Bug | SPIREXLS-3652 | Fixes the issue that it failed to add DataValidation for a .xlsb file. |
| Bug | SPIREXLS-3661 | Fixes the issue that the application threw "Object reference not set to an instance of an object" when converting XLSX to PDF with multithreading. |
| Bug | SPIREXLS-3663 | Fixes the issue that the data label of Pie chart was incorrect after converting Excel to PDF. |
| Bug | SPIREXLS-3665 | Optimizes the memory consumption when setting styles for cell range. |
| Bug | SPIREXLS-3667 | Fixes the issue that the chart position was incorrect after converting Excel to Html. |
| Bug | SPIREXLS-3668 | Fixes the issue that the separator of CSV file was different when invoking the CurrentCulture setting code at different position. |
| Bug | SPIREXLS-3669 | Fixes the issue that it were not take effect to set the wrap text and auto fit rows for the columns merged cells. |
| Bug | SPIREXLS-3675 | Fixes the issue that the formula calculation was failed. |
| Bug | SPIREXLS-3679 | Fixes the issue that the application printed out the extra '0' character when converting Excel to PDF. |
| Bug | SPIREXLS-3689 SPIREXLS-3707 |
Fixes the issue that the application threw "System.FormatException" when loading an Excel file. |
Spire.Doc
| Category | ID | Description |
| Bug | SPIREDOC-7065 | Fixes the issue that the width of the table in the generated file was changed after converting HTML to Word. |
| Bug | SPIREDOC-7327 | Fixes the issue that the position of the underline in the generated file was changed after converting the Word to PDF. |
| Bug | SPIREDOC-7328 | Fixes the issue that the space between list number and content in the generated file was closer after converting the Word to PDF. |
| Bug | SPIREDOC-7352 SPIREDOC-7354 |
Fixes the issue that the position of the content in the generated file was moved after converting the Word to PDF. |
| Bug | SPIREDOC-7353 | Fixes the issue that the position of the table in the generated file was changed after converting the Word to PDF. |
| Bug | SPIREDOC-7355 | Fixes the issue that an extra blank page was generated in the generated file after converting the Word to PDF. |
| Bug | SPIREDOC-7432 | Fixes the issue that the image content displayed wrong in the generated file after insert the image to the Word file. |
| Bug | SPIREDOC-7442 | Fixes the issue that the program threw exception "System.ArgumentException" when converting the Word to Image. |
| Bug | SPIREDOC-5048 | Fixes the issue that the hyperlink of image was lost after converting Docx to Html. |
| Bug | SPIREDOC-7336 | Fixes the issue that the text content was overlapped after converting Docx to PDF. |
| Bug | SPIREDOC-7337 SPIREDOC-7349 SPIREDOC-7357 |
Fixes the issue that the content format was incorrect after converting Docx to PDF. |
| Bug | SPIREDOC-7361 | Fixes the issue that the font size of list was incorrect after converting Docx to PDF. |
Spire.PDF
| Category | ID | Description |
| New feature | SPIREPDF-415 | Supports filling XFA image field.
PdfDocument pdfDocument = new PdfDocument();
pdfDocument.LoadFromFile(inputFile);
PdfFormWidget form = pdfDocument.Form as PdfFormWidget;
if (form.XFAForm != null)
{
List<XfaField> xFields = form.XFAForm.XfaFields;
for (int i = 0; i < xFields.Count; i++)
{
if (xFields[i] is XfaImageField)
{ XfaImageField xImageField = xFields[i] as XfaImageField; FileStream fileStream = new FileStream(imageName, FileMode.Open, FileAccess.Read, FileShare.Read); xImageField.Image = Image.FromStream(fileStream); }
}
}
|
| Bug | SPIREPDF-198 | Fixes the issue that it failed to get PDF FormField. |
| Bug | SPIREPDF-898 | Fixes the issue that the merged PDF file was unable to be opened. |
| Bug | SPIREPDF-2365 | Fixes the issue that the image added on ButtonField was unable to display correctly. |
| Bug | SPIREPDF-4259 | Fixes the issue that the application threw "ArgumentException" when converting PDF to Html with multithreads. |
| Bug | SPIREPDF-4881 | Fixes the issue that the first signature was invalid when using FindText() at the same time. |
| Bug | SPIREPDF-4918 | Fixes the issue that the extracted text was incorrect. |
| Bug | SPIREPDF-4927 | Fixes the issue that the application threw "System.NullReferenceException" when printing PDF file. |
| Bug | SPIREPDF-4929 | Fixes the issue that the chinese text was lost when printing PDF file. |
| Bug | SPIREPDF-4932 | Fixes the issue that the application threw "System.FormatException" when merging PDF files. |
| Bug | SPIREPDF-4938 | Fixes the issue that the application threw "ArgumentException" when invoking "new PdfTrueTypeFont()" with multithreads. |
| Bug | SPIREPDF-4941 | Fixes the issue that the output PDF has a big size when merging the split PDF files. |
| Bug | SPIREPDF-4946 | Fixes the issue that the application threw "System.NullReferenceException”" when flattening PDF fields. |
| Bug | SPIREPDF-4947 | Fixes the issue that the application threw "System.NullReferenceException”" when converting PDF to image. |