A cell whose formatting is already right often has to be reused elsewhere: the unit price column carries a money format, a light blue fill and thin borders, while the amount column on the same row is still plain. Copying a cell format hands the look the source cell has already settled on to the target cell -- number format, font, fill, border and alignment in one go -- and leaves the data in the target cell untouched. Spire.XLS for JavaScript performs these operations in the browser through WebAssembly; the input and output files are managed by a virtual file system (VFS), with no backend service required.
This article covers two feature points:
For installation and project setup, see Integrating Spire.XLS for JavaScript in a React Project. The examples below assume Spire.XLS is installed and the WebAssembly module has been initialized.
Copy the whole cell format
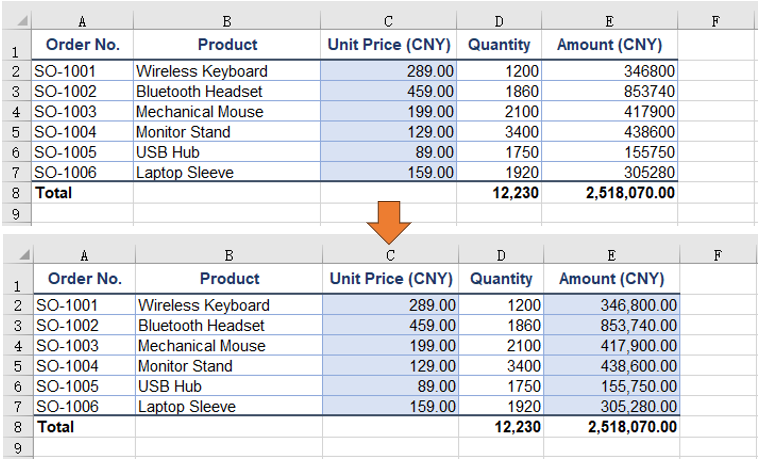
Every part of a cell's look is kept in a style object of its own. Handing the source cell's style object straight to the target cell carries the number format, font, fill, border and alignment across in one go, while the data in the target cell stays where it is. The sample workbook's unit price column already carries a money format and a light blue fill, and the amount column is still plain, so copying the former onto the latter row by row shows the difference.
Assigning the source cell's whole Style to the target cell's Style completes the copy:
| Syntax | Result |
|---|---|
sheet.Range.get('C2').Style |
Takes the whole style object of the source cell (the unit price column) |
sheet.Range.get('E2').Style = sheet.Range.get('C2').Style |
Hands that whole style to the target cell (the amount column): number format, font, fill, border and alignment follow |
sheet.Range.get({ row, column: 5 }).Text |
The value already in the target cell stays where it is, unaffected by the style assignment |
The steps are:
- Load the font file and the test data file into the VFS with
window.spire.FetchFileToVFS. - Create a workbook with
new Workbook(), load the input file withworkbook.LoadFromFile, and take the first worksheet withworkbook.Worksheets.get(0). - Take the source column's cell and the target column's cell row by row with
sheet.Range.get. - Assign the source cell's
Styleto the target cell'sStyle; the whole cell format follows, and the target cell's value is left untouched. - Save the workbook with
workbook.SaveToFileand dispose of it withworkbook.Disposeto free resources.
The full code example below shows how to copy the whole cell format in React:
function App() {
  const copyCellStyle = async () => {
    // get the Spire.XLS WASM module
    const xlsModule = window.wasmModule?.spirexls;

    // check that the module is ready
    if (!xlsModule) {
      alert('Spire.Xls is not ready yet');
      return;
    }

    // load the font and the test data file into the VFS
    await window.spire.FetchFileToVFS('ARIAL.TTF', '/Library/Fonts/', `${process.env.PUBLIC_URL}/font/`);
    const inputFileName = 'CopyCellStyle.xlsx';
    await window.spire.FetchFileToVFS(inputFileName, '', `${process.env.PUBLIC_URL}data/`);

    // load the workbook and take the first worksheet
    const workbook = new xlsModule.Workbook();
    workbook.LoadFromFile({ fileName: inputFileName });
    const sheet = workbook.Worksheets.get(0);

    // row by row, put the unit price column's format onto the amount column; the amounts stay put
    for (let row = 2; row <= 7; row++) {
      sheet.Range.get(`E${row}`).Style = sheet.Range.get(`C${row}`).Style;
    }

    // save the workbook
    const outputFileName = 'CopyCellStyle-output.xlsx';
    workbook.SaveToFile({ fileName: outputFileName, version: xlsModule.ExcelVersion.Version2016 });

    // dispose of the workbook to free resources
    workbook.Dispose();

    // read the result file from the VFS and start the download
    const fileArray = window.dotnetRuntime.Module.FS.readFile(outputFileName);
    const blob = new Blob([fileArray], { type: 'application/vnd.openxmlformats-officedocument.spreadsheetml.sheet' });
    const url = URL.createObjectURL(blob);
    const a = document.createElement('a');
    a.href = url;
    a.download = outputFileName;
    a.click();
    URL.revokeObjectURL(url);
  };

  return (
    <div style={{ textAlign: 'center', height: '300px' }}>
      <h1>Copy Cell Format</h1>
      <button id="copy-cell-style" onClick={copyCellStyle}>Copy the Whole Cell Format</button>
    </div>
  );
}

export default App;
The worksheet after copying the whole cell format:
Clone and reuse a named style
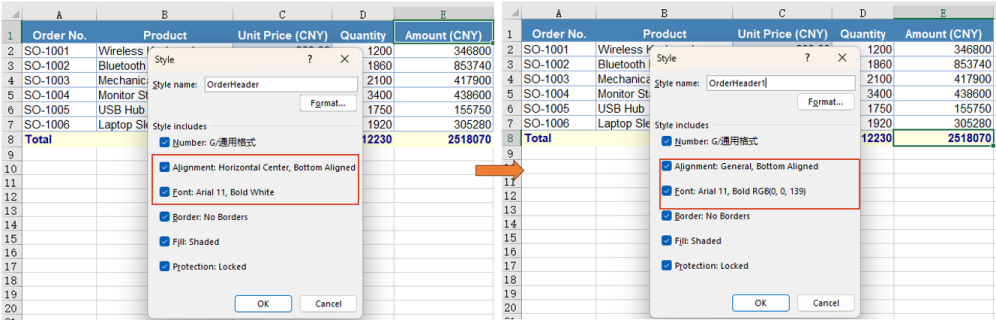
When one set of formatting is needed in several places, registering it as a named style lets it be applied to any range by name, and a colour change has to be made in one place only. A named style lives on the workbook: create it with workbook.Styles.Add, set its properties, then apply it by name through Range.CellStyleName. The example builds a style of white text on a steel blue fill for the header row, then clones it and changes only the colours for the total line -- the change lands on the clone alone, and the original style is unaffected.
A named style is registered on the workbook and applied to a range by name:
| Syntax | Result |
|---|---|
workbook.Styles.Add('OrderHeader') |
Registers a named style called OrderHeader on the workbook |
headerStyle.Font.Color, headerStyle.Color, headerStyle.FillPattern |
Sets the text colour, the fill colour and the fill pattern one by one |
headerStyle.clone() |
Copies out a style of its own, with a number appended to the name |
sheet.Range.get('A1:E1').CellStyleName = headerStyle.Name |
Applies the named style to that range by name |
The steps are:
- Load the font file and the test data file into the VFS with
window.spire.FetchFileToVFS. - Create a workbook with
new Workbook(), load the input file withworkbook.LoadFromFile, and take the first worksheet withworkbook.Worksheets.get(0). - Create a named style with
workbook.Styles.Addand set its font name, size, bold, text colour, fill colour, fill pattern and horizontal alignment. - Apply the style to the header range by name with
sheet.Range.get('A1:E1').CellStyleName. - Clone it with the style's
clone(), change only the text colour and the fill colour, and get the variant the total line needs. - Apply the variant to the total line with
sheet.Range.get('A8:E8').CellStyleName. - Save the workbook with
workbook.SaveToFileand dispose of it withworkbook.Disposeto free resources.
The full code example below shows how to clone a named style and reuse it for different ranges in React:
function App() {
  const cloneNamedStyle = async () => {
    // get the Spire.XLS WASM module
    const xlsModule = window.wasmModule?.spirexls;

    // check that the module is ready
    if (!xlsModule) {
      alert('Spire.Xls is not ready yet');
      return;
    }

    // load the font and the test data file into the VFS
    await window.spire.FetchFileToVFS('ARIAL.TTF', '/Library/Fonts/', `${process.env.PUBLIC_URL}/font/`);
    const inputFileName = 'CopyCellStyle.xlsx';
    await window.spire.FetchFileToVFS(inputFileName, '', `${process.env.PUBLIC_URL}data/`);

    // load the workbook and take the first worksheet
    const workbook = new xlsModule.Workbook();
    workbook.LoadFromFile({ fileName: inputFileName });
    const sheet = workbook.Worksheets.get(0);

    // create a named style: white text on a steel blue fill, centred
    const headerStyle = workbook.Styles.Add('OrderHeader');
    headerStyle.Font.FontName = 'Arial';
    headerStyle.Font.Size = 11;
    headerStyle.Font.IsBold = true;
    headerStyle.Font.Color = xlsModule.Color.get_White();
    headerStyle.Color = xlsModule.Color.get_SteelBlue();
    headerStyle.FillPattern = xlsModule.ExcelPatternType.Solid;
    headerStyle.HorizontalAlignment = xlsModule.HorizontalAlignType.Center;

    // apply the named style to the header row
    sheet.Range.get('A1:E1').CellStyleName = headerStyle.Name;

    // clone it and change only the colours, giving the variant the total line needs
    const totalStyle = headerStyle.clone();
    totalStyle.Font.Color = xlsModule.Color.get_DarkBlue();
    totalStyle.Color = xlsModule.Color.get_LightYellow();

    // apply the cloned style to the total line
    sheet.Range.get('A8:E8').CellStyleName = totalStyle.Name;

    // save the workbook
    const outputFileName = 'CloneNamedStyle.xlsx';
    workbook.SaveToFile({ fileName: outputFileName, version: xlsModule.ExcelVersion.Version2016 });

    // dispose of the workbook to free resources
    workbook.Dispose();

    // read the result file from the VFS and start the download
    const fileArray = window.dotnetRuntime.Module.FS.readFile(outputFileName);
    const blob = new Blob([fileArray], { type: 'application/vnd.openxmlformats-officedocument.spreadsheetml.sheet' });
    const url = URL.createObjectURL(blob);
    const a = document.createElement('a');
    a.href = url;
    a.download = outputFileName;
    a.click();
    URL.revokeObjectURL(url);
  };

  return (
    <div style={{ textAlign: 'center', height: '300px' }}>
      <h1>Clone and Reuse a Named Style</h1>
      <button id="clone-named-style" onClick={cloneNamedStyle}>Clone and Reuse a Named Style</button>
    </div>
  );
}

export default App;
The worksheet after cloning a named style and reusing it:
FAQ
Copying the number format alone, without the fill or the border
Reason: A whole-cell copy takes the fill, font and border along with the number format, which is more than a change of display calls for.
Solution: Take NumberFormat from the source cell's style and assign that single property to the target cell's style, leaving the rest untouched:
// take the number format of the total line's quantity cell as the format to apply
const sourceStyle = sheet.Range.get('D8').Style;

// put only the number format onto the quantity column; the bold and the top border stay untouched
for (let row = 2; row <= 7; row++) {
  sheet.Range.get(`D${row}`).Style.NumberFormat = sourceStyle.NumberFormat;
}
Why a whole font object cannot be assigned to the target cell
Reason: Style.Font is a read-only property; it returns the font object the cell currently carries, so it cannot be replaced wholesale -- only the members hanging off it can be changed.
Solution: Set FontName, Size, Color, IsBold and the like one at a time. To bring the fill and the border across as well, assign the whole Style; to reuse a group of settings, register them as a named style and apply that style by name.
Does re-colouring a clone change the original style as well
Cause: clone() produces a copy that stands on its own, and once saved it takes a separate entry among the workbook's named styles; the name has a number appended to keep the two apart, so OrderHeader clones to OrderHeader1. Changing the text colour and the fill colour on the copy leaves the original where it was, still carrying the colours it had before the clone.
Solution: When several colour variants are needed, clone them all from the same base style and adjust each one separately; the definition of the base style never moves.
A named style or a plain Style assignment -- which one to use
Cause: Assigning a Style copies the source cell's current look onto the target cell in one go, which suits a one-off move; Range.CellStyleName applies a named style registered on the workbook, so a format used over and over is referred to by a single name in the code.
Solution: For a one-off move of the look, assign the whole Style; for a format reused in several places, build a named style with workbook.Styles.Add and apply it by name.
Get a Free License
Spire.XLS for JavaScript offers a 30-day full-featured free trial license with no functional limitations. Apply here to evaluate before purchasing.
