A table has only a few seconds to be understood, and the work is done not only by the numbers but by the fonts: a title big enough to stand out, a figure that matters found at a glance, a cancelled line spotted immediately. In Excel every one of those differences is carried by a font object belonging to a single cell -- font name, size, colour, bold, italic, underline, strikethrough; changing a cell touches only that cell. One cell can also hold several fonts at once, and switching a single word to another colour or size lifts it out of the sentence around it. Spire.XLS for JavaScript performs these operations in the browser through WebAssembly; the output file is managed by a virtual file system (VFS), with no backend service required.
This article covers two feature points:
For installation and project setup, see Integrating Spire.XLS for JavaScript in a React Project. The examples below assume Spire.XLS is installed and the WebAssembly module has been initialized.
Set the font formatting of a cell
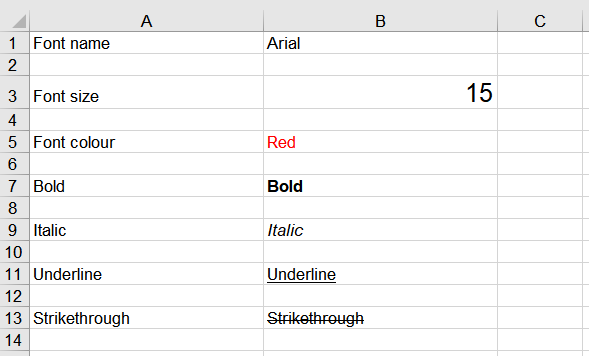
Every cell carries a font object of its own, and all seven properties -- font name, size, colour, bold, italic, underline and strikethrough -- hang off that object. To see what each one does, start a worksheet of its own, write the property's name and a sample of text row by row, and set the matching property on the cell that holds the sample: a change lands on that cell alone, and the description in column A keeps its own look. The steps are:
- Load the font file into the VFS with
window.spire.FetchFileToVFS. - Create a workbook with
new Workbook()and take the first worksheet withworkbook.Worksheets.get(0). - Write the properties out one per row with
sheet.Range.get: the name into column A and the sample text into column B, rows starting at 1 and going up by 2. - Set the matching format on each row's sample through
FontName,Size,Color,IsBold,IsItalic,UnderlineandIsStrikethroughonRange.Style.Font, taking the font colour fromxlsModule.Color.get_Red()and the underline fromxlsModule.FontUnderlineType.Single. - Set both columns to a width of 25 with
sheet.Columns.get(0).ColumnWidthandsheet.Columns.get(1).ColumnWidth. - Save the workbook with
workbook.SaveToFileand dispose of it withworkbook.Disposeto free resources.
The full code example below shows how to set font formatting for cells in React:
function App() {
  const setCellFont = async () => {
    // get the Spire.XLS WASM module
    const xlsModule = window.wasmModule?.spirexls;

    // check that the module is ready
    if (!xlsModule) {
      alert('Spire.Xls is not ready yet');
      return;
    }

    // load the font file into the VFS
    await window.spire.FetchFileToVFS('ARIAL.TTF', '/Library/Fonts/', `${process.env.PUBLIC_URL}/font/`);

    // create a new workbook and take the first worksheet
    const workbook = new xlsModule.Workbook();
    const sheet = workbook.Worksheets.get(0);

    // set the font name
    let row = 1;
    sheet.Range.get(`A${row}`).Value = 'Font name';
    sheet.Range.get(`B${row}`).Value = 'Arial';
    sheet.Range.get(`B${row}`).Style.Font.FontName = 'Arial';

    // set the font size
    row += 2;
    sheet.Range.get(`A${row}`).Value = 'Font size';
    sheet.Range.get(`B${row}`).Value = '15';
    sheet.Range.get(`B${row}`).Style.Font.Size = 15;

    // set the font colour
    row += 2;
    sheet.Range.get(`A${row}`).Value = 'Font colour';
    sheet.Range.get(`B${row}`).Value = 'Red';
    sheet.Range.get(`B${row}`).Style.Font.Color = xlsModule.Color.get_Red();

    // bold the text
    row += 2;
    sheet.Range.get(`A${row}`).Value = 'Bold';
    sheet.Range.get(`B${row}`).Value = 'Bold';
    sheet.Range.get(`B${row}`).Style.Font.IsBold = true;

    // italicise the text
    row += 2;
    sheet.Range.get(`A${row}`).Value = 'Italic';
    sheet.Range.get(`B${row}`).Value = 'Italic';
    sheet.Range.get(`B${row}`).Style.Font.IsItalic = true;

    // underline the text
    row += 2;
    sheet.Range.get(`A${row}`).Value = 'Underline';
    sheet.Range.get(`B${row}`).Value = 'Underline';
    sheet.Range.get(`B${row}`).Style.Font.Underline = xlsModule.FontUnderlineType.Single;

    // strike through the text
    row += 2;
    sheet.Range.get(`A${row}`).Value = 'Strikethrough';
    sheet.Range.get(`B${row}`).Value = 'Strikethrough';
    sheet.Range.get(`B${row}`).Style.Font.IsStrikethrough = true;

    // set the column widths
    sheet.Columns.get(0).ColumnWidth = 25;
    sheet.Columns.get(1).ColumnWidth = 25;

    // save the workbook as an Excel file
    const outputFileName = 'CellFont.xlsx';
    workbook.SaveToFile({ fileName: outputFileName, version: xlsModule.ExcelVersion.Version2016 });

    // dispose of the workbook to free resources
    workbook.Dispose();

    // read the result file from the VFS and start the download
    const fileArray = window.dotnetRuntime.Module.FS.readFile(outputFileName);
    const blob = new Blob([fileArray], { type: 'application/vnd.openxmlformats-officedocument.spreadsheetml.sheet' });
    const url = URL.createObjectURL(blob);
    const a = document.createElement('a');
    a.href = url;
    a.download = outputFileName;
    a.click();
    URL.revokeObjectURL(url);
  };

  return (
    <div style={{ textAlign: 'center', height: '300px' }}>
      <h1>Set Cell Font Formatting</h1>
      <button id="cell-font" onClick={setCellFont}>Set the font formatting of a cell</button>
    </div>
  );
}

export default App;
After running, the effect of setting font formatting for individual cells:
Mix several fonts inside one cell
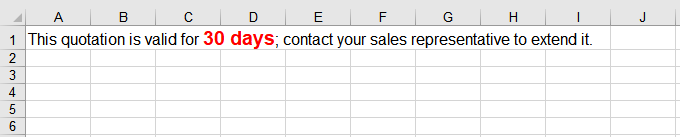
A cell's rich text object lets one run of text be cut at character positions and each piece given a different font, while the sentence still reads as a whole. The way to do it is to create the font objects first and then assign them range by range with SetFont -- each call overwrites one range, so every part of the sentence has to be covered. Ranges count from 0 and include both ends. The steps are:
- Load the font file into the VFS with
window.spire.FetchFileToVFS. - Create a workbook with
new Workbook()and take the first worksheet withworkbook.Worksheets.get(0). - Create two fonts with
workbook.CreateFont(): one for the whole sentence, and one that emphasises the key phrase throughIsBoldandKnownColor. - Take the cell that holds the sentence with
sheet.Range.get('A1'), and write the whole sentence into its rich text object throughRichText.Text. - Work out the start and end of the text that needs the new font within the sentence with
note.indexOf(key)andkey.length, then assign the fonts to the three parts -- before the key phrase, the key phrase itself and after it -- withRichText.SetFont. - Save the workbook with
workbook.SaveToFileand dispose of it withworkbook.Disposeto free resources.
The full code example below shows how to give part of the text in one cell a different font in React:
function App() {
  const setRichTextFonts = async () => {
    // get the Spire.XLS WASM module
    const xlsModule = window.wasmModule?.spirexls;

    // check that the module is ready
    if (!xlsModule) {
      alert('Spire.Xls is not ready yet');
      return;
    }

    // load the font file into the VFS
    await window.spire.FetchFileToVFS('ARIAL.TTF', '/Library/Fonts/', `${process.env.PUBLIC_URL}/font/`);

    // create a new workbook and take the first worksheet
    const workbook = new xlsModule.Workbook();
    const sheet = workbook.Worksheets.get(0);

    // create the first font, for the whole sentence
    const font1 = workbook.CreateFont();
    font1.FontName = 'Arial';
    font1.Size = 12;

    // create the second font, for the key phrase
    const font2 = workbook.CreateFont();
    font2.FontName = 'Arial';
    font2.Size = 14;
    font2.IsBold = true;
    font2.KnownColor = xlsModule.ExcelColors.Red;

    // take the cell's rich text object and write the whole sentence
    const note = 'This quotation is valid for 30 days; contact your sales representative to extend it.';
    const key = '30 days';
    const richText = sheet.Range.get('A1').RichText;
    richText.Text = note;

    // locate the character range the key phrase occupies
    const start = note.indexOf(key);
    const end = start + key.length - 1;

    // set the part before the key phrase to the first font
    richText.SetFont(0, start - 1, font1);

    // set the key phrase itself to the second font
    richText.SetFont(start, end, font2);

    // keep the part after the key phrase in the first font
    richText.SetFont(end + 1, note.length - 1, font1);

    // save the workbook as an Excel file
    const outputFileName = 'RichTextFont.xlsx';
    workbook.SaveToFile({ fileName: outputFileName, version: xlsModule.ExcelVersion.Version2016 });

    // dispose of the workbook to free resources
    workbook.Dispose();

    // read the result file from the VFS and start the download
    const fileArray = window.dotnetRuntime.Module.FS.readFile(outputFileName);
    const blob = new Blob([fileArray], { type: 'application/vnd.openxmlformats-officedocument.spreadsheetml.sheet' });
    const url = URL.createObjectURL(blob);
    const a = document.createElement('a');
    a.href = url;
    a.download = outputFileName;
    a.click();
    URL.revokeObjectURL(url);
  };

  return (
    <div style={{ textAlign: 'center', height: '300px' }}>
      <h1>Mix Several Fonts Inside One Cell</h1>
      <button id="rich-text-fonts" onClick={setRichTextFonts}>Give part of the text a different font</button>
    </div>
  );
}

export default App;
After running, the effect of mixing several fonts inside one cell:
FAQ
What value should SetFont's end position take
Reason: Both position arguments of SetFont count from 0 and include the end position itself, so passing a string's length directly lands one character past the end.
Solution: Pass "length minus one" as the end position. To cover a whole run of text, use the sentence's length minus one:
richText.SetFont(0, note.length - 1, font1);
Get a Free License
Spire.XLS for JavaScript offers a 30-day full-featured free trial license with no functional limitations. Apply here to evaluate before purchasing.
