
Spire.Doc 9.11.5 supports converting Word to PDF with a new engine
We are pleased to announce the release of Spire.Doc 9.11.5. This version adds two new method, one is "SetColumnWidth" to set table column width, and the other one is "UseNewEngine" to use new engine to convert Word to PDF. Besides, it adjusts the method of setting table cell width. More details are listed below.
Here is a list of changes made in this release
| Category | ID | Description |
| New feature | - | Adds a new method "SetColumnWidth" to set table column width.
table.SetColumnWidth(int columnIndex, float columnWidth, CellWidthType columnWidthType); |
| New feature | - | Adds a new method "UseNewEngine" to use new engine to convert Word to PDF.
Document doc = new Document();
doc.LoadFromFile("input.docx");
doc.UseNewEngine = true;
doc.SaveToFile("result.pdf", FileFormat.PDF);
|
| Adjustment | - | Adjusts the method of setting table cell width.
//Old method //tableCell.Width //Deprecated //tableCell.CellWidthType //Deprecated //New method tableCell.SetCellWidth(float width, CellWidthType widthType); |
Java: Add a Text Box to a Chart in Excel
Text box allows people to enter text in it and move it arbitrarily. When dealing with the chart in Excel document, if the text description of the original chart is not specific enough, you can add additional information to the chart by adding text boxes to it. This article will introduce how to add a text box to a chart programmatically using Spire.XLS for Java.
Install Spire.XLS for Java
First of all, you're required to add the Spire.Xls.jar file as a dependency in your Java program. The JAR file can be downloaded from this link. If you use Maven, you can easily import the JAR file in your application by adding the following code to your project's pom.xml file.
<repositories>
    <repository>
        <id>com.e-iceblue</id>
        <name>e-iceblue</name>
        <url>https://repo.e-iceblue.com/nexus/content/groups/public/</url>
    </repository>
</repositories>
<dependencies>
    <dependency>
        <groupId>e-iceblue</groupId>
        <artifactId>spire.xls</artifactId>
        <version>15.6.3</version>
    </dependency>
</dependencies>
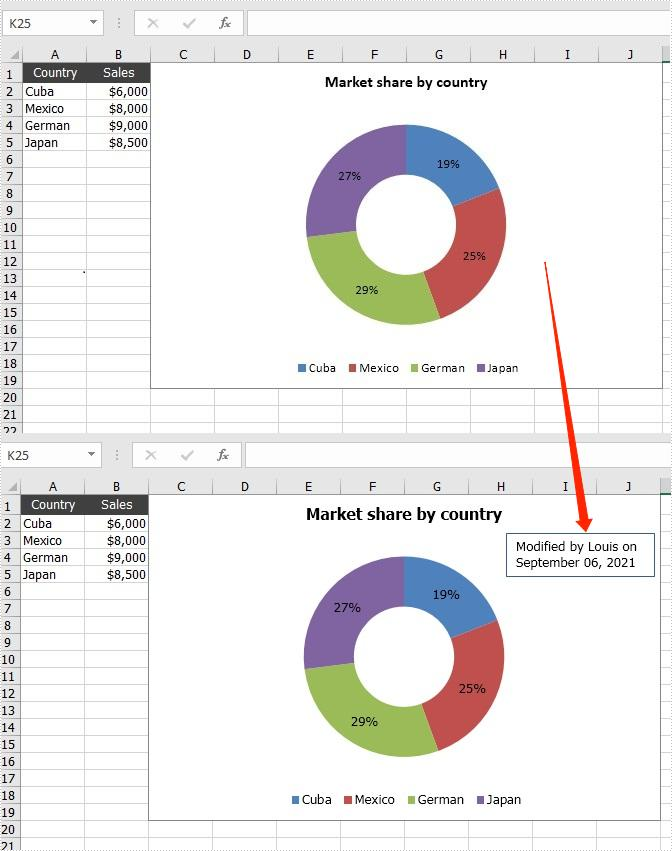
Add a Text Box to a Chart
The detailed steps are listed as below.
- Create a Workbook instance and load a sample Excel document using Workbook.loadFromFile() method.
- Get a specified worksheet using Workbook.getWorksheets().get() method.
- Get a specific chart using Worksheet.getCharts().get() method.
- Add a text box to the chart using Chart.getShapes().addTextBox() method, and then add text content in the text box using ITextBoxLinkShape.setText() method.
- Set the size and position of the added text box using the method offered by ITextBoxLinkShape interface.
- Save the document to file using Workbook.saveToFile() method.
- Java
import com.spire.xls.*;
import com.spire.xls.core.*;

public class addTextBoxToChart {
    public static void main(String[] args)throws Exception {
        //Create a Workbook instance
        Workbook workbook = new Workbook();

        //Load an Excel document
        workbook.loadFromFile("DoughnutChart.xlsx");

        //Get the first worksheet
        Worksheet sheet = workbook.getWorksheets().get(0);

        //Get the first chart
        Chart chart = sheet.getCharts().get(0);

        //Add a text box to the chart
        ITextBoxLinkShape textbox = chart.getShapes().addTextBox();
        textbox.setText("Modified by Louis on September 06, 2021");

        //Set the size and position of the text box
        textbox.setWidth(1100);
        textbox.setHeight(480);
        textbox.setLeft(2800);
        textbox.setTop(480);

        //Save the result file
        workbook.saveToFile("addTextBoxToChart.xlsx", ExcelVersion.Version2013);
    }
}
Apply for a Temporary License
If you'd like to remove the evaluation message from the generated documents, or to get rid of the function limitations, please request a 30-day trial license for yourself.
Java: Convert PDF to Images with Transparent Background
Spire.PDF for Java offers PdfDocument.saveAsImage() method to convert PDF document to image. From Version 4.11.1, Spire.PDF for Java supports to set the transparent value for the background of the resulted images during PDF to image conversion. This article will show you how to convert PDF to images with transparent background in Java applications.
Install Spire.PDF for Java
First of all, you need to add the Spire.PDF.jar file as a dependency in your Java program. The JAR file can be downloaded from this link. If you use Maven, you can easily import the JAR file by adding the following code to your project's pom.xml file.
<repositories>
    <repository>
        <id>com.e-iceblue</id>
        <name>e-iceblue</name>
        <url>https://repo.e-iceblue.com/nexus/content/groups/public/</url>
    </repository>
</repositories>
<dependencies>
    <dependency>
        <groupId>e-iceblue</groupId>
        <artifactId>spire.pdf</artifactId>
        <version>11.6.2</version>
    </dependency>
</dependencies>
Convert PDF to Images with Transparent Background
- Create an object of PdfDocument class.
- Load a sample PDF document using PdfDocument.loadFromFile() method.
- Specify the transparent value for the background of the resulted images using PdfDocument.getConvertOptions().setPdfToImageOptions() method.
- Save the document to images using PdfDocument.saveAsImage() method.
- Java
import com.spire.pdf.*;

import javax.imageio.ImageIO;
import java.awt.image.BufferedImage;
import java.io.File;


public class PdftoImage {
    public static void main(String[] args) throws Exception {

        //Create an object of PdfDocument class.
        PdfDocument pdf = new PdfDocument();

        //Load the sample PDF document
        pdf.loadFromFile("Sample.pdf");

        //Specify the background transparent value as 0 during PDF to image conversion.
        pdf.getConvertOptions().setPdfToImageOptions(0);

        //Save PDF to .png image
        BufferedImage image = pdf.saveAsImage(0);
        File file = new File( String.format("ToImage.png"));
        ImageIO.write(image, "PNG", file);
    }
}
Apply for a Temporary License
If you'd like to remove the evaluation message from the generated documents, or to get rid of the function limitations, please request a 30-day trial license for yourself.
Spire.Doc for Java 4.11.3 enhances the conversions from Word to PDF/images/HTML
We are happy to announce the release of Spire.Doc for Java 4.11.3. This version enhances the conversions from Word to PDF/images/HTML, as well as from HTML to Word. In addition, it also fixes the issue occurred in the course of comparing Word files. More details are listed as follows.
Here is a list of changes made in this release
| Category | ID | Description |
| Bug | SPIREDOC-6646 | Fixes the issue that the text overlapped after converting Word to PDF. |
| Bug | SPIREDOC-6664 | Fixes the issue that the bookmark was missing after splitting the table cells. |
| Bug | SPIREDOC-6668 | Fixes the issue that it didn't get the correct comment content. |
| Bug | SPIREDOC-6675 | Fixes the issue that content was missing after replacing text with equations. |
| Bug | SPIREDOC-6698 | Fixes the issue that it didn't get the correct paragraph text. |
| Bug | SPIREDOC-6708 | Fixes the issue that the table border was missing after comparing two Word documents. |
| Bug | SPIREDOC-6709 SPIREDOC-6716 SPIREDOC-6829 |
Fixes the issue that the content was incorrect after converting Word to PDF. |
| Bug | SPIREDOC-6717 | Fixes the issue that position of the header image was changed after converting Word to PDF. |
| Bug | SPIREDOC-6721 | Fixes the issue that the application threw the error "NullPointerException" when converting Word to PDF. |
| Bug | SPIREDOC-6779 | Fixes the issue that there was extra text after converting Word to HTML. |
| Bug | SPIREDOC-6796 | Fixes the issue that the pagination was incorrect after converting Word to PDF. |
| Bug | SPIREDOC-6799 SPIREDOC-6854 |
Fixes the issue that the date content was changed after converting Word to PDF. |
| Bug | SPIREDOC-6817 | Fixes the issue that the page number position was incorrect after converting Word to PDF. |
| Bug | SPIREDOC-6821 | Fixes the issue that the table border was missing after converting HTML to Word. |
| Bug | SPIREDOC-6822 | Fixes the issue that the application threw the error "NullPointerException" when getting the comments. |
| Bug | SPIREDOC-6848 | Fixes the issue that the application threw the error "IllegalArgumentException" when converting Word to PDF. |
| Bug | SPIREDOC-6855 | Fixes the issue that the content was garbled after converting Word to PDF. |
| Bug | SPIREDOC-6857 | Fixes the issue that it didn't accept the changes in the footer. |
| Bug | SPIREDOC-6901 | Fixes the issue that some images were missing after converting Word to PDF. |
C#/VB.NET: Distribute Table Rows and Columns in PowerPoint
When creating a new table in PowerPoint, the rows and columns are evenly distributed by default. As you insert data into the table cells, the row heights and column widths will be automatically adjusted to fit with the contents. To make the table nicely organized, you may want to re-distribute the rows and columns. This article demonstrates how to accomplish this task in C# and VB.NET using Spire.Presentation for .NET.
Install Spire.Presentation for .NET
To begin with, you need to add the DLL files included in the Spire.Presentation for.NET package as references in your .NET project. The DLL files can be either downloaded from this link or installed via NuGet.
PM> Install-Package Spire.Presentation
Distribute Table Rows and Columns
The following are the steps to distribute table rows and columns evenly in PowerPoint.
- Create a Presentation object, and load the sample PowerPoint document using Presentation.LoadFromFile() method.
- Get the first slide through Presentation.Slides[0] property.
- Loop through the shapes in the first slide, and determine if a certain shape is a table. If yes, convert the shape to an ITable object.
- Distribute the table rows and columns using ITable.DistributeRows() method and ITable.DistributeColumns() method, respectively.
- Save the changes to another file using Presentation.SaveToFile() method.
- C#
- VB.NET
using Spire.Presentation;

namespace DistributeRowsAndColumns
{
    class Program
    {
        static void Main(string[] args)
        {
            //Create a Presentation instance
            Presentation presentation = new Presentation();

            //Load the PowerPoint document
            presentation.LoadFromFile(@"C:\Users\Administrator\Desktop\Table.pptx");

            //Get the first slide
            ISlide slide = presentation.Slides[0];

            //Loop through the shapes
            for (int i = 0; i < slide.Shapes.Count; i++)
            {
                //Determine if a shape is table
                if (slide.Shapes[i] is ITable)
                {
                    //Get the table in the slide
                    ITable table = (ITable)slide.Shapes[i];

                    //Distribute table rows
                    table.DistributeRows(0, table.TableRows.Count-1);

                    //Distribute table columns
                    table.DistributeColumns(0, table.ColumnsList.Count-1);

                }
            }

            //Save the result to file
            presentation.SaveToFile("DistributeRowsAndColumns.pptx", FileFormat.Pptx2013);
        }
    }
}
Imports Spire.Presentation

Namespace DistributeRowsAndColumns
    Class Program
        Shared  Sub Main(ByVal args() As String)
            'Create a Presentation instance
            Dim presentation As Presentation =  New Presentation()

            'Load the PowerPoint document
            presentation.LoadFromFile("C:\Users\Administrator\Desktop\Table.pptx")

            'Get the first slide
            Dim slide As ISlide =  presentation.Slides(0)

            'Loop through the shapes
            Dim i As Integer
            For  i = 0 To  slide.Shapes.Count- 1  Step  i + 1
                'Determine if a shape is table
                If TypeOf slide.Shapes(i) Is ITable Then
                    'Get the table in the slide
                    Dim table As ITable = CType(slide.Shapes(i), ITable)

                    'Distribute table rows
                    table.DistributeRows(0, table.TableRows.Count-1)

                    'Distribute table columns
                    table.DistributeColumns(0, table.ColumnsList.Count-1)

                End If
            Next

            'Save the result to file
            presentation.SaveToFile("DistributeRowsAndColumns.pptx", FileFormat.Pptx2013)
        End Sub
    End Class
End Namespace
Apply for a Temporary License
If you'd like to remove the evaluation message from the generated documents, or to get rid of the function limitations, please request a 30-day trial license for yourself.
Spire.PDF 7.11.1 supports converting PDF to linearized PDF
We are glad to announce the release of Spire.PDF 7.11.1. This version supports converting PDF to linearized PDF. Meanwhile, it enhances the conversion from PDF to images and some known bugs have been successfully fixed.
Here is a list of changes made in this release
| Category | ID | Description |
| New feature | - | Supports converting PDF to linearized PDF.
PdfToLinearizedPdfConverter converter = new PdfToLinearizedPdfConverter("inputFile");
converter.ToLinearizedPdf("outputFile");
|
| Bug | SPIREPDF-2356 | Fixes the issue that the content was incorrect after converting PDF to Word. |
| Bug | SPIREPDF-4311 | Optimizes the time for converting PDF to images. |
| Bug | SPIREPDF-4587 | Fixes the issue that an error prompted when opening the result file after compressing the PDF file. |
| Bug | SPIREPDF-4609 | Fixes the issue that some digital signatures were missing after merging PDF files. |
| Bug | SPIREPDF-4622 | Fixes the issue that it didn't get the correct name of the used font. |
| Bug | SPIREPDF-4637 | Fixes the issue that the barcodes were incorrect after converting PDF to images. |
| Bug | SPIREPDF-4660 | Optimizes the memory consumption for converting PDF to PDFA. |
| Bug | SPIREPDF-4701 | Fixes the issue that the application threw the error "Header checksum illegal" when loading the PDF file. |
| Bug | SPIREPDF-4703 | Fixes the issue that the extracted content was incomplete. |
| Bug | SPIREPDF-4721 | Fixes the issue that the font size of the inserted checkbox field was incorrect. |
| Bug | SPIREPDF-4736 SPIREPDF-4727 |
Optimizes the time for adding watermarks. |
| Bug | SPIREPDF-4731 | Fixes the issue that setting line width for the PdfPolyLineAnnotation did not take effect. |
| Bug | SPIREPDF-4732 | Fixes the issue that the content extracted from PDF tables was incorrect. |
| Bug | SPIREPDF-4739 | Fixes the issue that the content extracted from the specified rectangular area was incorrect. |
| Bug | SPIREPDF-4745 | Fixes the issue that the application threw the error "Object reference not set to an instance of an object" when converting PDF to images. |
Spire.XLS for Java 4.11.0 supports to get the created time and the last saved time of Excel file
We are glad to announce the release of Spire.XLS for Java 4.11.0. This version supports to get the created time and the last saved time of Excel file. Meanwhile, it enhances the conversion from Excel to PDF and fixes some known issues.
Here is a list of changes made in this release
| Category | ID | Description |
| New feature | SPIREXLS-3488 | Supports to get the created time and the last saved time of Excel file.
BuiltInDocumentProperties properties1 = workbook.getDocumentProperties(); properties1.getCreatedTime(); properties1.getLastSaveTime(); |
| Bug | SPIREXLS-3427 | Fixes the issue that the conditional formats did not take effect when converting an Excel file to PDF |
| Bug | SPIREXLS-3444 | Fixes the issue that setting PivotTable layout mode to Outline mode did not take effect |
| Bug | SPIREXLS-3445 | Fixes the issue that setting diagonal border color did not take effect |
| Bug | SPIREXLS-3484 | Fixes the issue that the legend's name was incorrect after loading and saving an Excel file |
| Bug | SPIREXLS-3507 | Fixes the issue that the application threw "java.lang.NullPointerException" when converting an Excel file to PDF |
C#/VB.NET: Replace a Picture in Excel
Sometimes after you have finished an Excel workbook, you may need to replace some of the existing pictures with better ones for the purpose of making the workbook more appealing and persuasive. In this tutorial, you will learn how to replace a picture in Excel using Spire.XLS for .NET.
Install Spire.XLS for .NET
To begin with, you need to add the DLL files included in the Spire.XLS for .NET package as references in your .NET project. The DLLs files can be either downloaded from this link or installed via NuGet.
- Package Manager
PM> Install-Package Spire.XLS
Replace a Picture in Excel
The following are the detailed steps to replace a picture with another one using Spire.XLS for .NET.
- Create a Workbook object.
- Load a sample file using Workbook.LoadFromFile() method.
- Use Workbook.Worksheets[0] to get the first worksheet.
- Use Worksheet.Pictures[0] property to get the first picture from the first worksheet
- Use Image.FromFile() method to load an image from the specified file, and set it as a new value of ExcelPicture.Picture property. To do so, the original picture will be replaced with the new one.
- Save the document using Workbook.SaveToFile() method.
- C#
- VB.NET
using Spire.Xls;
using Spire.Xls.Collections;
using System.Drawing;

namespace ReplacePictureinExcel
{
    class Program
    {
        static void Main(string[] args)
        {
            //Create a Workbook instance
            Workbook workbook = new Workbook();
            //Load the Excel file
            workbook.LoadFromFile (“Input.xls”);

            //Get the first sheet
            Worksheet sheet = workbook.Worksheets[0];

            //Get Excel picture collection
            PicturesCollection pictureCollection = sheet.Pictures;

            //Get the first picture from the collection
            ExcelPicture excelPicture = pictureCollection[0];

            // Creates an Image from the specified file.
            excelPicture.Picture = Image.FromFile (image);

            //Save the document
            workbook.SaveToFile("ReplaceImage.xlsx", ExcelVersion.Version2013);
        }
    }
}
Imports Spire.Xls
Imports Spire.Xls.Collections
Imports System.Drawing

Namespace ReplacePictureinExcel
	Class Program
		Private Shared Sub Main(args As String())

			'Create a Workbook instance
			Dim workbook As New Workbook()
			'Load the Excel file
			workbook.LoadFromFile(Input.xls)

			'Get the first sheet
			Dim sheet As Worksheet = workbook.Worksheets(0)

			'Get Excel picture collection
			Dim pictureCollection As PicturesCollection = sheet.Pictures

			'Get the first picture from the collection
			Dim excelPicture As ExcelPicture = pictureCollection(0)

			' Creates an Image from the specified file.
			excelPicture.Picture = Image.FromFile(image)

			'Save the document
			workbook.SaveToFile("ReplaceImage.xlsx", ExcelVersion.Version2013)
		End Sub
	End Class
End Namespace
The original file:
The generated file:

Apply for a Temporary License
If you'd like to remove the evaluation message from the generated documents, or to get rid of the function limitations, please request a 30-day trial license for yourself.
Java: Verify if a PowerPoint Document is Digitally Signed
PowerPoint documents signed with digital signatures can help recipients check if they have been altered since they were signed. If any changes are made, the signatures will become invalid immediately. Therefore, before you edit a PowerPoint document, you should check if it has been digitally signed or not. In this article, you will learn how to achieve this task programmatically in Java using Spire.Presentation for Java.
Install Spire.Presentation for Java
First of all, you're required to add the Spire.Presentation.jar file as a dependency in your Java program. The JAR file can be downloaded from this link. If you use Maven, you can easily import the JAR file in your application by adding the following code to your project's pom.xml file.
<repositories>
    <repository>
        <id>com.e-iceblue</id>
        <name>e-iceblue</name>
        <url>https://repo.e-iceblue.com/nexus/content/groups/public/</url>
    </repository>
</repositories>
<dependencies>
    <dependency>
        <groupId>e-iceblue</groupId>
        <artifactId>spire.presentation</artifactId>
        <version>10.6.2</version>
    </dependency>
</dependencies>
Verify if a PowerPoint Document is Digitally Signed
Spire.Presentation for Java provides the Presentation.isDigitallySigned() method to detect if a PowerPoint document is digitally signed or not. If the method returns true, then it means the document is digitally signed.
The following are the detailed steps to implement this function:
- Create a Presentation instance.
- Load a PowerPoint document using Presentation.loadFromFile() method.
- Detect if the document is digitally signed or not using Presentation.isDigitallySigned() method.
- Java
import com.spire.presentation.Presentation;

public class VerifyIfPPTisDigitallySigned {
    public static void main(String []args) throws Exception {
        //Create a Presentation instance
        Presentation ppt = new Presentation();
        //Load a PowerPoint document
        ppt.loadFromFile("Sample.pptx");

        //Verify if the document is digitally signed or not
        if (ppt.isDigitallySigned()) {
            System.out.println("This document is digitally signed");
        } else {
            System.out.println("This document is not digitally signed");
        }
    }
}

Apply for a Temporary License
If you'd like to remove the evaluation message from the generated documents, or to get rid of the function limitations, please request a 30-day trial license for yourself.
Spire.PDF for Java 4.11.1 supports converting PDF to images with transparent background
We are pleased to announce the release of Spire.PDF for Java 4.11.1. This version supports converting PDF to images with transparent background, and enhances the conversion from PDF to Word. In addition, it fixes the issue that setting cell newlines did not work. More details are listed below.
Here is a list of changes made in this release
| Category | ID | Description |
| New feature | SPIREPDF-4734 | Supports converting PDF to images with transparent background.
PdfDocument doc = new PdfDocument();
doc.loadFromFile("input.pdf");
doc.getConvertOptions().setPdfToImageOptions(0);
BufferedImage image = doc.saveAsImage(0);
|
| Bug | SPIREPDF-3907 | Fixes the issue that the content was truncated when converting PDF to Word |
| Bug | SPIREPDF-4113 SPIREPDF-4638 SPIREPDF-4651 |
Fixes the issue that the application hanged when converting PDF to images |
| Bug | SPIREPDF-4588 SPIREPDF-4743 |
Fixes the issue that the application threw NullPointerException |
| Bug | SPIREPDF-4612 | Fixes the issue that the format was incorrect after adding text in grid cell |
| Bug | SPIREPDF-4663 | Fixes the issue that the size of the images obtained was incorrect |
| Bug | SPIREPDF-4706 | Fixes the issue that the application threw "String index out of range: 4" when converting PDF to Word |
| Bug | SPIREPDF-4713 | Fixes the issue that the application threw "Value cannot be null" when loading a PDF file |
| Bug | SPIREPDF-4714 | Fixes the issue that setting cell newlines did not work |
| Bug | SPIREPDF-4729 | Fixes the issue that the application threw "ClassCastException" when merging PDFs |
| Bug | SPIREPDF-4735 | Fixes the issue that the content was incorrect after splitting a PDF document |
| Bug | SPIREPDF-4755 | Fixes the issue that the application threw "NumberFormatException" when merging PDFs |