License Agreement
BY INSTALLING, DOWNLOADING, COPYING OR OTHERWISE USING THE PRODUCT, YOU AGREE TO BE BOUND BY THE TERMS OF THIS EULA. IF YOU DO NOT AGREE TO THE TERMS OF THIS EULA, DO NOT INSTALL, DOWNLOAD, COPY OR USE THE PRODUCT.
1. IMPORTANT NOTICE.
YOU SHOULD READ THE FOLLOWING TERMS AND CONDITIONS CAREFULLY BEFORE YOU DOWNLOAD, INSTALL OR USE E-ICEBLUE'S LIBRARY AND RELATED DOCUMENTATION (THE "LICENSED SOFTWARE") DISTRIBUTED UNDER THE TRADEMARK OF LIBRARY AND/OR E-ICEBLUE. BY INSTALLING OR USING THE LICENSED SOFTWARE, YOU AGREE TO BE BOUND BY THIS LICENSE AGREEMENT, AND ITS TERMS SHALL BE BINDING WITH RESPECT TO YOUR USE OF THE LICENSED SOFTWARE. IF YOU DO NOT AGREE TO THE FOLLOWING TERMS AND CONDITIONS, DO NOT INSTALL OR USE THE SOFTWARE.
2. DEFINITIONS.
A. "e-iceblue" means e-iceblue Corporation
B. "You" and "Your" mean the party purchasing a license to use the Licensed Software under the terms of this agreement.
C. "Application Programming Interface or API" means a publicly accessible interface defining the ways by which an application program may request services from libraries and/or software.
D. "Licensed Software" means compiled Objects, Modules, License Key and any and all updates thereto, together with all associated documentation provided by e-iceblue or its authorized resellers.
E. "License Key" means a unique code provided by e-iceblue or its authorized resellers which identifies You, as well as the license type, and which unlocks or enables certain features of the Licensed Software.
F. "Application" or "Your Application" means a software application that You develop which incorporates all or parts of the Licensed Software.
G. "Evaluation Trial Period" means a specified period of time during which You may temporarily use the Licensed Software for evaluation purposes only.
3. LICENSE GRANT.
The Cumulative License granted to You by e-iceblue is a combination of the Base License Grant, described in section (3A) below, which is common to every Licensed Software title covered by this agreement, and one or more supplemental License Grant which covers the specific product obtained by You from e-iceblue or its authorized resellers.
Four basic types of supplemental License Grants are described in sections (3B): Evaluation License, Developer License, Developer OEM License, Site Enterprise License, Site OEM License.
These five basic types are hereby further defined and/or restricted as to the number of developers, servers, geography locations and distribution method(s), depending on the specific product(s) being licensed by You.
The precise combination of the Base License Grant and one or more supplemental License Grant(s) obtained by You is identified by e-iceblue at the time of purchase or most recent upgrade.
3A. BASE LICENSE GRANT.
In consideration of Your payment of applicable license fees and/or Your acceptance of the terms of this Agreement, e-iceblue hereby grants to You certain nonexclusive and nontransferable rights limited by the terms of this Agreement.
The Licensed Software is licensed (not sold) to You, for use strictly under the terms of this Agreement, and e-iceblue reserves all rights not expressly granted to You herein. If You upgrade the Licensed Software to a higher-numbered version thereof or to a comparable E-iceblue product, this license is terminated and Your rights shall be limited to the license associated with the upgraded product or version.
In addition, You acknowledge that the Licensed Software may contain certain third party software components which are distributed under the terms of their own licenses.
3B. EVALUATION LICENSE.
In order to facilitate an efficient evaluation process of the Licensed Software by developers, e-iceblue may, at its discretion, provide specially designed, temporary License Key(s) that are encoded with an embedded expiration date.
The License granted in conjunction with such License Key(s) is considered temporary, and multiple developers may use it for the sole purpose of evaluating the Licensed Software during a specific Evaluation Trial Period. Licensed Evaluation Trial Software contains mechanisms that inhibit its ability to function at a later date.
It is Your responsibility to ensure that the Applications You create do not contain Licensed Evaluation Trial Software and that their ability to function at a later date is not inhibited or diminished.
3C. DEVELOPER LICENSE.
The following terms and conditions contained in this section (3C) apply to You ONLY if at the time of original purchase or most recent upgrade, the License granted to You by E-iceblue was defined as "Developer License".
The specific license level selected by you at the time of purchase or most recent upgrade determines whether the license applies to (1) a single named developer, or (2) a team of named developers, for example a Developer Team, or (3) a single site (facility or campus) whereby an unlimited number of developers located within said site (facility or campus) may be allowed access to the Licensed Software.
You are hereby granted a nonexclusive, royalty-free license to integrate the Licensed Software into Your Applications and to distribute such Licensed Software in connection with said Applications, provided that
(a) said Applications do not in any way compete with the Licensed Software, or provide substantially the same functionality as the Licensed Software, or expose the functionality of the Licensed Software through a programmable interface;
(b) each of Your Applications developed using Licensed Software is substantially larger, more complex, and contains a significantly wider range of functions as compared to the Licensed Software;
(c) each of Your Applications developed using Licensed Software is designed for end users, rather than for developers who would be able to build other software that would compete with the Licensed Software, and
(d) You do not permit further distribution of the Licensed Software by Your end users.
You may embed the License Keys in the Applications You distribute, provided that the following conditions are met:
(a) each such Application must be marked with a prominent copyright notice bearing Your name as declared by You during purchase of the License;
(b) the License Key may not be embedded in any such Application or distributed in any other manner that makes the License Key visible to the end user, and
(c) each such Application must include the following comment in its source code within close proximity to each copy of an embedded License Key: "This application utilizes a licensed copy of e-iceblue software, copyright (c) 2004-2026, which is the property of e-iceblue Corporation, www.e-iceblue.com. All rights are reserved by e-iceblue.
Use of any objects outside of the context of this application is a violation of United States and international copyright laws and other applicable laws."
For each License Key provided to You by e-iceblue, depending on the specific license level selected by you at the time of purchase or most recent upgrade, You are granted a nonexclusive License to make the Licensed Software and/or the License Key(s) available either to the specified number of Your named developers or to an unlimited number of Your developers located at a single site (facility or campus) as indicated by e-iceblue and further explained below.
Should either the number of named developers or the number of sites with access to the Licensed Software and/or the License Key(s) ever exceed the number indicated at the time of original purchase or most recent upgrade, You agree to inform E-iceblue of such change and to upgrade Your License accordingly by paying an upgrade fee to e-iceblue in a timely manner.
- One Developer Small Business authorizes One developer to utilize our product to create an unlimited number of applications which can be deployed at One geographic location in your organization (internal use only). It does not allow distribution of your custom applications to public-facing websites, docker or SaaS/PaaS/IaaS projects.
- One Developer OEM authorizes One developer to create an unlimited of custom applications using our product, and the applications are allowed to be distributed in any form to any number of geographic locations.
- One Site Small Business authorizes up to 10 developers to create an unlimited number of applications which can be deployed at up to 10 geographic locations. It does not allow distribution of your custom applications to public-facing websites, docker or SaaS/PaaS/IaaS projects.
- One Site OEM authorizes up to 10 developers to create an unlimited number of custom applications using our product, and the applications are allowed to be distributed in any form to any number of geographic locations.
Notes:
- A developer is defined as a software developer, a tester or other person who uses the product for programming, compiling and debugging. Each developer must have their own license.
- A geographic location is defined as a unique Mac Address/Machine ID.
4. RESTRICTIONS ON USE AND TRANSFER.
You may not sublicense, rent, lease, assign or otherwise transfer the Licensed Software or any of Your rights thereto, either in whole or in part, to anyone else, except that You may, after obtaining written permission from e-iceblue, permanently transfer the Licensed Software in its entirety, provided You retain no copies of the Licensed Software and the transferee agrees to the terms and conditions of this Agreement.
Use of the Licensed Software with a License Key obtained from a source other than e-iceblue or its authorized resellers is expressly and strictly forbidden. e-iceblue reserves the right to take any and all actions that e-iceblue, in its sole discretion, deems necessary to protect against, monitor and control the use of the Licensed Software with illegal License Keys.
You agree to ensure that anyone who uses any portion of the Licensed Software provided to You complies with the terms and conditions of this Agreement.
5. INTELLECTUAL PROPERTY RIGHTS.
You acknowledge that the Licensed Software contains copyrighted material, trade secrets, trademarks and other proprietary material of e-iceblue ("Confidential Information"), and is protected under United States and international copyright law and other applicable laws.
You may not engage in any unauthorized use or disclosure of any Confidential Information. You agree that the source code of the Licensed Software is confidential and proprietary to e-iceblue. Accordingly, You may not copy the Licensed Software, or decompile, disassemble, reverse engineer or create a derivative work based upon the Licensed Software, or authorize anyone else to do so.
You must reproduce and maintain all copyright notices that are contained in the Licensed Software on any copy thereof that You make or use.
6. TERM AND TERMINATION.
Except as otherwise provided in this Agreement, depending on the specific license level selected by you at the time of purchase or most recent upgrade, the term of the license granted herein is either perpetual, or alternatively the license is periodic, valid for a specific period of time, such as a month or a year.
The license becomes effective when You install or use the Licensed Software. You may terminate this license at any time by destroying any and all copies of the Licensed Software or by returning all such copies to e-iceblue.
This Agreement and the associated license for the Licensed Software will terminate automatically and without provision of notice by e-iceblue if You fail to comply with any of the terms or conditions of this Agreement or if You cease permanent use of the Licensed Software, for whatever reason.
Upon termination of this Agreement for any reason, You agree that You will destroy all copies of the Licensed Software or return all such copies to e-iceblue. In addition to this sentence and the previous sentence, Sections 4, 5 and 7-13 shall survive any termination of this Agreement.
7. LIMITED WARRANTY.
e-iceblue warrants that the Licensed Software will perform substantially in accordance with its accompanying documentation, when operated in the execution environment specified in such documentation, for the warranty period ending thirty (30) days following the date on which You first install or first use the Licensed Software.
This limited warranty is void if failure of the Licensed Software to conform to such warranty is caused in whole or in part by
(a) any defect in any hardware or other equipment used with the Licensed Software;
(b) any failure of any hardware or any other equipment used with the Licensed Software to function in accordance with applicable manufacturer's specifications for such items;
(c) any alteration, modification or enhancement of the Licensed Software by You or anyone other than e-iceblue;
(d) any failure by You or anyone else to follow e-iceblue's instructions with respect to proper use of the Licensed Software; or
(e) improper use, abuse, accident, neglect or negligence on the part of You or anyone other than e-iceblue.
e-iceblue will not be obligated to honor the limited warranty or provide any remedy thereunder unless the Licensed Software is returned to e-iceblue along with the original dated receipt.
Any replacement Licensed Software will be warranted for thirty (30) days following the date on which e-iceblue provides it to You.
EXCEPT AS OTHERWISE SET FORTH IN THIS AGREEMENT, THE LICENSED SOFTWARE IS PROVIDED TO YOU "AS IS", AND E-ICEBLUE MAKES NO EXPRESS OR IMPLIED WARRANTIES WHATSOEVER WITH RESPECT TO ITS FUNCTIONALITY, CONDITION, PERFORMANCE, OPERABILITY OR USE.
WITHOUT LIMITING THE FOREGOING, E-ICEBLUE DISCLAIMS ALL IMPLIED WARRANTIES INCLUDING, WITHOUT LIMITATION, ANY IMPLIED WARRANTIES OF MERCHANTABILITY, FITNESS FOR A PARTICULAR PURPOSE OR FREEDOM FROM INFRINGEMENT.
SOME JURISDICTIONS DO NOT ALLOW THE EXCLUSION OF IMPLIED WARRANTIES, SO THE ABOVE EXCLUSIONS MAY NOT APPLY TO YOU.
THIS LIMITED WARRANTY GIVES YOU SPECIFIC LEGAL RIGHTS, AND YOU MAY ALSO HAVE OTHER RIGHTS THAT VARY FROM ONE JURISDICTION TO ANOTHER.
8. LIMITATIONS OF LIABILITY.
YOUR SOLE AND EXCLUSIVE REMEDY FOR ANY BREACH OF THE FOREGOING LIMITED WARRANTY SHALL BE, AT E-ICEBLUE'S OPTION, EITHER (A) REPAIR OR REPLACEMENT OF THE LICENSED SOFTWARE SO THAT IT CONFORMS TO THE FOREGOING LIMITED WARRANTY, OR (B) REFUND OF THE FEE THAT YOU PAID TO LICENSE THE LICENSED SOFTWARE.
IN NO EVENT SHALL E-ICEBLUE BE LIABLE FOR ANY DAMAGES OF ANY TYPE, WHETHER DIRECT OR INDIRECT, CONSEQUENTIAL, INCIDENTAL OR SPECIAL DAMAGES, INCLUDING WITHOUT LIMITATION, LOST REVENUES, LOST PROFITS, LOSSES RESULTING FROM BUSINESS INTERRUPTION OR LOSS OF DATA, REGARDLESS OF THE FORM OF ACTION OR LEGAL THEORY UNDER WHICH SUCH LIABILITY MAY BE ASSERTED, EVEN IF E-ICEBLUE HAS BEEN ADVISED OF THE POSSIBILITY OR LIKELIHOOD OF SUCH DAMAGES.
E-ICEBLUE SHALL HAVE NO LIABILITY WITH RESPECT TO ANY DATA THAT IS READ, ACCESSED, STORED OR PROCESSED WITH THE LICENSED SOFTWARE, OR FOR THE COSTS OF RECOVERING ANY SUCH DATA.
IN NO EVENT SHALL E-ICEBLUE'S MAXIMUM AGGREGATE LIABILITY UNDER THIS AGREEMENT EXCEED THE TOTAL FEES PAID OR PAYABLE BY YOU TO LICENSE THE LICENSED SOFTWARE.
SOME JURISDICTIONS DO NOT ALLOW THE LIMITATION OR EXCLUSION OF LIABILITY FOR INCIDENTAL OR CONSEQUENTIAL DAMAGES, SO THE ABOVE LIMITATION OR EXCLUSION MAY NOT APPLY TO YOU.
9. INDEMNIFICATION.
You agree to defend, indemnify, and hold E-iceblue and all of its employees, agents, representatives, directors, officers, partners, shareholders, attorneys, predecessors, successors, and assigns harmless from and against any and all claims, proceedings, damages, injuries, liabilities, losses, costs, and expenses (including reasonable attorneys' fees and litigation expenses), relating to or arising from Your use of the Licensed Software, or any breach of this Agreement, except to the extent such claim relates to or arises from a violation by e-iceblue of any third party copyright, trademark, trade secret or other intellectual property right.
10. EXPORT.
You agree that You will not export or transmit the Licensed Software or any Applications, directly or indirectly, to any restricted countries or in any manner that would violate United States laws and regulations as shall from time to time govern the license and delivery of technology abroad by persons subject to the jurisdiction of the United States government, including the Export Administration Act of 1979, as amended, and any applicable laws or regulations issued thereafter.
11. U.S. GOVERNMENT RESTRICTED RIGHTS.
If You are licensing the Licensed Software on behalf of the U.S. Government or any of its agencies ("Government"), the use, duplication, reproduction, release, modification, disclosure or transfer of the Licensed Software by the Government is subject to restricted rights in accordance with Federal Acquisition Regulation ("FAR") 12.212 for civilian agencies and Defense Federal Acquisition Regulation Supplement ("DFARS") 227.7202 for military agencies.
The Licensed Software is commercial. Use of the Licensed Software by the Government is further restricted in accordance with the terms and conditions of this Agreement.
12. MISCELLANEOUS.
If any provision of this Agreement is held to be invalid or unenforceable under any circumstances, its application in any other circumstances and the remaining provisions of this Agreement shall not be affected.
No waiver of any right under this Agreement shall be effective unless given in writing by an authorized representative of e-iceblue.
No waiver by e-iceblue of any right shall be deemed to be a waiver of any other right of e-iceblue arising under this Agreement.
This Agreement is solely between You and e-iceblue and shall not be construed to create any third party beneficiary rights in any other individual, partnership, corporation or other entity.
This Agreement shall be governed by and interpreted in accordance with the laws of the State of New York, without regard to its provisions governing conflicts of law.
Any and all disputes between You and e-iceblue pertaining to this Agreement shall be submitted to one arbitrator in binding arbitration within ten miles of New York City, New York in accordance with the Commercial Rules of the American Arbitration Association ("AAA").
The arbitrator shall be experienced in computer consulting, the development of custom software, the sale of packaged software, or related services.
If You and e-iceblue do not agree on an arbitrator within sixty (60) days of the institution of the arbitration, the arbitrator shall be chose by AAA.
Evidence and argument may be presented in person or by telephone, fax, postal mail, electronic mail, and other methods of communication approved by the arbitrator.
The prevailing party in such proceeding shall be entitled to recover its actually incurred costs, including reasonable attorney's fees, arbitration and court costs.
All hearings shall be held and a written arbitration award issued within one-hundred eighty (180) days of the date on which the arbitrator is appointed.
Judgment on the award shall be final and binding and may be entered in any court of competent jurisdiction.
13. ENTIRE AGREEMENT.
YOU AGREE THAT THIS AGREEMENT IS THE COMPLETE AND EXCLUSIVE STATEMENT OF THE AGREEMENT BETWEEN YOU AND E-ICEBLUE, AND THAT IT SUPERSEDES ANY PROPOSALS OR PRIOR AGREEMENTS, ORAL OR WRITTEN, AND ANY OTHER COMMUNICATIONS RELATING TO THE LICENSED SOFTWARE AND THE SUBJECT MATTER HEREOF.
E-ICEBLUE SHALL NOT BE BOUND BY ANY PROVISION OF ANY PURCHASE ORDER, RECEIPT, ACCEPTANCE, CONFIRMATION, CORRESPONDENCE OR OTHERWISE, OR BY ANY AGREEMENT BETWEEN YOU AND ANY OTHER PARTY, UNLESS E-ICEBLUE SPECIFICALLY AGREES TO SUCH PROVISION IN WRITING IN A FORM OF A LEGAL CONTRACT, DATED AND SIGNED BY YOU AND BY E-ICEBLUE'S OFFICER OR AUTHORIZED EMPLOYEE.
NO VENDOR, DISTRIBUTOR, PROVIDER, RESELLER, OEM, SALES REPRESENTATIVE, OR OTHER PERSON IS AUTHORIZED TO MODIFY THIS AGREEMENT OR TO MAKE ANY WARRANTY, REPRESENTATION OR PROMISE REGARDING THE LICENSED SOFTWARE WHICH IS DIFFERENT FROM THOSE SET FORTH IN THIS AGREEMENT.
C#/VB.NET: Create Lists in PDF Documents
A list is a collection of related values written one after another. Lists are the best tool to make important information stand out on the page, show the steps in a process, or present an overview to the readers. In this article, you will learn how to create ordered or unordered lists in a PDF document in C# and VB.NET using Spire.PDF for .NET.
- Create an Ordered List in PDF
- Create an Unordered List with Symbol Bullets in PDF
- Create an Unordered List with Image Bullets in PDF
- Create a Nested Numbered List in PDF
Spire.PDF provides the PdfSortedList class and the PdfList class to represent the ordered lists and unordered lists, respectively. To set the list's content, indent, font, marker style and other attributes, use the methods, properties, or events under these two classes. The following table lists some of the core items involved in this tutorial.
| Member | Description |
| PdfSortedList class | Represents an ordered list in a PDF document. |
| PdfList class | Represents an unordered list in a PDF document. |
| Brush property | Gets or sets a list's brush. |
| Font property | Gets or sets a list's font. |
| Indent property | Gets or sets a list's indent. |
| TextIndent property | Gets or sets the indent from the marker to the list item text. |
| Items property | Gets items of a list. |
| Marker property | Gets or sets the marker of a list. |
| Draw() method | Draw list on the canvas of a page at the specified location. |
| PdfOrderedMarker class | Represents the marker style of an ordered list, such as numbers, letters, and roman numerals. |
| PdfMarker class | Represents bullet style for an unordered list. |
Install Spire.PDF for .NET
To begin with, you need to add the DLL files included in the Spire.PDF for.NET package as references in your .NET project. The DLL files can be either downloaded from this link or installed via NuGet.
PM> Install-Package Spire.PDF
Create an Ordered List in PDF
An ordered list is a container which holds a sequence of objects. Each item in the list is marked with a number, a letter, or a roman numeral. The following are the step to create an ordered list in PDF using Spire.PDF for .NET.
- Create a PdfDocument object.
- Add a page to it using PdfDocument.Pages.Add() method.
- Create PdfBrush and PdfFont objects for the list.
- Create a PdfOrderedMarker object, specifying the marker style.
- Specify the list content with a string, and create an object of PdfSortedList class based on the string.
- Set the font, indent, brush and marker of the list though the properties under the PdfSortedList object.
- Draw the list on the page at the specified location using PdfSortedList.Draw() method.
- Save the document to another file using PdfDocument.SaveToFile() method.
- C#
- VB.NET
using System;
using Spire.Pdf;
using Spire.Pdf.Graphics;
using Spire.Pdf.Lists;
namespace CreateOrderedList
{
class Program
{
static void Main(string[] args)
{
//Create a PdfDocument object
PdfDocument doc = new PdfDocument();
//Set the margins
PdfMargins margins = new PdfMargins(30);
//Add a page
PdfPageBase page = doc.Pages.Add(PdfPageSize.A4, margins);
//Create a brush
PdfBrush brush = PdfBrushes.Black;
//Create fonts
PdfFont titleFont = new PdfFont(PdfFontFamily.TimesRoman, 12f, PdfFontStyle.Bold);
PdfFont listFont = new PdfFont(PdfFontFamily.TimesRoman, 12f, PdfFontStyle.Regular);
//Create a maker for ordered list
PdfOrderedMarker marker = new PdfOrderedMarker(PdfNumberStyle.LowerLatin, listFont);
//Specify the initial coordinate
float x = 10;
float y = 20;
//Draw title
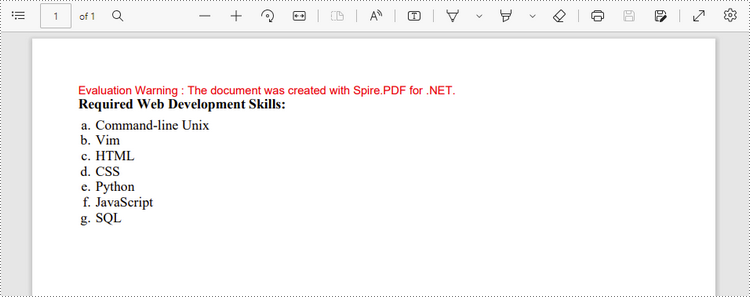
String title = "Required Web Development Skills:";
page.Canvas.DrawString(title, titleFont, brush, x, y);
y = y + (float)titleFont.MeasureString(title).Height;
y = y + 5;
//Create a numbered list
String listContent = "Command-line Unix\n"
+ "Vim\n"
+ "HTML\n"
+ "CSS\n"
+ "Python\n"
+ "JavaScript\n"
+ "SQL";
PdfSortedList list = new PdfSortedList(listContent);
//Set the font, indent, text indent, brush of the list
list.Font = listFont;
list.Indent = 2;
list.TextIndent = 4;
list.Brush = brush;
list.Marker = marker;
//Draw list on the page at the specified location
list.Draw(page, x, y);
//Save to file
doc.SaveToFile("OrderedList.pdf");
}
}
}
Create an Unordered List with Symbol Bullets in PDF
An unordered list, also named bulleted list, is a collection of related items that have no special order or sequence. Each item in the list is marked with a bullet. The following are the step to create an unordered list in PDF using Spire.PDF for .NET.
- Create a PdfDocument object.
- Add a page to it using PdfDocument.Pages.Add() method.
- Create PdfBrush and PdfFont objects for the list.
- Create a PdfMarker object, specifying the marker style.
- Specify the list content with a string, and create an object of PdfList class based on the string.
- Set the font, indent, brush and marker of the list though the properties under the PdfList object.
- Draw the list on the page at the specified location using PdfList.Draw() method.
- Save the document to another file using PdfDocument.SaveToFile() method.
- C#
- VB.NET
using Spire.Pdf;
using Spire.Pdf.Graphics;
using Spire.Pdf.Lists;
using System;
namespace CreateBulletedList
{
class Program
{
static void Main(string[] args)
{
//Create a PdfDocument object
PdfDocument doc = new PdfDocument();
//Set the margin
PdfMargins margin = new PdfMargins(30);
//Add a page
PdfPageBase page = doc.Pages.Add(PdfPageSize.A4, margin);
//Create fonts
PdfFont titleFont = new PdfFont(PdfFontFamily.TimesRoman, 12f, PdfFontStyle.Bold);
PdfFont listFont = new PdfFont(PdfFontFamily.TimesRoman, 12f, PdfFontStyle.Regular);
PdfFont markerFont = new PdfFont(PdfFontFamily.TimesRoman, 6f, PdfFontStyle.Regular);
//Create a brush
PdfBrush brush = PdfBrushes.Black;
//Specify the initial coordinate
float x = 10;
float y = 20;
//Draw title
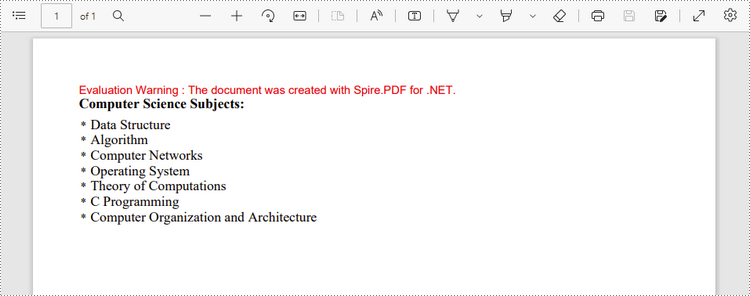
String title = "Computer Science Subjects:";
page.Canvas.DrawString(title, titleFont, brush, x, y);
y = y + (float)titleFont.MeasureString(title).Height;
y = y + 5;
//Specify the marker style
PdfMarker marker = new PdfMarker(PdfUnorderedMarkerStyle.Asterisk);
marker.Font = markerFont;
//Create an unordered list
String listContent = "Data Structure\n"
+ "Algorithm\n"
+ "Computer Networks\n"
+ "Operating System\n"
+ "Theory of Computations\n"
+ "C Programming\n"
+"Computer Organization and Architecture";
PdfList list = new PdfList(listContent);
//Set the font, indent, text indent, brush, maker of the list
list.Font = listFont;
list.Indent = 2;
list.TextIndent = 4;
list.Brush = brush;
list.Marker = marker;
//Draw list on a page at the specified location
list.Draw(page, x, y);
//Save to file
doc.SaveToFile("UnorderedList.pdf");
}
}
}
Create an Unordered List with Image Bullets in PDF
In addition to symbols, the bullet points of an unordered list can be also a picture. The steps to create an unordered list with images bullets are as follows.
- Create a PdfDocument object.
- Add a page to it using PdfDocument.Pages.Add() method.
- Create PdfBrush and PdfFont objects for the list.
- Create a PdfMarker object, setting the marker style as CustomImage.
- Set an image as the mark through PdfMarker.Image property.
- Specify the list content with a string, and create an object of PdfList class based on the string.
- Set the font, indent, brush and marker of the list though the properties under the PdfList object.
- Draw the list on the page at the specified location using PdfList.Draw() method.
- Save the document to another file using PdfDocument.SaveToFile() method.
- C#
- VB.NET
using System;
using Spire.Pdf;
using Spire.Pdf.Graphics;
using Spire.Pdf.Lists;
namespace CustomizeBulletPointsWithImage
{
class Program
{
static void Main(string[] args)
{
//Create a PdfDocument object
PdfDocument doc = new PdfDocument();
//Set the margin
PdfMargins margin = new PdfMargins(30);
//Add a page
PdfPageBase page = doc.Pages.Add(PdfPageSize.A4, margin);
//Create fonts
PdfFont titleFont = new PdfFont(PdfFontFamily.TimesRoman, 12f, PdfFontStyle.Bold);
PdfFont listFont = new PdfFont(PdfFontFamily.TimesRoman, 12f, PdfFontStyle.Regular);
//Create a brush
PdfBrush brush = PdfBrushes.Black;
//Specify the initial coordinate
float x = 10;
float y = 20;
//Draw title
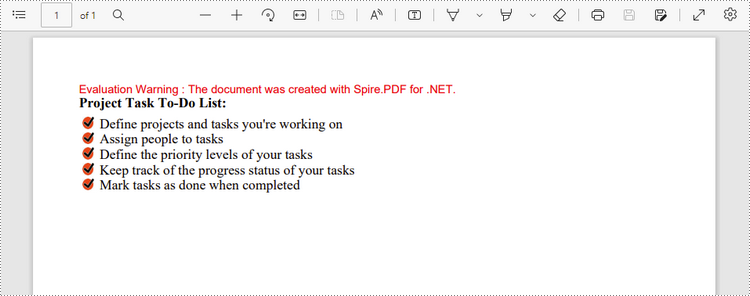
String title = "Project Task To-Do List:";
page.Canvas.DrawString(title, titleFont, brush, x, y);
y = y + (float)titleFont.MeasureString(title).Height;
y = y + 5;
//Specify the marker style to image
PdfMarker marker = new PdfMarker(PdfUnorderedMarkerStyle.CustomImage);
//Set the image for the marker
marker.Image = PdfImage.FromFile(@"C:\Users\Administrator\Desktop\checkmark.jpg");
//Create an unordered list
String listContent = "Define projects and tasks you're working on\n"
+ "Assign people to tasks\n"
+ "Define the priority levels of your tasks\n"
+ "Keep track of the progress status of your tasks\n"
+ "Mark tasks as done when completed";
PdfList list = new PdfList(listContent);
//Set the font, indent, text indent, brush, maker of the list
list.Font = listFont;
list.Indent = 2;
list.TextIndent = 4;
list.Brush = brush;
list.Marker = marker;
//Draw list on a page at the specified location
list.Draw(page, x, y);
//Save to file
doc.SaveToFile("ImageBullets.pdf");
}
}
}
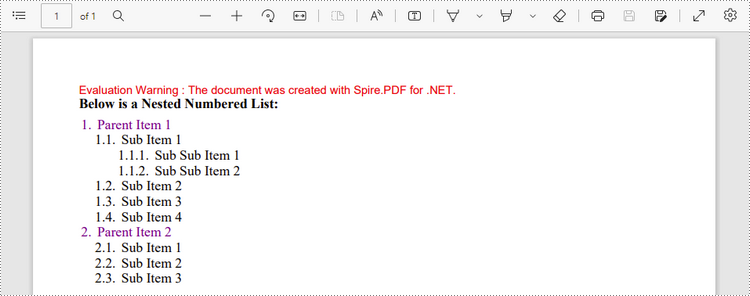
Create a Nested Numbered List in PDF
A nested list is a list that contains at least one sub list. Nested lists are used to present data in hierarchical structures. The following are the steps to create a nested numbered list in PDF using Spire.PDF for .NET.
- Create a PdfDocument object.
- Add a page to it using PdfDocument.Pages.Add() method.
- Create a PdfOrderedMarker object, specifying the marker style as Numeric.
- Specify the list content with a string, and create a parent list based on the string. And then set the font, indent, brush and marker of the list though the properties under the PdfSortedList object.
- Repeat the above step to create sub lists and sub-sub lists.
- Get the specific item of the parent list through PdfSortedList.Items[] property, and add a list to it as its sub list through PdfListItem.Sublist property.
- Draw the list on the page at the specified location using PdfSortedList.Draw() method.
- Save the document to another file using PdfDocument.SaveToFile() method.
- C#
- VB.NET
using System;
using Spire.Pdf;
using Spire.Pdf.Graphics;
using Spire.Pdf.Lists;

namespace CreateMultiLevelLists
{
    class Program
    {
        static void Main(string[] args)
        {
            //Create a PdfDocument object
            PdfDocument doc = new PdfDocument();

            //Set the margin
            PdfMargins margin = new PdfMargins(30);

            //Add a page
            PdfPageBase page = doc.Pages.Add(PdfPageSize.A4, margin);

            //Specify the initial coordinate
            float x = 10;
            float y = 20;

            //Create two brushes
            PdfBrush blackBrush = PdfBrushes.Black;
            PdfBrush purpleBrush = PdfBrushes.Purple;

            //Create two fonts
            PdfFont titleFont = new PdfFont(PdfFontFamily.TimesRoman, 12f, PdfFontStyle.Bold);
            PdfFont listFont = new PdfFont(PdfFontFamily.TimesRoman, 12f, PdfFontStyle.Regular);

            //Create a maker for ordered list
            PdfOrderedMarker marker = new PdfOrderedMarker(PdfNumberStyle.Numeric, listFont);

            //Draw title
            String title = "Below is a Nested Numbered List:";
            page.Canvas.DrawString(title, titleFont, blackBrush, x, y);
            y = y + (float)titleFont.MeasureString(title).Height;
            y = y + 5;

            //Create a parent list
            String parentListContent = "Parent Item 1\n"
                    + "Parent Item 2";
            PdfSortedList parentList = new PdfSortedList(parentListContent);
            parentList.Font = listFont;
            parentList.Indent = 2;
            parentList.Brush = purpleBrush;
            parentList.Marker = marker;

            //Create a sub list - "subList_1"
            String subListContent_1 = "Sub Item 1\n"
                    + "Sub Item 2\n"
                    + "Sub Item 3\n"
                    + "Sub Item 4";
            PdfSortedList subList_1 = new PdfSortedList(subListContent_1);
            subList_1.Indent = 12;
            subList_1.Font = listFont;
            subList_1.Brush = blackBrush;
            subList_1.Marker = marker;
            subList_1.MarkerHierarchy = true;

            //Create another sub list -"subList_2"
            String subListContent_2 = "Sub Item 1\n"
                    + "Sub Item 2\n"
                    + "Sub Item 3";
            PdfSortedList subList_2 = new PdfSortedList(subListContent_2);
            subList_2.Indent = 12;
            subList_2.Font = listFont;
            subList_2.Brush = blackBrush;
            subList_2.Marker = marker;
            subList_2.MarkerHierarchy = true;

            //Create a sub-sub list - "subList_1"
            String subSubListContent_1 = "Sub Sub Item 1\n"
                    + "Sub Sub Item 2";
            PdfSortedList subSubList = new PdfSortedList(subSubListContent_1);
            subSubList.Indent = 20;
            subSubList.Font = listFont;
            subSubList.Brush = blackBrush;
            subSubList.Marker = marker;
            subSubList.MarkerHierarchy = true;

            //Set subList_1 as sub list of the first item of parent list
            PdfListItem item_1 = parentList.Items[0];
            item_1.SubList = subList_1;

            //Set subList_2 as sub list of the second item of parent list
            PdfListItem item_2 = parentList.Items[1];
            item_2.SubList = subList_2;

            //Set subSubList as sub list of the first item of subList_1
            PdfListItem item_1_1 = subList_1.Items[0];
            item_1_1.SubList = subSubList;

            //Draw parent list
            parentList.Draw(page, x, y);

            //Save to file
            doc.SaveToFile("MultiLevelList.pdf");
        }
    }
}
Apply for a Temporary License
If you'd like to remove the evaluation message from the generated documents, or to get rid of the function limitations, please request a 30-day trial license for yourself.
C#/VB.NET: Insert Hyperlinks into Existing Text in PDF
Hyperlinks in PDF are a valuable feature that enables readers to effortlessly access a given webpage. By including hyperlinks in a PDF, it becomes easier to offer readers supplementary information about the document or direct them to relevant resources. When a reader clicks on a hyperlink, the corresponding page opens immediately in the browser. In this article, we will demonstrate how to add hyperlinks to existing text in a PDF document through .NET programs using Spire.PDF for .NET.
Install Spire.PDF for .NET
To begin with, you need to add the DLL files included in the Spire.PDF for.NET package as references in your .NET project. The DLL files can be either downloaded from this link or installed via NuGet.
PM> Install-Package Spire.PDF
Insert a Hyperlink to Existing Text in PDF with C#/VB.NET
Hyperlinks in PDF documents are inserted to the page as annotation elements. Adding a hyperlink to existing text in a PDF document requires locating the text first. Once the location has been obtained, an object of PdfUriAnnotation class with the link can be created and added to the position. The detailed steps are as follows:
- Create an object of PdfDocument class and load a PDF file using PdfDocument.LoadFromFile() method.
- Get the first page using PdfDocument.Pages property.
- Create an object of PdfTextFinder class and set the finder options using PdfTextFinder.Options.Parameter property.
- Find the specified text in the page using PdfTextFinder.Find() method and get the third occurrence.
- Loop through the text bounds of the specified occurrence (because the text being searched may span multiple lines and have more than one bound, the retrieved text bounds are stored in a list to accommodate this variability).
- Create an object of PdfUriAnnotation class within the text bound and set the URL, border, and border color using properties under PdfUriAnnotation class.
- Insert the hyperlink to the page annotations using PdfPageBase.AnnotationsWidget.Add(PdfUriAnnotation) method.
- Save the PDF file using PdfDocument.SaveToFile() method.
- C#
- VB.NET
using Spire.Pdf;
using Spire.Pdf.Annotations;
using Spire.Pdf.Texts;
using System.Collections.Generic;
using System.Drawing;
using TextFindParameter = Spire.Pdf.Texts.TextFindParameter;
namespace ChangeHyperlink
{
internal class Program
{
static void Main(string[] args)
{
//Create an object of PdfDocument class
PdfDocument pdf = new PdfDocument();
//Load a PDF file
pdf.LoadFromFile("Sample.pdf");
//Get the first page
PdfPageBase page = pdf.Pages[0];
//Create an object of PdfTextFinder and set the finder options
PdfTextFinder finder = new PdfTextFinder(page);
finder.Options.Parameter = TextFindParameter.IgnoreCase;
//Find the specified text in the page and get the third occurrence
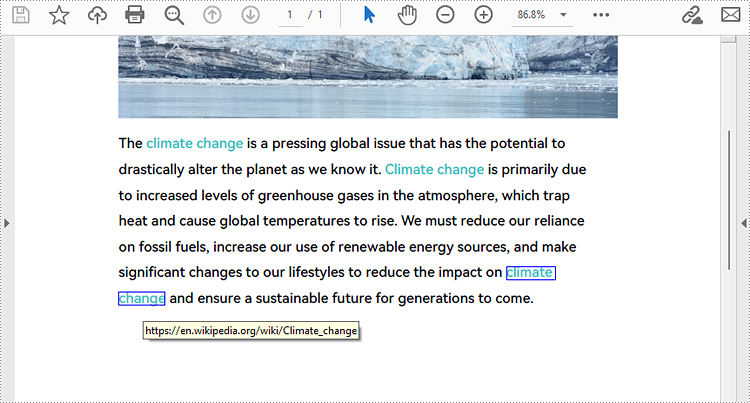
List<PdfTextFragment> collection = finder.Find("climate change");
PdfTextFragment fragment = collection[2];
//Loop through the text bounds of the specified occurrence
foreach (RectangleF bounds in fragment.Bounds)
{
//Create a hyperlink annotation
PdfUriAnnotation url = new PdfUriAnnotation(bounds);
//Set the URL of the hyperlink
url.Uri = "https://en.wikipedia.org/wiki/Climate_change";
//Set the border of the hyperlink annotation
url.Border = new PdfAnnotationBorder(1f);
//Set the color of the border
url.Color = Color.Blue;
//Add the hyperlink annotation to the page
page.Annotations.Add(url);
}
//Save the PDF file
pdf.SaveToFile("AddHyperlinks.pdf");
pdf.Dispose();
}
}
}
Apply for a Temporary License
If you'd like to remove the evaluation message from the generated documents, or to get rid of the function limitations, please request a 30-day trial license for yourself.
Manage Word Headings to Form a Catalogue in C#, VB.NET
Word Heading can be taken as title of each part in Word document. This guide demonstrates solution to manage these Word headings and form them as a catalogue in C# and VB.NET.
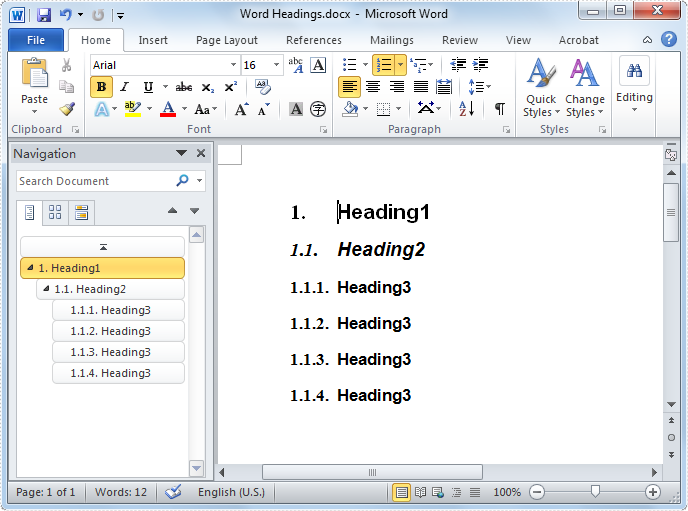
In Word document, users can set some contents, for example, phrases of summary of the following paragraphs, as headings. These Word headings can be displayed in the first page of whole document and form as catalogue after arrangement so that readers can get outline of whole document. Solution in this guide presents how to manage Word headings with numbered style in a new created document in C# and VB.NET via Spire.Doc for .NET and screenshot below shows results of managing Word headings.
Heading is one of kind of styles for paragraphs and Spire.Doc for .NET provides several BuiltinStyle types for paragraphs. In this example, three BuiltinStyle types will be applied: Heading1, Heading2 and Heading3. Following, details will be presented step by step.
Firstly, initialize a Document instance and add section, paragraph for this instance. Secondly, invoke AppendText method with parameter string text and ApplyStyle(BuiltinStyle.Heading1) method of Paragraph class to add text and set heading style for new added paragraph. Then, invoke ListFromat.ApplyNumberedStyle() method of Paragraph class to set number list for it. Thirdly, add new paragraph and set Heading2 style for it as the previous step. Initialize a ListStyle instance for document with Numbered ListType. Then, initialize a ListLevel instance from ListStyle and set UsePrevLevelPattern and NumberPrefix properties for this instance. After that, invoke ListStyleCollection.Add(ListStyle) method of Document class and ListFormat.ApplyStyle method of Paragraph class with parameter string styleName to add ListStyle for Heading2. Fourthly, add a new paragraph and set BuiltinStyle as Heading3 and apply ListStyle for this paragraph as the previous step. Finally, invoke SaveToFile method of Document class with parameter string fileName and FileFormat to save this document. Refer the code:
using Spire.Doc;
using Spire.Doc.Documents;

namespace WordHeading
{
    class Heading
    {
        static void Main(string[] args)
        {
             //Create Document
             Document document = new Document();
             Section section = document.AddSection();
             Paragraph paragraph = section.Paragraphs.Count > 0 ? section.Paragraphs[0] : section.AddParagraph();

             //Add Heading 1
             paragraph = section.AddParagraph();
             paragraph.AppendText(BuiltinStyle.Heading1.ToString());
             paragraph.ApplyStyle(BuiltinStyle.Heading1);
             paragraph.ListFormat.ApplyNumberedStyle();

             //Add Heading 2
             paragraph = section.AddParagraph();
             paragraph.AppendText(BuiltinStyle.Heading2.ToString());
             paragraph.ApplyStyle(BuiltinStyle.Heading2);

             //List Style for Headings 2
             ListStyle listSty2 = document.Styles.Add(ListType.Numbered, "MyStyle2");

             foreach (ListLevel listLev in listSty2.ListRef.Levels)
             {
                 listLev.UsePrevLevelPattern = true;
                 listLev.NumberPrefix = "1.";
             }

             paragraph.ListFormat.ApplyStyle(listSty2.Name);

             //Add List Style 3
             ListStyle listSty3 = document.Styles.Add(ListType.Numbered, "MyStyle3");
             foreach (ListLevel listLev in listSty3.ListRef.Levels)
             {
                 listLev.UsePrevLevelPattern = true;
                 listLev.NumberPrefix = "1.1.";
             }

             //Add Heading 3
             for (int i = 0; i < 4; i++)
             {
                 paragraph = section.AddParagraph();

                 //Append Text
                 paragraph.AppendText(BuiltinStyle.Heading3.ToString());

                 //Apply List Style 3 for Heading 3
                 paragraph.ApplyStyle(BuiltinStyle.Heading3);
                 paragraph.ListFormat.ApplyStyle(listSty3.Name);
             }

             //Save and Launch
             document.SaveToFile("Word Headings.docx", FileFormat.Docx);
        }
    }
}
Imports Spire.Doc
Imports Spire.Doc.Documents

Namespace WordHeading
    Friend Class Heading
        Shared Sub Main(ByVal args() As String)
         'Create Document
         Dim document As New Document()
         Dim section As Section = document.AddSection()
         Dim paragraph As Paragraph = If(section.Paragraphs.Count > 0, section.Paragraphs(0), section.AddParagraph())

         'Add Heading 1
         paragraph = section.AddParagraph()
         paragraph.AppendText(BuiltinStyle.Heading1.ToString())
         paragraph.ApplyStyle(BuiltinStyle.Heading1)
         paragraph.ListFormat.ApplyNumberedStyle()

         'Add Heading 2
         paragraph = section.AddParagraph()
         paragraph.AppendText(BuiltinStyle.Heading2.ToString())
         paragraph.ApplyStyle(BuiltinStyle.Heading2)

         ' List Style for Headings 2
         Dim listSty2 As ListStyle = document.Styles.Add(ListType.Numbered, "MyStyle2")

         For Each listLev As ListLevel In listSty2.ListRef.Levels
             listLev.UsePrevLevelPattern = True
             listLev.NumberPrefix = "1."
         Next

         paragraph.ListFormat.ApplyStyle(listSty2.Name)

         ' Add List Style 3
         Dim listSty3 As ListStyle = document.Styles.Add(ListType.Numbered, "MyStyle3")

         For Each listLev As ListLevel In listSty3.ListRef.Levels
             listLev.UsePrevLevelPattern = True
             listLev.NumberPrefix = "1.1."
         Next

         'Add Heading 3
         For i As Integer = 0 To 3
             paragraph = section.AddParagraph()

             'Append Text
             paragraph.AppendText(BuiltinStyle.Heading3.ToString())

             'Apply List Style 3 for Heading 3
             paragraph.ApplyStyle(BuiltinStyle.Heading3)
             paragraph.ListFormat.ApplyStyle(listSty3.Name)
         Next i

         'Save and Launch
         document.SaveToFile("Word Headings.docx", FileFormat.Docx)
        End Sub
    End Class
End Namespace
Spire.Doc, as professional Word component, is very powerful on fast generating, loading, writing, modifying and saving Word documents in .NET, WPF, Silverlight without Word automation and any third party tools.
Merge PDF Files and Add Page Number in C#/VB.NET
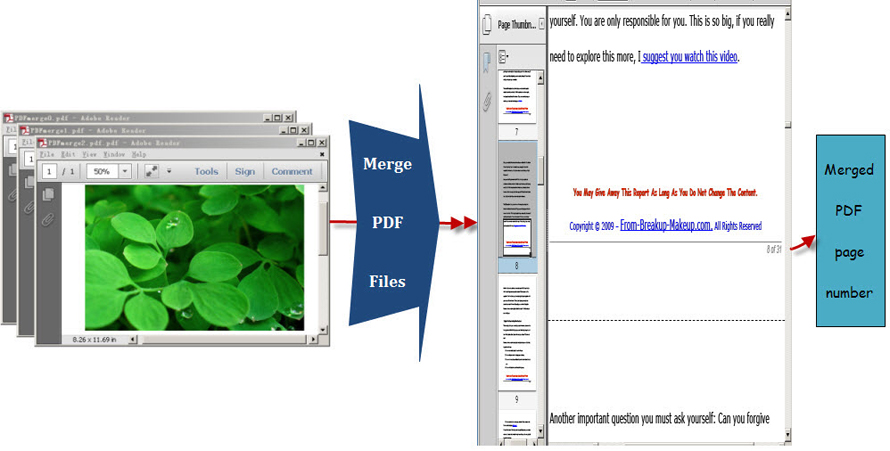
After searching so much information about PDF merge, it is easy to find that whether you merge PDF files online or use C#/VB.NET to realize this task, you never escape worrying some important points such as the safety of your PDF file, so much time it costs or whether the merged file supports to print page number and so on. However, as long as you come here, these troubles will not appear. This section will specifically introduce you a secure solution to merge PDF files into one with C#, VB.NET via a .NET PDF component Spire.PDF for .NET.
Spire.PDF for .NET, built from scratch in C#, enables programmers and developers to create, read, write and manipulate PDF documents in .NET applications without using Adobe Acrobat or any external libraries. Using Spire.PDF for .NET, you not only can quickly merge PDF files but also enables you to print PDF page with page number. Now please preview the effective screenshot below:
Before following below procedure, please download Spire.PDF for .NET and install it on system.
Step1: You can use the String array to save the names of the three PDF files which will be merged into one PDF and demonstrate Spire.Pdf.PdfDocument array. Then, load three PDF files and select the first PdfDocument for the purpose of merging the second and third PDF file to it. In order to import all pages from the second PDF file to the first PDF file, you need to call the method public void AppendPage(PdfDocument doc). Also by calling another method public PdfPageBase InsertPage(PdfDocument doc, int pageIndex),every page of the third PDF file can be imported to the first PDF file.
private void button1_Click(object sender, EventArgs e)
        {
            //pdf document list
            String[] files = new String[]
            {
                @"..\PDFmerge0.pdf",
                @"..\ PDFmerge1.pdf",
                @"..\ PDFmerge2.pdf"
            };
            //open pdf documents
            PdfDocument[] docs = new PdfDocument[files.Length];
            for (int i = 0; i < files.Length; i++)
            {
                docs[i] = new PdfDocument(files[i]);
            }
            //append document
            docs[0].AppendPage(docs[1]);

            //import PDF pages
            for (int i = 0; i < docs[2].Pages.Count; i = i + 2)
            {
                docs[0].InsertPage(docs[2], i);
            }
 Private Sub button1_Click(sender As Object, e As EventArgs)
	'pdf document list
	Dim files As [String]() = New [String]() {"..\PDFmerge0.pdf", "..\ PDFmerge1.pdf", "..\ PDFmerge2.pdf"}
	'open pdf documents
	Dim docs As PdfDocument() = New PdfDocument(files.Length - 1) {}
	For i As Integer = 0 To files.Length - 1
		docs(i) = New PdfDocument(files(i))
	Next

	'append document
	docs(0).AppendPage(docs(1))

	'import PDF pages
	Dim j As Integer = 0
	While j < docs(2).Pages.Count
		docs(0).InsertPage(docs(2), j)
		j = j + 2
	End While"
Step2: Draw page number in the first PDF file. In this step, you can set PDF page number margin by invoking the class Spire.Pdf.Graphics. PdfMargins. Then, Call the custom method DrawPageNumber(PdfPageCollection pages, PdfMargins margin, int startNumber, int pageCount) to add page number in the bottom of every page in the first PDF. Please see the detail code below:
//set PDF margin
            PdfUnitConvertor unitCvtr = new PdfUnitConvertor();
            PdfMargins margin = new PdfMargins();
            margin.Top = unitCvtr.ConvertUnits(2.54f, PdfGraphicsUnit.Centimeter, PdfGraphicsUnit.Point);
            margin.Bottom = margin.Top;
            margin.Left = unitCvtr.ConvertUnits(3.17f, PdfGraphicsUnit.Centimeter, PdfGraphicsUnit.Point);
            margin.Right = margin.Left;
            this.DrawPageNumber(docs[0].Pages, margin, 1, docs[0].Pages.Count);

          private void DrawPageNumber(PdfPageCollection pages, PdfMargins margin, int startNumber, int pageCount)
          {
            foreach (PdfPageBase page in pages)
            {
                page.Canvas.SetTransparency(0.5f);
                PdfBrush brush = PdfBrushes.Black;
                PdfPen pen = new PdfPen(brush, 0.75f);
                PdfTrueTypeFont font = new PdfTrueTypeFont(new Font("Arial", 9f, System.Drawing.FontStyle.Italic), true);
                PdfStringFormat format = new PdfStringFormat(PdfTextAlignment.Right);
                format.MeasureTrailingSpaces = true;
                float space = font.Height * 0.75f;
                float x = margin.Left;
                float width = page.Canvas.ClientSize.Width - margin.Left - margin.Right;
                float y = page.Canvas.ClientSize.Height - margin.Bottom + space;
                page.Canvas.DrawLine(pen, x, y, x + width, y);
                y = y + 1;
                String numberLabel
                    = String.Format("{0} of {1}", startNumber++, pageCount);
                page.Canvas.DrawString(numberLabel, font, brush, x + width, y, format);
                page.Canvas.SetTransparency(1);
            }
        }
       'set PDF margin
	Dim unitCvtr As New PdfUnitConvertor()
	Dim margin As New PdfMargins()
	margin.Top = unitCvtr.ConvertUnits(2.54F, PdfGraphicsUnit.Centimeter, PdfGraphicsUnit.Point)
	margin.Bottom = margin.Top
	 margin.Left = unitCvtr.ConvertUnits(3.17F, PdfGraphicsUnit.Centimeter, PdfGraphicsUnit.Point)
	margin.Right = margin.Left
	Me.DrawPageNumber(docs(0).Pages, margin, 1, docs(0).Pages.Count)

       Private Sub DrawPageNumber(pages As PdfPageCollection, margin As PdfMargins, startNumber As Integer, pageCount As Integer)
	For Each page As PdfPageBase In pages
		page.Canvas.SetTransparency(0.5F)
		Dim brush As PdfBrush = PdfBrushes.Black
		Dim pen As New PdfPen(brush, 0.75F)
		Dim font As New PdfTrueTypeFont(New Font("Arial", 9F, System.Drawing.FontStyle.Italic), True)
		Dim format As New PdfStringFormat(PdfTextAlignment.Right)
		format.MeasureTrailingSpaces = True
		Dim space As Single = font.Height * 0.75F
		Dim x As Single = margin.Left
		Dim width As Single = page.Canvas.ClientSize.Width - margin.Left - margin.Right
		Dim y As Single = page.Canvas.ClientSize.Height - margin.Bottom + space
		page.Canvas.DrawLine(pen, x, y, x + width, y)
		y = y + 1
		Dim numberLabel As [String] = [String].Format("{0} of {1}", System.Math.Max(System.Threading.Interlocked.Increment(startNumber),startNumber - 1), pageCount)
		page.Canvas.DrawString(numberLabel, font, brush, x + width, y, format)
		page.Canvas.SetTransparency(1)
	Next
End Sub
The PDF merge code can be very long when you view it at first sight, actually, if you do not need to add page number in your merged PDF, steps two should be avoided. However, in many cases, page number brings great convenience for users to read PDF as well as print it. Spire.PDF for .NET can satisfy both your requirements of merging PDF files and adding page numbers in the merged PDF file.
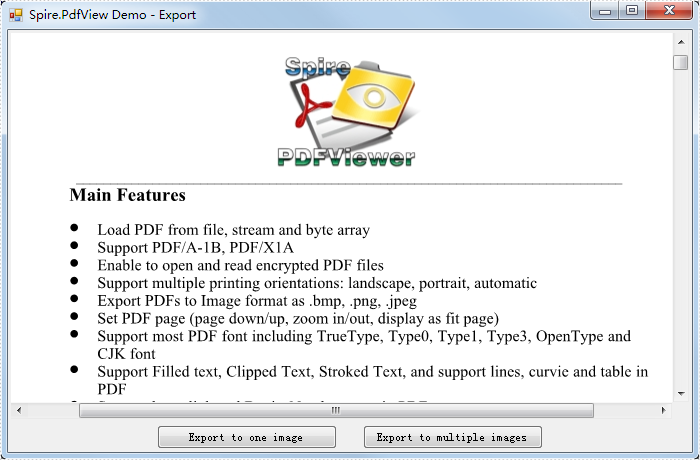
Export PDF Document to images
The sample demonstrates how to export PDF pages as images by PdfDocumentViewer Component.
C#/VB.NET: Create, Fill, or Remove Fillable Forms in PDF
The ability to create fillable PDF forms that end users can fill out (without having to print) can be a real benefit to making your business efficient. With these documents, users can download them, fill them out, save them, and send them back to you. No more printing and scanning. In this article, you will learn how to create, fill, or remove fillable forms in PDF in C# and VB.NET by using Spire.PDF for .NET.
- Create Fillable Form Fields in a PDF Document
- Fill Form Fields in an Existing PDF Document
- Remove a Particular Field or All Fields from an Existing PDF Document
Spire.PDF for .NET offers a series of useful classes under the Spire.Pdf.Fields namespace, allowing programmers to create and edit various types of form fields including text box, check box, combo box, list box, and radio button. The table below lists some of the core classes involved in this tutorial.
| Class | Description |
| PdfForm | Represents interactive form of the PDF document. |
| PdfField | Represents field of the PDF document's interactive form. |
| PdfTextBoxField | Represents text box field in the PDF form. |
| PdfCheckBoxField | Represents check box field in the PDF form. |
| PdfComboBoxField | Represents combo box field in the PDF Form. |
| PdfListBoxField | Represents list box field of the PDF form. |
| PdfListFieldItem | Represents an item of a list field. |
| PdfRadioButtonListField | Represents radio button field in the PDF form. |
| PdfRadioButtonListItem | Represents an item of a radio button list. |
| PdfButtonField | Represents button field in the PDF form. |
| PdfSignatureField | Represents signature field in the PDF form. |
Install Spire.PDF for .NET
To begin with, you need to add the DLL files included in the Spire.PDF for.NET package as references in your .NET project. The DLLs files can be either downloaded from this link or installed via NuGet.
PM> Install-Package Spire.PDF
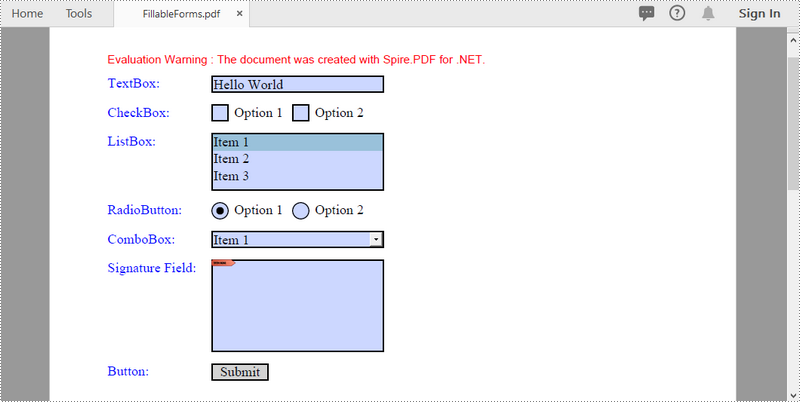
Create Fillable Form Fields in a PDF Document
To create a PDF form, initialize an instance of the corresponding field class. Set its size and position in the document through the Bounds property, and then add it to PDF using PdfFormFieldCollection.Add() method. The following are the main steps to create various types of form fields in a PDF document using Spire.PDF for .NET.
- Create a PdfDocument object.
- Add a page using PdfDocuemnt.Pages.Add() method.
- Create a PdfTextBoxField object, set the properties of the field including Bounds, Font and Text, and then add it to the document using PdfFormFieldCollection.Add() method.
- Repeat the step 3 to add check box, combo box, list box, radio button, signature field and button to the document.
- Save the document to a PDF file using PdfDocument.SaveToFile() method.
- C#
- VB.NET
using Spire.Pdf;
using Spire.Pdf.Actions;
using Spire.Pdf.Fields;
using Spire.Pdf.Graphics;
using System.Drawing;

namespace CreateFillableFormsInPdf
{
    class Program
    {
        static void Main(string[] args)
        {
            //Create a PdfDocument object
            PdfDocument doc = new PdfDocument();

            //Add a page
            PdfPageBase page = doc.Pages.Add();

            //Initialize x and y coordinates
            float baseX = 100;
            float baseY = 30;

            //Create two brush objects
            PdfSolidBrush brush1 = new PdfSolidBrush(new PdfRGBColor(Color.Blue));
            PdfSolidBrush brush2 = new PdfSolidBrush(new PdfRGBColor(Color.Black));

            //Create a font
            PdfFont font = new PdfFont(PdfFontFamily.TimesRoman, 12f, PdfFontStyle.Regular);

            //Add a textbox
            page.Canvas.DrawString("TextBox:", font, brush1, new PointF(10, baseY));
            RectangleF tbxBounds = new RectangleF(baseX, baseY, 150, 15);
            PdfTextBoxField textBox = new PdfTextBoxField(page, "textbox");
            textBox.Bounds = tbxBounds;
            textBox.Text = "Hello World";
            textBox.Font = font;
            doc.Form.Fields.Add(textBox);
            baseY += 25;

            //add two checkboxes
            page.Canvas.DrawString("CheckBox:", font, brush1, new PointF(10, baseY));
            RectangleF checkboxBound1 = new RectangleF(baseX, baseY, 15, 15);
            PdfCheckBoxField checkBoxField1 = new PdfCheckBoxField(page, "checkbox1");
            checkBoxField1.Bounds = checkboxBound1;
            checkBoxField1.Checked = false;
            page.Canvas.DrawString("Option 1", font, brush2, new PointF(baseX + 20, baseY));

            RectangleF checkboxBound2 = new RectangleF(baseX + 70, baseY, 15, 15);
            PdfCheckBoxField checkBoxField2 = new PdfCheckBoxField(page, "checkbox2");
            checkBoxField2.Bounds = checkboxBound2;
            checkBoxField2.Checked = false;
            page.Canvas.DrawString("Option 2", font, brush2, new PointF(baseX + 90, baseY));
            doc.Form.Fields.Add(checkBoxField1);
            doc.Form.Fields.Add(checkBoxField2);
            baseY += 25;

            //Add a listbox
            page.Canvas.DrawString("ListBox:", font, brush1, new PointF(10, baseY));
            RectangleF listboxBound = new RectangleF(baseX, baseY, 150, 50);
            PdfListBoxField listBoxField = new PdfListBoxField(page, "listbox");
            listBoxField.Items.Add(new PdfListFieldItem("Item 1", "item1"));
            listBoxField.Items.Add(new PdfListFieldItem("Item 2", "item2"));
            listBoxField.Items.Add(new PdfListFieldItem("Item 3", "item3")); ;
            listBoxField.Bounds = listboxBound;
            listBoxField.Font = font;
            listBoxField.SelectedIndex = 0;
            doc.Form.Fields.Add(listBoxField);
            baseY += 60;

            //Add two radio buttons
            page.Canvas.DrawString("RadioButton:", font, brush1, new PointF(10, baseY));
            PdfRadioButtonListField radioButtonListField = new PdfRadioButtonListField(page, "radio");
            PdfRadioButtonListItem radioItem1 = new PdfRadioButtonListItem("option1");
            RectangleF radioBound1 = new RectangleF(baseX, baseY, 15, 15);
            radioItem1.Bounds = radioBound1;
            page.Canvas.DrawString("Option 1", font, brush2, new PointF(baseX + 20, baseY));

            PdfRadioButtonListItem radioItem2 = new PdfRadioButtonListItem("option2");
            RectangleF radioBound2 = new RectangleF(baseX + 70, baseY, 15, 15);
            radioItem2.Bounds = radioBound2;
            page.Canvas.DrawString("Option 2", font, brush2, new PointF(baseX + 90, baseY));
            radioButtonListField.Items.Add(radioItem1);
            radioButtonListField.Items.Add(radioItem2);
            radioButtonListField.SelectedIndex = 0;
            doc.Form.Fields.Add(radioButtonListField);
            baseY += 25;

            //Add a combobox
            page.Canvas.DrawString("ComboBox:", font, brush1, new PointF(10, baseY));
            RectangleF cmbBounds = new RectangleF(baseX, baseY, 150, 15);
            PdfComboBoxField comboBoxField = new PdfComboBoxField(page, "combobox");
            comboBoxField.Bounds = cmbBounds;
            comboBoxField.Items.Add(new PdfListFieldItem("Item 1", "item1"));
            comboBoxField.Items.Add(new PdfListFieldItem("Item 2", "itme2"));
            comboBoxField.Items.Add(new PdfListFieldItem("Item 3", "item3"));
            comboBoxField.Items.Add(new PdfListFieldItem("Item 4", "item4"));
            comboBoxField.SelectedIndex = 0;
            comboBoxField.Font = font;
            doc.Form.Fields.Add(comboBoxField);
            baseY += 25;

            //Add a signature field
            page.Canvas.DrawString("Signature Field:", font, brush1, new PointF(10, baseY));
            PdfSignatureField sgnField = new PdfSignatureField(page, "sgnField");
            RectangleF sgnBounds = new RectangleF(baseX, baseY, 150, 80);
            sgnField.Bounds = sgnBounds;
            doc.Form.Fields.Add(sgnField);
            baseY += 90;

            //Add a button
            page.Canvas.DrawString("Button:", font, brush1, new PointF(10, baseY));
            RectangleF btnBounds = new RectangleF(baseX, baseY, 50, 15);
            PdfButtonField buttonField = new PdfButtonField(page, "button");
            buttonField.Bounds = btnBounds;
            buttonField.Text = "Submit";
            buttonField.Font = font;
            PdfSubmitAction submitAction = new PdfSubmitAction("https://www.e-iceblue.com/getformvalues.php");
            submitAction.DataFormat = SubmitDataFormat.Html;
            buttonField.Actions.MouseDown = submitAction;
            doc.Form.Fields.Add(buttonField);

            //Save to file
            doc.SaveToFile("FillableForms.pdf", FileFormat.PDF);
        }
    }
}
Fill Form Fields in an Existing PDF Document
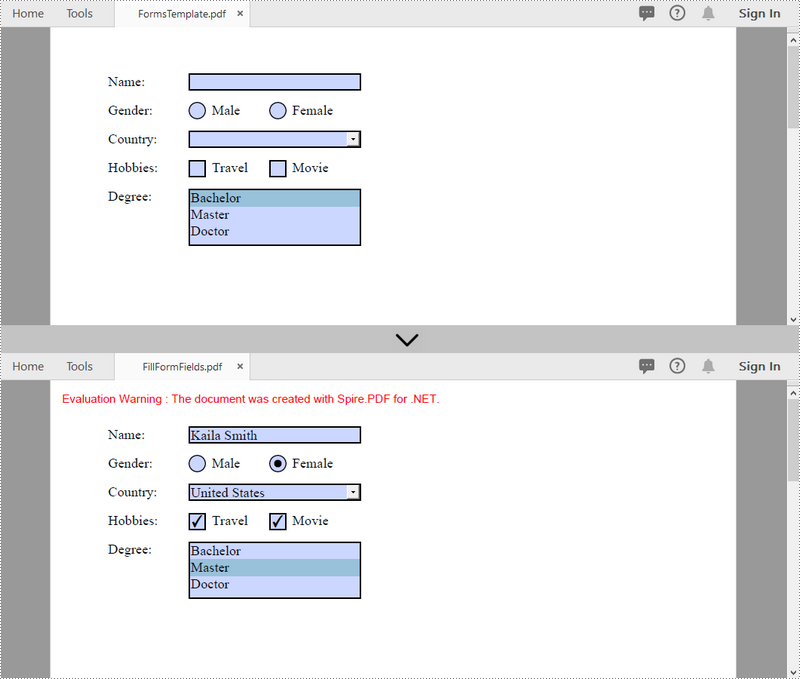
In order to fill out a form, we must first get all the form fields from the PDF document, determine the type of a certain field, and then input a value or select a value from a predefined list. The following are the steps to fill form fields in an existing PDF document using Spire.PDF for .NET.
- Create a PdfDocument object.
- Load a sample PDF document using PdfDocument.LoadFromFile() method.
- Get the form from the document through PdfDocument.Form property.
- Get the form widget collection through PdfFormWidget.FieldsWidget property.
- Loop through the form widget collection to get a specific PdfField.
- Determine if the PdfField is a certain field type such as text box. If yes, set the text of the text box through PdfTextBoxFieldWidget.Text property.
- Repeat the sixth step to fill radio button, check box, combo box, and list box with values.
- Save the document to a PDF file using PdfDocument.SaveToFile() method.
- C#
- VB.NET
using Spire.Pdf;
using Spire.Pdf.Fields;
using Spire.Pdf.Widget;

namespace FillFormFields
{
    class Program
    {
        static void Main(string[] args)
        {
            //Create a PdfDocument object
            PdfDocument doc = new PdfDocument();

            //Load a template containing forms
            doc.LoadFromFile(@"C:\Users\Administrator\Desktop\FormsTemplate.pdf");

            //Get the form from the document
            PdfFormWidget form = (PdfFormWidget)doc.Form;

            //Get the form widget collection
            PdfFormFieldWidgetCollection formWidgetCollection = form.FieldsWidget;

            //Loop through the widgets
            for (int i = 0; i < formWidgetCollection.Count; i++)
            {
                //Get a specific field
                PdfField field = formWidgetCollection[i];

                //Determine if the field is a text box
                if (field is PdfTextBoxFieldWidget)
                {
                    if (field.Name == "name")
                    {
                        //Set the text of text box
                        PdfTextBoxFieldWidget textBoxField = (PdfTextBoxFieldWidget)field;
                        textBoxField.Text = "Kaila Smith";
                    }
                }

                //Determine if the field is a radio button
                if (field is PdfRadioButtonListFieldWidget)
                {
                    if (field.Name == "gender")
                    {
                        //Set the selected index of radio button
                        PdfRadioButtonListFieldWidget radioButtonListField = (PdfRadioButtonListFieldWidget)field;
                        radioButtonListField.SelectedIndex = 1;
                    }
                }

                //Determine if the field is a combo box
                if (field is PdfComboBoxWidgetFieldWidget)
                {
                    if (field.Name == "country")
                    {
                        //Set the selected index of combo box
                        PdfComboBoxWidgetFieldWidget comboBoxField = (PdfComboBoxWidgetFieldWidget)field;
                        int[] index = { 0 };
                        comboBoxField.SelectedIndex = index;
                    }
                }

                //Determine if the field is a check box
                if (field is PdfCheckBoxWidgetFieldWidget)
                {
                    //Set the "Checked" status of check box
                    PdfCheckBoxWidgetFieldWidget checkBoxField = (PdfCheckBoxWidgetFieldWidget)field;
                    switch (checkBoxField.Name)
                    {
                        case "travel":
                            checkBoxField.Checked = true;
                            break;
                        case "movie":
                            checkBoxField.Checked = true;
                            break;
                    }
                }

                //Determine if the field is a list box
                if (field is PdfListBoxWidgetFieldWidget)
                {
                    if (field.Name == "degree")
                    {
                        //Set the selected index of list box
                        PdfListBoxWidgetFieldWidget listBox = (PdfListBoxWidgetFieldWidget)field;
                        int[] index = { 1 };
                        listBox.SelectedIndex = index;
                    }
                }
            }

            //Save to file
            doc.SaveToFile("FillFormFields.pdf", FileFormat.PDF);
        }
    }
}
Remove a Particular Field or All Fields from an Existing PDF Document
A form field in a PDF document can be accessed by its index or name and removed by PdfFieldCollection.Remove() method. The following are the steps to remove a particular field or all fields from an existing PDF document using Sprie.PDF for .NET.
- Create a PdfDocument object.
- Load a PDF document using PdfDocument.LoadFromFile() method.
- Get the form widget collection from the document.
- Loop through the widget collection to get a specific PdfField. Remove the field one by one using PdfFieldCollection.Remove() method.
- To remove a certain form field, get it from the document through PdfFormWidget.FieldsWidget["fieldName"] property and then call the PdfFieldCollectiont.Remove() method.
- Save the document to a PDF file using PdfDocument.SaveToFile() method.
- C#
- VB.NET
using Spire.Pdf;
using Spire.Pdf.Fields;
using Spire.Pdf.Widget;

namespace RemoveFormFields
{
    class Program
    {
        static void Main(string[] args)
        {
            //Create a PdfDocument object
            PdfDocument doc = new PdfDocument();

            //Load a PDF file
            doc.LoadFromFile(@"C:\Users\Administrator\Desktop\FormsTemplate.pdf");

            //Get the form fields from the document
            PdfFormWidget formWidget = doc.Form as PdfFormWidget;

            //Loop through the widgets
            for (int i = formWidget.FieldsWidget.List.Count - 1; i >= 0; i--)
            {
                //Get a specific field
                PdfField field = formWidget.FieldsWidget.List[i] as PdfField;

                //Remove the field
                formWidget.FieldsWidget.Remove(field);
            }

            //Get a specific field by its name
            //PdfField field = formWidget.FieldsWidget["name"];
            //Remove the field
            //formWidget.FieldsWidget.Remove(field);

            //Save to file
            doc.SaveToFile("DeleteAllFields.pdf");
        }
    }
}
Apply for a Temporary License
If you'd like to remove the evaluation message from the generated documents, or to get rid of the function limitations, please request a 30-day trial license for yourself.
Draw Special Shapes in PDF in C#/VB.NET
Spire.PDF can help us draw different shapes in PDF document. We can use Spire.PDF to draw rectangles in PDF, draw circles in PDF, draw arcs in PDF and draw ellipses in PDF. Besides these shapes, we can also use Spire.PDF to draw some other special shapes such as Spiral and five-pointed stars.
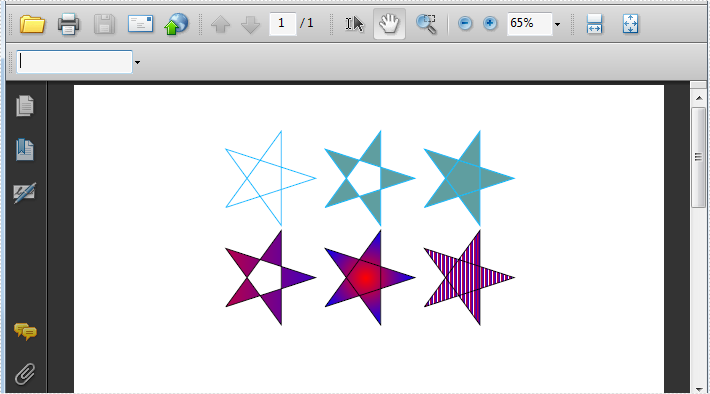
Draw Five-Pointed Star in PDF
By using Spire.PDF, we can draw different stars in PDF document. The sample below is showing how to draw 6 types of different five-pointed star.
using Spire.Pdf;
using Spire.Pdf.Graphics;
using System;
using System.Drawing;


namespace FivePointedStar
{
    class Program
    {
        private static void DrawStar(PdfPageBase page)
        {
            PdfDocument doc = new PdfDocument();
            PdfPageBase page = doc.Pages.Add();
            PointF[] points = new PointF[5];
            for (int i = 0; i < points.Length; i++)
            {
                float x = (float)Math.Cos(i * 2 * Math.PI / 5);
                float y = (float)Math.Sin(i * 2 * Math.PI / 5);
                points[i] = new PointF(x, y);
            }
            PdfPath path = new PdfPath();
            path.AddLine(points[2], points[0]);
            path.AddLine(points[0], points[3]);
            path.AddLine(points[3], points[1]);
            path.AddLine(points[1], points[4]);
            path.AddLine(points[4], points[2]);

            //save graphics state
            PdfDocument doc = new PdfDocument();
            PdfPageBase page = doc.Pages.Add();
            PdfGraphicsState state = page.Canvas.Save();
            PdfPen pen = new PdfPen(Color.DeepSkyBlue, 0.02f);
            PdfBrush brush1 = new PdfSolidBrush(Color.CadetBlue);

            page.Canvas.ScaleTransform(50f, 50f);
            page.Canvas.TranslateTransform(5f, 1.2f);
            page.Canvas.DrawPath(pen, path);

            page.Canvas.TranslateTransform(2f, 0f);
            path.FillMode = PdfFillMode.Alternate;
            page.Canvas.DrawPath(pen, brush1, path);

            page.Canvas.TranslateTransform(2f, 0f);
            path.FillMode = PdfFillMode.Winding;
            page.Canvas.DrawPath(pen, brush1, path);

            PdfLinearGradientBrush brush2
                = new PdfLinearGradientBrush(new PointF(-2, 0), new PointF(2, 0), Color.Red, Color.Blue);
            page.Canvas.TranslateTransform(-4f, 2f);
            path.FillMode = PdfFillMode.Alternate;
            page.Canvas.DrawPath(pen, brush2, path);

            PdfRadialGradientBrush brush3
                = new PdfRadialGradientBrush(new PointF(0f, 0f), 0f, new PointF(0f, 0f), 1f, Color.Red, Color.Blue);
            page.Canvas.TranslateTransform(2f, 0f);
            path.FillMode = PdfFillMode.Winding;
            page.Canvas.DrawPath(pen, brush3, path);

            PdfTilingBrush brush4 = new PdfTilingBrush(new RectangleF(0, 0, 4f, 4f));
            brush4.Graphics.DrawRectangle(brush2, 0, 0, 4f, 4f);

            page.Canvas.TranslateTransform(2f, 0f);
            path.FillMode = PdfFillMode.Winding;
            page.Canvas.DrawPath(pen, brush4, path);

            //restor graphics
            page.Canvas.Restore(state);
        }
    }
}
Imports Spire.Pdf
Imports Spire.Pdf.Graphics
Imports System.Drawing


Namespace FivePointedStar
	Class Program
		Private Shared Sub DrawStar(page As PdfPageBase)
			Dim doc As New PdfDocument()
			Dim page As PdfPageBase = doc.Pages.Add()
			Dim points As PointF() = New PointF(4) {}
			For i As Integer = 0 To points.Length - 1
				Dim x As Single = CSng(Math.Cos(i * 2 * Math.PI / 5))
				Dim y As Single = CSng(Math.Sin(i * 2 * Math.PI / 5))
				points(i) = New PointF(x, y)
			Next
			Dim path As New PdfPath()
			path.AddLine(points(2), points(0))
			path.AddLine(points(0), points(3))
			path.AddLine(points(3), points(1))
			path.AddLine(points(1), points(4))
			path.AddLine(points(4), points(2))

			'save graphics state
			Dim doc As New PdfDocument()
			Dim page As PdfPageBase = doc.Pages.Add()
			Dim state As PdfGraphicsState = page.Canvas.Save()
			Dim pen As New PdfPen(Color.DeepSkyBlue, 0.02F)
			Dim brush1 As PdfBrush = New PdfSolidBrush(Color.CadetBlue)

			page.Canvas.ScaleTransform(50F, 50F)
			page.Canvas.TranslateTransform(5F, 1.2F)
			page.Canvas.DrawPath(pen, path)

			page.Canvas.TranslateTransform(2F, 0F)
			path.FillMode = PdfFillMode.Alternate
			page.Canvas.DrawPath(pen, brush1, path)

			page.Canvas.TranslateTransform(2F, 0F)
			path.FillMode = PdfFillMode.Winding
			page.Canvas.DrawPath(pen, brush1, path)

			Dim brush2 As New PdfLinearGradientBrush(New PointF(-2, 0), New PointF(2, 0), Color.Red, Color.Blue)
			page.Canvas.TranslateTransform(-4F, 2F)
			path.FillMode = PdfFillMode.Alternate
			page.Canvas.DrawPath(pen, brush2, path)

			Dim brush3 As New PdfRadialGradientBrush(New PointF(0F, 0F), 0F, New PointF(0F, 0F), 1F, Color.Red, Color.Blue)
			page.Canvas.TranslateTransform(2F, 0F)
			path.FillMode = PdfFillMode.Winding
			page.Canvas.DrawPath(pen, brush3, path)

			Dim brush4 As New PdfTilingBrush(New RectangleF(0, 0, 4F, 4F))
			brush4.Graphics.DrawRectangle(brush2, 0, 0, 4F, 4F)

			page.Canvas.TranslateTransform(2F, 0F)
			path.FillMode = PdfFillMode.Winding
			page.Canvas.DrawPath(pen, brush4, path)

			'restor graphics
			page.Canvas.Restore(state)
		End Sub
	End Class
End Namespace
Effective Screenshot:
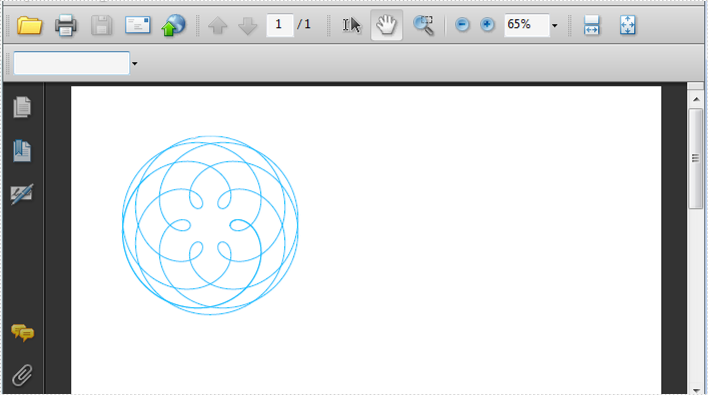
Draw Spiral in PDF
A spiral is a curve which emanates from a central point, getting progressively farther away as it revolves around the point. Spire.PDF can also help us easily draw Spiral in PDF and we can design at will.
using Spire.Pdf;
using Spire.Pdf.Graphics;
using System;

namespace DrawSpiral
{
    class Program
    {
        static void Main(string[] args)
        {
            PdfDocument doc = new PdfDocument();
            PdfPageBase page = doc.Pages.Add();
            //save graphics state
            PdfGraphicsState state = page.Canvas.Save();

            //Draw shap - spiro
            PdfPen pen = PdfPens.DeepSkyBlue;

            int nPoints = 1000;
            double r1 = 30;
            double r2 = 25;
            double p = 35;
            double x1 = r1 + r2 - p;
            double y1 = 0;
            double x2 = 0;
            double y2 = 0;

            page.Canvas.TranslateTransform(100, 100);

            for (int i = 0; i < nPoints; i++)
            {
                double t = i * Math.PI / 90;
                x2 = (r1 + r2) * Math.Cos(t) - p * Math.Cos((r1 + r2) * t / r2);
                y2 = (r1 + r2) * Math.Sin(t) - p * Math.Sin((r1 + r2) * t / r2);
                page.Canvas.DrawLine(pen, (float)x1, (float)y1, (float)x2, (float)y2);
                x1 = x2;
                y1 = y2;
            }

            //restor graphics
            page.Canvas.Restore(state);
        }
    }
}
Imports Spire.Pdf
Imports Spire.Pdf.Graphics
Imports Spire.Pdf.Texts
Imports System.Drawing

Namespace AddLineNumber
    Class Program
		Shared Sub Main(ByVal args() As String)
			Dim doc As New PdfDocument()
			Dim page As PdfPageBase = doc.Pages.Add()
			'save graphics state
			Dim state As PdfGraphicsState = page.Canvas.Save()

			'Draw shap - spiro
			Dim pen As PdfPen = PdfPens.DeepSkyBlue

			Dim nPoints As Integer = 1000
			Dim r1 As Double = 30
			Dim r2 As Double = 25
			Dim p As Double = 35
			Dim x1 As Double = r1 + r2 - p
			Dim y1 As Double = 0
			Dim x2 As Double = 0
			Dim y2 As Double = 0

			page.Canvas.TranslateTransform(100, 100)

			For i As Integer = 0 To nPoints - 1
				Dim t As Double = i * Math.PI / 90
				x2 = (r1 + r2) * Math.Cos(t) - p * Math.Cos((r1 + r2) * t / r2)
				y2 = (r1 + r2) * Math.Sin(t) - p * Math.Sin((r1 + r2) * t / r2)
				page.Canvas.DrawLine(pen, CSng(x1), CSng(y1), CSng(x2), CSng(y2))
				x1 = x2
				y1 = y2
			Next

			'restor graphics
			page.Canvas.Restore(state)

		End Sub
	End Class
End Namespace
Effective Screenshot:
C#/VB.NET: Insert, Replace or Delete Images in PDF
Compared with text-only documents, documents containing images are undoubtedly more vivid and engaging to readers. When generating or editing a PDF document, you may sometimes need to insert images to improve its appearance and make it more appealing. In this article, you will learn how to insert, replace or delete images in PDF documents in C# and VB.NET using Spire.PDF for .NET.
- Insert an Image into a PDF Document
- Replace an Image with Another Image in a PDF Document
- Delete a Specific Image in a PDF Document
Install Spire.PDF for .NET
To begin with, you need to add the DLL files included in the Spire.PDF for.NET package as references in your .NET project. The DLL files can be either downloaded from this link or installed via NuGet.
PM> Install-Package Spire.PDF
Insert an Image into a PDF Document in C# and VB.NET
The following steps demonstrate how to insert an image into an existing PDF document:
- Initialize an instance of the PdfDocument class.
- Load a PDF document using PdfDocument.LoadFromFile() method.
- Get the desired page in the PDF document through PdfDocument.Pages[pageIndex] property.
- Load an image using PdfImage.FromFile() method.
- Specify the width and height of the image area on the page.
- Specify the X and Y coordinates to start drawing the image.
- Draw the image on the page using PdfPageBase.Canvas.DrawImage() method.
- Save the result document using PdfDocument.SaveToFile() method.
- C#
- VB.NET
using Spire.Pdf;
using Spire.Pdf.Graphics;

namespace InsertImage
{
    class Program
    {
        static void Main(string[] args)
        {
            //Create a PdfDocument instance
            PdfDocument pdf = new PdfDocument();
            pdf.LoadFromFile("Input.pdf");

            //Get the first page in the PDF document
            PdfPageBase page = pdf.Pages[0];

            //Load an image
            PdfImage image = PdfImage.FromFile("image.jpg");

            //Specify the width and height of the image area on the page
            float width = image.Width * 0.50f;
            float height = image.Height * 0.50f;

            //Specify the X and Y coordinates to start drawing the image
            float x = 180f;
            float y = 70f;

            //Draw the image at a specified location on the page
            page.Canvas.DrawImage(image, x, y, width, height);

            //Save the result document
            pdf.SaveToFile("AddImage.pdf", FileFormat.PDF);
        }
    }
}
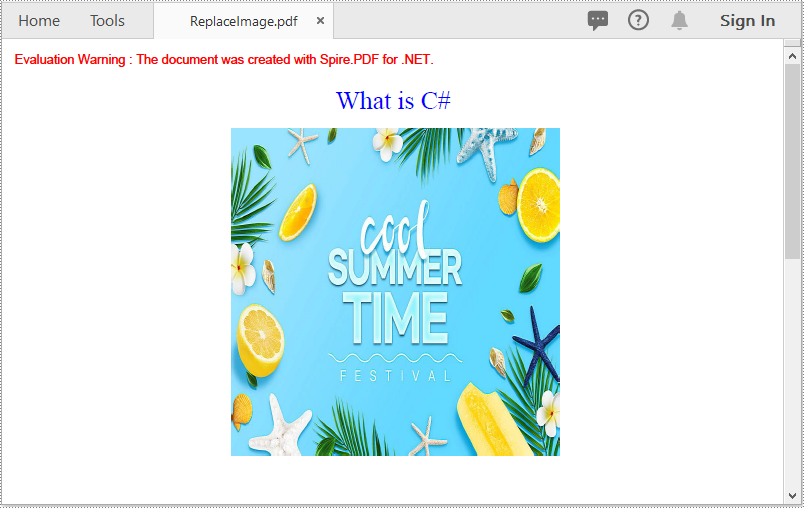
Replace an Image with Another Image in a PDF Document in C# and VB.NET
The following steps demonstrate how to replace an image with another image in a PDF document:
- Initialize an instance of the PdfDocument class.
- Load a PDF document using PdfDocument.LoadFromFile() method.
- Get the desired page in the PDF document through PdfDocument.Pages[pageIndex] property.
- Load an image using PdfImage.FromFile() method.
- Initialize an instance of the PdfImageHelper class.
- Get the image information from the page using PdfImageHelper.GetImagesInfo() method.
- Replace a specific image on the page with the loaded image using PdfImageHelper.ReplaceImage() method.
- Save the result document using PdfDocument.SaveToFile() method.
- C#
- VB.NET
using Spire.Pdf;
using Spire.Pdf.Graphics;
using Spire.Pdf.Utilities;

namespace ReplaceImage
{
    class Program
    {
        static void Main(string[] args)
        {
            //Create a PdfDocument instance
            PdfDocument doc = new PdfDocument();
            //Load a PDF document
            doc.LoadFromFile("AddImage.pdf");

            //Get the first page
            PdfPageBase page = doc.Pages[0];

            //Load an image
            PdfImage image = PdfImage.FromFile("image1.jpg");

            //Create a PdfImageHelper instance
            PdfImageHelper imageHelper = new PdfImageHelper();
            //Get the image information from the page
            PdfImageInfo[] imageInfo = imageHelper.GetImagesInfo(page);
            //Replace the first image on the page with the loaded image
            imageHelper.ReplaceImage(imageInfo[0], image);

            //Save the result document
            doc.SaveToFile("ReplaceImage.pdf", FileFormat.PDF);
        }
    }
}
Delete a Specific Image in a PDF Document in C# and VB.NET
The following steps demonstrate how to delete an image from a PDF document:
- Initialize an instance of the PdfDocument class.
- Load a PDF document using PdfDocument.LoadFromFile() method.
- Get the desired page in the PDF document through PdfDocument.Pages[pageIndex] property.
- Delete a specific image on the page using PdfPageBase.DeleteImage() method.
- Save the result document using PdfDocument.SaveToFile() method.
- C#
- VB.NET
using Spire.Pdf;

namespace DeleteImage
{
    class Program
    {
        static void Main(string[] args)
        {
            //Create a PdfDocument instance
            PdfDocument pdf = new PdfDocument();
            //Load a PDF document
            pdf.LoadFromFile("AddImage.pdf");

            //Get the first page
            PdfPageBase page = pdf.Pages[0];

            //Delete the first image on the page
            PdfImageHelper imageHelper = new PdfImageHelper();
            PdfImageInfo[] imageInfos = imageHelper.GetImagesInfo(pdf.Pages[0]);
            for (int i = 0; i < imageInfos.Length; i++)
            { imageHelper.DeleteImage(imageInfos[i], true); }

            //Save the result document
            pdf.SaveToFile("DeleteImage.pdf", FileFormat.PDF);
        }
    }
}
Apply for a Temporary License
If you'd like to remove the evaluation message from the generated documents, or to get rid of the function limitations, please request a 30-day trial license for yourself.
XLS Report Silverlight
The sample demonstrates how to work with MarkerDesign in Silverlight via Spire.XLS.