Convert HTML to PDF with New Plugin
Converting HTML to PDF with C# PDF component is so important that we always try our best to improve our Spire.PDF better and better. We aim to make it is much more convenient for our developers to use. Now besides the previous method of converting HTML to PDF offered by Spire.PDF, we have a new plugin for html conversion to PDF. This section will focus on the new plugin of convert HTML to PDF. With this new plugin, we support to convert the HTML page with rich elements, such as HTTPS, CSS3, HTML5, JavaScript.
You need to download Spire.PDF and install it on your system, add Spire.PDF.dll as reference in the downloaded Bin folder thought the below path '..\Spire.PDF\Bin\NET4.0\Spire.PDF.dll'. And for gain the new plugin, you could get the new plugin from the download file directly: windows-x86.zip windows-x64.zip macosx_x64.zip linux_x64.tar.gz .
On Windows system, you need to unzip the convertor plugin package and copy the folder 'plugins' under the same folder of Spire.Pdf.dll. Before you use QT plugin for converting HTML to PDF, please ensure you have installed Microsoft Visual C++ 2015 Redistributable on your computer.
On Mac and Linux system, you need to copy the zip file under the system and then unzip the convertor plugin package there to use the plugins successfully.
C# HtmlToPdf.zip and VB.NET HtmlToPdfVB.zip, you could download and try it.
Calling the plugins is very simple, please check the below C# code for convert HTML to PDF.
using System.Drawing;
using Spire.Pdf.Graphics;
using Spire.Pdf.HtmlConverter.Qt;

namespace SPIREPDF_HTMLtoPDF
{
    class Program
    {
        static void Main(string[] args)
        {
            HtmlConverter.Convert("http://www.wikipedia.org/", "HTMLtoPDF.pdf",

                //enable javascript
                true,

                //load timeout
                100 * 1000,

                //page size
                new SizeF(612, 792),

                //page margins
                new PdfMargins(0, 0));
            System.Diagnostics.Process.Start("HTMLtoPDF.pdf");
        }
    }
}
Imports System.Drawing
Imports Spire.Pdf.Graphics
Imports Spire.Pdf.HtmlConverter.Qt

Module Module1

    Sub Main()
        HtmlConverter.Convert("http://www.wikipedia.org/", "HTMLtoPDF.pdf", True, 100 * 1000, New SizeF(612, 792), New PdfMargins(0, 0))
        System.Diagnostics.Process.Start("HTMLtoPDF.pdf")
    End Sub

End Module
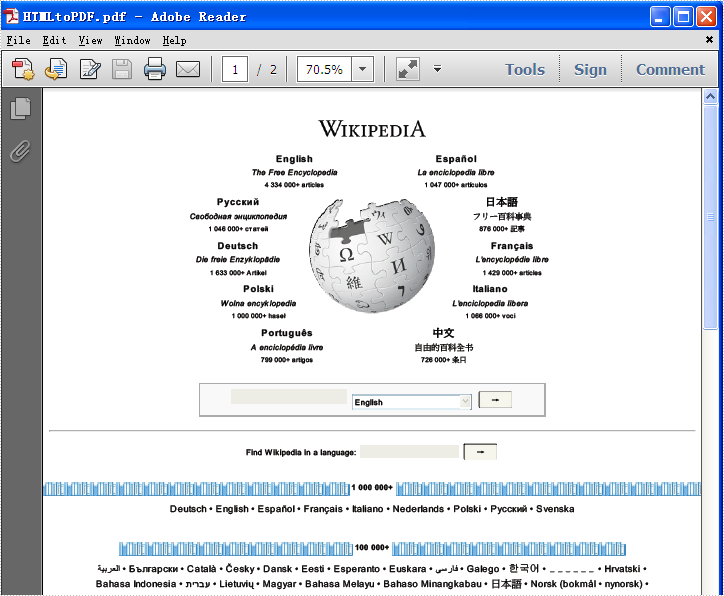
Please check the effective screenshot as below:
The following sample will focus on the new plugin of convert HTML string to PDF.
using System;
using System.Collections.Generic;
using System.Linq;
using System.Text;
using Spire.Pdf;
using System.IO;
using Spire.Pdf.HtmlConverter;
using System.Drawing;
namespace HTMLToPDFwithPlugins
{
    class Program
    {
        static void Main(string[] args)
        {
            string input =@"<strong>This is a test for converting HTML string to PDF </strong>
                 <ul><li>Spire.PDF supports to convert HTML in URL into PDF</li>
                 <li>Spire.PDF supports to convert HTML string into PDF</li>
                 <li>With the new plugin</li></ul>";

            string outputFile = "ToPDF.pdf";

            Spire.Pdf.HtmlConverter.Qt.HtmlConverter.Convert(input,

            outputFile,
            //enable javascript
            true,
            //load timeout
            10 * 1000,
            //page size
            new SizeF(612, 792),
            //page margins
            new Spire.Pdf.Graphics.PdfMargins(0),
            //load from content type
            LoadHtmlType.SourceCode
            );
            System.Diagnostics.Process.Start(outputFile);
        }
    }
}
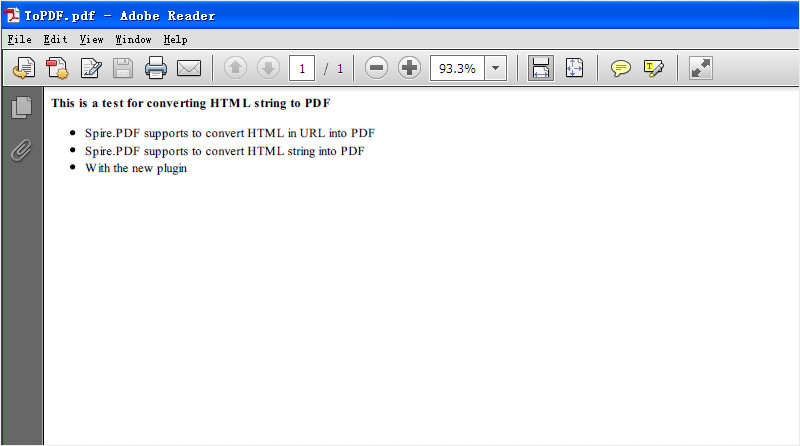
Effective screenshot:
How to Export Data into XML in C#?
The aim of the article is to introduce the procedure of exporting data into Office OpenXML in only two steps with a .net component. Spire.DataExport is a completely pure .NET component suit for exporting data into MS Excel, MS Word, HTML, Office OpenXML, PDF, MS Access, DBF, RTF, SQL Script, SYLK, DIF, CSV, MS Clipboard format. It has high performance for exporting data from Command, ListView, DataTable components, which help you to save much time and money.
Please download Spire.DataExport for .NET, add Spire.DataExport.dll as reference and set its target framework as .NET 4. Besides, many developers also check and download another C# excel component together - Spire.XLS for .NET.
Step1: Function to fill data in datatable
In this step, Spire.DataExport will help to load Data information from the datatable. After setting up the data source and SQL command, we can even preview and modify data through DataGridVew before exporting.
private void Form1_Load(object sender, EventArgs e)
        {
            oleDbConnection1.ConnectionString = txtConnectString.Text;
            oleDbCommand1.CommandText = txtCommandText.Text;
            using (OleDbDataAdapter da = new OleDbDataAdapter())
            {
                da.SelectCommand = oleDbCommand1;
                da.SelectCommand.Connection = oleDbConnection1;
                DataTable dt = new DataTable();
                da.Fill(dt);
                dataGridView1.DataSource = dt;
            }
        }
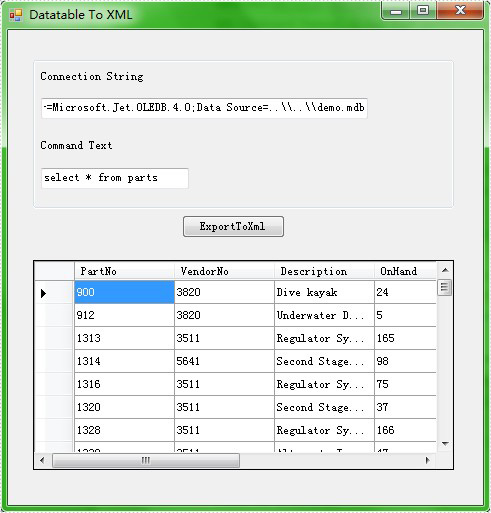
Check the Screenshot below:
Step2: Export Data to Office OpenXML
The code below shows how to export data from the datatable to Office OpenXML. Spire.DataExport will create a new Office OpenXML and export data into Office OpenXML through DataGridView. It also allows you to rename the generated Office OpenXML in this step.
private void btnExportToXml_Click(object sender, EventArgs e)
        {
            Spire.DataExport.XML.XMLExport xmlExport = new Spire.DataExport.XML.XMLExport();
            xmlExport.DataSource = Spire.DataExport.Common.ExportSource.DataTable;
            xmlExport.DataTable = this.dataGridView1.DataSource as DataTable;
            xmlExport.ActionAfterExport = Spire.DataExport.Common.ActionType.OpenView;
            xmlExport.FileName = @"..\..\ToXml.xml";
            xmlExport.SaveToFile();
        }
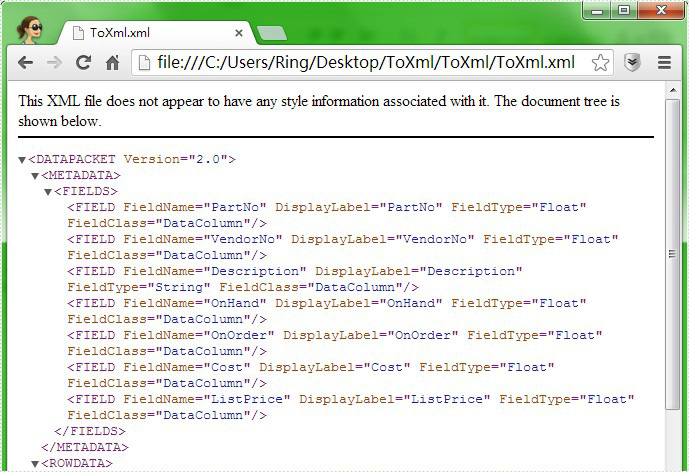
Check the Screenshot below:
How to Export Data into MS Access in C#?
This article will show you a clear introduction of how to Export Data to MS Access in C# via a .NET Data Export component. Spire.DataExport for.NET is designed to help developers to perform data exporting processing tasks. With Spire.DataExport, the whole exporting process is quickly and it only needs two simple steps.
Please download Spire.DataExport for .NET and install it on your system, add Spire.DataExport.dll as reference in the downloaded Bin folder thought the below path: “…\Spire.DataExport\Bin\NET4.0\ Spire.DataExport.dll”.
Step 1: Load Data Information
In this step, Spire.DataExport helps us load data from database. Through DataGridVew, we can even preview and modify data.
private void Form1_Load(object sender, EventArgs e)
        {
            oleDbConnection1.ConnectionString = txtConnectString.Text;
            oleDbCommand1.CommandText = txtCommandText.Text;
            using (OleDbDataAdapter da = new OleDbDataAdapter())
            {
                da.SelectCommand = oleDbCommand1;
                da.SelectCommand.Connection = oleDbConnection1;
                DataTable dt = new DataTable();
                da.Fill(dt);
                dataGridView1.DataSource = dt;
            }
        }
Please check the screenshot:
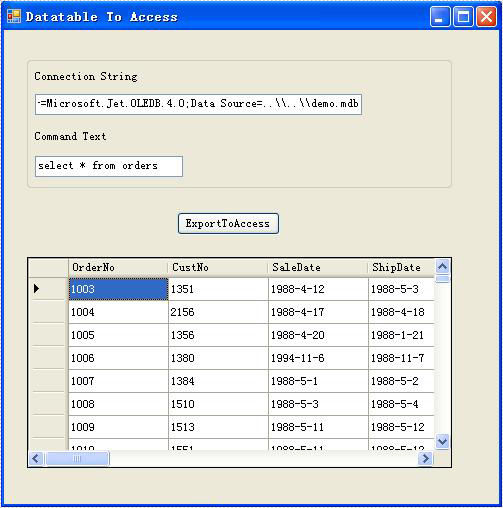
Step 2: Set Export into MS Access
Here we need to set it as Access format. Spire.DataExport will create a new Access and through DataGridView export data into Access file. You can rename the file as you like.
private void btnExportToAccess_Click(object sender, EventArgs e)
        {
            Spire.DataExport.Access.AccessExport accessExport = new
            Spire.DataExport.Access.AccessExport();
            accessExport.DataSource = Spire.DataExport.Common.ExportSource.DataTable;
            accessExport.DataTable = this.dataGridView1.DataSource as DataTable;
            accessExport.DatabaseName = @"..\..\ToMdb.mdb";
            accessExport.TableName = "ExportFromDatatable";
            accessExport.SaveToFile();
        }
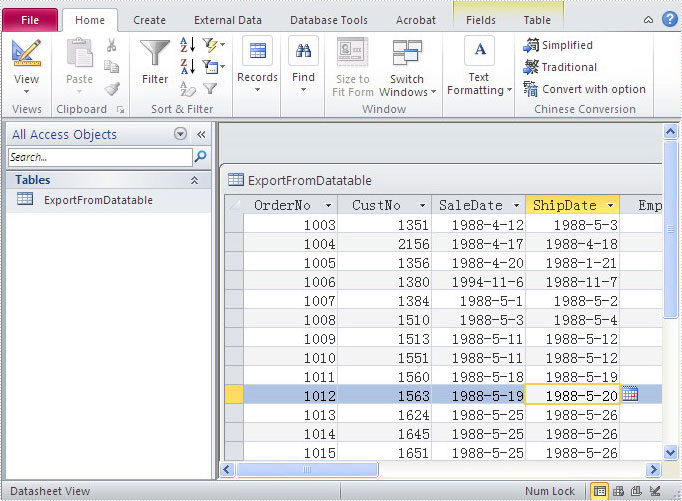
Here comes to the results:
How to Export Data from Datatable to Word Document in C#?
There are some requirements to export datatable or dataset to word file on many occasions at work. The aim of this article is to help you complete this requirement. Spire.DataExport can help easily load data from the datatable and create a new Word file for storing the data. In addition to this, Spire.DataExport (or Spire.Office) can export data into MS Excel, HTML, XML, PDF, MS Access, DBF, SQL Script, SYLK, DIF, CSV and MS Clipboard format as well, which can be downloaded here. The following code is the example of showing how Spire.DataExport works.
Step 1: Function to fill data in datatable
In this step, Spire.DataExport will help load Data information from the datatable. After setting up the data source and SQL command, it allows you to preview and edit data in DataGridView component before exporting.
private void Form1_Load(object sender, EventArgs e)
        {
            oleDbConnection1.ConnectionString = txtConnectString.Text;
            oleDbCommand1.CommandText = txtCommandText.Text;
            using (OleDbDataAdapter da = new OleDbDataAdapter())
            {
                da.SelectCommand = oleDbCommand1;
                da.SelectCommand.Connection = oleDbConnection1;
                DataTable dt = new DataTable();
                da.Fill(dt);
                dataGridView1.DataSource = dt;
            }
        }
Effect Picture
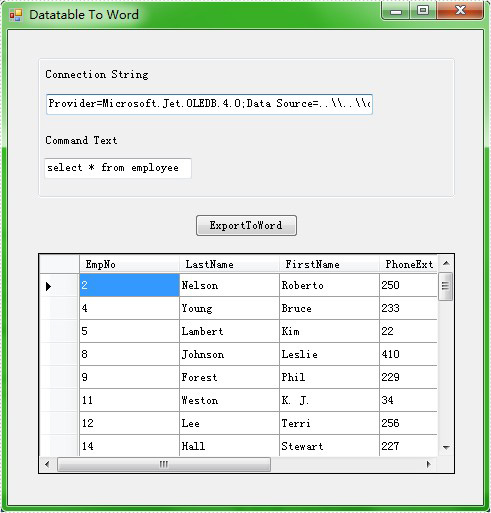
Step 2: Export Data to word document
The code below shows how to export data from the datatable to Word file. Spire.DataExport will create a new MS Word for storing exported Data. It also allows you to rename the generated Word file in this step.
private void btnExportToWord_Click(object sender, EventArgs e)
{
Spire.DataExport.RTF.RTFExport rtfExport = new Spire.DataExport.RTF.RTFExport();
rtfExport.DataSource = Spire.DataExport.Common.ExportSource.DataTable;
rtfExport.DataTable = this.dataGridView1.DataSource as DataTable;
rtfExport.ActionAfterExport = Spire.DataExport.Common.ActionType.OpenView;
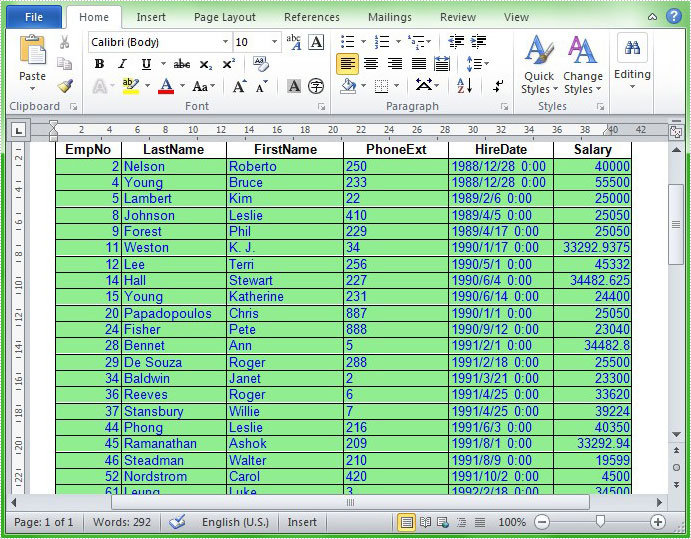
RTFStyle rtfStyle = new RTFStyle();
rtfStyle.FontColor = Color.Blue;
rtfStyle.BackgroundColor = Color.LightGreen;
rtfExport.RTFOptions.DataStyle = rtfStyle;
rtfExport.FileName=@"..\..\ToWord.doc";
rtfExport.SaveToFile();
}
Effect Picture
C#: Extract Images from PDF Documents
Extracting images from PDFs is a common task for many users, whether it's for repurposing visuals in a presentation, archiving important graphics, or facilitating easier analysis. By mastering image extraction using C#, developers can enhance resource management and streamline their workflow.
In this article, you will learn how to extract images from individual PDF pages as well as from entire documents using C# and Spire.PDF for .NET.
Install Spire.PDF for .NET
To begin with, you need to add the DLL files included in the Spire.PDF for.NET package as references in your .NET project. The DLL files can be either downloaded from this link or installed via NuGet.
PM> Install-Package Spire.PDF
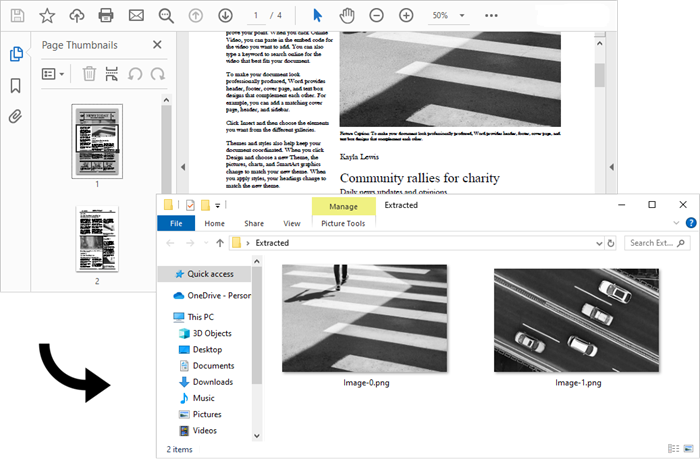
Extract Images from a Specific PDF Page
The PdfImageHelper class in Spire.PDF for .NET is designed to help users manage images within PDF documents. It allows for various operations, such as deleting, replacing, and retrieving images.
To obtain information about the images on a specific PDF page, developers can utilize the PdfImageHelper.GetImagesInfo(PdfPageBase page) method. Once they have the image information, they can save the images to files using the PdfImageInfo.Image.Save() method.
The steps to extract images from a specific PDF page are as follows:
- Create a PdfDocument object.
- Load a PDF file using PdfDocument.LoadFromFile() method.
- Get a specific page using PdfDocument.Pages[index] property.
- Create a PdfImageHelper object.
- Get the image information collection from the page using PdfImageHelper.GetImagesInfo() method.
- Iterate through the image information collection and save each instance as a PNG file using PdfImageInfo.Image.Save() method.
- C#
using Spire.Pdf;
using Spire.Pdf.Utilities;
using System.Drawing;

namespace ExtractImagesFromSpecificPage
{
    class Program
    {
        static void Main(string[] args)
        {
            // Create a PdfDocument object
            PdfDocument doc = new PdfDocument();

            // Load a PDF document
            doc.LoadFromFile("C:\\Users\\Administrator\\Desktop\\Input.pdf");

            // Get a specific page
            PdfPageBase page = doc.Pages[0];

            // Create a PdfImageHelper object
            PdfImageHelper imageHelper = new PdfImageHelper();

            // Get all image information from the page
            PdfImageInfo[] imageInfos = imageHelper.GetImagesInfo(page);

            // Iterate through the image information
            for (int i = 0; i < imageInfos.Length; i++)
            {
                // Get a specific image information
                PdfImageInfo imageInfo = imageInfos[i];

                // Get the image
                Image image = imageInfo.Image;

                // Save the image to a png file
                image.Save("C:\\Users\\Administrator\\Desktop\\Extracted\\Image-" + i + ".png");
            }

            // Dispose resources
            doc.Dispose();
        }
    }
}
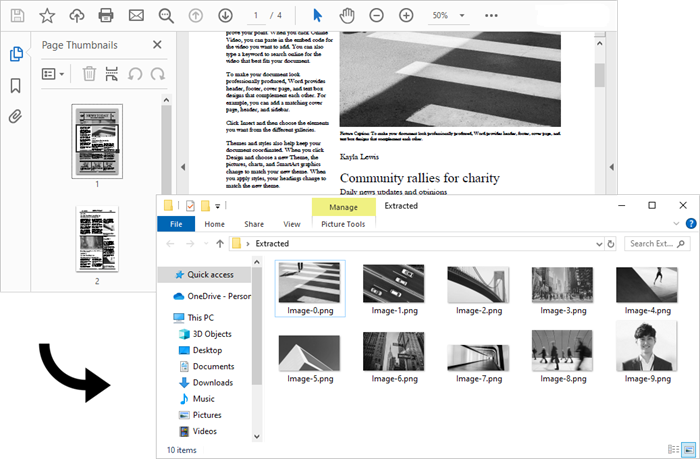
Extract All Images from an Entire PDF Document
Now that you know how to extract images from a specific page, you can iterate through the pages in a PDF document and extract images from each page. This allows you to collect all the images contained in the document.
The steps to extract all images throughout an entire PDF document are as follows:
- Create a PdfDocument object.
- Load a PDF file using PdfDocument.LoadFromFile() method.
- Create a PdfImageHelper object.
- Iterate through the pages in the document.
- Get a specific page using PdfDocument.Pages[index] property.
- Get the image information collection from the page using PdfImageHelper.GetImagesInfo() method.
- Iterate through the image information collection and save each instance as a PNG file using PdfImageInfo.Image.Save() method.
- C#
using Spire.Pdf;
using Spire.Pdf.Utilities;
using System.Drawing;

namespace ExtractAllImages
{
    class Program
    {
        static void Main(string[] args)
        {
            // Create a PdfDocument object
            PdfDocument doc = new PdfDocument();

            // Load a PDF document
            doc.LoadFromFile("C:\\Users\\Administrator\\Desktop\\Input.pdf");

            // Create a PdfImageHelper object
            PdfImageHelper imageHelper = new PdfImageHelper();

            // Declare an int variable
            int m = 0;

            // Iterate through the pages
            for (int i = 0; i < doc.Pages.Count; i++)
            {
                // Get a specific page
                PdfPageBase page = doc.Pages[i];

                // Get all image information from the page
                PdfImageInfo[] imageInfos = imageHelper.GetImagesInfo(page);

                // Iterate through the image information
                for (int j = 0; j < imageInfos.Length; j++)
                {
                    // Get a specific image information
                    PdfImageInfo imageInfo = imageInfos[j];

                    // Get the image
                    Image image = imageInfo.Image;

                    // Save the image to a png file
                    image.Save("C:\\Users\\Administrator\\Desktop\\Extracted\\Image-" + m + ".png");
                    m++;
                }

            }

            // Dispose resources
            doc.Dispose();
        }
    }
}
Apply for a Temporary License
If you'd like to remove the evaluation message from the generated documents, or to get rid of the function limitations, please request a 30-day trial license for yourself.
How to convert PDF pages to Tiff image in WPF?
Background
PDF is now widely used to represent document in independent specification. It encapsulates a complete description of a fixed-layout flat document, including the text, fonts and graphics and so on. Due to its powerful functions, it is difficult for developers to parse its format. Or more specifically, to parse content out from PDF document and convert it to different image format is a tough task for some developers. This article will help you solve this problem by using PDF document viewer component Spire.PDFViewer for WPF by 5 easy steps. Firstly, you can download Spire.PDFViewer for WPF.
Target
To convert a specified or random page including frames of images from PDF file to TIFF programmatically.
Step 1: To create WPF application in Visual Studio and reference Spire.PdfViewer.WPF dlls.
Set .NET 4 as target framework
Step 2: Instance an object of Spire.PdfViewer.Wpf.PdfDocumentViewer
PdfDocumentViewer pdfViewer = new PdfDocumentViewer();
Step 3: Call the “LoadFromFile”of PdfDocumentViewer object and load a PDF file.
pdfViewer.LoadFromFile ("sample.pdf");
Step 4: Create an array and save all pages of this PDF file.
int[] pageNumbers=new int[pageCount];
            for (int i=0;i
Step 5: Save it to Tiff image format
pdfViewer.SaveAsImage("sample.tiff",pageNumbers);
The following code snippet shows all the code when converting pdf page to tiff image:
private void Button_Click(object sender, RoutedEventArgs e)
        {
            // Instance an object of Spire.PdfViewer.Wpf.PdfDocumentViewer
            PdfDocumentViewer pdfViewer = new PdfDocumentViewer();
            //Load a pdf file
            pdfViewer.LoadFromFile("sample.pdf");
            int pageCount = pdfViewer.PageCount;
            // create an array and save all pages of this PDF file.
            int[] pageNumbers=new int[pageCount];
            for (int i=0;i
Screenshot

Spire.PDFViewer for WPF is a powerful WPF PDF Viewer control which enables developers to display PDF documents with their WPF applications without Adobe Reader. It’s available to load and view PDF documents like PDF/A-1B, PDF/X1A, and even encrypted from stream, file and byte array with support for printing, zooming, etc.
C#/VB.NET: Convert PDF to XPS or XPS to PDF
XPS is a format similar to PDF but uses XML in layout, appearance and printing information of a file. XPS format was developed by Microsoft and it is natively supported by the Windows operating systems. If you want to work with your PDF files on a Windows computer without installing other software, you can convert it to XPS format. Likewise, if you need to share a XPS file with a Mac user or use it on various devices, it is more recommended to convert it to PDF. This article will demonstrate how to programmatically convert PDF to XPS or XPS to PDF using Spire.PDF for .NET.
Install Spire.PDF for .NET
To begin with, you need to add the DLL files included in the Spire.PDF for.NET package as references in your .NET project. The DLL files can be either downloaded from this link or installed via NuGet.
PM> Install-Package Spire.PDF
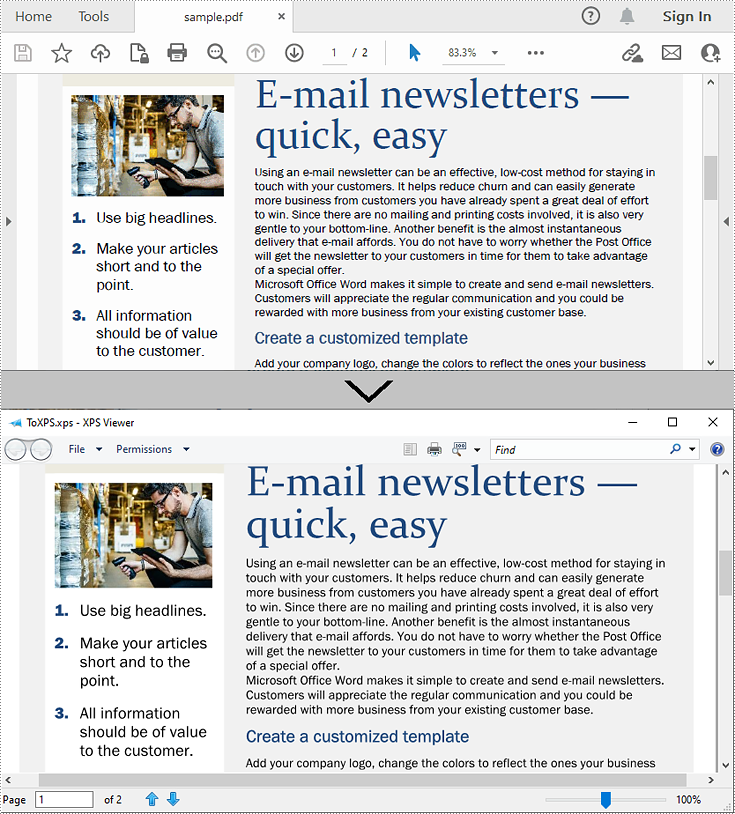
Convert PDF to XPS in C# and VB.NET
Spire.PDF for .NET supports converting PDF to various file formats, and to achieve the PDF to XPS conversion, you just need three lines of core code. The following are the detailed steps.
- Create a PdfDocument instance.
- Load a sample PDF document using PdfDocument.LoadFromFile() method.
- Convert the PDF document to an XPS file using PdfDocument.SaveToFile (string filename, FileFormat.XPS) method.
- C#
- VB.NET
using Spire.Pdf;

namespace ConvertPdfToXps
{
    class Program
    {
        static void Main(string[] args)
        {
            //Create a PdfDocument instance
            PdfDocument pdf = new PdfDocument();

            //Load sample PDF document
            pdf.LoadFromFile("sample.pdf");

            //Save it to XPS format
            pdf.SaveToFile("ToXPS.xps", FileFormat.XPS);
            pdf.Close();
        }
    }
}
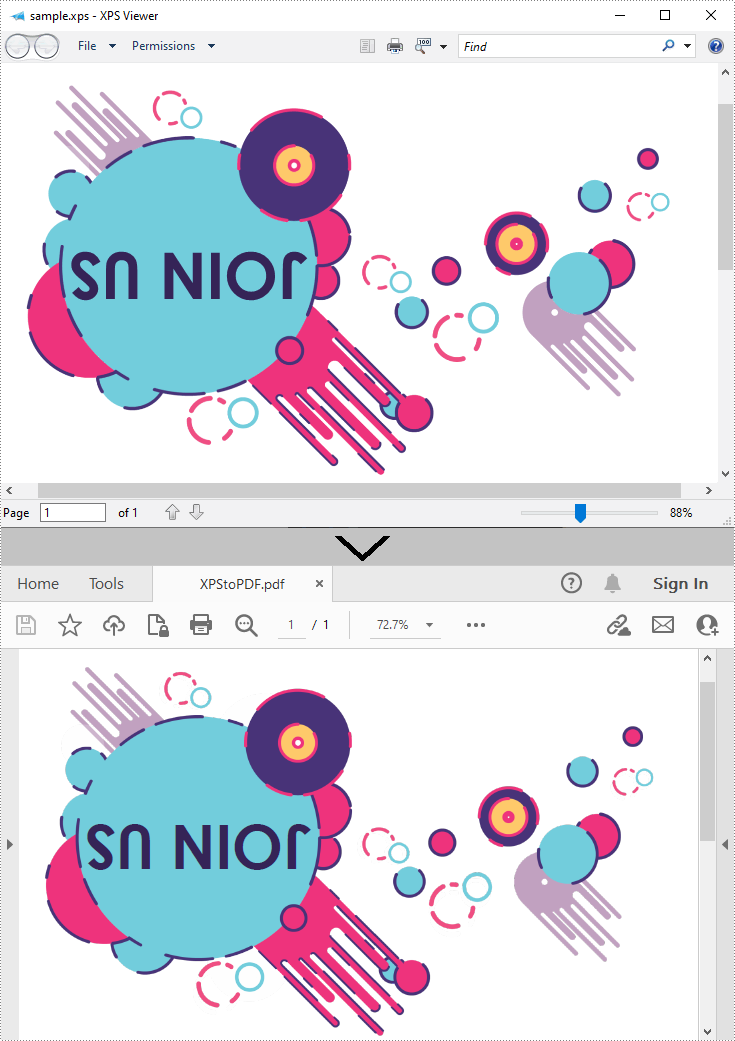
Convert XPS to PDF in C# and VB.NET
Conversion from XPS to PDF can also be achieved with Spire.PDF for .NET. While converting, you can set to keep high quality image on the generated PDF file by using the PdfDocument.ConvertOptions.SetXpsToPdfOptions() method. The following are the detailed steps.
- Create a PdfDocument instance.
- Load an XPS file using PdfDocument.LoadFromFile(string filename, FileFormat.XPS) method or PdfDocument.LoadFromXPS() method.
- While conversion, set the XPS to PDF convert options to keep high quality images using PdfDocument.ConvertOptions.SetXpsToPdfOptions() method.
- Save the XPS file to a PDF file using PdfDocument.SaveToFile(string filename, FileFormat.PDF) method.
- C#
- VB.NET
using Spire.Pdf;

namespace ConvertXPStoPDF
{
    class Program
    {
        static void Main(string[] args)
        {
            //Create a PdfDocument instance
            PdfDocument pdf = new PdfDocument();

            //Load a sample XPS file
            pdf.LoadFromFile("Sample.xps", FileFormat.XPS);
            //pdf.LoadFromXPS("Sample.xps");

            //Keep high quality images when converting XPS to PDF
            pdf.ConvertOptions.SetXpsToPdfOptions(true);

            //Save the XPS file to PDF
            pdf.SaveToFile("XPStoPDF.pdf", FileFormat.PDF);
        }
    }
}
Apply for a Temporary License
If you'd like to remove the evaluation message from the generated documents, or to get rid of the function limitations, please request a 30-day trial license for yourself.
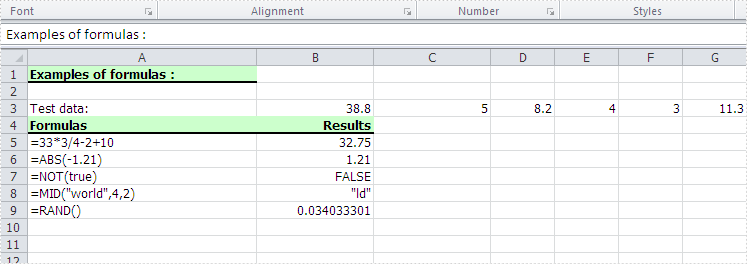
How to Calculate Formulas in XLS Document in C#
Background
Excel is widely used to organize data manipulations like arithmetic operations. Excel provides many built-in functions which automate a number of types of calculation. Functions are pre-programmed formulate for example, the square-root function, trigonometric functions, logarithms etc. Excel has more than 300 functions covering a range of statistical, mathematical, financial and logical operations. There is no doubt that using a function offers a shortcut method.
Calculate Formulas in XLS Document
Microsoft Excel is a powerful tool which has many uses, the most basic feature of which is performing functions. The aim of this article is to help you perform simple arithmetic operations on values in programming by using excel functions. Spire.Xls for .NET can help you easily create a new excel document or load an existing excel document into program, and calculate data of designated cell by function. Applied in Console platform, WinForm and Asp.net, It provide different types of mathematical functions, statistical functions , logic functions ,and string functions to calculate data with C# codes.
The following is the method example of using Console application to show how Spire.XLS for .NET realizes the calculation formula:
Step 1: Build a console application, and add spire.XLS.dll, Spire.Common.dll assembly.
Step 2: Instantiate an object of Spire.Xls.WorkBook, and add a “WorkSheet” in WorkBook object.
Workbook workbook = new Workbook();
Worksheet sheet = workbook. Worksheets[0];
Step 3: Set the value and format in Cell A1 and Cell A3.veiwing the C# Code.
//set Column A, B, C width
sheet.SetColumnWidth(1, 32);
sheet.SetColumnWidth(2, 16);
sheet.SetColumnWidth(3, 16);

// Set value of Cell A1
sheet.Range[currentRow++, 1].Value = "Examples of formulas :";
// Set value of Cell A2.
sheet.Range[++currentRow, 1].Value = "Test data:";

// Set text format Of Cell A1
CellRange range = sheet.Range["A1"];
range.Style.Font.IsBold = true;
range.Style.FillPattern = ExcelPatternType.Solid;
range.Style.KnownColor = ExcelColors.LightGreen1;
range.Style.Borders[BordersLineType.EdgeBottom].LineStyle = LineStyleType.Medium;
Step 4: Set some cells value and then to sum up some cells data and the results will be displayed in one of the cells.
sheet.Range[currentRow, 2].NumberValue = 7.3;
sheet.Range[currentRow, 3].NumberValue = 5;
sheet.Range[currentRow, 4].NumberValue = 8.2;
sheet.Range[currentRow, 5].NumberValue = 4;
sheet.Range[currentRow, 6].NumberValue = 3;
sheet.Range[currentRow, 7].NumberValue = 11.3;
//Create arithmetic expression string about cells

currentFormula = "=Sheet1!$B$3 + Sheet1!$C$3+Sheet1!$D$3+Sheet1!$E$3+Sheet1!$F$3+Sheet1!$G$3";
//Caculate arithmetic expression about cells
formulaResult = workbook.CaculateFormulaValue(currentFormula);
value = formulaResult.ToString();
sheet.Range[currentRow, 2].Value = value;
Step 5: Respectively set value and text format of Cell A4, B4.
sheet.Range[++currentRow, 1].Value = "Formulas"; ;
sheet.Range[currentRow, 2].Value = "Results";
range = sheet.Range[currentRow, 1, currentRow, 2];
range.Style.Font.IsBold = true;
range.Style.KnownColor = ExcelColors.LightGreen1;
range.Style.FillPattern = ExcelPatternType.Solid;
range.Style.Borders[BordersLineType.EdgeBottom].LineStyle = LineStyleType.Medium;
Step 6: Realize calculation simple expression.
// Create arithmetic tables enclosed type string
currentFormula = "=33*3/4-2+10";
sheet.Range[++currentRow, 1].Text = currentFormula;
// Caculate arithmetic expression
formulaResult = workbook.CaculateFormulaValue(currentFormula);
value = formulaResult.ToString();
sheet.Range[currentRow, 2].Value = value;
Step 7: Realize some mathematic functions.
//absolute value function .
currentFormula = "=ABS(-1.21)";
sheet.Range[currentRow, 1].Text = currentFormula;
sheet.Range[currentRow++, 2].Formula = currentFormula;
Step 8: Realize some logic function.
//NOT function
//Create NOT function string
currentFormula = "=NOT(true)";
sheet.Range[currentRow, 1].Text = currentFormula;
//Caculate NOT function
formulaResult = workbook.CaculateFormulaValue(currentFormula);
value = formulaResult.ToString();
sheet.Range[currentRow, 2].Value = value;
sheet.Range[currentRow, 2].HorizontalAlignment = HorizontalAlignType.Right;
Step 9: Realize some string handling functions.
//Get the substring
// Build substring function
currentFormula = "=MID(\"world\",4,2)";
sheet.Range[++currentRow, 1].Text = currentFormula;
//Caculate substring function
formulaResult = workbook.CaculateFormulaValue(currentFormula);
value = formulaResult.ToString();
sheet.Range[currentRow, 2].Value = value;
sheet.Range[currentRow, 2].HorizontalAlignment = HorizontalAlignType.Right;
Step 10: Realize a random function.
// Random function
// Create random function string.
currentFormula = "=RAND()";
sheet.Range[++currentRow, 1].Text = currentFormula;
//Caculate random function
formulaResult = workbook.CaculateFormulaValue(currentFormula);
value = formulaResult.ToString();
sheet.Range[currentRow, 2].Value = value;
Step 11: Save workbook object as file.
workbook.SaveToFile("formulaTest.xls",ExcelVersion.Version97to2003);
Viewing the full c# code
using Spire.Xls;

namespace XlsCalculateFormula
{
    class Program
    {
        static void Main(string[] args)
        {
            // Instantiate a new Workbook object
            Workbook workbook = new Workbook();

            // Access the first worksheet in the workbook
            Worksheet sheet = workbook.Worksheets[0];

            int currentRow = 1;
            string currentFormula = string.Empty;
            object formulaResult = null;
            string value = string.Empty;

            // Set column widths for columns A, B, and C (1-based index)
            sheet.SetColumnWidth(1, 32);
            sheet.SetColumnWidth(2, 16);
            sheet.SetColumnWidth(3, 16);

            // Set the value of Cell A1
            sheet.Range[currentRow++, 1].Value = "Examples of formulas :";
            // Set the value of Cell A2
            sheet.Range[++currentRow, 1].Value = "Test data:";
            // Set the style of Cell A1
            CellRange range = sheet.Range["A1"];
            range.Style.Font.IsBold = true;
            range.Style.FillPattern = ExcelPatternType.Solid;
            range.Style.KnownColor = ExcelColors.LightGreen1;
            range.Style.Borders[BordersLineType.EdgeBottom].LineStyle = LineStyleType.Medium;

            // Populate test data in row 3 (columns B to G)
            sheet.Range[currentRow, 2].NumberValue = 7.3;
            sheet.Range[currentRow, 3].NumberValue = 5; ;
            sheet.Range[currentRow, 4].NumberValue = 8.2;
            sheet.Range[currentRow, 5].NumberValue = 4;
            sheet.Range[currentRow, 6].NumberValue = 3;
            sheet.Range[currentRow, 7].NumberValue = 11.3;
            // Define a formula that sums the values in cells B3 through G3
            currentFormula = "=Sheet1!$B$3 + Sheet1!$C$3+Sheet1!$D$3+Sheet1!$E$3+Sheet1!$F$3+Sheet1!$G$3";
            // Calculate the result of the formula
            formulaResult = workbook.CalculateFormulaValue(currentFormula);
            value = formulaResult.ToString();
            sheet.Range[currentRow, 2].Value = value;


            // Set the value and format of two head cell
            sheet.Range[++currentRow, 1].Value = "Formulas"; ;
            sheet.Range[currentRow, 2].Value = "Results";
            sheet.Range[currentRow, 2].HorizontalAlignment = HorizontalAlignType.Right;
            range = sheet.Range[currentRow, 1, currentRow, 2];
            range.Style.Font.IsBold = true;
            range.Style.KnownColor = ExcelColors.LightGreen1;
            range.Style.FillPattern = ExcelPatternType.Solid;
            range.Style.Borders[BordersLineType.EdgeBottom].LineStyle = LineStyleType.Medium;

            // --- Arithmetic Expression Example ---

            // Define a basic arithmetic formula
            currentFormula = "=33*3/4-2+10";
            sheet.Range[++currentRow, 1].Text = currentFormula;
            // Calculate and display the result
            formulaResult = workbook.CalculateFormulaValue(currentFormula);
            value = formulaResult.ToString();
            sheet.Range[currentRow, 2].Value = value;

            // --- Mathematical Function: ABS (Absolute Value) ---

            // Define an ABS function formula
            currentFormula = "=ABS(-1.21)";
            sheet.Range[++currentRow, 1].Text = currentFormula;
            // Calculate and display the absolute value
            formulaResult = workbook.CalculateFormulaValue(currentFormula);
            value = formulaResult.ToString();
            sheet.Range[currentRow, 2].Value = value;


            // --- Statistical Function: SUM ---

            // Define a SUM function formula
            currentFormula = "=SUM(18,29)";
            sheet.Range[++currentRow, 1].Text = currentFormula;
            // Calculate and display the sum
            formulaResult = workbook.CalculateFormulaValue(currentFormula);
            value = formulaResult.ToString();
            sheet.Range[currentRow, 2].Value = value;

            // --- Logical Function: NOT ---
            // Define a NOT function formula
            currentFormula = "=NOT(true)";
            sheet.Range[currentRow, 1].Text = currentFormula;
            // Calculate and display the logical result
            formulaResult = workbook.CalculateFormulaValue(currentFormula);
            value = formulaResult.ToString();
            sheet.Range[currentRow, 2].Value = value;
            sheet.Range[currentRow, 2].HorizontalAlignment = HorizontalAlignType.Right;

            // --- Text Function: MID (Substring Extraction) ---
            // Define a MID function to extract characters from a string
            currentFormula = "=MID(\"world\",4,2)";
            sheet.Range[++currentRow, 1].Text = currentFormula;
            // Calculate and display the substring result
            formulaResult = workbook.CalculateFormulaValue(currentFormula);
            value = formulaResult.ToString();
            sheet.Range[currentRow, 2].Value = value;
            sheet.Range[currentRow, 2].HorizontalAlignment = HorizontalAlignType.Right;

            // --- Random Number Function: RAND() ---
            // Define a RAND function to generate a random number between 0 and 1
            currentFormula = "=RAND()";
            sheet.Range[++currentRow, 1].Text = currentFormula;
            // Calculate and display the random value
            formulaResult = workbook.CalculateFormulaValue(currentFormula);
            value = formulaResult.ToString();
            sheet.Range[currentRow, 2].Value = value;

            // Save the workbook to a file
            workbook.SaveToFile("formulaTest2.xls", ExcelVersion.Version97to2003);
            System.Diagnostics.Process.Start("formulaTest2.xls");
        }
    }
}
Screenshot:
C#/VB.NET: Merge Word Documents
Watch this quick demo video to see how multiple Word documents can be merged into one file using C# and VB.NET.
Long papers or research reports are often completed collaboratively by multiple people. To save time, each person can work on their assigned parts in separate documents and then merge these documents into one after finish editing. Apart from manually copying and pasting content from one Word document to another, this article will demonstrate the following two ways to merge Word documents programmatically using Spire.Doc for .NET .
Install Spire.Doc for .NET
To begin with, you need to add the DLL files included in the Spire.Doc for.NET package as references in your .NET project. The DLL files can be either downloaded from this link or installed via NuGet.
PM> Install-Package Spire.Doc
Merge Documents by Inserting the Entire File
The Document.InsertTextFromFile() method provided by Spire.Doc for .NET allows merging Word documents by inserting other documents entirely into a document. Using this method, the contents of the inserted document will start from a new page. The detailed steps are as follows:
- Create a Document instance.
- Load the original Word document using Document.LoadFromFile() method.
- Insert another Word document entirely to the original document using Document.InsertTextFromFile() method.
- Save the result document using Document.SaveToFile() method.
- C#
- VB.NET
using Spire.Doc;

namespace MergeWord
{
    class Program
    {
        static void Main(string[] args)
        {
            //Create a Document instance
            Document document = new Document();

            //Load the original Word document
            document.LoadFromFile("Doc1.docx", FileFormat.Docx);

            //Insert another Word document entirely to the original document
            document.InsertTextFromFile("Doc2.docx", FileFormat.Docx);

            //Save the result document
            document.SaveToFile("MergedWord.docx", FileFormat.Docx);
        }
    }
}
Merge Documents by Cloning Contents
If you want to merge documents without starting a new page, you can clone the contents of other documents to add to the end of the original document. The detailed steps are as follows:
- Load two Word documents.
- Loop through the second document to get all the sections using Document.Sections property, and then loop through all the sections to get their child objects using Section.Body.ChildObjects property.
- Get the last section of the first document using Document.LastSection property, and then add the child objects to the last section of the first document using LastSection.Body.ChildObjects.Add() method.
- Save the result document using Document.SaveToFile() method.
- C#
- VB.NET
using Spire.Doc;

namespace MergeWord
{
    class Program
    {
        static void Main(string[] args)
        {
            //Load two Word documents
            Document doc1 = new Document("Doc1.docx");
            Document doc2 = new Document("Doc2.docx");

            //Loop through the second document to get all the sections
            foreach (Section section in doc2.Sections)
            {

                //Loop through the sections of the second document to get their child objects
                foreach (DocumentObject obj in section.Body.ChildObjects)
                {

                    // Get the last section of the first document
                     Section lastSection = doc1.LastSection;

                    //Add all child objects to the last section of the first document
                    lastSection.Body.ChildObjects.Add(obj.Clone());
                }
            }

            // Save the result document
            doc1.SaveToFile("MergeDocuments.docx", FileFormat.Docx);
        }
    }
}
Apply for a Temporary License
If you'd like to remove the evaluation message from the generated documents, or to get rid of the function limitations, please request a 30-day trial license for yourself.
Modify Passwords of Encrypted PDF in C#/VB.NET
Modifying passwords of PDF file is really a rational choice especially when the passwords are known by someone and your PDF file is no longer safe. Spire.PDF for .NET enables you to modify passwords of your encrypted PDF file in C#, VB.NET. You can modify your owner password as well as user password and set user restrictions when access the PDF file. Now please see the process of modifying encrypted PDF passwords as below picture:
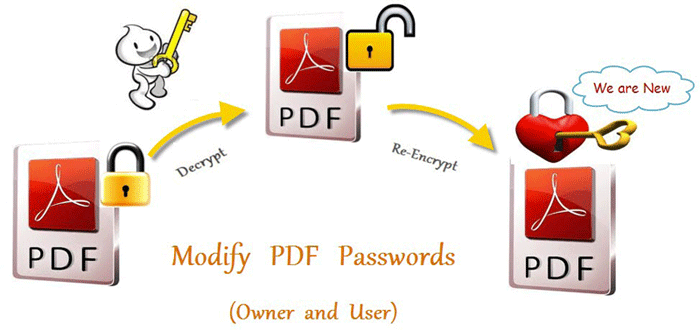
From above picture, you can easily find that the first step is to decrypt PDF file by owner password. So the original owner password is necessary. You can decrypt it by this method: Spire.Pdf.PdfDocument(string filename, string password)
Then, modify passwords by resetting owner password and user password. PDFSecurity class which is in the namespace Spire.PDFDocument.Security can help you not only to set owner password and user password, but also can set user permissions to restrict user access.
Below shows the whole code of modifying passwords of encrypted PDF file, please download Spire.PDF for .NET and install it on system before following the code:
using Spire.Pdf;
using Spire.Pdf.Security;

namespace modify_PDF_passwords
{
    class Program
    {
        static void Main(string[] args)
        {

            //load a encrypted file and decrypt it
            String encryptedPdf = @""..\Encrypt.pdf"";
            PdfDocument doc = new PdfDocument(encryptedPdf, ""e-iceblue"");

            // Define user and owner passwords
            string userPassword = ""user"";
            string ownerPassword = ""owner"";

            // Create a security policy with the specified passwords
            PdfSecurityPolicy securityPolicy = new PdfPasswordSecurityPolicy(userPassword, ownerPassword);

            // Set the encryption algorithm to AES 128-bit
            securityPolicy.EncryptionAlgorithm = PdfEncryptionAlgorithm.AES_128;

            // Allow printing of the document
            securityPolicy.DocumentPrivilege.AllowPrint = true;

            // Allow filling form fields in the document
            securityPolicy.DocumentPrivilege.AllowFillFormFields = true;

            // Allow copying content from the document
            securityPolicy.DocumentPrivilege.AllowContentCopying = true;

            // Encrypt the PDF document using the specified security policy
            doc.Encrypt(securityPolicy);

            // Save the encrypted PDF document to a file named ""SecurityPermission.pdf""
           doc.SaveToFile(""Encryption-result.pdf"");

        }
    }
}
Imports Spire.Pdf
Imports Spire.Pdf.Security

Namespace modify_PDF_passwords
	Class Program
		Private Shared Sub Main(args As String())

		  load a encrypted file and decrypt it
		  Dim encryptedPdf As String = ""..\Encrypt.pdf""
		  Dim doc As New PdfDocument(encryptedPdf, ""e-iceblue"")

		  ' Define user and owner passwords
		  Dim userPassword As String = ""user""
		  Dim ownerPassword As String = ""owner""

		  ' Create a security policy with the specified passwords
		  Dim securityPolicy As PdfSecurityPolicy = New PdfPasswordSecurityPolicy(userPassword, ownerPassword)

		  ' Set the encryption algorithm to AES 128-bit
		  securityPolicy.EncryptionAlgorithm = PdfEncryptionAlgorithm.AES_128

		  ' Allow printing of the document
		  securityPolicy.DocumentPrivilege.AllowPrint = True

		  ' Allow filling form fields in the document
		  securityPolicy.DocumentPrivilege.AllowFillFormFields = True

		  ' Allow copying content from the document
		  securityPolicy.DocumentPrivilege.AllowContentCopying = True

		  ' Encrypt the PDF document using the specified security policy
		  doc.Encrypt(securityPolicy)

		  ' Save the encrypted PDF document to a file named ""SecurityPermission.pdf""
		  doc.SaveToFile(""Encryption-result.pdf"")

		End Sub
	End Class
End Namespace
Spire.PDF for .NET is a .NET PDF component that enables you to generate, read, edit and manipulate PDF files in C#, VB.NET.