Parameters, checklists and summary figures are easier to read in a table than in a paragraph of text. Inserting tables page by page and filling every cell by hand takes time, and across a longer deck the row and column counts drift apart and the styling no longer matches; when an old template is reused, the tables left over from the previous version have to be cleared out as well.
This article uses Spire.Presentation for JavaScript to create and delete PowerPoint tables in the browser. The whole process runs locally on the user's device through WebAssembly, requires no Office installation and no back-end service, and keeps the presentation from leaving the browser.
This article covers two features:
For installation and project configuration, see Integrating Spire.Presentation for JavaScript in a React Project. The examples below assume that Spire.Presentation for JavaScript is installed and the WebAssembly module has been initialized.
Add a table to a PowerPoint slide
A new presentation comes with one blank slide, and a table's position, column widths and row heights are all fixed at the moment it is inserted. Give the width of each column and the height of each row according to the number of rows and columns, then write the text cell by cell, and the table lands exactly where it is expected on the page. Applying a built-in table style lets the header row and the detail rows differ in fill color automatically, without setting borders and fills cell by cell, and keeps the tables on different slides consistent.
| Call | Result |
|---|---|
Presentation.Slides.get_Item(index) |
Take a slide by index, starting from 0 |
slide.Shapes.AppendTable(x, y, widths, heights) |
Add a table at the given position with the given column widths and row heights |
table.get_Item(columnIndex, rowIndex) |
Take a cell by column and row index |
cell.TextFrame.Text |
Set or read the text of a cell |
cell.TextFrame.Paragraphs.get_Item(0).TextRanges.get_Item(0) |
Take the text range of the cell's first paragraph, used for font settings |
textRange.LatinFont |
Set the font of the text range |
paragraph.Alignment = TextAlignmentType.Center |
Center the paragraph horizontally |
table.StylePreset = TableStylePreset.MediumStyle1Accent2 |
Apply a built-in table style |
The steps are:
- Get the Spire.Presentation WASM module and check that it is ready, load the font file into the VFS, then create a
Presentationobject and take its first slide withSlides.get_Item(0). - Prepare the column width and row height arrays and call
slide.Shapes.AppendTable()to add the table; the returned object is what the values are written through. - Walk the data row by row and column by column, take each cell with
table.get_Item(), write the text intocell.TextFrame.Text, and setLatinFontthroughTextRanges.get_Item(0). - Set the
Alignmentof the header row's paragraphs toTextAlignmentType.Center, then setStylePresettoTableStylePreset.MediumStyle1Accent2. - Call
Presentation.SaveToFile()to save the result file andDispose()to release the presentation, then read the file back from the VFS and start the download.
The code that adds a table to a PowerPoint slide:
function App() {
  const addTable = async () => {
    // get the Spire.Presentation WASM module
    const pptModule = window.wasmModule?.spirepresentation;

    // check that the module is ready
    if (!pptModule) {
      alert('Spire.Presentation is not ready yet');
      return;
    }

    // load the font into the VFS
    await window.spire.FetchFileToVFS('arial.ttf', '/Library/Fonts/', `${process.env.PUBLIC_URL}/font/`);

    // create a presentation and take its first slide
    const ppt = new pptModule.Presentation();
    const slide = ppt.Slides.get_Item(0);

    // define the width of the four columns and the height of the five rows (in points)
    const widths = [150, 150, 150, 150];
    const heights = [40, 40, 40, 40, 40];

    // add a four-column, five-row table at the given position
    const table = slide.Shapes.AppendTable(60, 120, widths, heights);

    // prepare the data to write into the table, the first row is the header
    const data = [
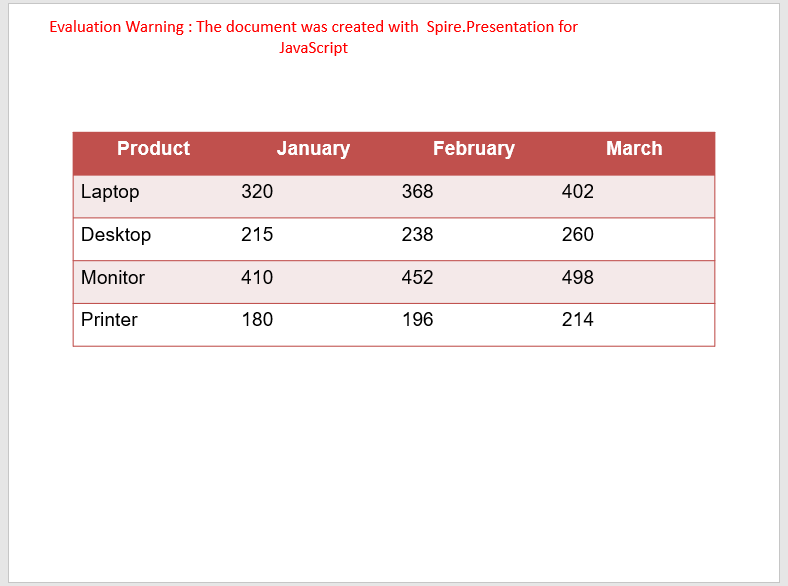
      ['Product', 'January', 'February', 'March'],
      ['Laptop', '320', '368', '402'],
      ['Desktop', '215', '238', '260'],
      ['Monitor', '410', '452', '498'],
      ['Printer', '180', '196', '214'],
    ];

    // write the text of every cell row by row and apply the same font
    for (let row = 0; row < data.length; row++) {
      for (let col = 0; col < data[row].length; col++) {
        const cell = table.get_Item(col, row);
        cell.TextFrame.Text = data[row][col];
        const textRange = cell.TextFrame.Paragraphs.get_Item(0).TextRanges.get_Item(0);
        textRange.LatinFont = new pptModule.TextFont('Arial');
      }
    }

    // center the header row and apply a built-in table style
    for (let col = 0; col < 4; col++) {
      table.get_Item(col, 0).TextFrame.Paragraphs.get_Item(0).Alignment = pptModule.TextAlignmentType.Center;
    }
    table.StylePreset = pptModule.TableStylePreset.MediumStyle1Accent2;

    // save the result file
    const outputFileName = 'AddTable_result.pptx';
    ppt.SaveToFile({ file: outputFileName, fileFormat: pptModule.FileFormat.Pptx2013 });
    ppt.Dispose();

    // read the generated file from the VFS and start the download
    const fileArray = window.dotnetRuntime.Module.FS.readFile(outputFileName);
    const blob = new Blob([fileArray], { type: 'application/vnd.openxmlformats-officedocument.presentationml.presentation' });
    const url = URL.createObjectURL(blob);
    const a = document.createElement('a');
    a.href = url;
    a.download = outputFileName;
    a.click();
    URL.revokeObjectURL(url);
  };

  return (
    <div style={{ textAlign: 'center', height: '300px' }}>
      <h1>Working with Tables in PowerPoint</h1>
      <button onClick={addTable}>Add a table</button>
    </div>
  );
}

export default App;
The presentation after adding a table:
Remove the tables from a PowerPoint slide
Tables share the slide's shape collection with text, pictures and other shapes, so removing a shape by index easily hits the wrong element. Walking the collection first, picking out the tables by type into a separate array and then removing them one by one leaves every other shape untouched. A second benefit is that a slide holding several tables is cleaned up in one pass.
| Call | Result |
|---|---|
slide.Shapes.Count |
The number of shapes on the slide |
slide.Shapes.get_Item(index) |
Take a shape on the slide by index |
shape instanceof pptModule.ITable |
Tell whether a shape is a table |
slide.Shapes.Remove(shape) |
Remove the given shape from the slide |
The steps are:
- Get the Spire.Presentation WASM module and check that it is ready, load the font file and the presentation into the VFS, create a
Presentationobject and load the file withLoadFromFile(), then take the first slide withSlides.get_Item(0). - Walk the shape collection up to
Shapes.Count, take each shape withShapes.get_Item(i), tell whether it is a table withshape instanceof pptModule.ITable, and put the matches into a separate array. - Walk that array and call
Shapes.Remove()on each table to take it off the slide. - Call
Presentation.SaveToFile()to save the result file andDispose()to release the presentation, then read the file back from the VFS and start the download.
The code that removes the tables from a PowerPoint slide:
function App() {
  const removeTable = async () => {
    // get the Spire.Presentation WASM module
    const pptModule = window.wasmModule?.spirepresentation;

    // check that the module is ready
    if (!pptModule) {
      alert('Spire.Presentation is not ready yet');
      return;
    }

    // load the presentation into the VFS
    const inputFileName = 'en_Tables.pptx';
    await window.spire.FetchFileToVFS(inputFileName, '', `${process.env.PUBLIC_URL}/data/`);

    // load the presentation and take its first slide
    const ppt = new pptModule.Presentation();
    ppt.LoadFromFile(inputFileName);
    const slide = ppt.Slides.get_Item(0);

    // walk the shape collection and collect the tables into a separate array
    const tables = [];
    for (let i = 0; i < slide.Shapes.Count; i++) {
      const shape = slide.Shapes.get_Item(i);
      if (shape instanceof pptModule.ITable) {
        tables.push(shape);
      }
    }

    // remove each table from the slide
    for (let i = 0; i < tables.length; i++) {
      slide.Shapes.Remove(tables[i]);
    }

    // save the result file
    const outputFileName = 'RemoveTable_result.pptx';
    ppt.SaveToFile({ file: outputFileName, fileFormat: pptModule.FileFormat.Pptx2013 });
    ppt.Dispose();

    // read the generated file from the VFS and start the download
    const fileArray = window.dotnetRuntime.Module.FS.readFile(outputFileName);
    const blob = new Blob([fileArray], { type: 'application/vnd.openxmlformats-officedocument.presentationml.presentation' });
    const url = URL.createObjectURL(blob);
    const a = document.createElement('a');
    a.href = url;
    a.download = outputFileName;
    a.click();
    URL.revokeObjectURL(url);
  };

  return (
    <div style={{ textAlign: 'center', height: '300px' }}>
      <h1>Working with Tables in PowerPoint</h1>
      <button onClick={removeTable}>Remove the table</button>
    </div>
  );
}

export default App;
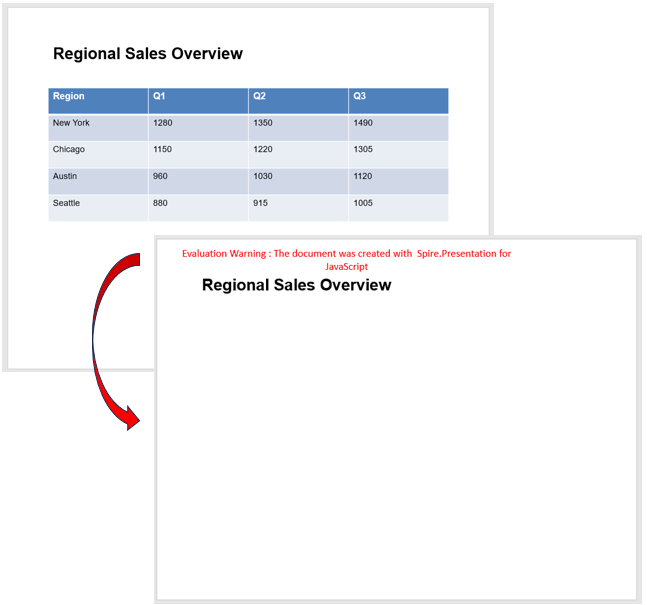
The presentation after removing the table from the slide:
FAQ
How do I adjust the column widths and row heights of a table
Cause: The column widths and row heights are given as arrays when the table is inserted, so adjusting a single column or row afterwards means taking the matching object from the row or column collection first.
Solution: ColumnsList and TableRows take a column or row by index (starting from 0); set Width and Height on them, and the overall size of the table follows:
table.ColumnsList.get_Item(1).Width = 220;
table.TableRows.get_Item(1).Height = 60;
How do I center the text vertically inside a cell
Cause: Cell text is anchored to the top by default, so once the row is made taller the text sits against the upper edge and no longer looks centered.
Solution: Set the cell's TextAnchorType to TextAnchorType.Center; use Top or Bottom instead to keep the text at the upper or lower edge:
table.get_Item(col, row).TextAnchorType = pptModule.TextAnchorType.Center;
Get a Free License
If you wish to delete the evaluation message from the resulting documents, or to get rid of function limitations, please contact sales to obtain a valid 30-day temporary license.
