Animations decide how and when the content of a presentation appears on screen. If shapes, titles and bullet points all show up at once, the audience has to keep up with the whole page at the same time; setting the animations page by page by hand takes time and is hard to keep consistent in a batch of generated decks. Adding animations with Spire.Presentation for JavaScript lets you arrange the order of every slide while the presentation is being generated, so the content and its effects are reused together.
This article uses Spire.Presentation for JavaScript to add animations to PowerPoint shapes in the browser. The whole process runs locally on the user's device through WebAssembly, requires no Office installation and no back-end service, and keeps the presentation from leaving the browser.
This article covers two features:
For installation and project configuration, see Integrating Spire.Presentation for JavaScript in a React Project. The examples below assume that Spire.Presentation for JavaScript is installed and the WebAssembly module has been initialized.
Add entrance animations to PowerPoint shapes
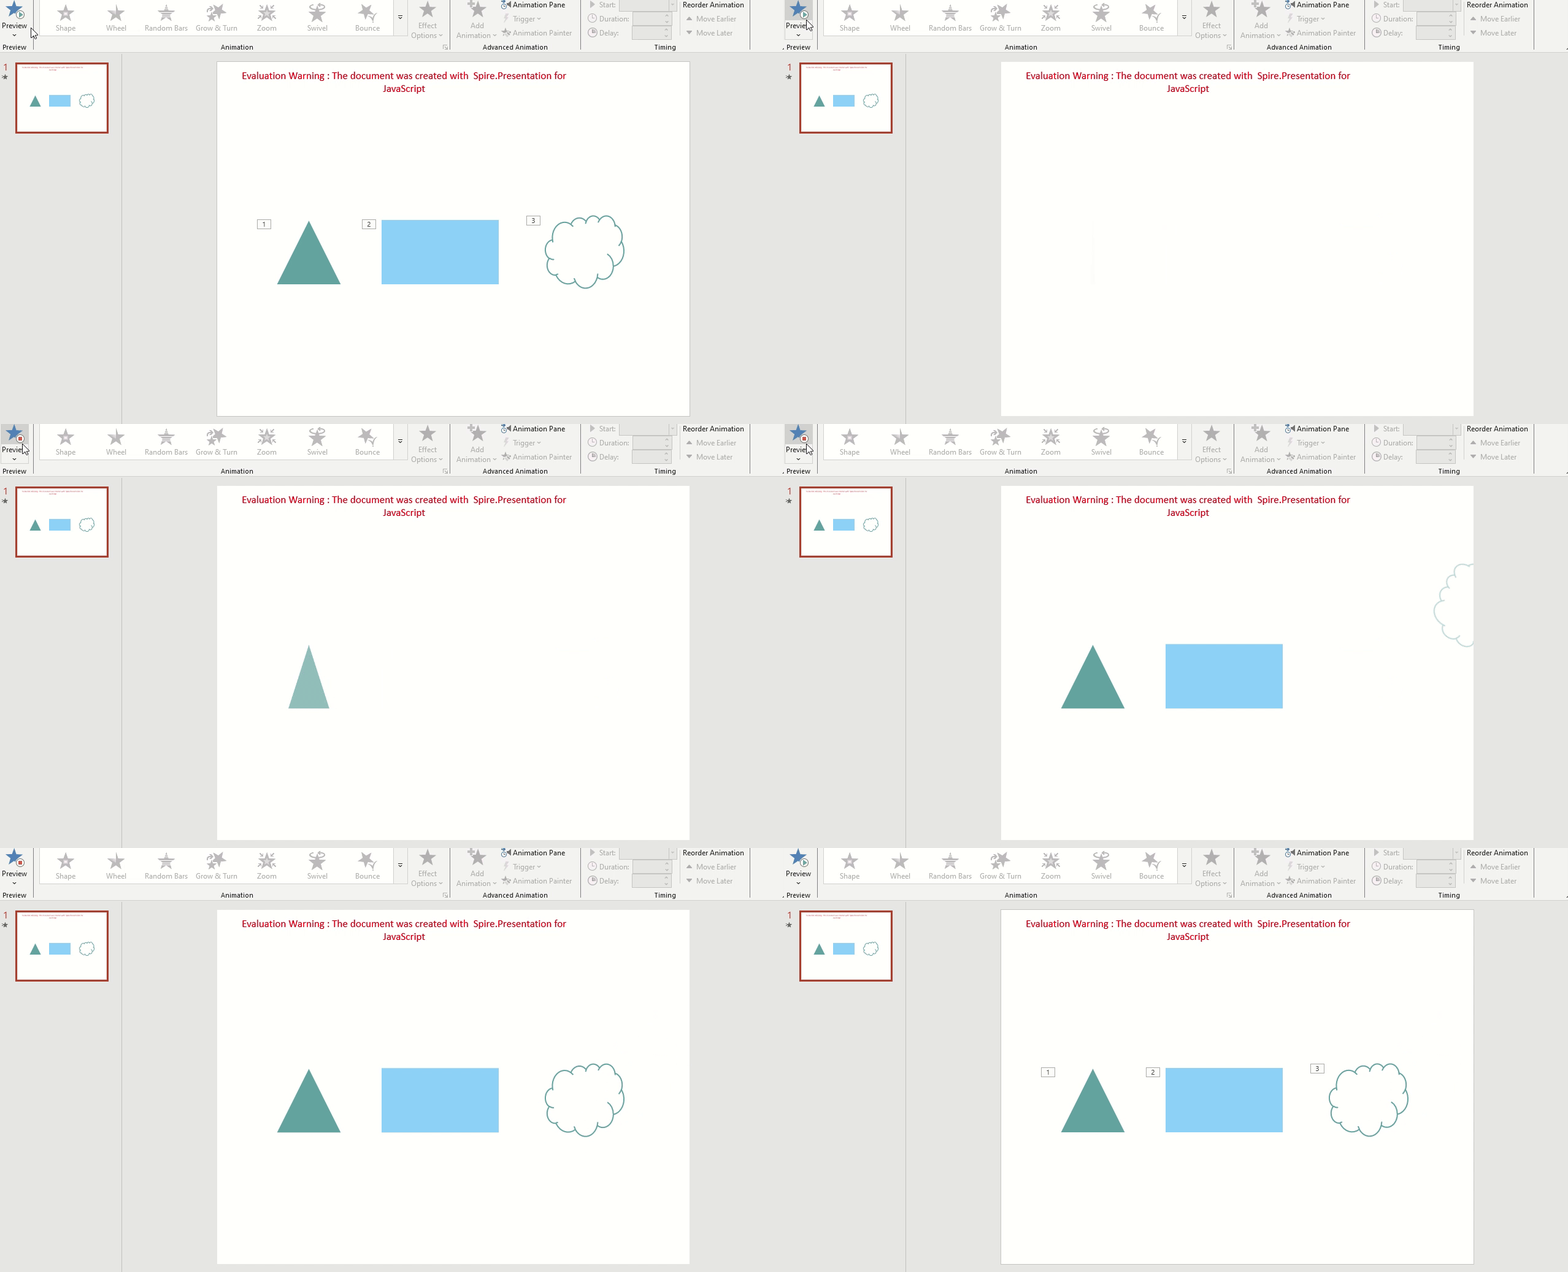
A newly added shape has no motion when the slide show starts. Once an entrance animation is assigned, the shape appears in turn along the animation sequence, so the content can be revealed piece by piece instead of all at once. The animations of a slide are stored in one main sequence, ordered by the time they are added, and they fire in that order during the slide show.
| Writing | Result |
|---|---|
slide.Timeline.MainSequence |
Returns the main animation sequence of the current slide, holding the effects in order |
MainSequence.AddEffect(shape, effectType) |
Adds an animation effect to a shape and returns the effect object |
AnimationEffectType.FadedSwivel, FadedZoom, Float, etc. |
Selects the entrance effect, such as faded swivel, faded zoom or float |
slide.Shapes.AppendShape({ shapeType, rectangle }) |
Adds a shape in the specified area of the slide |
The steps are:
- Get the Spire.Presentation WASM module and make sure it is ready, load the font file into the VFS, and create a
Presentationobject. - Get the first slide through
Presentation.Slides.get_Item(0). - Add a title text box and three shapes with
Shapes.AppendShape(), and set their fill and outline throughFillandLine. - Call
slide.Timeline.MainSequence.AddEffect()in turn withAnimationEffectType.FadedSwivel,FadedZoomandFloat, one for each shape. - Call
Presentation.SaveToFile()to save the result file, release the presentation withDispose(), then read the file from the VFS and trigger the download.
The code for adding entrance animations to PowerPoint shapes:
function App() {
  const addEntranceAnimation = async () => {
    // Get the Spire.Presentation WASM module
    const pptModule = window.wasmModule?.spirepresentation;

    // Check that the module is ready
    if (!pptModule) {
      alert('Spire.Presentation is not ready yet');
      return;
    }

    // Load the font file into the VFS
    await window.spire.FetchFileToVFS('ARIAL.TTF', '/Library/Fonts/', `${process.env.PUBLIC_URL}/font/`);

    // Create a presentation and get the first slide
    const ppt = new pptModule.Presentation();
    const slide = ppt.Slides.get_Item(0);

    // Add a title text box
    const title = slide.Shapes.AppendShape({
      shapeType: pptModule.ShapeType.Rectangle,
      rectangle: pptModule.RectangleF.FromLTRB(60, 60, 660, 140),
    });
    title.Fill.FillType = pptModule.FillFormatType.None;
    title.Line.FillType = pptModule.FillFormatType.None;
    title.AppendTextFrame('Shape Animation Demo');
    title.TextFrame.TextRange.FontHeight = 32;
    title.TextFrame.TextRange.Fill.FillType = pptModule.FillFormatType.Solid;
    title.TextFrame.TextRange.Fill.SolidColor.Color = pptModule.Color.get_Black();
    title.TextFrame.Paragraphs.get_Item(0).Alignment = pptModule.TextAlignmentType.Center;

    // Add three shapes
    const triangle = slide.Shapes.AppendShape({
      shapeType: pptModule.ShapeType.Triangle,
      rectangle: pptModule.RectangleF.FromLTRB(90, 240, 190, 340),
    });
    triangle.Fill.FillType = pptModule.FillFormatType.Solid;
    triangle.Fill.SolidColor.Color = pptModule.Color.get_CadetBlue();
    triangle.Line.FillType = pptModule.FillFormatType.Solid;
    triangle.Line.SolidFillColor.Color = pptModule.Color.get_White();

    const rectangle = slide.Shapes.AppendShape({
      shapeType: pptModule.ShapeType.Rectangle,
      rectangle: pptModule.RectangleF.FromLTRB(250, 240, 430, 340),
    });
    rectangle.Fill.FillType = pptModule.FillFormatType.Solid;
    rectangle.Fill.SolidColor.Color = pptModule.Color.get_LightSkyBlue();
    rectangle.Line.FillType = pptModule.FillFormatType.Solid;
    rectangle.Line.SolidFillColor.Color = pptModule.Color.get_White();
    rectangle.AppendTextFrame('Animated Shape');
    rectangle.TextFrame.TextRange.FontHeight = 24;

    const cloud = slide.Shapes.AppendShape({
      shapeType: pptModule.ShapeType.Cloud,
      rectangle: pptModule.RectangleF.FromLTRB(500, 235, 620, 345),
    });
    cloud.Fill.FillType = pptModule.FillFormatType.Solid;
    cloud.Fill.SolidColor.Color = pptModule.Color.get_White();
    cloud.Line.FillType = pptModule.FillFormatType.Solid;
    cloud.Line.SolidFillColor.Color = pptModule.Color.get_CadetBlue();

    // Add entrance animations to the three shapes in order
    slide.Timeline.MainSequence.AddEffect(triangle, pptModule.AnimationEffectType.FadedSwivel);
    slide.Timeline.MainSequence.AddEffect(rectangle, pptModule.AnimationEffectType.FadedZoom);
    slide.Timeline.MainSequence.AddEffect(cloud, pptModule.AnimationEffectType.Float);

    // Save the result file
    const outputFileName = 'AddEntranceAnimation_result.pptx';
    ppt.SaveToFile({ file: outputFileName, fileFormat: pptModule.FileFormat.Pptx2013 });
    ppt.Dispose();

    // Read the generated file from the VFS and trigger the download
    const fileArray = window.dotnetRuntime.Module.FS.readFile(outputFileName);
    const blob = new Blob([fileArray], { type: 'application/vnd.openxmlformats-officedocument.presentationml.presentation' });
    const url = URL.createObjectURL(blob);
    const a = document.createElement('a');
    a.href = url;
    a.download = outputFileName;
    a.click();
    URL.revokeObjectURL(url);
  };

  return (
    <div style={{ textAlign: 'center', height: '300px' }}>
      <h1>Shape Animation</h1>
      <button onClick={addEntranceAnimation}>Add entrance animation</button>
    </div>
  );
}

export default App;
Presentation after adding entrance animations to three shapes:
Add exit animations to shapes
An entrance animation brings a shape in; an exit animation takes it away once the topic has been covered, freeing the page for what comes next. Call AddEffect() to add an effect, then set PresetClassType to TimeNodePresetClassType.Exit so the effect runs on exit instead of entrance:
const effect = slide.Timeline.MainSequence.AddEffect(shape, pptModule.AnimationEffectType.RandomBars);
effect.PresetClassType = pptModule.TimeNodePresetClassType.Exit;
Set animation duration, delay and repeat options
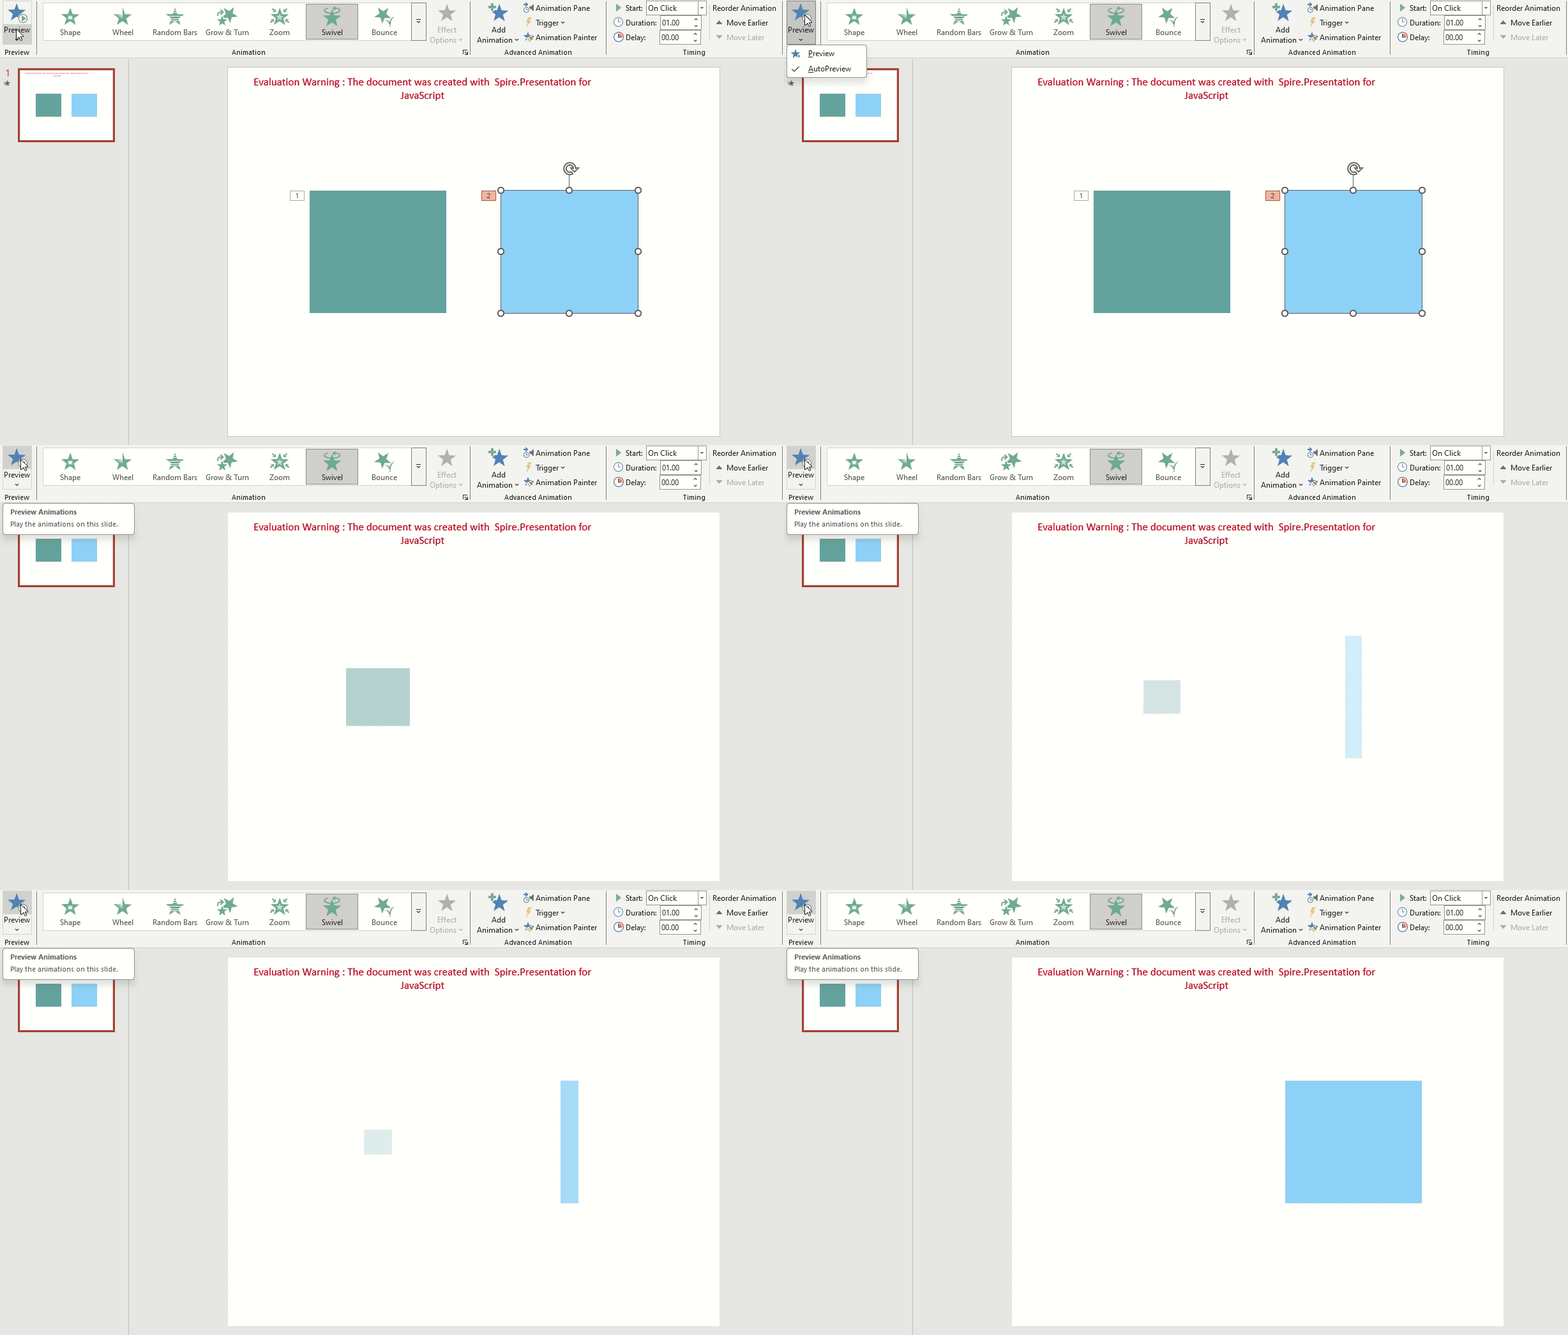
The default duration and trigger rhythm suit a single walk-through, but not content that needs emphasis or a longer stay on screen: some animations should be slowed down so the change is easy to follow, while others should keep repeating while the slide stays visible. Every effect object carries Timing, which controls the duration, delay and repeat mode separately without touching the effect type itself.
| Writing | Result |
|---|---|
effect.Timing.Duration |
Sets how long one run of the animation takes, in seconds |
effect.Timing.TriggerDelayTime |
Sets how long to wait after the trigger before playing, in seconds |
Timing.AnimationRepeatType |
Sets how the animation repeats |
AnimationRepeatType.UtilEndOfSlide |
Keeps playing until the slide is left |
AnimationRepeatType.Number + Timing.RepeatCount |
Repeats the animation a fixed number of times |
The steps are:
- Get the Spire.Presentation WASM module and make sure it is ready, load the font file into the VFS, then create a
Presentationobject and get the first slide. - Add two color blocks with
Shapes.AppendShape()and set their fill colors. - For the first block, call
AddEffect()to add an animation, then seteffect.Timing.Durationandeffect.Timing.TriggerDelayTime. - Set
effect.Timing.AnimationRepeatTypetoAnimationRepeatType.UtilEndOfSlide, so the animation keeps playing until the slide is left. - For the second block, add another animation, set
Timing.AnimationRepeatTypetoAnimationRepeatType.Number, and give the count throughTiming.RepeatCount. - Save the result file, release the presentation, then read the file from the VFS and trigger the download.
The code for setting animation duration, delay and repeat options:
function App() {
  const setAnimationTiming = async () => {
    // Get the Spire.Presentation WASM module
    const pptModule = window.wasmModule?.spirepresentation;

    // Check that the module is ready
    if (!pptModule) {
      alert('Spire.Presentation is not ready yet');
      return;
    }

    // Load the font file into the VFS
    await window.spire.FetchFileToVFS('ARIAL.TTF', '/Library/Fonts/', `${process.env.PUBLIC_URL}/font/`);

    // Create a presentation and get the first slide
    const ppt = new pptModule.Presentation();
    const slide = ppt.Slides.get_Item(0);

    // Add two color blocks
    const firstBar = slide.Shapes.AppendShape({
      shapeType: pptModule.ShapeType.Rectangle,
      rectangle: pptModule.RectangleF.FromLTRB(120, 180, 320, 360),
    });
    firstBar.Fill.FillType = pptModule.FillFormatType.Solid;
    firstBar.Fill.SolidColor.Color = pptModule.Color.get_CadetBlue();
    firstBar.Line.FillType = pptModule.FillFormatType.None;

    const secondBar = slide.Shapes.AppendShape({
      shapeType: pptModule.ShapeType.Rectangle,
      rectangle: pptModule.RectangleF.FromLTRB(400, 180, 600, 360),
    });
    secondBar.Fill.FillType = pptModule.FillFormatType.Solid;
    secondBar.Fill.SolidColor.Color = pptModule.Color.get_LightSkyBlue();
    secondBar.Line.FillType = pptModule.FillFormatType.None;

    // Add an animation to one block and set its duration and delay
    const effect = slide.Timeline.MainSequence.AddEffect(firstBar, pptModule.AnimationEffectType.FadedZoom);
    effect.Timing.Duration = 1.5;
    effect.Timing.TriggerDelayTime = 0.5;
    effect.Timing.AnimationRepeatType = pptModule.AnimationRepeatType.UtilEndOfSlide;

    // Add an animation to the other block and repeat it three times
    const loopEffect = slide.Timeline.MainSequence.AddEffect(secondBar, pptModule.AnimationEffectType.FadedSwivel);
    loopEffect.Timing.Duration = 1;
    loopEffect.Timing.AnimationRepeatType = pptModule.AnimationRepeatType.Number;
    loopEffect.Timing.RepeatCount = 3;

    // Save the result file
    const outputFileName = 'SetAnimationTiming_result.pptx';
    ppt.SaveToFile({ file: outputFileName, fileFormat: pptModule.FileFormat.Pptx2013 });
    ppt.Dispose();

    // Read the generated file from the VFS and trigger the download
    const fileArray = window.dotnetRuntime.Module.FS.readFile(outputFileName);
    const blob = new Blob([fileArray], { type: 'application/vnd.openxmlformats-officedocument.presentationml.presentation' });
    const url = URL.createObjectURL(blob);
    const a = document.createElement('a');
    a.href = url;
    a.download = outputFileName;
    a.click();
    URL.revokeObjectURL(url);
  };

  return (
    <div style={{ textAlign: 'center', height: '300px' }}>
      <h1>Shape Animation</h1>
      <button onClick={setAnimationTiming}>Set animation timing</button>
    </div>
  );
}

export default App;
Presentation after setting animation duration, delay and repeat options:
FAQ
How to read the animations already in a slide
Cause: When you keep working on an existing presentation, you need to know which animations each slide already has before deciding what to add or adjust.
Solution: Walk through the main sequence and read the effect type, target shape and duration of each effect:
const sequence = slide.Timeline.MainSequence;
for (let i = 0; i < sequence.Count; i++) {
  const effect = sequence.get_Item(i);
  console.log(effect.AnimationEffectType, effect.ShapeTarget.Name, effect.Timing.Duration);
}
How to play an animation after the previous one finishes
Cause: A new animation waits for a click by default, so several effects need one click each and the rhythm is easy to break.
Solution: Set Timing.TriggerType to AnimationTriggerType.AfterPrevious; the animation then starts as soon as the previous one ends. WithPrevious plays it together with the previous animation:
effect.Timing.TriggerType = pptModule.AnimationTriggerType.AfterPrevious;
Why animations do not show in exported images
Cause: Animations live in the animation timeline of the presentation and play in order during the slide show; an exported image is a still frame that only reflects the final style and position of the shapes.
Solution: Play the presentation in a viewer that supports animations to see the effect; exported images are suited to showing a single frame of layout, not the animation itself.
Get a Free License
If you wish to delete the evaluation message from the resulting documents, or to get rid of function limitations, please contact sales to obtain a valid 30-day temporary license.
