Explanatory content in a presentation is often hard to convey with text alone: the order of steps, the relationships between parts, and the boundaries of key information all become clearer once they are marked with a graphic. Drawing and styling shapes by hand on every slide takes time and is difficult to keep consistent across batch-generated documents.
This article uses Spire.Presentation for JavaScript to add shapes to PowerPoint presentations in the browser. The whole process runs locally on the user's device through WebAssembly, requires no Office installation and no back-end service, and keeps the presentation from leaving the browser.
This article covers two core features:
For installation and project configuration, see Integrating Spire.Presentation for JavaScript in a React Project. The examples below assume that Spire.Presentation is installed and the WebAssembly module has been initialized.
Add Basic Shapes to PowerPoint Slides
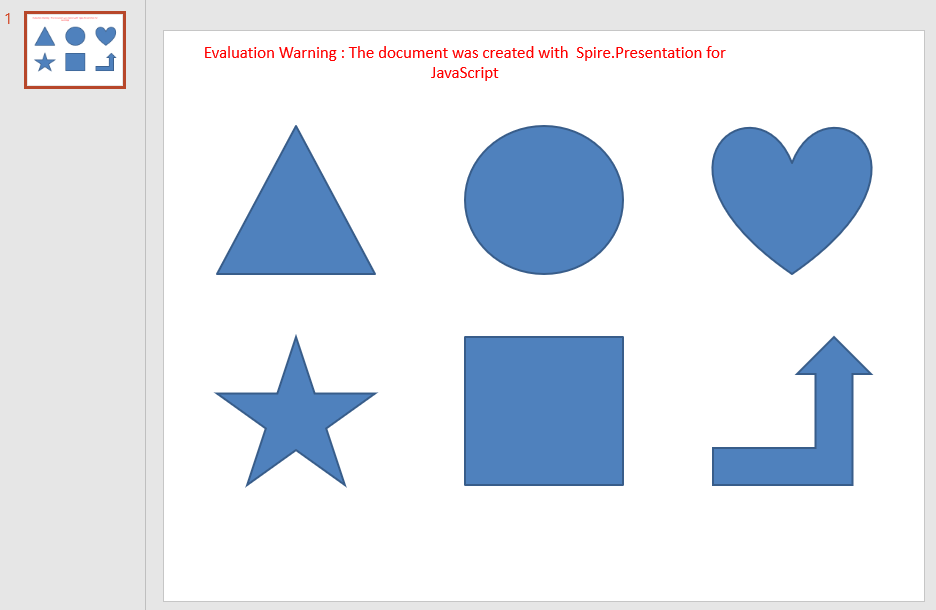
Triangles, ellipses, hearts, five-pointed stars, rectangles and bent-up arrows are common building blocks on a slide; they divide areas, mark key points or support a text explanation. Adding a shape to a slide requires the shape type first, and then the position and size expressed in coordinates, so that the graphic lands exactly where it is expected.
| Usage | Result |
|---|---|
slide.Shapes.AppendShape({ shapeType, rectangle }) |
Add a shape of the given type inside the specified area |
RectangleF.FromLTRB(left, top, right, bottom) |
Define the position and size of a shape with its top-left and bottom-right coordinates |
ShapeType.Rectangle, ShapeType.Ellipse, ShapeType.Triangle, ShapeType.Heart, ShapeType.FivePointedStar, ShapeType.BentUpArrow |
The shape types for a rectangle, an ellipse, a triangle, a heart, a five-pointed star and a bent-up arrow |
The steps are:
- Get the Spire.Presentation WASM module and make sure it is ready, load the font file into the VFS, and create a
Presentationobject. - Get the first slide with
Presentation.Slides.get_Item(0). - Define the area of each shape with the top-left and bottom-right coordinates of
RectangleF.FromLTRB(). - Add a triangle, an ellipse, a heart, a five-pointed star, a rectangle and a bent-up arrow with
Shapes.AppendShape(), selecting the matchingShapeTypemember inshapeType. - Save the result file with
Presentation.SaveToFile()and release the presentation withDispose(). - Read the result file from the VFS and trigger the browser download.
The following code adds basic shapes to PowerPoint slides:
function App() {
  const addBasicShapes = async () => {
    // Get the Spire.Presentation WASM module
    const pptModule = window.wasmModule?.spirepresentation;

    // Check that the module is ready
    if (!pptModule) {
      alert('Spire.Presentation is not ready yet');
      return;
    }

    // Load the font into the VFS
    await window.spire.FetchFileToVFS('ARIAL.TTF', '/Library/Fonts/', `${process.env.PUBLIC_URL}/font/`);

    // Create a presentation; it already contains one blank slide
    const ppt = new pptModule.Presentation();
    const slide = ppt.Slides.get_Item(0);

    // Add a triangle
    slide.Shapes.AppendShape({
      shapeType: pptModule.ShapeType.Triangle,
      rectangle: pptModule.RectangleF.FromLTRB(50, 90, 200, 230),
    });

    // Add an ellipse
    slide.Shapes.AppendShape({
      shapeType: pptModule.ShapeType.Ellipse,
      rectangle: pptModule.RectangleF.FromLTRB(285, 90, 435, 230),
    });

    // Add a heart
    slide.Shapes.AppendShape({
      shapeType: pptModule.ShapeType.Heart,
      rectangle: pptModule.RectangleF.FromLTRB(520, 90, 670, 230),
    });

    // Add a five-pointed star
    slide.Shapes.AppendShape({
      shapeType: pptModule.ShapeType.FivePointedStar,
      rectangle: pptModule.RectangleF.FromLTRB(50, 290, 200, 430),
    });

    // Add a rectangle
    slide.Shapes.AppendShape({
      shapeType: pptModule.ShapeType.Rectangle,
      rectangle: pptModule.RectangleF.FromLTRB(285, 290, 435, 430),
    });

    // Add a bent-up arrow
    slide.Shapes.AppendShape({
      shapeType: pptModule.ShapeType.BentUpArrow,
      rectangle: pptModule.RectangleF.FromLTRB(520, 290, 670, 430),
    });

    // Save the result file
    const outputFileName = 'AddBasicShapes.pptx';
    ppt.SaveToFile({ file: outputFileName, fileFormat: pptModule.FileFormat.Pptx2013 });
    ppt.Dispose();

    // Read the generated file from the VFS and trigger the download
    const fileArray = window.dotnetRuntime.Module.FS.readFile(outputFileName);
    const blob = new Blob([fileArray], { type: 'application/vnd.openxmlformats-officedocument.presentationml.presentation' });
    const url = URL.createObjectURL(blob);
    const a = document.createElement('a');
    a.href = url;
    a.download = outputFileName;
    a.click();
    URL.revokeObjectURL(url);
  };

  return (
    <div style={{ textAlign: 'center', height: '300px' }}>
      <h1>Add Shapes</h1>
      <button onClick={addBasicShapes}>
        Add Basic Shapes
      </button>
    </div>
  );
}

export default App;
Presentation after adding six basic shapes to a blank slide:
Style Shapes in PowerPoint
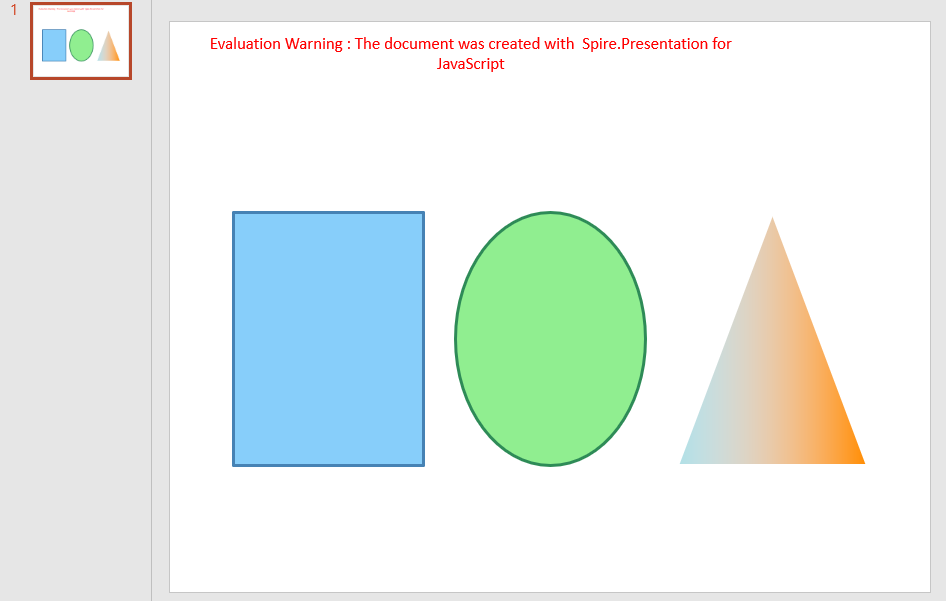
A newly added shape follows the theme colors of the presentation, which often need adjustment on a concrete slide: change the fill and outline so the graphic matches the page palette, adjust the outline width to emphasize a part, or switch to a gradient fill to give the graphic more depth. Style changes are applied to the shape object, so a look defined once can be reused and the colors stay consistent.
| Usage | Result |
|---|---|
shape.Fill.FillType = FillFormatType.Solid |
Set the shape fill to a solid color |
shape.Fill.SolidColor.Color = Color.get_xxx() |
Set the fill color inside the shape |
shape.Fill.FillType = FillFormatType.Gradient |
Set the shape fill to a gradient |
shape.Fill.Gradient.GradientStops.Append({ position, knownColor }) |
Add color stops to the gradient and define the effect |
shape.Line.FillType = FillFormatType.Solid |
Set the shape outline to a solid line |
shape.Line.SolidFillColor.Color = Color.get_xxx() |
Set the outline color of the shape |
shape.Line.Width = n |
Set the outline width of the shape |
The steps are:
- Get the Spire.Presentation WASM module and make sure it is ready, load the font file into the VFS, and create a
Presentationobject and get the first slide. - Add the shapes to style with
Shapes.AppendShape(). - Set
Fill.FillTypetoFillFormatType.Solidand choose the fill color withFill.SolidColor.Color. - Set
Line.FillTypetoFillFormatType.Solid, choose the outline color withLine.SolidFillColor.Color, and adjust the outline width withLine.Width. - For a gradient effect, change
Fill.FillTypetoFillFormatType.Gradientand add color stops withFill.Gradient.GradientStops.Append(). - Save the result file with
Presentation.SaveToFile(), release the presentation withDispose(), and read the file from the VFS to trigger the download.
The following code styles the shapes in PowerPoint:
function App() {
  const styleShapes = async () => {
    // Get the Spire.Presentation WASM module
    const pptModule = window.wasmModule?.spirepresentation;

    // Check that the module is ready
    if (!pptModule) {
      alert('Spire.Presentation is not ready yet');
      return;
    }

    // Load the font into the VFS
    await window.spire.FetchFileToVFS('ARIAL.TTF', '/Library/Fonts/', `${process.env.PUBLIC_URL}/font/`);

    // Create a presentation and get the first slide
    const ppt = new pptModule.Presentation();
    const slide = ppt.Slides.get_Item(0);

    // Add a rectangle with a solid fill, an outline color and a line width
    let shape = slide.Shapes.AppendShape({
      shapeType: pptModule.ShapeType.Rectangle,
      rectangle: pptModule.RectangleF.FromLTRB(60, 180, 240, 420),
    });
    shape.Fill.FillType = pptModule.FillFormatType.Solid;
    shape.Fill.SolidColor.Color = pptModule.Color.get_LightSkyBlue();
    shape.Line.FillType = pptModule.FillFormatType.Solid;
    shape.Line.SolidFillColor.Color = pptModule.Color.get_SteelBlue();
    shape.Line.Width = 3;

    // Add an ellipse with a solid fill and an outline color
    shape = slide.Shapes.AppendShape({
      shapeType: pptModule.ShapeType.Ellipse,
      rectangle: pptModule.RectangleF.FromLTRB(270, 180, 450, 420),
    });
    shape.Fill.FillType = pptModule.FillFormatType.Solid;
    shape.Fill.SolidColor.Color = pptModule.Color.get_LightGreen();
    shape.Line.FillType = pptModule.FillFormatType.Solid;
    shape.Line.SolidFillColor.Color = pptModule.Color.get_SeaGreen();
    shape.Line.Width = 3;

    // Add a triangle with a gradient fill and an outline color
    shape = slide.Shapes.AppendShape({
      shapeType: pptModule.ShapeType.Triangle,
      rectangle: pptModule.RectangleF.FromLTRB(480, 180, 660, 420),
    });
    shape.Fill.FillType = pptModule.FillFormatType.Gradient;
    shape.Fill.Gradient.GradientStops.Append({ position: 0, knownColor: pptModule.KnownColors.PowderBlue });
    shape.Fill.Gradient.GradientStops.Append({ position: 1, knownColor: pptModule.KnownColors.DarkOrange });
    shape.Line.FillType = pptModule.FillFormatType.Solid;
    shape.Line.SolidFillColor.Color = pptModule.Color.get_White();
    shape.Line.Width = 3;

    // Save the result file
    const outputFileName = 'AddShapeStyles.pptx';
    ppt.SaveToFile({ file: outputFileName, fileFormat: pptModule.FileFormat.Pptx2013 });
    ppt.Dispose();

    // Read the generated file from the VFS and trigger the download
    const fileArray = window.dotnetRuntime.Module.FS.readFile(outputFileName);
    const blob = new Blob([fileArray], { type: 'application/vnd.openxmlformats-officedocument.presentationml.presentation' });
    const url = URL.createObjectURL(blob);
    const a = document.createElement('a');
    a.href = url;
    a.download = outputFileName;
    a.click();
    URL.revokeObjectURL(url);
  };

  return (
    <div style={{ textAlign: 'center', height: '300px' }}>
      <h1>Style Shapes</h1>
      <button onClick={styleShapes}>
        Style Shapes
      </button>
    </div>
  );
}

export default App;
Presentation after applying fills, outlines and gradient styles:
FAQ
How to make a shape unfilled and keep only its outline
Cause: Newly added shapes have a fill by default. For an outline-only figure, or to let content underneath show through, set the fill to none explicitly.
Solution: Set Fill.FillType to FillFormatType.None, and define the outline with Line.FillType and Line.SolidFillColor.Color:
shape.Fill.FillType = pptModule.FillFormatType.None;
shape.Line.FillType = pptModule.FillFormatType.Solid;
shape.Line.SolidFillColor.Color = pptModule.Color.get_SlateBlue();
How to change a shape's position and size after adding it
Cause: The position and size of a shape remain editable after it is added; there is no need to create it again.
Solution: Set the Left, Top, Width and Height properties on the shape object:
const shape = slide.Shapes.get_Item(0);
shape.Left = 160;
shape.Top = 260;
shape.Width = 300;
shape.Height = 200;
How to add a shadow to a shape
Cause: A shadow gives a shape more depth, but the fill and outline only control the shape itself; the shadow is set through a separate effect object.
Solution: Create an InnerShadowEffect, set BlurRadius, Direction, Distance and ColorFormat.Color, then assign it to shape.EffectDag.InnerShadowEffect:
const innerShadow = new pptModule.InnerShadowEffect();
innerShadow.BlurRadius = 20;
innerShadow.Direction = 0;
innerShadow.Distance = 0;
innerShadow.ColorFormat.Color = pptModule.Color.get_Black();
shape.EffectDag.InnerShadowEffect = innerShadow;
Get a Free License
If you wish to delete the evaluation message from the resulting documents, or to get rid of function limitations, please contact sales to obtain a valid 30-day temporary license.
