
.NET (1329)
Children categories
The PDF417 barcode, also known as Portable Data File 417 or PDF417 Truncated, is a two-dimensional (2D), high-density symbology capable of encoding text, numbers, files and actual data bytes.
Compaction Modes
The data is encoded using one of three compaction modes: Text compaction mode, Binary compaction mode, and Numeric compaction mode.
- Text: It allows encoding all printable ASCII characters, i.e. values from 32 to 126 inclusive in accordance with ISO/IEC 646, as well as selected control characters such as TAB (horizontal tab ASCII 9), LF (NL line feed, new line ASCII 10) and CR (carriage return ASCII 13).
- Binary: It allows encoding all 256 possible 8-bit byte values. This includes all ASCII characters value from 0 to 127 inclusive and provides for international character set support.
- Numeric: It allows efficient encoding of numeric data strings.
- Auto: It switches between Text, Binary and Numeric modes in order to minimize the number of codewords to be encoded.
PDF417 Error Correction Levels
Error correction allows the symbol to endure some damage without causing loss of data. The error correction level depends on the amount of data that needs to be encoded, the size and the amount of symbol damage that could occur. The error correction levels range from 0 to 8.
| EC Level | 0 | 1 | 2 | 3 | 4 | 5 | 6 | 7 | 8 | ||
| EC Codewords Generated | 2 | 4 | 6 | 8 | 16 | 32 | 64 | 128 | 512 | ||
| Data Codewords | 1-40 | 41-160 | 161-320 | 321-863 | |||||||
| Data Bytes Encoded | 1-56 | 57-192 | 193-384 | 385-1035 | |||||||
Following code snippets show how to create a PDF417 barcode image using Spire.Barcode.
Step 1: Create an instance of BarcodeSetting class.
BarcodeSettings settings = new BarcodeSettings();
Step 2: Set the barode type as Pdf417 and set the data to be encoded.
settings.Type = BarCodeType.Pdf417;
settings.Data = "123456789";
Step 3: Set the data mode as numeric.
settings.Pdf417DataMode = Pdf417DataMode.Numeric;
Step 4: Set the error correction level as level 2.
settings.Pdf417ECL = Pdf417ECL.Level2;
Step 5: Initialize an instance of BarcodeGenerator and generate an image based on the settings.
BarCodeGenerator generator = new BarCodeGenerator(settings);
Image image = generator.GenerateImage();
Step 6: Save the image in .png format.
image.Save("PDF417Code.png");
Output:

Full Code:
using Spire.Barcode;
using System.Drawing;

namespace PDF417Code
{
    class Program
    {
        static void Main(string[] args)
        {
            BarcodeSettings settings = new BarcodeSettings();
            settings.Type = BarCodeType.Pdf417;
            settings.Data = "123456789";
            settings.Data2D = "123456789";
            settings.Pdf417DataMode = Pdf417DataMode.Numeric;
            settings.Pdf417ECL = Pdf417ECL.Level2;
            BarCodeGenerator generator = new BarCodeGenerator(settings);
            Image image = generator.GenerateImage();
            image.Save("PDF417Code.png");
        }
    }
}

Generating QR codes with C# is a practical solution for many common development tasks—such as encoding URLs, login tokens, or product information. With the help of a .NET-compatible barcode library, you can quickly create scannable QR images and integrate them into your applications or documents.
This tutorial shows how to build a simple yet powerful C# QR code generator: from generating a QR code from a string, embedding a logo, to inserting the image into PDF, Word, and Excel files. It also covers usage in both Windows and ASP.NET applications, using clean and reusable C# code examples.
Quick Navigation
- 1. How QR Code Generation Works in C#
- 2. Generate QR Code from String in C#
- 3. Insert QR Codes into Documents (PDF, Word, Excel)
- 4. QR Code Generator in Windows and Web Applications
- 5. FAQ
- 6. Conclusion
1. How QR Code Generation Works in C#
Before diving into the code, it’s useful to understand what a QR code is. QR codes are 2D matrix barcodes that can encode URLs, text, contact info, and more. In C#, QR code generation involves three steps:
- Encode your content (usually a string)
- Configure QR code options (error correction, size, margin, etc.)
- Export the result as an image
In this tutorial, we use a simple .NET-compatible library Spire.Barcode for .NET to keep things straightforward and flexible.
Install Spire.Barcode for .NET via NuGet
PM> Install-Package Spire.Barcode
You can also choose Free Spire.Barcode for .NET for smaller tasks:
PM> Install-Package FreeSpire.Barcode
2. Generate QR Code from String in C#
Let’s start with a basic example: generating a QR code from a string in C#. Using the BarcodeSettings and BarCodeGenerator classes provided by Spire.Barcode for .NET, you can easily encode any text or URL into a scannable QR code.
The key steps include:
- Defining QR code content and format using
BarcodeSettings, including data string, error correction level, size, margin, and optional logo; - Generating the image via
BarCodeGenerator, which produces a ready-to-useSystem.Drawing.Imageobject; - Saving or embedding the result in external documents or applications.
The following code demonstrates how to configure the QR code and export it as a PNG image.
using Spire.Barcode;
using System.Drawing;
using System.Drawing.Imaging;

namespace GenerateQRCode
{
    class Program
    {
        static void Main(string[] args)
        {
            // Initialize barcode settings
            BarcodeSettings settings = new BarcodeSettings();
            // Specify the barcode type as QR Code
            settings.Type = BarCodeType.QRCode;
            // Set the QR code data
            settings.Data = "https://www.example.com/";
            // Set the text to display (optional)
            settings.Data2D = "Scan to go to example.com";
            settings.ShowTextOnBottom = true;
            settings.TextFont = new Font(FontFamily.GenericSansSerif, 16.0f);

            // Set data mode and error correction level
            settings.QRCodeDataMode = QRCodeDataMode.Auto;
            settings.QRCodeECL = QRCodeECL.H;
            // (Optional) Embed a logo image in the QR code
            settings.QRCodeLogoImage = Image.FromFile("Logo.png");
            // Set the width of bar module
            settings.X = 3.0f;

            // Generate the QR code image
            BarCodeGenerator generator = new BarCodeGenerator(settings);
            // Generate the QR code image
            Image qr = generator.GenerateImage();
            // Save the image to a file
            qr.Save("QR Code.png", ImageFormat.Png);
        }
    }
}
You can change the settings.Data to encode any text or URL. To embed a logo, use QRCodeLogoImage with a local image path. Error correction level H ensures that the QR code remains scannable even with a logo.
The QR code generated using C#:

You may also like: How to Scan QR Code Using C#
3. Insert QR Codes into Documents (PDF, Word, Excel)
A common use case for a c# qr generator is embedding QR codes into documents—automatically generating reports, receipts, or certificates. The generated QR image can be inserted into files using standard .NET Office libraries.
Insert into PDF
PdfDocument pdf = new PdfDocument();
PdfPageBase page = pdf.AppendPage();

page.Canvas.DrawImage(PdfImage.FromImage(qr), 100, 400, 100, 100);

pdf.SaveToFile("output.pdf");
Use cases: digital invoices, shipping labels, authentication docs.
Insert into Word Document
Document doc = new Document();
Section section = doc.AddSection();
Paragraph para = section.AddParagraph();

DocPicture picture = para.AppendPicture(qr);

doc.SaveToFile("output.docx", FileFormat.Docx);
Use cases: contracts, personalized letters, ID cards.
Insert into Excel Worksheet
Workbook book = new Workbook();
Worksheet sheet = book.Worksheets[0];

sheet.Pictures.Add(2, 2, qr);  // Cell C3

book.SaveToFile("output.xlsx", ExcelVersion.Version2016);
Use cases: customer records, product sheets, logistics tracking.
Recommended article: Read Barcodes from PDF Documents
4. QR Code Generator in Windows and Web Applications
Windows Application
In a Windows Forms app, you can display the generated QR image in a PictureBox, and allow users to save it. This is useful for desktop-based systems like check-in kiosks or internal tools.
pictureBox1.Image = qr;
ASP.NET Web Application
In ASP.NET, return the QR image in a memory stream:
MemoryStream ms = new MemoryStream();
qr.Save(ms, ImageFormat.Png);
return File(ms.ToArray(), "image/png");
These approaches are lightweight and do not depend on heavy frameworks.
FAQ
Q: How to generate a QR code in .NET C# by code? A: Use a barcode library like Spire.Barcode for .NET. Simply define your QR code content, set the desired options (e.g., error correction level, logo image), and export it as an image. It's straightforward to integrate into C# applications.
Q: What is the best QR code generator for C#? A: There are several good options available. Spire.Barcode for .NET is a solid choice—it supports multiple barcode formats, allows logo insertion, and integrates well with Office documents.
Q: Can I adjust the size and layout of the generated QR code? A: Yes. You can modify properties like X, LeftMargin, and TopMargin to control the module size and spacing around the QR code.
Q: How can I use the generated QR code in documents or applications? A: The generated image can be embedded into PDFs, Word documents, Excel sheets, or displayed in Windows Forms or ASP.NET pages. This makes it useful in reports, labels, and web systems.
Conclusion
Creating a QR code generator in C# is simple yet highly effective. This tutorial demonstrated how to generate QR codes with a few lines of C# code, insert them into documents, and deploy them in both desktop and web environments. You can further expand on this by exploring batch generation, QR styling, or integrating scanning features in future enhancements.
To try it yourself, you can apply for a free temporary license here to unlock the full capabilities of Spire.Barcode for .NET.
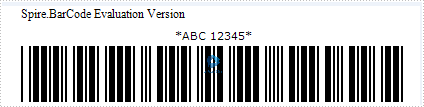
Code39 is also known as Alpha39, Code 3 of 9, Code 3/9, Type 39, USS Code 39, USD-3. This article will show you how to use Spire.Barcode to create Code39 barcode. It supports 43 characters, consisting of uppercase letters (A through Z), numeric digits (0 through 9) and a number of special characters (*, -, $, /, +, %, and space). Usually Code39 starts and ends with “*”. Here comes to the steps of how to create Code39 barcodes.
Step 1: Create a BarcodeSettings instance.
BarcodeSettings bs = new BarcodeSettings();
Step 2: Set the BarcodeType property to Code39
bs.Type = BarCodeType.Code39;
Step 3: Set the data for the barcode.
bs.Data = "*ABC 12345* ";
Step 4: Generate barcode image using BarCodeGenerator.
BarCodeGenerator bg = new BarCodeGenerator(bs);
bg.GenerateImage().Save("Code39Code.png");
Effective screenshot of Code39 barcode image:
Full codes:
using Spire.Barcode;


namespace Code39
{
    class Program
    {
        static void Main(string[] args)
        {
            BarcodeSettings bs = new BarcodeSettings();

            bs.Type = BarCodeType.Code39;
            bs.Data = "*ABC 12345* ";


            BarCodeGenerator bg = new BarCodeGenerator(bs);

            bg.GenerateImage().Save("Code39Code.png");
            System.Diagnostics.Process.Start("Code39Code.png");
        }
    }
}
Spire.PDF allows us to convert a PDF document, a single page or a range of pages in a PDF document to SVG file format. We have introduced how to convert a PDF document to SVG, in this tutorial, we are going to demonstrate how to convert a PDF page to SVG.
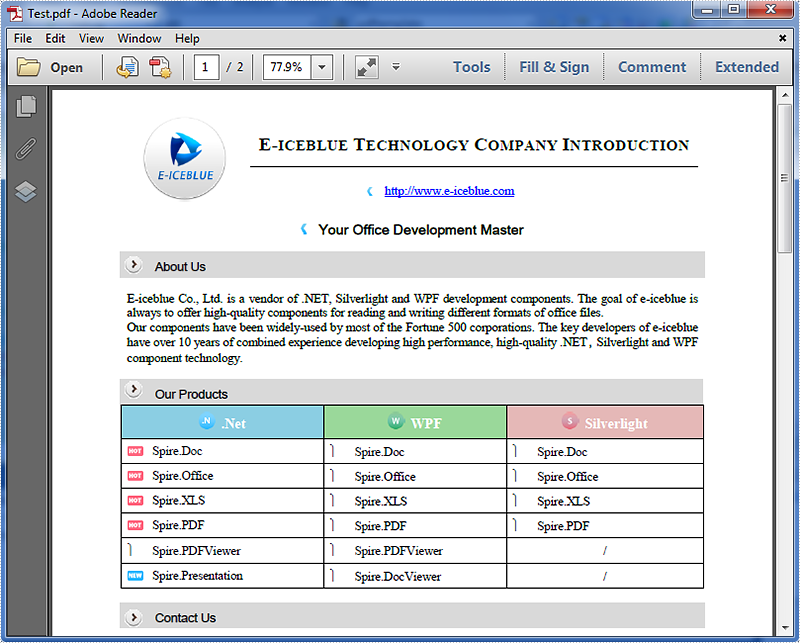
Below is the source PDF file we used in this example:
Code snippets:
Step 1: Instantiate an object of PdfDocument class and load the PDF document.
PdfDocument doc = new PdfDocument();
doc.LoadFromFile("Test.pdf");
Step 2: Convert the first page of the PDF document to SVG using the SaveToFile(string filename, int startIndex, int endIndex, FileFormat fileFormat) method.
doc.SaveToFile("Result.svg", 0, 0, FileFormat.SVG);
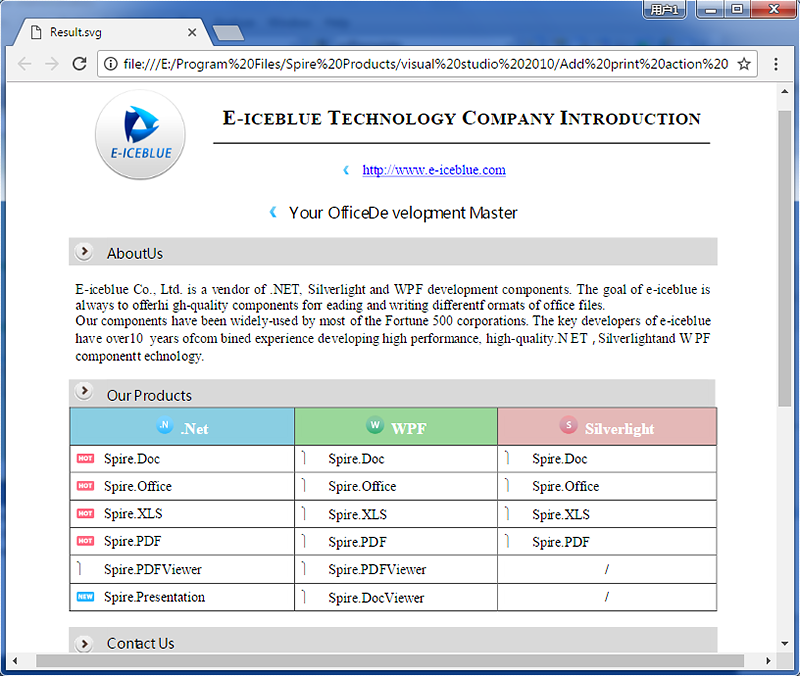
The resultant SVG file looks as follows:
Full code:
using Spire.Pdf;

namespace PDF_Page_to_SVG
{
    class Program
    {
        static void Main(string[] args)
        {
            PdfDocument doc = new PdfDocument();
            doc.LoadFromFile("Test.pdf");
            doc.SaveToFile("Result.svg", 0, 0, FileFormat.SVG);
        }
    }
}
Imports Spire.Pdf

Namespace PDF_Page_to_SVG
	Class Program
		Private Shared Sub Main(args As String())
			Dim doc As New PdfDocument()
			doc.LoadFromFile("Test.pdf")
			doc.SaveToFile("Result.svg", 0, 0, FileFormat.SVG)
		End Sub
	End Class
End Namespace
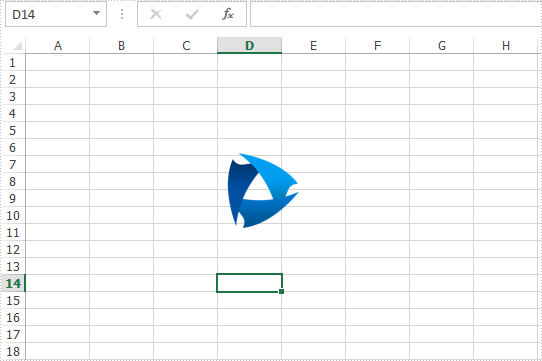
When we add an image to the Excel worksheet, we always need to reset the size and position for the image to list the image where we want and make the size coordinate with the other elements on the Excel worksheet. This article will focus on demonstrates how to apply picture settings by using Spire.XLS.
Step 1: Initialize an instance of Workbook and get the first worksheet.
Workbook workbook = new Workbook();
Worksheet sheet = workbook.Worksheets[0];
Step 2: Add a picture to the first worksheet.
ExcelPicture picture = sheet.Pictures.Add(1, 1, "Logo.png");
Step 3: Set the size for the picture.
picture.Width = 75;
picture.Height = 75;
Step 4: Set the position for the picture.
picture.Left = 200;
picture.Top = 100;
Step 5: Save the document to file.
workbook.SaveToFile("Output.xlsx",FileFormat.Version2013);
Effective screenshot after reset the size and position for the image:
Full codes:
using Spire.Xls;
namespace ReseSizeandPosition
{
    class Program
    {
        static void Main(string[] args)
        {
            Workbook workbook = new Workbook();
            Worksheet sheet = workbook.Worksheets[0];

            ExcelPicture picture = sheet.Pictures.Add(1, 1, "Logo.png");

            picture.Width = 75;
            picture.Height = 75;

            picture.Left = 200;
            picture.Top = 100;

            workbook.SaveToFile("Output.xlsx", FileFormat.Version2013);
        }
    }
}
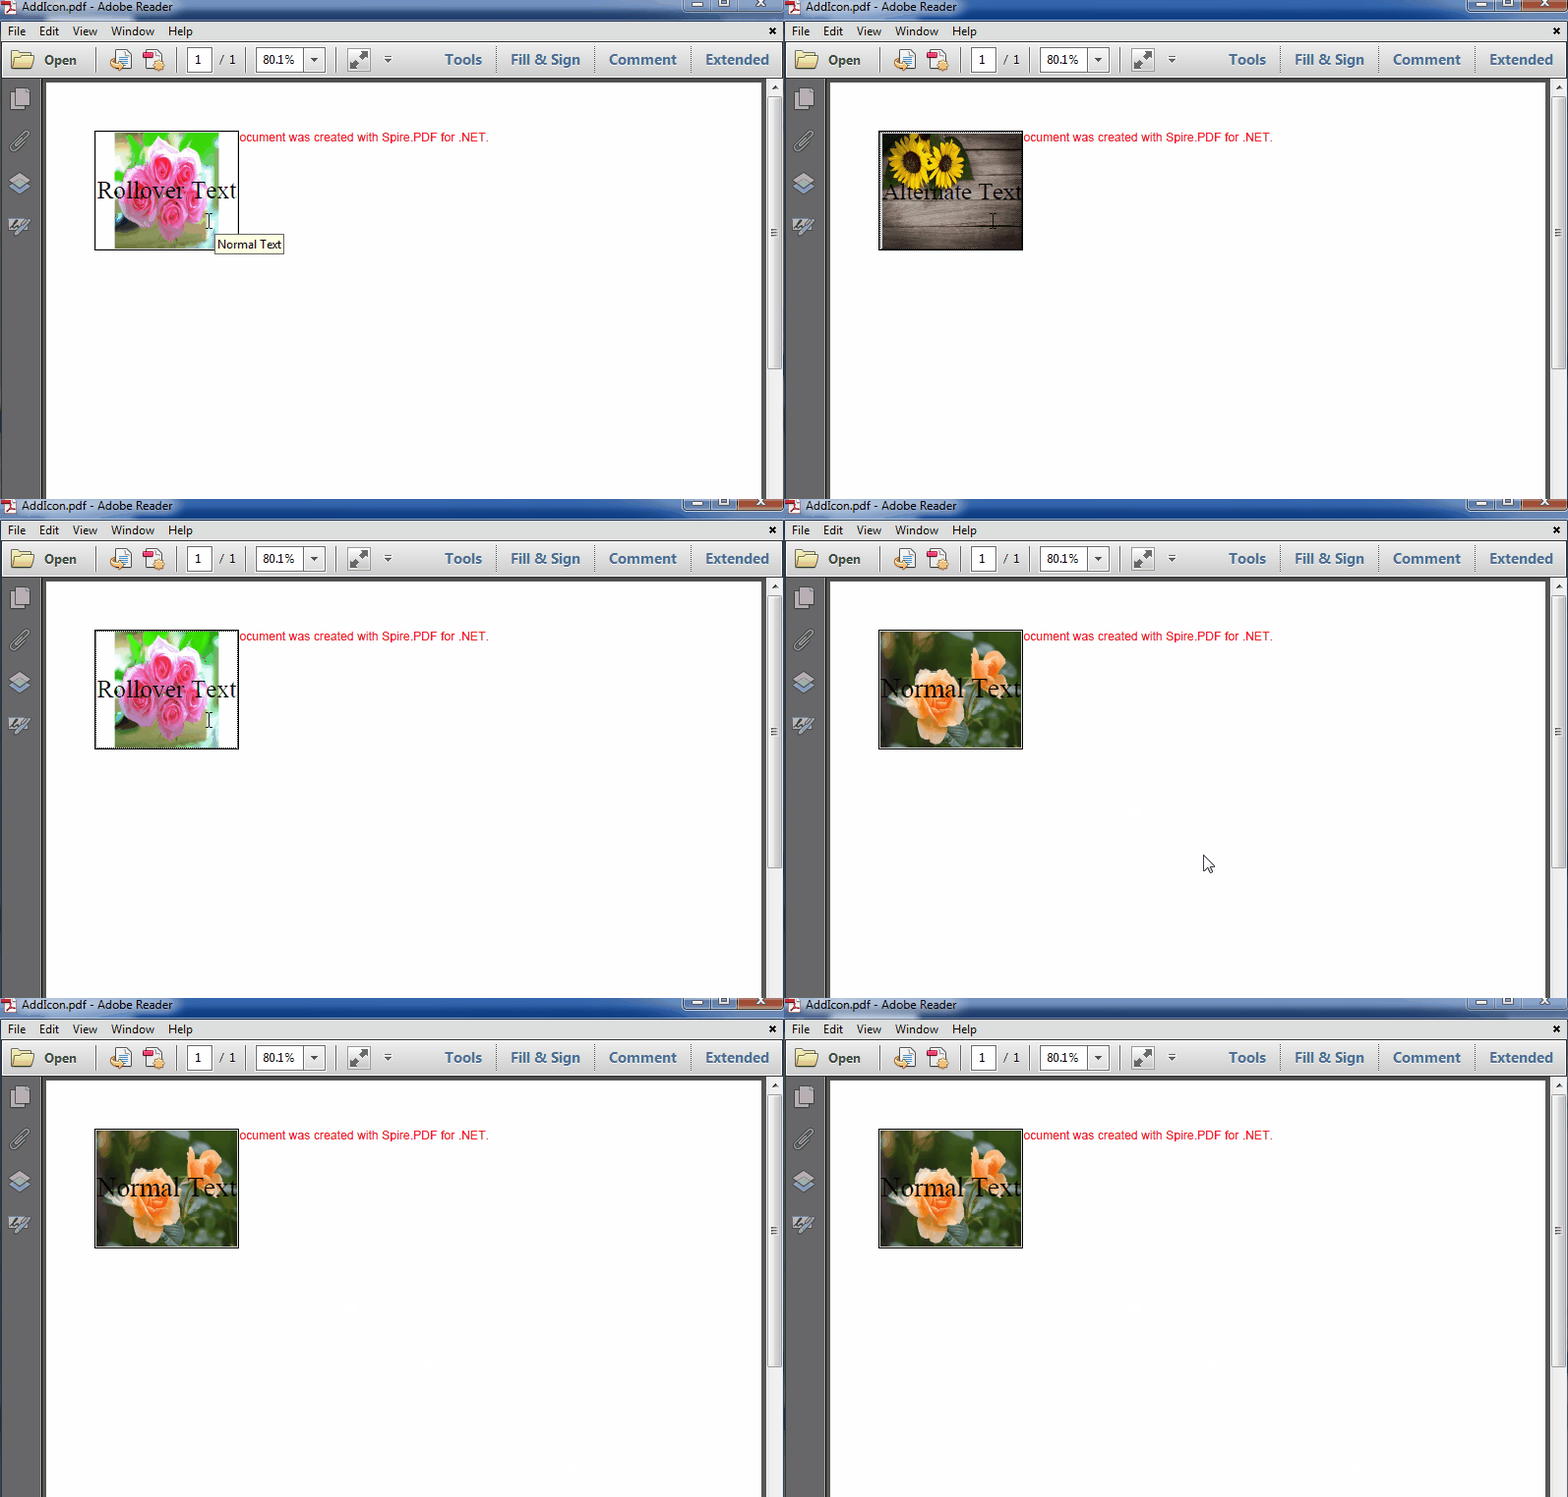
Assign an Icon to a PDF Button Field and Set Icon Layout in C#
2017-06-02 07:50:05 Written by KoohjiIn PDF, buttons can be assigned icon appearances and each button can have as many as three appearances: Normal, Rollover, and Click. With Spire.PDF, not only can we assign icons to buttons, but also we can change the icons of buttons. In this article, we’re going to show you how to assign an icon to a button and set icon layout using Spire.PDF and C#. As for changing icons, please refer How to change the image on button field in C#.
Code Snippets:
Step 1: Create a PDF document and add a page to it.
PdfDocument doc = new PdfDocument();
PdfPageBase page = doc.Pages.Add();
Step 2: Create a button field.
PdfButtonField btn = new PdfButtonField(page, "button1");
btn.Bounds = new RectangleF(0, 50, 120, 100);
Step 3: Set button layout.
btn.HighlightMode = PdfHighlightMode.Push;
btn.LayoutMode = PdfButtonLayoutMode.CaptionOverlayIcon;
//Set text and icon for Normal appearance
btn.Text = "Normal Text";
btn.Icon = PdfImage.FromFile("Image.png");
//Set text and icon for Click appearance (Can only be set when highlight mode is Push)
btn.AlternateText = "Alternate Text";
btn.AlternateIcon = PdfImage.FromFile("Sunflower.jpg");
//Set text and icon for Rollover appearance (Can only be set when highlight mode is Push)
btn.RolloverText = "Rollover Text";
btn.RolloverIcon = PdfImage.FromFile("PinkRoses.jpg");
Step 4: Set icon layout.
btn.IconLayout.Spaces = new float[] { 0.5f, 0.5f };
btn.IconLayout.ScaleMode = PdfButtonIconScaleMode.Proportional;
btn.IconLayout.ScaleReason = PdfButtonIconScaleReason.Always;
btn.IconLayout.IsFitBounds = false;
Step 5: Add the button to the document.
doc.Form.Fields.Add(btn);
Step 6: Save the document.
doc.SaveToFile("AddIcon.pdf");
The resultant document looks as follows:
Full code:
using System.Drawing;
using Spire.Pdf;
using Spire.Pdf.Fields;
using Spire.Pdf.Graphics;

namespace Add_Icon_to_PDF_Button_Field
{
    class Program
    {
        static void Main(string[] args)
        {
            //Create a PDF document
            PdfDocument doc = new PdfDocument();
            PdfPageBase page = doc.Pages.Add();

            //Create a Button
            PdfButtonField btn = new PdfButtonField(page, "button1");
            btn.Bounds = new RectangleF(0, 50, 120, 100);
            btn.HighlightMode = PdfHighlightMode.Push;
            btn.LayoutMode = PdfButtonLayoutMode.CaptionOverlayIcon;
            //Set text and icon for Normal appearance
            btn.Text = "Normal Text";
            btn.Icon = PdfImage.FromFile("Image.png");
            //Set text and icon for Click appearance (Can only be set when highlight mode is Push)
            btn.AlternateText = "Alternate Text";
            btn.AlternateIcon = PdfImage.FromFile("Sunflower.jpg");
            //Set text and icon for Rollover appearance (Can only be set when highlight mode is Push)
            btn.RolloverText = "Rollover Text";
            btn.RolloverIcon = PdfImage.FromFile("PinkRoses.jpg");

            //Set icon layout
            btn.IconLayout.Spaces = new float[] { 0.5f, 0.5f };
            btn.IconLayout.ScaleMode = PdfButtonIconScaleMode.Proportional;
            btn.IconLayout.ScaleReason = PdfButtonIconScaleReason.Always;
            btn.IconLayout.IsFitBounds = false;

            //Add the button to the document
            doc.Form.Fields.Add(btn);

            //Save the document
            doc.SaveToFile("AddIcon.pdf");
        }
    }
}
In PowerPoint, a combination chart is a type of chart that combines two or more different chart types into a single chart. It allows you to display multiple sets of data in the same chart, making it easier to compare and analyze different variables. In this article, you will learn how to programmatically create a combination chart in a PowerPoint presentation using Spire.Presentation for .NET.
Install Spire.Presentation for .NET
To begin with, you need to add the DLL files included in the Spire.Presentation for.NET package as references in your .NET project. The DLL files can be either downloaded from this link or installed via NuGet.
PM> Install-Package Spire.Presentation
Create a Combination Chart in PowerPoint in C# and VB.NET
Spire.Presentation for .NET offers the ISlide.Shapes.AppendChart(ChartType type, RectangleF rectangle) method to add a certain chart type to a slide, and then you can change the chart type of the second series to another chart to create a combo chart. The following are the steps to combine a column chart and a line chart in PowerPoint.
- Create a Presentation instance.
- Get a specified slide and add a column chart to it using ISlide.Shapes.AppendChart(ChartType.ColumnClustered, RectangleF rectangle) method.
- Create a DataTable object and add some data, then import data from data table to chart data.
- Set the chart title, categories labels, series labels and series values.
- Change the chart type of the second series to a line chart with data markers using IChart.Series[int index].Type property.
- Plot the second series on the secondary value axis by setting the IChart.Series[int index].UseSecondAxis property to true.
- Set the number format and gridlines of the secondary value axis.
- Save the result document using Presentation.SaveToFile() method.
- C#
- VB.NET
using Spire.Presentation;
using Spire.Presentation.Charts;
using Spire.Presentation.Drawing;
using System;
using System.Data;
using System.Drawing;

namespace CombinationChart
{
    class Program
    {
        static void Main(string[] args)
        {
            //Create a Presentation instance
            Presentation presentation = new Presentation();

            //Add a column clustered chart to the first slide
            RectangleF rect = new RectangleF(80, 120, 550, 320);
            IChart chart = presentation.Slides[0].Shapes.AppendChart(ChartType.ColumnClustered, rect);

            //Set and format chart title
            chart.ChartTitle.TextProperties.Text = "Monthly Sales Report";
            chart.ChartTitle.TextProperties.IsCentered = true;
            chart.ChartTitle.Height = 30;
            chart.HasTitle = true;

            //Create a datatable and add some data
            DataTable dataTable = new DataTable();
            dataTable.Columns.Add(new DataColumn("Month", Type.GetType("System.String")));
            dataTable.Columns.Add(new DataColumn("Sales", Type.GetType("System.Int32")));
            dataTable.Columns.Add(new DataColumn("Growth rate", Type.GetType("System.Decimal")));
            dataTable.Rows.Add("January", 200, 0.6);
            dataTable.Rows.Add("February", 250, 0.8);
            dataTable.Rows.Add("March", 300, 0.6);
            dataTable.Rows.Add("April", 150, 0.2);
            dataTable.Rows.Add("May", 200, 0.5);
            dataTable.Rows.Add("June", 400, 0.9);

            //Import data from datatable to chart data
            for (int c = 0; c < dataTable.Columns.Count; c++)
            {
                chart.ChartData[0, c].Text = dataTable.Columns[c].Caption;
            }
            for (int r = 0; r < dataTable.Rows.Count; r++)
            {
                object[] datas = dataTable.Rows[r].ItemArray;
                for (int c = 0; c < datas.Length; c++)
                {
                    chart.ChartData[r + 1, c].Value = datas[c];

                }
            }

            //Set series labels
            chart.Series.SeriesLabel = chart.ChartData["B1", "C1"];

            //Set categories labels
            chart.Categories.CategoryLabels = chart.ChartData["A2", "A7"];

            //Assign data to series values
            chart.Series[0].Values = chart.ChartData["B2", "B7"];
            chart.Series[1].Values = chart.ChartData["C2", "C7"];

            //Change the chart type of series 2 to a line chart with data markers
            chart.Series[1].Type = ChartType.LineMarkers;

            //Plot data of series 2 on the secondary axis
            chart.Series[1].UseSecondAxis = true;

            //Set the number format of the secondary value axis
            chart.SecondaryValueAxis.NumberFormat = "0%";

            //Hide the gridlines of the secondary value axis
            chart.SecondaryValueAxis.MajorGridTextLines.FillType = FillFormatType.None;

            //Set the legend position
            chart.ChartLegend.Position = ChartLegendPositionType.Top;

            //Set overlap
            chart.OverLap = -50;

            //Set gapwidth
            chart.GapWidth = 200;

            //Save the result document
            presentation.SaveToFile("CombinationChart.pptx", FileFormat.Pptx2010);
        }
    }
}

Apply for a Temporary License
If you'd like to remove the evaluation message from the generated documents, or to get rid of the function limitations, please request a 30-day trial license for yourself.
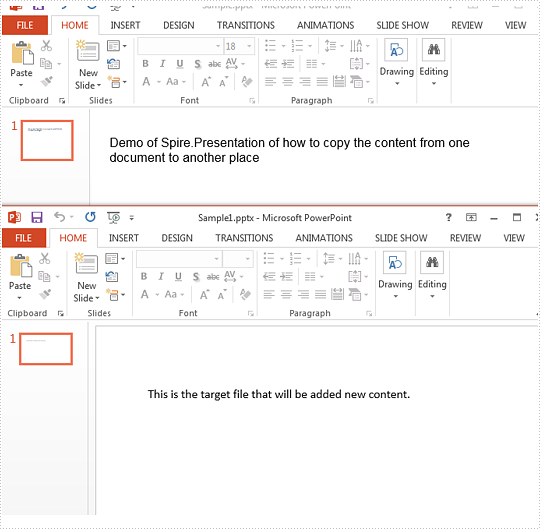
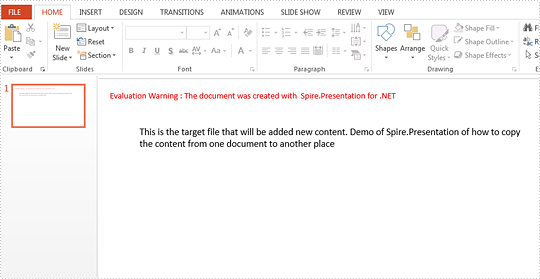
In our daily work, we may need to copy the contents from one presentation slides to another. This article is aimed to introduce the method of how to copy the content from one paragraph from the source PowerPoint document to the target document by using Spire.Presenation.
Firstly, View the original presentation slide and the target presentation slide.
Step 1: Initialize an instances of Presentation class and load the source document from file
Presentation ppt = new Presentation();
ppt.LoadFromFile("Sample.pptx", FileFormat.Pptx2010);
Step 2: Get the text from the first shape on the first slide.
string Text = "";
IShape shp = ppt.Slides[0].Shapes[0];
Text = ((IAutoShape)shp).TextFrame.Text;
Step 3: Get the first shape on the first slide from the target document file.
Presentation ppt2 = new Presentation("Sample1.pptx", FileFormat.Pptx2010);
IShape destshp = ppt2.Slides[0].Shapes[0];
Step 4: Get text from placeholder.
((IAutoShape)destshp).TextFrame.Text += Text;
Step 5: Save the document to file.
ppt2.SaveToFile("Sample1.pptx", FileFormat.Pptx2010);
Effective screenshot after copy the paragraph from the source file:
Full codes:
using Spire.Presentation;
namespace CoppyParagh
{
    class Program
    {
        static void Main(string[] args)
        {

            Presentation ppt = new Presentation();
            ppt.LoadFromFile("Sample.pptx", FileFormat.Pptx2010);

            string Text = "";
            IShape shp = ppt.Slides[0].Shapes[0];
            Text = ((IAutoShape)shp).TextFrame.Text;

            Presentation ppt2 = new Presentation("Sample1.pptx", FileFormat.Pptx2010);
            IShape destshp = ppt2.Slides[0].Shapes[0];
            ((IAutoShape)destshp).TextFrame.Text += Text;

            ppt2.SaveToFile("Sample1.pptx", FileFormat.Pptx2010);


        }
    }
}
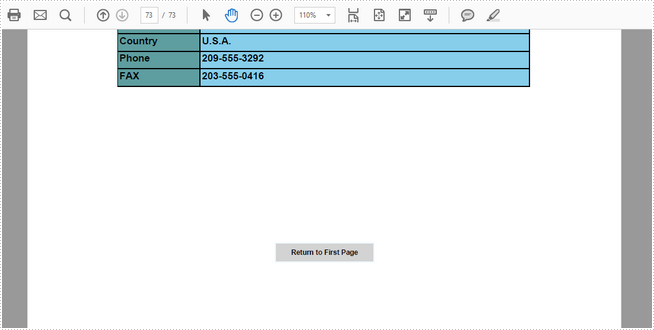
A navigation button in a PDF document can redirect users from one page to another. For instance, when a navigation button is clicked, we can jump to the next/last page or return to the previous/first page. This article will introduce how to create such a navigation button in PDF using Spire.PDF.
Step 1: Initialize an instance of PdfDocument class and load a PDF document.
PdfDocument doc = new PdfDocument();
doc.LoadFromFile(@"C:\Users\Administrator\Desktop\Sales Report.pdf");
Step 2: Enable creation of form fields in the document.
doc.AllowCreateForm = true;
Step 3: Get the last page.
PdfPageBase page = doc.Pages[doc.Pages.Count-1];
Step 4: Create a button field and specify the button name, tooltip and border style.
PdfButtonField button = new PdfButtonField(page, "Return to First Page");
button.Bounds = new RectangleF(page.ActualSize.Width/2-50, 400, 100, 20);
button.BorderColor = new PdfRGBColor(Color.AliceBlue);
button.BorderStyle = PdfBorderStyle.Solid;
button.ToolTip = "First Page";
button.Font = new PdfFont(PdfFontFamily.Helvetica, 7f,PdfFontStyle.Bold);
Step 5: Create a PdfNamedAction that goes to the named destination (previous, next, first or last page), and add the button field to the document.
PdfNamedAction namedAction = new PdfNamedAction(PdfPredefinedAction.FirstPage);

doc.Form.Fields.Add(button);
Step 6: Get the button's widget annotation back from the page, apply the action to its OnActivated property, and save the document.
PdfAnnotationCollection annotations = PdfAnnotationCollection.Create(page);
((PdfWidgetAnnotation)annotations[annotations.Count - 1]).OnActivated = namedAction;

doc.SaveToFile("NavigationButton.pdf", FileFormat.PDF);
Output:
Full Code:
using Spire.Pdf;
using Spire.Pdf.Actions;
using Spire.Pdf.Fields;
using Spire.Pdf.Graphics;
using Spire.Pdf.Interactive.Annotations;
using System.Drawing;

namespace NavigationButtons
{
    class Program
    {
        static void Main(string[] args)
        {
            PdfDocument doc = new PdfDocument();
            doc.LoadFromFile(@"C:\Users\Administrator\Desktop\Sales Report.pdf");
            doc.AllowCreateForm = true;
            PdfPageBase page = doc.Pages[doc.Pages.Count - 1];

            PdfButtonField button = new PdfButtonField(page, "Return to First Page");
            button.Bounds = new RectangleF(page.ActualSize.Width / 2 - 50, 400, 100, 20);
            button.BorderColor = new PdfRGBColor(Color.AliceBlue);
            button.BorderStyle = Spire.Pdf.Fields.PdfBorderStyle.Solid;
            button.ToolTip = "First Page";
            button.Font = new PdfFont(PdfFontFamily.Helvetica, 7f, PdfFontStyle.Bold);

            PdfNamedAction namedAction = new PdfNamedAction(PdfPredefinedAction.FirstPage);

            doc.Form.Fields.Add(button);

            PdfAnnotationCollection annotations = PdfAnnotationCollection.Create(page);
            ((PdfWidgetAnnotation)annotations[annotations.Count - 1]).OnActivated = namedAction;

            doc.SaveToFile("NavigationButton.pdf", FileFormat.PDF);
        }
    }
}
Imports Spire.Pdf
Imports Spire.Pdf.Actions
Imports Spire.Pdf.Fields
Imports Spire.Pdf.Graphics
Imports Spire.Pdf.Interactive.Annotations
Imports System.Drawing

Namespace NavigationButtons
	Class Program
		Private Shared Sub Main(args As String())
			Dim doc As New PdfDocument()
			doc.LoadFromFile("C:\Users\Administrator\Desktop\Sales Report.pdf")
			doc.AllowCreateForm = True
			Dim page As PdfPageBase = doc.Pages(doc.Pages.Count - 1)

			Dim button As New PdfButtonField(page, "Return to First Page")
			button.Bounds = New RectangleF(page.ActualSize.Width / 2 - 50, 400, 100, 20)
			button.BorderColor = New PdfRGBColor(Color.AliceBlue)
			button.BorderStyle = Spire.Pdf.Fields.PdfBorderStyle.Solid
			button.ToolTip = "First Page"
			button.Font = New PdfFont(PdfFontFamily.Helvetica, 7F, PdfFontStyle.Bold)

			Dim namedAction As New PdfNamedAction(PdfPredefinedAction.FirstPage)

			doc.Form.Fields.Add(button)

			Dim annotations As PdfAnnotationCollection = PdfAnnotationCollection.Create(page)
			DirectCast(annotations(annotations.Count - 1), PdfWidgetAnnotation).OnActivated = namedAction

			doc.SaveToFile("NavigationButton.pdf", FileFormat.PDF)
		End Sub
	End Class
End Namespace
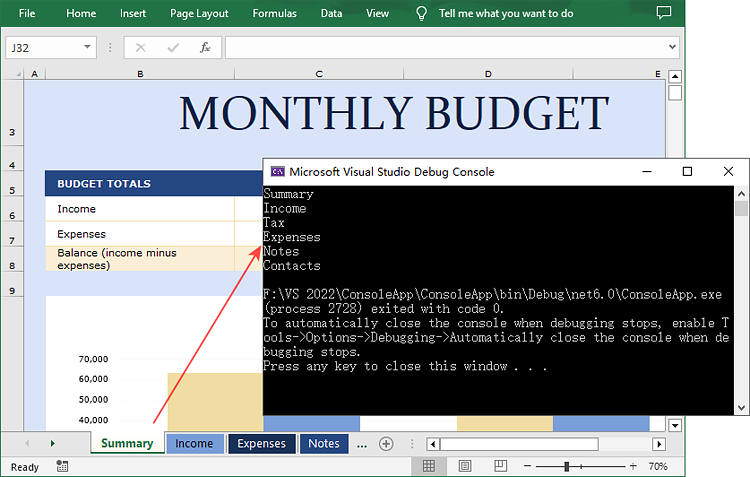
In Excel, the worksheet names can serve as a form of metadata about the workbook's contents. By retrieving a list of these names, it is possible to have a rough understanding of what each worksheet is used for and provide an overview of where a certain type of data is stored. This is particularly useful for larger workbooks or when collaborating with others. In this article, you will learn how to get sheet names in Excel in C# using Spire.XLS for .NET.
Install Spire.XLS for .NET
To begin with, you need to add the DLL files included in the Spire.XLS for .NET package as references in your .NET project. The DLL files can be either downloaded from this link or installed via NuGet.
PM> Install-Package Spire.XLS
Get All Worksheet Names in Excel in C#
The Worksheet.Name property returns the name of a Worksheet. To retrieve the names of all the worksheets in Excel (including hidden ones), you can iterate through each worksheet and use this property to get their names. The detailed steps are as follows:
- Create a Workbook object.
- Load an Excel file using Workbook.LoadFromFile() method.
- Get all the worksheets in the Excel workbook through Workbook.Worksheets property.
- Iterate through each worksheet.
- Get the name of each worksheet through Worksheet.Name property and then output the results.
- C#
using Spire.Xls;
using Spire.Xls.Collections;

namespace WorksheetName
{
    class Program
    {
        static void Main(string[] args)
        {
            // Create a Workbook object
            Workbook workbook = new Workbook();

            // Load an Excel document
            workbook.LoadFromFile("Budget.xlsx");

            // Get all the worksheets in Excel
            WorksheetsCollection worksheets = workbook.Worksheets;

            // Iterate through each worksheet
            foreach (Worksheet sheet in worksheets)
            {
                // Get worksheet name
                Console.WriteLine(sheet.Name);
            }
        }
    }
}
Get Hidden Worksheet Names in Excel in C#
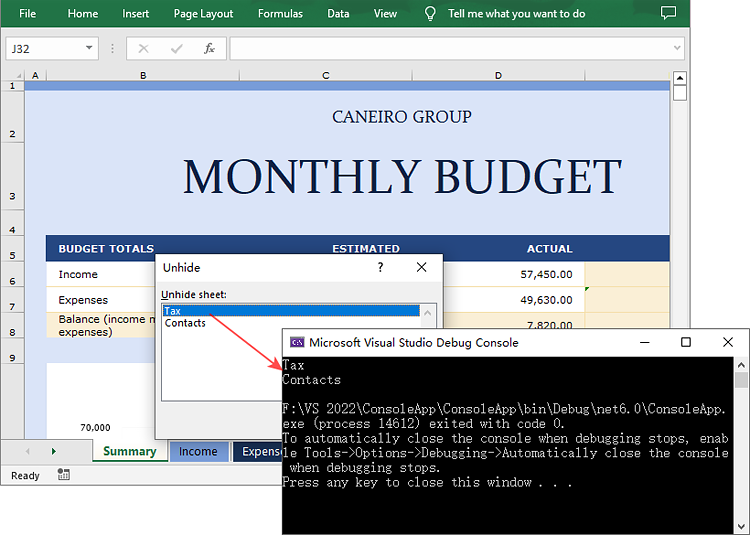
If you only need to retrieve the names of the hidden worksheets, you can first iterate through each worksheet to determine whether a worksheet is hidden, and if so, get its name through the Worksheet.Name property. The detailed steps are as follows:
- Create a Workbook object.
- Load an Excel file using Workbook.LoadFromFile() method.
- Get all the worksheets in the Excel workbook through Workbook.Worksheets property.
- Iterate through each worksheet and find the hidden worksheets.
- Get the names of the hidden worksheets through Worksheet.Name property and then output the results.
- C#
using Spire.Xls;
using Spire.Xls.Collections;

namespace HiddenSheetsName
{
    class Program
    {
        static void Main(string[] args)
        {
            // Create a Workbook object
            Workbook workbook = new Workbook();

            // Load an Excel document
            workbook.LoadFromFile("E:\\PythonExcel\\Monthly company budget.xlsx");

            // Get all the worksheets in Excel
            WorksheetsCollection worksheets = workbook.Worksheets;

            // Iterate through each worksheet
            foreach (Worksheet sheet in worksheets)
            {
                // Detect the hidden worksheet
                if (sheet.Visibility == WorksheetVisibility.Hidden)
                {
                    // Get the hidden worksheet name
                    Console.WriteLine(sheet.Name);
                }
            }
        }
    }
}
Apply for a Temporary License
If you'd like to remove the evaluation message from the generated documents, or to get rid of the function limitations, please request a 30-day trial license for yourself.
