
A date can look exactly right in Excel and still behave differently when you copy it into another application. You might see 2026-01-01 in a worksheet, only to get a number when combining it with text or changing its cell format.
That happens because Excel stores dates as numbers. Their appearance comes from the number format applied to the cell.
When you need a specific date string for a report, an import template, or another system, converting the date to text gives you control over the result.
This guide covers four approaches, from entering a single date manually to converting an entire column with Python.
Before You Start: Date Formatting vs. Text Conversion
Changing how a date looks does not change its underlying type.
For example, applying the custom format yyyy-mm-dd makes a date appear as 2026-01-01, but Excel still stores a numeric date value. Converting it to text produces the actual string 2026-01-01. Excel’s TEXT function performs this conversion while applying a specified format.
| Action | Appearance | Underlying value |
|---|---|---|
| Apply a custom date format | 2026-01-01 | Numeric date value |
| Convert the date to text | 2026-01-01 | Text string |
For the examples below, imagine an order worksheet with these columns:
| OrderDate | OrderID | Customer | Product | Quantity |
|---|---|---|---|---|
| 2026-01-01 | ORD-1003 | Harbor Logistics | Portable SSD 1TB | 2 |
| 2026-01-09 | ORD-1004 | Summit Education | USB-C Hub | 8 |
| 2026-02-14 | ORD-1005 | Bluebird Trading | Webcam | 4 |
The dates are in column A, with a header in row 1.
Keep a copy of the original workbook before trying methods that replace existing values. Retaining the original dates is useful if you later need date calculations.
Method 1: Enter Dates as Text with an Apostrophe
For a few manually entered dates, add an apostrophe (') before the date:
'2026-01-01
Press Enter, and the cell displays:
2026-01-01
The apostrophe tells Excel to treat the entry as text. It does not appear as part of the displayed cell content. Microsoft documents this approach as a way to prevent automatic date conversion.
You can type the exact representation you need:
| What you enter | What the cell displays |
|---|---|
'2026-01-01 |
2026-01-01 |
'01/09/2026 |
01/09/2026 |
'20260101 |
20260101 |
Best for: entering a small number of date strings into a template.
This method is quick, but it requires manual entry or editing. For an existing column containing hundreds of dates, use one of the following approaches.
Method 2: Convert Dates to Text with the TEXT Function
The TEXT function is the most flexible worksheet option when you want to control the output format.
Suppose A2 contains a valid Excel date. Enter this formula in an empty cell:
=TEXT(A2,"yyyy-mm-dd")
The formula returns a text string such as:
2026-01-01
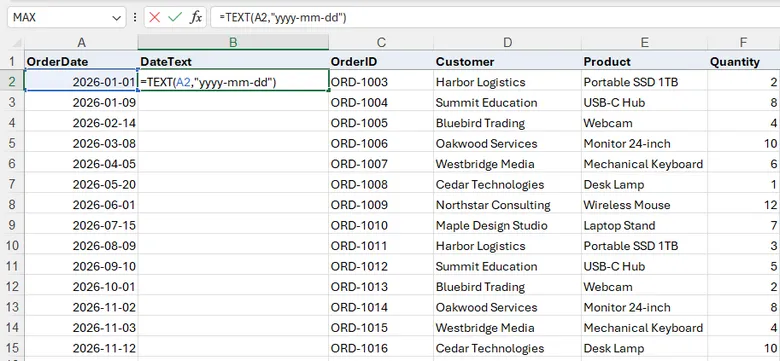
Then drag the fill handle down to convert the remaining dates. TEXT takes the original value and applies the format code you provide.
Choose a Date Format
Change the second argument to produce a different date representation:
| Formula | Example result |
|---|---|
=TEXT(A2,"yyyy-mm-dd") |
2026-01-01 |
=TEXT(A2,"mm/dd/yyyy") |
01/01/2026 |
=TEXT(A2,"dd/mm/yyyy") |
01/01/2026 |
=TEXT(A2,"yyyymmdd") |
20260101 |
Using mm and dd keeps leading zeros, which helps when another system expects a fixed-length value.
If the source column contains blank cells, use:
=IF(A2="","",TEXT(A2,"yyyy-mm-dd"))
This leaves the result empty when the source cell is blank.
Replace Formulas with Static Text
The formula result remains linked to the original date. If you need independent text values:
- Select the cells containing the TEXT formulas.
- Press Ctrl+C.
- Right-click the destination cell.
- Choose Paste Special → Values.
The pasted cells now contain the resulting strings rather than formulas. If replacing the original date column, complete this step before deleting the source data.
Best for: converting existing dates into a precise format while keeping the process visible in the worksheet.
Method 3: Convert Dates to Text Using Text to Columns
Despite its name, Text to Columns can be used without splitting a column. The final step of the wizard lets you choose Text as the output type. Microsoft’s support community includes this workflow for converting dates to text.
To try it with the order worksheet:
- Select the date cells in column A, excluding the header.
- Open Data → Text to Columns.
- Select Delimited , then click Next.
- Clear all delimiter checkboxes so the dates remain in one column.
- Click Next again.
- Under Column data format, select Text.
- Set Destination to an empty column, such as
$H$2. - Click Finish.
Using an empty destination column lets you compare the result with the source dates before replacing anything.
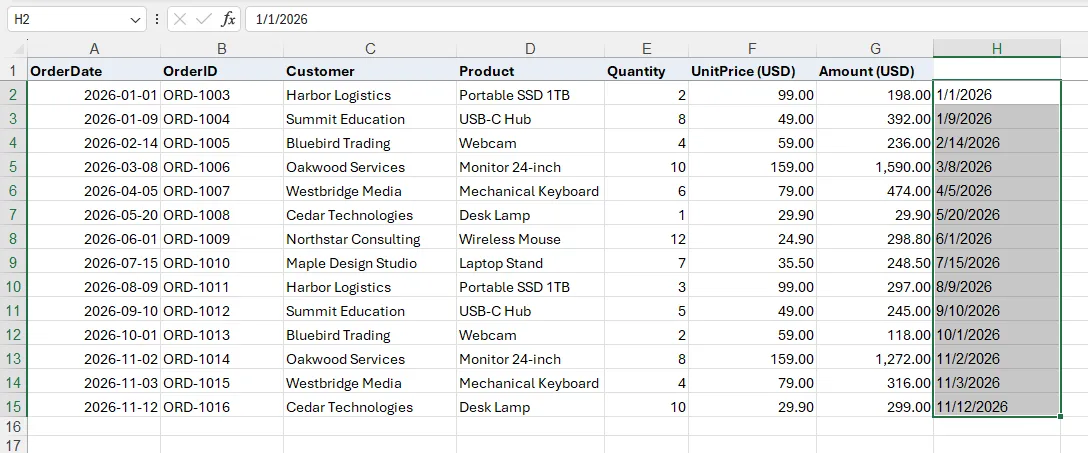
The main limitation is format control. Text to Columns does not provide a format string such as yyyy-mm-dd. The resulting date representation can depend on regional date settings, so check the output rather than assuming it preserves a custom cell format.
If the destination must contain exactly 20260101 or 2026-01-01, the TEXT function gives you a more explicit conversion rule.
Best for: a one-time conversion when you want static text without entering formulas.
Method 4: Automate Date-to-Text Conversion with Python
Manual steps work well for occasional tasks. A script becomes useful when the same conversion needs to run repeatedly as part of a reporting or export process.
Spire.XLS for Python can read, edit, and save Excel workbooks without requiring Microsoft Excel to be installed. In this example, it reads dates from column A and replaces them with formatted text strings.
Install Spire.XLS for Python
Install the package from your terminal:
pip install Spire.XLS
Convert a Date Column to Text
The following code processes column A in the first worksheet , starting at row 2 to skip the header:
from spire.xls import Workbook, FileFormat

# 1. Load the workbook
workbook = Workbook()
workbook.LoadFromFile("Excel_Date.xlsx")

# 2. Get the first worksheet
sheet = workbook.Worksheets.get_Item(0)

# 3. Loop through column A
last_row = sheet.Columns[0].LastRow

for i in range(2, last_row + 1):
    cell = sheet.Range.get_Item(i, 1)

    # Read the cell as a date object
    date_value = cell.DateTimeValue

    # Convert the date to a formatted string
    text_date = date_value.ToString("yyyy-MM-dd")

    # Set the cell format to Text, then write the string
    cell.NumberFormat = "@"
    cell.Text = text_date

# 4. Save the output workbook
workbook.SaveToFile(
    "FormattedDates.xlsx",
    FileFormat.Version2016
)
workbook.Dispose()
Place Excel_Date.xlsx in the script’s working directory, or replace the input filename with its full path.
This example assumes every processed cell contains a valid date. For a column containing blanks, notes, or invalid values, add validation before reading DateTimeValue.
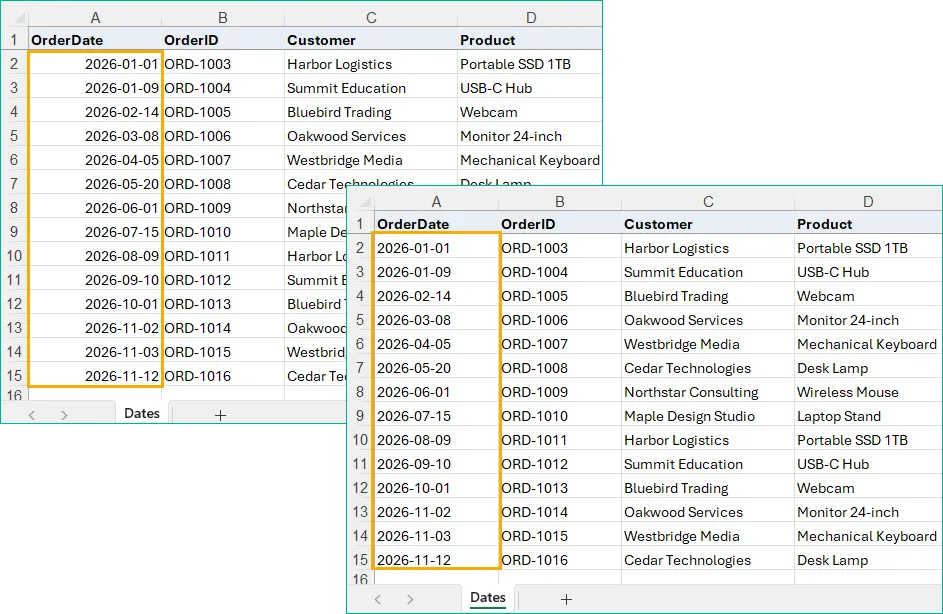
The screenshot below compares the original date values with the text strings generated by the Python script:
Understand the Key Steps
Three operations perform the conversion:
date_value = cell.DateTimeValue
This reads the date value from the source cell.
text_date = date_value.ToString("yyyy-MM-dd")
This produces the desired string. The format uses uppercase MM for the month.
cell.NumberFormat = "@"
cell.Text = text_date
These lines set the cell to text format and write the formatted string. Writing the string is essential: changing the number format alone does not perform the same conversion.
The script saves a separate output workbook, leaving the input file available for comparison. It processes one column in one worksheet; the same logic can later be placed inside worksheet or file loops for broader automation.
Best for: repeatable conversions that belong in a Python workflow.
Which Method Should You Choose?
Choose based on how the data arrives and how often you need to process it.
| Method | Best use | Format control | Output |
|---|---|---|---|
| Apostrophe | A few manually entered dates | Exact text you type | Static text |
| TEXT function | Existing dates needing a specific format | Explicit format code | Formula result; optionally pasted as values |
| Text to Columns | One-time conversion without formulas | Limited | Static text |
| Python | Repeated conversion in a script | Explicit format string | Text written into the output workbook |
For everyday worksheet work, TEXT is usually the strongest starting point because the conversion rule is easy to see and adjust.
Use an apostrophe when entering a few values, Text to Columns for a quick conversion whose output format you have checked, and Python when the task needs to become a repeatable process.
Frequently Asked Questions
Why does changing a date cell’s format to Text show a number?
Excel stores dates as numeric values. Changing the cell’s format to Text does not turn that value into a formatted date string.
Use TEXT(A2,"yyyy-mm-dd") to generate the string you want.
How can I check whether a converted date is really text?
Use the ISTEXT function:
=ISTEXT(A2)
It returns TRUE when A2 contains text and FALSE when it contains a numeric date value. This is more reliable than judging by the cell’s appearance.
Can I still calculate with dates after converting them to text?
Text strings do not behave as consistently as native dates in calculations. Some formulas may interpret recognizable strings, but that interpretation can depend on their format and regional settings.
Keep the original date column if you need to calculate intervals, group records by month, or perform other date operations.
How do I keep leading zeros in date text?
Use two-digit month and day components. For example:
=TEXT(A2,"yyyy-mm-dd")
In the Python example, use:
date_value.ToString("yyyy-MM-dd")
Both produce a value such as 2026-01-09, preserving the zeros in the month and day.