Whether you’re building a sales report, quarterly business review, budget deck, or data-heavy client presentation, mixing PowerPoint storytelling with live Excel data keeps your slides accurate and professional. Instead of copying static screenshots of tables that quickly go out of date, learning how to embed an Excel file in PowerPoint lets you keep the data inside your presentation and access or edit it directly from the slide.
This tutorial breaks down every practical method to embed Excel in PowerPoint, covering manual workflows for everyday users and a C# automation solution for developers.
- Linking vs. Embedding: What’s the Difference?
- Method 1: Embed the Entire Excel File as an Object
- Method 2: Copy and Paste to Embed an Excel Table or Chart
- Method 3: Automatically Embed Excel into PowerPoint with C#
- Tips and Troubleshooting for Embedded Excel Files
Linking vs. Embedding: What’s the Difference?
Before you insert Excel into PowerPoint, it helps to understand the fundamental distinction.
-
Embedding stores a copy of the Excel workbook inside the PowerPoint file. The data becomes self-contained: it travels with the presentation, but it does not update when the original Excel file changes.
-
Linking, by contrast, creates a live connection to the external Excel file. When the source workbook changes, the PowerPoint slide can be refreshed to reflect the new data. The trade-off is that the presentation depends on the source file being available and in the same location.
| Feature | Embed | Link |
|---|---|---|
| Data storage | Full Excel copy stored inside PowerPoint | Only a reference pointing to an outside Excel file |
| Updates | Static; no changes even if the original Excel file is modified | Updates when source file is edited |
| File size | Larger, contains complete Excel data | Smaller, holds only file path information |
| File portability | ✅ Fully self‑contained; works when shared with others | ❌ Broken if source file is moved, renamed or missing |
| Best for | Sharing presentations, fixed data snapshots | Recurring internal reports where source files stay in place |
The methods below focus specifically on embedding Excel files in PowerPoint.
Method 1: Embed the Entire Excel File as an Object
Use this approach when you need the full workbook on your slide, not only selected tables or charts. You can double‑click the embedded object to open the native Excel editing environment directly inside PowerPoint.
- Open your PowerPoint presentation and navigate to the target slide.
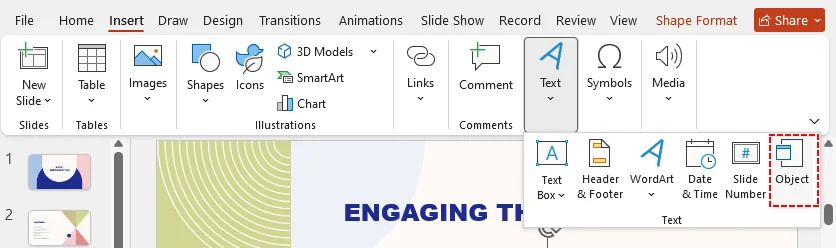
- Go to the top menu bar and select the Insert tab.
- Click Object in the Text group. The Insert Object pop-up window will open.
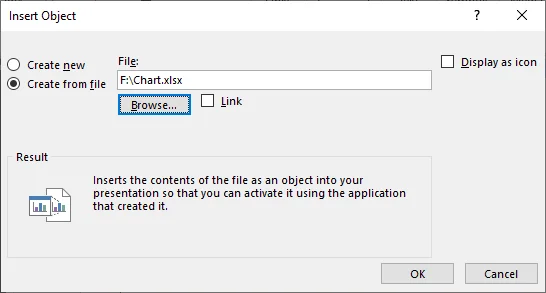
- Select Create from file.
- Click Browse and select your target
.xlsxor.xlsfile. - Leave the Link box unchecked — this step is critical for true embedding.
- Click OK to embed the workbook.
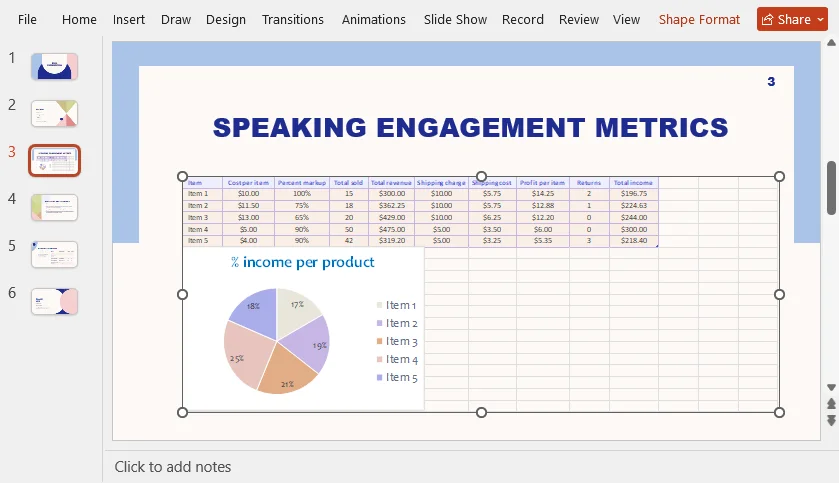
The entire Excel workbook will appear on your slide. You can drag the corners to resize the object and move it to your preferred position. Double-click the embedded object to launch an Excel editing window directly inside PowerPoint. You can adjust formulas, formatting, charts, and cell values without opening Excel separately.
Pro Tip: Check Display as icon if you prefer to show only an Excel icon on the slide instead of worksheet content. This keeps the slide visually clean while still giving recipients double-click access to the full workbook.
Method 2: Copy and Paste to Embed an Excel Table or Chart
When you do not require the full workbook and only want specific tables, cell ranges or charts embedded onto a slide, use copy‑and‑paste with embedded workbook options. The output becomes an embedded Excel object that retains Excel editing capabilities.
- Open your Excel file and highlight the cells or chart you want to place in PowerPoint.
- Press Ctrl + C to copy.
- Switch back to PowerPoint, right-click on your slide.
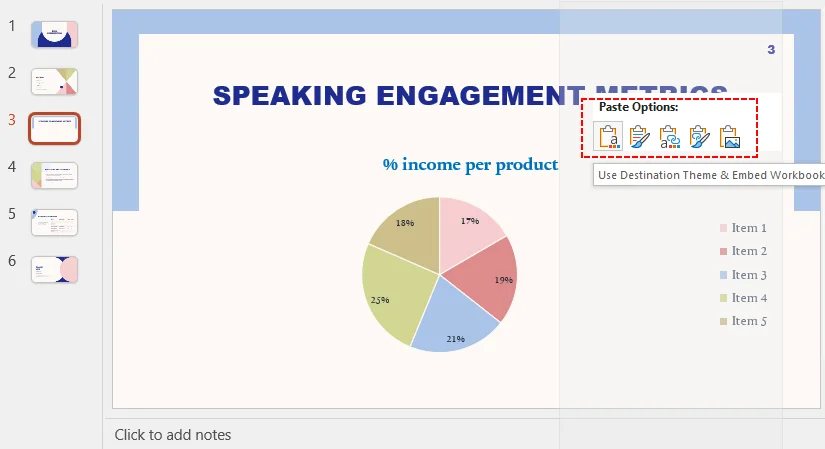
- Under Paste Options, choose one of the two embed‑enabled paste choices:
- Use Destination Theme & Embed Workbook: Embeds content and matches your existing PowerPoint theme styles.
- Keep Source Formatting & Embed Workbook: Embeds content and preserves original Excel colors, fonts and borders.
Your selected data is now embedded within PowerPoint. Double‑click the pasted object to trigger the embedded Excel editor to adjust numbers, formulas or chart settings. This method is ideal for KPI tables, financial figures and standalone charts for individual slides.
Beyond embedding an Excel workbook, you can also embed other rich media, such as inserting a video in PowerPoint, turning a slide into a self-contained multimedia experience.
Method 3: Automatically Embed Excel into PowerPoint with C#
For bulk presentation generation, automated report workflows or integration within .NET applications, you can embed Excel files as OLE objects programmatically with Free Spire.Office for .NET. No manual PowerPoint UI steps or Microsoft Office Interop are needed.
Prerequisites
Install Free Spire.Office for .NET via Nuget:
Install-Package FreeSpire.Office
The package includes both Spire.XLS for Excel processing and Spire.Presentation for PowerPoint generation.
C# Code to Embed Excel Object into PowerPoint
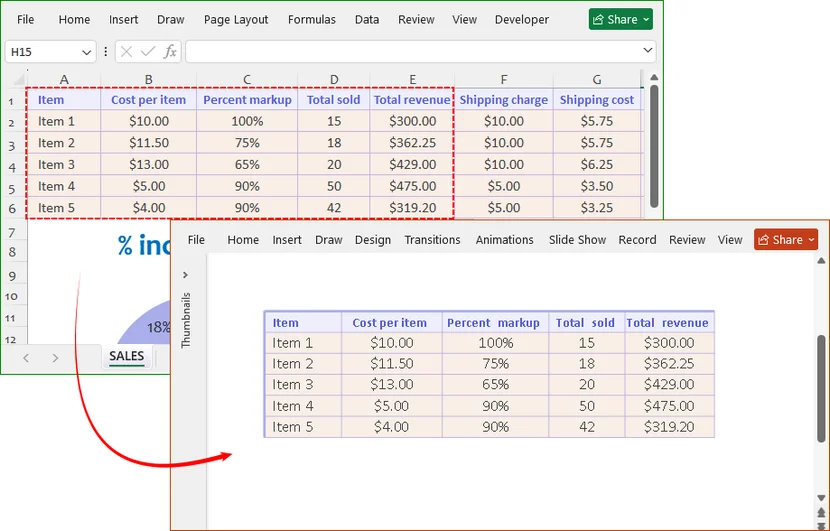
The following example loads an Excel file, generates a thumbnail image of a cell range, embeds it as an OLE object on the first slide, and saves the resulting presentation as a .pptx file.
using Spire.Presentation;
using Spire.Presentation.Drawing;
using Spire.Xls;
using System.Drawing;

namespace ExcelToPpt
{
    class Program
    {
        static void Main(string[] args)
        {
            // 1. Load the Excel workbook
            Workbook workbook = new Workbook();
            workbook.LoadFromFile(@"F:\Chart.xlsx");

            // 2. Create a preview image from a cell range
            Image image = workbook.Worksheets[0].ToImage(1, 1, 6, 5);

            // 3. Initialize the presentation and add the image
            Presentation ppt = new Presentation();
            IImageData oleImage = ppt.Images.Append(image);

            // 4. Embed the Excel file as an OLE object
            Rectangle rec = new Rectangle(60, 60, image.Width, image.Height);
            using (MemoryStream ms = new MemoryStream())
            {
                workbook.SaveToStream(ms);
                ms.Position = 0;
                IOleObject oleObject = ppt.Slides[0].Shapes.AppendOleObject("excel", ms.ToArray(), rec);
                oleObject.SubstituteImagePictureFillFormat.Picture.EmbedImage = oleImage;
                oleObject.ProgId = "Excel.Sheet.12";
            }

            // 5. Save the presentation
            ppt.SaveToFile("EmbeddedExcel.pptx", Spire.Presentation.FileFormat.Pptx2010);
        }
    }
}
How the Code Works
-
Load workbook:
Spire.XLS.Workbookreads your Excel file into memory.ToImage()renders a visual preview snapshot of your chosen cell range. -
Register preview thumbnail:
ppt.Images.Append(image)adds the snapshot to the presentation’s internal image assets. -
Insert OLE Object:
AppendOleObject()is the core function for embedding the full Excel workbook binary data onto the slide at your defined position and size. -
Set ProgID: The
ProgIdproperty tells PowerPoint which application to launch when users double‑click the embedded object. UseExcel.Sheet.12for.xlsxfiles andExcel.Sheet.8for legacy.xlsfiles. - Export file: Saves output as a standard modern .pptx file.
Output result to attach Excel file to PowerPoint:
Pro Tip: Building on the same Spire library used above, you can directly generate PowerPoint charts populated with source Excel data programmatically in C#, without embedding the full Excel file as an OLE object.
Tips and Troubleshooting for Embedded Excel Files
1. Double-click does not open Excel: Make sure Excel is installed on the computer viewing the presentation. Embedded OLE objects may have limited functionality in PowerPoint Online or on mobile devices.
2. Embedded data does not update: This is expected. Embedded workbooks are snapshots. If you need live updates, use linking instead.
3. File size becomes too large: Embedding full workbooks increases presentation size. You can embed only the table or chart you need to keep the slide clean.
4. Slide looks cluttered: Use Display as icon when embedding the entire workbook so viewers can open it without showing the full worksheet on the slide.
5. You want to edit the embedded data: Double-click the embedded object. PowerPoint opens a mini-Excel editor inside the slide.
6. You need to remove an embedded file: Select the embedded object and press Delete.
Conclusion
Embedding an Excel file in PowerPoint is the most reliable way to keep data‑heavy slides self-contained, portable, and easy to share. Whether you embed a complete workbook, a selected table or chart, or display the file as an icon for a cleaner slide, all embedded data travels inside the presentation and remains accessible without depending on an external Excel file.
Choose the embedding method that aligns with your presentation goals:
- Embed the full workbook when viewers need access to the complete Excel file.
- Embed only a table or chart when you want to keep the slide focused and the file size smaller.
- Display as icon when you want the slide to stay visually clean while still providing double-click access to the workbook.
- Use C# automation when you need to embed Excel files programmatically across many presentations.
Embedding does not create a live connection to the original workbook. This characteristic makes it the preferred solution for scenarios where data integrity, portability, and seamless file sharing matter more than automatic updates. With the methods in this guide, you can add Excel to PowerPoint confidently and keep your presentations professional and ready to share.