Comment citer un PDF au format MLA : guide étape par étape
Table des matières
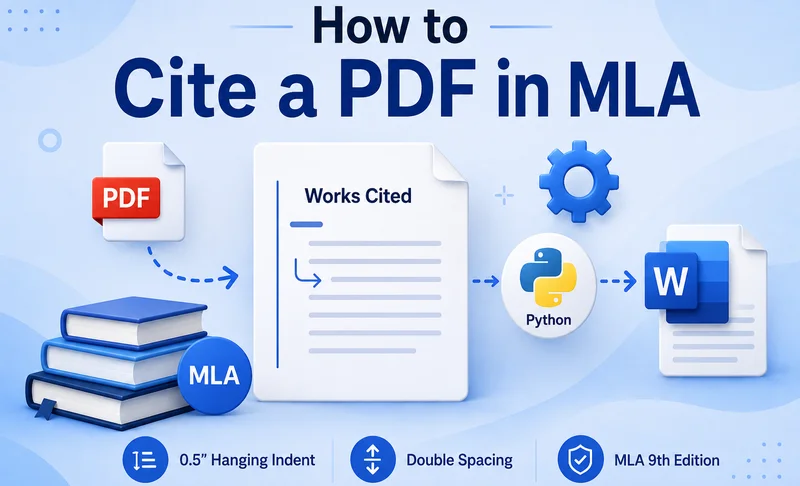
Citer un PDF en MLA ne se résume pas à ajouter « PDF » à une référence. Le format de citation dépend du contenu du PDF (livre, article de revue, rapport) et de la manière dont vous y avez accédé. Une fois la citation préparée, elle doit être correctement mise en forme dans la liste des ouvrages cités (Works Cited).
Ce guide explique comment citer un PDF en MLA, comment formater la citation dans Microsoft Word et comment automatiser la mise en forme de plusieurs entrées avec Python.
- Exigences de citation MLA pour les documents PDF
- Formater rapidement une citation PDF en MLA avec Microsoft Word
- Formater plusieurs citations PDF MLA avec Python
- Obtenir des informations de citation MLA avec Google Scholar ou MyBib
- FAQ
Exigences de citation MLA pour les documents PDF
Le format MLA n'utilise pas un format de citation unique pour tous les PDF. Citez plutôt l'ouvrage en fonction de son type et incluez les informations de publication et d'accès pertinentes.
Selon la source, une citation MLA peut inclure :
- Auteur
- Titre
- Conteneur, tel qu'une revue, un site web ou une base de données
- Éditeur
- Date de publication
- Plage de pages, le cas échéant
- DOI ou URL, le cas échéant
La neuvième édition du MLA Handbook, publiée en 2021, fournit les directives actuelles de documentation MLA.
Exemples de citation MLA pour PDF
- Pour un livre autonome disponible en PDF, la citation peut suivre le format standard du livre :
Chomsky, Noam. Media Control: The Spectacular Achievements of Propaganda. Seven Stories Press, 1997.
- Pour un article de revue disponible en PDF :
Rawls, John. « Kantian Constructivism in Moral Theory ». The Journal of Philosophy, vol. 77, n° 9, 1980, pp. 515–572.
Un PDF téléchargé depuis un site web peut nécessiter des informations supplémentaires sur le site ou la version du PDF. MLA autorise la mention téléchargement PDF lorsque cela aide à clarifier le format de la source.
La citation exacte doit donc être vérifiée par rapport à la source originale avant de formater l'entrée finale dans la liste des ouvrages cités.
Comment formater rapidement une citation PDF en MLA avec Microsoft Word
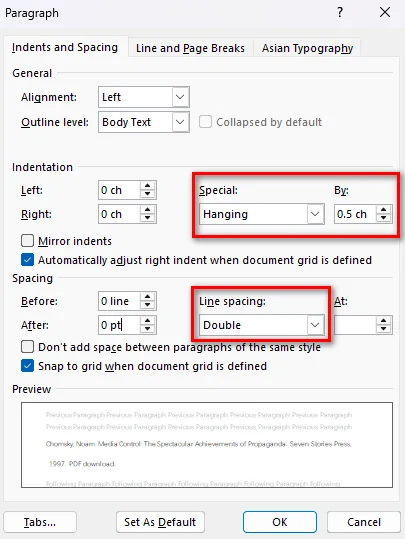
Après avoir préparé votre citation, vous pouvez utiliser Microsoft Word pour appliquer la mise en forme requise pour une liste d'ouvrages cités. MLA recommande un retrait négatif de 0,5 pouce (environ 1,27 cm) et un interligne double.
Suivez ces étapes :
- Étape 1 : Sélectionnez les entrées de citation dans votre liste d'ouvrages cités.
- Étape 2 : Faites un clic droit sur la sélection et choisissez Paragraphe.
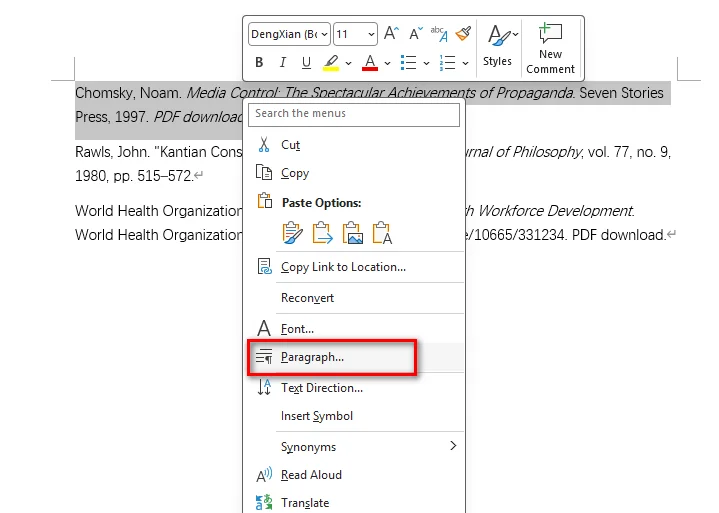
- Étape 3 : Sous Retrait, réglez Spécial sur Suspendu et de sur 1,27 cm. Sous Espacement, réglez Avant et Après sur 0 pt, réglez l'Interligne sur Double, puis cliquez sur OK.
Vous pouvez également appuyer sur Ctrl + T sous Windows ou Command + T sur Mac pour appliquer rapidement un retrait négatif.
Évitez d'utiliser des espaces, des tabulations ou des sauts de ligne manuels pour créer le retrait. La mise en forme de paragraphe permet de garder les entrées alignées lorsque vous modifiez le texte de la citation.
Remarque : Si vous devez également placer le PDF original dans un document Word, consultez Comment insérer un PDF dans Word pour connaître les méthodes permettant d'insérer le contenu d'un PDF tout en préservant sa mise en page et sa modifiabilité.
Comment formater plusieurs citations PDF MLA avec Python
Microsoft Word est pratique lorsque vous n'avez que quelques citations à formater. Pour les applications qui génèrent des rapports, traitent des documents soumis par les utilisateurs ou créent de longues listes d'ouvrages cités, le formatage par programmation peut être plus efficace.
Free Spire.Doc for Python est une bibliothèque Python autonome permettant de créer, modifier, formater et convertir des documents Word sans nécessiter Microsoft Word. Elle fournit des propriétés de mise en forme de paragraphe qui peuvent être utilisées pour créer le retrait négatif requis pour les citations MLA.
Vous pouvez combiner LeftIndent avec un FirstLineIndent négatif. Pour un retrait négatif de 0,5 pouce, réglez les deux valeurs sur 36 points dans des directions opposées.
L'exemple suivant crée plusieurs entrées de citation MLA et applique automatiquement la mise en forme requise :
from spire.doc import *
from spire.doc.common import *

# Créer un document et une section
doc = Document()
section = doc.AddSection()

# Exemples d'entrées de citation MLA
citations = [
    "Chomsky, Noam. Media Control: The Spectacular Achievements of Propaganda. Seven Stories Press, 1997.",
    'Rawls, John. "Kantian Constructivism in Moral Theory." The Journal of Philosophy, vol. 77, no. 9, 1980, pp. 515–572.'
]

# Ajouter et formater chaque citation
for citation in citations:
    paragraph = section.AddParagraph()
    paragraph.AppendText(citation)

    # Appliquer un retrait négatif de 0,5 pouce
    paragraph.Format.LeftIndent = 36.0
    paragraph.Format.FirstLineIndent = -36.0

    # Appliquer un interligne double et supprimer l'espacement entre paragraphes
    paragraph.Format.LineSpacingRule = LineSpacingRule.Multiple
    paragraph.Format.LineSpacing = 24.0
    paragraph.Format.BeforeSpacing = 0.0
    paragraph.Format.AfterSpacing = 0.0

# Enregistrer le document
doc.SaveToFile("MLA_PDF_Citations.docx", FileFormat.Docx2013)
doc.Close()

Dans l'exemple, LeftIndent = 36.0 déplace le contenu du paragraphe de 0,5 pouce vers la droite, tandis que FirstLineIndent = -36.0 ramène la première ligne vers la marge gauche. Ensemble, ils créent un retrait négatif.
Le code définit également BeforeSpacing et AfterSpacing sur 0.0 et utilise LineSpacingRule.Multiple avec LineSpacing = 24.0 pour produire un interligne double dans cette configuration de Free Spire.Doc.
Cette approche est utile lorsque vous disposez déjà de chaînes de caractères de citation et que vous devez générer un document Word formaté de manière cohérente à partir de nombreuses entrées.
Obtenir des informations de citation MLA avec Google Scholar ou MyBib
Si vous avez besoin d'aide pour collecter des informations de citation, des outils tels que Google Scholar et MyBib peuvent constituer un point de départ utile.
Google Scholar propose une option Citer pour de nombreux résultats de recherche, tandis que MyBib peut générer des citations au style MLA à partir des informations de source disponibles.
Cependant, les citations générées doivent toujours être vérifiées par rapport à la source originale. Un outil de citation peut ne pas toujours identifier correctement le type de source, les détails de publication ou la méthode d'accès au PDF.
Un flux de travail pratique est :
- Identifier le type d'ouvrage contenu dans le PDF.
- Collecter les informations de publication requises.
- Générer ou préparer la citation MLA.
- Vérifier la citation par rapport à la source originale.
- Formater les entrées terminées manuellement dans Word ou automatiquement avec Python.
Foire aux questions
Dois-je ajouter « téléchargement PDF » à chaque citation MLA ?
Non. La mention téléchargement PDF n'est pas requise pour chaque citation de PDF. Elle peut être utilisée comme description lorsque vous souhaitez préciser que vous avez consulté une version PDF de la source.
MLA utilise-t-il le même format pour chaque PDF ?
Non. La citation dépend du type d'ouvrage et de la manière dont vous y avez accédé. Un livre, un article de revue et un rapport téléchargés depuis un site web peuvent nécessiter des informations de citation différentes.
Comment formater une citation PDF dans une liste d'ouvrages cités MLA ?
Utilisez un retrait négatif de 0,5 pouce et un interligne double pour les entrées de citation. Dans Microsoft Word, vous pouvez appliquer la mise en forme via les paramètres de Paragraphe ou utiliser Ctrl + T sous Windows.
Puis-je formater plusieurs citations PDF MLA avec Python ?
Oui. Si le texte de la citation est déjà préparé, Free Spire.Doc for Python peut créer des documents Word et appliquer une mise en forme de paragraphe cohérente à plusieurs entrées de citation. Des propriétés telles que LeftIndent et FirstLineIndent peuvent être combinées pour créer un retrait négatif.
Conclusion
Citer un PDF en MLA devient plus facile lorsque vous séparez le processus en deux parties : préparer la citation en fonction de la source et formater correctement l'entrée terminée. Pour quelques citations, Microsoft Word offre un moyen rapide d'appliquer le retrait négatif et l'interligne double requis. Lorsque vous devez formater de nombreuses entrées de manière cohérente, Free Spire.Doc for Python peut automatiser le processus et générer un document Word prêt à l'emploi.
À lire aussi :
Cómo citar un PDF en formato MLA: guía paso a paso
Tabla de contenidos
Citar un PDF en formato MLA requiere algo más que simplemente añadir "PDF" a una referencia. El formato de la cita depende de lo que contenga el PDF, como un libro, un artículo de revista o un informe, y de dónde se haya accedido a él. Una vez preparada la cita, también debe formatearse correctamente en la lista de Obras Citadas (Works Cited).
Esta guía explica cómo citar un PDF en MLA, cómo formatear la cita en Microsoft Word y cómo automatizar el formato de múltiples entradas con Python.
- Requisitos de citación MLA para documentos PDF
- Formatear una cita PDF en MLA rápidamente con Microsoft Word
- Formatear múltiples citas PDF MLA con Python
- Obtener información de citación MLA con Google Scholar o MyBib
- Preguntas frecuentes
Requisitos de citación MLA para documentos PDF
MLA no utiliza un formato de cita fijo para todos los PDF. En su lugar, cite la obra según su tipo e incluya la información pertinente de publicación y acceso.
Dependiendo de la fuente, una cita MLA puede incluir:
- Autor
- Título
- Contenedor, como una revista, sitio web o base de datos
- Editorial
- Fecha de publicación
- Rango de páginas, cuando corresponda
- DOI o URL, cuando corresponda
La novena edición del Manual MLA, publicado en 2021, proporciona las directrices actuales de documentación MLA.
Ejemplos de citación PDF en MLA
- Para un libro independiente disponible como PDF, la cita puede seguir el formato estándar de libro:
Chomsky, Noam. Media Control: The Spectacular Achievements of Propaganda. Seven Stories Press, 1997.
- Para un artículo de revista disponible como PDF:
Rawls, John. “Kantian Constructivism in Moral Theory.” The Journal of Philosophy, vol. 77, no. 9, 1980, pp. 515–572.
Un PDF descargado de un sitio web puede requerir información adicional sobre el sitio web o la versión del PDF. MLA permite la descripción descarga de PDF cuando ayuda a aclarar el formato de la fuente.
Por lo tanto, la cita exacta debe verificarse con la fuente original antes de formatear la entrada final de Obras Citadas.
Cómo formatear una cita PDF en MLA rápidamente con Microsoft Word
Después de preparar su cita, puede utilizar Microsoft Word para aplicar el formato requerido para una lista de Obras Citadas. MLA recomienda una sangría francesa de 0.5 pulgadas y un interlineado doble.
Siga estos pasos:
- Paso 1: Seleccione las entradas de la cita en su lista de Obras Citadas.
- Paso 2: Haga clic derecho en la selección y elija Párrafo.
- Paso 3: En Sangría, establezca Especial en Sangría francesa y En en 0.5 pulgadas. En Espaciado, establezca Anterior y Posterior en 0 pto, establezca Interlineado en Doble y haga clic en Aceptar.
También puede presionar Ctrl + T en Windows o Command + T en Mac para aplicar una sangría francesa rápidamente.
Evite usar espacios, tabulaciones o saltos de línea manuales para crear la sangría. El formato de párrafo mantiene las entradas alineadas cuando edita el texto de la cita.
Nota: Si también necesita colocar el PDF original en un documento de Word, consulte Cómo insertar un PDF en Word para conocer métodos para insertar contenido PDF conservando su diseño y editabilidad.
Cómo formatear múltiples citas PDF MLA con Python
Microsoft Word es conveniente cuando solo necesita formatear unas pocas citas. Para aplicaciones que generan informes, procesan documentos enviados por usuarios o crean listas extensas de Obras Citadas, formatear las entradas de citación mediante programación puede ser más eficiente.
Free Spire.Doc for Python es una biblioteca de Python independiente para crear, editar, formatear y convertir documentos de Word sin necesidad de Microsoft Word. Proporciona propiedades de formato de párrafo que se pueden utilizar para crear la sangría francesa requerida para las citas MLA.
Puede combinar LeftIndent con un FirstLineIndent negativo. Para una sangría francesa de 0.5 pulgadas, establezca ambos valores en 36 puntos en direcciones opuestas.
El siguiente ejemplo crea múltiples entradas de cita MLA y aplica el formato requerido automáticamente:
from spire.doc import *
from spire.doc.common import *

# Crear un documento y una sección
doc = Document()
section = doc.AddSection()

# Entradas de cita MLA de muestra
citations = [
    "Chomsky, Noam. Media Control: The Spectacular Achievements of Propaganda. Seven Stories Press, 1997.",
    'Rawls, John. "Kantian Constructivism in Moral Theory." The Journal of Philosophy, vol. 77, no. 9, 1980, pp. 515–572.'
]

# Añadir y formatear cada cita
for citation in citations:
    paragraph = section.AddParagraph()
    paragraph.AppendText(citation)

    # Aplicar una sangría francesa de 0.5 pulgadas
    paragraph.Format.LeftIndent = 36.0
    paragraph.Format.FirstLineIndent = -36.0

    # Aplicar interlineado doble y eliminar el espaciado entre párrafos
    paragraph.Format.LineSpacingRule = LineSpacingRule.Multiple
    paragraph.Format.LineSpacing = 24.0
    paragraph.Format.BeforeSpacing = 0.0
    paragraph.Format.AfterSpacing = 0.0

# Guardar el documento
doc.SaveToFile("MLA_PDF_Citations.docx", FileFormat.Docx2013)
doc.Close()
En el ejemplo, LeftIndent = 36.0 mueve el contenido del párrafo 0.5 pulgadas a la derecha, mientras que FirstLineIndent = -36.0 mueve la primera línea de vuelta al margen izquierdo. Juntos, crean una sangría francesa.
El código también establece BeforeSpacing y AfterSpacing en 0.0 y utiliza LineSpacingRule.Multiple con LineSpacing = 24.0 para producir un interlineado doble en esta configuración de Free Spire.Doc.
Este enfoque es útil cuando ya tiene cadenas de citas y necesita generar un documento de Word con formato consistente a partir de muchas entradas.
Obtener información de citación MLA con Google Scholar o MyBib
Si necesita ayuda para recopilar información de citación, herramientas como Google Scholar y MyBib pueden proporcionar un punto de partida útil.
Google Scholar ofrece una opción de Citar para muchos resultados de búsqueda, mientras que MyBib puede generar citas al estilo MLA a partir de la información de la fuente disponible.
Sin embargo, las citas generadas siempre deben verificarse con la fuente original. Es posible que una herramienta de citación no siempre identifique correctamente el tipo de fuente, los detalles de publicación o el método de acceso al PDF.
Un flujo de trabajo práctico es:
- Identificar el tipo de obra contenida en el PDF.
- Recopilar la información de publicación requerida.
- Generar o preparar la cita MLA.
- Verificar la cita con la fuente original.
- Formatear las entradas completadas manualmente en Word o automáticamente con Python.
Preguntas frecuentes
¿Necesito añadir "descarga de PDF" a cada cita MLA?
No. Descarga de PDF no es obligatorio para cada cita de PDF. Puede utilizarse como descripción cuando desee aclarar que consultó una versión en PDF de la fuente.
¿Utiliza MLA el mismo formato para cada PDF?
No. La cita depende del tipo de obra y de cómo haya accedido a ella. Un libro, un artículo de revista y un informe descargado de un sitio web pueden requerir información de citación diferente.
¿Cómo formateo una cita PDF en una lista de Obras Citadas de MLA?
Utilice una sangría francesa de 0.5 pulgadas y un interlineado doble para las entradas de la cita. En Microsoft Word, puede aplicar el formato a través de la configuración de Párrafo o usar Ctrl + T en Windows.
¿Puedo formatear múltiples citas PDF MLA con Python?
Sí. Si el texto de la cita ya está preparado, Free Spire.Doc for Python puede crear documentos de Word y aplicar un formato de párrafo consistente a múltiples entradas de cita. Propiedades como LeftIndent y FirstLineIndent pueden combinarse para crear una sangría francesa.
Conclusión
Citar un PDF en MLA se vuelve más fácil cuando se separa el proceso en dos partes: preparar la cita basada en la fuente y formatear correctamente la entrada terminada. Para unas pocas citas, Microsoft Word ofrece una forma rápida de aplicar la sangría francesa y el interlineado doble requeridos. Cuando necesite formatear muchas entradas de manera consistente, Free Spire.Doc for Python puede automatizar el proceso y generar un documento de Word listo para usar.
Lea también:
Wie man ein PDF im MLA-Format zitiert: Schritt-für-Schritt-Anleitung
Inhaltsverzeichnis
Das Zitieren eines PDFs im MLA-Stil erfordert mehr, als einfach nur „PDF“ zu einer Quellenangabe hinzuzufügen. Das Zitierformat hängt davon ab, was das PDF enthält (z. B. ein Buch, einen Fachartikel oder einen Bericht) und wo Sie darauf zugegriffen haben. Sobald das Zitat erstellt ist, muss es im Literaturverzeichnis („Works Cited“) korrekt formatiert werden.
Dieser Leitfaden erklärt, wie man ein PDF im MLA-Stil zitiert, wie man das Zitat in Microsoft Word formatiert und wie man die Formatierung mehrerer Einträge mit Python automatisiert.
- MLA-Zitieranforderungen für PDF-Dokumente
- Schnelle Formatierung eines PDF-Zitats im MLA-Stil mit Microsoft Word
- Formatierung mehrerer MLA-PDF-Zitate mit Python
- Abrufen von MLA-Zitierinformationen mit Google Scholar oder MyBib
- FAQs
MLA-Zitieranforderungen für PDF-Dokumente
MLA verwendet kein festes Zitierformat für jedes PDF. Zitieren Sie das Werk stattdessen entsprechend seiner Art und fügen Sie die relevanten Veröffentlichungs- und Zugriffsinformationen hinzu.
Je nach Quelle kann ein MLA-Zitat Folgendes enthalten:
- Autor
- Titel
- Behälter (Container), wie z. B. eine Fachzeitschrift, eine Website oder eine Datenbank
- Herausgeber
- Veröffentlichungsdatum
- Seitenzahlen, falls zutreffend
- DOI oder URL, falls zutreffend
Die neunte Ausgabe des MLA Handbook, veröffentlicht im Jahr 2021, enthält die aktuellen MLA-Dokumentationsrichtlinien.
Beispiele für MLA-PDF-Zitate
- Für ein eigenständiges Buch, das als PDF verfügbar ist, kann das Zitat dem Standard-Buchformat folgen:
Chomsky, Noam. Media Control: The Spectacular Achievements of Propaganda. Seven Stories Press, 1997.
- Für einen Fachartikel, der als PDF verfügbar ist:
Rawls, John. „Kantian Constructivism in Moral Theory.“ The Journal of Philosophy, Bd. 77, Nr. 9, 1980, S. 515–572.
Ein von einer Website heruntergeladenes PDF erfordert möglicherweise zusätzliche Informationen über die Website oder die PDF-Version. MLA erlaubt die Beschreibung PDF-Download, wenn dies zur Klärung des Formats der Quelle beiträgt.
Das genaue Zitat sollte daher vor der Formatierung des endgültigen Eintrags im Literaturverzeichnis mit der Originalquelle abgeglichen werden.
Schnelle Formatierung eines PDF-Zitats im MLA-Stil mit Microsoft Word
Nachdem Sie Ihr Zitat vorbereitet haben, können Sie Microsoft Word verwenden, um die für ein Literaturverzeichnis erforderliche Formatierung anzuwenden. MLA empfiehlt einen hängenden Einzug von 0,5 Zoll (ca. 1,27 cm) und einen doppelten Zeilenabstand.
Befolgen Sie diese Schritte:
- Schritt 1: Markieren Sie die Zitateinträge in Ihrem Literaturverzeichnis.
- Schritt 2: Klicken Sie mit der rechten Maustaste auf die Auswahl und wählen Sie Absatz.
- Schritt 3: Stellen Sie unter Einzug die Option Sondereinzug auf Hängend und den Wert auf 1,27 cm (bzw. 0,5 Zoll). Stellen Sie unter Abstand die Werte Vor und Nach auf 0 pt, setzen Sie den Zeilenabstand auf Doppelt und klicken Sie auf OK.
Sie können auch Strg + T unter Windows oder Command + T auf dem Mac drücken, um schnell einen hängenden Einzug anzuwenden.
Vermeiden Sie die Verwendung von Leerzeichen, Tabulatoren oder manuellen Zeilenumbrüchen, um den Einzug zu erstellen. Die Absatzformatierung sorgt dafür, dass die Einträge ausgerichtet bleiben, wenn Sie den Text des Zitats bearbeiten.
Hinweis: Wenn Sie das ursprüngliche PDF ebenfalls in ein Word-Dokument einfügen müssen, lesen Sie Wie man ein PDF in Word einfügt, um Methoden zum Einfügen von PDF-Inhalten unter Beibehaltung des Layouts und der Bearbeitbarkeit zu erfahren.
Formatierung mehrerer MLA-PDF-Zitate mit Python
Microsoft Word ist praktisch, wenn Sie nur wenige Zitate formatieren müssen. Für Anwendungen, die Berichte erstellen, benutzerdefinierte Dokumente verarbeiten oder umfangreiche Literaturverzeichnisse erstellen, kann die programmgesteuerte Formatierung von Zitaten effizienter sein.
Free Spire.Doc for Python ist eine eigenständige Python-Bibliothek zum Erstellen, Bearbeiten, Formatieren und Konvertieren von Word-Dokumenten, ohne dass Microsoft Word erforderlich ist. Sie bietet Absatzformatierungseigenschaften, die verwendet werden können, um den für MLA-Zitate erforderlichen hängenden Einzug zu erstellen.
Sie können LeftIndent mit einem negativen FirstLineIndent kombinieren. Für einen hängenden Einzug von 0,5 Zoll setzen Sie beide Werte auf 36 Punkte in entgegengesetzte Richtungen.
Das folgende Beispiel erstellt mehrere MLA-Zitateinträge und wendet die erforderliche Formatierung automatisch an:
from spire.doc import *
from spire.doc.common import *

# Erstellen eines Dokuments und eines Abschnitts
doc = Document()
section = doc.AddSection()

# Beispiel für MLA-Zitateinträge
citations = [
    "Chomsky, Noam. Media Control: The Spectacular Achievements of Propaganda. Seven Stories Press, 1997.",
    'Rawls, John. "Kantian Constructivism in Moral Theory." The Journal of Philosophy, vol. 77, no. 9, 1980, pp. 515–572.'
]

# Hinzufügen und Formatieren jedes Zitats
for citation in citations:
    paragraph = section.AddParagraph()
    paragraph.AppendText(citation)

    # Anwenden eines hängenden Einzugs von 0,5 Zoll (36 Punkte)
    paragraph.Format.LeftIndent = 36.0
    paragraph.Format.FirstLineIndent = -36.0

    # Anwenden von doppeltem Zeilenabstand und Entfernen von Absatzabständen
    paragraph.Format.LineSpacingRule = LineSpacingRule.Multiple
    paragraph.Format.LineSpacing = 24.0
    paragraph.Format.BeforeSpacing = 0.0
    paragraph.Format.AfterSpacing = 0.0

# Speichern des Dokuments
doc.SaveToFile("MLA_PDF_Zitate.docx", FileFormat.Docx2013)
doc.Close()
Im Beispiel verschiebt LeftIndent = 36.0 den Absatzinhalt um 0,5 Zoll nach rechts, während FirstLineIndent = -36.0 die erste Zeile zurück an den linken Rand bewegt. Zusammen erzeugen sie einen hängenden Einzug.
Der Code setzt außerdem BeforeSpacing und AfterSpacing auf 0.0 und verwendet LineSpacingRule.Multiple mit LineSpacing = 24.0, um in dieser Free Spire.Doc-Konfiguration einen doppelten Zeilenabstand zu erzeugen.
Dieser Ansatz ist nützlich, wenn Sie bereits Zitat-Strings haben und ein einheitlich formatiertes Word-Dokument aus vielen Einträgen generieren müssen.
Abrufen von MLA-Zitierinformationen mit Google Scholar oder MyBib
Wenn Sie Hilfe beim Sammeln von Zitierinformationen benötigen, können Tools wie Google Scholar und MyBib einen nützlichen Ausgangspunkt bieten.
Google Scholar bietet für viele Suchergebnisse eine Zitieren-Option, während MyBib MLA-konforme Zitate aus verfügbaren Quelleninformationen generieren kann.
Generierte Zitate sollten jedoch immer mit der Originalquelle abgeglichen werden. Ein Zitier-Tool erkennt möglicherweise nicht immer den Quellentyp, die Veröffentlichungsdetails oder die PDF-Zugriffsmethode korrekt.
Ein praktischer Arbeitsablauf ist:
- Identifizieren Sie die Art des Werks im PDF.
- Sammeln Sie die erforderlichen Veröffentlichungsinformationen.
- Generieren oder erstellen Sie das MLA-Zitat.
- Überprüfen Sie das Zitat anhand der Originalquelle.
- Formatieren Sie die fertigen Einträge manuell in Word oder automatisch mit Python.
Häufig gestellte Fragen (FAQs)
Muss ich zu jedem MLA-Zitat „PDF-Download“ hinzufügen?
Nein. PDF-Download ist nicht für jedes PDF-Zitat erforderlich. Es kann als Beschreibung verwendet werden, wenn Sie verdeutlichen möchten, dass Sie eine PDF-Version der Quelle konsultiert haben.
Verwendet MLA für jedes PDF das gleiche Format?
Nein. Das Zitat hängt von der Art des Werks und der Art des Zugriffs ab. Ein Buch, ein Fachartikel oder ein Bericht, der von einer Website heruntergeladen wurde, erfordert möglicherweise unterschiedliche Zitierinformationen.
Wie formatiere ich ein PDF-Zitat in einem MLA-Literaturverzeichnis?
Verwenden Sie einen hängenden Einzug von 0,5 Zoll und einen doppelten Zeilenabstand für die Zitateinträge. In Microsoft Word können Sie die Formatierung über die Absatz-Einstellungen vornehmen oder Strg + T unter Windows verwenden.
Kann ich mehrere MLA-PDF-Zitate mit Python formatieren?
Ja. Wenn der Zitattext bereits vorbereitet ist, kann Free Spire.Doc for Python Word-Dokumente erstellen und eine konsistente Absatzformatierung auf mehrere Zitateinträge anwenden. Eigenschaften wie LeftIndent und FirstLineIndent können kombiniert werden, um einen hängenden Einzug zu erzeugen.
Fazit
Das Zitieren eines PDFs im MLA-Stil wird einfacher, wenn Sie den Prozess in zwei Teile unterteilen: die Vorbereitung des Zitats basierend auf der Quelle und die korrekte Formatierung des fertigen Eintrags. Für einige wenige Zitate bietet Microsoft Word eine schnelle Möglichkeit, den erforderlichen hängenden Einzug und den doppelten Zeilenabstand anzuwenden. Wenn Sie viele Einträge konsistent formatieren müssen, kann Free Spire.Doc for Python den Prozess automatisieren und ein sofort einsatzbereites Word-Dokument generieren.
Ebenfalls lesen:
Как цитировать PDF в формате MLA: пошаговое руководство
Оглавление
Цитирование PDF-файла в формате MLA требует большего, чем просто добавление пометки «PDF» к источнику. Формат ссылки зависит от того, что содержит PDF-файл (книгу, статью из журнала или отчет), и от того, где вы получили к нему доступ. После подготовки ссылки её необходимо правильно оформить в списке использованных источников (Works Cited).
В этом руководстве объясняется, как оформить ссылку на PDF в стиле MLA, как отформатировать её в Microsoft Word и как автоматизировать форматирование нескольких записей с помощью Python.
- Требования MLA к оформлению ссылок на PDF-документы
- Быстрое форматирование ссылки на PDF в стиле MLA с помощью Microsoft Word
- Форматирование нескольких ссылок MLA на PDF с помощью Python
- Получение информации для цитирования в MLA через Google Scholar или MyBib
- Часто задаваемые вопросы
Требования MLA к оформлению ссылок на PDF-документы
В MLA не существует единого фиксированного формата для всех PDF-файлов. Ссылку следует оформлять в соответствии с типом работы, включая соответствующую информацию о публикации и доступе.
В зависимости от источника, ссылка в формате MLA может включать:
- Автора
- Название
- Контейнер (например, журнал, веб-сайт или база данных)
- Издателя
- Дату публикации
- Диапазон страниц (если применимо)
- DOI или URL (если применимо)
Девятое издание MLA Handbook, опубликованное в 2021 году, содержит актуальные рекомендации по оформлению документации в стиле MLA.
Примеры оформления ссылок на PDF в MLA
- Для отдельной книги, доступной в формате PDF, ссылка может следовать стандартному формату книги:
Chomsky, Noam. Media Control: The Spectacular Achievements of Propaganda. Seven Stories Press, 1997.
- Для статьи из журнала, доступной в формате PDF:
Rawls, John. “Kantian Constructivism in Moral Theory.” The Journal of Philosophy, vol. 77, no. 9, 1980, pp. 515–572.
PDF-файл, загруженный с веб-сайта, может потребовать дополнительной информации о самом сайте или версии PDF. MLA допускает использование описания PDF download, если это помогает уточнить формат источника.
Поэтому перед составлением финальной записи в списке использованных источников точную ссылку следует сверить с оригиналом.
Как быстро отформатировать ссылку на PDF в стиле MLA с помощью Microsoft Word
После подготовки текста ссылки вы можете использовать Microsoft Word для применения форматирования, требуемого для списка использованных источников. MLA рекомендует использовать выступающий отступ (hanging indent) размером 0,5 дюйма и двойной межстрочный интервал.
Выполните следующие действия:
- Шаг 1: Выделите записи в вашем списке использованных источников.
- Шаг 2: Нажмите правой кнопкой мыши на выделенный текст и выберите Абзац (Paragraph).
- Шаг 3: В разделе Отступ (Indentation) установите Первая строка (Special) на Выступ (Hanging), а значение на (By) — на 0,5 дюйма. В разделе Интервал (Spacing) установите значения Перед (Before) и После (After) на 0 пт, установите Межстрочный интервал (Line spacing) на Двойной (Double) и нажмите ОК.
Вы также можете нажать Ctrl + T в Windows или Command + T на Mac, чтобы быстро применить выступающий отступ.
Избегайте использования пробелов, табуляции или ручных разрывов строк для создания отступа. Форматирование абзаца позволяет записям оставаться выровненными при редактировании текста ссылки.
Примечание: Если вам также нужно разместить исходный PDF-файл в документе Word, см. статью Как вставить PDF в Word, где описаны методы вставки содержимого PDF с сохранением его макета и возможности редактирования.
Как отформатировать несколько ссылок MLA на PDF с помощью Python
Microsoft Word удобен, если вам нужно отформатировать всего несколько ссылок. Для приложений, которые генерируют отчеты, обрабатывают пользовательские документы или создают большие списки использованных источников, программное форматирование может быть более эффективным.
Free Spire.Doc for Python — это автономная библиотека Python для создания, редактирования, форматирования и конвертации документов Word без необходимости установки Microsoft Word. Она предоставляет свойства форматирования абзацев, которые можно использовать для создания выступающего отступа, требуемого в MLA.
Вы можете объединить LeftIndent с отрицательным значением FirstLineIndent. Для выступающего отступа в 0,5 дюйма установите оба значения на 36 пунктов в противоположных направлениях.
Следующий пример создает несколько записей ссылок MLA и автоматически применяет необходимое форматирование:
from spire.doc import *
from spire.doc.common import *

# Создание документа и раздела
doc = Document()
section = doc.AddSection()

# Примеры записей ссылок MLA
citations = [
    "Chomsky, Noam. Media Control: The Spectacular Achievements of Propaganda. Seven Stories Press, 1997.",
    'Rawls, John. "Kantian Constructivism in Moral Theory." The Journal of Philosophy, vol. 77, no. 9, 1980, pp. 515–572.'
]

# Добавление и форматирование каждой ссылки
for citation in citations:
    paragraph = section.AddParagraph()
    paragraph.AppendText(citation)

    # Применение выступающего отступа 0,5 дюйма
    paragraph.Format.LeftIndent = 36.0
    paragraph.Format.FirstLineIndent = -36.0

    # Применение двойного интервала и удаление интервалов между абзацами
    paragraph.Format.LineSpacingRule = LineSpacingRule.Multiple
    paragraph.Format.LineSpacing = 24.0
    paragraph.Format.BeforeSpacing = 0.0
    paragraph.Format.AfterSpacing = 0.0

# Сохранение документа
doc.SaveToFile("MLA_PDF_Citations.docx", FileFormat.Docx2013)
doc.Close()
В примере LeftIndent = 36.0 сдвигает содержимое абзаца на 0,5 дюйма вправо, а FirstLineIndent = -36.0 возвращает первую строку к левому полю. Вместе они создают выступающий отступ.
Код также устанавливает BeforeSpacing и AfterSpacing на 0.0 и использует LineSpacingRule.Multiple со значением LineSpacing = 24.0 для получения двойного интервала в конфигурации Free Spire.Doc.
Этот подход полезен, когда у вас уже есть строки ссылок и нужно сгенерировать единообразно отформатированный документ Word из множества записей.
Получение информации для цитирования в MLA через Google Scholar или MyBib
Если вам нужна помощь в сборе информации для цитирования, такие инструменты, как Google Scholar и MyBib, могут стать полезной отправной точкой.
Google Scholar предоставляет опцию Цитировать (Cite) для многих результатов поиска, а MyBib может генерировать ссылки в стиле MLA на основе доступной информации об источнике.
Однако сгенерированные ссылки всегда следует сверять с оригиналом. Инструмент цитирования не всегда может правильно определить тип источника, детали публикации или метод доступа к PDF.
Практический рабочий процесс выглядит так:
- Определите тип работы, содержащейся в PDF.
- Соберите необходимую информацию о публикации.
- Сгенерируйте или подготовьте ссылку в стиле MLA.
- Сверьте ссылку с оригинальным источником.
- Отформатируйте готовые записи вручную в Word или автоматически с помощью Python.
Часто задаваемые вопросы
Нужно ли добавлять «PDF download» к каждой ссылке в MLA?
Нет. PDF download не требуется для каждой ссылки на PDF. Это описание можно использовать, если вы хотите уточнить, что вы обращались к PDF-версии источника.
Использует ли MLA одинаковый формат для всех PDF?
Нет. Ссылка зависит от типа работы и способа доступа к ней. Книга, статья из журнала и отчет, загруженные с веб-сайта, могут требовать разной информации для цитирования.
Как отформатировать ссылку на PDF в списке использованных источников MLA?
Используйте выступающий отступ 0,5 дюйма и двойной межстрочный интервал. В Microsoft Word вы можете применить форматирование через настройки Абзаца или использовать Ctrl + T в Windows.
Можно ли отформатировать несколько ссылок MLA на PDF с помощью Python?
Да. Если текст ссылки уже готов, Free Spire.Doc for Python может создавать документы Word и применять единообразное форматирование абзацев к нескольким записям. Свойства, такие как LeftIndent и FirstLineIndent, можно комбинировать для создания выступающего отступа.
Заключение
Цитирование PDF в формате MLA становится проще, если разделить процесс на две части: подготовка ссылки на основе источника и правильное форматирование готовой записи. Для небольшого количества ссылок Microsoft Word предоставляет быстрый способ применения необходимого выступающего отступа и двойного интервала. Когда вам нужно единообразно отформатировать множество записей, Free Spire.Doc for Python может автоматизировать этот процесс и создать готовый к использованию документ Word.
Читайте также:
Set Excel Background Color and Background Image with JavaScript in React
When creating reports, setting background colors for cells highlights headers and key data, and setting a background image for the worksheet makes the whole report more recognizable. Spire.XLS for JavaScript performs both kinds of settings directly in the browser based on WebAssembly, and manages input/output files through a virtual file system (VFS), with no backend service required.
This article covers two core features:
For installation and project configuration, refer to Integrating Spire.XLS for JavaScript in a React Project. The examples below assume Spire.XLS is installed and the WebAssembly module is initialized.
Set Cell Background Color
Setting a background color for cells highlights headers, important data, or specific regions. Spire.XLS for JavaScript sets a background color for a cell or a cell range through the CellRange.Style.Color property, with rich built-in colors supported. The main steps are as follows:
- Create a
Workbookobject and use theLoadFromFile()method to load the Excel document. - Use the
Workbook.Worksheets.get()method to get a specific worksheet. - Use the
CellRange.Style.Colorproperty to set a background color for a specific cell range. - Use the
Workbook.SaveToFile()method to save the document to a specified path.
Here is a complete code example showing how to set background colors for cell ranges in React:
function App() {
  const setBackgroundColor = async () => {
    // Get the Spire.XLS WASM module
    const xlsModule = window.wasmModule?.spirexls;

    // Check whether the module is ready
    if (!xlsModule) {
      alert('Spire.Xls is not ready yet');
      return;
    }

    // Load the font and Excel file into the VFS
    await window.spire.FetchFileToVFS('ARIAL.TTF', '/Library/Fonts/', `${process.env.PUBLIC_URL}/font/`);
    const inputFileName = 'SetBackgroundColor.xlsx';
    await window.spire.FetchFileToVFS(inputFileName, '', `${process.env.PUBLIC_URL}data/`);

    // Load the workbook
    const workbook = new xlsModule.Workbook();
    workbook.LoadFromFile({ fileName: inputFileName });

    // Get the first worksheet
    const sheet = workbook.Worksheets.get(0);

    // Set the header row to a yellow background
    sheet.Range.get("A1:E1").Style.Color = xlsModule.Color.get_Yellow();

    // Set the first two data rows to a light sky blue background
    sheet.Range.get("A2:E2").Style.Color = xlsModule.Color.get_LightSkyBlue();
    sheet.Range.get("A3:E3").Style.Color = xlsModule.Color.get_LightSkyBlue();

    // Save the document
    const outputFileName = 'SetBackgroundColor_output.xlsx';
    workbook.SaveToFile({ fileName: outputFileName, version: xlsModule.ExcelVersion.Version2010 });

    // Release resources
    workbook.Dispose();

    // Read the converted file from the VFS and trigger a download
    const fileArray = window.dotnetRuntime.Module.FS.readFile(outputFileName);
    const blob = new Blob([fileArray], { type: 'application/vnd.openxmlformats-officedocument.spreadsheetml.sheet' });
    const url = URL.createObjectURL(blob);
    const a = document.createElement('a');
    a.href = url;
    a.download = outputFileName;
    a.click();
    URL.revokeObjectURL(url);
  };

  return (
    <div style={{ textAlign: 'center', height: '300px' }}>
      <h1>Set Cell Background Color</h1>
      <button onClick={setBackgroundColor}>
        Start
      </button>
    </div>
  );
}

export default App;
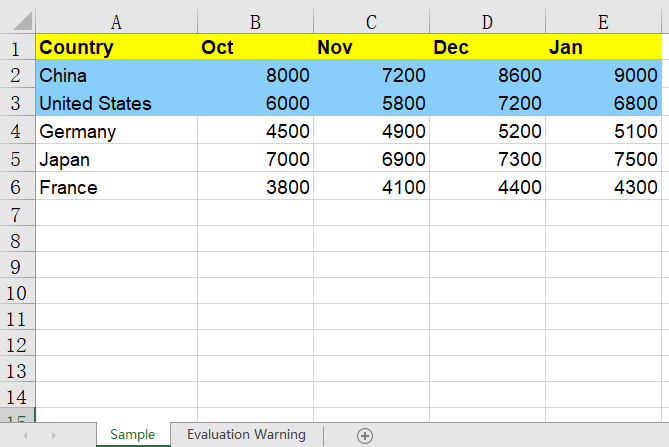
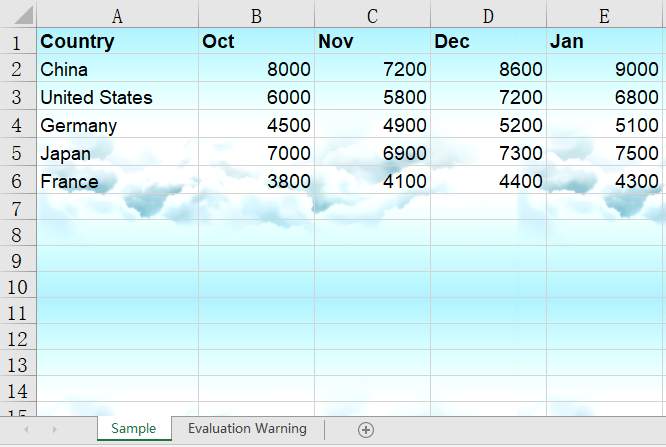
After setting the background colors, the header row is displayed with a yellow background and the first two data rows with a light sky blue background, making it easy to distinguish cells in different regions.
Set Worksheet Background Image
In addition to setting background colors for cells, you can also set a background image for the whole worksheet to make the report more recognizable. Spire.XLS for JavaScript sets an image as the worksheet background through the Worksheet.PageSetup.BackgroundImage property. The main steps are as follows:
- Create a
Workbookobject and use theLoadFromFile()method to load the Excel document. - Use the
Workbook.Worksheets.get()method to get a specific worksheet. - Use a
Streamobject to read the image file to be used as the background. - Use the
Worksheet.PageSetup.BackgroundImageproperty to set the image as the worksheet background. - Use the
Workbook.SaveToFile()method to save the document to a specified path.
Here is a complete code example showing how to set a background image for a worksheet in React:
function App() {
  const setBackgroundImage = async () => {
    // Get the Spire.XLS WASM module
    const xlsModule = window.wasmModule?.spirexls;

    // Check whether the module is ready
    if (!xlsModule) {
      alert('Spire.Xls is not ready yet');
      return;
    }

    // Load the font, image, and Excel file into the VFS
    await window.spire.FetchFileToVFS('ARIAL.TTF', '/Library/Fonts/', `${process.env.PUBLIC_URL}/font/`);
    const backgroundImageName = 'Background.png';
    await window.spire.FetchFileToVFS(backgroundImageName, '', `${process.env.PUBLIC_URL}data/`);
    const inputFileName = 'SetBackgroundColor.xlsx';
    await window.spire.FetchFileToVFS(inputFileName, '', `${process.env.PUBLIC_URL}data/`);

    // Load the workbook
    const workbook = new xlsModule.Workbook();
    workbook.LoadFromFile({ fileName: inputFileName });

    // Get the first worksheet
    const sheet = workbook.Worksheets.get(0);

    // Open the image as a stream
    const bm = new xlsModule.Stream(backgroundImageName);

    // Set the image as the worksheet background
    sheet.PageSetup.BackgroundImage = bm;

    // Save the document
    const outputFileName = 'SetBackgroundImage_output.xlsx';
    workbook.SaveToFile({ fileName: outputFileName, version: xlsModule.ExcelVersion.Version2010 });

    // Release resources
    workbook.Dispose();

    // Read the converted file from the VFS and trigger a download
    const fileArray = window.dotnetRuntime.Module.FS.readFile(outputFileName);
    const blob = new Blob([fileArray], { type: 'application/vnd.openxmlformats-officedocument.spreadsheetml.sheet' });
    const url = URL.createObjectURL(blob);
    const a = document.createElement('a');
    a.href = url;
    a.download = outputFileName;
    a.click();
    URL.revokeObjectURL(url);
  };

  return (
    <div style={{ textAlign: 'center', height: '300px' }}>
      <h1>Set Worksheet Background Image</h1>
      <button onClick={setBackgroundImage}>
        Start
      </button>
    </div>
  );
}

export default App;
After setting the background image, the image fills the back of the worksheet as its background, while the cell contents and data remain clearly displayed on top of the image.
FAQ
The background color is lost after saving and reopening
Cause: The Style.Color property sets the background (fill) color of a cell, not the font color. If the color is overridden by other styles, or the fill pattern is not set correctly, the color may not display properly.
Solution: Set the color directly for the cell range, for example sheet.Range.get("A1:E1").Style.Color = xlsModule.Color.get_Yellow();. If you want to use a patterned fill, combine Style.Interior.FillPattern and Style.Interior.Gradient.
The background image does not appear above the data
Cause: A worksheet background image is always displayed behind the cell contents and only serves as background decoration. It neither covers the data nor is covered by it.
Solution: This is the normal display layering. If you need the image to appear on top of the data, use the Worksheet.Pictures.Add() method to insert a floating image in the worksheet instead of setting a worksheet background.
Obtain a Free License
Spire.XLS for JavaScript offers a 30-day full-featured free trial license with no functional limitations. Apply here to evaluate before purchasing.
Sort Data in Excel with JavaScript in React
In everyday Excel data processing, sorting is one of the most common operations — whether rearranging data by name, value, or date, it makes tables more organized and easier to search. Spire.XLS for JavaScript performs data sorting directly in the browser based on WebAssembly, and manages input/output files through a virtual file system (VFS), with no backend service required.
This article covers two core features:
For installation and project configuration, refer to Integrating Spire.XLS for JavaScript in a React Project. The examples below assume Spire.XLS is installed and the WebAssembly module is initialized.
Sort Data in a Cell Range in Ascending Order
Sorting a specified cell range in ascending order is the most common data arrangement requirement. Spire.XLS for JavaScript adds a sort field and specifies the sort order with the Workbook.DataSorter.SortColumns.Add() method, then sorts the specified range with the Workbook.DataSorter.Sort() method. The main steps are as follows:
- Create a
Workbookobject and use theLoadFromFile()method to load the Excel document. - Use the
Workbook.Worksheets.get()method to get a specific worksheet. - Use the
Workbook.DataSorter.SortColumns.Add()method to add a sort field, specifying the column and the sort order. - Use the
Workbook.DataSorter.Sort()method to sort the specified cell range. - Use the
Workbook.SaveToFile()method to save the document to a specified path.
Here is a complete code example showing how to sort a cell range in ascending order by a single column in React:
function App() {
  const sortAscending = async () => {
    // Get the Spire.XLS WASM module
    const xlsModule = window.wasmModule?.spirexls;

    // Check whether the module is ready
    if (!xlsModule) {
      alert('Spire.Xls is not ready yet');
      return;
    }

    // Load the font and Excel file into the VFS
    await window.spire.FetchFileToVFS('ARIAL.TTF', '/Library/Fonts/', `${process.env.PUBLIC_URL}/font/`);
    const inputFileName = 'DataSorting.xlsx';
    await window.spire.FetchFileToVFS(inputFileName, '', `${process.env.PUBLIC_URL}data/`);

    // Load the workbook
    const workbook = new xlsModule.Workbook();
    workbook.LoadFromFile({ fileName: inputFileName });

    // Get the first worksheet
    const sheet = workbook.Worksheets.get(0);

    // Add a sort field: sort by the 5th column (Population) in ascending order
    workbook.DataSorter.SortColumns.Add({ key: 4, orderBy: xlsModule.OrderBy.Ascending });

    // Sort the specified cell range A1:E19
    workbook.DataSorter.Sort(sheet.Range.get("A1:E19"));

    // Save the document
    const outputFileName = 'SortDataAscending_output.xlsx';
    workbook.SaveToFile({ fileName: outputFileName, version: xlsModule.ExcelVersion.Version2010 });

    // Release resources
    workbook.Dispose();

    // Read the converted file from the VFS and trigger a download
    const fileArray = window.dotnetRuntime.Module.FS.readFile(outputFileName);
    const blob = new Blob([fileArray], { type: 'application/vnd.openxmlformats-officedocument.spreadsheetml.sheet' });
    const url = URL.createObjectURL(blob);
    const a = document.createElement('a');
    a.href = url;
    a.download = outputFileName;
    a.click();
    URL.revokeObjectURL(url);
  };

  return (
    <div style={{ textAlign: 'center', height: '300px' }}>
      <h1>Sort Data in Ascending Order</h1>
      <button onClick={sortAscending}>
        Start
      </button>
    </div>
  );
}

export default App;
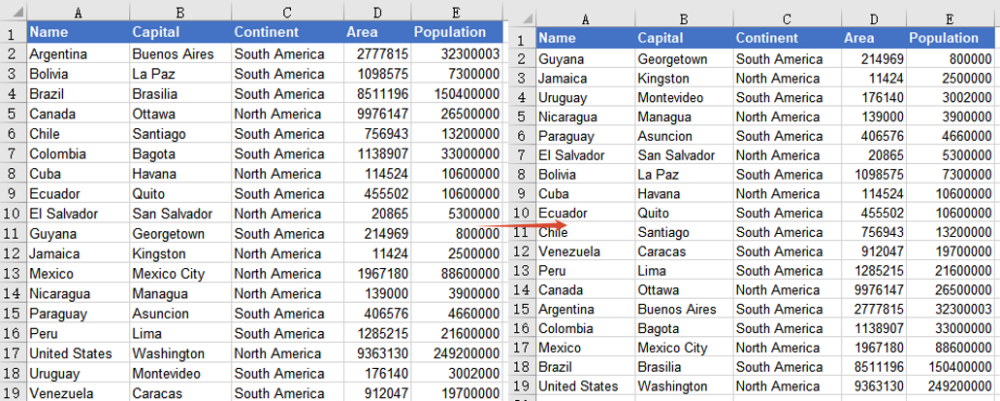
After sorting, the data is rearranged in ascending numerical order based on the 5th column (Population), from the smallest to the largest, and the other columns in the same row stay aligned with the Population column.
Sort Data by Multiple Columns
When a single-column sort is not enough, you can sort by multiple columns at the same time. Spire.XLS for JavaScript supports adding multiple sort fields by calling the SortColumns.Add() method several times. Data is sorted by the first field first, then by the subsequent fields. The main steps are as follows:
- Create a
Workbookobject and use theLoadFromFile()method to load the Excel document. - Use the
Workbook.Worksheets.get()method to get a specific worksheet. - Call the
Workbook.DataSorter.SortColumns.Add()method several times to add multiple sort fields. - Use the
Workbook.DataSorter.Sort()method to sort the specified cell range. - Use the
Workbook.SaveToFile()method to save the document to a specified path.
Here is a complete code example showing how to sort a cell range by multiple columns in React:
function App() {
  const sortMultipleColumns = async () => {
    // Get the Spire.XLS WASM module
    const xlsModule = window.wasmModule?.spirexls;

    // Check whether the module is ready
    if (!xlsModule) {
      alert('Spire.Xls is not ready yet');
      return;
    }

    // Load the font and Excel file into the VFS
    await window.spire.FetchFileToVFS('ARIAL.TTF', '/Library/Fonts/', `${process.env.PUBLIC_URL}/font/`);
    const inputFileName = 'DataSorting.xlsx';
    await window.spire.FetchFileToVFS(inputFileName, '', `${process.env.PUBLIC_URL}data/`);

    // Load the workbook
    const workbook = new xlsModule.Workbook();
    workbook.LoadFromFile({ fileName: inputFileName });

    // Get the first worksheet
    const sheet = workbook.Worksheets.get(0);

    // Add multiple sort fields: first by the 3rd column (Continent), then by the 4th column (Area), ascending
    workbook.DataSorter.SortColumns.Add({ key: 2, orderBy: xlsModule.OrderBy.Ascending });
    workbook.DataSorter.SortColumns.Add({ key: 3, orderBy: xlsModule.OrderBy.Ascending });

    // Sort the specified cell range A1:E19
    workbook.DataSorter.Sort(sheet.Range.get("A1:E19"));

    // Save the document
    const outputFileName = 'SortDataMultipleColumns_output.xlsx';
    workbook.SaveToFile({ fileName: outputFileName, version: xlsModule.ExcelVersion.Version2010 });

    // Release resources
    workbook.Dispose();

    // Read the converted file from the VFS and trigger a download
    const fileArray = window.dotnetRuntime.Module.FS.readFile(outputFileName);
    const blob = new Blob([fileArray], { type: 'application/vnd.openxmlformats-officedocument.spreadsheetml.sheet' });
    const url = URL.createObjectURL(blob);
    const a = document.createElement('a');
    a.href = url;
    a.download = outputFileName;
    a.click();
    URL.revokeObjectURL(url);
  };

  return (
    <div style={{ textAlign: 'center', height: '300px' }}>
      <h1>Sort Data by Multiple Columns</h1>
      <button onClick={sortMultipleColumns}>
        Start
      </button>
    </div>
  );
}

export default App;
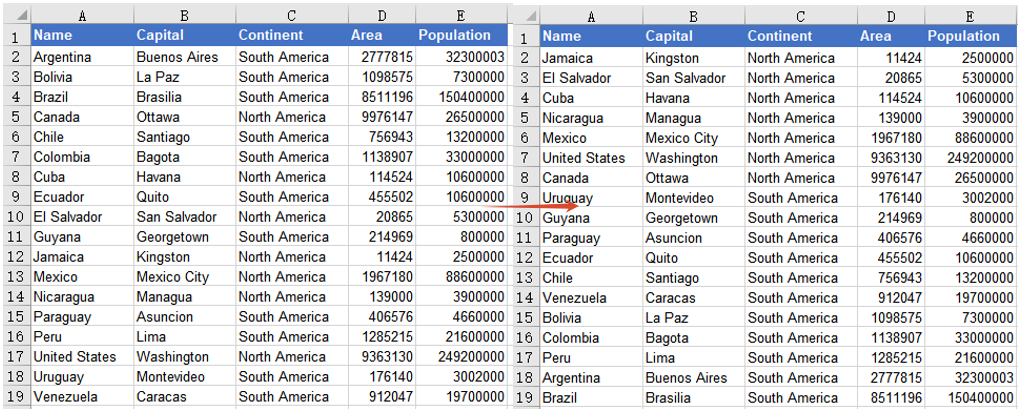
After sorting, the data is first arranged in ascending order by the 3rd column (Continent), grouping countries from the same continent together; when the continents are the same, it is then sorted in ascending order by the 4th column (Area).
FAQ
The header row is also included in the sorting
Cause: By default, the DataSorter.Sort() method treats the first row of the sort range as a title row and keeps it in place. If the header is moved into the data rows, it is usually because the starting row of the sort range is set incorrectly.
Solution: Make sure the range passed to the Sort() method includes the header row and that the header row is at the top of the range, for example sheet.Range.get("A1:E19"). You can also start the sort from the data rows, such as sheet.Range.get("A2:E19").
After a single-column sort, other columns do not change accordingly
Cause: The sort only takes effect on the cell range passed to the Sort() method. If you sort only a single column's range, the other columns will not be rearranged, causing data in the same row to become misaligned.
Solution: Make the sort range cover all related columns (for example, the complete range that includes name, capital, continent, area, and population, A1:E19), so that the entire row moves together.
Obtain a Free License
Spire.XLS for JavaScript offers a 30-day full-featured free trial license with no functional limitations. Apply here to evaluate before purchasing.
Find and Replace Data in Excel with JavaScript in React
Finding and replacing data is a common requirement when processing Excel files in web applications. Spire.XLS for JavaScript runs entirely in the browser via WebAssembly, using a virtual file system (VFS) to manage input and output files — no backend server required. It provides search methods such as FindAllString() and FindAllNumber() that let you locate target data across an entire worksheet or within a specified cell range, quickly replace it with new content, and optionally mark the replaced cells with a highlight color.
With Spire.XLS for JavaScript, you can batch-replace text across an entire worksheet or restrict the search to a specific cell range, giving you both efficiency and flexibility when updating partial data precisely.
This article covers two core features:
- Find and Replace Data in a Worksheet in Excel
- Find and Replace Data in a Specific Cell Range in Excel
For installation and project setup, refer to Integrating Spire.XLS for JavaScript in a React Project. The examples below assume Spire.XLS is installed and the WebAssembly module is initialized.
Find and Replace Data in a Worksheet in Excel
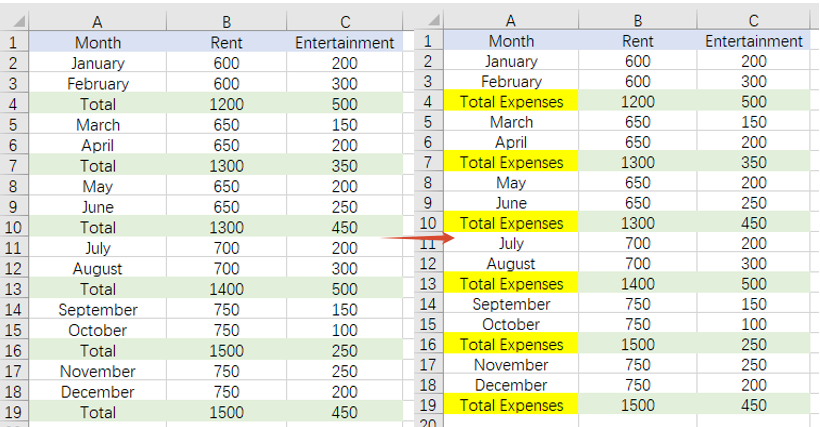
With Spire.XLS for JavaScript, you can find all cells containing a specified text in an entire worksheet and replace them with new content. The FindAllString() method returns all matching cell ranges. You can then replace the text by setting the range.Text property and highlight the replaced cells by setting the range.Style.Color property, making it easy to identify where modifications were made. The steps are as follows:
- Create a
Workbookobject and load an existing Excel file. - Get the worksheet to operate on via
workbook.Worksheets.get(). - Use
worksheet.FindAllString()to find all cell ranges containing the specified text in the worksheet. - Iterate through the search results, replacing the text via
range.Textand setting the highlight color viarange.Style.Color. - Save the workbook to an Excel file using
SaveToFile().
Below is a complete code example demonstrating how to find and replace data across an entire worksheet in React:
function App() {
  const findAndReplace = async () => {
    // Get the Spire.XLS WASM module
    const xlsModule = window.wasmModule?.spirexls;

    // Check if the module is ready
    if (!xlsModule) {
      alert('Spire.Xls is not ready yet');
      return;
    }

    let excelFileName = 'Sample.xlsx';
    await window.spire.FetchFileToVFS(excelFileName, '', `${process.env.PUBLIC_URL}static/data/`);

    // Create a new workbook and load an existing Excel file
    const workbook = new xlsModule.Workbook();
    workbook.LoadFromFile({ fileName: excelFileName });

    // Get the first worksheet
    let worksheet = workbook.Worksheets.get(0);

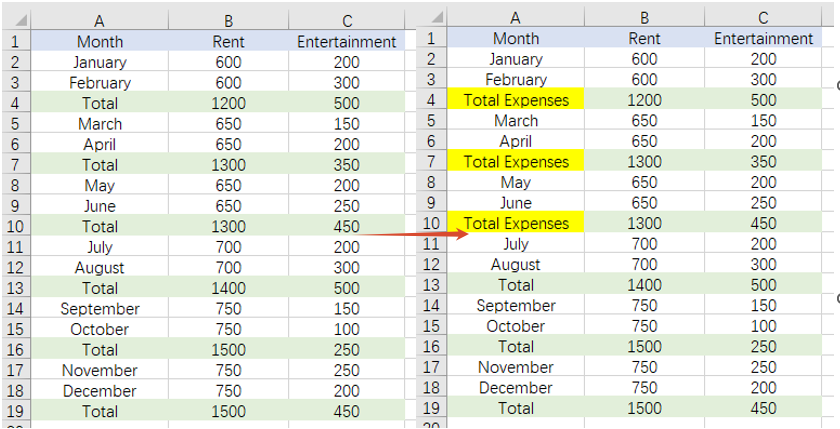
    // Find all cells containing the text "Total" in the worksheet
    let ranges = worksheet.FindAllString("Total", false, false);

    // Iterate through the search results, replace the text, and set the highlight color
    for (let range of ranges) {
      range.Text = "Total Expenses";
      range.Style.Color = xlsModule.Color.get_Yellow();
    }

    // Save the workbook
    const outputFileName = 'FindAndReplaceData.xlsx';
    workbook.SaveToFile({ fileName: outputFileName, version: xlsModule.ExcelVersion.Version2010 });
    workbook.Dispose();

    // Read the file from VFS and trigger download
    const fileArray = window.dotnetRuntime.Module.FS.readFile(outputFileName);
    const blob = new Blob([fileArray], { type: 'application/vnd.openxmlformats-officedocument.spreadsheetml.sheet' });
    const url = URL.createObjectURL(blob);
    const a = document.createElement('a');
    a.href = url;
    a.download = outputFileName;
    a.click();
    URL.revokeObjectURL(url);
  };

  return (
    <div style={{ textAlign: 'center', height: '300px' }}>
      <h1>Find and Replace Data in a Worksheet</h1>
      <button onClick={findAndReplace}>
        Generate
      </button>
    </div>
  );
}

export default App;
Find and replace data in a worksheet in Excel
Find and Replace Data in a Specific Cell Range in Excel
When you only need to update part of the data, you can restrict the search to a specific cell range. After specifying the target range with the sheet.Range.get() method, range.FindAllString() searches for cells containing the specified text only within that range, ensuring that data outside the range remains unaffected. The steps are as follows:
- Create a
Workbookobject and load an existing Excel file. - Get the worksheet to operate on via
workbook.Worksheets.get(). - Specify the cell range to search with
sheet.Range.get(). - Use
range.FindAllString()to find cells containing the target text within the specified range, then iterate through the results to replace the text and set the highlight color. - Save the workbook to an Excel file using
SaveToFile().
Below is a complete code example demonstrating how to find and replace data in a specific cell range in React:
function App() {
  const findAndReplaceInRange = async () => {
    // Get the Spire.XLS WASM module
    const xlsModule = window.wasmModule?.spirexls;

    // Check if the module is ready
    if (!xlsModule) {
      alert('Spire.Xls is not ready yet');
      return;
    }

    // Load the sample file into the Virtual File System (VFS)
    let excelFileName = 'FindCellsSample.xlsx';
    await window.spire.FetchFileToVFS(excelFileName, '', `${process.env.PUBLIC_URL}static/data/`);

    // Create a new workbook and load an existing Excel file
    const workbook = new xlsModule.Workbook();
    workbook.LoadFromFile({ fileName: excelFileName });

    // Get the first worksheet
    let worksheet = workbook.Worksheets.get(0);

    // Specify the cell range to search
    let range = worksheet.Range.get({
      row: 1,
      column: 1,
      lastRow: 12,
      lastColumn: 2,
    });

    // Find all cells containing the text "Total" within the specified range
    let ranges = range.FindAllString("Total", false, false);

    // Iterate through the search results, replace the text, and set the highlight color
    for (let r of ranges) {
      r.Text = "Total Expenses";
      r.Style.Color = xlsModule.Color.get_Yellow();
    }

    // Save the workbook
    const outputFileName = 'FindAndReplaceInRange.xlsx';
    workbook.SaveToFile({ fileName: outputFileName, version: xlsModule.ExcelVersion.Version2010 });
    workbook.Dispose();

    // Read the file from VFS and trigger download
    const fileArray = window.dotnetRuntime.Module.FS.readFile(outputFileName);
    const blob = new Blob([fileArray], { type: 'application/vnd.openxmlformats-officedocument.spreadsheetml.sheet' });
    const url = URL.createObjectURL(blob);
    const a = document.createElement('a');
    a.href = url;
    a.download = outputFileName;
    a.click();
    URL.revokeObjectURL(url);
  };

  return (
    <div style={{ textAlign: 'center', height: '300px' }}>
      <h1>Find and Replace Data in a Specific Cell Range</h1>
      <button onClick={findAndReplaceInRange}>
        Generate
      </button>
    </div>
  );
}

export default App;
Find and replace data in a specific cell range in Excel
FAQ
How to control whether the search is case-sensitive or matches whole words
Cause: The last two boolean parameters of the FindAllString() method control whether the search is case-sensitive and whether it must match whole words. If these parameters are set incorrectly, you may find too many or too few matching results.
Solution: Adjust the parameters of FindAllString() according to your actual needs:
// Case-insensitive, whole-word matching not required
let ranges = worksheet.FindAllString("Area", false, false);

// Case-sensitive, whole-word matching required
let ranges = worksheet.FindAllString("Total", true, true);
How to find and replace numbers in a specific range
Cause: Find and replace works not only with text but also with numbers. If you only use FindAllString() to handle text, numeric cells cannot be matched.
Solution: Use the range.FindAllNumber() method to find numbers within the specified range, then replace the values by setting the Text property:
let numberRanges = range.FindAllNumber(100, true);
for (let r of numberRanges) {
  r.Text = "200";
  r.Style.Color = xlsModule.Color.get_Yellow();
}
Get a Free License
Spire.XLS for JavaScript offers a 30-day full-featured free trial license with no functional limitations. Apply here to evaluate before purchasing.
Formatação, resumo e indexação de texto com IA em C#
Sumário
- Por que a padronização de documentos Word com IA é importante
- O que este exemplo irá automatizar
- Configurando o Spire.Agent.Office para C#
- Padronizando a formatação do Word com IA
- Extraindo metadados e gerando resumos de documentos
- Criando um índice de documentos a partir de vários arquivos Word
- Melhores práticas para processamento confiável de documentos com IA
- Conclusão
- Veja também

As organizações frequentemente acumulam centenas ou até milhares de documentos Word ao longo do tempo. Esses arquivos podem vir de diferentes departamentos, funcionários, fornecedores ou sistemas legados, resultando em fontes, estruturas de títulos, numeração, espaçamento, cabeçalhos e outras formatações inconsistentes.
Preparar tais documentos para publicação, migração ou arquivamento é mais do que uma simples tarefa de formatação. Em muitos casos, as organizações também precisam identificar o assunto de cada documento, extrair metadados importantes, criar resumos concisos e organizar os resultados em um índice de documentos pesquisável.
A automação tradicional do Word pode lidar bem com regras de formatação fixas, mas torna-se difícil quando as estruturas dos documentos variam. Uma abordagem baseada em IA pode primeiro entender o papel lógico do conteúdo — como títulos, cabeçalhos, corpo do texto, datas e tipos de documento — e, em seguida, aplicar as operações de documento apropriadas.
Neste artigo, usaremos o Spire.Agent.Office para .NET para construir um fluxo de trabalho de processamento de Word em três etapas em C#:
Documentos Word → Padronização de formatação → Extração de metadados e resumos → Índice de documentos
Por que a padronização de documentos Word com IA é importante
Padronizar uma coleção de documentos Word nem sempre é tão simples quanto definir a mesma fonte para todos os parágrafos.
Uma organização típica pode ter documentos como:
Input/
├── Politica_de_Viagens_Funcionarios.docx
├── Guia_de_Onboarding_Fornecedores.docx
├── Relatorio_de_Incidente_Seguranca.docx
└── Politica_de_Trabalho_Remoto.docx
Mesmo quando esses documentos cobrem processos de negócios semelhantes, sua estrutura interna pode diferir consideravelmente.
Por exemplo, um documento pode usar um estilo real de Título 1 do Word para títulos de seção, enquanto outro simplesmente usa texto em negrito de 16 pontos. Alguns documentos podem usar seções numeradas como:
1. Objetivo
2. Escopo
3. Responsabilidades
enquanto outros podem usar numeração inconsistente como:
I. Objetivo
Seção 2 - Escopo
3) Responsabilidades
A automação de documentos tradicional geralmente exige que os desenvolvedores inspecionem posições de parágrafos, estilos ou padrões de texto e escrevam regras para cada variação.
O processamento de documentos assistido por IA muda a abordagem. Em vez de especificar que "o parágrafo 3 deve ser um título", os desenvolvedores podem descrever o resultado desejado:
Identifique o título do documento e a hierarquia de cabeçalhos, normalize os estilos e a numeração dos cabeçalhos e preserve o conteúdo original.
A camada de IA interpreta a estrutura do documento, enquanto o motor de documentos Word subjacente realiza o processamento real do documento.
Isso torna a abordagem particularmente útil para coleções de documentos de negócios semiestruturados, onde o conteúdo é diferente, mas o padrão de saída desejado é consistente.
O que este exemplo irá automatizar
Nosso fluxo de trabalho de exemplo contém três etapas de processamento.
Etapa 1: Padronizar a formatação do Word
Cada documento de origem é analisado e reformatado de acordo com um estilo corporativo compartilhado. O processamento inclui:
- Normalização de fontes e tamanhos de fonte
- Identificação de títulos de documentos
- Aplicação de níveis de cabeçalho consistentes
- Normalização da numeração de cabeçalhos
- Padronização do espaçamento entre parágrafos
- Adição de um cabeçalho comum
- Adição de números de página ao rodapé
- Preservação do texto original, tabelas, imagens e hiperlinks
O resultado é uma versão padronizada de cada documento de entrada.
Etapa 2: Extrair metadados e resumos
Os documentos padronizados são então analisados individualmente para extrair informações como:
- Título do documento
- Departamento
- Tipo de documento
- Data de vigência ou emissão
- Palavras-chave
- Resumo
Cada resultado é salvo como um pequeno documento de metadados Word estruturado.
Etapa 3: Criar um índice de documentos
Finalmente, os arquivos de metadados são combinados e convertidos em um único índice de documentos Word.
O índice final pode conter informações semelhantes a:
| Nº | Título | Departamento | Tipo | Data | Resumo |
|---|---|---|---|---|---|
| 1 | Política de Viagens | Recursos Humanos | Política | 15 de julho de 2026 | Define requisitos de aprovação e reembolso de viagens. |
| 2 | Guia de Onboarding de Fornecedores | Compras | Procedimento | 3 de junho de 2026 | Descreve o processo de registro e aprovação de novos fornecedores. |
| 3 | Relatório de Incidente de Segurança | TI | Relatório | 8 de agosto de 2026 | Resume um incidente de segurança e as ações tomadas em resposta. |
Isso produz não apenas arquivos Word mais limpos, mas também uma visão geral útil de toda a coleção de documentos.
Configurando o Spire.Agent.Office para C#
Primeiro, crie um projeto .NET e instale o Spire.Agent.Office via NuGet.
Você pode instalar o pacote pelo Gerenciador de Pacotes NuGet do Visual Studio ou usar a CLI do .NET:
dotnet add package Spire.Agent.Office
Em seguida, importe os namespaces necessários:
using System;
using System.IO;
using Spire.Agent.Office.AI;
using Spire.Agent.Office.Extensions;
using Spire.Doc;
O processamento de documentos por IA segue um padrão simples.
Primeiro, configure uma instância de AIOptions com um SpireToken:
AIOptions options = new AIOptions();
options.SpireToken = "seu SpireToken";
Você pode solicitar um SpireToken temporário para testes na página de licença temporária do Spire. Após obter o token, atribua-o à propriedade SpireToken antes de chamar as APIs de processamento de IA.
Em seguida, carregue um documento Word e crie um AIDocumentProcessor:
using (Document doc = new Document())
{
    doc.LoadFromFile("input.docx");

    AIDocumentProcessor processor = doc.AI(options);

    processor.ExecuteInstruction(
        doc,
        "Sua instrução em linguagem natural",
        "output.docx"
    );
}
A parte importante é a instrução. Em vez de escrever manualmente uma longa sequência de chamadas de API do Word, descrevemos como o documento deve ser e deixamos o agente realizar as operações correspondentes.
Nas seções a seguir, aplicaremos essa abordagem a um diretório inteiro de arquivos Word.
Padronizando a formatação do Word com IA
Suponha que documentos coletados de diferentes departamentos usem fontes, cabeçalhos, numeração e layouts de página inconsistentes.
Queremos que todos sigam o mesmo estilo de documento corporativo:
- Arial para todo o texto
- Texto do corpo com 11 pt
- Título do documento em negrito com 20 pt
- Título 1 em negrito com 16 pt
- Título 2 em negrito com 13 pt
- Numeração multinível consistente
- Espaçamento entre linhas de 1.15
- Um cabeçalho corporativo
- Números de página centralizados
- Sem alterações na redação original
O código a seguir processa cada arquivo .docx em um diretório de entrada e salva versões padronizadas em um novo diretório.
using System;
using System.IO;
using Spire.Agent.Office.AI;
using Spire.Agent.Office.Extensions;
using Spire.Doc;

string inputFolder = @"E:\Documents\Input";
string outputFolder = @"E:\Documents\Standardized";
string spireToken = "seu SpireToken";
Directory.CreateDirectory(outputFolder);

string aiRule = """
Analise a estrutura deste documento Word e padronize sua formatação de acordo com as seguintes regras corporativas:

1. Preserve toda a redação original. Não reescreva, resuma, encurte ou remova qualquer conteúdo do documento.
2. Use Arial como fonte padrão e 11 pt para o corpo do texto normal.
3. Identifique o título principal do documento e formate-o como negrito de 20 pt.
4. Identifique a hierarquia lógica de cabeçalhos e aplique estilos de cabeçalho Word apropriados. Use negrito de 16 pt para Título 1 e negrito de 13 pt para Título 2.
5. Normalize a numeração de seções em uma hierarquia consistente, como 1, 1.1 e 1.1.1, quando apropriado.
6. Use espaçamento entre linhas de 1.15 para parágrafos do corpo normal e mantenha o espaçamento entre parágrafos visualmente consistente.
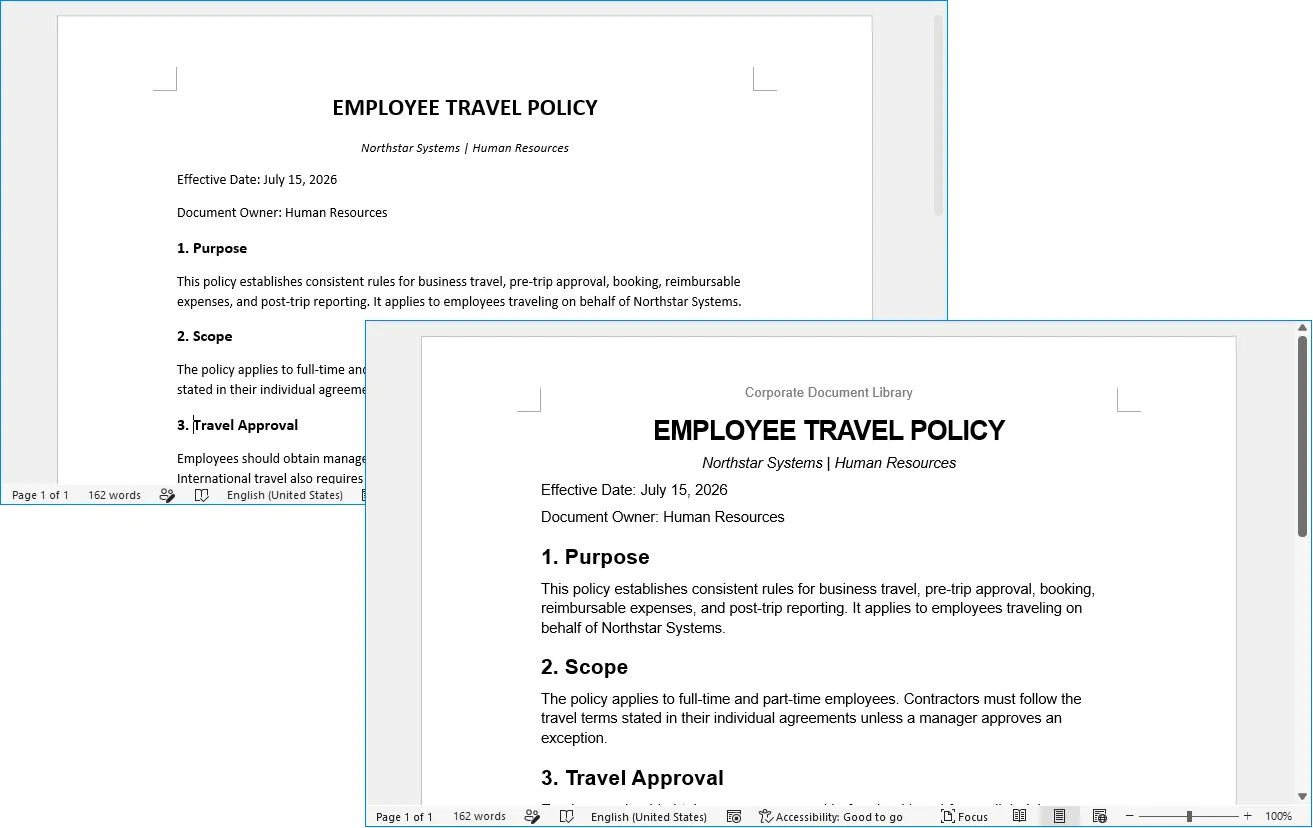
7. Adicione 'Biblioteca de Documentos Corporativos' ao cabeçalho do documento.
8. Adicione números de página centralizados ao rodapé.
9. Preserve todas as tabelas, imagens, hiperlinks e outros objetos de documento existentes.
10. Mantenha a estrutura geral do documento e o significado original inalterados.
""";

var aiOpts = new AIOptions { SpireToken = spireToken };

foreach (var file in Directory.GetFiles(inputFolder, "*.docx"))
{
    var fileName = Path.GetFileName(file);
    var savePath = Path.Combine(outputFolder, fileName);

    using var doc = new Document();
    doc.LoadFromFile(file);

    var res = doc.AI(aiOpts).ExecuteInstruction(doc, aiRule, savePath);
    Console.WriteLine(res.Success ? $"Processado: {fileName}" : $"Falha: {fileName} - {res.ErrorMessage}");
}
Um detalhe importante na instrução é o requisito de identificar a hierarquia lógica de cabeçalhos.
Isso é diferente de simplesmente alterar a fonte de cada parágrafo em negrito. O agente pode analisar o que um parágrafo representa e determinar se ele funciona como um título de documento, título de seção principal, subseção ou texto de corpo normal.
Para fluxos de trabalho de gerenciamento de documentos, estilos de cabeçalho adequados são especialmente úteis porque podem melhorar a navegação, a geração automática de sumários, marcadores de PDF, acessibilidade e a análise posterior de documentos.
Outra regra importante é:
Preserve toda a redação original.
A formatação e a reescrita de conteúdo devem ser tratadas como tarefas separadas. Quando o objetivo desta etapa é a padronização de documentos, a IA não deve reescrever ou resumir o texto original simultaneamente.
Após a execução, o diretório de saída contém cópias padronizadas:
Standardized/
├── Politica_de_Viagens_Funcionarios.docx
├── Guia_de_Onboarding_Fornecedores.docx
├── Relatorio_de_Incidente_Seguranca.docx
└── Politica_de_Trabalho_Remoto.docx
O exemplo a seguir mostra como um documento Word formatado de forma inconsistente parece antes e depois da padronização com IA.
Extraindo metadados e gerando resumos de documentos
Uma vez que a formatação foi padronizada, o próximo passo é entender o que cada documento contém.
Abrir manualmente centenas de arquivos e registrar seus títulos, departamentos, datas, categorias e resumos é demorado. Esta é uma tarefa onde a compreensão de documentos por IA é particularmente útil.
Para este exemplo, extrairemos seis campos de cada documento:
- Título
- Departamento
- Tipo de documento
- Data
- Palavras-chave
- Resumo
Em vez de retornar texto livre, a instrução exige uma estrutura previsível. Isso torna os resultados mais fáceis de processar posteriormente.
using System;
using System.IO;
using Spire.Agent.Office.AI;
using Spire.Agent.Office.Extensions;
using Spire.Doc;

string inputFolder = @"E:\Documents\Standardized";
string outputFolder = @"E:\Documents\Metadata";
string spireToken = "seu SpireToken";

Directory.CreateDirectory(outputFolder);

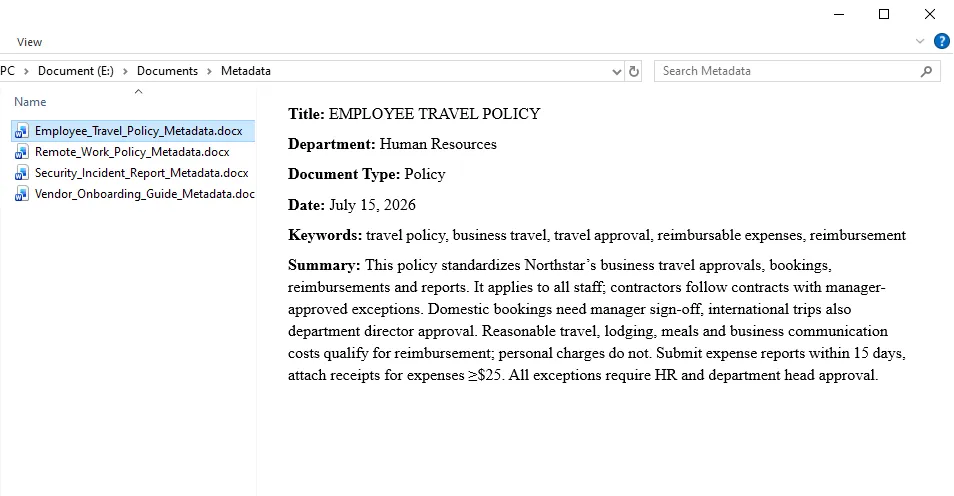
string aiRule = """
Analise este documento Word e crie um relatório de metadados conciso.

Extraia as seguintes informações do conteúdo real do documento:
- Título
- Departamento ou função de negócio responsável
- Tipo de documento, como Política, Procedimento, Relatório, Guia ou Memorando
- Data de Vigência ou Data de Emissão
- 3 a 5 Palavras-chave
- Resumo de aproximadamente 80 a 120 palavras

Crie um novo documento conciso contendo apenas esses campos.
Use exatamente os seguintes rótulos:

Título:
Departamento:
Tipo de Documento:
Data:
Palavras-chave:
Resumo:

Não invente informações que não possam ser razoavelmente determinadas a partir da fonte. Se uma data ou departamento específico não estiver disponível, use 'Não especificado'. Mantenha o resumo factual e baseado apenas no documento de origem.
""";

var aiOpts = new AIOptions { SpireToken = spireToken };

foreach (var file in Directory.GetFiles(inputFolder, "*.docx"))
{
    var fileName = Path.GetFileNameWithoutExtension(file);
    var savePath = Path.Combine(outputFolder, $"{fileName}_Metadata.docx");

    using var doc = new Document();
    doc.LoadFromFile(file);

    var res = doc.AI(aiOpts).ExecuteInstruction(doc, aiRule, savePath);
    Console.WriteLine(res.Success ? $"Metadados extraídos: {fileName}" : $"Falha: {fileName} - {res.ErrorMessage}");
}
Um documento de metadados gerado parece com isto:
O requisito de usar rótulos fixos é importante.
Se o prompt simplesmente disser "resuma o documento", documentos diferentes podem produzir estruturas de saída substancialmente diferentes. Exigir campos consistentes torna os arquivos intermediários muito mais fáceis de combinar em um índice final.
A instrução também diz explicitamente ao agente para não inventar metadados ausentes. Para registros de negócios, "Não especificado" é geralmente mais útil do que adivinhar um departamento ou data que o documento nunca declara.
Criando um índice de documentos a partir de vários arquivos Word
Neste ponto, temos um arquivo de metadados para cada documento processado:
Metadata/
├── Politica_de_Viagens_Funcionarios_Metadata.docx
├── Guia_de_Onboarding_Fornecedores_Metadata.docx
├── Relatorio_de_Incidente_Seguranca_Metadata.docx
└── Politica_de_Trabalho_Remoto_Metadata.docx
O passo final é consolidar esses arquivos de metadados individuais em um único índice de documentos baseado em Word.
Em vez de abrir manualmente cada documento de metadados, extrair seu texto e mesclar os resultados em C#, podemos passar todos os arquivos de metadados diretamente para o Spire.Agent.Office através do parâmetro attachments. O agente de IA lê os documentos anexados, extrai os campos rotulados de cada um e cria um novo documento Word contendo um índice consolidado.
O parâmetro attachments é útil quando a tarefa de IA depende de vários arquivos de suporte em vez de um único documento de entrada principal. Neste exemplo, não há um documento Word existente que precise ser modificado. Portanto, criamos um objeto Document vazio e usamos os arquivos de metadados como fontes de informação para gerar o índice final.
using System;
using System.IO;
using Spire.Agent.Office.AI;
using Spire.Agent.Office.Extensions;
using Spire.Doc;

string metadataFolder = @"E:\Documents\Metadata";
string outputPath = @"E:\Documents\Document_Index.docx";
string spireToken = "seu SpireToken";
var attachments = Directory.GetFiles(metadataFolder, "*_Metadata.docx");

string aiRule = """
Leia todos os documentos de metadados fornecidos nos anexos e crie um índice de documentos Word consolidado.

Crie o título 'Índice de Documentos' no topo do documento.

Crie uma tabela com as seguintes colunas:
Nº | Título | Departamento | Tipo de Documento | Data | Palavras-chave | Resumo

Requisitos:
1. Crie uma linha para cada documento de metadados.
2. Numere os registros sequencialmente começando de 1.
3. Extraia os valores dos campos rotulados em cada anexo.
4. Preserve as informações extraídas e não invente dados ausentes.
5. Use 'Não especificado' quando um campo estiver indisponível.
6. Deixe o cabeçalho da tabela em negrito.
7. Dê à coluna Resumo mais largura do que as outras colunas.
8. Use um estilo profissional limpo adequado para um registro de documentos interno.
9. Produza um documento Word independente contendo apenas o índice final.
""";

var aiOpts = new AIOptions { SpireToken = spireToken };

using var doc = new Document();
var res = doc.AI(aiOpts).ExecuteInstruction(doc, aiRule, outputPath, attachments);

Console.WriteLine(res.Success
    ? $"Índice de documentos criado: {outputPath}"
    : $"Falha ao criar índice de documentos: {res.ErrorMessage}");
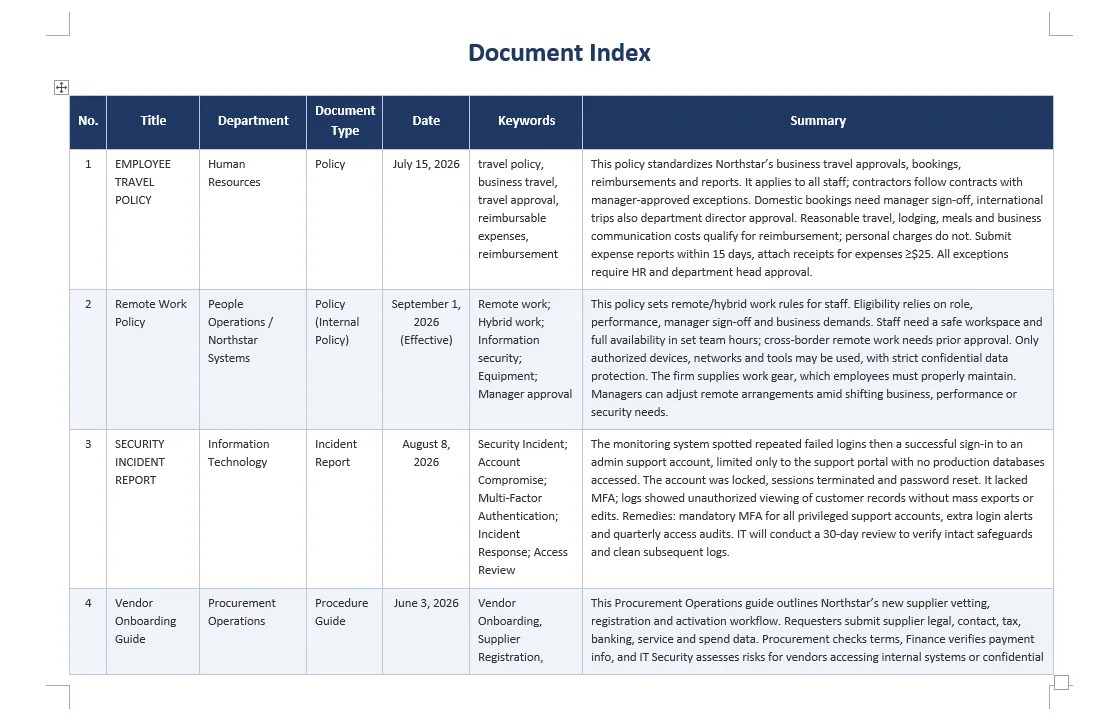
A saída final é salva como:
Document_Index.docx
Em vez de abrir cada documento original individualmente, os funcionários agora podem usar um índice consolidado para entender rapidamente quais documentos estão disponíveis e o que cada arquivo contém.
Este tipo de índice pode ser particularmente útil antes de migrar arquivos para um sistema de gerenciamento de documentos, preparar uma base de conhecimento interna, revisar coleções de documentos legados ou organizar registros para retenção de longo prazo.
Melhores práticas para processamento confiável de documentos com IA
A IA torna o processamento de documentos semiestruturados mais flexível, mas resultados confiáveis ainda dependem fortemente de como a tarefa é projetada.
Separe a formatação da análise de conteúdo
Evite pedir ao agente para padronizar a formatação, reescrever o texto, resumir o documento e extrair metadados em uma única instrução grande.
Essas são operações diferentes com objetivos diferentes.
Um fluxo de trabalho mais seguro é:
Documento original
        ↓
Padronização de formatação
        ↓
Documento padronizado
        ↓
Extração de metadados
        ↓
Metadados estruturados
        ↓
Índice de documentos
Isso também torna os problemas mais fáceis de identificar e depurar.
Defina regras de formatação explicitamente
Instruções como:
Faça o documento parecer profissional.
deixam muita margem para interpretação.
Sempre que a consistência for importante, especifique as regras corporativas reais:
Arial, corpo do texto de 11 pt
Título do documento de 20 pt
Título 1 de 16 pt
Título 2 de 13 pt
Espaçamento entre linhas de 1.15
Numeração 1 / 1.1 / 1.1.1
O mesmo princípio se aplica a cabeçalhos, rodapés, formatação de tabelas e layout de página.
Proteja o conteúdo original
Para tarefas de formatação, inclua explicitamente requisitos como:
Preserve toda a redação original.
e:
Não reescreva, resuma, encurte ou exclua o conteúdo do documento.
Os arquivos de origem também devem ser retidos em vez de sobrescritos durante o processamento em lote automatizado.
Uma estrutura de pastas prática é:
Documents/
├── Input/
├── Standardized/
├── Metadata/
└── Document_Index.docx
Solicite metadados estruturados
Quando as informações extraídas forem reutilizadas programaticamente, a saída previsível é mais valiosa do que a saída criativa.
Em vez de:
Diga-me sobre o que é este documento.
use um esquema fixo:
Título:
Departamento:
Tipo de Documento:
Data:
Palavras-chave:
Resumo:
Isso torna o processamento posterior consideravelmente mais fácil.
Trate informações ausentes explicitamente
Nem todo documento contém um nome de departamento, data de vigência, número de documento ou proprietário.
Diga à IA o que fazer quando as informações estiverem faltando:
Use "Não especificado" em vez de adivinhar.
Isso é especialmente importante para gerenciamento de documentos, jurídico, financeiro, conformidade e outros fluxos de trabalho sensíveis a registros.
Revise saídas de alta importância
Metadados e resumos gerados por IA não devem ser tratados automaticamente como registros autorizados em fluxos de trabalho de alto risco.
Para organização interna comum de documentos, os resultados automatizados podem ser suficientes. Para arquivos regulamentados, registros legais, documentos de conformidade ou sistemas oficiais de retenção, os campos extraídos e as classificações ainda devem ser validados de acordo com os requisitos de revisão da organização.
Conclusão
O processamento de Word em lote geralmente envolve dois problemas diferentes.
O primeiro é a automação de documentos: alterar fontes, aplicar estilos, criar cabeçalhos e rodapés, gerenciar numeração e gerar arquivos Word.
O segundo é a compreensão de documentos: determinar o que o conteúdo representa, identificar tipos de documentos, encontrar datas e departamentos, extrair palavras-chave e produzir resumos.
APIs tradicionais do Word são altamente eficazes quando os desenvolvedores já sabem exatamente qual conteúdo modificar. O processamento assistido por IA torna-se particularmente útil quando os documentos são inconsistentes e o software deve primeiro entender sua estrutura antes de decidir como processá-los.
Usando o Spire.Agent.Office em C#, essas duas capacidades podem ser combinadas em um único fluxo de trabalho:
Analisar → Padronizar → Extrair → Organizar
No exemplo acima, uma pasta contendo documentos Word inconsistentes é transformada em uma coleção de documentos padronizada, um conjunto de registros de metadados estruturados e, finalmente, um índice de documentos Word centralizado.
A mesma arquitetura pode ser estendida a outros fluxos de trabalho empresariais, como bibliotecas de políticas, manuais de procedimentos, documentação de conformidade, arquivos de projetos, registros de RH, documentação de fornecedores e migração de documentos legados.
Em vez de revisar e organizar arquivos manualmente um por um, os desenvolvedores podem definir as regras de documento e a estrutura de informações necessárias em linguagem natural e automatizar as partes repetitivas do fluxo de trabalho, enquanto ainda produzem documentos Word reais e editáveis.
Veja também
C# 기반의 AI 활용 텍스트 서식 지정, 요약 및 인덱싱
조직은 시간이 지남에 따라 수백 또는 수천 개의 Word 문서를 축적하게 됩니다. 이러한 파일들은 다양한 부서, 직원, 공급업체 또는 레거시 시스템에서 생성되므로 글꼴, 제목 구조, 번호 매기기, 간격, 머리글 및 기타 서식이 일관되지 않는 경우가 많습니다.
게시, 마이그레이션 또는 아카이빙을 위해 이러한 문서를 준비하는 것은 단순한 서식 지정 작업 이상의 의미를 갖습니다. 많은 경우 조직은 각 문서의 내용을 파악하고, 주요 메타데이터를 추출하며, 간결한 요약을 작성하고, 결과를 검색 가능한 문서 인덱스로 정리해야 합니다.
기존의 Word 자동화는 고정된 서식 규칙을 잘 처리할 수 있지만, 문서 구조가 다양해지면 어려움을 겪습니다. AI 기반 접근 방식은 먼저 제목, 머리글, 본문, 날짜, 문서 유형과 같은 콘텐츠의 논리적 역할을 이해한 다음 적절한 문서 작업을 적용할 수 있습니다.
이 기사에서는 Spire.Agent.Office for .NET을 사용하여 C#에서 3단계 Word 처리 워크플로를 구축하는 방법을 알아봅니다.
Word 문서 → 서식 표준화 → 메타데이터 및 요약 추출 → 문서 인덱스
AI 기반 Word 문서 표준화가 중요한 이유
Word 문서 모음을 표준화하는 것이 모든 단락을 동일한 글꼴로 설정하는 것처럼 간단하지는 않습니다.
일반적인 조직에는 다음과 같은 문서들이 있을 수 있습니다:
Input/
├── Employee_Travel_Policy.docx
├── Vendor_Onboarding_Guide.docx
├── Security_Incident_Report.docx
└── Remote_Work_Policy.docx
이 문서들이 유사한 비즈니스 프로세스를 다루더라도 내부 구조는 상당히 다를 수 있습니다.
예를 들어, 한 문서는 섹션 제목에 실제 Word 제목 1 스타일을 사용하는 반면, 다른 문서는 단순히 굵게 처리된 16포인트 텍스트를 사용할 수 있습니다. 일부 문서는 다음과 같이 번호가 매겨진 섹션을 사용할 수 있습니다:
1. 목적
2. 범위
3. 책임
반면 다른 문서는 다음과 같이 일관되지 않은 번호 매기기를 사용할 수 있습니다:
I. 목적
섹션 2 - 범위
3) 책임
기존의 문서 자동화는 일반적으로 개발자가 단락 위치, 스타일 또는 텍스트 패턴을 검사하고 각 변형에 대한 규칙을 작성해야 합니다.
AI 지원 문서 처리는 접근 방식을 바꿉니다. "3번째 단락은 제목이어야 한다"라고 지정하는 대신, 개발자는 원하는 결과를 설명하기만 하면 됩니다:
문서 제목과 제목 계층 구조를 식별하고, 제목 스타일과 번호 매기기를 정규화하며, 원본 내용을 보존하십시오.
AI 계층은 문서 구조를 해석하고, 기본 Word 문서 엔진은 실제 문서 작업을 수행합니다.
이로 인해 이 접근 방식은 콘텐츠는 다르지만 원하는 출력 표준은 일관된 반구조화된 비즈니스 문서 모음에 특히 유용합니다.
이 예제에서 자동화할 내용
우리의 샘플 워크플로는 세 가지 처리 단계로 구성됩니다.
1단계: Word 서식 표준화
각 원본 문서는 분석되어 공유 기업 스타일에 따라 다시 서식이 지정됩니다. 처리 내용은 다음과 같습니다:
- 글꼴 및 글꼴 크기 정규화
- 문서 제목 식별
- 일관된 제목 수준 적용
- 제목 번호 매기기 정규화
- 단락 간격 표준화
- 공통 머리글 추가
- 바닥글에 페이지 번호 추가
- 원본 텍스트, 표, 이미지 및 하이퍼링크 보존
결과물은 모든 입력 문서의 표준화된 버전입니다.
2단계: 메타데이터 및 요약 추출
표준화된 문서는 개별적으로 분석되어 다음과 같은 정보를 추출합니다:
- 문서 제목
- 부서
- 문서 유형
- 발효일 또는 발행일
- 키워드
- 요약
각 결과는 작은 구조화된 Word 메타데이터 문서로 저장됩니다.
3단계: 문서 인덱스 구축
마지막으로, 메타데이터 파일들이 결합되어 단일 Word 문서 인덱스로 변환됩니다.
완성된 인덱스에는 다음과 유사한 정보가 포함될 수 있습니다:
| 번호 | 제목 | 부서 | 유형 | 날짜 | 요약 |
|---|---|---|---|---|---|
| 1 | 직원 출장 정책 | 인사팀 | 정책 | 2026년 7월 15일 | 출장 승인 및 비용 상환 요건을 정의합니다. |
| 2 | 공급업체 온보딩 가이드 | 구매팀 | 절차 | 2026년 6월 3일 | 신규 공급업체 등록 및 승인 절차를 설명합니다. |
| 3 | 보안 사고 보고서 | IT팀 | 보고서 | 2026년 8월 8일 | 보안 사고 및 대응 조치를 요약합니다. |
이는 더 깔끔한 Word 파일뿐만 아니라 전체 문서 모음에 대한 유용한 개요를 생성합니다.
C#용 Spire.Agent.Office 설정
먼저 .NET 프로젝트를 만들고 NuGet을 통해 Spire.Agent.Office를 설치합니다.
Visual Studio의 NuGet 패키지 관리자에서 패키지를 설치하거나 .NET CLI를 사용할 수 있습니다:
dotnet add package Spire.Agent.Office
그런 다음 필요한 네임스페이스를 가져옵니다:
using System;
using System.IO;
using Spire.Agent.Office.AI;
using Spire.Agent.Office.Extensions;
using Spire.Doc;
AI 문서 처리는 간단한 패턴을 따릅니다.
먼저 SpireToken으로 AIOptions 인스턴스를 구성합니다:
AIOptions options = new AIOptions();
options.SpireToken = "your SpireToken";
테스트용 임시 SpireToken은 Spire 임시 라이선스 페이지에서 요청할 수 있습니다. 토큰을 얻은 후, AI 처리 API를 호출하기 전에 SpireToken 속성에 할당하십시오.
다음으로, Word 문서를 로드하고 AIDocumentProcessor를 만듭니다:
using (Document doc = new Document())
{
    doc.LoadFromFile("input.docx");

    AIDocumentProcessor processor = doc.AI(options);

    processor.ExecuteInstruction(
        doc,
        "자연어 지침",
        "output.docx"
    );
}
중요한 부분은 지침입니다. 긴 Word API 호출 시퀀스를 수동으로 작성하는 대신, 문서가 어떤 모습이어야 하는지 설명하고 에이전트가 해당 작업을 수행하도록 합니다.
다음 섹션에서는 이 접근 방식을 전체 Word 파일 디렉터리에 적용하겠습니다.
AI를 사용한 Word 서식 표준화
다른 부서에서 수집된 문서들이 일관되지 않은 글꼴, 제목, 번호 매기기 및 페이지 레이아웃을 사용한다고 가정해 보겠습니다.
모든 문서가 동일한 기업 문서 스타일을 따르기를 원합니다:
- 모든 텍스트에 Arial 사용
- 11pt 본문 텍스트
- 20pt 굵게 문서 제목
- 16pt 굵게 제목 1
- 13pt 굵게 제목 2
- 일관된 다단계 번호 매기기
- 1.15 줄 간격
- 기업 머리글
- 가운데 정렬된 페이지 번호
- 원본 문구 변경 없음
다음 코드는 입력 디렉터리의 모든 .docx 파일을 처리하고 표준화된 버전을 새 디렉터리에 저장합니다.
using System;
using System.IO;
using Spire.Agent.Office.AI;
using Spire.Agent.Office.Extensions;
using Spire.Doc;

string inputFolder = @"E:\Documents\Input";
string outputFolder = @"E:\Documents\Standardized";
string spireToken = "your SpireToken";
Directory.CreateDirectory(outputFolder);

string aiRule = """
이 Word 문서의 구조를 분석하고 다음 기업 문서 규칙에 따라 서식을 표준화하십시오:

1. 모든 원본 문구를 보존하십시오. 내용을 다시 쓰거나, 요약하거나, 줄이거나, 삭제하지 마십시오.
2. 기본 글꼴로 Arial을 사용하고 일반 본문 텍스트는 11pt를 사용하십시오.
3. 주요 문서 제목을 식별하고 20pt 굵게 서식을 지정하십시오.
4. 논리적 제목 계층 구조를 식별하고 적절한 Word 제목 스타일을 적용하십시오. 제목 1은 16pt 굵게, 제목 2는 13pt 굵게 사용하십시오.
5. 섹션 번호 매기기를 적절한 경우 1, 1.1, 1.1.1과 같은 일관된 계층 구조로 정규화하십시오.
6. 일반 본문 단락에는 1.15 줄 간격을 사용하고 단락 간격을 시각적으로 일관되게 유지하십시오.
7. 문서 머리글에 'Corporate Document Library'를 추가하십시오.
8. 바닥글에 가운데 정렬된 페이지 번호를 추가하십시오.
9. 기존의 모든 표, 이미지, 하이퍼링크 및 기타 문서 개체를 보존하십시오.
10. 전체 문서 구조와 원래 의미를 변경하지 마십시오.
""";

var aiOpts = new AIOptions { SpireToken = spireToken };

foreach (var file in Directory.GetFiles(inputFolder, "*.docx"))
{
    var fileName = Path.GetFileName(file);
    var savePath = Path.Combine(outputFolder, fileName);

    using var doc = new Document();
    doc.LoadFromFile(file);

    var res = doc.AI(aiOpts).ExecuteInstruction(doc, aiRule, savePath);
    Console.WriteLine(res.Success ? $"처리 완료: {fileName}" : $"실패: {fileName} - {res.ErrorMessage}");
}
지침에서 중요한 세부 사항 중 하나는 논리적 제목 계층 구조를 식별하라는 요구 사항입니다.
이는 단순히 굵게 표시된 모든 단락의 글꼴을 변경하는 것과는 다릅니다. 에이전트는 단락이 무엇을 나타내는지 분석하고 문서 제목, 주요 섹션 제목, 하위 섹션 또는 일반 본문 텍스트로 기능하는지 결정할 수 있습니다.
문서 관리 워크플로의 경우, 적절한 제목 스타일은 탐색, 자동 목차 생성, PDF 책갈피, 접근성 및 이후 문서 파싱을 개선할 수 있으므로 특히 유용합니다.
또 다른 중요한 규칙은 다음과 같습니다:
모든 원본 문구를 보존하십시오.
서식 지정과 콘텐츠 재작성은 일반적으로 별도의 작업으로 처리되어야 합니다. 이 단계의 목적이 문서 표준화일 때, AI는 원본 텍스트를 동시에 다시 쓰거나 요약해서는 안 됩니다.
실행 후 출력 디렉터리에는 표준화된 사본이 포함됩니다:
Standardized/
├── Employee_Travel_Policy.docx
├── Vendor_Onboarding_Guide.docx
├── Security_Incident_Report.docx
└── Remote_Work_Policy.docx
다음 예제는 일관되지 않게 서식이 지정된 Word 문서가 AI 기반 표준화 전후에 어떻게 보이는지 보여줍니다.
메타데이터 추출 및 문서 요약 생성
서식이 표준화되면 다음 단계는 각 문서에 무엇이 포함되어 있는지 파악하는 것입니다.
수백 개의 파일을 수동으로 열어 제목, 부서, 날짜, 범주 및 요약을 기록하는 것은 시간이 많이 걸립니다. 이 작업은 AI 문서 이해가 특히 유용한 부분입니다.
이 예제에서는 모든 문서에서 6개의 필드를 추출합니다:
- 제목
- 부서
- 문서 유형
- 날짜
- 키워드
- 요약
자유 형식의 산문을 반환하는 대신, 지침은 예측 가능한 구조를 요구합니다. 이렇게 하면 나중에 결과를 처리하기가 더 쉬워집니다.
using System;
using System.IO;
using Spire.Agent.Office.AI;
using Spire.Agent.Office.Extensions;
using Spire.Doc;

string inputFolder = @"E:\Documents\Standardized";
string outputFolder = @"E:\Documents\Metadata";
string spireToken = "your SpireToken";

Directory.CreateDirectory(outputFolder);

string aiRule = """
이 Word 문서를 분석하고 간결한 메타데이터 보고서를 작성하십시오.

실제 문서 내용에서 다음 정보를 추출하십시오:
- 제목
- 부서 또는 책임 비즈니스 기능
- 문서 유형 (예: 정책, 절차, 보고서, 가이드 또는 메모)
- 발효일 또는 발행일
- 3~5개의 키워드
- 약 80~120단어의 요약

이 필드들만 포함된 새롭고 간결한 문서를 만드십시오.
정확히 다음 레이블을 사용하십시오:

Title:
Department:
Document Type:
Date:
Keywords:
Summary:

소스에서 합리적으로 결정할 수 없는 정보는 지어내지 마십시오. 특정 날짜나 부서를 알 수 없는 경우 'Not specified'를 사용하십시오. 요약은 사실에 기반하고 소스 문서에만 근거해야 합니다.
""";

var aiOpts = new AIOptions { SpireToken = spireToken };

foreach (var file in Directory.GetFiles(inputFolder, "*.docx"))
{
    var fileName = Path.GetFileNameWithoutExtension(file);
    var savePath = Path.Combine(outputFolder, $"{fileName}_Metadata.docx");

    using var doc = new Document();
    doc.LoadFromFile(file);

    var res = doc.AI(aiOpts).ExecuteInstruction(doc, aiRule, savePath);
    Console.WriteLine(res.Success ? $"메타데이터 추출 완료: {fileName}" : $"실패: {fileName} - {res.ErrorMessage}");
}
생성된 메타데이터 문서는 다음과 같습니다:
고정된 레이블을 사용하라는 요구 사항은 중요합니다.
프롬프트가 단순히 "문서를 요약하라"고만 하면, 문서마다 출력 구조가 크게 다를 수 있습니다. 일관된 필드를 요구하면 중간 파일을 최종 인덱스로 결합하기가 훨씬 쉬워집니다.
또한 지침은 에이전트에게 누락된 메타데이터를 지어내지 말라고 명시적으로 지시합니다. 비즈니스 기록의 경우, 문서에 명시되지 않은 부서나 날짜를 추측하는 것보다 "Not specified"를 사용하는 것이 일반적으로 더 유용합니다.
여러 Word 파일에서 문서 인덱스 구축
이제 처리된 각 문서에 대해 하나의 메타데이터 파일이 준비되었습니다:
Metadata/
├── Employee_Travel_Policy_Metadata.docx
├── Vendor_Onboarding_Guide_Metadata.docx
├── Security_Incident_Report_Metadata.docx
└── Remote_Work_Policy_Metadata.docx
마지막 단계는 이러한 개별 메타데이터 파일을 단일 Word 기반 문서 인덱스로 통합하는 것입니다.
각 메타데이터 문서를 수동으로 열어 텍스트를 추출하고 C#에서 결과를 병합하는 대신, attachments 매개변수를 통해 모든 메타데이터 파일을 Spire.Agent.Office에 직접 전달할 수 있습니다. AI 에이전트는 첨부된 문서를 읽고 각 문서에서 레이블이 지정된 필드를 추출하여 통합된 인덱스가 포함된 새 Word 문서를 만듭니다.
attachments 매개변수는 AI 작업이 단일 기본 입력 문서가 아닌 여러 지원 파일에 의존할 때 유용합니다. 이 예제에서는 수정해야 할 기존 Word 문서가 없습니다. 따라서 빈 Document 개체를 만들고 메타데이터 파일을 최종 인덱스 생성을 위한 정보 소스로 사용합니다.
using System;
using System.IO;
using Spire.Agent.Office.AI;
using Spire.Agent.Office.Extensions;
using Spire.Doc;

string metadataFolder = @"E:\Documents\Metadata";
string outputPath = @"E:\Documents\Document_Index.docx";
string spireToken = "your SpireToken";
var attachments = Directory.GetFiles(metadataFolder, "*_Metadata.docx");

string aiRule = """
첨부 파일로 제공된 모든 메타데이터 문서를 읽고 통합된 Word 문서 인덱스를 만드십시오.

문서 상단에 'Document Index'라는 제목을 만드십시오.

다음 열이 포함된 표를 만드십시오:
No. | Title | Department | Document Type | Date | Keywords | Summary

요구 사항:
1. 각 메타데이터 문서에 대해 한 행을 만드십시오.
2. 1부터 순차적으로 레코드 번호를 매기십시오.
3. 각 첨부 파일의 레이블이 지정된 필드에서 값을 추출하십시오.
4. 추출된 정보를 보존하고 누락된 데이터를 지어내지 마십시오.
5. 필드를 사용할 수 없는 경우 'Not specified'를 사용하십시오.
6. 표 머리글을 굵게 만드십시오.
7. 요약 열의 너비를 다른 열보다 넓게 만드십시오.
8. 내부 문서 등록부에 적합한 깔끔하고 전문적인 스타일을 사용하십시오.
9. 최종 문서 인덱스만 포함된 독립형 Word 문서를 생성하십시오.
""";

var aiOpts = new AIOptions { SpireToken = spireToken };

using var doc = new Document();
var res = doc.AI(aiOpts).ExecuteInstruction(doc, aiRule, outputPath, attachments);

Console.WriteLine(res.Success
    ? $"문서 인덱스 생성 완료: {outputPath}"
    : $"문서 인덱스 생성 실패: {res.ErrorMessage}");
최종 출력은 다음과 같이 저장됩니다:
Document_Index.docx
직원들은 모든 원본 문서를 개별적으로 열어보는 대신, 이제 하나의 통합된 인덱스를 사용하여 어떤 문서를 사용할 수 있고 각 파일에 무엇이 포함되어 있는지 빠르게 파악할 수 있습니다.
이러한 유형의 인덱스는 파일을 문서 관리 시스템으로 마이그레이션하기 전, 내부 지식 기반을 준비하거나, 레거시 문서 모음을 검토하거나, 장기 보존을 위해 기록을 정리할 때 특히 유용할 수 있습니다.
안정적인 AI 문서 처리를 위한 모범 사례
AI는 반구조화된 문서 처리를 더 유연하게 만들지만, 안정적인 결과는 작업 설계 방식에 크게 의존합니다.
서식 지정과 콘텐츠 분석 분리
에이전트에게 서식 표준화, 텍스트 재작성, 문서 요약 및 메타데이터 추출을 하나의 큰 지침으로 요청하지 마십시오.
이들은 목표가 다른 별개의 작업입니다.
더 안전한 워크플로는 다음과 같습니다:
원본 문서
        ↓
서식 표준화
        ↓
표준화된 문서
        ↓
메타데이터 추출
        ↓
구조화된 메타데이터
        ↓
문서 인덱스
이렇게 하면 문제를 식별하고 디버깅하기가 더 쉬워집니다.
서식 규칙을 명시적으로 정의
다음과 같은 지침은:
문서를 전문적으로 보이게 하십시오.
해석의 여지가 너무 많습니다.
일관성이 중요할 때는 실제 기업 규칙을 지정하십시오:
Arial, 11pt 본문 텍스트
20pt 문서 제목
16pt 제목 1
13pt 제목 2
1.15 줄 간격
1 / 1.1 / 1.1.1 번호 매기기
동일한 원칙이 머리글, 바닥글, 표 서식 및 페이지 레이아웃에도 적용됩니다.
원본 콘텐츠 보호
서식 작업의 경우, 다음과 같은 요구 사항을 명시적으로 포함하십시오:
모든 원본 문구를 보존하십시오.
및:
문서 내용을 다시 쓰거나, 요약하거나, 줄이거나, 삭제하지 마십시오.
또한 자동화된 일괄 처리 중에 원본 파일이 덮어쓰이지 않도록 보존해야 합니다.
실용적인 폴더 구조는 다음과 같습니다:
Documents/
├── Input/
├── Standardized/
├── Metadata/
└── Document_Index.docx
구조화된 메타데이터 요청
추출된 정보가 프로그래밍 방식으로 재사용될 경우, 창의적인 출력보다 예측 가능한 출력이 더 가치가 있습니다.
다음 대신:
이 문서가 무엇에 관한 것인지 알려주십시오.
고정된 스키마를 사용하십시오:
Title:
Department:
Document Type:
Date:
Keywords:
Summary:
이렇게 하면 다운스트림 처리가 훨씬 쉬워집니다.
누락된 정보를 명시적으로 처리
모든 문서에 부서 이름, 발효일, 문서 번호 또는 소유자가 포함되어 있지는 않습니다.
정보가 누락되었을 때 AI가 수행할 작업을 지시하십시오:
추측하는 대신 "Not specified"를 사용하십시오.
이는 문서 관리, 법률, 재무, 규정 준수 및 기타 기록에 민감한 워크플로에 특히 중요합니다.
중요도가 높은 출력물 검토
AI가 생성한 메타데이터와 요약은 중요한 워크플로에서 자동으로 권위 있는 기록으로 취급되어서는 안 됩니다.
일반적인 내부 문서 정리의 경우 자동화된 결과로 충분할 수 있습니다. 규제 대상 아카이브, 법률 기록, 규정 준수 문서 또는 공식 보존 시스템의 경우, 추출된 필드와 분류는 조직의 검토 요구 사항에 따라 검증되어야 합니다.
결론
일괄 Word 처리는 종종 두 가지 다른 문제를 포함합니다.
첫 번째는 문서 자동화입니다: 글꼴 변경, 스타일 적용, 머리글 및 바닥글 생성, 번호 매기기 관리 및 Word 파일 생성.
두 번째는 문서 이해입니다: 콘텐츠가 무엇을 나타내는지 결정, 문서 유형 식별, 날짜 및 부서 찾기, 키워드 추출 및 요약 생성.
기존 Word API는 개발자가 수정할 콘텐츠를 정확히 알고 있을 때 매우 효과적입니다. AI 지원 처리는 문서가 일관되지 않고 소프트웨어가 처리 방법을 결정하기 전에 먼저 구조를 이해해야 할 때 특히 유용합니다.
C#에서 Spire.Agent.Office를 사용하면 이 두 가지 기능을 하나의 워크플로로 결합할 수 있습니다:
분석 → 표준화 → 추출 → 정리
위의 예제에서 일관되지 않은 Word 문서가 포함된 폴더는 표준화된 문서 모음, 구조화된 메타데이터 기록 세트, 그리고 마지막으로 중앙 집중식 Word 문서 인덱스로 변환됩니다.
동일한 아키텍처를 정책 라이브러리, 절차 매뉴얼, 규정 준수 문서, 프로젝트 아카이브, 인사 기록, 공급업체 문서 및 레거시 문서 마이그레이션과 같은 다른 엔터프라이즈 워크플로로 확장할 수 있습니다.
파일을 하나씩 수동으로 검토하고 정리하는 대신, 개발자는 필요한 문서 규칙과 정보 구조를 자연어로 정의하고 워크플로의 반복적인 부분을 자동화하면서도 실제 편집 가능한 Word 문서를 생성할 수 있습니다.
참고 자료
Formattazione, riassunto e indicizzazione di testo basati su IA in C#
Indice
- Perché la standardizzazione dei documenti Word basata sull'IA è importante
- Cosa automatizzerà questo esempio
- Configurare Spire.Agent.Office per C#
- Standardizzare la formattazione di Word con l'IA
- Estrarre metadati e generare riepiloghi dei documenti
- Creare un indice documentale da più file Word
- Best practice per un'elaborazione documentale IA affidabile
- Conclusione
- Vedi anche
Le organizzazioni accumulano spesso centinaia o addirittura migliaia di documenti Word nel tempo. Questi file possono provenire da diversi dipartimenti, dipendenti, fornitori o sistemi legacy, risultando in font, strutture di intestazione, numerazioni, spaziatura, intestazioni e altre formattazioni incoerenti.
Preparare tali documenti per la pubblicazione, la migrazione o l'archiviazione è più di un semplice compito di formattazione. In molti casi, le organizzazioni devono anche identificare l'oggetto di ciascun documento, estrarre metadati chiave, creare riepiloghi concisi e organizzare i risultati in un indice documentale ricercabile.
L'automazione tradizionale di Word può gestire bene regole di formattazione fisse, ma diventa difficile quando le strutture dei documenti variano. Un approccio basato sull'IA può prima comprendere il ruolo logico del contenuto — come titoli, intestazioni, corpo del testo, date e tipi di documento — e quindi applicare le operazioni documentali appropriate.
In questo articolo, utilizzeremo Spire.Agent.Office per .NET per costruire un flusso di lavoro di elaborazione Word in tre fasi in C#:
Documenti Word → Standardizzazione della formattazione → Estrazione di metadati e riepiloghi → Indice documentale
Perché la standardizzazione dei documenti Word basata sull'IA è importante
Standardizzare una raccolta di documenti Word non è sempre semplice come impostare lo stesso font per ogni paragrafo.
Un'organizzazione tipica può avere documenti come:
Input/
├── Employee_Travel_Policy.docx
├── Vendor_Onboarding_Guide.docx
├── Security_Incident_Report.docx
└── Remote_Work_Policy.docx
Anche quando questi documenti coprono processi aziendali simili, la loro struttura interna può differire considerevolmente.
Ad esempio, un documento potrebbe utilizzare uno stile Titolo 1 di Word reale per i titoli delle sezioni, mentre un altro usa semplicemente testo in grassetto da 16 punti. Alcuni documenti potrebbero utilizzare sezioni numerate come:
1. Scopo
2. Ambito
3. Responsabilità
mentre altri potrebbero usare una numerazione incoerente come:
I. Scopo
Sezione 2 - Ambito
3) Responsabilità
L'automazione documentale tradizionale solitamente richiede agli sviluppatori di ispezionare le posizioni dei paragrafi, gli stili o i pattern di testo e scrivere regole per ogni variazione.
L'elaborazione documentale assistita dall'IA cambia l'approccio. Invece di specificare che "il paragrafo 3 deve essere un'intestazione", gli sviluppatori possono descrivere il risultato desiderato:
Identifica il titolo del documento e la gerarchia delle intestazioni, normalizza gli stili e la numerazione delle intestazioni e preserva il contenuto originale.
Il livello IA interpreta la struttura del documento, mentre il motore sottostante di documenti Word esegue l'elaborazione effettiva.
Questo rende l'approccio particolarmente utile per raccolte di documenti aziendali semi-strutturati in cui il contenuto è diverso ma lo standard di output desiderato è coerente.
Cosa automatizzerà questo esempio
Il nostro flusso di lavoro di esempio contiene tre fasi di elaborazione.
Fase 1: Standardizzare la formattazione di Word
Ogni documento sorgente viene analizzato e riformattato secondo uno stile aziendale condiviso. L'elaborazione include:
- Normalizzazione di font e dimensioni dei font
- Identificazione dei titoli dei documenti
- Applicazione di livelli di intestazione coerenti
- Normalizzazione della numerazione delle intestazioni
- Standardizzazione della spaziatura dei paragrafi
- Aggiunta di un'intestazione comune
- Aggiunta di numeri di pagina nel piè di pagina
- Preservazione del testo originale, tabelle, immagini e collegamenti ipertestuali
Il risultato è una versione standardizzata di ogni documento di input.
Fase 2: Estrarre metadati e riepiloghi
I documenti standardizzati vengono poi analizzati individualmente per estrarre informazioni come:
- Titolo del documento
- Dipartimento
- Tipo di documento
- Data di efficacia o di emissione
- Parole chiave
- Riepilogo
Ogni risultato viene salvato come un piccolo documento di metadati Word strutturato.
Fase 3: Creare un indice documentale
Infine, i file di metadati vengono combinati e convertiti in un unico indice documentale Word.
L'indice finito può contenere informazioni simili a:
| N. | Titolo | Dipartimento | Tipo | Data | Riepilogo |
|---|---|---|---|---|---|
| 1 | Policy viaggi dipendenti | Risorse Umane | Policy | 15 luglio 2026 | Definisce i requisiti di approvazione e rimborso delle trasferte. |
| 2 | Guida all'onboarding dei fornitori | Approvvigionamento | Procedura | 3 giugno 2026 | Descrive il processo di registrazione e approvazione dei nuovi fornitori. |
| 3 | Rapporto incidente di sicurezza | IT | Rapporto | 8 agosto 2026 | Riassume un incidente di sicurezza e le azioni intraprese in risposta. |
Questo produce non solo file Word più puliti, ma anche una panoramica utile dell'intera raccolta documentale.
Configurare Spire.Agent.Office per C#
Per prima cosa, crea un progetto .NET e installa Spire.Agent.Office tramite NuGet.
Puoi installare il pacchetto dal Gestore pacchetti NuGet di Visual Studio o utilizzare la CLI .NET:
dotnet add package Spire.Agent.Office
Quindi importa i namespace richiesti:
using System;
using System.IO;
using Spire.Agent.Office.AI;
using Spire.Agent.Office.Extensions;
using Spire.Doc;
L'elaborazione documentale IA segue un modello semplice.
Per prima cosa, configura un'istanza AIOptions con uno SpireToken:
AIOptions options = new AIOptions();
options.SpireToken = "il tuo SpireToken";
Puoi richiedere uno SpireToken temporaneo per i test dalla pagina della licenza temporanea Spire. Dopo aver ottenuto il token, assegnalo alla proprietà SpireToken prima di chiamare le API di elaborazione IA.
Successivamente, carica un documento Word e crea un AIDocumentProcessor:
using (Document doc = new Document())
{
    doc.LoadFromFile("input.docx");

    AIDocumentProcessor processor = doc.AI(options);

    processor.ExecuteInstruction(
        doc,
        "La tua istruzione in linguaggio naturale",
        "output.docx"
    );
}
La parte importante è l'istruzione. Invece di scrivere manualmente una lunga sequenza di chiamate API Word, descriviamo come dovrebbe apparire il documento e lasciamo che l'agente esegua le operazioni corrispondenti.
Nelle sezioni seguenti, applicheremo questo approccio a un'intera directory di file Word.
Standardizzare la formattazione di Word con l'IA
Supponiamo che i documenti raccolti da diversi dipartimenti utilizzino font, intestazioni, numerazioni e layout di pagina incoerenti.
Vogliamo che tutti seguano lo stesso stile documentale aziendale:
- Arial per tutto il testo
- Testo del corpo da 11 pt
- Titolo del documento in grassetto da 20 pt
- Titolo 1 in grassetto da 16 pt
- Titolo 2 in grassetto da 13 pt
- Numerazione multilivello coerente
- Interlinea 1.15
- Un'intestazione aziendale
- Numeri di pagina centrati
- Nessuna modifica alla formulazione originale
Il codice seguente elabora ogni file .docx in una directory di input e salva le versioni standardizzate in una nuova directory.
using System;
using System.IO;
using Spire.Agent.Office.AI;
using Spire.Agent.Office.Extensions;
using Spire.Doc;

string inputFolder = @"E:\Documents\Input";
string outputFolder = @"E:\Documents\Standardized";
string spireToken = "il tuo SpireToken";
Directory.CreateDirectory(outputFolder);

string aiRule = """
Analizza la struttura di questo documento Word e standardizza la sua formattazione secondo le seguenti regole aziendali:

1. Preserva tutta la formulazione originale. Non riscrivere, riassumere, accorciare o rimuovere alcun contenuto del documento.
2. Usa Arial come font predefinito e 11 pt per il normale testo del corpo.
3. Identifica il titolo principale del documento e formattalo in grassetto da 20 pt.
4. Identifica la gerarchia logica delle intestazioni e applica gli stili di intestazione Word appropriati. Usa 16 pt in grassetto per Titolo 1 e 13 pt in grassetto per Titolo 2.
5. Normalizza la numerazione delle sezioni in una gerarchia coerente come 1, 1.1 e 1.1.1 dove appropriato.
6. Usa un'interlinea di 1.15 per i paragrafi del corpo normale e mantieni la spaziatura dei paragrafi visivamente coerente.
7. Aggiungi 'Libreria Documenti Aziendali' nell'intestazione del documento.
8. Aggiungi numeri di pagina centrati nel piè di pagina.
9. Preserva tutte le tabelle, immagini, collegamenti ipertestuali e altri oggetti del documento esistenti.
10. Mantieni invariata la struttura complessiva del documento e il significato originale.
""";

var aiOpts = new AIOptions { SpireToken = spireToken };

foreach (var file in Directory.GetFiles(inputFolder, "*.docx"))
{
    var fileName = Path.GetFileName(file);
    var savePath = Path.Combine(outputFolder, fileName);

    using var doc = new Document();
    doc.LoadFromFile(file);

    var res = doc.AI(aiOpts).ExecuteInstruction(doc, aiRule, savePath);
    Console.WriteLine(res.Success ? $"Elaborato: {fileName}" : $"Fallito: {fileName} - {res.ErrorMessage}");
}
Un dettaglio importante nell'istruzione è il requisito di identificare la gerarchia logica delle intestazioni.
Questo è diverso dal semplice cambio di font di ogni paragrafo in grassetto. L'agente può analizzare cosa rappresenta un paragrafo e determinare se funge da titolo del documento, intestazione di sezione principale, sottosezione o normale testo del corpo.
Per i flussi di lavoro di gestione documentale, gli stili di intestazione corretti sono particolarmente utili perché possono migliorare la navigazione, la generazione automatica dell'indice, i segnalibri PDF, l'accessibilità e la successiva analisi del documento.
Un'altra regola importante è:
Preserva tutta la formulazione originale.
La formattazione e la riscrittura del contenuto dovrebbero normalmente essere trattate come compiti separati. Quando lo scopo di questa fase è la standardizzazione del documento, l'IA non dovrebbe riscrivere o riassumere simultaneamente il testo sorgente.
Dopo l'esecuzione, la directory di output contiene copie standardizzate:
Standardized/
├── Employee_Travel_Policy.docx
├── Vendor_Onboarding_Guide.docx
├── Security_Incident_Report.docx
└── Remote_Work_Policy.docx
L'esempio seguente mostra come appare un documento Word formattato in modo incoerente prima e dopo la standardizzazione basata sull'IA.
Estrarre metadati e generare riepiloghi dei documenti
Una volta standardizzata la formattazione, il passo successivo è comprendere cosa contiene ogni documento.
Aprire manualmente centinaia di file e registrare titoli, dipartimenti, date, categorie e riepiloghi richiede molto tempo. Questo è un compito in cui la comprensione documentale dell'IA è particolarmente utile.
Per questo esempio, estrarremo sei campi da ogni documento:
- Titolo
- Dipartimento
- Tipo di documento
- Data
- Parole chiave
- Riepilogo
Invece di restituire prosa a forma libera, l'istruzione richiede una struttura prevedibile. Questo rende i risultati più facili da elaborare in seguito.
using System;
using System.IO;
using Spire.Agent.Office.AI;
using Spire.Agent.Office.Extensions;
using Spire.Doc;

string inputFolder = @"E:\Documents\Standardized";
string outputFolder = @"E:\Documents\Metadata";
string spireToken = "il tuo SpireToken";

Directory.CreateDirectory(outputFolder);

string aiRule = """
Analizza questo documento Word e crea un rapporto di metadati conciso.

Estrai le seguenti informazioni dal contenuto effettivo del documento:
- Titolo
- Dipartimento o funzione aziendale responsabile
- Tipo di documento, come Policy, Procedura, Rapporto, Guida o Memo
- Data di efficacia o Data di emissione
- Da 3 a 5 parole chiave
- Riepilogo di circa 80-120 parole

Crea un nuovo documento conciso contenente solo questi campi.
Usa esattamente le seguenti etichette:

Titolo:
Dipartimento:
Tipo di documento:
Data:
Parole chiave:
Riepilogo:

Non inventare informazioni che non possono essere ragionevolmente determinate dalla fonte. Se una data o un dipartimento specifico non sono disponibili, usa 'Non specificato'. Mantieni il riepilogo fattuale e basato solo sul documento sorgente.
""";

var aiOpts = new AIOptions { SpireToken = spireToken };

foreach (var file in Directory.GetFiles(inputFolder, "*.docx"))
{
    var fileName = Path.GetFileNameWithoutExtension(file);
    var savePath = Path.Combine(outputFolder, $"{fileName}_Metadata.docx");

    using var doc = new Document();
    doc.LoadFromFile(file);

    var res = doc.AI(aiOpts).ExecuteInstruction(doc, aiRule, savePath);
    Console.WriteLine(res.Success ? $"Metadati estratti: {fileName}" : $"Fallito: {fileName} - {res.ErrorMessage}");
}
Un documento di metadati generato appare così:
Il requisito di utilizzare etichette fisse è importante.
Se il prompt dice semplicemente "riassumi il documento", documenti diversi possono produrre strutture di output sostanzialmente diverse. Richiedere campi coerenti rende i file intermedi molto più facili da combinare in un indice finale.
L'istruzione dice anche esplicitamente all'agente di non inventare metadati mancanti. Per i record aziendali, "Non specificato" è generalmente più utile che indovinare un dipartimento o una data che il documento non dichiara mai.
Creare un indice documentale da più file Word
A questo punto, abbiamo un file di metadati per ogni documento elaborato:
Metadata/
├── Employee_Travel_Policy_Metadata.docx
├── Vendor_Onboarding_Guide_Metadata.docx
├── Security_Incident_Report_Metadata.docx
└── Remote_Work_Policy_Metadata.docx
Il passo finale è consolidare questi singoli file di metadati in un unico indice documentale basato su Word.
Invece di aprire manualmente ogni documento di metadati, estrarne il testo e unire i risultati in C#, possiamo passare tutti i file di metadati direttamente a Spire.Agent.Office tramite il parametro attachments. L'agente IA legge i documenti allegati, estrae i campi etichettati da ciascuno e crea un nuovo documento Word contenente un indice consolidato.
Il parametro attachments è utile quando il compito IA dipende da più file di supporto piuttosto che da un singolo documento di input principale. In questo esempio, non esiste un documento Word esistente che debba essere modificato. Pertanto, creiamo un oggetto Document vuoto e utilizziamo i file di metadati come fonti di informazioni per generare l'indice finale.
using System;
using System.IO;
using Spire.Agent.Office.AI;
using Spire.Agent.Office.Extensions;
using Spire.Doc;

string metadataFolder = @"E:\Documents\Metadata";
string outputPath = @"E:\Documents\Document_Index.docx";
string spireToken = "il tuo SpireToken";
var attachments = Directory.GetFiles(metadataFolder, "*_Metadata.docx");

string aiRule = """
Leggi tutti i documenti di metadati forniti negli allegati e crea un indice documentale Word consolidato.

Crea il titolo 'Indice Documentale' nella parte superiore del documento.

Crea una tabella con le seguenti colonne:
N. | Titolo | Dipartimento | Tipo di documento | Data | Parole chiave | Riepilogo

Requisiti:
1. Crea una riga per ogni documento di metadati.
2. Numera i record in sequenza partendo da 1.
3. Estrai i valori dai campi etichettati in ogni allegato.
4. Preserva le informazioni estratte e non inventare dati mancanti.
5. Usa 'Non specificato' quando un campo non è disponibile.
6. Rendi l'intestazione della tabella in grassetto.
7. Dai alla colonna Riepilogo più larghezza rispetto alle altre colonne.
8. Usa uno stile professionale pulito adatto a un registro documentale interno.
9. Produci un documento Word autonomo contenente solo l'indice documentale finale.
""";

var aiOpts = new AIOptions { SpireToken = spireToken };

using var doc = new Document();
var res = doc.AI(aiOpts).ExecuteInstruction(doc, aiRule, outputPath, attachments);

Console.WriteLine(res.Success
    ? $"Indice documentale creato: {outputPath}"
    : $"Impossibile creare l'indice documentale: {res.ErrorMessage}");
L'output finale viene salvato come:
Document_Index.docx
Invece di aprire ogni documento originale individualmente, i dipendenti possono ora utilizzare un unico indice consolidato per comprendere rapidamente quali documenti sono disponibili e cosa contiene ogni file.
Questo tipo di indice può essere particolarmente utile prima di migrare file in un sistema di gestione documentale, preparare una base di conoscenza interna, rivedere raccolte di documenti legacy o organizzare record per la conservazione a lungo termine.
Best practice per un'elaborazione documentale IA affidabile
L'IA rende l'elaborazione di documenti semi-strutturati più flessibile, ma i risultati affidabili dipendono ancora fortemente da come viene progettato il compito.
Separare la formattazione dall'analisi del contenuto
Evita di chiedere all'agente di standardizzare la formattazione, riscrivere il testo, riassumere il documento ed estrarre metadati in un'unica grande istruzione.
Queste sono operazioni diverse con obiettivi diversi.
Un flusso di lavoro più sicuro è:
Documento originale
        ↓
Standardizzazione formattazione
        ↓
Documento standardizzato
        ↓
Estrazione metadati
        ↓
Metadati strutturati
        ↓
Indice documentale
Questo rende anche i problemi più facili da identificare e correggere.
Definire le regole di formattazione in modo esplicito
Istruzioni come:
Rendi il documento professionale.
lasciano troppo spazio all'interpretazione.
Ogni volta che la coerenza è importante, specifica le regole aziendali effettive:
Arial, testo del corpo da 11 pt
Titolo del documento da 20 pt
Titolo 1 da 16 pt
Titolo 2 da 13 pt
Interlinea 1.15
Numerazione 1 / 1.1 / 1.1.1
Lo stesso principio si applica a intestazioni, piè di pagina, formattazione delle tabelle e layout di pagina.
Proteggere il contenuto originale
Per i compiti di formattazione, includi esplicitamente requisiti come:
Preserva tutta la formulazione originale.
e:
Non riscrivere, riassumere, accorciare o eliminare il contenuto del documento.
I file sorgente dovrebbero anche essere conservati piuttosto che sovrascritti durante l'elaborazione batch automatizzata.
Una struttura di cartelle pratica è:
Documents/
├── Input/
├── Standardized/
├── Metadata/
└── Document_Index.docx
Richiedere metadati strutturati
Quando le informazioni estratte verranno riutilizzate programmaticamente, un output prevedibile è più prezioso di un output creativo.
Invece di:
Dimmi di cosa tratta questo documento.
usa uno schema fisso:
Titolo:
Dipartimento:
Tipo di documento:
Data:
Parole chiave:
Riepilogo:
Questo rende l'elaborazione a valle considerevolmente più facile.
Gestire le informazioni mancanti in modo esplicito
Non ogni documento contiene un nome di dipartimento, una data di efficacia, un numero di documento o un proprietario.
Dì all'IA cosa fare quando le informazioni mancano:
Usa "Non specificato" invece di indovinare.
Questo è particolarmente importante per la gestione documentale, legale, finanziaria, di conformità e altri flussi di lavoro sensibili ai record.
Rivedere gli output ad alta importanza
I metadati e i riepiloghi generati dall'IA non dovrebbero essere automaticamente trattati come record autorevoli in flussi di lavoro ad alto rischio.
Per l'organizzazione ordinaria dei documenti interni, i risultati automatizzati possono essere sufficienti. Per archivi regolamentati, record legali, documenti di conformità o sistemi di conservazione ufficiali, i campi estratti e le classificazioni dovrebbero comunque essere convalidati secondo i requisiti di revisione dell'organizzazione.
Conclusione
L'elaborazione batch di Word spesso comporta due problemi diversi.
Il primo è l'automazione documentale: cambiare font, applicare stili, creare intestazioni e piè di pagina, gestire la numerazione e generare file Word.
Il secondo è la comprensione documentale: determinare cosa rappresenta il contenuto, identificare i tipi di documento, trovare date e dipartimenti, estrarre parole chiave e produrre riepiloghi.
Le API Word tradizionali sono altamente efficaci quando gli sviluppatori sanno già esattamente quale contenuto modificare. L'elaborazione assistita dall'IA diventa particolarmente utile quando i documenti sono incoerenti e il software deve prima comprendere la loro struttura prima di decidere come elaborarli.
Utilizzando Spire.Agent.Office in C#, queste due capacità possono essere combinate in un unico flusso di lavoro:
Analizzare → Standardizzare → Estrarre → Organizzare
Nell'esempio sopra, una cartella contenente documenti Word incoerenti viene trasformata in una raccolta documentale standardizzata, una serie di record di metadati strutturati e infine un indice documentale Word centralizzato.
La stessa architettura può essere estesa ad altri flussi di lavoro aziendali, come librerie di policy, manuali di procedura, documentazione di conformità, archivi di progetto, record HR, documentazione dei fornitori e migrazione di documenti legacy.
Invece di rivedere e organizzare manualmente i file uno per uno, gli sviluppatori possono definire le regole documentali e la struttura delle informazioni richieste in linguaggio naturale e automatizzare le parti ripetitive del flusso di lavoro, producendo comunque documenti Word reali e modificabili.