4 Ways to Save One Page of a PDF (Windows, Mac & Python)

Sometimes you only need one page from a large PDF file, whether you are submitting a single invoice, sharing a specific chart from a 100-page report, or organizing digital archives. Learning how to save one page of a PDF efficiently can save you time and effort. This guide explains four practical methods. Each method works for different skill levels.
- Using Print to PDF on Windows & Browsers
- Save One Page of a PDF on a Mac Using Preview
- Using Online PDF Editors
- Automatically Saving PDF Page with Python
- Comparison Table of 4 Methods
Save One Page of a PDF Using Print to PDF on Windows & Browsers
The most accessible way to extract a page is through the printing feature built into almost every modern operating system and browser. This technique essentially prints PDF pages of your choice into a new, smaller digital file. Depending on the software you are using, the steps to save just one page of a PDF document vary slightly in their interface.
Option A: Using Google Chrome or Microsoft Edge
Browsers are the quickest tools for this task because they require no installation. This is the go-to solution for anyone wondering how to save only one page of a PDF while browsing the web or working with local files.
- Step 1: Drag your PDF file directly into a Chrome or Edge tab.
- Step 2: Press Ctrl + P to open the print menu.
- Step 3: In the Destination dropdown, ensure Save as PDF is selected.
- Step 4: Under Pages, select Custom and type the single page number you wish to keep.
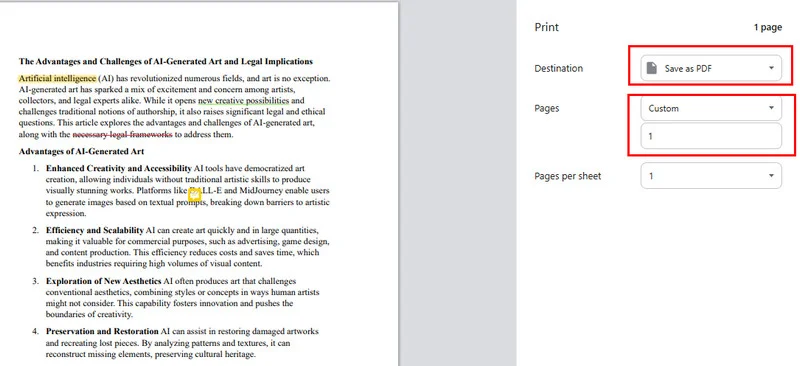
- Step 5: Click the blue Save button and choose your destination folder.
Option B: Using Adobe Acrobat Reader
Adobe Acrobat is one of the most widely used PDF tools, offering professional tools for almost any task. When you need to save a single page of a PDF within this powerful tool, the most efficient method is using its built-in print engine, which utilizes a specialized dialog layout for precision.
- Step 1: Open your document in Adobe Acrobat or Reader.
- Step 2: Click the Printer icon or press Ctrl + P to open the print dialog.
- Step 3: From the Printer menu at the top, select Adobe PDF or Microsoft Print to PDF.
- Step 4: Under the "Pages to Print" section, select the Pages radio button and enter your target page number.

- Step 5: Click Print and, when the Save As window pops up, name your file and save it.
Note: If you find it easier to remove unwanted content rather than extracting a single page, check out this guide on how to delete pages from PDF with Acrobat.
Save One Page of a PDF on a Mac Using Preview
If you are an Apple user, saving only one page of a PDF on a Mac is an intuitive process. macOS includes a powerful built-in tool called Preview that handles PDF manipulation natively without needing a virtual printer altogether. You can quickly extract a page using simple drag-and-drop actions.
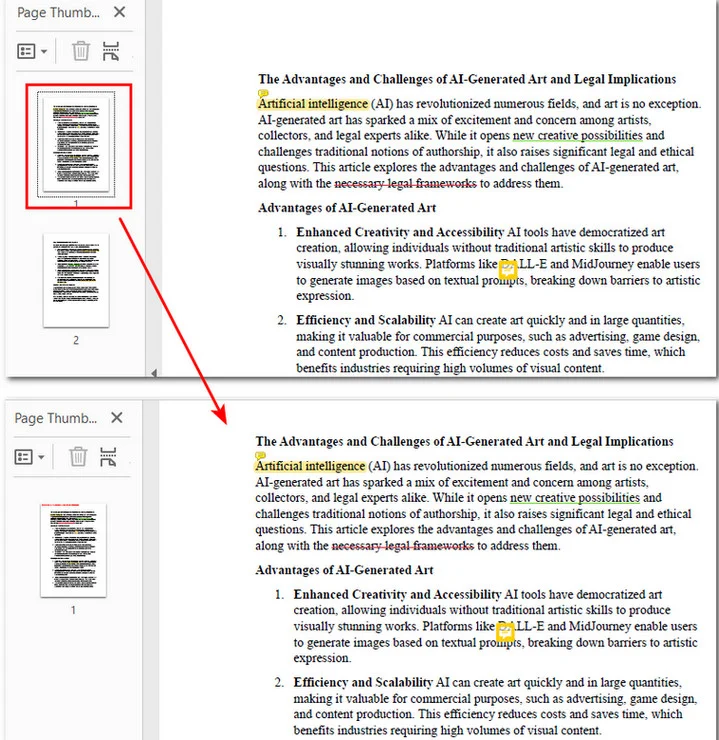
- Step 1: Double-click your PDF file to open it in Preview by default.
- Step 2: If you don't see the page previews on the left, navigate to View > Thumbnails.
- Step 3: Locate the target page in the sidebar, then simply click and drag that thumbnail directly onto your desktop.
- Step 4: Alternatively, select the thumbnail, go to File > Export as PDF, and ensure the Selected Pages option is checked before saving.
Save One Page of a PDF Document with Online PDF Editors
Sometimes you may be working on a mobile device or need to save one page of a PDF document separately while performing other edits like merging or compressing. Online PDF suites offer specialized split or extract tools designed for these specific tasks. These platforms are ideal for those who prefer a simple drag-and-drop interface over complex system menus.
- Step 1: Visit a trusted site like Smallpdf, iLovePDF, or Adobe’s online PDF services. For this guide, we will use Smallpdf as an example.
- Step 2: Click Choose Files or drag your document into the Extract PDF Pages tool of Smallpdf.
- Step 3: Scroll through the document and check the box on the specific page you want to save.
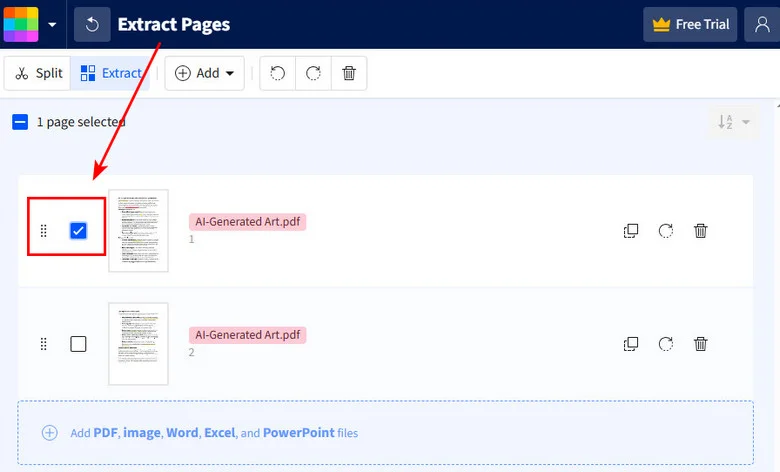
- Step 4: Click the Finish button to start the extraction process.
- Step 5: After the processing is complete, click the Download button to save the new file directly to your device.
Save One Page in a PDF Automatically with Python
For developers who process large numbers of PDFs, automation is more efficient. Using a code script allows you to automate the process of saving only one page of a PDF across hundreds of files in seconds. For this purpose, we recommend Free Spire.PDF for Python, a robust and independent library that enables developers to create, read, and manipulate PDF documents without Adobe Acrobat.
It saves a single page of a PDF by cloning the specific page to a new PdfDocument and then saving it. In most cases, the original layout and content are preserved, unlike printing, which flattens these elements.
Here's how to install Free Spire.PDF and initiate the PDF page saving:
- Step 1: Install the library via terminal using pip install Spire.Pdf.Free.
- Step 2: Load your source document and initialize a new, empty PDF object to act as the single-page container.
- Step 3: Use the PdfDocument.InsertPage() method to copy the target page into the new file.
- Step 4: Save the new PDF using the PdfDocument.SaveToFile() method.
Below is a simple Python example showing how to save the first page of a PDF document:
from spire.pdf import *

# Load the source PDF document
input_pdf = PdfDocument()
input_pdf.LoadFromFile("/input/sample.pdf")

# Create a new PDF document for the output
output_pdf = PdfDocument()

# Save only the first page
output_pdf.InsertPage(input_pdf, 0)

# Save the extracted page as a new document
output_pdf.SaveToFile("/output/extracted_single_page.pdf")
output_pdf.Close()
input_pdf.Close()
The preview of the original file and the output PDF document:
Which Method Should You Choose?
In today's tutorial, we have covered four distinct methods. To help you quickly identify the most suitable option for your tasks, the following table compares these methods based on accessibility, platform, and scale.
| Scenario | Recommended Method | Primary Benefit |
|---|---|---|
| Quick one-off tasks (Windows/PC) | Print to PDF (Browser or Adobe) | Universal & free; no new software required. |
| Working on a macOS device | Mac Preview | Native system tool with seamless drag-and-drop. |
| On-the-go or mobile editing | Online PDF Editors | No local storage used; accessible from any device. |
| Bulk or repetitive processing | Python Scripting | High-speed automation with 100% precision. |
Conclusion
Saving a single page from a PDF is actually easier than many people expect. If you need a quick solution, the print-to-PDF method works on almost any computer. Mac users can use Preview, while online tools are convenient when you don’t want to install software.
If you need to extract PDF pages in bulk, using Python with Free Spire.PDF is the most efficient approach. Choose the method that fits your workflow, and you’ll be able to save one page of a PDF quickly whenever you need it.
Also Read:
Remove Highlights from PDF: Online, Adobe & Python Guide

Knowing how to remove highlights from PDF files is a vital skill, especially when you're cleaning up a draft. While highlighting helps emphasize key points, cluttered markups can hinder readability. In this guide, we explore the most effective ways to delete all highlights in a PDF at once or selectively clear specific markups using online tools, Adobe Acrobat, and Python automation.
- Remove Highlights from PDF Online
- Remove Highlight from PDF in Adobe Acrobat
- Automate with Spire.PDF for Python
- Comparison Table of Three Methods
- Conclusion
Remove Highlights from PDF Online Free: The Quick Web Fix
For users who need to remove PDF highlights without Acrobat, online platforms are the fastest solutions to clean a PDF file. These tools are ideal for one-off tasks without installing software on your device.
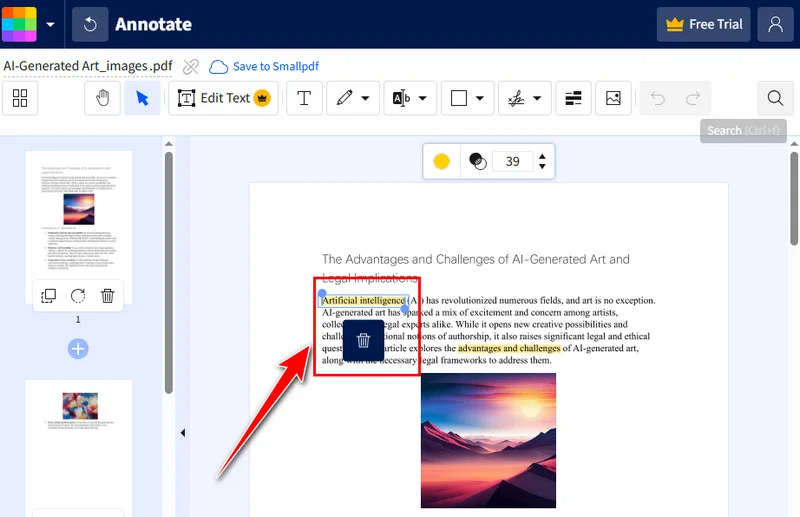
One of the most intuitive ways to handle this is via Smallpdf. It treats highlights as interactive objects, making the highlights removal process seamless.
Quick Steps to Clear Highlights Online:
- Access the Editor: Navigate to the PDF Editor tool on the Smallpdf homepage.
- Upload Your File: Drag and drop your document from your device or cloud storage.
- Select the Markup: Click directly on the yellow highlight to activate the selection box.
- Execute Deletion: Once selected, simply hit the Delete key on your keyboard or click the trash icon appearing above text.
- Finish and Export: Click Download to save the file immediately. Alternatively, select Finish to enter the preview mode, where you can then choose to Download or Export As other formats like Microsoft Word or Excel.
Pro Tip: Troubleshooting "Stubborn" Highlights
If you find that a highlight won't select, ensure your editor is specifically toggled to "Annotation Mode". For scanned documents where the highlight is flattened into the image itself, you can use a white shape overlay to manually mask the highlight color.
Note: Security & Storage Always download your copy immediately, as most online free tools have a limited session window for file storage. Additionally, be cautious with sensitive or confidential data; since these services may upload your file to a third-party server, local methods like Free Spire.PDF and Adobe Acrobat are preferred for privacy.
Professional Precision: How to Remove Highlight from PDF in Adobe Acrobat
For complex legal documents, Adobe Acrobat Pro is the industry standard. It provides the precision needed to manage intricate text markups. It supports managing all annotations in a dedicated "Comments" pane .
This method is perfect when you need to distinguish between a highlight and a background fill that might have been added during the original document creation.
Step-by-Step Instructions:
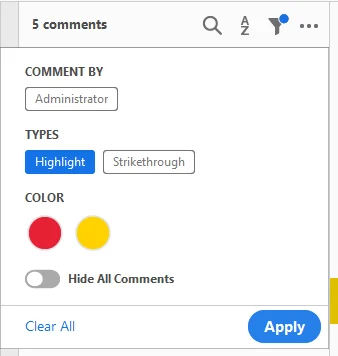
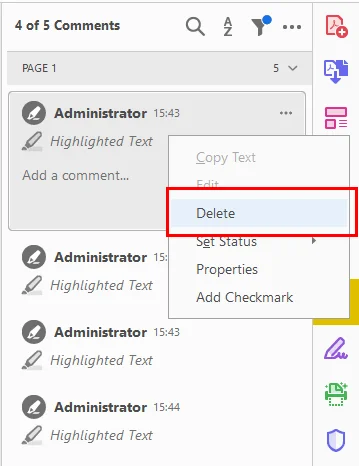
- Open the Comments Pane: On the right-hand toolbar, select the Comments tool. This will list every markup in chronological order.
- Filter and Find: You can sort by type, author, or color. This is particularly helpful if you only want to remove the highlight from the PDF while keeping other annotations intact.
- Batch or Single Delete:
- To remove one: Right-click the highlight on the page or in the list and select Delete.
- To delete all highlights in PDF at once: Hold the Ctrl key and manually click each comment in the list you wish to remove, then right-click and select Delete.
- System Alternatives: If you are on a Mac, you can achieve basic removal via Mac Preview by selecting the highlight and hitting backspace, or even via Chrome's PDF viewer for very simple annotation layers.
Note: Ensure you "Save As" a new version after editing to preserve the original document's metadata if needed.
Also read: How to Highlight Text in a PDF: 5 Easy Methods
Developer’s Choice: Automate with Free Spire.PDF for Python
For developers handling high volumes of data, manual clicking is inefficient. Using a library like Free Spire.PDF for Python, you can programmatically remove highlights from PDF files across entire directories in seconds.
Basic Implementation: Clear All Markups at Once
Free Spire.PDF provides access to the Annotations collection, where highlighters are stored as PdfTextMarkupAnnotationWidget objects. Since this class also encompasses other text markups like strikethroughs and underlines, our implementation includes a specific check for the TextMarkupAnnotationType to ensure only highlights are targeted and removed.
Here's a code example showing how to delete all highlights from a PDF all at once:
from spire.pdf.common import *
from spire.pdf import *

# Initialize the PdfDocument object
pdf = PdfDocument()
# Load the PDF file
pdf.LoadFromFile("/input/sample.pdf")

# Iterate through each page in the document
for i in range(pdf.Pages.Count):
    page = pdf.Pages[i]
    # Access the collection of annotations for the current page
    annotations = page.Annotations

    # Iterate through annotations in reverse order
    for j in range(annotations.Count - 1, -1, -1):
        annot = annotations[j]

        # Check if the annotation is a text markup type (highlights, underlines, etc.)
        if isinstance(annot, PdfTextMarkupAnnotationWidget):
            # Verify if the specific markup type is a Highlight
            if annot.TextMarkupAnnotationType == PdfTextMarkupAnnotationType.Highlight:
                # Remove the highlight annotation from the collection
                annotations.RemoveAt(j)

# Save the modified document
pdf.SaveToFile("/output/HighlightsRemoved.pdf")
pdf.Close()
Here's the preview of the original PDF and the cleaned PDF:
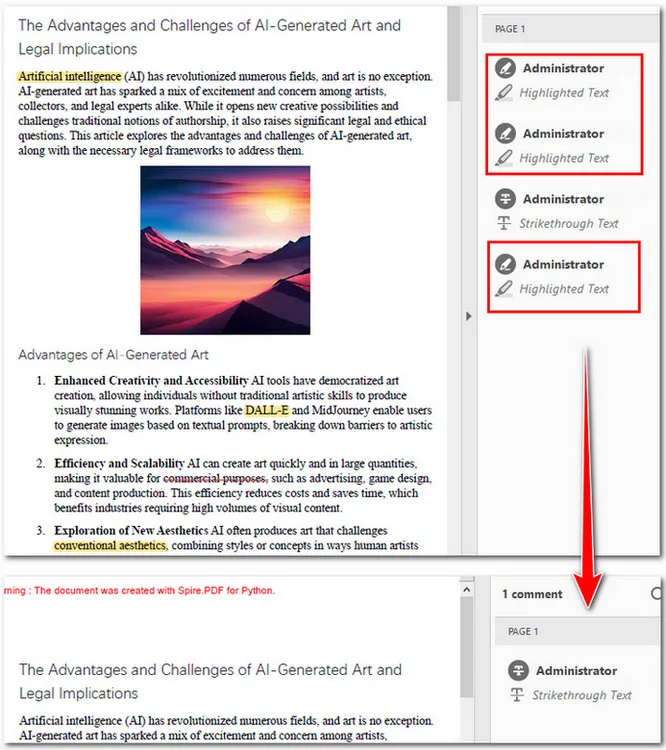
You can see that the three highlights in the PDF have been deleted, and the strikethrough was preserved.
Advanced Control: Selective Removal by Index or Attribute
Sometimes, a total wipe is unnecessary. You might only want to remove specific annotations, such as the second highlight on a page, or filter highlights based on their metadata, like author or content.
By first filtering the annotations into a list, you can target specific instances. Below is the implementation for removing the second highlight found on the first page:
from spire.pdf.common import *
from spire.pdf import *

# Create a PdfDocument object and load a PDF file
doc = PdfDocument()
doc.LoadFromFile("/input/sample.pdf")

# Get the annotations collection of the first page
annotations = doc.Pages[0].Annotations

# Loop through annotations collection and get the highlights
highlights = []
for i in range(annotations.Count):
    if isinstance(annotations[i], PdfTextMarkupAnnotationWidget):
        highlights.append(annotations[i])

# Remove the second highlight
annotations.Remove(highlights[1])

# Save the document
doc.SaveToFile("/output/RemoveSecondHighlight.pdf")
doc.Close()
Here's the preview of the original PDF and the output file:

Note: Programming libraries can only detect "Annotation" layers. If the highlight is flattened into the content stream, you will need to OCR the PDF or use coordinate-based white-out techniques.
Final Comparison: Which Method Should You Choose?
As we have explored, the ideal way to remove highlights from PDF files depends on your specific workflow, the volume of documents, and your technical level. The following table provides a side-by-side breakdown to help you select the most efficient tool for your needs.
| Feature | Online Tools | Adobe Acrobat | Free Spire.PDF (Python) |
|---|---|---|---|
| Effort | Low (One-off) | Medium (Manual) | High (Initial Setup) |
| Speed | Fast | Slow for Batch | Lightning Fast for Batch |
| Cost | Free (Usually) | Paid Subscription | Free |
| Privacy | Low (Cloud) | High (Local) | Highest (Local/Encrypted) |
Conclusion
In this guide, we explained three ways to remove highlights from PDF files. Online tools like Smallpdf are perfect for quick tasks, while Adobe Acrobat offers the manual precision required for professional document management. For developers, Free Spire.PDF for Python is ideal for high-volume automation and data privacy.
By understanding these different approaches, you can transform a cluttered, marked-up document into a clean, professional PDF in seconds. Experiment with the method that best fits your workflow to stay productive and organized.
You May Also Like:
How to Curve Text in Word: WordArt, Text Box or Python
Curving text is a powerful way to enhance the visual appeal of your documents, whether you are designing a professional company seal, a creative logo, or an official certificate. Many users search for how to curve text in Word because the option isn't directly presented in the standard font settings. In this guide, we will explore manual techniques to create curved text in Word and provide a programmatic solution for developers using Python.
- Using WordArt to Curve Text in Word
- Make Text Curve in Word via Text Box
- Fine-Tuning Your Curved Text
- Create Curved Text in Word using Free Spire.Doc
- FAQs
Using WordArt to Curve Text in Word
The most traditional method involves using the WordArt gallery in Microsoft Word. This tool treats your text as a graphic object, allowing for complex geometric distortions that standard paragraph text cannot support. If you're looking for how to curve words in Word documents with stylized effects like shadows or gradients, this is the best starting point.
Step 1: Go to the Insert tab, click the WordArt button, and select a style that fits your design.
Step 2: Type the content you wish to bend into the placeholder box that appears.
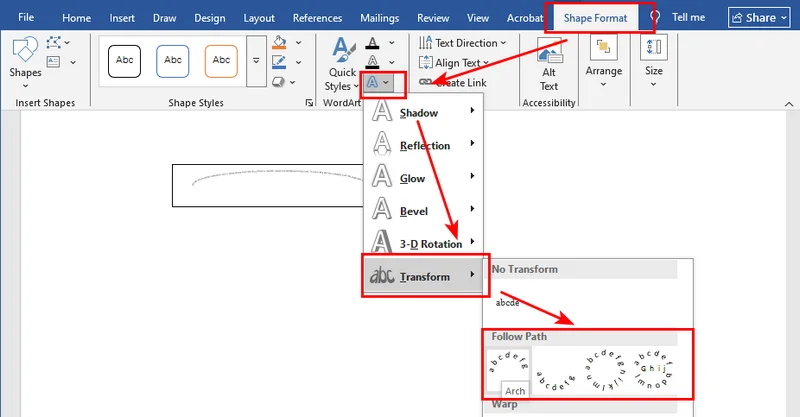
Step 3: With the WordArt object selected, navigate to the Shape Format tab, click Text Effects, hover over Transform, and choose an option under the Follow Path section.

Step 4: Drag the small yellow circle (control handle) on the text box border to increase or decrease the intensity of the curve.

How to Curve Text in Word 365
Microsoft Word 365 uses the same WordArt transformation engine as modern desktop versions of Word, which means the steps for creating curved text are almost identical.
Step 1: Go to the Insert tab and select WordArt.
Step 2: Type your text inside the WordArt box.
Step 3: Open the Shape Format (or Drawing Format) tab.
Step 4: Click Text Effects → Transform → Follow Path, then choose an arc style such as Arch Up or Circle.
Word 365 also offers several additional transformation presets, allowing you to create more advanced curved text effects compared with older versions of Microsoft Word.
How to Curve Text in Word Using a Text Box
If you prefer a cleaner, more minimalist look without the pre-defined styles of WordArt, using a standard text box is a clever alternative. This method is ideal when you need to curve words in Word files while maintaining a professional and simple aesthetic. It also allows you to bend text on Word layouts without worrying about complex text fills.
Step 1: Go to the Insert tab, click Text Box, and select Simple Text Box to place it in your document.
Step 2: Right-click the edge of the text box, select Format Shape, and set both Fill and Line to "No fill" and "No line" to make the container invisible.
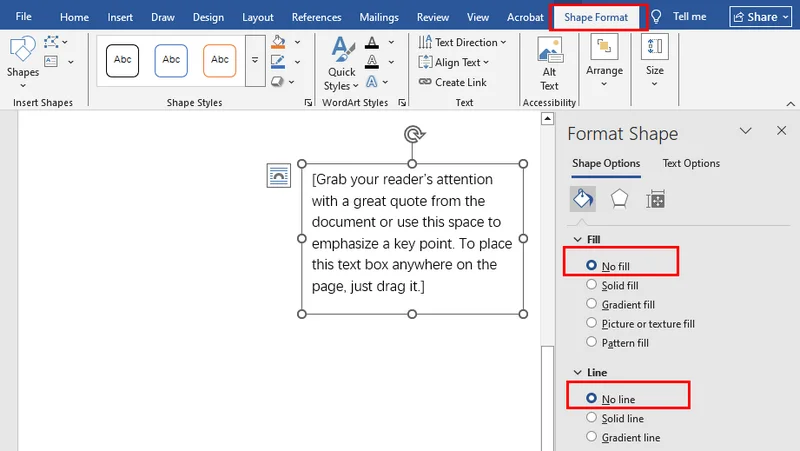
Step 3: Select the text box, go to the Shape Format tab, click Text Effects, and choose your desired arc style under Transform.
Note: While using text boxes offers great flexibility for curving text in Word documents, managing multiple floating objects can sometimes clutter your layout. If you need to clean up your document later, check out our guide on how to delete text boxes in Word manually or via code.
Fine-Tuning Your Curved Text in Microsoft Word
Once you have applied the basic transformation, you might find that the alignment isn't quite perfect. Fine-tuning the appearance of curved text in Microsoft Word requires a basic understanding of how Word handles object bounding boxes.
To ensure your text in Word curves exactly how you envisioned, pay attention to the aspect ratio of the text box. Stretching the box horizontally will flatten the arc, while narrowing it will sharpen the curve. You can also use the "Rotate" handle at the top of the box to position the arc at a specific angle, which is particularly useful for circular stamps where text needs to wrap around the bottom.
To further enhance your document's security and branding, you might also want to learn how to add watermarks in Word to protect your creative designs.
Programmatically Create Curved Text in Word using Free Spire.Doc
For developers who need to automate document generation, manual clicking is not efficient enough for large-scale document generation. You can programmatically create curved text in Word documents using the Free Spire.Doc library, which provides deep control over Shape objects and WordArt attributes.
Using code is highly efficient for automated workflows, ensuring that every curved text element maintains perfect alignment and styling across all your generated files.
The following code snippet demonstrates how to use Free Spire.Doc for Python to create a Word document and programmatically add a text shape with a curved effect.
from spire.doc import *
from spire.doc.common import *

# Create a new Word document
doc = Document()

# Add a section
section = doc.AddSection()

# Add a paragraph
para = section.AddParagraph()

# Add a shape and set its size and type to TextCurve
# Parameters: Width, Height, ShapeType
shape = para.AppendShape(200, 100, ShapeType.TextCurve)

# Set the vertical and horizontal position of the shape on the page
shape.VerticalPosition = 50
shape.HorizontalPosition = 50

# Set the content of the WordArt
shape.WordArt.Text = "Automated Curved Text"

# Set the fill color and stroke color
shape.FillColor = Color.get_AliceBlue()
shape.StrokeColor = Color.get_DarkBlue()

# Save the document to the specified path
doc.SaveToFile("/output/CurvedText.docx", FileFormat.Docx2016)
doc.Close()
Here's the preview of the output file:

Frequently Asked Questions
Q1: Can I curve an existing paragraph directly?
No, Microsoft Word requires the text to be inside a Shape or WordArt container. To make text in Word curve, you need to copy your existing text and paste it into a WordArt object or a transformed text box.
Q2: Will the curve remain if I export to PDF?
Yes, as long as you use a high-quality conversion tool like Free Spire.Doc, the curved text will be rendered as a vector object when converted to PDF, ensuring it remains sharp and professional.
Conclusion
Mastering how to curve text in Word allows you to move beyond basic document editing into the realm of professional layout design. Whether you choose the intuitive UI methods or the robust automation provided by Spire.Doc, creating dynamic, non-linear text is essential for modern documentation. We encourage you to download the trial version of Spire.Doc to experiment with these advanced formatting features in your own projects today.
Explore More Word Automation Tips:
How to Delete Duplicate Columns in Excel: 4 Best Ways

Whether you are merging customer lists or importing survey results, redundant columns can lead to errors and confusion. While Excel provides a built-in button to remove duplicate rows, deleting duplicate columns is more challenging because the built-in tools don't search horizontally by default. In this guide, we will explore the 4 most effective ways to delete duplicate columns in Excel, ranging from a simple "Transpose" trick to advanced Python automation. No matter your skill level, these methods will ensure you can find and remove duplicate columns to keep your data accurate.
- Transpose and Delete: The Universal Workaround
- Identify Duplicates Manually Using a Helper Row
- Delete Duplicate Columns Instantly with UNIQUE
- Automate Column Deletion with Python
- Summary: Which Method Should You Choose?
How to Delete Duplicate Columns in Excel with Transpose and Delete
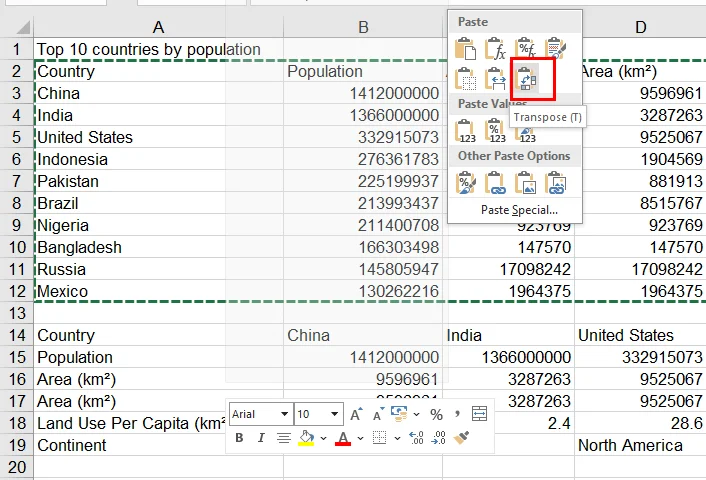
Since Excel's "Remove Duplicates" tool only works on rows, the smartest trick is to rotate your data 90 degrees. This approach transposes columns of the original worksheet to rows, allowing you to delete duplicate columns using the standard "Remove Duplicates" tool.
Steps to use the Transpose method:
- Copy your data: Select your cell range and press
Ctrl + C. - Paste Transpose: Right-click a blank area and select the Transpose icon (or use Paste Special > Transpose). Your columns are now rows.
- Remove Duplicates: Go to the Data tab and click Remove Duplicates. Excel will now identify and delete the duplicate rows that were originally columns.
- Transpose Back: Copy the cleaned data and use the Transpose paste option again to return it to its original column layout.

Note: The transpose method is a clever solution best suited for simple data (text and numbers). Since changing the layout can disrupt cell references, using this method may cause formula errors (#REF!) or minor formatting shifts. We strongly recommend saving a backup copy of your workbook before you begin to ensure your original data remains safe.
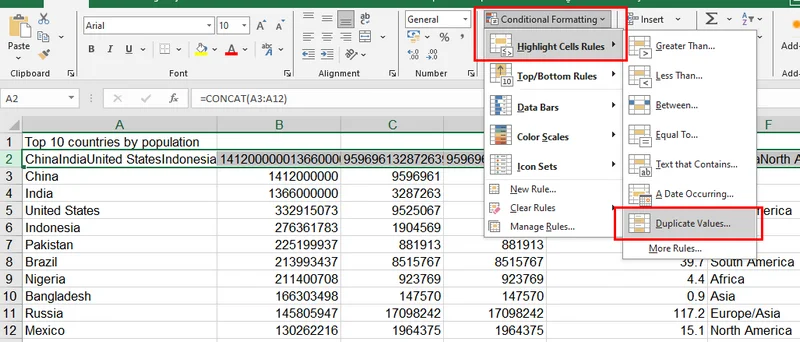
Identify Duplicate Columns in Excel Using a Helper Row
If you prefer a visual check to prevent errors before deleting anything, you can use a helper row combined with conditional formatting. This approach allows you to find duplicate columns with full manual oversight.
Steps to highlight redundant columns:
-
Create a Helper Row: Insert a new row at the very top (e.g., Row 1).
-
Combine Data: In cell A2, enter a formula like the following and drag it across all columns:
=CONCAT(A3:A12)This merges the entire content of each column into a single text string for comparison.
- Highlight: Select Row 2, go to Home > Conditional Formatting > Highlight Cells Rules > Duplicate Values.
- Delete: Any column with a highlighted header is a duplicate. You can now manually review and delete similar columns by hand.

Note: Be sure to replace A3:A12 with your actual data range. If your columns contain massive text that exceeds Excel’s 32,767-character limit per cell, we recommend using the Python solution below instead.
Remove Duplicate Columns from Excel Instantly with UNIQUE Function
For users of Microsoft 365 or Excel 2021, the UNIQUE function can be the fastest and safest method. It can generate a dataset without duplicate columns dynamically without modifying your original data.
How to use it:
-
Click an empty cell where you want the cleaned data to appear.
-
=UNIQUE(A1:F10, TRUE)The second parameter
TRUEtells Excel to compare columns instead of rows. -
Press Enter, and Excel will spill a clean version of your table, effectively removing duplicate columns from the output.
Note: This method also works perfectly in Google Sheets. However, please note that the UNIQUE function is only available in Microsoft 365, Excel 2021, and later versions. If you are using an older version, such as Excel 2019 or 2016, this function will not be available, and we recommend using the transpose or helper row methods instead.
Automate Excel Column Deletion with Python
For data analysts handling massive spreadsheets with hundreds of columns, manual clicking is not an efficient option. It is recommended to delete duplicate columns in Excel files programmatically using Free Spire.XLS for Python.
This professional library allows for high-precision cleaning, such as stripping hidden whitespaces that often cause standard Excel tools to miss duplicates.
Installation: pip install Spire.Xls.Free
The Python Script:
The following script iterates through columns from right to left, identifies columns with identical data, and deletes duplicates automatically.
from spire.xls import *
from spire.xls.common import *

# Create a Workbook object and load the sample file
workbook = Workbook()
workbook.LoadFromFile("/input/Population.xlsx")

# Get the third worksheet
sheet = workbook.Worksheets[2]

# Get the last row and column index
lastRow = sheet.LastRow
lastCol = sheet.LastColumn
seen_columns = set()

# Loop through columns from right to left
for col in range(lastCol, 0, -1):
    column_values = []

    # Get the contents of all cells in the column
    for row in range(1, lastRow + 1):
        cell_text = sheet.Range[row, col].Text
        column_values.append(cell_text.strip() if cell_text else "")

    # Merge the column values into a unique identifier
    column_key = "|".join(column_values)

    if column_key in seen_columns:
        # Delete the duplicate column
        sheet.DeleteColumn(col)
        print(f"Deleted Duplicate Column: {col}")
    else:
        seen_columns.add(column_key)

# Save the modified workbook
workbook.SaveToFile("/output/RemovedDuplicateColumns.xlsx", ExcelVersion.Version2016)
workbook.Dispose()
The preview of the original worksheet and the output file: 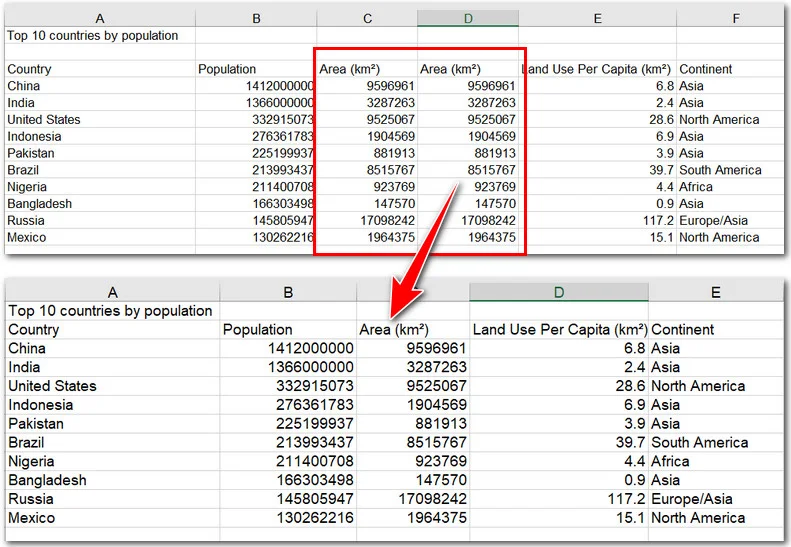
Summary: Which Method Should You Choose?
Choosing how to remove duplicate columns from Excel depends on your dataset size and version. To wrap up, we have compared the four methods across three key dimensions—best use case, primary action, and difficulty level—to help you quickly identify the most suitable solution for your project.
To wrap up, we have compared the four methods above across three key dimensions—Best Use Case, Primary Action, and Difficulty Level—to help you quickly identify the most suitable solution for your project.
| Feature | Transpose Method | Helper Row | UNIQUE Function | Python Script |
|---|---|---|---|---|
| Best For | General Users | Manual Review | Excel 365/2021 Users | Automation/Big Data |
| Action | Physical Deletion | Visual Highlighting | Dynamic List | Programmatic Delete |
| Difficulty | Beginner | Beginner | Intermediate | Advanced |
Conclusion
Whether you use the clever "Transpose" workaround or a professional Python script, mastering these techniques ensures your data remains professional and error-free. Knowing how to delete duplicate columns in Excel is a vital skill for any serious data cleaner. Always remember to save a backup of your file before performing bulk deletions. Ready to streamline your spreadsheets? Try one of these methods today!
Also Read:
How to Do Strikethrough in Excel: Methods for Windows & Mac
Table of Contents
Managing data effectively often requires visual cues to signal completion or updates. Whether you are managing a daily task list, tracking inventory, or auditing financial records, learning how to do strikethrough in Excel is an essential skill for staying organized. Excel doesn't feature a strikethrough button on the default Home ribbon, which can be frustrating for new users. However, by using a specific Excel hotkey for strikethrough or accessing the formatting menu, you can quickly cross out information without deleting the underlying data.
- Strikethrough Text in Excel Cells with Basic Methods
- Adding Strikethrough to Your Quick Access Toolbar
- Strikethrough Using Conditional Formatting
- Programmatic Strikethrough with Free Spire.XLS
- FAQs
How to Strikethrough Text in Excel Cells (Basic Methods)
Mastering the basics is the first step toward spreadsheet efficiency. Most users search for how to strikethrough text in an Excel cell because they need a way to mark items as "done" or "obsolete" while keeping the record visible for future reference.
There are two primary ways to achieve this manually: using fast keyboard commands or navigating through the standard formatting tool. Both methods are effective for formatting either an entire cell or just a specific string of text within a cell.
The Ultimate Shortcut for Strikethrough in Excel
Efficiency is key when handling large datasets. If you find yourself frequently needing to do strikethrough in Excel, memorizing the keyboard shortcut will save you hours of clicking through menus over time.
- For Windows Users: The standard shortcut for strikethrough in Excel is Ctrl + 5. Simply select your cell (or highlight text inside the formula bar) and press these keys simultaneously.
- For Mac Users: The most direct strikethrough shortcut in Excel on Mac is Command + Shift + X. If you prefer a more visual approach, you can press Command + 1 to open the Format Cells dialog, navigate to the Font tab, and manually check the "Strikethrough" box.
Note: These shortcuts are toggles. If you press them a second time on the same cell, the strikethrough effect will be removed immediately.
Manual Method: Using the Format Cells Tool
If you aren't a fan of keyboard shortcuts, the classic Format Cells menu offers a visual way to apply styles. This method is often considered the most reliable way to cross out text in Excel because it allows you to preview the font changes before applying them to your spreadsheet.
Step-by-Step Instructions:
- Right-click on the cell or the specific text you wish to format.
- Select Format Cells from the context menu (or press Ctrl + 1).
- Navigate to the Font tab in the popup window.
- Under the Effects section, check the box labeled Strikethrough.
- Click OK to apply the change.

Tip: If you are looking to further polish your cell's appearance, you might also want to learn how to rotate text in Excel to create professional headers.
Advanced: Adding Strikethrough to Your Quick Access Toolbar
For those who perform this action dozens of times a day, even a shortcut might feel repetitive. You can actually customize your workspace to include a dedicated button for this function, making it easier than ever to do strikethrough in Excel with a single click.
Step-by-Step Instructions:
- Click the small drop-down arrow on the Quick Access Toolbar (located at the very top of your Excel window).
- Select More Commands from the list.
- Under "Choose commands from," select All Commands.
- Scroll down to find Strikethrough and click the Add >> button to move it to your toolbar.
- Click OK to save your changes.
Adding these frequently used buttons to your ribbon saves time. Just as you’ve added a strikethrough button, mastering different ways to wrap text will help you keep your headers and data neat with minimal clicks.
Dynamic Strikethrough: Using Conditional Formatting
Sometimes, you want Excel to do the heavy lifting for you. By using conditional formatting, you can set up a rule that automatically applies a strikethrough text in Excel cell style based on the value of another cell.
Step-by-Step Instructions:
- Highlight the cells you want to be automatically crossed out (e.g., task names in Column A).
- Go to the Home tab and click Conditional Formatting > New Rule.
- Select Use a formula to determine which cells to format.
- In the formula box, enter a rule like
=$B2="Done"(assuming Column B contains your status). - Click the Format button, go to the Font tab, and check the Strikethrough box.
- Click OK on both windows to apply the rule.
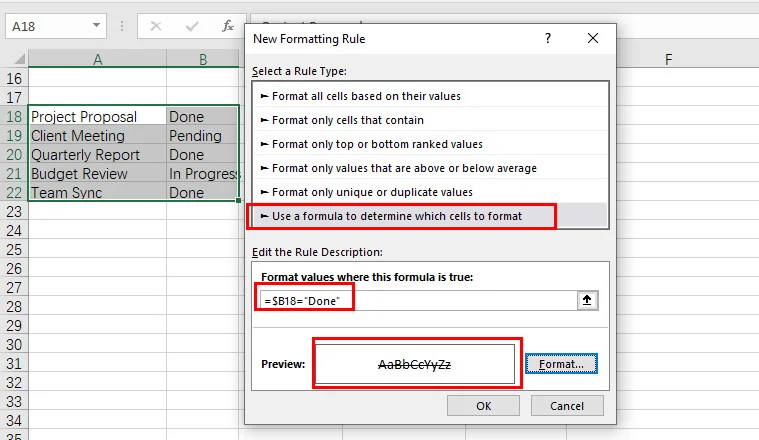
Now, whenever you type "Done" in Column B, the corresponding task in Column A will be instantly struck through. This is the smartest way to strikethrough text in an Excel cell without lifting a finger once the setup is complete.
Programmatic Strikethrough: Using Free Spire.XLS for Python
For developers and data analysts, manual clicking is not an option when dealing with thousands of generated reports. In these cases, using a robust library like Free Spire.XLS allows you to automate how to do strikethrough in Excel through code.
Using Free Spire.XLS, you can programmatically define styles for specific ranges. This is particularly useful for automated financial auditing or generating before and after reports where changes need to be visually highlighted.
from spire.xls import *
from spire.xls.common import *

# Create a Workbook instance and load an Excel file
workbook = Workbook()
workbook.LoadFromFile("/input/sales report.xlsx")

# Get a worksheet
sheet = workbook.Worksheets[0]

# Apply strikethrough to specific cells
sheet.Range["H3"].Style.Font.IsStrikethrough = True
sheet.Range["H10"].Style.Font.IsStrikethrough = True

# Save the modified Excel file
workbook.SaveToFile("/output/Updated_Tasks.xlsx", ExcelVersion.Version2016)
workbook.Dispose()
The preview of the output Excel file:
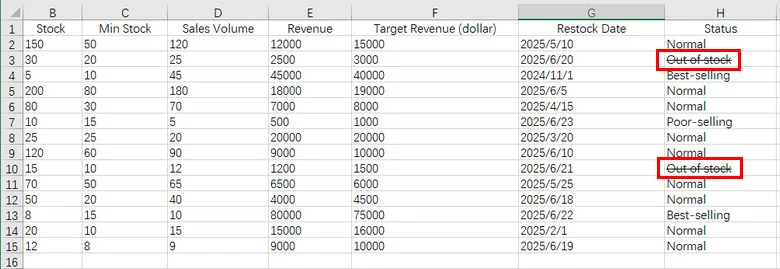
This approach allows you to apply strikethrough formatting programmatically across large datasets, ensuring consistency across enterprise-level documentation without human error.
Furthermore, Free Spire.XLS can be seamlessly combined with conditional formatting logic. For instance, in the inventory file shown above, you can write code to automatically apply a strikethrough to any cell in Column H whenever its value is set to "Out of Stock". This ensures your data remains dynamic and visually intuitive without any manual intervention.
Conclusion
Mastering how to do strikethrough in Excel is a small but powerful way to improve your data visualization and project management. Whether you prefer the speed of a shortcut for strikethrough in Excel, the precision of the Format Cells menu, or the automation power of Free Spire.XLS, there is a solution tailored to your specific workflow. By incorporating these techniques, you can transform a static spreadsheet into a functional, easy-to-read dashboard.
FAQs about Strikethrough in Excel
Q1: What is the shortcut for strikethrough in Excel?
A: Use Ctrl + 5 on Windows or Command + Shift + X on Mac. It’s a toggle, so pressing it again removes the effect.
Q2: How to strikethrough a whole row in Excel?
A: Use Conditional Formatting. Select your range and use a formula like =$B2="Done". The $ ensures the entire row is crossed out based on one cell's value.
Q3: What is the Alt code for strikethrough?
A: There is no direct Alt code, but you can use the sequence Alt > H > 4 on Windows to apply it via the ribbon menu.
Q4: Can I use Ctrl + E for strikethrough?
A: Ctrl + E is for Flash Fill. For strikethrough, you need to use Ctrl + 5.
Also Read
Count Colored Cells in Excel: 3 Easy Ways (Manual/Automation)
Table of Contents

When it comes to data management, color is often more than just a visual aid. It represents a vital layer of information. Whether you are highlighting overdue invoices in red or marking completed projects in green, these visual cues help us navigate complex datasets at a glance. However, a common frustration arises when you need to turn those colors into numbers: Excel lacks a native, one-click function to count colored cells in Excel. In this guide, we will explore three effective methods, ranging from simple manual tricks to advanced automation with Python, to help you master this essential task.
- Counting Highlighted Excel Cells Without VBA
- Count Colored Excel Cells Using Python
- Handling Conditional Formatting
Method 1: Counting Highlighted Excel Cells Without VBA
If you are dealing with a one-off report or a small dataset, you might prefer a solution that uses only the standard Excel interface. Fortunately, you can leverage built-in features to achieve accurate results without touching a single line of VBA. There are two primary manual ways to tackle this: the Filter method for dynamic counting and the Find method for a quick tally.
A. The Filter and SUBTOTAL Method
This is the most reliable manual technique for counting Excel cells by color in dynamic datasets. Unlike the standard COUNT function, SUBTOTAL can be configured to ignore hidden rows, making it the perfect partner for filters.
- Step 1: In a cell outside your data range, insert the formula
=SUBTOTAL(103, A2:A100). The code103tells Excel to count non-empty visible cells. - Step 2: Select your header row and press "Ctrl + Shift + L" to enable filters.
- Step 3: Click the filter dropdown on your colored column, select Filter by Color, and choose your target shade.

- Step 4: The formula will automatically update to show only the count of the filtered colored cells.

B. The Find and Select Method
If you just need a quick count without setting up formulas, the Find tool is surprisingly effective. This method scans the sheet for a specific format and tells you how many instances it found in the status bar.
- Step 1: Press Ctrl + F to open the Find and Replace dialog and click Options.
- Step 2: Click the small arrow next to the Format button and select Clear Find Format. This is a critical step to ensure no previous search settings interfere with your current search.
- Step 3: Click the Format... button.
- Step 4: In the popup dialog, navigate to the Fill tab.
- Step 5: Either manually select your target color or use Choose Format From Cell. If you use the sampler, quickly check the Font, Border, and Number tabs to ensure they haven't been automatically filled; if they have, clear those specific settings.

- Step 6: Ensure the Find what text box is completely empty.

- Step 7: Click Find All. You will see the total count at the bottom of the window.

Method 2: Count Colored Excel Cells Using Python (Static Fill)
While manual filters work for quick checks, they fall short when you need to process hundreds of files. This is where Free Spire.XLS for Python shines, allowing you to programmatically count highlighted cells in Excel by accessing the style properties of every cell. Since manually filled colors are stored as static attributes, the most robust approach for counting is to sample the target color from an existing reference cell.
This sampling technique ensures that colored cells in Excel are counted accurately, even if the file uses complex theme colors or custom RGB tints that are hard to define manually.
- Step 1: Load your workbook and access the specific worksheet using index.
- Step 2: Sample the ARGB value from a reference cell (e.g., B3) to define your target color.
- Step 3: Iterate through the target range to compare each cell's style and increment your count.
The following Python example demonstrates how to sample a reference cell's color to count all matching cells within a range:
from spire.xls import *
from spire.xls.common import *
# Create a Workbook object
workbook = Workbook()
# Load an Excel file
workbook.LoadFromFile(r"/input/Population.xlsx")
# Get the third worksheet
sheet = workbook.Worksheets[2]
# Sample the ARGB value from a known colored cell (B3) to ensure a perfect match
target_argb = sheet.Range["B3"].Style.Color.ToArgb()
count = 0
# Iterate through the specific range to count colored cells
for cell in sheet.Range["B1:E12"]:
if cell.Style.Color.ToArgb() == target_argb:
count += 1
# Print the result
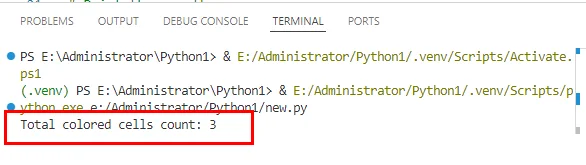
print(f"Total colored cells count: {count}")
workbook.Dispose()
The counting result:
Method 3: Handling Conditional Formatting via Logic
Static colors are straightforward, but conditional formatting is a different beast entirely. Since the color is generated dynamically based on rules, the cell’s underlying style property often remains empty. The color you see is merely a rendering layer.
To count Excel cells colored by conditional formatting, the most professional approach is to sync your logic. Instead of detecting the visual output of colored cells, you should count the underlying data that triggers the rule. This method is faster and more robust, as it bypasses the apparent rendering and prevents errors caused by varying Excel versions or themes.
- Step 1: Define your conditional formatting rule using Free Spire.XLS.
- Step 2: Use the same logical condition in your counting loop.
The following example demonstrates how to count highlighted cells in Excel based on their conditional formatting logic:
from spire.xls import *
from spire.xls.common import *
# Initialize workbook and load the source file
workbook = Workbook()
workbook.LoadFromFile(r"/input/Population.xlsx")
# Get the third worksheet
sheet = workbook.Worksheets[2]
# Define the target range for conditional formatting
data_range = sheet.Range["D3:D12"]
# Apply conditional formatting rule: Highlight cells > 10 in Red
cf = sheet.ConditionalFormats.Add()
cf.AddRange(data_range)
condition = cf.AddCondition()
condition.FormatType = ConditionalFormatType.CellValue
condition.Operator = ComparisonOperatorType.Greater
condition.FirstFormula = "10"
condition.BackColor = Color.get_Red()
# Perform logical counting synchronized with the formatting rule
count = 0
for cell in data_range:
if cell.NumberValue > 10:
count += 1
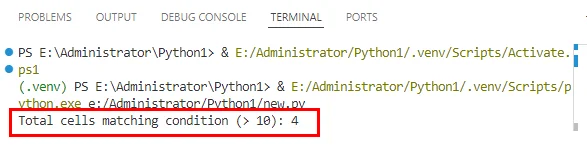
print(f"Total cells matching condition (> 10): {count}")
# Save the stylized result
#workbook.SaveToFile(r"/output/Conditional_Red_Result.xlsx", ExcelVersion.Version2016)
workbook.Dispose()
The result of counting colored cells in Excel using conditional format:
Notice: This method is ideal when the conditional formatting rules are already known. While it is technically possible to reverse-engineer underlying Excel rules via ConditionalFormats, the varying storage mechanisms across different file versions make 'Logic Sync' the most robust and high-performance approach. By bypassing complex API calls, this practice guarantees accuracy in your results.
Conclusion
Mastering how to count colored cells in Excel helps bridge visual formatting and reliable data analysis. For simple scenarios, built-in filters may be enough; for complex workflows, logic-based solutions like Free Spire.XLS provide better accuracy and scalability. By shifting from manual color counting to rule-driven reporting, your spreadsheets become a more dependable source of truth.
Also Read
How to Lock Excel Cells: Manual & Python Automation Guide

Protecting your data from accidental changes is a fundamental skill for anyone managing sensitive information. Whether you are building a financial model or a shared tracking sheet, knowing how to lock Excel cells ensures that your core data and complex calculations remain intact. This guide will walk you through the standard manual methods and advanced Python techniques to secure your spreadsheets effectively, helping you understand how to lock a cell in Excel with precision.
- Locking Cells in MS Excel
- Locking Cells in Excel via Spire.XLS for Python
- Lock Cells with Formula with Spire.XLS
- Troubleshooting & Tips
1. The Manual Method: Locking Cells in MS Excel
For most daily tasks, the built-in interface in Microsoft Excel is the quickest way to safeguard your work. It is designed for accessibility, allowing users to toggle protection settings through a few clicks in the ribbon. Understanding the workflow is essential, as it establishes the core logic of Excel's security layers.
1.1 Lock All Cells in a Worksheet
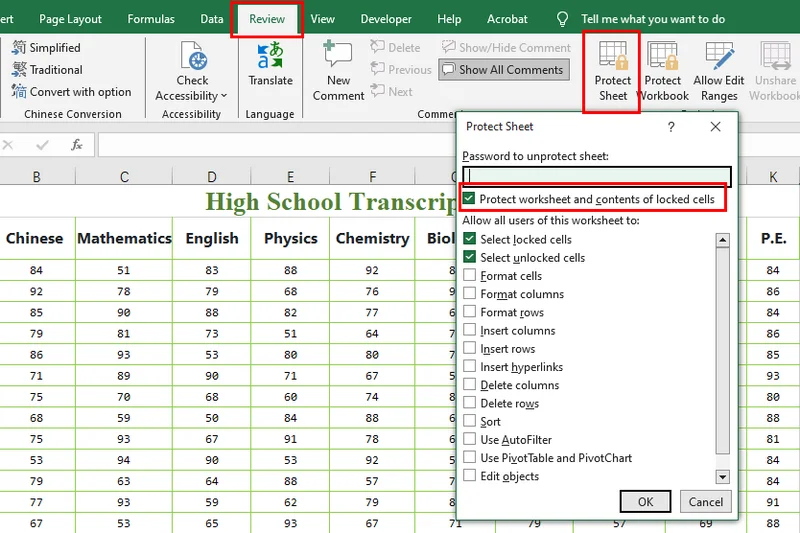
By default, every cell in an Excel sheet is technically marked as "Locked," but this property remains dormant until worksheet protection is activated. This global approach is ideal for creating read-only distributions where no data should be modified. To apply a total lock, follow these steps:
-
Open your Excel workbook and navigate to the Review tab on the top ribbon.
-
Click the Protect Sheet button.
-
In the pop-up window, enter an optional password and ensure the box "Protect worksheet and contents of locked cells" is checked.
- Click OK and confirm your password. This is the simplest way when you want to lock a cell in Excel for a secure, final document.
1.2 How to Lock Certain Cells in Excel
In many professional scenarios, you need users to enter data in specific cells while keeping headers and core values protected. This requires reversing the default settings so that only a chosen selection remains restricted. This selective approach is the most common answer to locking certain cells in Excel without hindering user collaboration:
-
Select the entire worksheet (click the triangle in the top-left corner or press Ctrl + A).
-
Right-click any cell, select Format Cells, go to the Protection tab, and uncheck Locked. (All cells are now editable).
-
Highlight only the specific cells or ranges you wish to protect.
-
Right-click the selection, return to Format Cells > Protection, and check the Locked box.
-
Go to the Review tab and click Protect Sheet to activate these restrictions.

1.3 How to Lock the Cell in Excel with Formula
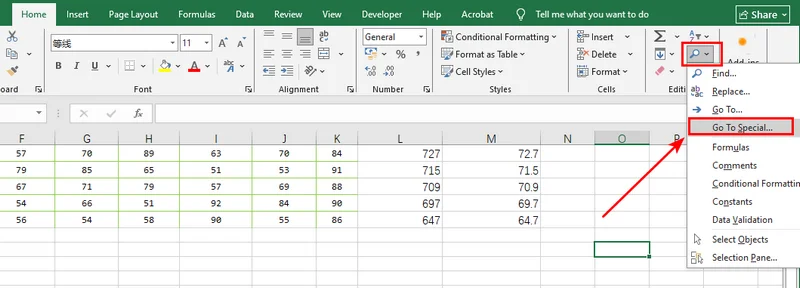
Formulas are the brain of your spreadsheet. After you insert formulas into Excel, protecting them from accidental overwrites becomes essential for maintaining long-term accuracy. Instead of checking for every calculation manually, Excel offers a specialized tool to identify them instantly. To lock the cell in Excel with a formula ensures your logic remains tamper-proof:
-
Select all cells in your worksheet, go to Format Cells > Protection, and uncheck Locked so the sheet starts as fully editable.
-
On the Home tab, click Find & Select in the Editing group and choose Go To Special.
- Select the Formulas radio button and click OK; Excel will automatically highlight every cell containing a calculation.
-
With the formulas still highlighted, right-click one of them, choose Format Cells, and check the Locked box.
-
Finally, navigate to the Review tab and select Protect Sheet to lock down your calculations while leaving raw data cells open for input.

2. Locking Cells in Excel via Free Spire.XLS for Python
Manual clicking quickly becomes a liability when managing hundreds of files or dynamic reports. By using a Python library like Free Spire.XLS, you can implement robust protection using either specific coordinates or the allocated range to target only cells containing actual content. This programmatic approach is perfect for developers who need to enforce data integrity across massive datasets. To achieve a professional lock of certain cells in Excel automatically, you can utilize the following script, which offers the flexibility to protect specific coordinates or the entire used area via simple comment toggles:
from spire.xls import *
from spire.xls.common import *

# Specify the file path
inputFile = "/input/sample.xlsx"
outputFile = "/output/LockAllUsedCells.xlsx"

# Create a Workbook instance and load the file
workbook = Workbook()
workbook.LoadFromFile(inputFile)

# Get the first worksheet
sheet = workbook.Worksheets[0]

# Use AllocatedRange to get all cells that contain data or formatting
usedRange = sheet.AllocatedRange

# Lock a specific cell in the sheet
#sheet.Range["A1"].Text = "Locked"
#sheet.Range["A1"].Style.Locked = True

# Lock a specific range of cells in the sheet
#sheet.Range["C1:E3"].Text = "Locked"
#sheet.Range["C1:E3"].Style.Locked = True

# Set the range to locked
usedRange.Style.Locked = True

# Set sheet protection for locking
sheet.Protect("123456", SheetProtectionType.All)

# Save the result file
workbook.SaveToFile(outputFile, ExcelVersion.Version2013)
workbook.Dispose()
The preview of the Excel file modified with Free Spire.XLS for Python:
3. How to Lock a Cell in Excel with Formula Using Free Spire.XLS
Static ranges are easy to protect, but relying on fixed addresses can lead to security gaps if your data structure evolves or expands. The most efficient solution is to programmatically scan the workbook using the HasFormula property, which identifies calculations regardless of their position.
This API-driven approach effectively replicates the manual "Go To Special" feature with speed and repeatability, offering a professional way to lock cells in Excel with a formula. To implement this dynamic protection, you can use the following script to iterate through the used area and secure every formula automatically:
from spire.xls import *
from spire.xls.common import *

# Define input and output paths
inputFile = "/input/sample.xlsx"
outputFile = "/output/LockFormulaCells.xlsx"

# Create a Workbook instance and load the file
workbook = Workbook()
workbook.LoadFromFile(inputFile)

# Get the first worksheet
sheet = workbook.Worksheets[0]

# Iterate through all used cells in the worksheet
for cell in sheet.AllocatedRange:
    # Check if the cell contains a formula
    if cell.HasFormula:
        # Lock the cell if it contains a formula
        cell.Style.Locked = True
    else:
        # Unlock the cell if it's just data, so users can still edit it
        cell.Style.Locked = False

# Apply protection with a password to make the locking effective
sheet.Protect("123456", SheetProtectionType.All)

# Save the result file
workbook.SaveToFile(outputFile, ExcelVersion.Version2013)
workbook.Dispose()
4. Troubleshooting & Tips
To ensure your protection works flawlessly, keep these essential tips in mind for both manual and programmatic methods:
Common Pitfalls in MS Excel
-
The "Two-Step" Rule: To activate protection, always perform both: (1) Check the "Locked" box in Format Cells and (2) Click "Protect Sheet" in the Review tab.
-
Default Locking: Remember that Excel locks all cells by default. If you want to lock only a few, you must first select the whole sheet and uncheck "Locked" before targeting your specific cells.
-
Overlapping Permissions: If you allow "Select locked cells" in the Protection menu, users can still click them, which sometimes leads to confusion about whether the lock is active.
Performance & Logic in Python
-
Activation: Just like the manual method,
Style.Locked = Trueonly flags a cell. You must callWorksheet.Protect()in your code to turn the key. -
Optimization: Use
Worksheet.AllocatedRangeto ensure your script only processes cells that actually contain data.
Password Security
-
Unlocking Difficulty: Free Spire.XLS and Excel use strong encryption. If you set a password, store it safely; recovering a protected sheet without it is nearly impossible.
-
Read-Only vs. Locked: Locking cells prevents editing, but if you need to hide formulas entirely, remember to check the "Hidden" box in the "Format Cells" menu as well.
Conclusion
Mastering how to lock Excel cells is a vital step in maintaining the security and professionalism of your digital workspace. Whether you prefer the visual simplicity of the MS Excel ribbon for one-off tasks or the scalable power of Free Spire.XLS for Python automation, the core principles remain the same: unlock your inputs, lock your logic, and always enable sheet protection. If you are ready to streamline your data management, start by applying these protection strategies to your most critical workbooks today.
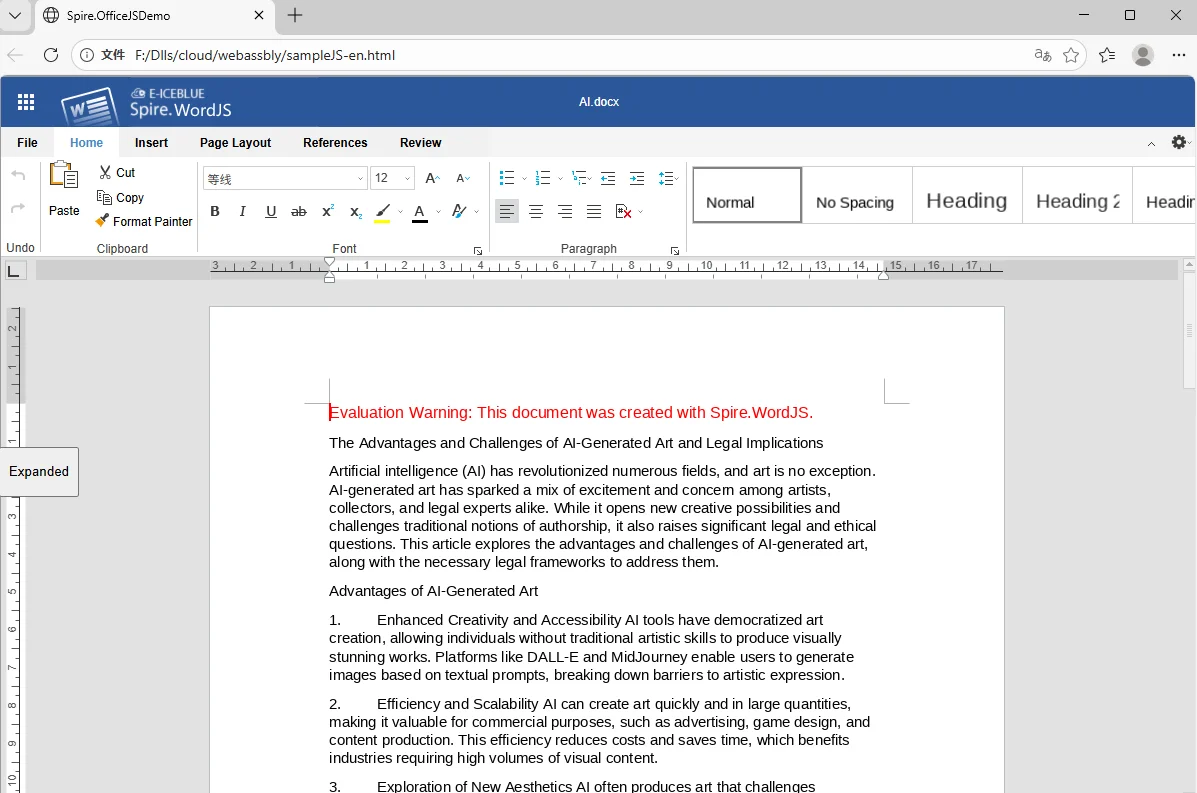
How to Integrate Spire.OfficeJS into JavaScript
Spire.OfficeJS is a powerful front-end JavaScript library that enables users to edit, preview, and process Office documents directly in a web browser—without plugins and without installing local tools such as Microsoft Office or WPS.
This article explains how to use Spire.OfficeJS in a native JavaScript environment.
Spire.OfficeJS consists of four modules:
- Spire.WordJS: Provides preview and editing capabilities for Word documents, with full compatibility with Microsoft Word and WPS formats, such as .doc, .docx, .wps, and .wpt.
- Spire.ExcelJS: Enables preview and editing of Excel documents, including formats such as .xls, .xlsx, .et, and .ett.
- Spire.PresentationJS: Supports preview and editing of PowerPoint documents, including .ppt and .pptx.
- Spire.PDFJS: Provides preview functionality for PDF documents.
Table of Contents
Preparation
Spire.OfficeJS is powered by a web service. To use it in a native JavaScript environment, you must first start the web service.
The service is launched using scripts included in the product package, with the default service port set to 8001.
Step 1. Download and Extract the Installation Package
Download the Spire.OfficeJS package for your operating system, and extract it to a local directory.
Step 2. Start the Web Service
- Windows
In the extracted product directory, run the run_servers.bat file. The terminal output will be similar to the following:
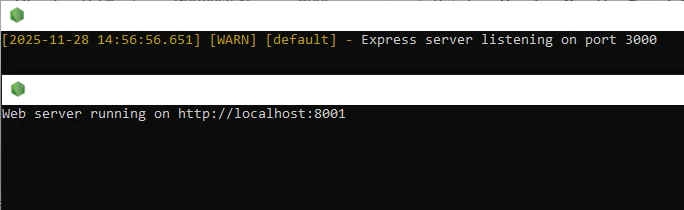
Note: Port 3000 is used by the sample document management system. By default, you can access it in a browser at localhost:3000 or 127.0.0.1:3000 for testing.
- Linux (x86_64)
Run the run_servers.sh file in the extracted product directory using the command sh run_servers.sh start (to stop the service, use sh run_servers.sh stop; to restart the service, use sh run_servers.sh restart).
The terminal output is shown below:

Step 3. Configure the Service Address
By default, the service uses 127.0.0.1. You can modify the baseUrl value in the example\config\default.json file to a domain name or an actual IP address, so that the service can be accessed via a domain or IP address.
After making the change, restart the service for the configuration to take effect.
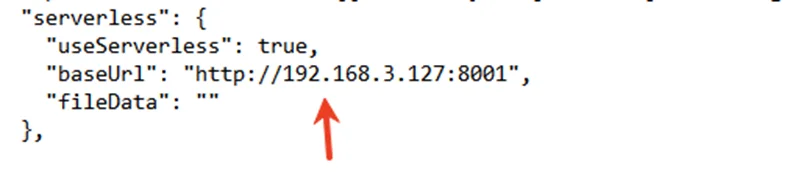
Now, the client can access the sample system using the configured IP address or domain name, for example: 192.168.3.127:3000
JavaScript Integration Examples:
- Browser Preview Integration (HTML):
Script file:
To help you get started quickly, you can download the complete HTML example file using the link below and open it directly in your browser:
Demo Download
- Parameter Description:
| Parameter | Example Description | Value | ||
| fileAttrs | File Configuration Object | |||
| fileInfo | File Information Object | |||
| name | File Name Optional | Optional | ||
| ext | Document Name | docx,xlsx,pptx | ||
| primary | Document Unique Identifier | Optional | ||
| creator | Document Creator | Optional | ||
| createTime | Document Creation Time | Optional | ||
| sourceUrl | Document URL | Required. Must be accessible and have the appropriate access permissions. | ||
| createUrl | Template Document URL | Optional | ||
| user | User Configuration Object | |||
| id | User ID | Optional | ||
| name | User Name | Optional | ||
| editorAttrs | Editor Configuration Object | |||
| editorMode | Edit Mode Optional. Accepts 'edit' (edit) or 'view' (view). Default is 'edit'. | Optional. Accepts 'edit' (edit) or 'view' (view). Default is 'edit'. | ||
| editorWidth | Width | Optional. Default value is 100%. | ||
| editorHeight | Height | Optional. Default value is 100%. | ||
| editorType | Editor Type | Optional. If not specified, the editor type is determined automatically based on the file type. Must be set to document, spreadsheet, or presentation. | ||
| platform | Editor Platform Type | Required. Accepts 'desktop' (desktop view), 'mobile' (mobile view), or 'embedded' (embedded view). Must be set to one of: desktop, mobile, or embedded. | ||
| viewLanguage | UI Language | Optional. Accepts "en" or "zh". If not specified, the browser’s default language is used. | ||
| isReadOnly | Read-Only Mode | Default is false, allowing the document to be edited. When set to true, the document is read-only. | ||
| canChat | Chat Enabled | Default is true. When set to false, chat is disabled. | ||
| canComment | Comments Enabled | Default is true. When set to false, comments are disabled. | ||
| canReview | Track Changes Enabled | Default is true. When set to false, track changes is disabled. | ||
| canDownload | Download Allowed | Default is true, allowing downloads. When set to false, downloading is not allowed. | ||
| canEdit | Edit Allowed | Default is true, allowing editing. When set to false, editing is not allowed. | ||
| canForcesave | Force Save Enabled | Default is true. When set to false, force save is disabled. | ||
| embedded | Embedded View Configuration Object | Includes saveUrl, embedUrl, shareUrl, and toolbarDocked, used to control saving, sharing, and toolbar display in embedded mode. | ||
| saveUrl | Embedded Document Save URL | Default is empty. Can be set to a URL used to save edited content. | ||
| embedUrl | Embedded Document Access URL | Default is empty. Can be set to a URL used to open the document directly. | ||
| shareUrl | Embedded Document Share URL | Default is empty. Can be set to a URL used to share the document. | ||
| toolbarDocked | Toolbar Dock Position | Default is "top". Accepts "top" or "bottom". | ||
| events | Events | |||
| plugins | Editor Plugin Configuration Object | Default is empty. Used to extend editor functionality. | ||
| pluginsData | Plugin Data Array | Default is empty. Plugins can be added as needed. | ||
| useWebAssemblyDoc | Enable WebAssembly for Word Documents | Default is true, allowing Word documents to be processed in the browser. When set to false, WebAssembly support is disabled. | ||
| spireDocJsLicense | Word WebAssembly License File URL | Default is empty. Used to activate the WebAssembly functionality. | ||
| useWebAssemblyExcel | Enable WebAssembly for Excel Documents | Default is true, allowing Excel documents to be processed in the browser. When set to false, WebAssembly support is disabled. | ||
| spireXlsJsLicense | Excel WebAssembly License File URL | Default is empty. Used to activate the WebAssembly functionality. | ||
| useWebAssemblyPpt | Enable WebAssembly for PowerPoint Documents | Default is true, allowing PowerPoint documents to be processed in the browser. When set to false, WebAssembly support is disabled. | ||
| spirePresentationJsLicense | PowerPoint WebAssembly License File URL | Default is empty. Used to activate the WebAssembly functionality. | ||
| useWebAssemblyPdf | Enable WebAssembly for PDF Documents | Default is true, allowing PDF documents to be processed in the browser. When set to false, WebAssembly support is disabled. | ||
| spirePdfJsLicense | PDF WebAssembly License File | Default is empty. Used to activate the WebAssembly functionality. | ||
| spireOfficeJsLicense | OfficeJS License File | Default is empty. Used to activate all online document editing features. | ||
| serverless | Serverless Mode Configuration Object | Includes useServerless, baseUrl, and fileData, allowing the front end to upload, edit, and download documents directly. | ||
| useSeverless | Enable Serverless Mode | Default is true. When enabled, the front end can operate on documents directly. When set to false, a server-side service is required. | ||
| baseUrl | Service URL in Serverless Mode | Default is empty. Must be set to the deployed server IP address and port. | ||
| fileData | Document Data | Default is empty. Stores the uploaded file data on the front end and is used to initialize the editor. | ||
Note: Applying a license removes the default watermark and unlocks all features. If you need a license file, please feel free to contact us at any time.
Frequently Asked Questions
During the deployment and integration of Spire.OfficeJS, you may encounter certain issues. The table below lists some common problems along with their solutions for your reference. If you have any additional questions, please contact our technical support team.
| Issue | Cause | Solution |
|---|---|---|
| Unable to access the service in the browser | Service not started / Required ports not open | Verify that the service is running and ensure ports 3000 and 8001 are open |
| Page loads but displays a blank screen | Browser cache contains outdated resources | Clear the browser cache or reopen the page in private/incognito mode |
| JavaScript file fails to load | Incorrect IP address or port | Check whether the SpireCloudEditor.js script URL is correct |
| File upload fails | baseUrl is not configured with the actual deployment address |
Update the configuration file and restart the service |
| Unable to execute the script on Linux | Insufficient script permissions | Run chmod +x run_servers.sh to grant execute permissions |
Summary
At this point, you have successfully completed the deployment and integration of Spire.OfficeJS. Your system can now view and edit documents online directly in the browser, without requiring client-side installations or additional development environments.
If you would like to explore more advanced usage scenarios or learn how to integrate Spire.OfficeJS into different types of applications, please refer to the related documentation or contact our team for further guidance.
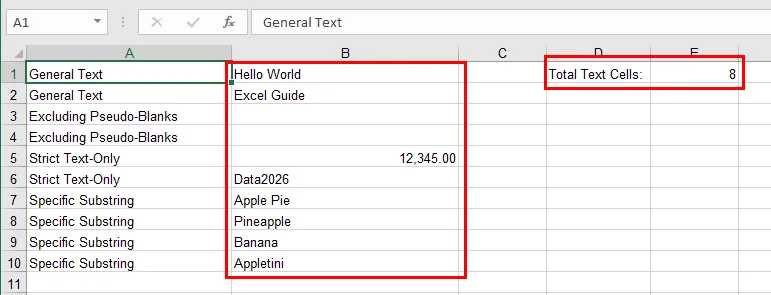
How to Count Cells with Text in Excel: A Complete Guide
Managing massive spreadsheets often feels like looking for a needle in a haystack. Whether you are cleaning raw data or preparing a financial summary, one of the most fundamental tasks is knowing how to count cells with text in Excel. While it sounds simple, the presence of numbers, hidden spaces, and formula-generated empty strings can easily lead to inaccurate results. In this guide, we will break down the most reliable Excel formulas for text counting and show you how to automate these solutions effortlessly.
- Essential Excel Formulas to Count Cells with Text
- Count Cells with Text in Microsoft Excel
- Count Cells with Text in Excel Automatically
- Dealing with Edge Cases: Common Pitfalls
Core Concepts: Essential Excel Formulas to Count Cells with Text
To master data validation, you first need to understand the mechanics of the COUNTIF function. It is the most intuitive tool when it comes to counting cells with text in an Excel file, but its true power lies in how you define your criteria.
The Foundation: Using COUNTIF for Quick Counting
The basic syntax, =COUNTIF(range, criteria), allows you to scan a dataset for specific patterns. When dealing with generic text, we use wildcards to tell Excel exactly what qualifies as "content."
Four Common Scenarios for Counting Text
Excel files often contain multiple types of data, so you may need to use one or more of the following four specialized approaches:
Scenario 1: The Standard Way (General Text)
- Formula:
=COUNTIF(range, "*") - Analysis: This is the most common Excel formula to count cells with text. The asterisk (*) acts as a wildcard that matches any text string, so only text values are counted, for example, cells containing "Apple", "Banana", or "Text123" will be included, while cells with only numbers are excluded.
Scenario 2: The Data Cleaning Way (Excluding Pseudo-Blanks)
- Formula:
=COUNTIFS(range, "*", range, "<> ") - Analysis: Some cells may appear empty but actually contain a single space character. By combining multiple criteria with
COUNTIFS, this formula counts cells that contain text while excluding values that are exactly one space. For example, entries like "Apple" or "Text123" are included, while cells containing " " are ignored. However, this approach does not exclude cells that contain two or more spaces, so it can be combined with other formulas for more precise results.
Scenario 3: The Technical Way (Strict Text-Only)
- Formula:
=SUMPRODUCT(--ISTEXT(range)) - Analysis: When a worksheet contains a mix of dates, error values (#N/A), and logical values (TRUE/FALSE), ISTEXT provides a strict way to identify text. It checks the underlying data type rather than the displayed characters, so values like "Apple" or "Text123" are counted, while dates, booleans, and errors are excluded.
Scenario 4: The Advanced Way (Specific Substrings)
- Formula:
=COUNTIF(range, "*keyword*") - Analysis: This approach is useful for log analysis or keyword tagging. By using wildcards on both sides, the formula counts cells that contain a specific substring anywhere within the text, for example, values like "error_404" or "login_error" are included when searching for "error".
How to Count Cells with Text in Microsoft Excel
Using these formulas directly in Excel offers several practical advantages. Most users already have Excel installed and are familiar with its interface, making it easy to enter formulas, navigate sheets, and quickly validate results. Applying Conditional Formatting can serve as a visual sanity check, helping you verify which cells meet the text criteria.
Steps to Count Text in Excel Using COUNTIF
-
Select a range, for example, B1:B10.
-
Enter the appropriate formula in any blank cell:
=COUNTIF(B1:B10, "*")=COUNTIF(B1:B10, "*keyword*")(optional)=COUNTIFS(B1:B10, "*", B1:B10, "<> ")(optional)
-
Press Enter and the cell shows the counting result.

Tip: If you want to see which cells are counted, you can use conditional formatting with a formula like =ISTEXT(B1) to highlight the text cells. This makes it easy to visually identify the counted entries.
How to Count Cells with Text in Excel Automatically Using Free Spire.XLS
Manual formatting is fine for one-off tasks, but what if you have 500 workbooks? This is where Free Spire.XLS shines. It allows you to inject these professional text counting logics directly into your Excel files programmatically.
Why Automate?
Automation eliminates human error and saves hours of repetitive clicking. With Free Spire.XLS, you can apply complex count formulas in Excel cells with text logic across thousands of rows in seconds.
Step-by-Step Implementation (Python Example)
Free Spire.XLS makes it easy to apply COUNTIF formulas programmatically. In this example, we count the number of text cells in a specified range and write the result directly to the worksheet.
from spire.xls import *

# Create a Workbook and load an Excel file
workbook = Workbook()
workbook.LoadFromFile("/sample.xlsx")

# Get the first worksheet
sheet = workbook.Worksheets[0]

# Specify the cell range for counting
source_range = "B1:B10"

# Count cells with text using COUNTIF
sheet.Range["D1"].Text = "Total Text Cells:"
sheet.Range["E1"].Formula = f'=COUNTIF({source_range}, "*")'

# Save the modified Excel file
workbook.SaveToFile("/Text_Count_Simple.xlsx", ExcelVersion.Version2016)
workbook.Dispose()
Here's the counting result:
Dealing with Edge Cases: Common Pitfalls
Even experienced Excel users can get tripped up by subtle data quirks. When counting text with COUNTIF, keep the following points in mind:
- Empty Strings:
Cells containing formulas like ="" return empty strings rather than true blanks. Although COUNTIF(range, "*") does not count these cells, they can still cause confusion when visually inspecting data or when using functions such as COUNTA. If necessary, LEN(A2)>0 can be used to explicitly test for non-empty text.
- Hidden Characters:
Data copied from web pages or external systems often includes non-breaking spaces (CHAR(160)), which are not removed by TRIM(). In such cases, combining SUBSTITUTE(A2, CHAR(160), "") with TRIM() helps ensure that only meaningful text is counted. You may also find converting numbers to text in Excel useful when preparing data for consistent counting.
- Incorrect Ranges:
Miscounted results are often caused by selecting the wrong cell range rather than using an incorrect formula. Always double-check the starting and ending cells, especially when comparing manual Excel results with automated outputs.
- Performance:
Using built-in Excel formulas such as COUNTIF allows Free Spire.XLS to rely on Excel’s native formula engine for calculation. This approach is significantly more efficient than iterating through each cell in code to evaluate its value, particularly when working with large worksheets.
Conclusion
Learning how to count cells with text in Excel is a small skill that yields massive dividends in data accuracy. By moving from manual formulas to Free Spire.XLS automation, you transform a tedious chore into a scalable, error-free workflow. Whether you're managing simple lists or complex databases, these tools ensure your insights are always based on clean, well-categorized data.
Ready to take your spreadsheet game to the next level? Try Free Spire.XLS and start automating your data validation with ease!
Also Read
How to Convert RTF to PDF Online and Offline (3 Proven Ways)
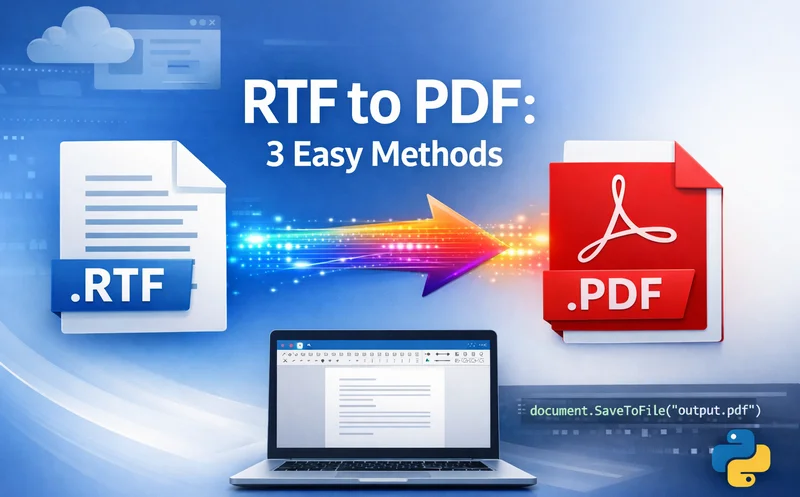
Rich Text Format (RTF) is a versatile file type for cross-platform sharing, but when it comes to professional presentation and document security, the PDF format is the industry standard. Whether you are a casual user looking for a quick fix or a developer needing a long-term solution, knowing how to convert RTF to PDF efficiently can save you significant time and effort. In this guide, we will explore three distinct methods, ranging from online tools and desktop software to automated Python scripts, to make your documents remain polished and safe.
- Online RTF to PDF Converters
- Microsoft Word Save RTF as PDF
- Automated Conversion with Free Spire.Doc for Python
- Compare the Three Methods
1. The Quickest Choice: Online RTF to PDF Converters
If you only have a single document and don't want to install new software, an online RTF-to-PDF converter is the top choice. These platforms are designed for speed and accessibility, allowing you to transfer RTF to PDF directly from your web browser. While they require an internet connection, they are incredibly user-friendly for non-technical tasks.
Option A: Convertio (A Multi-Format Hub)
Convertio is a robust all-in-one conversion site. It is ideal for users who handle various file types and want a clean, ad-free interface.

- Step 1: Visit the Convertio website and click "Choose Files" to upload your RTF document.
- Step 2: Choose PDF as the output format.
- Step 3: Click "Convert" to convert the RTF file to PDF, and then download the final PDF.
Option B: CLOUDXDOCS (Document-Centric AI Platform)
CLOUDXDOCS is a specialized hub focusing on professional document formats like Word, PDF, and RTF. Unlike general converters, it features built-in AI tools that allow you to refine or edit your content immediately after converting from RTF to PDF.

- Step 1: Navigate to the "Converter" menu on the homepage and select "RTF > PDF."
- Step 2: Upload your RTF document; the platform will automatically begin the conversion process.
- Step 3: Once finished, click "View" to preview the results or "Download" to save the PDF to your local device.
2. The Native Method: Microsoft Word "Save As" PDF
For users who already have office productivity suites installed, utilizing desktop software is the most secure and reliable way to handle documents. This method doesn't require an internet connection and provides high-quality results for maintaining complex formatting. Learning how to save RTF as PDF natively helps to preserve your fonts and margins to look the same.
Microsoft Word remains the most popular tool for this task because it handles RTF encoding natively, minimizing the risk of garbled text that sometimes occurs with low-quality converters.
How to convert an RTF file to PDF using MS Word:
- Step 1: Right-click your RTF file and select Open with > Word.
- Step 2: Once the document is open, go to the File menu in the top-left corner.
- Step 3: Go to Save As and choose PDF from the file type dropdown menu.
- Step 4: Choose your destination folder and click Save.

While MS Word is great for quick PDF exports, you might also want to transfer your files to a standard Word format permanently. If you're looking for a dedicated way to convert RTF to Word, the process is equally straightforward.
3. The Developer's Solution: Free Spire.Doc for Python
When you need to process hundreds of files or integrate document conversion into a software project, manual methods are no longer practical. Free Spire.Doc for Python offers a professional library to save RTF as PDF programmatically. Unlike the previous methods, this approach allows for total automation without needing Microsoft Word installed on your system.

This library is particularly powerful because it gives developers granular control over the RTF-to-PDF conversion process, making it the preferred choice for high-volume business environments.
How to convert RTF to PDF via Python:
- Step 1: Open your terminal and run:
pip install Spire.Doc.Freeto install the library. - Step 2: Create a Document object and load an RTF file.
- Step 3: Save the RTF file as a PDF by calling the Document.SaveToFile() method.
Here's the code example:
from spire.doc import *
from spire.doc.common import *

inputFile = "sample.rtf"
outputFile = "RtfToPDF.pdf"

# Create a Document object
doc = Document()

# Load an RTF file from disk
doc.LoadFromFile(inputFile)

# Save the RTF file as a PDF file
doc.SaveToFile(outputFile, FileFormat.PDF)
doc.Close()
Comparison: Which Method Should You Use
To help you decide which approach fits your workflow, here is a quick comparison of the three methods discussed:
| Feature | Online Converters (CLOUDXDOCS/Convertio) | Microsoft Word | Free Spire.Doc for Python |
|---|---|---|---|
| Best For | Casual users & one-off tasks | Formal, manual editing | Developers & Automation |
| Setup Required | None (Browser-based) | Software installation | Python environment & library |
| Privacy Level | Files processed on cloud servers | High (Local processing) | High (Local/Server processing) |
| Batch Processing | Limited/Manual | No (One by one) | Yes (Fully automated) |
| Internet Required | Yes | No | No |
| Cost | Free (often with daily limits) | Requires Office license | Free |
Conclusion
Choosing the right approach depends entirely on your specific needs. Online RTF to PDF converters are perfect for one-off tasks, while Microsoft Word is the go-to for offline, high-fidelity editing. However, for those looking for an automated way to save RTF as PDF within a workflow, Free Spire.Doc for Python provides a sophisticated and efficient solution. By understanding how to convert RTF to PDF through these different methods, you can ensure that your documents are always professional, portable, and perfectly formatted for your target audience.