A report whose header and total rows carry nothing but data and borders is hard to scan. Tinting those cells is the usual answer, but a flat color only goes so far: sometimes a light-to-dark sweep is what marks the important row, and sometimes a light dot or stripe texture sets the totals apart without burying the numbers underneath it. Spire.XLS for JavaScript supports both gradient and pattern fills through the Interior object, performing these operations directly in the browser through WebAssembly, managing input and output files with a virtual file system (VFS) and requiring no backend service.
This article covers two core feature points:
For installation and project setup, see Integrating Spire.XLS for JavaScript in a React Project. The examples below assume Spire.XLS is installed and the WebAssembly module has been initialized.
Apply a gradient fill to cells
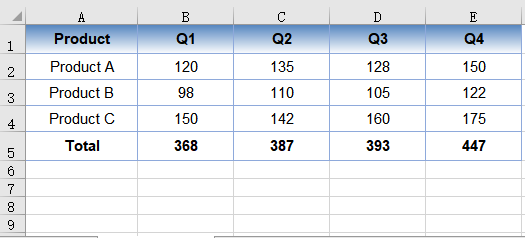
A gradient fill takes three steps: name the fill type, give the two ends their colors, and say how the transition runs. All three land on the same Interior object -- FillPattern picks the fill type, Gradient.ForeColor and Gradient.BackColor give the two ends their colors, and Gradient.TwoColorGradient takes two parameters: the direction comes from GradientStyleType, which covers horizontal, vertical, both diagonals and the spreads that radiate out from the centre or the corner, while the shading variant comes from GradientVariantsType and runs from ShadingVariants1 to ShadingVariants4. The same pair of colors reads completely differently once the direction and variant change. The steps are:
- Load the font and the sample data into the VFS.
- Create a
Workbook, load it withLoadFromFile, then get the first worksheet withWorksheets.get(0). - Take the header range with
Range.getand setStyle.Interior.FillPatterntoExcelPatternType.Gradient. - Give the two ends of the gradient their colors with
Gradient.ForeColorandGradient.BackColor. - Set the direction and the shading variant with
Gradient.TwoColorGradient. - Save the workbook with
SaveToFile.
The complete code example below shows how to apply a gradient fill to Excel cells in React:
function App() {
  const applyGradient = async () => {
    // Get the Spire.XLS WASM module
    const xlsModule = window.wasmModule?.spirexls;

    // Check if the module is ready
    if (!xlsModule) {
      alert('Spire.Xls is not ready yet');
      return;
    }

    // Load the font and the sample data into the VFS
    await window.spire.FetchFileToVFS('ARIAL.TTF', '/Library/Fonts/', `${process.env.PUBLIC_URL}/font/`);
    const inputFileName = 'FillSample_EN.xlsx';
    await window.spire.FetchFileToVFS(inputFileName, '', `${process.env.PUBLIC_URL}data/`);

    // Load the workbook and get the first worksheet
    const workbook = new xlsModule.Workbook();
    workbook.LoadFromFile({ fileName: inputFileName });
    const sheet = workbook.Worksheets.get(0);

    // Take the header row, A1:E1
    const header = sheet.Range.get('A1:E1');

    // Set the fill type to a gradient
    header.Style.Interior.FillPattern = xlsModule.ExcelPatternType.Gradient;

    // Give the two ends of the gradient their colors
    header.Style.Interior.Gradient.ForeColor = xlsModule.Color.FromArgb(255, 255, 255);
    header.Style.Interior.Gradient.BackColor = xlsModule.Color.FromArgb(79, 129, 189);

    // Two-color gradient: the first parameter sets the direction, the second the shading variant
    header.Style.Interior.Gradient.TwoColorGradient(
      xlsModule.GradientStyleType.Horizontal,
      xlsModule.GradientVariantsType.ShadingVariants1,
    );

    // Save the workbook
    const outputFileName = 'GradientFill.xlsx';
    workbook.SaveToFile({ fileName: outputFileName });

    // Dispose of the workbook object to release resources
    workbook.Dispose();

    // Read the result file from the VFS and trigger the download
    const fileArray = window.dotnetRuntime.Module.FS.readFile(outputFileName);
    const blob = new Blob([fileArray], { type: 'application/vnd.openxmlformats-officedocument.spreadsheetml.sheet' });
    const url = URL.createObjectURL(blob);
    const a = document.createElement('a');
    a.href = url;
    a.download = outputFileName;
    a.click();
    URL.revokeObjectURL(url);
  };

  return (
    <div style={{ textAlign: 'center', height: '300px' }}>
      <h1>Apply Gradient Fill</h1>
      <button onClick={applyGradient}>Start</button>
    </div>
  );
}

export default App;
After running, the effect of applying a gradient fill to the header row:
Apply a pattern fill to cells
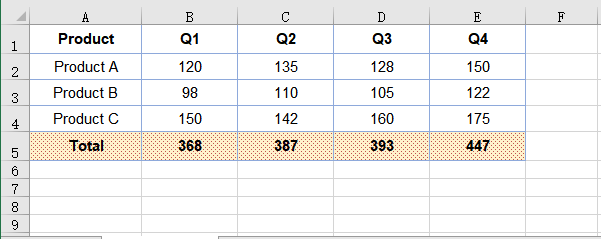
A pattern fill is not one effect but a family of built-in styles: dots, horizontal and vertical stripes, diagonals, chequerboards and more all live under ExcelPatternType, several dozen values in all, with densities running from 5% to 75%. Compared with a gradient, a pattern carries far less visual weight, so it can be laid across a whole row without getting in the way of reading, which makes it a better fit for marking a total row or setting a block of data apart.
Setting one works the same way as a gradient: Interior.FillPattern picks the style, and then two colors are needed. There is one easy trap here -- Interior.Color sets the color of the pattern itself, while Interior.PatternColor sets the backdrop underneath it, so the two property names mean the opposite of what they suggest. Give the dark color to Interior.Color and the light one to Interior.PatternColor, and the dots float on a pale ground. The steps are:
- Load the font and the sample data into the VFS.
- Create a
Workbook, load it withLoadFromFile, then get the first worksheet withWorksheets.get(0). - Take the total row with
Range.getand setStyle.Interior.FillPatternto the wantedExcelPatternTypevalue. - Give the pattern its color with
Interior.Colorand the backdrop its color withInterior.PatternColor. - Save the workbook with
SaveToFile.
The complete code example below shows how to apply a pattern fill to Excel cells in React:
function App() {
  const applyPattern = async () => {
    // Get the Spire.XLS WASM module
    const xlsModule = window.wasmModule?.spirexls;

    // Check if the module is ready
    if (!xlsModule) {
      alert('Spire.Xls is not ready yet');
      return;
    }

    // Load the font and the sample data into the VFS
    await window.spire.FetchFileToVFS('ARIAL.TTF', '/Library/Fonts/', `${process.env.PUBLIC_URL}/font/`);
    const inputFileName = 'FillSample_EN.xlsx';
    await window.spire.FetchFileToVFS(inputFileName, '', `${process.env.PUBLIC_URL}data/`);

    // Load the workbook and get the first worksheet
    const workbook = new xlsModule.Workbook();
    workbook.LoadFromFile({ fileName: inputFileName });
    const sheet = workbook.Worksheets.get(0);

    // Take the total row, A5:E5
    const total = sheet.Range.get('A5:E5');

    // Pick a built-in pattern, here a 12.5% gray dot pattern
    total.Style.Interior.FillPattern = xlsModule.ExcelPatternType.Percent125Gray;

    // Interior.Color sets the pattern itself, Interior.PatternColor the backdrop behind it
    total.Style.Interior.Color = xlsModule.Color.FromArgb(192, 80, 77);
    total.Style.Interior.PatternColor = xlsModule.Color.FromArgb(255, 242, 204);

    // Save the workbook
    const outputFileName = 'PatternFill.xlsx';
    workbook.SaveToFile({ fileName: outputFileName });

    // Dispose of the workbook object to release resources
    workbook.Dispose();

    // Read the result file from the VFS and trigger the download
    const fileArray = window.dotnetRuntime.Module.FS.readFile(outputFileName);
    const blob = new Blob([fileArray], { type: 'application/vnd.openxmlformats-officedocument.spreadsheetml.sheet' });
    const url = URL.createObjectURL(blob);
    const a = document.createElement('a');
    a.href = url;
    a.download = outputFileName;
    a.click();
    URL.revokeObjectURL(url);
  };

  return (
    <div style={{ textAlign: 'center', height: '300px' }}>
      <h1>Apply Pattern Fill</h1>
      <button onClick={applyPattern}>Start</button>
    </div>
  );
}

export default App;
After running, the effect of applying a pattern fill to the total row:
FAQ
The fill is set, so why did the cell's font style stay the same?
Cause: Style.Interior only handles the fill. Fill, font and borders are three independent members of Style, and touching one leaves the other two alone -- darken the background and the text stays the same black, which turns the cell into a smudge; recolor Style.Font and the background does not follow either.
Solution: Set the fill and the font separately, and usually change both together when contrast matters:
// Fill
sheet.Range.get('A1:E1').Style.Interior.Color = xlsModule.Color.FromArgb(79, 129, 189);

// Font
sheet.Range.get('A1:E1').Style.Font.Color = xlsModule.Color.FromArgb(255, 255, 255);
sheet.Range.get('A1:E1').Style.Font.IsBold = true;
Style.Font also carries FontName, Size, IsItalic and Underline, none of which interfere with the fill.
After filling a cell, how do I take the color off again?
Cause: Changing the color only swaps one fill for another; it does not remove the fill. The fill type is still a value other than None, so the pattern or the background color is still written into the cell's style.
Solution: Set the fill type back to ExcelPatternType.None, and the pattern and colors stop applying along with it:
sheet.Range.get('A5:E5').Style.Interior.FillPattern = xlsModule.ExcelPatternType.None;
Get a Free License
Spire.XLS for JavaScript offers a 30-day full-featured free trial license with no functional limitations. Apply here to evaluate before purchasing.
