
Textbox (6)
In the earlier tutorial, we have given a brief introduction on how to insert Textbox in Word and this article will demonstrate how to position the text vertically in a text box using Spire.Doc for .NET.
using Spire.Doc;
using Spire.Doc.Documents;
using Spire.Doc.Fields;
using System;

namespace WordTextbox
{
    class Program
    {
        static void Main(string[] args)
        {
            // Instantiate document object
            Document document = new Document();

            //Add a section
            Section section = document.AddSection();

            //Set the margin
            section.PageSetup.Margins.Left = 90;
            section.PageSetup.Margins.Right = 90;
            Paragraph paragraph = section.AddParagraph();

            //Add texbox 1
            TextBox textBox1 = paragraph.AppendTextBox(section.PageSetup.Margins.Left - 20, section.PageSetup.PageSize.Height + 20);

            //Fix the position of textbox
            textBox1.Format.HorizontalOrigin = HorizontalOrigin.Page;
            textBox1.Format.HorizontalPosition = 0;
            textBox1.Format.VerticalPosition = -10f;
            textBox1.Format.VerticalOrigin = VerticalOrigin.Page;

            //Set the text vertically
            textBox1.Format.TextAnchor = ShapeVerticalAlignment.Center;
            textBox1.Format.LayoutFlowAlt = TextDirection.LeftToRight;

            //Add text and set the font
            Paragraph textboxPara1 = textBox1.Body.AddParagraph();
            TextRange txtrg = textboxPara1.AppendText("Name_______Number_________Class__________");
            txtrg.CharacterFormat.FontName = "Arial";
            txtrg.CharacterFormat.FontSize = 10;
            txtrg.CharacterFormat.TextColor = System.Drawing.Color.Black;
            textboxPara1.Format.HorizontalAlignment = HorizontalAlignment.Center;

            //Save the document
            document.SaveToFile("Result.docx");

        }
    }
}
Namespace WordTextbox

    Class Program

        Private Shared Sub Main(ByVal args() As String)
            Dim document As Document = New Document
            Dim section As Section = document.AddSection
            section.PageSetup.Margins.Left = 90
            section.PageSetup.Margins.Right = 90
            Dim paragraph As Paragraph = section.AddParagraph
            Dim textBox1 As TextBox = paragraph.AppendTextBox((section.PageSetup.Margins.Left - 20), (section.PageSetup.PageSize.Height + 20))
            textBox1.Format.HorizontalOrigin = HorizontalOrigin.Page
            textBox1.Format.HorizontalPosition = 0
            textBox1.Format.VerticalPosition = -10!
            textBox1.Format.VerticalOrigin = VerticalOrigin.Page
            textBox1.Format.TextAnchor = ShapeVerticalAlignment.Center
            textBox1.Format.LayoutFlowAlt = TextDirection.LeftToRight
            Dim textboxPara1 As Paragraph = textBox1.Body.AddParagraph
            Dim txtrg As TextRange = textboxPara1.AppendText("Name_______Number_________Class__________")
            txtrg.CharacterFormat.FontName= "Arial"
            txtrg.CharacterFormat.FontSize = 10
            txtrg.CharacterFormat.TextColor = System.Drawing.Color.Black
            textboxPara1.Format.HorizontalAlignment = HorizontalAlignment.Center
            document.SaveToFile("Result.docx")
        End Sub
    End Class
End Namespace
Output

Insert, Read and Delete Table from Word Textbox in C#
2017-09-12 03:09:35 Written by support iceblueIn Word, textbox can contain multiple elements such as text, image and table. This article demonstrates how to insert table into word textbox, and read and delete existing table from word textbox using Spire.Doc.
Insert table
using Spire.Doc;
using Spire.Doc.Documents;
using Spire.Doc.Fields;
namespace InsertTable
{
class Program
{
static void Main(string[] args)
{
//Create a Document instance
Document document = new Document();
//Add a section
Section section = document.AddSection();
//Add a paragraph to the section
Paragraph paragraph = section.AddParagraph();
//Add textbox to the paragraph
TextBox textbox = paragraph.AppendTextBox(300, 100);
//Add text to textbox
Paragraph textboxParagraph = textbox.Body.AddParagraph();
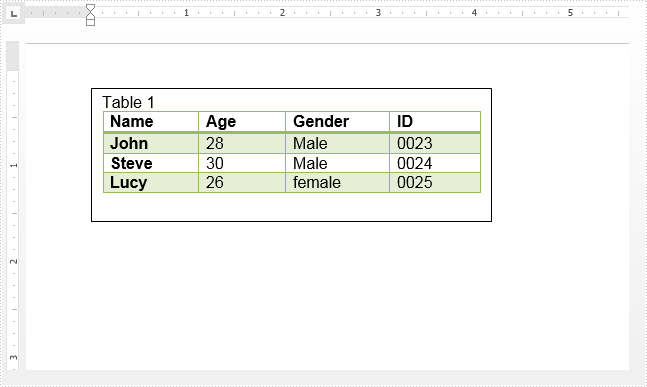
TextRange textboxRange = textboxParagraph.AppendText("Table 1");
textboxRange.CharacterFormat.FontName = "Arial";
//Insert table to textbox
Table table = textbox.Body.AddTable(true);
//Specify the number of rows and columns of the table
table.ResetCells(4, 4);
string[,] data = new string[,]
{
{"Name","Age","Gender","ID" },
{"John","28","Male","0023" },
{"Steve","30","Male","0024" },
{"Lucy","26","female","0025" }
};
//Add data to table
for (int i = 0; i < 4; i++)
{
for (int j = 0; j < 4; j++)
{
TextRange tableRange = table[i, j].AddParagraph().AppendText(data[i, j]);
tableRange.CharacterFormat.FontName = "Arial";
}
}
//Apply style to table
table.ApplyStyle(DefaultTableStyle.LightGridAccent3);
//Save the document
document.SaveToFile("Output.docx", FileFormat.Docx2013);
}
}
}
Read table
using Spire.Doc;
using Spire.Doc.Documents;
using Spire.Doc.Fields;
using System.IO;
using System.Text;
namespace ReadTable
{
class Program
{
static void Main(string[] args)
{
//Create a Document instance and load the word document
Document document = new Document("Output.docx");
//Get the first textbox
TextBox textbox = document.TextBoxes[0];
//Get the first table in the textbox
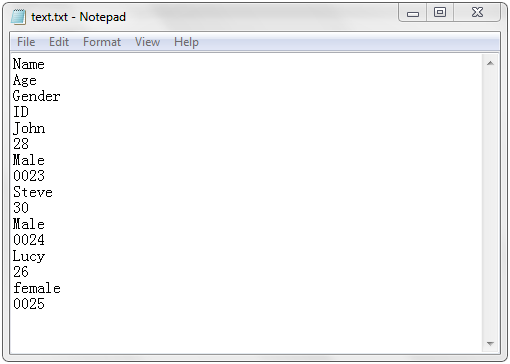
Table table = textbox.Body.Tables[0] as Table;
StringBuilder sb = new StringBuilder();
//Loop through the paragraphs of the table and extract text to a .txt file
foreach (TableRow row in table.Rows)
{
foreach (TableCell cell in row.Cells)
{
foreach (Paragraph paragraph in cell.Paragraphs)
{
sb.AppendLine(paragraph.Text);
}
}
}
File.WriteAllText("text.txt", sb.ToString());
}
}
}
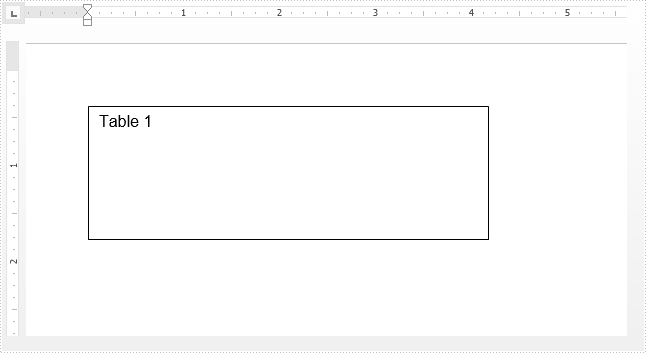
Delete table
using Spire.Doc;
using Spire.Doc.Fields;
namespace DeleteTable
{
    class Program
    {

        static void Main(string[] args)
        {
            //Create a Document instance and load the word document
            Document document = new Document("Output.docx");

            //Get the first textbox
            TextBox textbox = document.TextBoxes[0];

            //Remove the first table from the textbox
            textbox.Body.Tables.RemoveAt(0);

            //Save the document
            document.SaveToFile("RemoveTable.docx", FileFormat.Docx2013);


        }
    }
}
How to Insert Image to Text Box in Word in C#, VB.NET
2017-04-20 02:22:23 Written by support iceblueSpire.Doc supports to insert a picture to text box as a background image or as a part of body content. This article demonstrates how to achieve these purposes through following code snippets.
Part 1. Insert Background Image to Text Box
using Spire.Doc;
using Spire.Doc.Documents;
using Spire.Doc.Fields;
using System.Drawing;
namespace InsertTextBox
{
    class Program
    {

        static void Main(string[] args)
        {

            //Create a Word document
            Document doc = new Document();
            Section section = doc.AddSection();
            Paragraph paragraph = section.AddParagraph();

            //Append a Textbox to paragraph
            TextBox tb = paragraph.AppendTextBox(120, 200);

            //Set the position of Textbox
            tb.Format.HorizontalOrigin = HorizontalOrigin.Page;
            tb.Format.HorizontalPosition = 50;
            tb.Format.VerticalOrigin = VerticalOrigin.Page;
            tb.Format.VerticalPosition = 50;

            //Set the fill effect of Textbox as picture
            tb.Format.FillEfects.Type = BackgroundType.Picture;

            //Fill the Textbox with a picture
            tb.Format.FillEfects.Picture = Image.FromFile("Background.jpg");

            //Save to file
            doc.SaveToFile("InsertBackgroundImage.docx", FileFormat.Docx2013);

        }
    }
}
Output:
Part 2. Insert Image to Body of Text Box
using Spire.Doc;
using Spire.Doc.Documents;
using Spire.Doc.Fields;
using System.Drawing;
namespace InsertTextBox
{
class Program
{
static void Main(string[] args)
{
//Create a Word document
Document doc = new Document();
Section section = doc.AddSection();
Paragraph paragraph = section.AddParagraph();
//Append a Textbox to paragraph
TextBox tb = paragraph.AppendTextBox(140, 250);
//Set the position of Textbox
tb.Format.HorizontalOrigin = HorizontalOrigin.Page;
tb.Format.HorizontalPosition = 50;
tb.Format.VerticalOrigin = VerticalOrigin.Page;
tb.Format.VerticalPosition = 50;
//Insert an image to body of Textbox
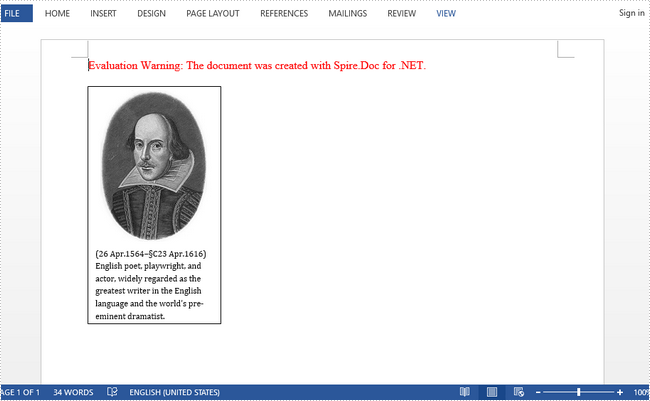
Paragraph para1 = tb.Body.AddParagraph();
Image image = Image.FromFile("Shakespeare.jpg");
DocPicture picture = para1.AppendPicture(image);
para1.Format.AfterSpacing = 8;
para1.Format.HorizontalAlignment = HorizontalAlignment.Center;
//Insert text to body of Textbox
Paragraph para2 = tb.Body.AddParagraph();
TextRange textRange = para2.AppendText("(26 Apr.1564–§C23 Apr.1616) English poet, playwright, and actor, widely regarded as the greatest writer in the English language and the world's pre-eminent dramatist.");
textRange.CharacterFormat.FontName = "Cambria";
textRange.CharacterFormat.FontSize = 9;
para2.Format.LineSpacing = 15;
para2.Format.HorizontalAlignment = HorizontalAlignment.Left;
para2.Format.SuppressAutoHyphens = true;
//Save to file
doc.SaveToFile("InsertToBody.docx", FileFormat.Docx2013);
}
}
}
Output:
In our tutorials, there are articles introducing the method to insert, remove, position text box and extract text from text box. This article is going to give the documentation of how to set the internal margin for textbox with the position and line style settings included using Spire.Doc.
Note: before start, please download the latest version of Spire.Doc and add the .dll in the bin folder as the reference of Visual Studio.
Step 1: Create a Word document and add a section.
            Document document = new Document();
            Section sec = document.AddSection();
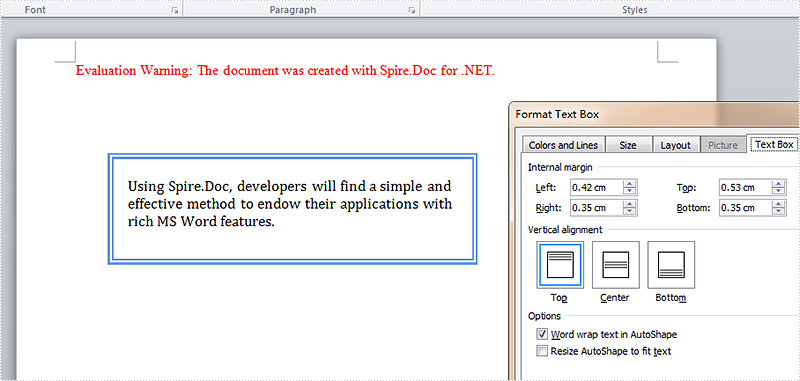
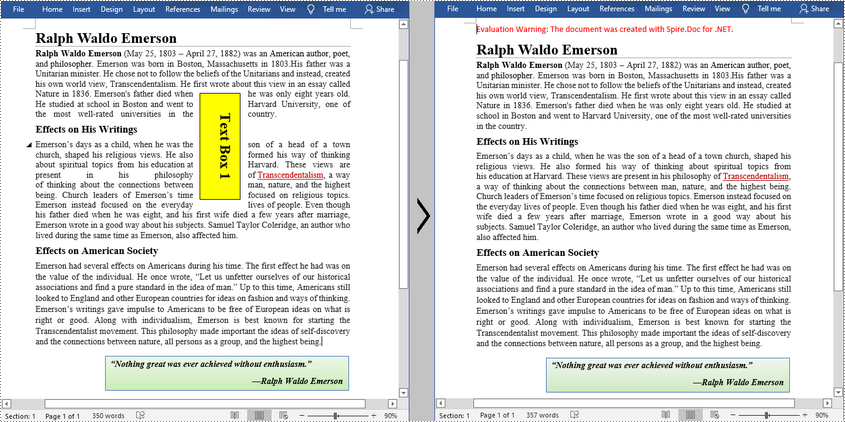
Step 2: Add a text box and append sample text.
            TextBox TB = document.Sections[0].AddParagraph().AppendTextBox(310, 90);
            Paragraph para = TB.Body.AddParagraph();
            TextRange TR = para.AppendText("Using Spire.Doc, developers will find a simple and effective method to endow their applications with rich MS Word features. ");
            TR.CharacterFormat.FontName = "Cambria ";
            TR.CharacterFormat.FontSize = 13;
Step 3: Set exact position for the text box.
            TB.Format.HorizontalOrigin = HorizontalOrigin.Page;
            TB.Format.HorizontalPosition = 80;
            TB.Format.VerticalOrigin = VerticalOrigin.Page;
            TB.Format.VerticalPosition = 100;
Step 4: Set line style for the text box.
            TB.Format.LineStyle = TextBoxLineStyle.Double;
            TB.Format.LineColor = Color.CornflowerBlue;
            TB.Format.LineDashing = LineDashing.DashDotDot;
            TB.Format.LineWidth = 5;
Step 5: Set internal margin for the text box:
            TB.Format.InternalMargin.Top = 15;
            TB.Format.InternalMargin.Bottom = 10;
            TB.Format.InternalMargin.Left = 12;
            TB.Format.InternalMargin.Right = 10;
Step 6: Save the document and launch to see effects.
            document.SaveToFile("result.docx",FileFormat.docx2013);
            System.Diagnostics.Process.Start("result.docx");
Effects:
Full Codes:
using System;
using System.Collections.Generic;
using System.Linq;
using System.Text;
using Spire.Doc;
using Spire.Doc.Documents;
using Spire.Doc.Fields;
using System.Drawing;

namespace Demo
{
    class Program
    {
        static void Main(string[] args)
        {

            Document document = new Document();
            Section sec = document.AddSection();

            TextBox TB = document.Sections[0].AddParagraph().AppendTextBox(310, 90);
            Paragraph para = TB.Body.AddParagraph();
            TextRange TR = para.AppendText("Using Spire.Doc, developers will find a simple and effective method to endow their applications with rich MS Word features. ");
            TR.CharacterFormat.FontName = "Cambria ";
            TR.CharacterFormat.FontSize = 13;

            TB.Format.HorizontalOrigin = HorizontalOrigin.Page;
            TB.Format.HorizontalPosition = 80;
            TB.Format.VerticalOrigin = VerticalOrigin.Page;
            TB.Format.VerticalPosition = 100;

            TB.Format.LineStyle = TextBoxLineStyle.Double;
            TB.Format.LineColor = Color.CornflowerBlue;
            TB.Format.LineDashing = LineDashing.DashDotDot;
            TB.Format.LineWidth = 5;

            TB.Format.InternalMargin.Top = 15;
            TB.Format.InternalMargin.Bottom = 10;
            TB.Format.InternalMargin.Left = 12;
            TB.Format.InternalMargin.Right = 10;

            document.SaveToFile("result.docx",FileFormat.docx2013);
            System.Diagnostics.Process.Start("result.docx");
        }
    }
}
Text Box has been widely used in word documents to present additional information to readers. As a powerful and easy to use .NET word component, Spire.Doc has powerful function to work with text box. We have already showed you how to insert text box to word document and extract Text from Text Boxes in Word document. In this article let's see how to remove text box from word document in C#.
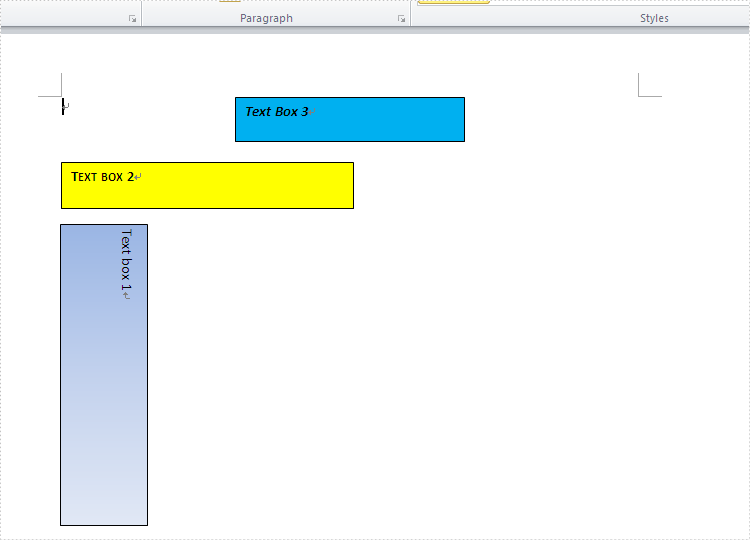
Spire.Doc supports to remove the particular text box or clear all the text boxes from the word documents. We will show you the details as below. Firstly, check the original word document contains three text boxes on it.
Here comes to the steps of how to remove the text box from word document by using the class of TextBoxes.
Step 1: Create a new document and load from file.
Document Doc = new Document();
Doc.LoadFromFile("Sample.docx");
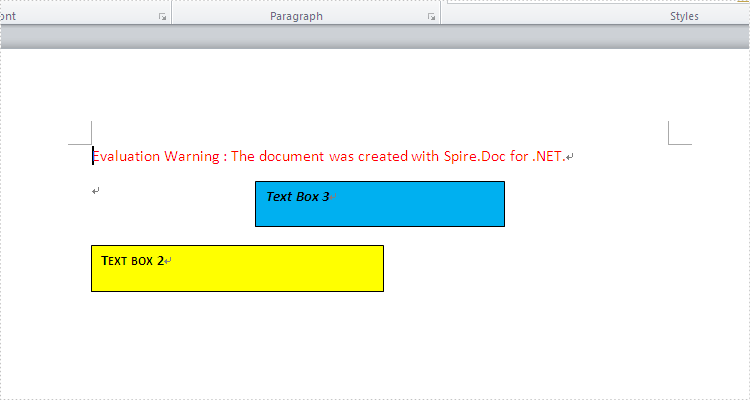
Step 2: Remove the first text box by using the class of TextBoxes.
Doc.TextBoxes.RemoveAt(0);
Step 3: Save and launch the file.
Doc.SaveToFile("result.docx", FileFormat.Docx);
System.Diagnostics.Process.Start("result.docx");
Effective screenshot:
If you want to clear all the text boxes at one time, the following code snippet will fulfill it.
Screenshot after clear all the text boxes:
Doc.TextBoxes.Clear();
Full codes:
namespace Removetextbox
{
    class Program
    {
        static void Main(string[] args)
        {
            Document Doc = new Document();
            Doc.LoadFromFile("Sample.docx");

            Doc.TextBoxes.RemoveAt(0);
            //Doc.TextBoxes.Clear();

            Doc.SaveToFile("result.docx", FileFormat.Docx);
            System.Diagnostics.Process.Start("result.docx");

        }
    }
}
A text box is a movable, resizable container for storing text or images. In Word documents, you can insert text boxes as sidebars or to bring focus to some important text, such as headings or quotes. Occasionally, you may also need to delete some mistakenly added text boxes. In this article, you will learn how to programmatically insert or remove a text box in a Word document using Spire.Doc for .NET.
Install Spire.Doc for .NET
To begin with, you need to add the DLL files included in the Spire.Doc for .NET package as references in your .NET project. The DLLs files can be either downloaded from this link or installed via NuGet.
PM> Install-Package Spire.Doc
Insert a Text Box in a Word Document
Spire.Doc for .NET provides the Paragraph.AppendTextBox(float width, float height) method to insert a text box in a specified paragraph. After the text box is inserted, Spire.Doc for .NET also provides the TextBox class for users to format the text box by setting its properties, such as Format, Body etc. The detailed steps are as follows.
- Create a Document instance, and then load a sample Word document using Document.LoadFromFile() method.
- Get the first section using Document.Sections[] property, and then add a paragraph to the section using Section.AddParagraph() method.
- Add a text box to the paragraph using Paragraph.AppendTextBox(float width, float height) method.
- Get the format of the text box using TextBox.Format property, and then set the text box's wrapping type, position, border color and fill color using the properties of TextBoxFormat Class.
- Add a paragraph to the text box using TextBox.Body.AddParagraph() method, and then set its alignment.
- Insert an image to the paragraph using Paragraph.AppendPicture() method, and then set the size of the inserted image.
- Insert text to the text box using Paragraph.AppendText() method, and then set the text font.
- Save the document to another file using Document.SaveToFile() method.
- C#
- VB.NET
using Spire.Doc;
using Spire.Doc.Documents;
using Spire.Doc.Fields;
using System.Drawing;
namespace InsertTextbox
{
class Program
{
static void Main(string[] args)
{
//Create a Document instance
Document document = new Document();
//Load a sample Word document
document.LoadFromFile("Ralph.docx");
//Insert a textbox and set its wrapping style
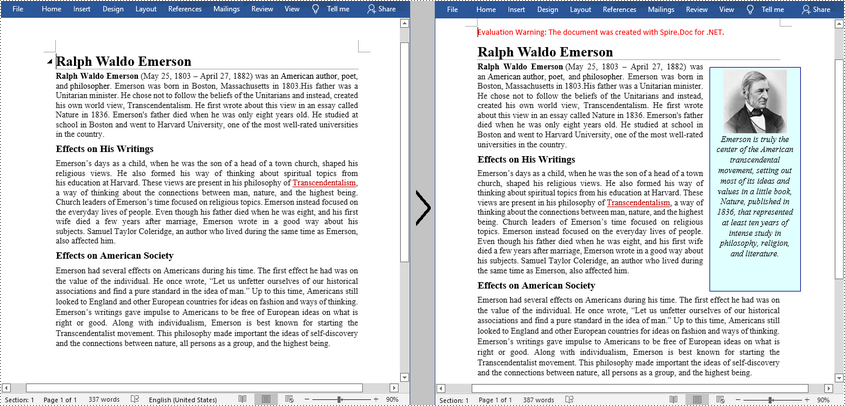
TextBox TB = document.Sections[0].AddParagraph().AppendTextBox(130, 320);
TB.Format.TextWrappingStyle = TextWrappingStyle.Square;
//Set the position of the textbox
TB.Format.HorizontalOrigin = HorizontalOrigin.RightMarginArea;
TB.Format.HorizontalPosition = -100;
TB.Format.VerticalOrigin = VerticalOrigin.Page;
TB.Format.VerticalPosition = 130f;
//Set the border style and fill color of the textbox
TB.Format.LineColor = Color.DarkBlue;
TB.Format.FillColor = Color.LightCyan;
//Insert an image to textbox as a paragraph
Paragraph para = TB.Body.AddParagraph();
DocPicture picture = para.AppendPicture(@"C:\Users\Administrator\Desktop\Ralph.jpg");
//Set alignment for the paragraph
para.Format.HorizontalAlignment = HorizontalAlignment.Center;
//Set the size of the inserted image
picture.Height = 90;
picture.Width = 90;
//Insert text to textbox as the second paragraph
TextRange TR = para.AppendText("Emerson is truly the center of the American transcendental movement, "
+ "setting out most of its ideas and values in a little book, Nature, published in 1836, "
+ "that represented at least ten years of intense study in philosophy, religion, and literature.");
//Set alignment for the paragraph
para.Format.HorizontalAlignment = HorizontalAlignment.Center;
//Set the font of the text
TR.CharacterFormat.FontName = "Times New Roman";
TR.CharacterFormat.FontSize = 12;
TR.CharacterFormat.Italic = true;
//Save the result file
document.SaveToFile("AddTextBox.docx", FileFormat.Docx);
}
}
}
Remove a Text Box from a Word Document
Spire.Doc for .NET provides the Document.TextBoxes.RemoveAt(int index) method to delete a specified text box. If you want to delete all text boxes from a Word document, you can use the Document.TextBoxes.Clear() method. The below example shows how to remove the first text box from a Word document.
- Create a Document instance.
- Load a sample Word document using Document.LoadFromFile() method.
- Remove the first text box using Document.TextBoxes.RemoveAt(int index) method.
- Save the document to another file using Document.SaveToFile() method.
- C#
- VB.NET
using Spire.Doc;

namespace Removetextbox
{
    class Program
    {
        static void Main(string[] args)
        {
            //Create a Document instance
            Document Doc = new Document();

            //Load a sample Word document
            Doc.LoadFromFile("TextBox.docx");

            //Remove the first text box
            Doc.TextBoxes.RemoveAt(0);

            //Remove all text boxes
            //Doc.TextBoxes.Clear();

            //Save the result document
            Doc.SaveToFile("RemoveTextbox.docx", FileFormat.Docx);
        }
    }
}
Apply for a Temporary License
If you'd like to remove the evaluation message from the generated documents, or to get rid of the function limitations, please request a 30-day trial license for yourself.
