
Python (363)
Converting Excel spreadsheets to image formats can be extremely valuable and versatile in a wide range of situations. Whether you need to share data with others who don’t have Excel installed on their devices, present information in a document or presentation, or publish content online, converting Excel to image format offers a convenient solution. In this article, we will introduce how to programmatically convert Excel to images in Python using Spire.XLS for Python.
- Convert an Excel Worksheet to an Image in Python
- Convert an Excel Worksheet to an Image without White Margins in Python
- Convert a Specific Cell Range to an Image in Python
Install Spire.XLS for Python
This scenario requires Spire.XLS for Python and plum-dispatch v1.7.4. They can be easily installed in your Windows through the following pip command.
pip install Spire.XLS
If you are unsure how to install, please refer to this tutorial: How to Install Spire.XLS for Python on Windows
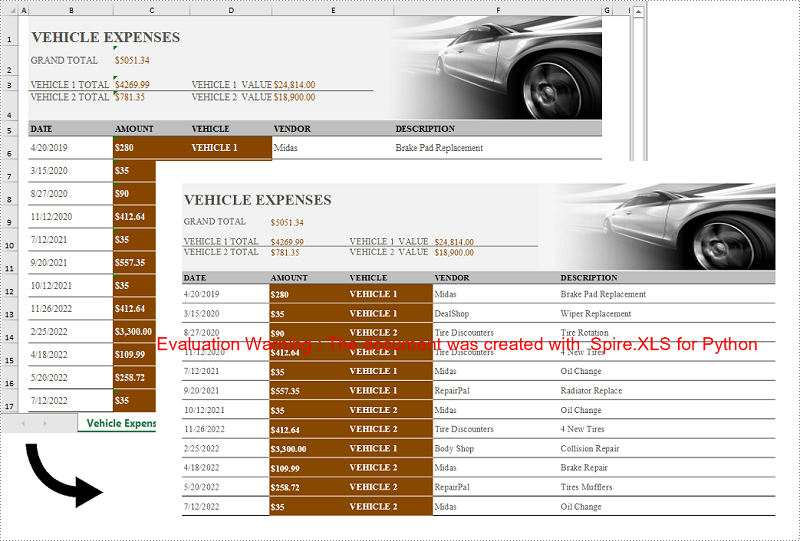
Convert an Excel Worksheet to an Image in Python
You can easily convert a whole Excel worksheet to an image by using the Worksheet.SaveToImage() method provided by Spire.XLS for Python. The detailed steps are as follows:
- Create a Workbook object.
- Load an Excel file using Workbook.LoadFromFile() method.
- Get a specific worksheet by its index using Workbook.Worksheets[int index] property.
- Convert the worksheet to an image using Worksheet.ToImage() method.
- Save the image to a PNG file (you can also save the image as other image formats such as JPG and BMP).
- Python
from spire.xls import *
from spire.xls.common import *

# Create a Workbook object
workbook = Workbook()
# Load an Excel file
workbook.LoadFromFile("Sample.xlsx")

# Get the first worksheet
sheet = workbook.Worksheets[0]

# Save the worksheet to an image
image = sheet.ToImage(sheet.FirstRow, sheet.FirstColumn, sheet.LastRow, sheet.LastColumn)
# Save the image to a PNG file
image.Save("SheetToImage.png")
workbook.Dispose()
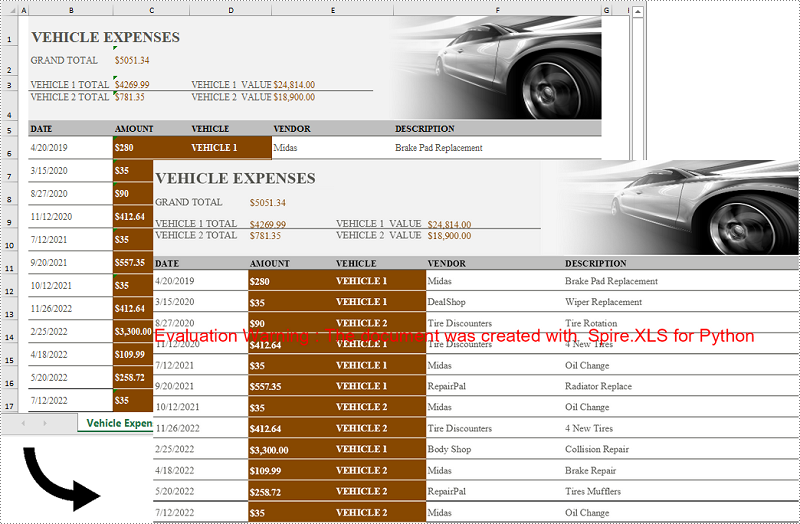
Convert an Excel Worksheet to an Image without White Margins in Python
When converting an Excel worksheet to an image, you may find the resulting image has unwanted white margins surrounding the cells. If you want to convert the worksheet to an image without any extraneous margins, you can remove the page margins set in the original worksheet. The detailed steps are as follows:
- Create a Workbook object.
- Load an Excel file using Workbook.LoadFromFile() method.
- Get a specific worksheet by its index using Workbook.Worksheets[int index] property.
- Remove all margins from the worksheet by setting its left, right, top, and bottom margin values to zero.
- Convert the worksheet to an image using Worksheet.ToImage() method.
- Save the image to a PNG file.
- Python
from spire.xls import *
from spire.xls.common import *

# Create a Workbook object
workbook = Workbook()
# Load an Excel file
workbook.LoadFromFile("Sample.xlsx")

# Get the first worksheet
sheet = workbook.Worksheets[0]

# Set all margins of the worksheet to zero
sheet.PageSetup.LeftMargin = 0
sheet.PageSetup.BottomMargin = 0
sheet.PageSetup.TopMargin = 0
sheet.PageSetup.RightMargin = 0

# Convert the worksheet to an image
image = sheet.ToImage(sheet.FirstRow, sheet.FirstColumn, sheet.LastRow, sheet.LastColumn)
# Save the image to a PNG file
image.Save("SheetToImageWithoutMargins.png")
workbook.Dispose()
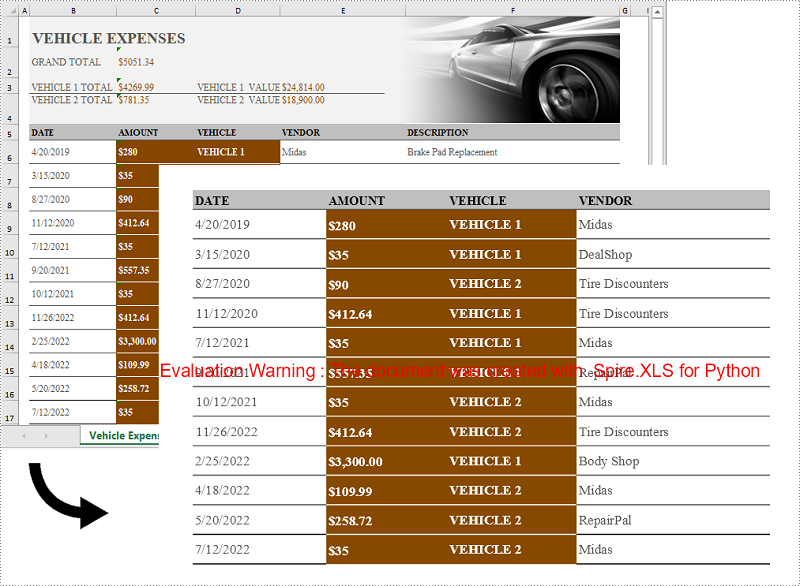
Convert a Specific Cell Range to an Image in Python
In addition to converting a whole worksheet to an image, Spire.XLS for Python also supports converting a specific cell range of a worksheet to an image. The detailed steps are as follows:
- Create a Workbook object.
- Load an Excel file using Workbook.LoadFromFile() method.
- Get a specific worksheet by its index using Workbook.Worksheets[int index] property.
- Convert a specific cell range of the worksheet to an image using Worksheet.ToImage() method and pass the index of the start row, start column, end row, and end column of the cell range to the method as parameters.
- Save the image to a PNG file.
- Python
from spire.xls import *
from spire.xls.common import *

# Create a Workbook object
workbook = Workbook()
# Load an Excel file
workbook.LoadFromFile("Sample.xlsx")

# Get the first worksheet
sheet = workbook.Worksheets[0]

# Convert a specific cell range of the worksheet to an image
image = sheet.ToImage(5, 2, 17, 5)
# Save the image to a PNG file
image.Save("CellRangeToImage.png")
workbook.Dispose()
Apply for a Temporary License
If you'd like to remove the evaluation message from the generated documents, or to get rid of the function limitations, please request a 30-day trial license for yourself.
Inserting or deleting images in Excel can be a powerful way to enhance your spreadsheets and make them visually appealing. Whether you want to include logos, charts, diagrams, or any other graphical elements, Excel provides the functionality to seamlessly integrate images into your worksheets. Additionally, Excel offers the options to manipulate and organize images, allowing you to resize, move, or delete them as needed. In this article, we will explore how to programmatically insert or delete pictures in Excel in Python by using Spire.XLS for Python.
Install Spire.XLS for Python
This scenario requires Spire.XLS for Python and plum-dispatch v1.7.4. They can be easily installed in your Windows through the following pip command.
pip install Spire.XLS
If you are unsure how to install, please refer to this tutorial: How to Install Spire.XLS for Python on Windows
Insert a Picture to a Specific Cell in Python
To add a picture to a certain cell, you use Worksheet.Pictures.Add(int topRow, int leftColumn, Image image) method. The following are the detailed steps.
- Initialize a Workbook instance.
- Get a specific worksheet through Workbook.Worksheets[sheetIndex] property.
- Insert a picture into a specific cell using Worksheet.Pictures.Add() method and return an object of ExcelPicture.
- Set the width and height of the picture, as well as the distance between the picture and the cell border through the properties under the ExcelPicture object.
- Save the workbook to an Excel file using Workbook.SaveToFile() method.
- Python
from spire.xls import *
from spire.xls.common import *

# Create a Workbook object
workbook = Workbook()

# Get the first worksheet.
sheet = workbook.Worksheets[0]

# Add a picture to a specific cell
imgPath = "C:\\Users\\Administrator\\Desktop\\logo.png"
picture = sheet.Pictures.Add(1, 3, imgPath)

# Set the picture width and height
picture.Width = 150
picture.Height = 150

# Adjust the column width and row height so that the cell can accommodate the picture
sheet.Columns[2].ColumnWidth = 25
sheet.Rows[0].RowHeight = 135

# Set the distance between cell border and image
picture.LeftColumnOffset = 90
picture.TopRowOffset = 20

# Save to file
workbook.SaveToFile("output/InsertImage.xlsx", ExcelVersion.Version2013)
workbook.Dispose()
Delete Pictures in a Worksheet in Python
A picture in a worksheet can be removed using Worksheet.Pictures[imgIndex].Remove() method. To delete all pictures, you can use a for loop to iterate through the pictures in the worksheet. The following are the detailed steps.
- Create a Workbook object.
- Load an Excel file using Workbook.LoadFromFile() method.
- Get a specific worksheet through Workbook.Worksheets[sheetIndex] property.
- Delete images in the worksheet using Worksheet.Pictures[imgIndex].Remove() method.
- Save the workbook to another Excel file using Workbook.SaveToFile() method.
- Python
from spire.xls import *
from spire.xls.common import *

# Create a Workbook object
workbook = Workbook()

# Load an Excel file
workbook.LoadFromFile("C:\\Users\\Administrator\\Desktop\\InsertImage.xlsx")

# Get the first worksheet
sheet = workbook.Worksheets[0]

# Delete all pictures from the worksheet
for i in range(sheet.Pictures.Count - 1, -1, -1):
    sheet.Pictures[i].Remove()

# Delete a specific picture
# sheet.Pictures[imgIndex].Remove()

# Save to file
workbook.SaveToFile("output/DeleteImage.xlsx", ExcelVersion.Version2013)
workbook.Dispose()
Apply for a Temporary License
If you'd like to remove the evaluation message from the generated documents, or to get rid of the function limitations, please request a 30-day trial license for yourself.
Nowadays, digital documents play a significant role in our daily lives, both in personal and professional settings. One such common format is Microsoft Word - used for creating and editing textual documents. However, there may come a time when you need to convert your Word files into a more universally accessible format, such as PDF. PDFs offer advantages like preserving formatting, ensuring compatibility, and maintaining document integrity across different devices and operating systems. In this article, you will learn how to convert Word to PDF in Python using Spire.Doc for Python.
- Convert Doc or Docx to PDF in Python
- Convert Word to Password-Protected PDF in Python
- Convert Word to PDF with Bookmarks in Python
- Convert Word to PDF with Fonts Embedded in Python
- Set Image Quality When Converting Word to PDF in Python
Install Spire.Doc for Python
This scenario requires Spire.Doc for Python and plum-dispatch v1.7.4. They can be easily installed in your Windows through the following pip command.
pip install Spire.Doc
If you are unsure how to install, please refer to this tutorial: How to Install Spire.Doc for Python on Windows
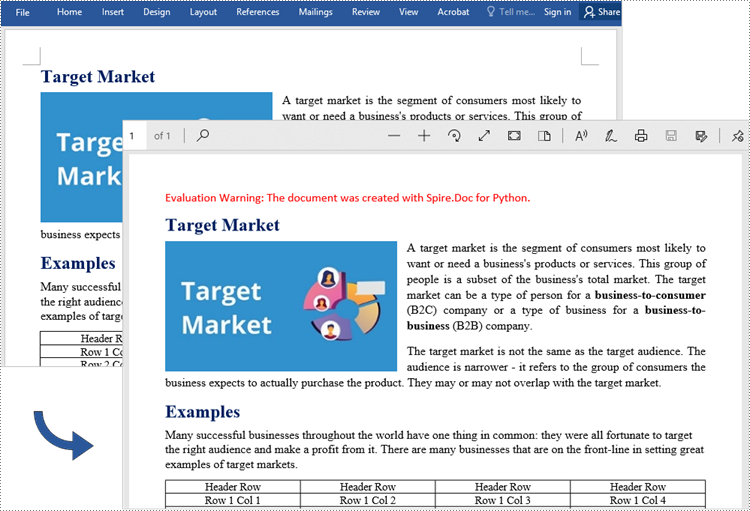
Convert Doc or Docx to PDF in Python
Spire.Doc for Python offers the Document.SaveToFile(string fileName, FileFormat fileFormat) method that allows to save Word as PDF, XPS, HTML, RTF, etc. If you just want to save your Word documents as regular PDFs without additional settings, follow the steps below.
- Create a Document object.
- Load a sample Word document using Document.LoadFromFile() method.
- Save the document to PDF using Doucment.SaveToFile() method.
- Python
from spire.doc import *
from spire.doc.common import *

# Create word document
document = Document()

# Load a doc or docx file
document.LoadFromFile("C:\\Users\\Administrator\\Desktop\\input.docx")

#Save the document to PDF
document.SaveToFile("output/ToPDF.pdf", FileFormat.PDF)
document.Close()
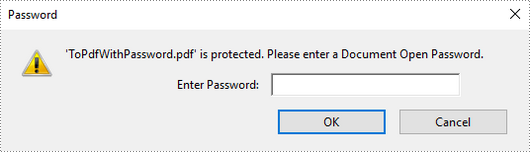
Convert Word to Password-Protected PDF in Python
To convert Word to a Password-Protected PDF, you can utilize the Document.SaveToFile(string fileName, ToPdfParameterList paramList) method, where the ToPdfParameterList parameter allows you to control the conversion process of a Word document into a PDF format. This includes options such as encrypting the document during the conversion. Here are the specific steps to accomplish this task.
- Create a Document object.
- Load a sample Word document using Document.LoadFromFile() method.
- Create a ToPdfParameterList object, which is used to set conversion options.
- Specify the open password and permission password and then set both passwords for the generated PDF using ToPdfParameterList.PdfSecurity.Encrypt() method.
- Save the Word document to PDF with password using Doucment.SaveToFile(string fileName, ToPdfParameterList paramList) method.
- Python
from spire.doc import *
from spire.doc.common import *

# Create a Document object
document = Document()

# Load a Word file
document.LoadFromFile("C:\\Users\\Administrator\\Desktop\\input.docx")

# Create a ToPdfParameterList object
parameter = ToPdfParameterList()

# Specify open password and permission password
openPsd = "abc-123"
permissionPsd = "permission"

# Protect the PDF to be generated with open password and permission password
parameter.PdfSecurity.Encrypt(openPsd, permissionPsd, PdfPermissionsFlags.Default, PdfEncryptionKeySize.Key128Bit)

# Save the Word document to PDF
document.SaveToFile("output/ToPdfWithPassword.pdf", parameter)
document.Close()
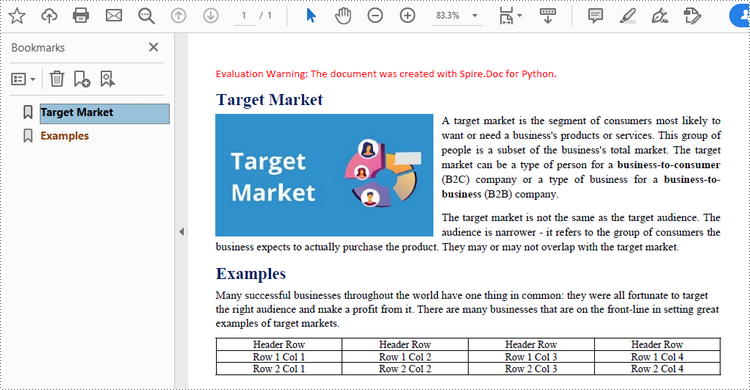
Convert Word to PDF with Bookmarks in Python
Adding bookmarks to a document can improve its readability. When creating PDF from Word, you may want to keep the existing bookmarks or create new ones based on the headings. Here are the steps to convert Word to PDF while maintaining bookmarks.
- Create a Document object.
- Load a Word file using Document.LoadFromFile() method.
- Create a ToPdfParameterList object, which is used to set conversion options.
- Create bookmarks in PDF from the headings in Word by setting ToPdfParameterList.CreateWordBookmarksUsingHeadings to true.
- Save the document to PDF with bookmarks using Doucment.SaveToFile(string fileName, ToPdfParameterList paramList) method.
- Python
from spire.doc import *
from spire.doc.common import *

# Create a Document object
document = Document()

# Load a Word file
document.LoadFromFile("C:\\Users\\Administrator\\Desktop\\input.docx")

# Create a ToPdfParameterList object
parames = ToPdfParameterList()

# Create bookmarks from Word headings
parames.CreateWordBookmarksUsingHeadings = True

# Create bookmarks in PDF from existing bookmarks in Word
# parames.CreateWordBookmarks = True

# Save the document to PDF
document.SaveToFile("output/ToPdfWithBookmarks.pdf", FileFormat.PDF)
document.Close()
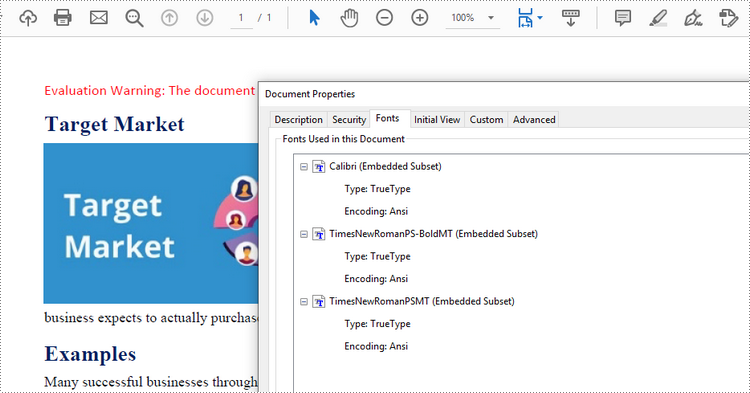
Convert Word to PDF with Fonts Embedded in Python
To ensure consistent appearance of a PDF document on any device, you probably need to embed fonts in the generated PDF document. The following are the steps to embed the fonts used in a Word document into the resulting PDF.
- Create a Document object.
- Load a sample Word file using Document.LoadFromFile() method.
- Create a ToPdfParameterList object, which is used to set conversion options.
- Embed fonts in generated PDF through ToPdfParameterList.IsEmbeddedAllFonts property.
- Save the document to PDF using Doucment.SaveToFile(string fileName, ToPdfParameterList paramList) method.
- Python
from spire.doc import *
from spire.doc.common import *

# Create a Document object
document = Document()

# Load a Word file
document.LoadFromFile("C:\\Users\\Administrator\\Desktop\\input.docx")

# Create a ToPdfParameterList object
parameter = ToPdfParameterList()

# Embed fonts in PDF
parameter.IsEmbeddedAllFonts = True

# Save the Word document to PDF
document.SaveToFile("output/EmbedFonts.pdf", parameter)
document.Close()
Set Image Quality When Converting Word to PDF in Python
When converting a Word document to PDF, it is important to consider the size of the resulting file, especially if it contains numerous high-quality images. You have the option to compress the image quality during the conversion process. To do this, follow the steps below.
- Create a Document object.
- Load a sample Word file using Document.LoadFromFile() method.
- Set the image quality through Document.JPEGQuality property.
- Save the document to PDF using Doucment.SaveToFile() method.
- Python
from spire.doc import *
from spire.doc.common import *

# Create a Document object
document = Document()

# Load a Word file
document.LoadFromFile("C:\\Users\\Administrator\\Desktop\\input.docx")

# Compress image to 40% of its original quality
document.JPEGQuality = 40

# Preserve original image quality
# document.JPEGQuality = 100

# Save the Word document to PDF
document.SaveToFile("output/SetImageQuality.pdf", FileFormat.PDF)
document.Close()
Get a Free License
To fully experience the capabilities of Spire.Doc for Python without any evaluation limitations, you can request a free 30-day trial license.
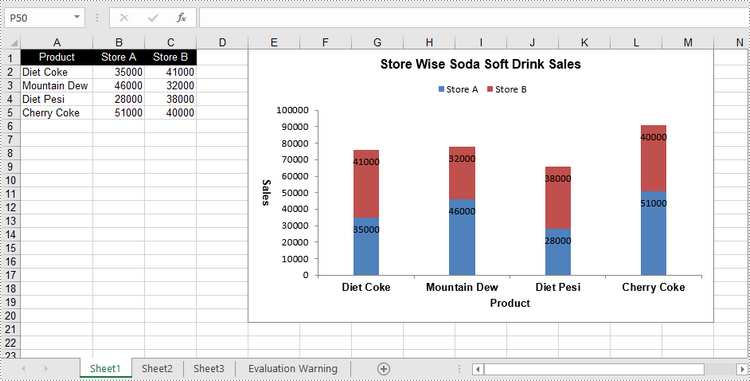
A clustered column chart and a stacked column chart are two variants of column chart. The clustered column chart enables straightforward comparison of values across different categories, while the stacked column chart displays both the total for each category and the proportion of its individual components. In this article, you will learn how to create clustered or stacked column charts in Excel in Python using Spire.XLS for Python.
Install Spire.XLS for Python
This scenario requires Spire.XLS for Python and plum-dispatch v1.7.4. They can be easily installed in your Windows through the following pip command.
pip install Spire.XLS
If you are unsure how to install, please refer to this tutorial: How to Install Spire.XLS for Python on Windows
Create a Clustered Column Chart in Excel in Python
To add a chart to a worksheet, use Worksheet.Chart.Add(ExcelChartType chartType) method. The ExcelChartType enumeration includes various chart types predefined in MS Excel. The following are the steps to add a clustered column chart in Excel using Spire.XLS for Python.
- Create a Workbook object.
- Get a specific worksheet through Workbook.Worksheets[index] property.
- Write data into the specified cells.
- Add a clustered column char to the worksheet using Worksheet.Chart.Add(ExcelChartType.ColumnClustered) method.
- Set the chart data through Chart.DataRange property.
- Set the position, title, and other attributes of the chart through the properties under the Chart object.
- Save the workbook to an Excel file using Workbook.SaveToFile() method.
- Python
from spire.xls import *
from spire.xls.common import *

# Create a Workbook object
workbook = Workbook()

# Get the first sheet
sheet = workbook.Worksheets[0]

# Set chart data
sheet.Range["A1"].Value = "Product"
sheet.Range["A2"].Value = "Diet Coke"
sheet.Range["A3"].Value = "Mountain Dew"
sheet.Range["A4"].Value = "Diet Pesi"
sheet.Range["A5"].Value = "Cherry Coke"

sheet.Range["B1"].Value = "Store A"
sheet.Range["B2"].NumberValue = 35000
sheet.Range["B3"].NumberValue = 46000
sheet.Range["B4"].NumberValue = 28000
sheet.Range["B5"].NumberValue = 51000
sheet.Range["C1"].Value = "Store B"
sheet.Range["C2"].NumberValue = 41000
sheet.Range["C3"].NumberValue = 32000
sheet.Range["C4"].NumberValue = 38000
sheet.Range["C5"].NumberValue = 40000

# Set cell style
sheet.Range["A1:C1"].RowHeight = 15
sheet.Range["A1:C1"].Style.Color = Color.get_Black()
sheet.Range["A1:C1"].Style.Font.Color = Color.get_White()
sheet.Range["A1:C1"].Style.VerticalAlignment = VerticalAlignType.Center
sheet.Range["A1:C1"].Style.HorizontalAlignment = HorizontalAlignType.Center
sheet.AutoFitColumn(1)

# Add a chart to the sheet
chart = sheet.Charts.Add(ExcelChartType.ColumnClustered)

# Set data range of chart
chart.DataRange = sheet.Range["A1:C5"]
chart.SeriesDataFromRange = False

# Set position of the chart
chart.LeftColumn = 5
chart.TopRow = 1
chart.RightColumn = 14
chart.BottomRow = 21

# Set chart title
chart.ChartTitle = "Store Wise Soda Soft Drink Sales"
chart.ChartTitleArea.IsBold = True
chart.ChartTitleArea.Size = 12

# Set axis title
chart.PrimaryCategoryAxis.Title = "Product"
chart.PrimaryCategoryAxis.Font.IsBold = True
chart.PrimaryCategoryAxis.TitleArea.IsBold = True
chart.PrimaryValueAxis.Title = "Sales"
chart.PrimaryValueAxis.HasMajorGridLines = False
chart.PrimaryValueAxis.TitleArea.IsBold = True
chart.PrimaryValueAxis.TitleArea.TextRotationAngle = 90

# Set series color, overlap, gap width and data labels
series = chart.Series
for i in range(len(series)):
    cs = series[i]
    cs.Format.Options.IsVaryColor = True
    cs.Format.Options.Overlap = -50
    cs.Format.Options.GapWidth = 350
    cs.DataPoints.DefaultDataPoint.DataLabels.HasValue = True

# Set legend position
chart.Legend.Position = LegendPositionType.Top

# Save the document
workbook.SaveToFile("ClusteredColumnChart.xlsx", ExcelVersion.Version2016)
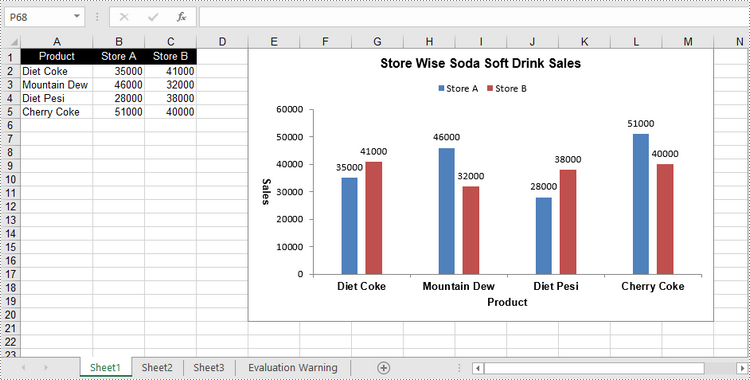
Create a Stacked Column Chart in Excel in Python
The process of creating a stacked column chart is similar to that of creating a clustered column chart. The only difference is that you must change the Excel chart type from ColumnClustered to ColumnStacked.
- Create a Workbook object.
- Get a specific worksheet through Workbook.Worksheets[index] property.
- Write data into the specified cells.
- Add a clustered column char to the worksheet using Worksheet.Chart.Add(ExcelChartType.ColumnStacked) method.
- Set the chart data through Chart.DataRange property.
- Set the position, title, and other attributes of the chart through the properties under the Chart object.
- Save the workbook to an Excel file using Workbook.SaveToFile() method.
- Python
from spire.xls import *
from spire.xls.common import *

# Create a Workbook object
workbook = Workbook()

# Get the first sheet
sheet = workbook.Worksheets[0]

# Set chart data
sheet.Range["A1"].Value = "Product"
sheet.Range["A2"].Value = "Diet Coke"
sheet.Range["A3"].Value = "Mountain Dew"
sheet.Range["A4"].Value = "Diet Pesi"
sheet.Range["A5"].Value = "Cherry Coke"
sheet.Range["B1"].Value = "Store A"
sheet.Range["B2"].NumberValue = 35000
sheet.Range["B3"].NumberValue = 46000
sheet.Range["B4"].NumberValue = 28000
sheet.Range["B5"].NumberValue = 51000
sheet.Range["C1"].Value = "Store B"
sheet.Range["C2"].NumberValue = 41000
sheet.Range["C3"].NumberValue = 32000
sheet.Range["C4"].NumberValue = 38000
sheet.Range["C5"].NumberValue = 40000

# Set cell style
sheet.Range["A1:C1"].RowHeight = 15
sheet.Range["A1:C1"].Style.Color = Color.get_Black()
sheet.Range["A1:C1"].Style.Font.Color = Color.get_White()
sheet.Range["A1:C1"].Style.VerticalAlignment = VerticalAlignType.Center
sheet.Range["A1:C1"].Style.HorizontalAlignment = HorizontalAlignType.Center
sheet.AutoFitColumn(1)

# Add a chart to the sheet
chart = sheet.Charts.Add(ExcelChartType.ColumnStacked)

# Set data range of chart
chart.DataRange = sheet.Range["A1:C5"]
chart.SeriesDataFromRange = False

# Set position of the chart
chart.LeftColumn = 5
chart.TopRow = 1
chart.RightColumn = 14
chart.BottomRow = 21

# Set chart title
chart.ChartTitle = "Store Wise Soda Soft Drink Sales"
chart.ChartTitleArea.IsBold = True
chart.ChartTitleArea.Size = 12

# Set axis title
chart.PrimaryCategoryAxis.Title = "Product"
chart.PrimaryCategoryAxis.Font.IsBold = True
chart.PrimaryCategoryAxis.TitleArea.IsBold = True
chart.PrimaryValueAxis.Title = "Sales"
chart.PrimaryValueAxis.HasMajorGridLines = False
chart.PrimaryValueAxis.TitleArea.IsBold = True
chart.PrimaryValueAxis.TitleArea.TextRotationAngle = 90

# Set series color, gap width and data labels
series = chart.Series
for i in range(len(series)):
    cs = series[i]
    cs.Format.Options.IsVaryColor = True
    cs.Format.Options.GapWidth = 270
    cs.DataPoints.DefaultDataPoint.DataLabels.HasValue = True
    cs.DataPoints.DefaultDataPoint.DataLabels.Position = DataLabelPositionType.Inside

# Set legend position
chart.Legend.Position = LegendPositionType.Top

# Save the document
workbook.SaveToFile("StackedColumnChart.xlsx", ExcelVersion.Version2016)
Apply for a Temporary License
If you'd like to remove the evaluation message from the generated documents, or to get rid of the function limitations, please request a 30-day trial license for yourself.
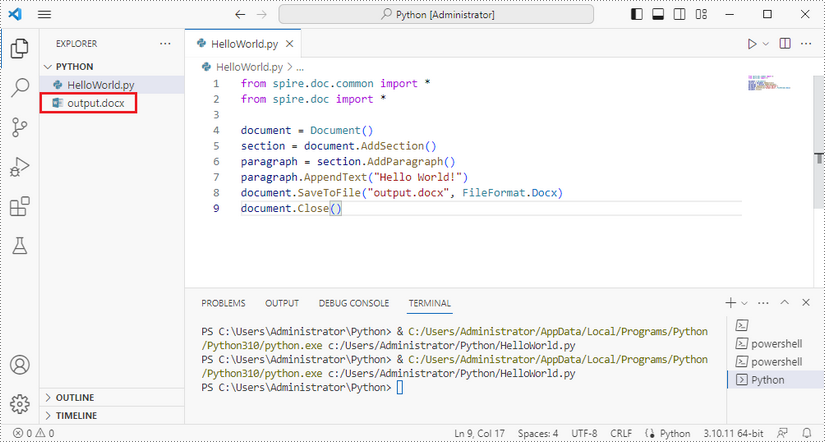
Spire.Doc for Python is a Python library for reading, creating, editing and converting Word (.doc & .docx) files in any Python application. This article shows you how to install Spire.Doc for Python on Windows.
Step 1
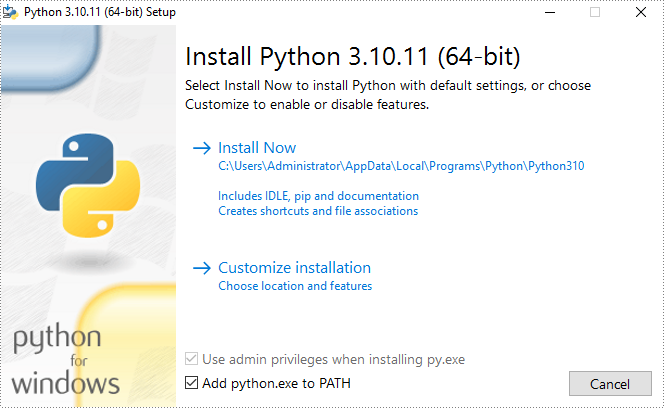
Download the latest version of Python and install it on your computer. If you have already installed it, skip to step 2.
Step 2
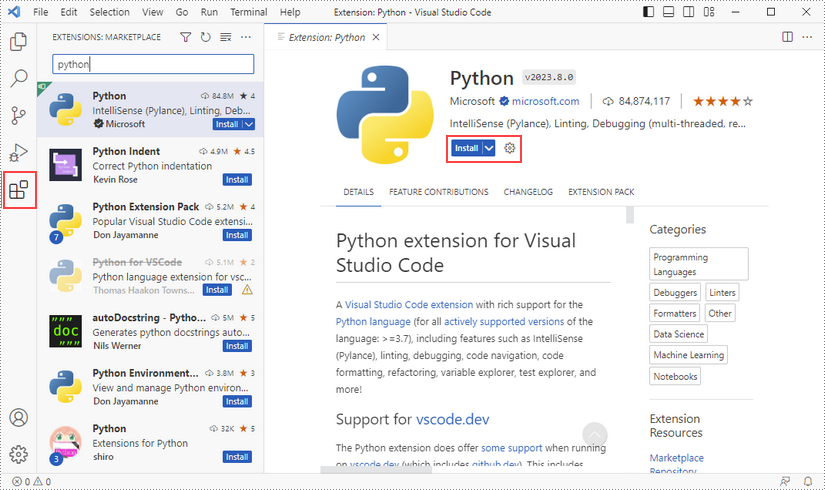
Click "Extensions" in VS Code, search for "Python" and then install it.
Step 3
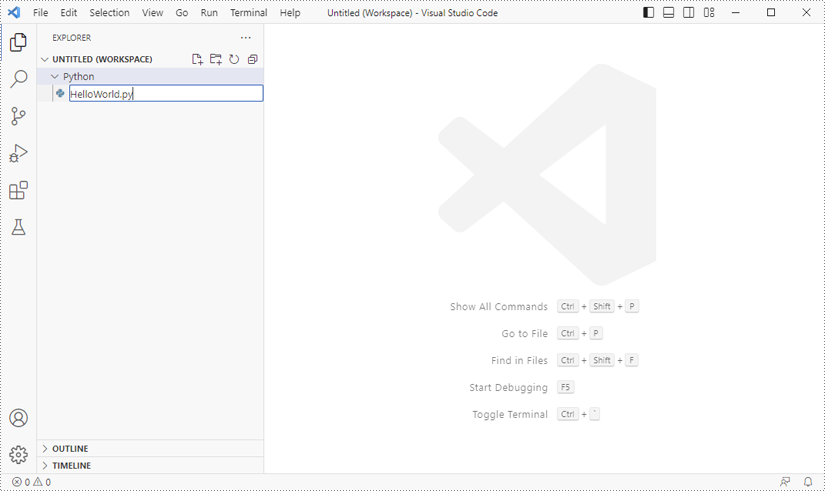
Click "Explorer" - "NO FOLRDER OPENED" - "Open Folder".
Choose an existing folder as the workspace, or you can create a new folder and then select it.
Add a .py file to the folder you just added (Python folder in this case), and name it whatever you like.
Step 4
Click "Terminal" and then "New Terminal".
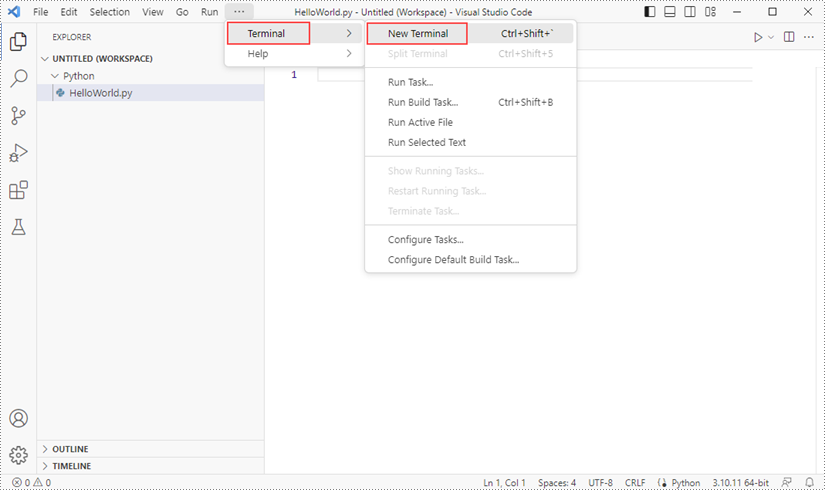
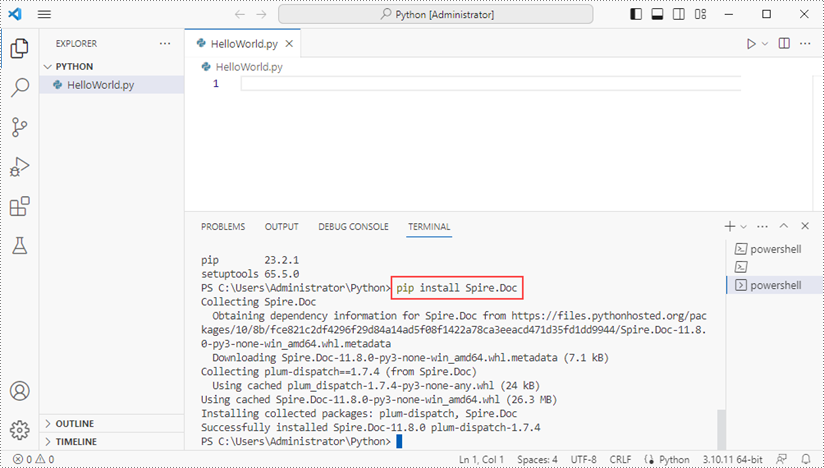
Input the following pip command to install Spire.Doc for Python and plum-dispatch v1.7.4.
pip install Spire.Doc
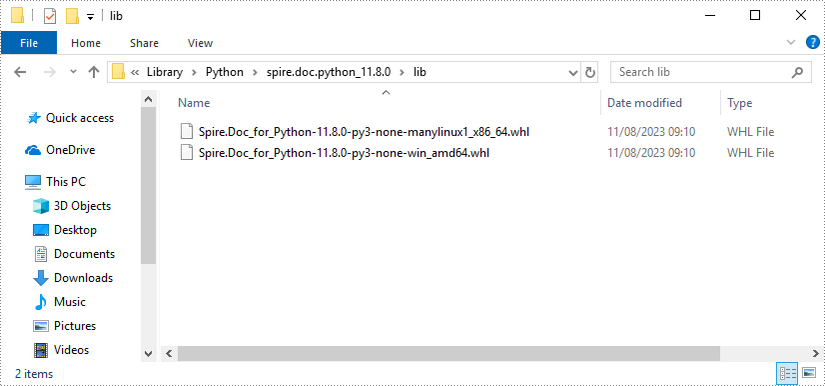
Alternatively, you can download Spire.Doc for Python from our website, and unzip it to get two .whl files from the "lib" folder. They're for Linux and Windows systems, respectively.
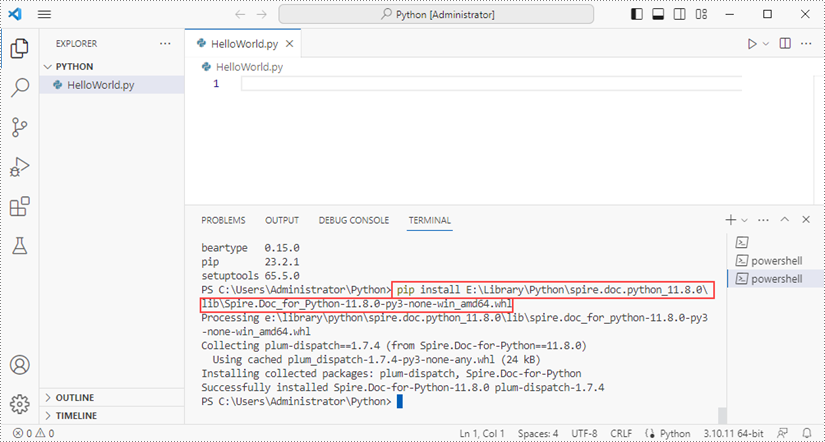
Then, install Spire.Doc for Python and plum-dispatch v1.7.4 by running the following commands.
pip install E:\Library\Python\spire.doc.python_11.8.0\lib\Spire.Doc_for_Python-11.8.0-py3-none-win_amd64.whl
Step 5
Add the following code snippet to the "HelloWorld.py" file.
- Python
from spire.doc.common import *
from spire.doc import *

document = Document()
section = document.AddSection()
paragraph = section.AddParagraph()
paragraph.AppendText("Hello World!")
document.SaveToFile("output.docx", FileFormat.Docx)
document.Close()
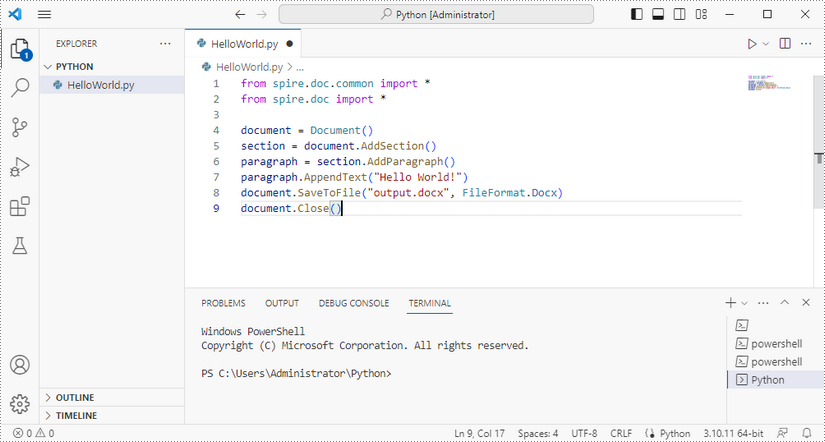
Once you run the Python file, you'll see the result Word document in the "EXPORER" panel.
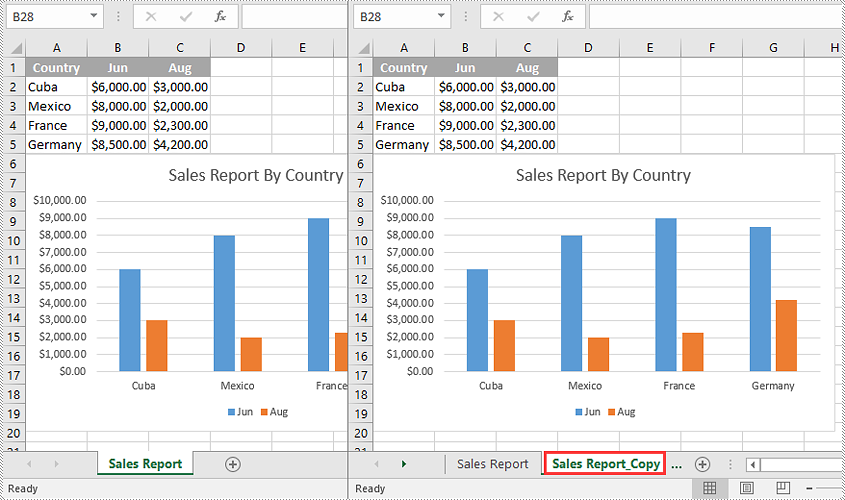
Copying worksheets in Excel is a critical skill to have, especially when you need to create new worksheets based on existing ones. By utilizing the copy function, you can avoid potential errors that may arise from manually recreating the same content. This not only saves time and effort but also ensures that your data remains accurate and reliable. In this article, we will demonstrate how to copy worksheets in Excel in Python using Spire.XLS for Python.
- Copy a Worksheet in the Same Excel Workbook
- Copy a Worksheet to Another Excel Workbook
- Copy Visible Worksheets to a New Excel Workbook
Install Spire.XLS for Python
This scenario requires Spire.XLS for Python and plum-dispatch v1.7.4. They can be easily installed in your Windows through the following pip command.
pip install Spire.XLS
If you are unsure how to install, please refer to this tutorial: How to Install Spire.XLS for Python on Windows
Copy a Worksheet in the Same Excel Workbook in Python
You can copy a worksheet within the same workbook by adding a new worksheet to the workbook and then copying the data from the original worksheet to the new one.
The following steps demonstrate how to copy a worksheet within the same workbook:
- Initialize an instance of the Workbook class.
- Load an Excel workbook using the Workbook.LoadFromFile() method.
- Get a specific worksheet using the Workbook.Worksheets[int index] property.
- Add a new worksheet to the workbook using the Workbook.Worksheets.Add() method.
- Copy the data from the specific worksheet to the new worksheet using the Worksheet.CopyFrom(Worksheet worksheet) method.
- Save the resulting workbook to another file using the Workbook.SaveToFile() method.
- Python
from spire.xls import *
from spire.xls.common import *

#Initialize an instance of the Workbook class
workbook = Workbook()
#Load an Excel workbook
workbook.LoadFromFile("Input.xlsx")

#Get the first worksheet
sourceSheet = workbook.Worksheets[0]

sheetName = sourceSheet.Name + "_Copy"

#Add a new worksheet with a specific name to the workbook
destSheet = workbook.Worksheets.Add(sheetName)

#Copy the first worksheet to the newly added worksheet
destSheet.CopyFrom(sourceSheet)

#Save the result workbook to another file
workbook.SaveToFile("CopyInSameWorkbook.xlsx", ExcelVersion.Version2013)
workbook.Dispose()
Copy a Worksheet to Another Excel Workbook in Python
To copy a worksheet from one workbook to another, you need to add a new worksheet to the destination workbook and then copy the data of the worksheet from the source workbook to the new worksheet of the destination workbook. If you want to maintain the source formatting, you can copy the theme of the source workbook to the destination workbook.
The following steps demonstrate how to copy a worksheet from one workbook to another:
- Initialize an instance of the Workbook class.
- Load the source workbook using the Workbook.LoadFromFile() method.
- Get a specific worksheet using the Workbook.Worksheets[int index] property.
- Initialize an instance of the Workbook class.
- Load the destination workbook using the Workbook.LoadFromFile() method.
- Add a new worksheet to the destination workbook using the Workbook.Worksheets.Add() method.
- Copy the specific worksheet of the source workbook to the new worksheet of the destination workbook using the Worksheet.CopyFrom(Worksheet worksheet) method.
- Copy the theme from the source workbook to the destination workbook using the Workbook.CopyTheme (Workbook srcWorkbook) method.
- Save the resulting workbook to another file using the Workbook.SaveToFile() method.
- Python
from spire.xls import *
from spire.xls.common import *

#Initialize an instance of the Workbook class
sourceWorkbook = Workbook()
#Load the source Excel workbook
sourceWorkbook.LoadFromFile("CopyWorksheets-Input.xlsx")

#Get the first worksheet of the source workbook
sourceSheet = sourceWorkbook.Worksheets[0]
#Get the name of the first worksheet
sheetName = sourceSheet.Name + "_Copy"

#Initialize an instance of the Workbook class
destWorkbook = Workbook()
 #Load the destination Excel workbook
destWorkbook.LoadFromFile("CopyWorksheets-Sample.xlsx")

#Add a new worksheet with a specific name to the destination workbook
destSheet = destWorkbook.Worksheets.Add(sheetName)

#Copy the first worksheet of the source workbook to the new worksheet of the destination workbook
destSheet.CopyFrom(sourceSheet)

#Copy the theme from the source workbook to the destination workbook
destWorkbook.CopyTheme(sourceWorkbook)

#Save the destination workbook to another file
destWorkbook.SaveToFile("CopyToAnotherWorkbook.xlsx", ExcelVersion.Version2013)

sourceWorkbook.Dispose()
destWorkbook.Dispose()
Copy Visible Worksheets to a New Excel Workbook in Python
If you only want to share visible worksheets rather than the entire workbook with others, you can copy the visible worksheets to a new workbook.
The following steps demonstrate how to copy visible worksheets from a workbook to a new workbook:
- Initialize an instance of the Workbook class.
- Load the source workbook using the Workbook.LoadFromFile() method.
- Initialize an instance of the Workbook class to create a new workbook, then clear the default worksheets in the new workbook using the Workbook.Worksheets.Clear() method.
- Iterate through all the worksheets in the source workbook.
- Check if the current worksheet is visible using the Worksheet.Visibility property.
- If the result is true, add a new worksheet to the new workbook using the Workbook.Worksheets.Add() method.
- Copy the worksheet from the source workbook to the new worksheet of the new workbook using the Worksheet.CopyFrom(Worksheet worksheet) method.
- Copy the theme from the source workbook to the new workbook using the Workbook.CopyTheme(Workbook srcWorkbook) method.
- Save the resulting workbook to another file using the Workbook.SaveToFile() method.
- Python
from spire.xls import *
from spire.xls.common import *

#Initialize an instance of the Workbook class
sourceWorkbook = Workbook()
#Load the source Excel workbook
sourceWorkbook.LoadFromFile("CopyWorksheets-Input.xlsx")

#Initialize an instance of the Workbook class to create a new workbook
newWorkbook = Workbook()
newWorkbook.Version = ExcelVersion.Version2013
#Clear the default worksheets in the new workbook
newWorkbook.Worksheets.Clear()

#Iterate through all the worksheets in the source workbook
for sourceSheet in sourceWorkbook.Worksheets:
    #Check if the current worksheet is visible
    if sourceSheet.Visibility == WorksheetVisibility.Visible:
        sheetName = sourceSheet.Name + "_Copy"
        #Add a new worksheet with a specific name to the new workbook
        destSheet = newWorkbook.Worksheets.Add(sheetName)
        #Copy the worksheet from the source workbook to the new worksheet of the new workbook
        destSheet.CopyFrom(sourceSheet)

#Copy the theme from the source workbook to the new workbook
newWorkbook.CopyTheme(sourceWorkbook)

#Save the new workbook to another file
newWorkbook.SaveToFile("CopyVisibleSheetsToNewWorkbook.xlsx", ExcelVersion.Version2013)
sourceWorkbook.Dispose()
newWorkbook.Dispose()
Apply for a Temporary License
If you'd like to remove the evaluation message from the generated documents, or to get rid of the function limitations, please request a 30-day trial license for yourself.
Convert Excel (XLSX/XLS) to CSV in Python – Batch & Multi-Sheet
2023-08-11 00:58:16 Written by Koohji
If you’re looking to convert xlsx to csv in Python, or even handle .xls files, this guide is for you. CSV files are lightweight, easy to parse, and widely supported across databases and data tools—making them ideal for automation and data exchange.
In this article, we’ll show you how to convert Excel to CSV in Python using Spire.XLS for Python. The library supports .xlsx, .xls, and other common Excel spreadsheet formats, and doesn’t rely on any third-party components. You’ll learn how to export the entire workbook, handle multiple worksheets, and ensure encoding—all with clean and efficient Python code.
What’s Covered:
- Convert XLSX to CSV in Python
- Convert Excel (XLS/XLSX) to CSV: All Sheets, Old Files & Batch
- Advanced Conversion: Customize CSV Output in Python
- Bonus Tip: Convert CSV Back to Excel (XLSX)
- Frequently Asked Questions
Convert XLSX to CSV in Python
To follow along, install Spire.XLS for Python (pip install spire.xls) or Free Spire.XLS for Python (pip install spire.xls.free) for lightweight tasks.
The most common use case is converting .xlsx files to .csv. Here’s a simple script using Spire.XLS:
from spire.xls import Workbook, FileFormat

# Initialize a workbook and load the xlsx file
workbook = Workbook()
workbook.LoadFromFile("Sample.xlsx")

# Save the workbook as a csv file
workbook.SaveToFile("output/XLSXToCSV.csv", FileFormat.CSV)
workbook.Dispose()
Result:
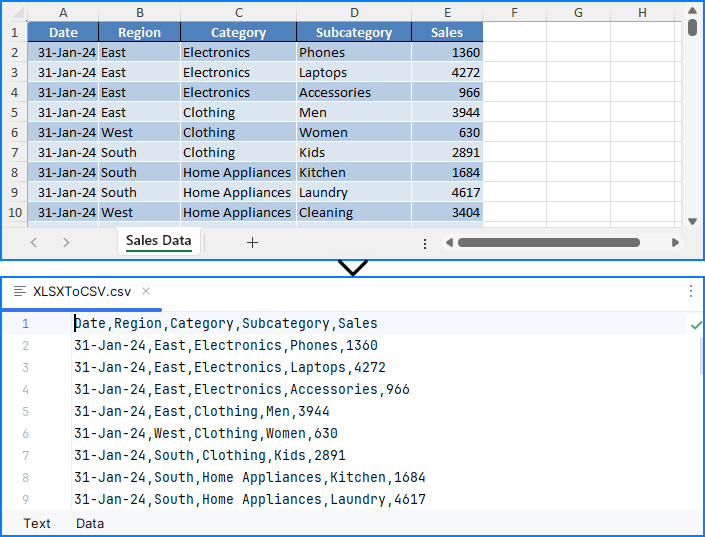
⚠️ Note: The SaveToFile() method saves only the first worksheet. If you need to convert all sheets, see the next section.
This method is perfect for simple, single-sheet Excel-to-CSV conversions in Python.
Convert Excel (XLS/XLSX) to CSV: All Sheets, Old Files & Batch
Whether you're working with modern .xlsx, older .xls, or multi-sheet Excel files, Spire.XLS offers multiple ways to export everything to CSV in Python.
Export All Worksheets to Separate CSV Files
To export every worksheet into its own CSV file—for example, monthly tabs or department data:
from spire.xls import Workbook, Encoding

# Initialize a workbook and load the Excel file
workbook = Workbook()
workbook.LoadFromFile("Sample.xlsx")

# Iterate through each sheet
for i in range(workbook.Worksheets.Count):
    # Save the current sheet to CSV format
    sheet = workbook.Worksheets.get_Item(i)
    sheet.SaveToFile(f"output/Sheets/Sheet{i}.csv", ",", Encoding.get_UTF8())
workbook.Dispose()
Result:
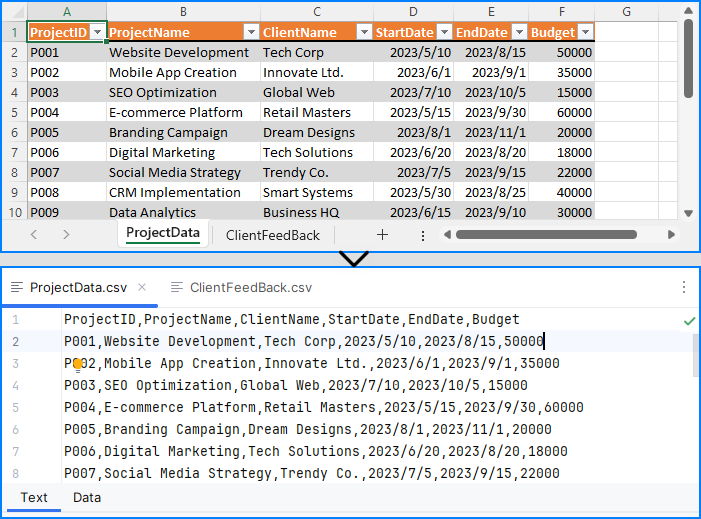
Each worksheet becomes an individual CSV, ideal for segmented data processing and distribution.
Convert XLS to CSV in Python
Legacy Excel files (.xls) are still common in many industries. Fortunately, Spire.XLS fully supports them:
workbook = Workbook()
workbook.LoadFromFile("legacy.xls")
workbook.SaveToFile("legacy_output.csv", FileFormat.CSV)
This converts the first worksheet by default. To convert all .xls sheets, apply the loop method shown above.
You may also like: Convert XLS Files to XLSX Files with Python
Batch Convert Excel Files to CSV
To automate conversion of multiple .xlsx and .xls files stored in a folder:
import os
from spire.xls import Workbook, FileFormat

excel_dir = "./excels"
output_dir = "./csvs"

for file in os.listdir(excel_dir):
    if file.endswith(".xlsx") or file.endswith(".xls"):
        workbook = Workbook()
        workbook.LoadFromFile(os.path.join(excel_dir, file))
        base_name = os.path.splitext(file)
        workbook.SaveToFile(os.path.join(output_dir, base_name + ".csv"), FileFormat.CSV)
Note: This script saves only the first worksheet. Use sheet.SaveToFile() in a loop if you want all sheets.
Advanced Conversion: Customize CSV Output in Python
Need to export only specific cells, rows, or columns from Excel to CSV? You can read worksheet content manually and write customized CSV output:
import csv
from itertools import chain

from spire.xls import Workbook

# Initialize a Workbook object and load the Excel file
workbook = Workbook()
workbook.LoadFromFile("Sample.xlsx")
# Get the first worksheet
sheet = workbook.Worksheets.get_Item(0)

# Export data to CSV
with open("output/FilteredOutput.csv", "w", newline="", encoding="utf-8") as csvfile:
    writer = csv.writer(csvfile)
    for row in range(sheet.AllocatedRange.RowCount):  # Export rows 1 to 5
        row_data = []
        for col in chain(range(0, 2), range(3, sheet.AllocatedRange.ColumnCount)):  # Export columns A to C
            row_data.append(sheet.Range.get_Item(row + 1, col + 1).Value)
        writer.writerow(row_data)
Result:
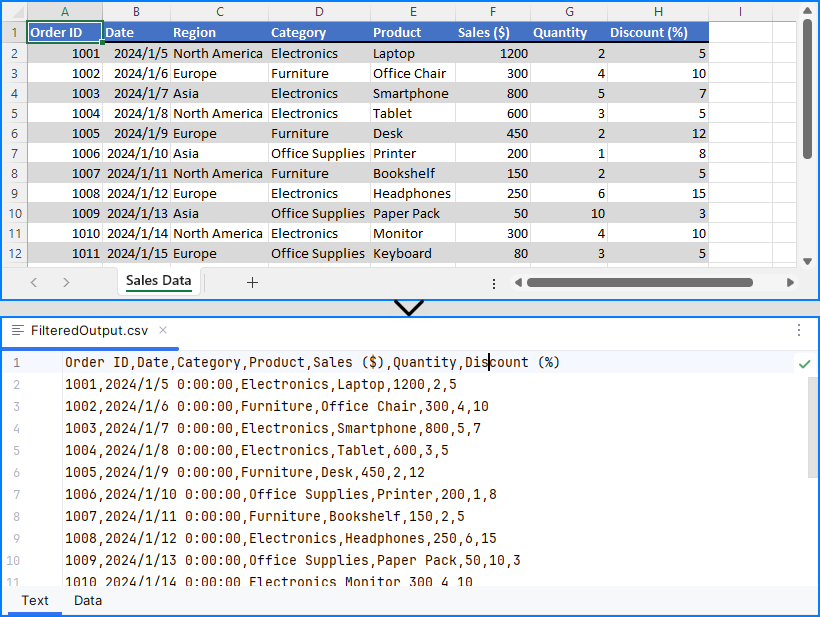
This provides full control for custom Excel to CSV conversion in Python, such as skipping headers or exporting limited ranges.
Explore More: Export & Import Data Between Excel Files and Databases | Python
Bonus Tip: Convert CSV Back to Excel (XLSX)
While this guide focuses on Excel to CSV, you can also convert CSV files back to Excel using Spire.XLS:
from spire.xls import Workbook, FileFormat

workbook = Workbook()
workbook.LoadFromFile("output.csv", ",")
workbook.SaveToFile("restored.xlsx", FileFormat.Version2016)
This is useful for restoring structured Excel files after processing raw CSV data.
Want to explore more? Check out our dedicated guide on how to convert CSV to Excel using Python for more advanced methods, formatting options, and batch conversion tips.
Frequently Asked Questions
Q1: How to convert an XLSX file to CSV in Python?
A: You can use Python libraries like Spire.XLS to load the XLSX file and save it as CSV. See the detailed steps in Convert XLSX to CSV in Python.
Q2: How to convert xlsx into csv?
A: Convert XLSX to CSV by loading the file and exporting to CSV format, either saving the first sheet or iterating through all sheets to save separately. Check Convert Excel (XLS/XLSX) to CSV: All Sheets, Old Files & Batch for multi-sheet and batch examples.
Q3: How to convert xlsx to csv from the command line?
A: While this article focuses on Python, you can create Python scripts using Spire.XLS or other libraries and run them from the command line to batch convert XLSX to CSV files. See the Batch Convert Excel Files to CSV section for related code.
Q4: How to convert Excel to text in Python?
A: Converting Excel to text typically means extracting cell values and saving them as CSV or TXT. Using libraries like Spire.XLS or pandas in Python, you can export Excel data into plain text formats easily. For more advanced output, check Advanced Conversion: Customize CSV Output in Python.
Conclusion
In this guide, you’ve learned effective ways to convert XLSX and XLS files to CSV using Python, including exporting entire workbooks or specific sheets, handling batch conversions, and restoring Excel files from CSV. You also gained insights on customizing CSV outputs by selecting precise cell ranges.
Whether you want to automate your Excel to CSV conversion in Python, process legacy Excel files, or streamline data workflows, Spire.XLS provides a robust, code-friendly solution without requiring Microsoft Excel.
Get a Free License for the Full Version
While the free version of Spire.XLS for Python covers basic Python Excel to CSV tasks, if you need the full features and enhanced performance, you can apply for a temporary free license of the full version. This lets you unlock all capabilities and simplify your Python Excel to CSV processing even further.
The Excel spreadsheet is extensively utilized for organizing, analyzing, and presenting data in a tabular format. The capacity to programmatically interact with Excel files holds great value as it facilitates automation and integration of Excel functionality within software applications. Specifically, knowing how to create new Excel documents, retrieve information from existing ones, and update or modify them as needed through code would be very helpful. This article will demonstrate how to create, read, or update Excel documents in Python using Spire.XLS for Python.
- Create an Excel Document in Python
- Read Data from a Worksheet in Python
- Update an Excel Document in Python
Install Spire.XLS for Python
This scenario requires Spire.XLS for Python and plum-dispatch v1.7.4. They can be easily installed in your Windows through the following pip command.
pip install Spire.XLS
If you are unsure how to install, please refer to this tutorial: How to Install Spire.XLS for Python on Windows
Create an Excel Document in Python
Spire.XLS for Python offers a variety of classes and interfaces that you can use to create and edit Excel documents. Here is a list of important classes, properties and methods involved in this article.
| Member | Description |
| Workbook class | Represents an Excel workbook model. |
| Workbook.Worksheets.Add() method | Adds a worksheet to workbook. |
| Workbook.SaveToFile() method | Saves the workbook to an Excel document. |
| Worksheet class | Represents a worksheet in a workbook. |
| Worksheet.Range property | Gets a specific cell or cell range from worksheet. |
| Worksheet.Range.Text property | Gets or sets the text value of a cell. |
| Worksheet.Rows property | Gets a collection of rows in worksheet. |
| CellRange class | Represents a cell or cell range in worksheet. |
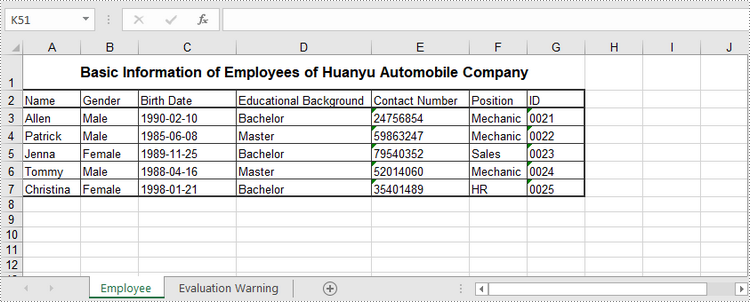
The following are the steps to create an Excel document from scratch using Spire.XLS for Python.
- Create a Workbook object.
- Add a worksheet using Workbook.Worksheets.Add() method.
- Write data to specific cells through Worksheet.Range.Text property.
- Save the workbook to an Excel document using Workbook.SaveToFile() method.
- Python
from spire.xls import *
from spire.xls.common import *

# Create a Workbook object
wb = Workbook()

# Remove default worksheets
wb.Worksheets.Clear()

# Add a worksheet and name it "Employee"
sheet = wb.Worksheets.Add("Employee")

# Merge the cells between A1 and G1
sheet.Range["A1:G1"].Merge()

# Write data to A1 and apply formatting to it
sheet.Range["A1"].Text = "Basic Information of Employees of Huanyu Automobile Company"
sheet.Range["A1"].HorizontalAlignment = HorizontalAlignType.Center
sheet.Range["A1"].VerticalAlignment = VerticalAlignType.Center
sheet.Range["A1"].Style.Font.IsBold = True
sheet.Range["A1"].Style.Font.Size = 13

# Set row height of the first row
sheet.Rows[0].RowHeight = 30

# Write data to specific cells
sheet.Range["A2"].Text = "Name"
sheet.Range["B2"].Text = "Gender"
sheet.Range["C2"].Text = "Birth Date"
sheet.Range["D2"].Text = "Educational Background"
sheet.Range["E2"].Text = "Contact Number"
sheet.Range["F2"].Text = "Position"
sheet.Range["G2"].Text = "ID"

sheet.Range["A3"].Text = "Allen"
sheet.Range["B3"].Text = "Male"
sheet.Range["C3"].Text = "1990-02-10"
sheet.Range["D3"].Text = "Bachelor"
sheet.Range["E3"].Text = "24756854"
sheet.Range["F3"].Text = "Mechanic"
sheet.Range["G3"].Text = "0021"

sheet.Range["A4"].Text = "Patrick"
sheet.Range["B4"].Text = "Male"
sheet.Range["C4"].Text = "1985-06-08"
sheet.Range["D4"].Text = "Master"
sheet.Range["E4"].Text = "59863247"
sheet.Range["F4"].Text = "Mechanic"
sheet.Range["G4"].Text = "0022"

sheet.Range["A5"].Text = "Jenna"
sheet.Range["B5"].Text = "Female"
sheet.Range["C5"].Text = "1989-11-25"
sheet.Range["D5"].Text = "Bachelor"
sheet.Range["E5"].Text = "79540352"
sheet.Range["F5"].Text = "Sales"
sheet.Range["G5"].Text = "0023"

sheet.Range["A6"].Text = "Tommy"
sheet.Range["B6"].Text = "Male"
sheet.Range["C6"].Text = "1988-04-16"
sheet.Range["D6"].Text = "Master"
sheet.Range["E6"].Text = "52014060"
sheet.Range["F6"].Text = "Mechanic"
sheet.Range["G6"].Text = "0024"

sheet.Range["A7"].Text = "Christina"
sheet.Range["B7"].Text = "Female"
sheet.Range["C7"].Text = "1998-01-21"
sheet.Range["D7"].Text = "Bachelor"
sheet.Range["E7"].Text = "35401489"
sheet.Range["F7"].Text = "HR"
sheet.Range["G7"].Text = "0025"

# Set row height of a range
sheet.Range["A2:G7"].RowHeight = 15

# Set column width
sheet.SetColumnWidth(3, 15)
sheet.SetColumnWidth(4, 21)
sheet.SetColumnWidth(5, 15)

# Set border style of a range
sheet.Range["A2:G7"].BorderAround(LineStyleType.Medium)
sheet.Range["A2:G7"].BorderInside(LineStyleType.Thin)
sheet.Range["A2:G2"].BorderAround(LineStyleType.Medium)
sheet.Range["A2:G7"].Borders.KnownColor = ExcelColors.Black

# Save to a .xlsx file
wb.SaveToFile("output/NewSpreadsheet.xlsx", FileFormat.Version2016)
Read Data from a Worksheet in Python
The Worksheet.Range.Value property returns number value or text value of a cell as a string. To get data of a whole worksheet or a cell range, loop through the cells within it. The following are the steps to get data of a worksheet using Spire.XLS for Python.
- Create a Workbook object.
- Load an Excel document using Workbook.LoadFromFile() method.
- Get a specific worksheet through Workbook.Worksheets[index] property.
- Get the cell range contain data though Worksheet.AllocatedRange property.
- Iterate through the rows and columns to get cells within the range, and return the value of each cell through CellRange.Value property.
- Python
from spire.xls import *
from spire.xls.common import *

# Create a Workbook object
wb = Workbook()

# Load an existing Excel file
wb.LoadFromFile("C:\\Users\\Administrator\\Desktop\\NewSpreadsheet.xlsx");

# Get the first worksheet
sheet = wb.Worksheets[0]

# Get the cell range containing data
locatedRange = sheet.AllocatedRange

# Iterate through the rows
for i in range(len(sheet.Rows)):

    # Iterate through the columns
    for j in range(len(locatedRange.Rows[i].Columns)):

        # Get data of a specific cell
        print(locatedRange[i + 1, j + 1].Value + "  ", end='')

    print("")

Update an Excel Document in Python
To change the value of a certain cell, just re-assign a value to it through Worksheet.Range.Value property. The following are the detailed steps.
- Create a Workbook object.
- Load an Excel document using Workbook.LoadFromFile() method.
- Get a specific worksheet through Workbook.Worksheets[index] property.
- Change the value of a particular cell though Worksheet.Range.Value property.
- Save the workbook to an Excel file using Workbook.SaveToFile() method.
- Python
from spire.xls import *
from spire.xls.common import *
# Create a Workbook object
wb = Workbook();
# Load an existing Excel file
wb.LoadFromFile("C:\\Users\\Administrator\\Desktop\\NewSpreadsheet.xlsx")
# Get the first worksheet
sheet = wb.Worksheets[0]
# Change the value of a specific cell
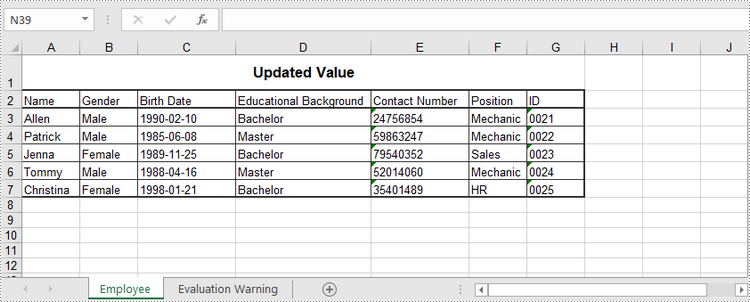
sheet.Range["A1"].Value = "Updated Value"
# Save to file
wb.SaveToFile("output/Updated.xlsx", ExcelVersion.Version2016)
Apply for a Temporary License
If you'd like to remove the evaluation message from the generated documents, or to get rid of the function limitations, please request a 30-day trial license for yourself.
Converting Excel files to PDF format can be a useful way to share and distribute spreadsheets, especially if you want to ensure that the formatting and layout of the file remains consistent across different devices and software. In addition, PDFs often appear more polished and professional than Excel files, making them a popular choice for official reports, presentations, and other business documents. In this article, you will learn how to convert Excel to PDF in Python using Spire.XLS for Python.
Install Spire.XLS for Python
This scenario requires Spire.XLS for Python and plum-dispatch v1.7.4. They can be easily installed in your Windows through the following pip command.
pip install Spire.XLS
If you are unsure how to install, please refer to this tutorial: How to Install Spire.XLS for Python on Windows
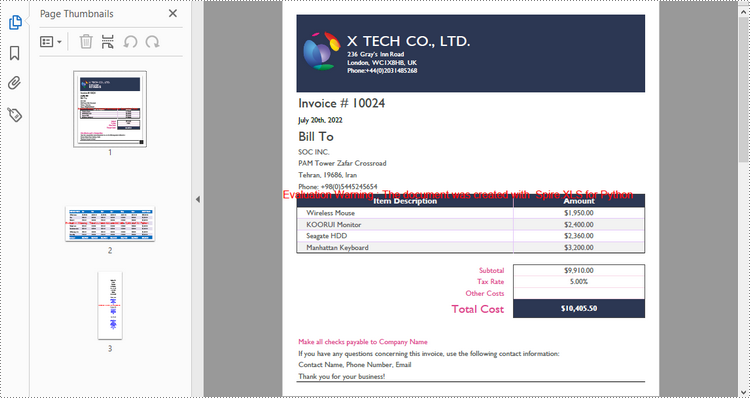
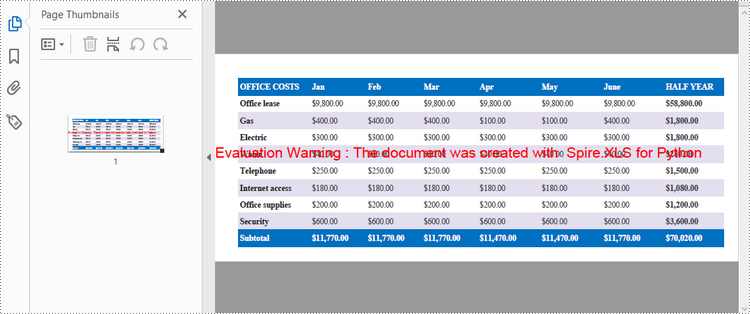
Convert a Whole Excel Document to PDF in Python
The Workbook.SaveToFile() method is used to convert a complete Excel document into a single PDF file. Once the conversion is done, each worksheet will appear as a separate page in the resultant PDF file. To control the conversion settings, use the Workbook.ConverterSetting property.
The following are the detailed steps to convert an Excel document to a PDF file in Python.
- Create a Workbook object.
- Load an Excel document using Workbook.LoadFromFile() method.
- Set the margins of every worksheet through Worksheet.PageSetup property, which will later become the blank edges of the generated PDF.
- Set the Excel to PDF conversion options through the properties under Workbook.ConverterSetting object.
- Convert the whole Excel document to PDF using Workbook.SaveToFile() method.
- Python
from spire.xls import *
from spire.xls.common import *

# Create a Workbook object
workbook = Workbook()

# Load an Excel document
workbook.LoadFromFile("C:\\Users\\Administrator\\Desktop\\sample.xlsx")

# Iterate through the worksheets in the workbook
for sheet in workbook.Worksheets:

    # Get the PageSetup object
    pageSetup = sheet.PageSetup

    # Set page margins
    pageSetup.TopMargin = 0.3
    pageSetup.BottomMargin = 0.3
    pageSetup.LeftMargin = 0.3
    pageSetup.RightMargin = 0.3

# Set worksheet to fit to page when converting
workbook.ConverterSetting.SheetFitToPage = True

# Convert to PDF file
workbook.SaveToFile("output/ToPdf.pdf", FileFormat.PDF)
workbook.Dispose()
Convert a Particular Worksheet to PDF in Python
The Worksheet.SaveToPdf() method is used to convert a specific worksheet into a PDF document. The detailed steps are as follows.
- Create a Workbook object.
- Load an Excel document using Workbook.LoadFromFile() method.
- Get a particular worksheet through Workbook.Worksheets[] property.
- Set the margins of the worksheet through Worksheet.PageSetup property, which will later become the blank edges of the generated PDF.
- Set the Excel to PDF conversion options through the properties under Workbook.ConverterSetting object.
- Convert the worksheet to PDF using Worksheet.SaveToPdf() method.
- Python
from spire.xls import *
from spire.xls.common import *

# Create a Workbook object
workbook = Workbook()

# Load an Excel document
workbook.LoadFromFile("C:\\Users\\Administrator\\Desktop\\input.xlsx")

# Get a particular worksheet
sheet = workbook.Worksheets[1]

# Get the PageSetup object
pageSetup = sheet.PageSetup

# Set page margins
pageSetup.TopMargin = 0.3
pageSetup.BottomMargin = 0.3
pageSetup.LeftMargin = 0.3
pageSetup.RightMargin = 0.3

# Set worksheet to fit to page when converting
workbook.ConverterSetting.SheetFitToPage = True

# Convert the worksheet to PDF file
sheet.SaveToPdf("output/WorksheetToPdf.pdf")
workbook.Dispose()
Apply for a Temporary License
If you'd like to remove the evaluation message from the generated documents, or to get rid of the function limitations, please request a 30-day trial license for yourself.
Spire.PDF for Python is a professional PDF development component that enables developers to create, read, edit, convert, and save PDF files in Python programs without depending on any external applications or libraries. This Python PDF class library provides developers with various functions to create PDF files from scratch or process existing PDF documents completely through Python programs.
Spire.PDF for Python supports various PDF processing features including security settings, extracting text/image from PDF, merging/splitting PDF, adding page numbers to PDF, drawing text/image/shape/barcode to PDF, creating/filling in form fields, adding and deleting PDF layers, cropping pages, copying pages, overlaying PDF, creating actions in PDF, inserting text/image watermarks to PDF, adding/deleting/extracting annotations, adding/updating/deleting PDF bookmarks, adding tables to PDF, compressing PDF documents etc.
