C#/VB.NET: Create, Read, or Update Excel Documents
Excel spreadsheet is a widely used file format that enables users to organize, analyze, and present data in a tabular format. The ability to interact with Excel files programmatically is highly valuable, as it allows automation and integration of Excel functionality into software applications. This capability is particularly useful when working with large datasets, performing complex calculations, or when data needs to be dynamically generated or updated. In this article, you will learn how to create, read, or update Excel documents in C# and VB.NET using Spire.XLS for .NET.
- Create an Excel File in C#, VB.NET
- Read Data of a Worksheet in C#, VB.NET
- Update an Excel File in C#, VB.NET
Install Spire.XLS for .NET
To begin with, you need to add the DLL files included in the Spire.XLS for .NET package as references in your .NET project. The DLL files can be either downloaded from this link or installed via NuGet.
PM> Install-Package Spire.XLS
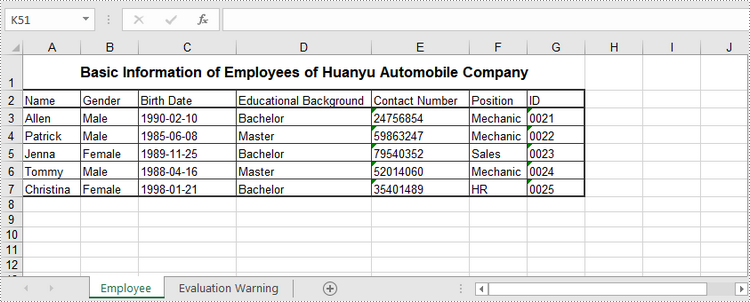
Create an Excel File in C#, VB.NET
Spire.XLS for .NET offers a variety of classes and interfaces that you can use to create and edit Excel documents. Here is a list of important classes, properties and methods involved in this article.
| Member | Description |
| Workbook class | Represents an Excel workbook model. |
| Workbook.Worksheets.Add() method | Adds a worksheet to workbook. |
| Workbook.SaveToFile() method | Saves the workbook to an Excel document. |
| Worksheet class | Represents a worksheet in a workbook. |
| Worksheet.Range property | Gets a specific cell or cell range from worksheet. |
| Worksheet.Range.Value property | Gets or sets the value of a cell. |
| Worksheet.Rows property | Gets a collection of rows in worksheet. |
| Worksheet.InsertDataTable() method | Imports data from DataTable to worksheet. |
| CellRange class | Represents a cell or cell range in worksheet. |
The following are the steps to create an Excel document from scratch using Spire.XLS for .NET.
- Create a Workbook object.
- Add a worksheet using Workbook.Worksheets.Add() method.
- Write data to a specific cell through Worksheet.Range.Value property.
- Import data from a DataTable to the worksheet using Worksheet.InsertDataTable() method.
- Save the workbook to an Excel document using Workbook.SaveToFile() method.
- C#
- VB.NET
using Spire.Xls;
using System.Data;

namespace CreateExcelSpreadsheet
{
    class Program
    {
        static void Main(string[] args)
        {
            //Create a Workbook object
            Workbook wb = new Workbook();

            //Remove default worksheets
            wb.Worksheets.Clear();

            //Add a worksheet and name it "Employee"
            Worksheet sheet = wb.Worksheets.Add("Employee");

            //Merge the cells between A1 and G1
            sheet.Range["A1:G1"].Merge();

            //Write data to A1 and apply formatting to it
            sheet.Range["A1"].Value = "Basic Information of Employees of Huanyu Automobile Company";
            sheet.Range["A1"].HorizontalAlignment = HorizontalAlignType.Center;
            sheet.Range["A1"].VerticalAlignment = VerticalAlignType.Center;
            sheet.Range["A1"].Style.Font.IsBold = true;
            sheet.Range["A1"].Style.Font.Size = 13F;

            //Set row height of the first row
            sheet.Rows[0].RowHeight = 30F;

            //Create a DataTable
            DataTable dt = new DataTable();
            dt.Columns.Add("Name");
            dt.Columns.Add("Gender");
            dt.Columns.Add("Birth Date");
            dt.Columns.Add("Educational Background");
            dt.Columns.Add("Contact Number");
            dt.Columns.Add("Position");
            dt.Columns.Add("ID");
            dt.Rows.Add("Allen", "Male", "1990-02-10", "Bachelor", "24756854", "Mechanic", "0021");
            dt.Rows.Add("Patrick", "Male", "1985-06-08", "Master", "59863247", "Mechanic", "0022");
            dt.Rows.Add("Jenna", "Female", "1989-11-25", "Bachelor", "79540352", "Sales", "0023");
            dt.Rows.Add("Tommy", "Male", "1988-04-16", "Master", "52014060", "Mechanic", "0024");
            dt.Rows.Add("Christina", "Female", "1998-01-21", "Bachelor", "35401489", "HR", "0025");

            //Import data from DataTable to worksheet
            sheet.InsertDataTable(dt, true, 2, 1, true);

            //Set row height of a range
            sheet.Range["A2:G7"].RowHeight = 15F;

            //Set column width
            sheet.Range["A2:G7"].Columns[2].ColumnWidth = 15F;
            sheet.Range["A2:G7"].Columns[3].ColumnWidth = 21F;
            sheet.Range["A2:G7"].Columns[4].ColumnWidth = 15F;

            //Set border style of a range
            sheet.Range["A2:G7"].BorderAround(LineStyleType.Medium);
            sheet.Range["A2:G7"].BorderInside(LineStyleType.Thin);
            sheet.Range["A2:G2"].BorderAround(LineStyleType.Medium);
            sheet.Range["A2:G7"].Borders.KnownColor = ExcelColors.Black;

            //Save to a .xlsx file
            wb.SaveToFile("NewSpreadsheet.xlsx", FileFormat.Version2016);
        }
    }
}
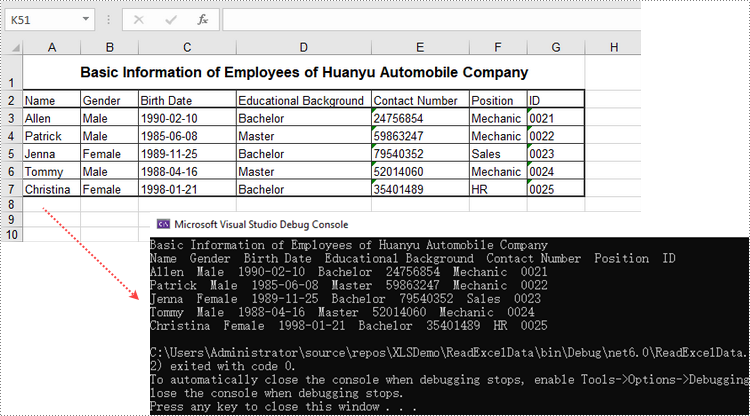
Read Data of a Worksheet in C#, VB.NET
The Worksheet.Range.Value property returns number value or text value of a cell as a string. To get data of a whole worksheet or a cell range, loop through the cells within it. The following are the steps to get data of a worksheet using Spire.XLS for .NET.
- Create a Workbook object.
- Load an Excel document using Workbook.LoadFromFile() method.
- Get a specific worksheet through Workbook.Worksheets[index] property.
- Get the cell range containing data though Worksheet.AllocatedRange property.
- Iterate through the rows and columns to get cells within the range, and return the value of each cell through CellRange.Value property.
- C#
- VB.NET
using Spire.Xls;

namespace ReadExcelData
{
    class Program
    {
        static void Main(string[] args)
        {
            //Create a Workbook object
            Workbook wb = new Workbook();

            //Load an existing Excel file
            wb.LoadFromFile(@"C:\Users\Administrator\Desktop\NewSpreadsheet.xlsx");

            //Get the first worksheet
            Worksheet sheet = wb.Worksheets[0];

            //Get the cell range containing data
            CellRange locatedRange = sheet.AllocatedRange;

            //Iterate through the rows
            for (int i = 0;i < locatedRange.Rows.Length;i++)
            {
                //Iterate through the columns
                for (int j = 0; j < locatedRange.Rows[i].ColumnCount; j++)
                {
                    //Get data of a specific cell
                    Console.Write(locatedRange[i + 1, j + 1].Value + "  ");

                }
                Console.WriteLine();
            }
        }
    }
}
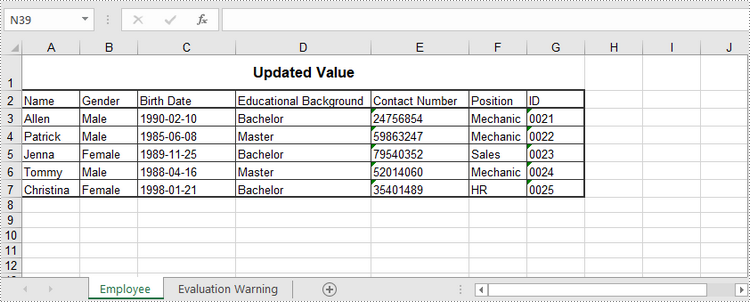
Update an Excel Document in C#, VB.NET
To change the value of a certain cell, just re-assign a value to it through Worksheet.Range.Value property. The following are the detailed steps.
- Create a Workbook object.
- Load an Excel document using Workbook.LoadFromFile() method.
- Get a specific worksheet through Workbook.Worksheets[index] property.
- Change the value of a particular cell though Worksheet.Range.Value property.
- Save the workbook to an Excel file using Workbook.SaveToFile() method.
- C#
- VB.NET
using Spire.Xls;

namespace UpdateCellValue
{
    class Program
    {
        static void Main(string[] args)
        {
            //Create a Workbook object
            Workbook wb = new Workbook();

            //Load an existing Excel file
            wb.LoadFromFile(@"C:\Users\Administrator\Desktop\NewSpreadsheet.xlsx");

            //Get the first worksheet
            Worksheet sheet = wb.Worksheets[0];

            //Change the value of a specific cell
            sheet.Range["A1"].Value = "Updated Value";

            //Save to file
            wb.SaveToFile("Updated.xlsx", ExcelVersion.Version2016);
        }
    }
}
Apply for a Temporary License
If you'd like to remove the evaluation message from the generated documents, or to get rid of the function limitations, please request a 30-day trial license for yourself.
Load/Save Excel VBA in C#, VB.NET
By running VBA within the Office applications, developers/programmers can build customized solutions and programs to enhance the capabilities of those applications. The VBA function of Excel is very powerful. Below I will show you how to use VBA by Spire.XLS.
VBA is the acronym for VB.NET for Applications. It is an implementation of Microsoft's event-driven programming language VB.NET 6 and its associated integrated development environment (IDE), which are built into most Microsoft Office applications. VBA is closely related to VB.NET and uses the VB.NET Runtime Library, but can normally only run code within a host application rather than as a standalone program. It can be used to control one application from another via OLE Automation.
Spire.XLS for .NET is a professional Excel .NET component that can be linked into any type of .NET 2.0, 3.5 or 4.0 projects, either ASP.NET web sites or Windows Forms application. Spire.XLS for .NET offers a combination of APIs and GUI controls for speeding up Excel programming in .NET platform-create new Excel documents from scratch, edit existing Excel documents and convert Excel files. At the same time, Spire.XLS supports VBA and it can load/Save Excel VBA.
Here comes to the steps:
- Write a template with VBA program with which you can execute your work in Excel.
- Create another workbook to load the VBA template.
In this demo, it generates a new worksheet named "test" with the VBA template we provide.
Please check the codes as below:
using Spire.Xls;

namespace NumberFormat
{
    class Program
    {
        static void Main(string[] args)
        {
            //Create a workbook
            Workbook workbook = new Workbook();

            //Initailize worksheet
            workbook.LoadFromFile("VBASample.xls");
            Worksheet sheet = workbook.Worksheets[0];

            //VBA function
            sheet.Range["A1"].Text = "test";

            //Save the file
            workbook.SaveToFile("Sample.xls",ExcelVersion.Version97to2003);

            //Launch the file
            System.Diagnostics.Process.Start("Sample.xls");
        }
    }
}
Imports Spire.Xls

Module Module1

    Sub Main()
        'Create a workbook
        Dim workbook As New Workbook()

        'Initailize worksheet
        workbook.LoadFromFile("VBASample.xls")
        Dim sheet As Worksheet = workbook.Worksheets(0)

        'VBA function
        sheet.Range("A1").Text = "test"

        'Save doc file.
        workbook.SaveToFile("Sample.xls",ExcelVersion.Version97to2003)

        'Launching the MS Word file.
        System.Diagnostics.Process.Start("Sample.xls")
    End Sub
End Module
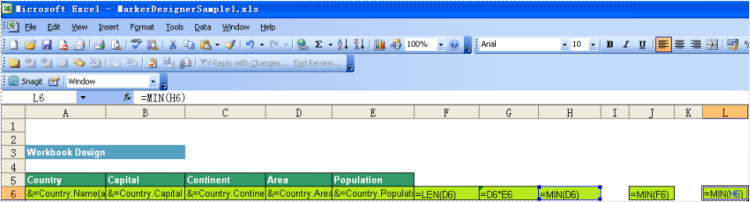
Marker Designer
Introduction
A Marker Designer represents a single data point or value that gives a mean to Spire.XLS to place relevant data into different cells of the worksheet in a workbook. We make use of Designer spreadsheets in which we write marker designers into different cells. Normally a marker designer consists of DataSource and a Field Name and starts with "&=". The DataSource can be a DataSet, DataTable, DataView or an Object variable etc. You can also make use of dynamic formulas that allows you to insert MS Excel's formulas into cells even when the formula must reference rows that will be inserted during the export process. Moreover, you may calculate totals and sub totals of any data field too.
Marker designer is a way to let Spire.XLS know that what information you wish to place in an Excel designer spreadsheet. Marker designers allow you to create templates that contain only relevant information and are formatted to meet your needs.
Designer Spreadsheet and Marker Designers
Designer spreadsheets are standard Excel files that contain the visual formatting, formulas and marker designers. They can contain marker designers that reference one or more data sources such as information from a project and information for related contacts. Marker designers are written into cells where you want information to be filled in.
All marker designers start with "&=", without the quotes. An example of a data marker is &=Party.FullName. If the data marker results in more than one item, i.e. row then following rows will be moved down automatically to make room for all of the new information. Thus sub-totals and totals can be placed on the following row after the data marker to make calculations based on inserted data. In order to make calculations on the rows that are inserted, you must use Dynamic Formulas.
Marker designers consist of the Data Source and Field Name parts for most information. Special information may also be passed with variables and variable arrays. Variables always fill only one cell whereas variable arrays may fill several ones. You may only use one data marker per cell. Unused marker designers will be removed.
Marker designer may also contain parameters. Parameters allow you to modify how the information will be laid out. They are appended to the end of marker designer in parenthesis as a comma separated list.
Marker designer Options
&=DataSource.FieldName
&=[Data Source].[Field Name]
&=VariableName
Formulas
Formulas allow you to insert Excel's formulas into cells even when the formula must reference rows that will be inserted during the export process. And they can repeat for each inserted row or use only the cell where the data marker is placed for it.
If value of a cell referred to other cells, such as (copy:rc6), it means the value of the cell will be referred by cells of column 6. Multiple refer can be used like this: (copy:rc5,copy:rc7).
Note: Separate them with comma
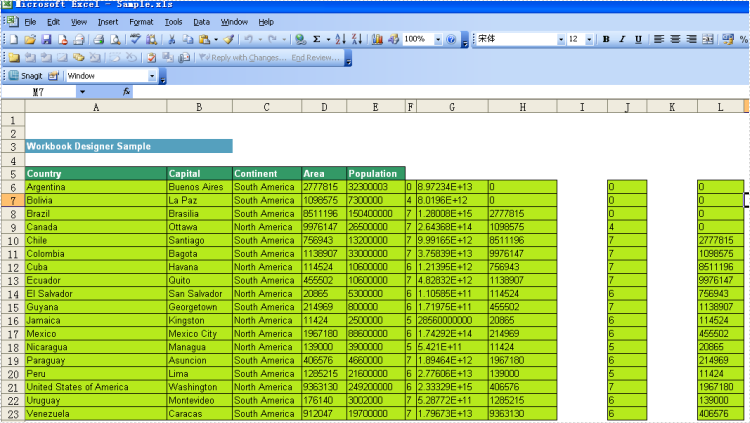
Cell "G6" contains the formula = D6*E6, cell "G7" contains = D7*E7 and cell "G8" contains = D8*E8, etc.
The following illustrates a repeating dynamic formula and the resulting Excel worksheet.
Result:
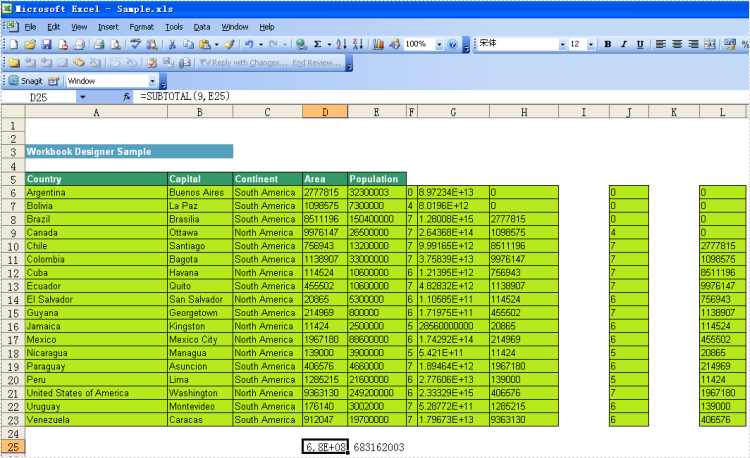
Sum and Subtotal
Below is showing you how to use these 2 formulas:
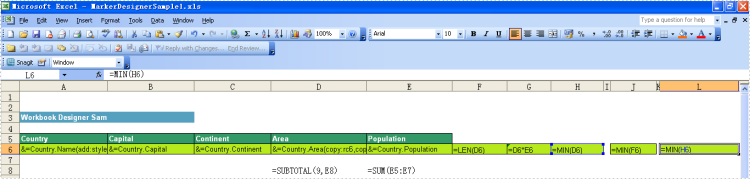
Result:
Code:
          Workbook workbook = new Workbook();

            workbook.LoadFromFile(@"..\..\..\..\..\..\Data\MarkerDesignerSample1.xls");
			DataTable dt = (DataTable)dataGrid1.DataSource;

			Worksheet sheet = workbook.Worksheets[0];
            //fill parameter
            workbook.MarkerDesigner.AddParameter("Variable1", 1234.5678);
            //fill DataTable
			workbook.MarkerDesigner.AddDataTable("Country",dt);
			workbook.MarkerDesigner.Apply();

            //AutoFit
			sheet.AllocatedRange.AutoFitRows();
			sheet.AllocatedRange.AutoFitColumns();

			workbook.SaveToFile("Sample.xls",ExcelVersion.Version97to2003);
Save Excel Document in C#, VB.NET
Automation of an Excel file allows us to doing various operations in C#/VB.NET. Any loss in these operations may result in unexpected negative consequences for developers and the clients of the developers. That means we must find a solution that enables us to Save Excel with no loss in quality of our operations. This section will demonstrate how to fast save Excel file with perfect performance as directly operations in Excel files.
Spire.Xls for .NET is a professional component that enables developers directly manages Excel operation regardless whether Microsoft Excel is installed on or not. With Spire.Xls for .NET, we can save Excel to what we want it to be. Any kind of trial and evaluation on Spire.Xls for .NET is always welcomed; so now please feel free to download Spire.Xls for .NET and then follow our guide to save perfect Excel or try other function of Spire.Xls for .NET.
Spire.Xls for .NET allows us to create a new Excel file, write data in to it, edit the input data and then save Excel file.
using Spire.Xls;
namespace Excel_save
{
   class Program
    {
        static void Main(string[] args)
        {
           //Create a new workbook
            Workbook workbook = new Workbook();
           //Initialize worksheet
            Worksheet sheet = workbook.Worksheets[0];
           //Append text
            sheet.Range["A1"].Text = "Demo: Save Excel in .NET";
           //Save it as Excel file
            workbook.SaveToFile("Sample.xls",ExcelVersion.Version97to2003);
           //Launch the file
           System.Diagnostics.Process.Start(workbook.FileName);
        }
    }
}
Imports Spire.Xls
Namespace Excel_save
	Class Program
		Private Shared Sub Main(args As String())
			'Create a new workbook
			Dim workbook As New Workbook()
			'Initialize worksheet
			Dim sheet As Worksheet = workbook.Worksheets(0)
			'Append text
			sheet.Range("A1").Text = "Demo: Save Excel in .NET"
			'Save it as Excel file
			workbook.SaveToFile("Sample.xls",ExcelVersion.Version97to2003)
			'Launch the file
			System.Diagnostics.Process.Start(workbook.FileName)
		End Sub
	End Class
End Namespace