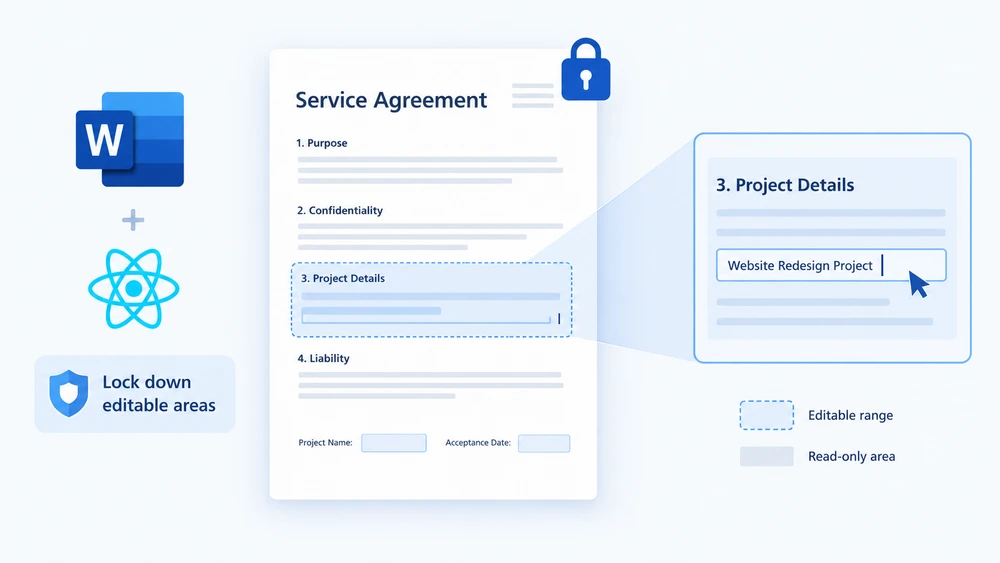
수십 명의 고객에게 발송되는 계약서 템플릿을 상상해 보세요. 법무팀은 모든 조항을 신중하게 작성했고, 각 수신자가 손대야 하는 것은 서명란, 프로젝트 이름, 승인 날짜뿐입니다. 완전히 편집 가능한 Word 파일을 건네면 누군가는 반드시 위약금 조항을 고쳐 쓰거나 책임 조항을 삭제할 것입니다. 문서 전체를 잠그면 아무도 필드를 채울 수 없습니다. 정말 필요한 것은 선택적 편집, 즉 “이 특정 단락은 편집해도 되고 나머지는 모두 고정된다”라고 말할 수 있는 방법입니다.
바로 이것이 편집 가능 범위가 제공하는 기능입니다. 문서 전체를 읽기 전용으로 보호한 다음, 열어 두려는 단락 주위에 한 쌍의 권한 표식을 배치합니다. Word에서 파일을 연 사람은 표시된 영역 안에서는 입력할 수 있지만 그 밖의 문자는 단 하나도 변경할 수 없습니다. Spire.Doc for JavaScript는 WebAssembly를 통해 이 기능을 브라우저로 가져오므로, 서버 왕복 없이 React 앱에서 보호된 문서를 생성할 수 있습니다. 글꼴과 입력 파일은 인메모리 가상 파일 시스템(VFS)을 통해 관리됩니다.
이 가이드에서는 워크플로의 두 부분을 모두 살펴봅니다:
- 편집 가능 범위 설정 — 문서를 보호하고 열린 영역을 표시합니다
- 편집 가능 범위 제거 — 표식을 제거하고 제한을 해제합니다
아직 프로젝트에 Spire.Doc을 연결하지 않았다면 React 프로젝트에서 Spire.Doc for JavaScript 통합하기부터 시작하세요. 아래 코드 조각은 WebAssembly 모듈이 로드되어 준비된 상태를 가정합니다.
편집 가능 범위 설정
이 프로세스는 세 단계로 구성됩니다. 먼저 FetchFileToVFS로 글꼴 파일과 대상 Word 문서를 WASM 가상 파일 시스템으로 가져옵니다. 다음으로 Document를 인스턴스화하고 파일을 로드한 뒤, Protect를 호출해 문서 전체를 읽기 전용으로 잠그고, 동일한 id를 공유하는 PermissionStart / PermissionEnd 쌍을 만듭니다. 이 두 표식이 편집 가능하게 남겨 둘 단락을 감쌉니다. 마지막으로 파일을 저장하고 VFS에서 다시 읽어 Blob으로 감싼 다음 다운로드를 트리거합니다.
function App() {
  const SetEditableRange = async () => {
    const docModule = window.wasmModule?.spiredoc;
    if (!docModule) {
      alert('Spire.Doc is not ready yet');
      return;
    }

    // Load the input document into VFS
    const inputFileName = "SetEditableRange.docx";
    await window.spire.FetchFileToVFS(inputFileName, "", `${process.env.PUBLIC_URL}static/data/`);

    // Create a document object and load the document
    const doc = new docModule.Document();
    doc.LoadFromFile(inputFileName);

    // Protect the whole document: everything outside the editable range is read-only
    doc.Protect({ type: docModule.ProtectionType.AllowOnlyReading, password: "password" });

    // Create the permission markers: a start and an end with the same id form one editable range
    const start = new docModule.PermissionStart(doc, "testID");
    const end = new docModule.PermissionEnd(doc, "testID");

    // Insert the markers into the first paragraph: the start at the beginning, the end appended at the end
    doc.Sections.get_Item(0).Paragraphs.get_Item(0).ChildObjects.Insert(0, start);
    doc.Sections.get_Item(0).Paragraphs.get_Item(0).ChildObjects.Add(end);

    // Save the document
    const outputFileName = "Set Editable Range.docx";
    doc.SaveToFile({ fileName: outputFileName, fileFormat: docModule.FileFormat.Docx2013 });
    doc.Dispose();

    const modifiedFileArray = window.dotnetRuntime.Module.FS.readFile(outputFileName);
    const blob = new Blob([modifiedFileArray], { type: 'application/vnd.openxmlformats-officedocument.wordprocessingml.document' });
    const url = URL.createObjectURL(blob);
    const a = document.createElement('a');
    a.href = url;
    a.download = outputFileName;
    a.click();
    URL.revokeObjectURL(url);
  };

 return (
    <div style={{ textAlign: 'center', height: '300px' }}>
      <h1>Set Editable Range in a Word Document</h1>
      <button onClick={SetEditableRange}>
        Generate
      </button>
    </div>
  );
}
export default App;
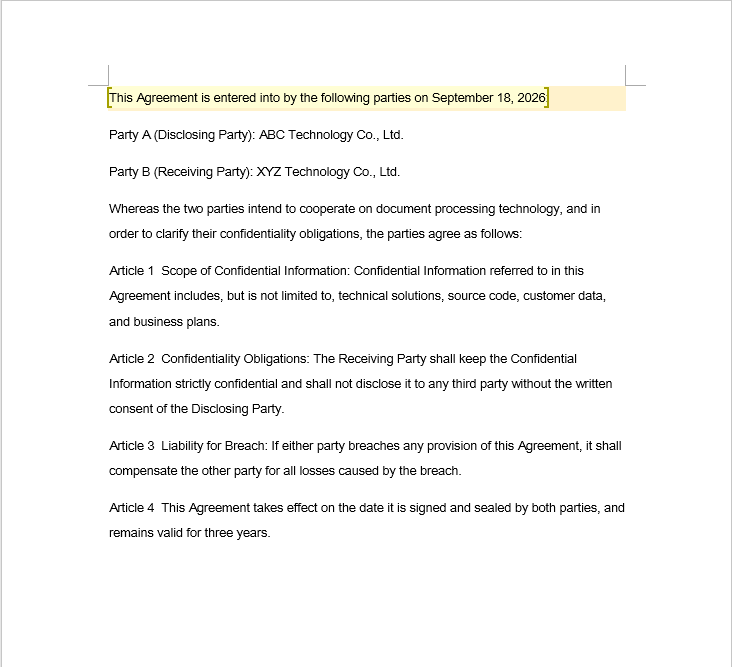
샘플 파일에서 검토자가 채울 수 있는 필드는 연한 음영으로 표시되어 있습니다. 이는 순전히 읽는 사람을 위한 시각적 신호일 뿐이며 코드에서 편집 가능 범위가 정의되는 방식과는 무관합니다. 표식이 배치되면 Word는 음영 처리된 단락을 편집 가능으로, 다른 모든 단락을 잠긴 것으로 처리합니다.
편집 가능 범위 제거
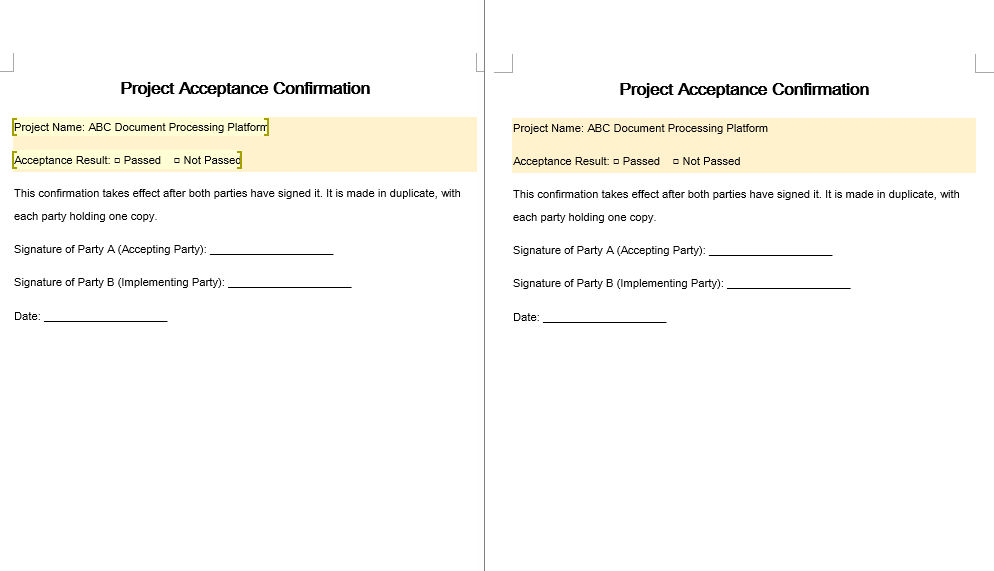
편집 가능 범위를 제거하는 것은 단일 순회입니다. 모든 섹션과 모든 단락을 반복하면서 단락의 ChildObjects 컬렉션에 있는 각 개체를 검사하고, PermissionStart 또는 PermissionEnd인 항목을 뽑아냅니다.
사람들이 흔히 놓치는 미묘한 점이 있습니다. ChildObjects.Remove는 컬렉션을 즉시 축소하므로 제거된 요소 뒤의 모든 요소가 인덱스 하나씩 앞으로 이동합니다. 삭제하면서 루프 카운터를 증가시키면 제거할 때마다 바로 다음 표식이 건너뛰어지고, 표식이 많을수록 더 많은 표식이 남게 됩니다.
function App() {
  const RemoveEditableRange = async () => {
    const docModule = window.wasmModule?.spiredoc;
    if (!docModule) {
      alert('Spire.Doc is not ready yet');
      return;
    }

      // Load the input document into VFS
      const inputFileName = "RemoveEditableRange.docx";
      await window.spire.FetchFileToVFS(inputFileName, "", `${process.env.PUBLIC_URL}static/data/`);

      // Create a document object and load the document
      const doc = new docModule.Document();
      doc.LoadFromFile(inputFileName);

      // Iterate over every section and paragraph and delete the permission markers
      for (let i = 0; i < doc.Sections.Count; i++) {
        const section = doc.Sections.get_Item(i);
        for (let j = 0; j < section.Body.Paragraphs.Count; j++) {
          const paragraph = section.Body.Paragraphs.get_Item(j);

          // Remove on a match; the collection shrinks, so the index is not incremented
          for (let k = 0; k < paragraph.ChildObjects.Count;) {
            const obj = paragraph.ChildObjects.get_Item(k);
            if (obj instanceof docModule.PermissionStart || obj instanceof docModule.PermissionEnd) {
              paragraph.ChildObjects.Remove(obj);
            } else {
              k++;
            }
          }
        }
      }

      // Save the document
      const outputFileName = "Remove Editable Range.docx";
      doc.SaveToFile({ fileName: outputFileName, fileFormat: docModule.FileFormat.Docx2013 });

    // Release resources
    doc.Dispose();

    const modifiedFileArray = window.dotnetRuntime.Module.FS.readFile(outputFileName);
    const blob = new Blob([modifiedFileArray], { type: 'application/vnd.openxmlformats-officedocument.wordprocessingml.document' });
    const url = URL.createObjectURL(blob);
    const a = document.createElement('a');
    a.href = url;
    a.download = outputFileName;
    a.click();
    URL.revokeObjectURL(url);
  };

 return (
    <div style={{ textAlign: 'center', height: '300px' }}>
      <h1>Remove Editable Ranges from a Word Document</h1>
      <button onClick={RemoveEditableRange}>
        Generate
      </button>
    </div>
  );
}
export default App;
표식을 삭제하면 편집 가능한 경계만 다시 그려질 뿐, 텍스트 자체와 모든 서식은 그대로 유지됩니다.
전체 보호 수명 주기
실제 승인 워크플로에서는 한 가지 작업만 하는 경우가 거의 없습니다. 일반적인 왕복 과정은 다음과 같습니다:
-
보호 —
AllowOnlyReading(또는AllowOnlyFormFields)와 암호를 사용해doc.Protect를 호출합니다. 이제 문서 전체가 잠깁니다. -
표시 — 검토자가 편집할 수 있는 각 단락을 하나의 id를 공유하는
PermissionStart/PermissionEnd쌍으로 감쌉니다. 해당 영역만 검토자가 입력할 수 있는 곳이 됩니다. - 표시 해제 — 검토 라운드가 끝나면 문서를 순회하며 모든 권한 표식을 제거합니다. 해당 영역은 다시 읽기 전용 본문에 포함됩니다.
-
보호 해제 —
doc.Unprotect("password")를 호출해 문서를 완전히 해제하고, 다음 처리 단계를 위해 완전히 편집 가능한 상태로 되돌립니다.
핵심은 보호와 편집 가능 범위가 서로 독립적인 두 계층이라는 점입니다. 보호는 문서가 잠기는지 여부를 결정하고, 표식 쌍은 그 잠금에서 어떤 부분이 예외인지를 결정합니다. 보호 상태를 건드리지 않고 표식을 원하는 만큼 추가하거나 제거할 수 있으며, 표식을 어지럽히지 않고 보호를 켜거나 끌 수 있습니다. 다만 표식은 보호가 활성화되어 있을 때만 효력을 발휘합니다.
자주 묻는 질문
편집 가능 범위를 설정했지만 그 안의 내용을 여전히 편집할 수 없습니다
원인: 권한 표식은 그 자체로는 아무 효과가 없습니다. 문서 전체 제한에 대한 예외를 만들어 줄 뿐이므로 Protect를 호출한 적이 없다면 예외를 적용할 제한 자체가 없어 표식은 아무 일도 하지 않습니다. 두 번째 요구 사항은 PermissionStart와 PermissionEnd가 동일한 id 문자열을 가져야 한다는 점입니다. Word는 id가 일치할 때만 이들을 한 쌍으로 취급합니다.
해결 방법: 먼저 편집 제한을 켠 다음, 동일한 id로 두 표식을 모두 만드세요:
// Enable protection first so that the markers mean something
document.Protect({ type: wasmModule.ProtectionType.AllowOnlyReading, password: "password" });

// The start and the end must use the same id
const start = new wasmModule.PermissionStart(document, "testID");
const end = new wasmModule.PermissionEnd(document, "testID");
편집 가능 범위를 제거할 때 일부 표식이 누락됩니다
원인: ChildObjects.Remove를 호출할 때마다 컬렉션이 하나씩 줄어들어 이후 모든 요소의 인덱스가 앞으로 이동합니다. 제거와 같은 반복에서 루프 카운터가 증가하면 현재 위치로 밀려온 요소를 검사하지 않게 되어 건너뛰게 되고, 표식이 추가될수록 문제가 더 커집니다.
해결 방법: 제거하는 동안 인덱스를 고정하거나(제거가 없을 때만 증가), 대상 개체를 먼저 모은 뒤 역순으로 삭제합니다:
for (let k = 0; k < paragraph.ChildObjects.Count;) {
  const obj = paragraph.ChildObjects.get_Item(k);
  if (obj instanceof wasmModule.PermissionStart || obj instanceof wasmModule.PermissionEnd) {
    paragraph.ChildObjects.Remove(obj);
    // Do not increment k here: check the new object at the current index
  } else {
    k++;
  }
}
표식을 제거한 후에도 문서가 여전히 읽기 전용입니다
원인: 표식은 잠금에서 어떤 영역이 예외인지만 정의할 뿐, 잠금 자체가 아닙니다. 표식을 제거하면 예외만 사라지고, Protect가 설정한 기본 보호는 여전히 유효하므로 문서 전체가 읽기 전용으로 남습니다.
해결 방법: 표식이 사라지고 더 이상 제한이 필요하지 않으면 원래 암호로 Unprotect를 호출하세요:
document.Unprotect("password");