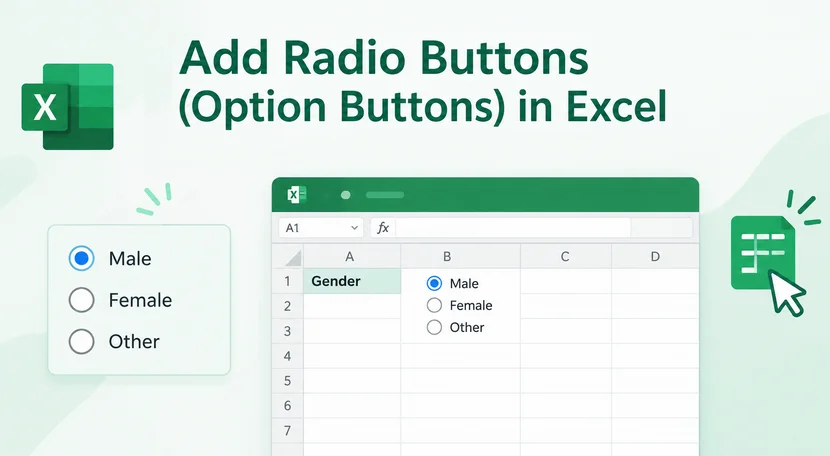
Excel worksheets often need structured input—not free-typed answers. If you want users to pick only one choice from a short list in an Excel sheet, radio buttons (called option buttons in Excel) are the perfect tool. They are widely used for surveys, forms, calculators, and interactive dashboards where single selection is required.
This tutorial shows how to add radio buttons in Excel using Form Controls, ActiveX Controls, and even C# if you need to automate Excel forms.
- What Is a Radio Button in Excel?
- Prerequisite: Enable the Developer Tab
- Two Types of Excel Radio Buttons: Form Controls vs ActiveX Controls
- How to Insert a Form Control Radio Button
- How to Insert an ActiveX Control Radio Button
- How to Create Radio Buttons Programmatically with C#
- Frequently Asked Questions (FAQs)
What Is a Radio Button in Excel?
A radio button (option button) is an interactive control that restricts user selection to one choice within a group. When one button is selected, any previously selected button in the same group is automatically cleared. This makes radio buttons ideal for fields like:
- Employment status: Full‑time / Part‑time
- Workflow status: Approve / Reject / Pending
- Satisfaction scoring (1‑5 rating scale)
- Binary Yes / No survey questions
⭐ Important distinction: Radio buttons are not checkboxes. Checkboxes in Excel allow multiple selections; radio buttons enforce a single choice within a group.
Prerequisite: Enable the Developer Tab
Radio button controls sit under the Developer tab, which is hidden by default in Excel. To show it:
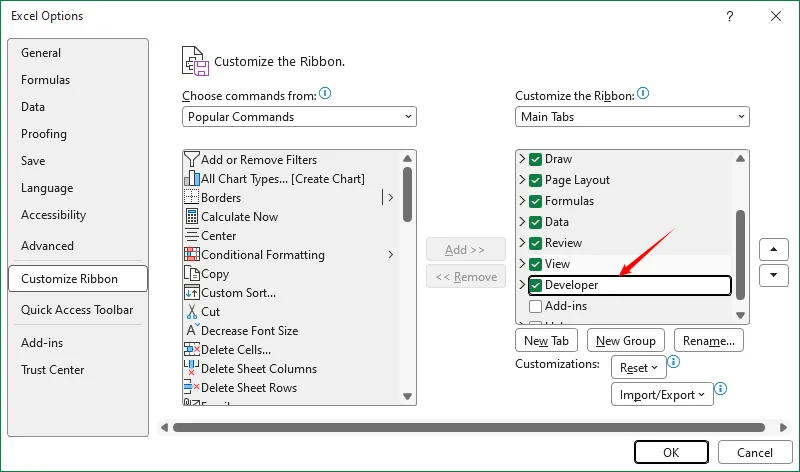
- Click File → Options.
- Select Customize Ribbon from the left‑hand menu.
- In the right‑side Main Tabs list, check the box for Developer.
- Click OK. The Developer tab will now appear on your top ribbon.
Two Types of Excel Radio Buttons: Form Controls vs ActiveX Controls
Excel offers two types of radio buttons, and choosing the right one matters.
| Feature | Form Control (Option Button) | ActiveX Control (Option Button) |
|---|---|---|
| Ease of use | Simple, quick to insert | More settings and flexibility |
| Linked cell | Set via Format Control → Control → Cell link | Set via Properties → LinkedCell |
| Grouping | Group Box container or built‑in grouping tool | Group Box or GroupName property |
| Events | Only the Click event | Many events (Change, Click, etc.) |
| Best for | Everyday spreadsheets, forms, surveys | Advanced dashboards, VBA‑automated workbooks |
✅ Recommendation for most users: Use Form Controls. They are native native Excel form controls, stable across file versions, and support direct cell linking without extra complexity.
How to Insert a Form Control Radio Button
Step 1: Insert the first Option Button
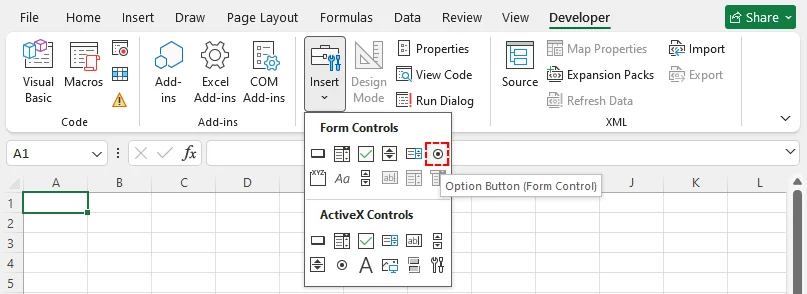
- Go to Developer → Insert.
- Under Form Controls, click the Option Button icon (a circle with a dot).
- Click (or drag) on the worksheet where you want the button to appear.
Step 2: Edit labels and duplicate additional options
- Right‑click the option button and choose Edit Text.
- Type your choice label (e.g., “Yes”, “No”, “Maybe”)
- Repeat the insert step for each additional option. Place them near one another so they form a logical group.
Step 3: Link radio buttons to a cell
This is the most important part: linking the group to a cell so Excel records which option the user selected.
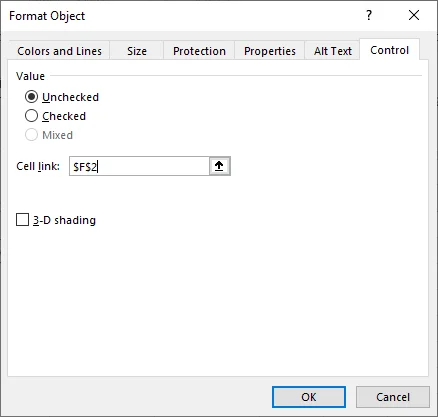
- Right‑click any one of the radio buttons in the group.
- Choose Format Control, and switch to the Control tab.
- In the Cell link box, select an empty cell (for example, $F$2)
- Click OK
Step 4: Understand the linked‑cell output
The linked cell returns the index number of the selected button.
- Select the first button → cell value = 1
- Select the second button → cell value = 2
- Subsequent buttons increment this index sequentially.
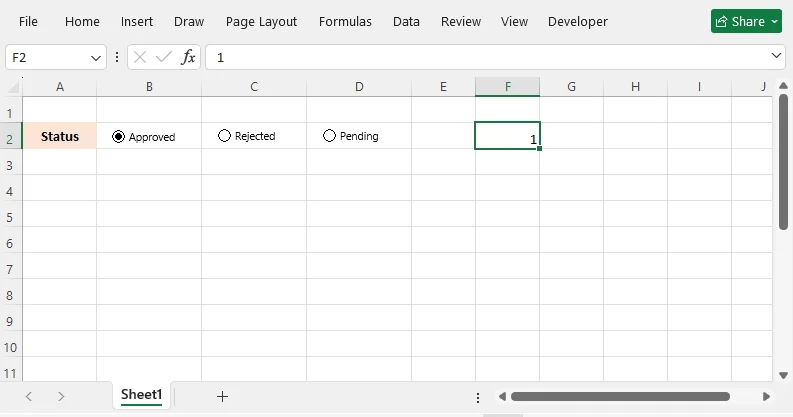
You can use this number with IF, INDEX, XLOOKUP formulas to drive charts, calculations, or conditional formatting.
Pro Tip: If you are building dashboards alongside your radio button forms, slicers in Excel provide another interactive filtering mechanism that works independently or together with your option‑button selections.
How to Insert an ActiveX Control Radio Button
If you need more control, for example, custom fonts, colors, or VBA events, you can use an ActiveX Option Button.
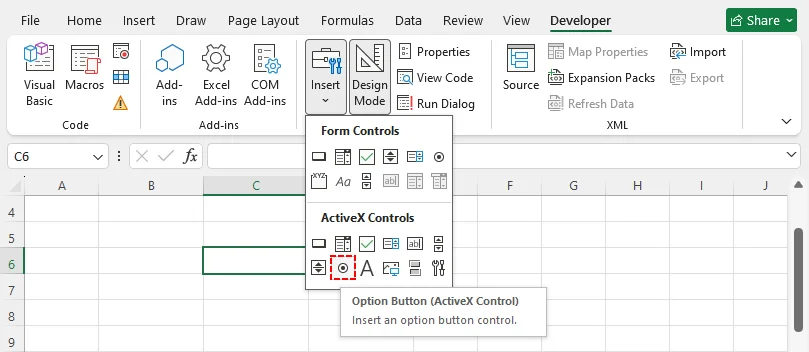
- Go to Developer → Insert → ActiveX Controls → Option Button.
- Drag on the sheet to draw the button.
- Right‑click and choose Properties to change the caption, color, and GroupName.
- Toggle Design Mode on for editing; toggle it off to test user interaction.
⚠️ Note: ActiveX controls can break in shared workbooks, Excel for the web, or different Office versions. Use Form Controls unless you definitely need VBA customization.
How to Create Radio Buttons Programmatically with C#
While Excel’s built‑in controls are perfect for manual setup, you can also create radio buttons programmatically using a .NET library. This is ideal for automating report generation, building dynamic forms, or integrating Excel output into a larger C# application.
Free Spire.XLS for .NET is a free, standalone library that lets you insert and configure Excel option button without requiring Excel to be installed on the server.
NuGet Installation
First install the free package via NuGet:
Install-Package FreeSpire.XLS
C# Code to Insert Radio Buttons
The following code creates a workbook, inserts a group of three radio buttons, links them to a cell, pre‑selects one choice and saves the result.
using Spire.Xls;
using Spire.Xls.Core;

namespace ExcelRadioButtons
{
    public class Program
    {
        static void Main(string[] args)
        {
            // Create a new workbook and get the first worksheet
            Workbook workbook = new Workbook();
            Worksheet sheet = workbook.Worksheets[0];

            // Add a label for the radio button group
            sheet.Range["A3"].Text = "Employment Type:";

            // Insert the first radio button at row 3, column 2
            IRadioButton rbFullTime = sheet.RadioButtons.Add(3, 2, 20, 80);
            rbFullTime.Text = "Full-Time";

            // Insert the second radio button at row 3, column 3
            IRadioButton rbPartTime = sheet.RadioButtons.Add(3, 3, 20, 80);
            rbPartTime.Text = "Part-Time";

            // Insert the third radio button at row 3, column 4
            IRadioButton rbContract = sheet.RadioButtons.Add(3, 4, 20, 80);
            rbContract.Text = "Contract";

            // Link the group to a cell (e.g., E3)
            // All buttons in the same group must share the same LinkedCell
            rbFullTime.LinkedCell = sheet.Range["E3"];
            rbPartTime.LinkedCell = sheet.Range["E3"];
            rbContract.LinkedCell = sheet.Range["E3"];

            // Pre-select the first option
            rbFullTime.CheckState = CheckState.Checked;

            // Save the file
            workbook.SaveToFile("RadioButtons.xlsx", ExcelVersion.Version2016);
        }
    }
}
How the Code Works
-
Worksheet.RadioButtons.Add(row, column, height, width): Creates a radio button at the target position. Row and column parameters use 1‑based indexing. -
IRadioButton.Text: Sets the visible label text shown next to the radio button. -
IRadioButton.CheckState: Pre‑checks an option by default; omit this property for an unchecked initial state. -
IRadioButton.LinkedCell: Defines the output cell receiving selection index numbers. All buttons belonging to one group must target the same linked cell to enforce single‑choice behavior.
Result:
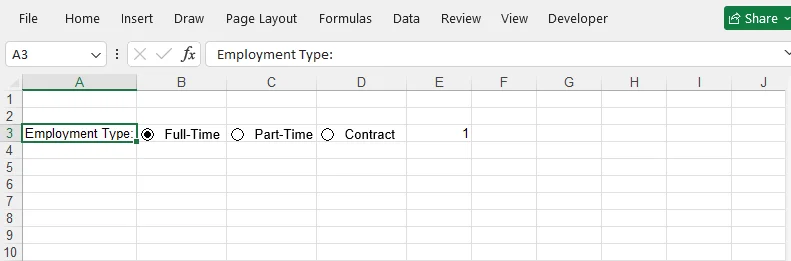
Just as you programmatically generate grouped radio buttons with Free Spire.XLS, you can use the same library to add checkboxes, text boxes, and drop‑down lists when automating Excel form generation.
Final Thoughts
Radio buttons are one of the simplest ways to make an Excel worksheet more structured and reliable. For most regular Excel users, Form Controls are the preferred option because they offer stability, simple configuration, and cross-compatibility across desktop versions of Excel. Reserve ActiveX controls only for advanced scenarios requiring custom styling and VBA event‑driven logic, keeping in mind their compatibility limitations in web‑based or collaborative workbooks.
If you need to generate Excel forms at scale in .NET applications, libraries like Free Spire.XLS can create grouped radio buttons programmatically without requiring Microsoft Excel to be installed on the server.
By picking the right control type and correctly setting up cell linking, you can build clean, reliable interactive spreadsheets that capture user input efficiently.
Frequently Asked Questions (FAQs)
Q. How to delete a radio button?
A: For a Form Control, select the button and then press Delete. For an ActiveX control, turn on Design Mode, select the control, and press Delete.
Q. Can I pre-select a radio button by default?
A: Yes. For Form Controls, you can set the linked cell to the desired index value, such as 1, before using the form. For ActiveX controls, set the control’s Value property. In C#, use CheckState.Checked.
Q. Why do all my radio buttons select together?
A: Your controls are treated as belonging to the same group. To create separate groups, place each set of option buttons inside its own Group Box. For ActiveX controls, you can also use the GroupName property.
Q. Is there a way to hide the linked cell from end users?
A: You can place the linked cell on a hidden column, hidden row, or a separate helper worksheet. Use a formula on your main sheet to pull the readable label. Do not hide the cell if you still need to test or reset the default selection.