

Creating Word documents programmatically is a powerful way to automate tasks, generate reports, and produce professional-looking documents. With Python, you can leverage a variety of libraries to accomplish this, and one standout option is Spire.Doc for Python, specifically designed for working with Word files.
This guide will walk you through the process of creating Word documents in Python using Spire.Doc, from setting up the library to adding formatted text, images, tables, and more. Whether you're generating reports, invoices, or any other document type, this step-by-step approach will equip you with the tools you need to streamline your workflow effectively.
Table of Contents:
- Introducing Spire.Doc: A Python Word Creation Library
- Setting Up Spire.Doc in Your Python Project
- Step 1: Create a Blank Word Document in Python
- Step 2: Add Text Content with Formatting (Titles, Paragraphs)
- Step 3: Insert and Position Images in Word Documents
- Step 4: Create and Customize Tables
- Step 5: Generate Numbered/Bulleted Lists
- Best Practices for Python Word Creation
- FAQs
- Conclusion
Introducing Spire.Doc: A Python Word Creation Library
Spire.Doc is a powerful library for creating, manipulating, and converting Word documents in Python. It enables developers to generate professional-quality documents programmatically without needing Microsoft Word. Here are some key features:
- Supports Multiple Formats : Works with DOCX, DOC, RTF, and HTML.
- Extensive Functionalities : Add text, images, tables, and charts.
- Styling and Formatting : Apply various styles for consistent document appearance.
- User-Friendly API: Simplifies automation of document generation processes.
- Versatile Applications : Ideal for generating reports, invoices, and other documents.
With Spire.Doc, you have the flexibility and tools to streamline your document creation tasks effectively.
Setting Up Spire.Doc in Your Python Project
To get started with Spire.Doc in your Python project, follow these simple steps:
- Install Spire.Doc : First, you need to install the Spire.Doc library. You can do this using pip. Open your terminal or command prompt and run the following command:
pip install spire.doc
- Import the Library : Once installed, import the Spire.Doc module in your Python script to access its functionalities. You can do this with the following import statement:
from spire.doc import *
from spire.doc.common import *
With the setup complete, you can begin writing your Python code to create Word documents according to your needs.
Step 1: Create a Blank Word Document in Python
The first step in automating Word document creation is to create a blank document. To begin with, we create a Document object, which serves as the foundation of our Word document. We then add a section to organize content, and set the page size to A4 with 60-unit margins . These configurations are crucial for ensuring proper document layout and readability.
Below is the code to initialize a document and set up the page configuration:
# Create a Document object
doc = Document()

# Add a section
section = doc.AddSection()

# Set page size and page margins
section.PageSetup.PageSize = PageSize.A4()
section.PageSetup.Margins.All = 60

# Save the document
doc.SaveToFile("BlankDocument.docx")
doc.Dispose
Step 2: Add Text Content with Formatting (Titles, Paragraphs)
1. Add Title, Headings, Paragraphs
In this step, we add text content by first creating paragraphs using the AddParagraph method, followed by inserting text with the AppendText method.
Different paragraphs can be styled using various BuiltInStyle options, such as Title , Heading1 , and Normal , allowing for quick generation of document elements. Additionally, the TextRange.CharacterFormat property can be used to adjust the font, size, and other styles of the text, ensuring a polished and organized presentation.
Below is the code to insert and format these elements:
# Add a title
title_paragraph = section.AddParagraph()
textRange = title_paragraph.AppendText("My First Document")
title_paragraph.ApplyStyle(BuiltinStyle.Title)
textRange.CharacterFormat.FontName = "Times New Properties"
textRange.CharacterFormat.FontSize = 24

# Add a heading
heading_paragraph = section.AddParagraph()
textRange = heading_paragraph.AppendText("This Is Heading1")
heading_paragraph.ApplyStyle(BuiltinStyle.Heading1)
textRange.CharacterFormat.FontName = "Times New Properties"
textRange.CharacterFormat.FontSize = 16

# Add a paragraph
normal_paragraph = section.AddParagraph()
textRange = normal_paragraph .AppendText("This is a sample paragraph.")
normal_paragraph .ApplyStyle(BuiltinStyle.Normal)
textRange.CharacterFormat.FontName = "Times New Properties"
textRange.CharacterFormat.FontSize = 12
2. Apply Formatting to Paragraph
To ensure consistent formatting across multiple paragraphs, we can create a ParagraphStyle that defines key properties such as font attributes (name, size, color, boldness) and paragraph settings (spacing, indentation, alignment) within a single object. This style can then be easily applied to the selected paragraphs for uniformity.
Below is the code to define and apply the paragraph style:
# Defined paragraph style
style = ParagraphStyle(doc)
style.Name = "paraStyle"
style.CharacterFormat.FontName = "Arial"
style.CharacterFormat.FontSize = 13
style.CharacterFormat.TextColor = Color.get_Red()
style.CharacterFormat.Bold = True
style.ParagraphFormat.AfterSpacing = 12
style.ParagraphFormat.BeforeSpacing = 12
style.ParagraphFormat.FirstLineIndent = 4
style.ParagraphFormat.LineSpacing = 10
style.ParagraphFormat.HorizontalAlignment = HorizontalAlignment.Left
doc.Styles.Add(style)

# Apply the style to the specific paragraph
normal_paragraph.ApplyStyle("paraStyle")
Step 3: Insert and Position Images in Word Documents
1. Insert an Image
In this step, we add an image to our document, allowing for visual enhancements that complement the text. We begin by creating a paragraph to host the image and then proceed to insert the desired image file usingthe Paragraph.AppendPicture method. After the image is inserted, we can adjust its dimensions and alignment to ensure it fits well within the document layout.
Below is the code to insert and format the image:
# Add a paragraph
paragraph = section.AddParagraph()

# Insert an image
picture = paragraph.AppendPicture("C:\\Users\\Administrator\\Desktop\\logo.png")

# Scale the image dimensions
picture.Width = picture.Width * 0.9
picture.Height = picture.Height * 0.9

# Set text wrapping style
picture.TextWrappingStyle = TextWrappingStyle.TopAndBottom

# Center-align the image horizontally
picture.HorizontalAlignment = HorizontalAlignment.Center
2. Position Image at Precise Location
To gain precise control over the positioning of images within your Word document, you can adjust both the horizontal and vertical origins and specify the image's coordinates in relation to these margins. This allows for accurate placement of the image, ensuring it aligns perfectly with the overall layout of your document.
Below is the code to set the image's position.
picture.HorizontalOrigin = HorizontalOrigin.LeftMarginArea
picture.VerticalOrigin = VerticalOrigin.TopMarginArea
picture.HorizontalPosition = 180.0
picture.VerticalPosition = 165.0
Note : Absolute positioning does not apply when using the Inline text wrapping style.
Step 4: Create and Customize Tables
In this step, we will create a table within the document and customize its appearance and functionality. This includes defining the table's structure, adding header and data rows, and setting formatting options to enhance readability.
Essential steps for creating and customizing a table in Word:
- Add a Table : Use the Section.AddTablemethod to create a new table.
- Specify Table Data : Define the data that will populate the table.
- Set Rows and Columns : Specify the number of rows and columns with the Table.ResetCells method.
- Access Rows and Cells : Retrieve a specific row using Table.Rows[rowIndex] and a specific cell using TableRow.Cells[cellIndex] .
- Populate the Table : Add paragraphs with text to the designated cells.
- Customize Appearance : Modify the table and cell styles through the Table.TableFormat and TableCell.CellFormat properties.
Below is the code to create and customize the table:
# Add a table
table = section.AddTable(True)

# Specify table data
header_data = ["Header 1", "Header 2", "Header 3"]
row_data = [["Row 1, Col 1", "Row 1, Col 2", "Row 1, Col 3"],
            ["Row 2, Col 1", "Row 2, Col 2", "Row 2, Col 3"]]

# Set the row number and column number of table
table.ResetCells(len(row_data) + 1, len(header_data))

# Set the width of table
table.PreferredWidth = PreferredWidth(WidthType.Percentage, int(100))

# Get header row
headerRow = table.Rows[0]
headerRow.IsHeader = True
headerRow.Height = 23
headerRow.RowFormat.BackColor = Color.get_DarkBlue()  # Header color

# Fill the header row with data and set the text formatting
for i in range(len(header_data)):
    headerRow.Cells[i].CellFormat.VerticalAlignment = VerticalAlignment.Middle
    paragraph = headerRow.Cells[i].AddParagraph()
    paragraph.Format.HorizontalAlignment = HorizontalAlignment.Center
    txtRange = paragraph.AppendText(header_data[i])
    txtRange.CharacterFormat.Bold = True
    txtRange.CharacterFormat.FontSize = 15
    txtRange.CharacterFormat.TextColor = Color.get_White()  # White text color

# Fill the rest rows with data and set the text formatting
for r in range(len(row_data)):
    dataRow = table.Rows[r + 1]
    dataRow.Height = 20
    dataRow.HeightType = TableRowHeightType.Exactly

    for c in range(len(row_data[r])):
        dataRow.Cells[c].CellFormat.VerticalAlignment = VerticalAlignment.Middle
        paragraph = dataRow.Cells[c].AddParagraph()
        paragraph.Format.HorizontalAlignment = HorizontalAlignment.Center
        txtRange = paragraph.AppendText(row_data[r][c])
        txtRange.CharacterFormat.FontSize = 13

# Alternate row color
for j in range(1, table.Rows.Count):
    if j % 2 == 0:
        row2 = table.Rows[j]
        for f in range(row2.Cells.Count):
            row2.Cells[f].CellFormat.BackColor = Color.get_LightGray()  # Alternate row color

# Set the border of table
table.TableFormat.Borders.BorderType = BorderStyle.Single
table.TableFormat.Borders.LineWidth = 1.0
table.TableFormat.Borders.Color = Color.get_Black()
Step 5: Generate Numbered/Bulleted Lists
In this step, we create and apply both numbered and bulleted lists to enhance the document's organization. Spire.Doc offers the ListStyle class to define and manage different types of lists with customizable formatting options. Once created, these styles can be applied to any paragraph in the document, ensuring a consistent look across all list items.
Steps for generating numbered/bulleted lists in Word:
- Define the List Style : Initialize a ListStyle for the numbered or bulleted list, specifying properties such as name, pattern type, and text position.
- Add the List Style to Document : Use the Document.ListStyles.Add() method to incorporate the new list style into the document's styles collection.
- Create List Items : For each item, create a paragraph and apply the corresponding list style using the Paragraph.ListFormat.ApplyStyle() method.
- Format Text Properties : Adjust font size and type for each item to ensure consistency and readability.
Below is the code to generate numbered and bulleted lists:
# Create a numbered list style
listStyle = ListStyle(doc, ListType.Numbered)
listStyle.Name = "numberedList"
listStyle.Levels[0].PatternType = ListPatternType.Arabic
listStyle.Levels[0].TextPosition = 60;
doc.ListStyles.Add(listStyle)

# Create a numbered list
for item in ["First item", "Second item", "Third item"]:
    paragraph = section.AddParagraph()
    textRange = paragraph.AppendText(item)
    textRange.CharacterFormat.FontSize = 13
    textRange.CharacterFormat.FontName = "Times New Roman"
    paragraph.ListFormat.ApplyStyle("numberedList")

# Create a bulleted list style
listStyle = ListStyle(doc, ListType.Bulleted)
listStyle.Name = "bulletedList"
listStyle.Levels[0].BulletCharacter = "\u00B7"
listStyle.Levels[0].CharacterFormat.FontName = "Symbol"
listStyle.Levels[0].TextPosition = 20
doc.ListStyles.Add(listStyle)

# Create a bulleted list
for item in ["Bullet item one", "Bullet item two", "Bullet item three"]:
    paragraph = section.AddParagraph()
    textRange = paragraph.AppendText(item)
    textRange.CharacterFormat.FontSize = 13
    textRange.CharacterFormat.FontName = "Times New Roman"
paragraph.ListFormat.ApplyStyle("bulletedList")
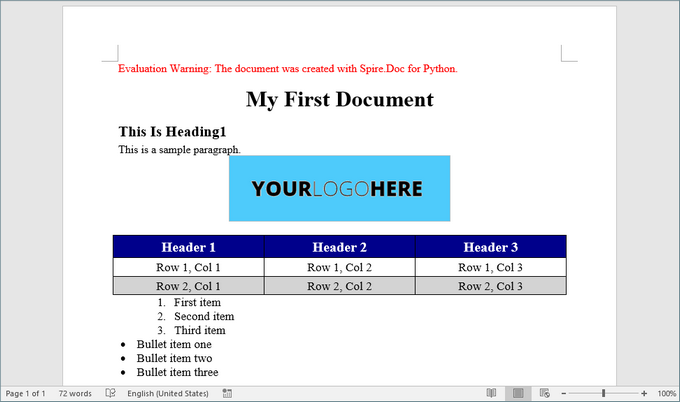
Here’s a screenshot of the Word document created using the code snippets provided above:
Best Practices for Python Word Creation
- Reuse Styles : Define paragraph and list styles upfront to maintain consistency.
- Modular Code : Break document generation into functions (e.g., add_heading(), insert_table()) for reusability.
- Error Handling : Validate file paths and inputs to avoid runtime errors.
- Performance Optimization: Dispose of document objects (doc.Dispose()) to free resources.
- Use Templates : For complex documents, create MS Word templates with placeholders and replace them programmatically to save development time.
By implementing these practices, you can streamline document automation, reduce manual effort, and ensure professional-quality outputs.
FAQs
Q1: Does Spire.Doc support adding headers and footers to a Word document?
Yes, you can add and customize headers and footers, including page numbers, images, and custom text.
Q2. Can I generate Word documents on a server without Microsoft Office installed?
Yes, Spire.Doc works without Office dependencies, making it ideal for server-side automation.
Q3: Can I convert Word documents to other formats using Spire.Doc?
Yes, Spire.Doc supports converting Word documents to various formats, including PDF, HTML, and plain text.
Q4. Can Spire.Doc edit existing Word documents?
Yes, Spire.Doc supports reading, editing, and saving DOCX/DOC files programmatically. Check out this documentation: How to Edit or Modify Word Documents in Pyhton
Conclusion
In this article, we've explored how to create Word documents in Python using the Spire.Doc library, highlighting its potential to enhance productivity while enabling the generation of highly customized and professional documents. By following the steps outlined in this guide, you can fully leverage Spire.Doc, making your document creation process both efficient and straightforward.
As you implement best practices and delve into the library's extensive functionalities, you'll discover that automating document generation significantly reduces manual effort, allowing you to concentrate on more critical tasks. Embrace the power of Python and elevate your document creation capabilities today!
