A different character format gives the same run of text a different feel: a cover title drops its fill and keeps only the outline, a poster slogan gains a shadow, chemical formulas and area units are unthinkable without superscripts and subscripts, and legal clauses and phonetic annotations traditionally carry a dot above the characters. None of these effects changes the text itself, only the way it is rendered, so they are best written in once at the document-generation stage instead of being adjusted character by character in Word.
This article uses Spire.Doc for JavaScript to apply four kinds of character effects: outline and shadow, emboss and engrave, superscript and subscript, and emphasis marks. The whole process runs on WebAssembly in the browser, depends on no backend, and the file stays on the user's device.
This article covers four features:
- Set an Outline and Shadow for Text
- Set Emboss and Engrave for Text
- Insert Superscripts and Subscripts
- Add Emphasis Marks to Text
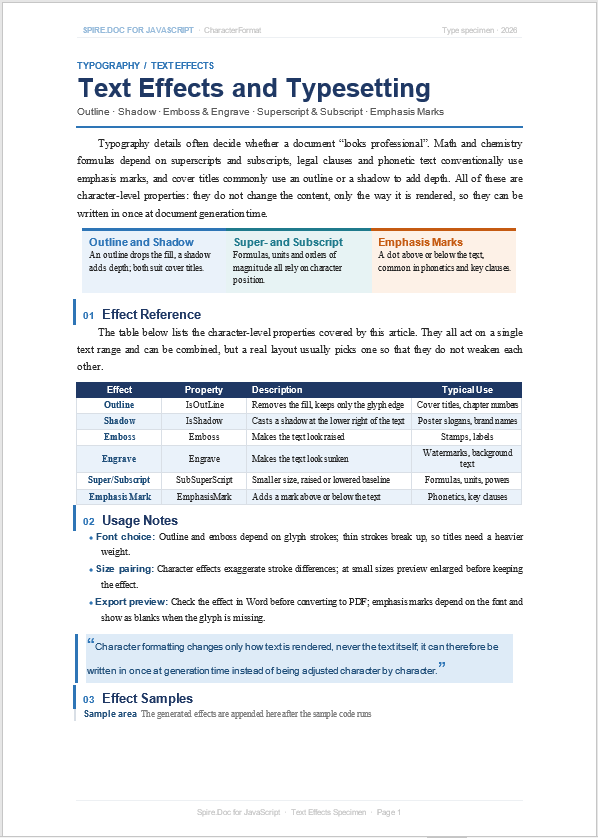
All examples below use the same input document, Typography.docx. It is a one-page type specimen, and the code appends the generated effects to the "sample area" at the end of the document:
How Character Formatting Is Applied
All the effects above are character-level properties, and they are all set through CharacterFormat. There are two common ways to obtain a CharacterFormat:
| Approach | Typical code | When to use |
|---|---|---|
| Set it on newly created text | paragraph.AppendText('Title').CharacterFormat |
Append sample text to the document |
| Find existing text and set it | doc.FindString('Title', false, false).GetAsOneRange().CharacterFormat |
Change text already in the body |
The values and effects of each property are as follows:
| Property | Value | Effect |
|---|---|---|
IsOutLine |
true / false |
Only the outline of the text is shown; the inner fill is removed |
IsShadow |
true / false |
A shadow appears at the lower right of the text |
Emboss |
true / false |
Emboss: the text appears raised |
Engrave |
true / false |
Engrave: the text appears sunken |
SubSuperScript |
The SubSuperScript enumeration |
Superscript, subscript or the normal position |
EmphasisMark |
The Emphasis enumeration |
An emphasis mark above or below the text |
For installation and project setup, refer to Integrating Spire.Doc for JavaScript in a React Project. The examples below assume that Spire.Doc is installed and the WebAssembly module is initialized. The first feature gives the complete React component; the other three reuse the same loading, saving and download code and show only the appended content and the format settings.
Set an Outline and Shadow for Text
IsOutLine removes the inner fill of the glyph and keeps only the outline; IsShadow casts a shadow to the lower right of the text. Both are Boolean properties, and turning them on or off is a matter of assigning true or false. An outline suits a cover title with thick strokes, and a shadow suits a slogan or brand name that needs a little depth.
The specific steps are as follows:
- Get the Spire.Doc WASM module and confirm that it is ready.
- Load the sample document
Typography.docx, create aDocumentobject and load the file. - Append a paragraph at the end of the first section and write "Outline Title".
- Set
IsOutLinethroughTextRange.CharacterFormat, then append "Shadow Title" and setIsShadow. - Save the result with
SaveToFile(), read the file from the VFS and trigger a browser download.
The code for setting an outline and shadow for text is as follows:
function App() {
  const setOutlineAndShadow = async () => {
    // Get the Spire.Doc WASM module
    const docModule = window.wasmModule?.spiredoc;

    if (!docModule) {
      alert('Spire.Doc is not ready yet');
      return;
    }

    await window.spire.FetchFileToVFS('Typography.docx', '', `${process.env.PUBLIC_URL}/data/`);

    const doc = new docModule.Document();
    doc.LoadFromFile('Typography.docx');

    const paragraph = doc.Sections.get_Item(0).AddParagraph();

    // Outline: keep only the glyph edge and remove the inner fill
    const outline = paragraph.AppendText('Outline Title');
    outline.CharacterFormat.IsOutLine = true;
    outline.CharacterFormat.FontSize = 26;

    paragraph.AppendText('    ');

    // Shadow: cast a shadow at the lower right of the text
    const shadow = paragraph.AppendText('Shadow Title');
    shadow.CharacterFormat.IsShadow = true;
    shadow.CharacterFormat.FontSize = 26;

    const outputFileName = 'TextEffects.docx';
    doc.SaveToFile({ fileName: outputFileName, fileFormat: docModule.FileFormat.Docx2013 });
    doc.Dispose();

    // Read the generated file from the VFS and trigger the download
    const fileArray = window.dotnetRuntime.Module.FS.readFile(outputFileName);
    const blob = new Blob([fileArray], {
      type: 'application/vnd.openxmlformats-officedocument.wordprocessingml.document',
    });
    const url = URL.createObjectURL(blob);
    const a = document.createElement('a');
    a.href = url;
    a.download = outputFileName;
    a.click();
    URL.revokeObjectURL(url);
  };

  return (
    <div style={{ textAlign: 'center', height: '300px' }}>
      <h1>Set Outline and Shadow</h1>
      <button onClick={setOutlineAndShadow}>Generate</button>
    </div>
  );
}

export default App;
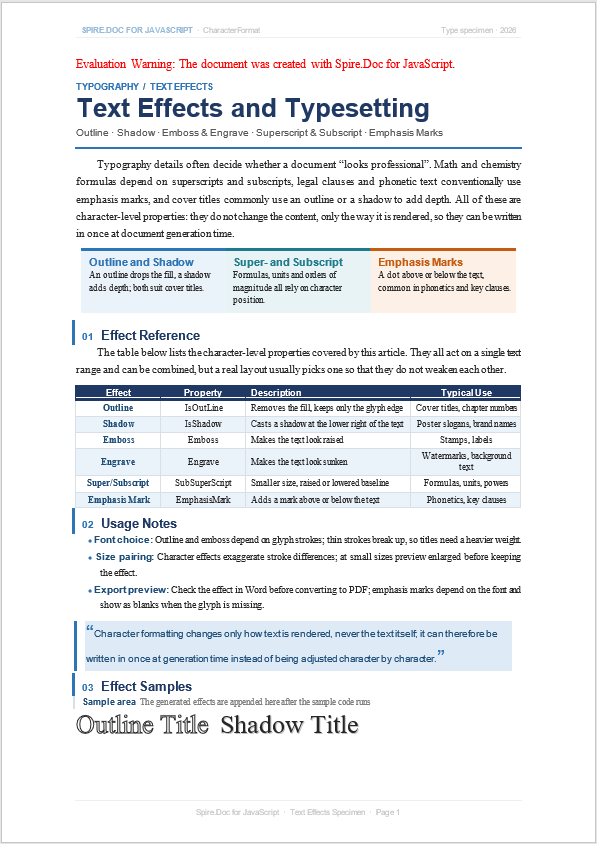
Two title samples are appended to the end of the generated document:
Can Outline and Shadow Be Enabled at the Same Time
The two properties are independent and can both be set to true:
// Enable outline and shadow on the same piece of text
outline.CharacterFormat.IsOutLine = true;
outline.CharacterFormat.IsShadow = true;
With both enabled, the shadow is layered on the hollow glyph, and dense strokes quickly look muddy. A title usually keeps only one of the two; when it needs more depth, give the text a heavier weight instead of stacking both effects.
Set Emboss and Engrave for Text
Emboss and Engrave are a pair of opposite effects: emboss makes the text look raised from the page, and engrave makes it look pressed into the page. They are often used to imitate rubber stamps, embossed seals or background lettering. Both are Boolean properties, set in the same way as outline and shadow.
The specific steps are as follows:
- Load
Typography.docxand take the first section. - Append a paragraph at the end and write "Emboss".
- Set
CharacterFormat.Embossof that text totrue. - Append "Engrave" and set
CharacterFormat.Engravetotrue. - Save the result and trigger the download.
The code for setting emboss and engrave for text is as follows:
const paragraph = doc.Sections.get_Item(0).AddParagraph();

// Emboss: the text appears raised
const emboss = paragraph.AppendText('Emboss');
emboss.CharacterFormat.Emboss = true;
emboss.CharacterFormat.FontSize = 22;

paragraph.AppendText('    ');

// Engrave: the text appears sunken
const engrave = paragraph.AppendText('Engrave');
engrave.CharacterFormat.Engrave = true;
engrave.CharacterFormat.FontSize = 22;
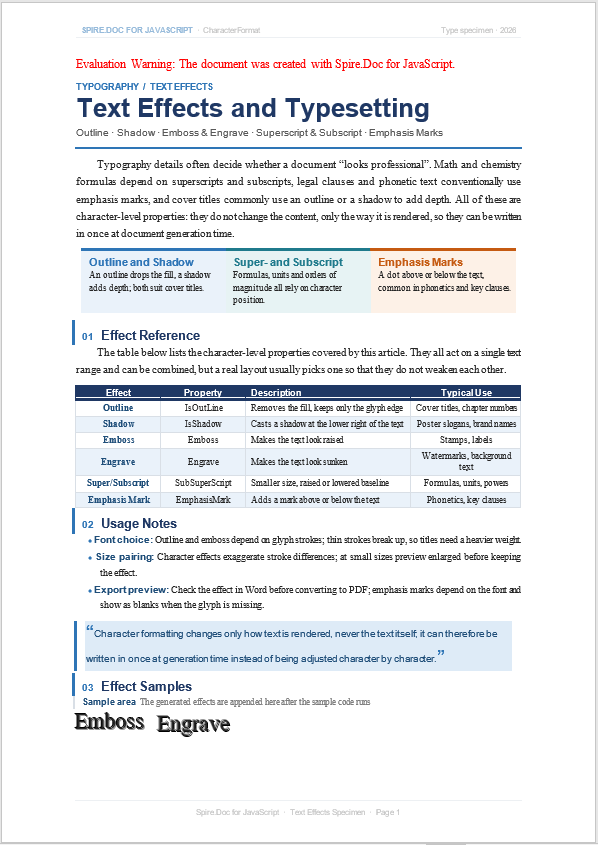
The emboss and engrave samples appear side by side at the end of the generated document:
Set Emboss or Engrave on Existing Text
The code above targets newly appended text. If the target text already exists in the body, use FindString() to locate it and then GetAsOneRange() to obtain the text range:
// Find the existing word "Stamp" in the body and change only its formatting
const seal = doc.FindString('Stamp', false, false).GetAsOneRange();
seal.CharacterFormat.Emboss = true;
FindString() returns a text selection object, and GetAsOneRange() suits the case where the match falls in a single text range. If the target text is split into several ranges in the document, use GetAsRange() to obtain the range collection and set each range in turn.
Insert Superscripts and Subscripts
Superscripts and subscripts are essential to formulas and units: H₂O, x² and 10⁻³ all rely on character position and font size working together. The SubSuperScript enumeration has four values:
| Value | Meaning |
|---|---|
SuperScript |
Superscript: reduced font size with the baseline raised |
SubScript |
Subscript: reduced font size with the baseline lowered |
BaseLine |
Laid out on the baseline, i.e. the normal position |
None |
No superscript or subscript property set |
The specific steps are as follows:
- Load
Typography.docxand append a paragraph at the end of the first section. - Write normal text, then the character that should become a subscript.
- Set the character's
CharacterFormat.SubSuperScripttoSubScript. - Continue with normal text and a superscript character, setting
SubSuperScripttoSuperScript. - Save the result and trigger the download.
The code for inserting superscripts and subscripts is as follows:
const paragraph = doc.Sections.get_Item(0).AddParagraph();

// Use one font size so that the super- and subscript positions are easy to see
const addText = (text) => {
  const run = paragraph.AppendText(text);
  run.CharacterFormat.FontSize = 12;
  return run;
};

addText('The formula of water is H');
const sub = addText('2');
sub.CharacterFormat.SubSuperScript = docModule.SubSuperScript.SubScript;

addText('O, the area is 25 m');
const sup = addText('2');
sup.CharacterFormat.SubSuperScript = docModule.SubSuperScript.SuperScript;

addText(', the volume is 1.2 × 10');
const minus3 = addText('-3');
minus3.CharacterFormat.SubSuperScript = docModule.SubSuperScript.SuperScript;

addText(' m');
const sup3 = addText('3');
sup3.CharacterFormat.SubSuperScript = docModule.SubSuperScript.SuperScript;
addText('.');
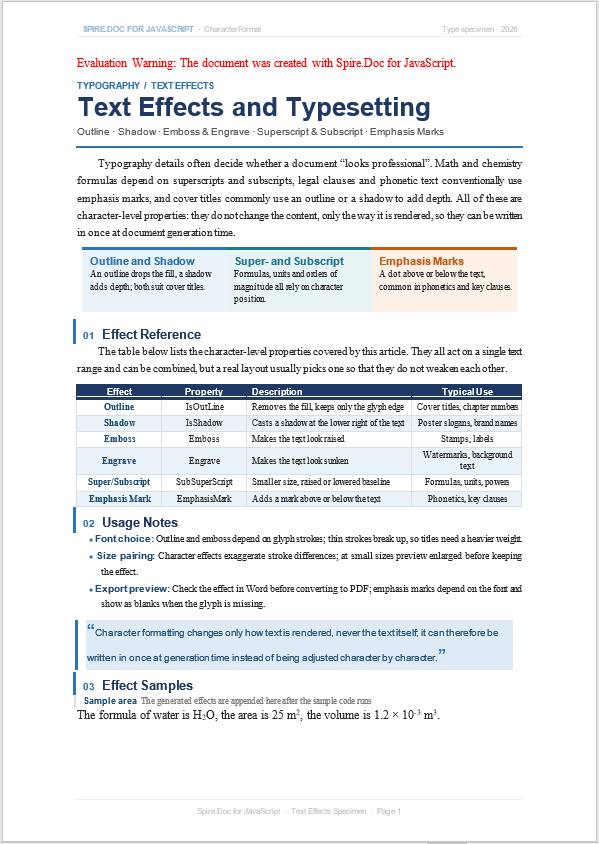
A line containing a superscript, a subscript and an order of magnitude is appended to the end of the generated document:
Write Several Super/Subscript Groups at Once
Formulas are usually made of normal text alternating with superscripts and subscripts. Write the "text + script type" pairs as an array and loop over them to avoid repeated code:
function appendFormula(paragraph, parts) {
  for (const [text, script] of parts) {
    const run = paragraph.AppendText(text);
    run.CharacterFormat.FontSize = 12;
    if (script) {
      run.CharacterFormat.SubSuperScript = docModule.SubSuperScript[script];
    }
  }
}

const paragraph = doc.Sections.get_Item(0).AddParagraph();
appendFormula(paragraph, [
  ['The formula of water is H', null], ['2', 'SubScript'], ['O', null],
  [', the area is 25 m', null], ['2', 'SuperScript'], ['.', null],
]);
Enumeration names can be accessed directly as string keys, and passing null or an empty string for script keeps the normal position.
Add Emphasis Marks to Text
An emphasis mark is a small dot, comma or similar mark above or below the text, common in Chinese phonetic annotation, Japanese furigana and some legal texts. The EmphasisMark property takes the Emphasis enumeration:
| Value | Mark position and shape |
|---|---|
Dot |
A dot above the text |
CommaAbove |
A comma above the text |
CircleAbove |
A circle above the text |
DotBelow |
A dot below the text |
None |
No mark |
The specific steps are as follows:
- Load
Typography.docxand append a paragraph at the end of the first section. - Write "Key Clause" and set
EmphasisMarktoDot. - Add a line break and write "Supplementary Note", setting
CommaAbove. - Continue with "Caution" and "Reference", setting
CircleAboveandDotBelowrespectively. - Save the result and trigger the download.
The code for adding emphasis marks to text is as follows:
const paragraph = doc.Sections.get_Item(0).AddParagraph();

const dot = paragraph.AppendText('Key Clause');
dot.CharacterFormat.EmphasisMark = docModule.Emphasis.Dot;
paragraph.AppendText(': this provision takes effect on the date of publication.');

paragraph.AppendText('\n');
const comma = paragraph.AppendText('Supplementary Note');
comma.CharacterFormat.EmphasisMark = docModule.Emphasis.CommaAbove;
paragraph.AppendText(': these rules are interpreted by the General Administration Department.');

paragraph.AppendText('\n');
const circle = paragraph.AppendText('Caution');
circle.CharacterFormat.EmphasisMark = docModule.Emphasis.CircleAbove;
paragraph.AppendText(': please cite the source when quoting.');

paragraph.AppendText('\n');
const below = paragraph.AppendText('Reference');
below.CharacterFormat.EmphasisMark = docModule.Emphasis.DotBelow;
paragraph.AppendText(': see the appendix and the relevant standards.');
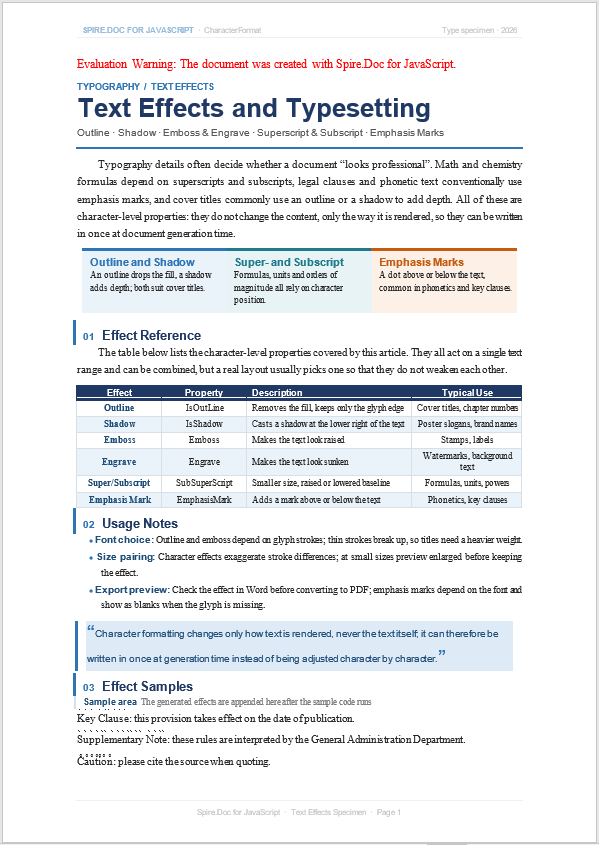
A comparison of the four emphasis marks is appended to the end of the generated document:
Add Emphasis Marks to Existing Text
If the emphasis mark is to be added to text already in the body, FindString() can locate it in the same way:
// Find the existing phrase "Key Clause" and add a dot to it only
const range = doc.FindString('Key Clause', false, false).GetAsOneRange();
range.CharacterFormat.EmphasisMark = docModule.Emphasis.Dot;
An emphasis mark is a character property; removing or changing it does not alter the text. After the document is saved and loaded again, CharacterFormat.EmphasisMark still returns the corresponding enumeration value.
FAQ
Why do outline or shadow effects look wrong after exporting to PDF
Cause: Both outline and shadow depend on glyph edges and font rendering. If the font subset is incomplete, the glyph strokes are too thin, or the PDF renderer does not support the character effect, the result may differ from what Word shows.
Fix: Use a font with thicker strokes and a complete glyph set, preview the effect in Word first, and then export to PDF. At small heading sizes an outline tends to break up, so a slightly larger font size is usually more legible.
Do superscripts and subscripts increase line spacing
They do occupy line height. Although the characters are smaller, they still take part in the line-height calculation; when they appear in succession or at a large font size, the spacing of the whole paragraph can be stretched. If the layout is strict, set a smaller font size for the superscripts and subscripts or use a fixed line spacing in the paragraph format to reduce the variation.
Why do emphasis marks show as blanks or boxes
This is usually caused by the font lacking the corresponding glyph. Emphasis marks are drawn from mark glyphs in the font; switch to a font that covers them (for example SimSun or Microsoft YaHei) and confirm the result in Word. Increasing the font size alone generally does not make a missing glyph appear.
Can the same effect be applied to several places at once
Yes. FindAllString() returns every match in the document; obtain the text range of each match and set the property on all of them. When there are many matches, check the context of the target text first so that identically named text in tables, headers or the table of contents is not changed as well.
Can emboss and engrave be used on the same piece of text
Both properties can be set to true separately, but both simulate depth through the light and shade of glyph edges, so stacked they tend to interfere with each other; in practice a layout usually picks one. When more contrast is needed, switch to an outline, a shadow or a different text color.
Get a Free License
Spire.Doc for JavaScript offers a 30-day full-featured free trial license with no functional limitations. Apply here to evaluate before purchasing.
