Confirmation forms, registration forms and signature pages usually need, in addition to text fields, two kinds of interactive elements: a set of items that can be checked, and a date in a consistent format. Boxes and dates drawn with ordinary characters may look similar, but they cannot record the checked state, and the date may be entered in various ways. Content controls turn these two kinds of input into structured objects: a check box stores its Checked state, and a date control stores the full date value and the display format.
This article uses Spire.Doc for JavaScript to create check box and date picker controls in the browser, and demonstrates how to load an existing document and toggle check box states in bulk. The processing is performed in WebAssembly: it does not depend on Office and requires no backend service.
This article covers the following topics:
The two kinds of controls correspond to the following types and property objects:
| Control type | SDTType value |
Control property class | Key properties |
|---|---|---|---|
| Check box content control | SdtType.CheckBox |
SdtCheckBox |
Checked |
| Date picker content control | SdtType.DatePicker |
SdtDate |
DateFormat, FullDate, CalendarType |
For installation and project setup, refer to Integrating Spire.Doc for JavaScript in a React Project. The examples below assume that Spire.Doc is installed and the WebAssembly module is initialized.
Add a Check Box Content Control
A check box content control represents a binary yes/no choice and usually appears in groups, for example a confirmation checklist, an equipment list or a set of service options. The control itself stores only the checked state, so the box symbol shown in the document has to be written into the control content as well.
The following members are involved in adding a check box content control:
| Member | Purpose |
|---|---|
SdtType.CheckBox |
Sets the control type to check box |
SdtCheckBox |
Control properties object of the check box |
SdtCheckBox.Checked |
Whether the box is currently checked |
TextRange |
Carries the box symbol displayed inside the control |
CharacterFormat.FontName |
Font used by the symbol; the example uses MS Gothic |
The specific steps are as follows:
- Get the Spire.Doc WASM module and confirm that it is ready.
- Load the font, create a document with the
Documentclass and add a section, then write the title and description. - For each item, create a
StructureDocumentTagInlinecontrol and setSDTTypetoSdtType.CheckBox. - Create a
SdtCheckBoxand setChecked, then write the matching box character intoSDTContent. - Save the result file with
SaveToFile(), read it from the VFS and trigger a browser download.
The code for adding a check box content control is as follows:
function App() {
  const addCheckBox = async () => {
    // Get the Spire.Doc WASM module
    const wasmModule = window.wasmModule?.spiredoc;

    if (!wasmModule) {
      alert('Spire.Doc is not ready yet');
      return;
    }

    // Load the font
    await window.spire.FetchFileToVFS('arial.ttf', '/Library/Fonts/', `${process.env.PUBLIC_URL}/font/`);
    await window.spire.FetchFileToVFS('arialbd.ttf', '/Library/Fonts/', `${process.env.PUBLIC_URL}/font/`);

    // Create a document and add a section
    const doc = new wasmModule.Document();
    const section = doc.AddSection();

    // Add the title and subtitle
    const titleParagraph = section.AddParagraph();
    const titleRange = titleParagraph.AppendText('Training Registration Confirmation');
    titleRange.CharacterFormat.FontName = 'Arial';
    titleRange.CharacterFormat.FontSize = 19;
    titleRange.CharacterFormat.Bold = true;
    titleRange.CharacterFormat.TextColor = wasmModule.Color.FromArgb(255, 15, 110, 90);
    titleParagraph.Format.AfterSpacing = 6;

    const subtitleParagraph = section.AddParagraph();
    const subtitleRange = subtitleParagraph.AppendText('Document Automation Essentials — November 12, 2026');
    subtitleRange.CharacterFormat.FontName = 'Arial';
    subtitleRange.CharacterFormat.FontSize = 9;
    subtitleRange.CharacterFormat.TextColor = wasmModule.Color.FromArgb(255, 89, 89, 89);
    subtitleParagraph.Format.AfterSpacing = 16;

    // Registrant information
    const info = section.AddParagraph();
    info.AppendText('Name: John Smith    Department: R&D Department');
    info.Format.AfterSpacing = 10;

    // Hint for the confirmation items
    const hint = section.AddParagraph();
    const hintRange = hint.AppendText('Please confirm the following items:');
    hintRange.CharacterFormat.FontName = 'Arial';
    hintRange.CharacterFormat.Bold = true;
    hint.Format.AfterSpacing = 6;

    // Add a check box control for each item
    const items = [
      ['I have read the course guidelines', 'read-notice', true],
      ['I need lunch arranged', 'need-lunch', false],
      ['I need printed handouts', 'need-handout', true],
    ];

    for (const [label, tag, checked] of items) {
      const paragraph = section.AddParagraph();
      paragraph.Format.LeftIndent = 24;

      // Create an inline content control
      const sdt = new wasmModule.StructureDocumentTagInline(doc);
      paragraph.ChildObjects.Add(sdt);

      // Set the control type to check box
      sdt.SDTProperties.SDTType = wasmModule.SdtType.CheckBox;
      sdt.SDTProperties.Alias = label;
      sdt.SDTProperties.Tag = tag;

      // Set the checked state
      const box = new wasmModule.SdtCheckBox();
      box.Checked = checked;
      sdt.SDTProperties.ControlProperties = box;

      // Write the box symbol that matches the state
      const symbol = new wasmModule.TextRange(doc);
      symbol.Text = checked ? '☒' : '☐';
      symbol.CharacterFormat.FontName = 'MS Gothic';
      symbol.CharacterFormat.FontSize = 12;
      sdt.SDTContent.ChildObjects.Add(symbol);

      // Append the item name after the control
      paragraph.AppendText('  ' + label);
    }

    // Add the closing note
    const noteParagraph = section.AddParagraph();
    noteParagraph.Format.BeforeSpacing = 10;
    const noteRange = noteParagraph.AppendText('Please return this form to the training team by November 8.');
    noteRange.CharacterFormat.FontName = 'Arial';
    noteRange.CharacterFormat.FontSize = 9;
    noteRange.CharacterFormat.TextColor = wasmModule.Color.FromArgb(255, 89, 89, 89);

    // Save the result file
    const outputFileName = 'AddCheckBoxContentControl.docx';
    doc.SaveToFile({ fileName: outputFileName, fileFormat: wasmModule.FileFormat.Docx2013 });
    doc.Dispose();

    // Read the generated file from the VFS and trigger the download
    const fileArray = window.dotnetRuntime.Module.FS.readFile(outputFileName);
    const blob = new Blob([fileArray], { type: 'application/vnd.openxmlformats-officedocument.wordprocessingml.document' });
    const url = URL.createObjectURL(blob);
    const a = document.createElement('a');
    a.href = url;
    a.download = outputFileName;
    a.click();
    URL.revokeObjectURL(url);
  };

  return (
    <div style={{ textAlign: 'center', height: '300px' }}>
      <h1>Add Check Box Content Control</h1>
      <button onClick={addCheckBox}>Generate Document</button>
    </div>
  );
}

export default App;
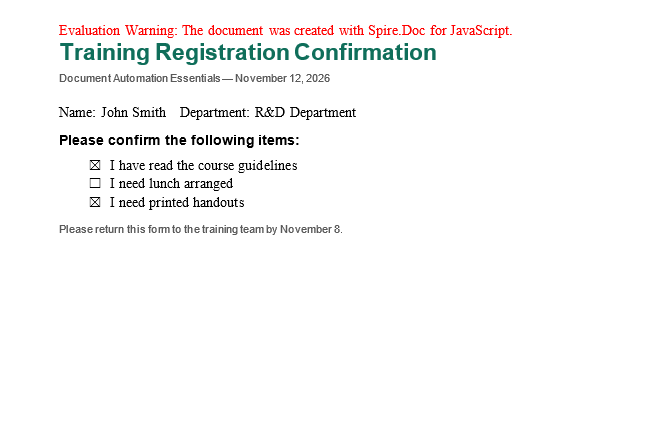
Document after adding a check box content control:
The Checked State and the Displayed Symbol Must Stay in Sync
SdtCheckBox.Checked stores the logical state of the control, while the box shown by Word comes from the characters in the control content. The two are independent: if Checked is set without writing a symbol, the resulting check box is blank in Word; if only the symbol is changed without changing Checked, the state read by a program disagrees with what is displayed.
The example handles both at once with a conditional expression: when checked is true it writes ☒ (U+2612), otherwise ☐ (U+2610), and sets the font to MS Gothic so that both characters have a matching glyph. When an existing document is modified later, the same rule has to be applied to keep the two in sync.
Add a Date Picker Content Control
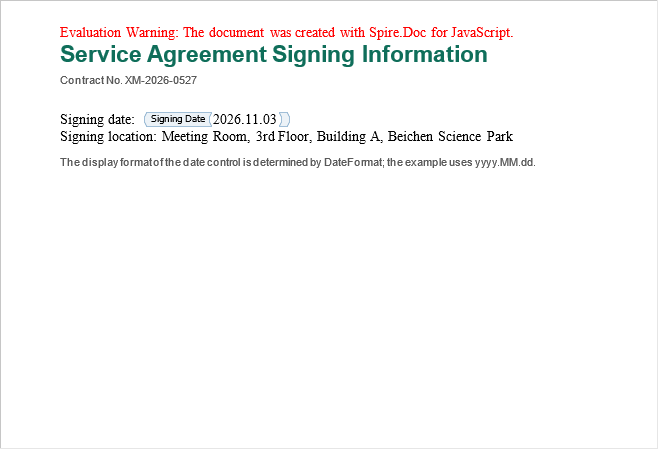
A date picker content control lets the person filling in the form select a date from a calendar and displays it in a preset format, which avoids 2026.11.3, 2026-11-03 and November 3, 2026 all appearing in the same document. The control stores the full date value, while the display format is determined by DateFormat; the two are set separately.
The following members are involved in adding a date picker content control:
| Member | Purpose |
|---|---|
SdtType.DatePicker |
Sets the control type to date picker |
SdtDate |
Control properties object of the date control |
SdtDate.DateFormat |
Display format, such as yyyy.MM.dd |
SdtDate.FullDate |
Full date value; requires a JavaScript Date object |
SdtDate.CalendarType |
Calendar type; the example uses CalendarType.Default |
The specific steps are as follows:
- Get the Spire.Doc WASM module and confirm that it is ready.
- Load the font, create a document with the
Documentclass and add a section, then write the title and contract number. - Create a
StructureDocumentTagInlinecontrol in the paragraph and setSDTTypetoSdtType.DatePicker. - Create a
SdtDate, setDateFormat,CalendarTypeandFullDate, and assign it toControlProperties. - Write the formatted date text, save the file and read it from the VFS for download.
The code for adding a date picker content control is as follows:
function App() {
  const addDatePicker = async () => {
    // Get the Spire.Doc WASM module
    const wasmModule = window.wasmModule?.spiredoc;

    if (!wasmModule) {
      alert('Spire.Doc is not ready yet');
      return;
    }

    // Load the font
    await window.spire.FetchFileToVFS('arial.ttf', '/Library/Fonts/', `${process.env.PUBLIC_URL}/font/`);
    await window.spire.FetchFileToVFS('arialbd.ttf', '/Library/Fonts/', `${process.env.PUBLIC_URL}/font/`);

    // Create a document and add a section
    const doc = new wasmModule.Document();
    const section = doc.AddSection();

    // Add the title and subtitle
    const titleParagraph = section.AddParagraph();
    const titleRange = titleParagraph.AppendText('Service Agreement Signing Information');
    titleRange.CharacterFormat.FontName = 'Arial';
    titleRange.CharacterFormat.FontSize = 19;
    titleRange.CharacterFormat.Bold = true;
    titleRange.CharacterFormat.TextColor = wasmModule.Color.FromArgb(255, 15, 110, 90);
    titleParagraph.Format.AfterSpacing = 6;

    const subtitleParagraph = section.AddParagraph();
    const subtitleRange = subtitleParagraph.AppendText('Contract No. XM-2026-0527');
    subtitleRange.CharacterFormat.FontName = 'Arial';
    subtitleRange.CharacterFormat.FontSize = 9;
    subtitleRange.CharacterFormat.TextColor = wasmModule.Color.FromArgb(255, 89, 89, 89);
    subtitleParagraph.Format.AfterSpacing = 16;

    // Add the explanatory text before the control
    const paragraph = section.AddParagraph();
    paragraph.AppendText('Signing date:  ');

    // Create an inline content control and add it to the paragraph
    const sdt = new wasmModule.StructureDocumentTagInline(doc);
    paragraph.ChildObjects.Add(sdt);

    // Set the control type to date picker
    sdt.SDTProperties.SDTType = wasmModule.SdtType.DatePicker;
    sdt.SDTProperties.Alias = 'Signing Date';
    sdt.SDTProperties.Tag = 'sign-date';
    sdt.SDTProperties.Appearance = wasmModule.SdtAppearance.Tags;

    // Set the date format and date value
    const date = new wasmModule.SdtDate();
    date.CalendarType = wasmModule.CalendarType.Default;
    date.DateFormat = 'yyyy.MM.dd';
    date.FullDate = new Date(2026, 10, 3);
    sdt.SDTProperties.ControlProperties = date;

    // Write the formatted date text
    const content = new wasmModule.TextRange(doc);
    content.Text = '2026.11.03';
    sdt.SDTContent.ChildObjects.Add(content);

    // Add the signing location
    const place = section.AddParagraph();
    place.AppendText('Signing location: Meeting Room, 3rd Floor, Building A, Beichen Science Park');

    // Add a note about the format
    const noteParagraph = section.AddParagraph();
    noteParagraph.Format.BeforeSpacing = 10;
    const noteRange = noteParagraph.AppendText('The display format of the date control is determined by DateFormat; the example uses yyyy.MM.dd.');
    noteRange.CharacterFormat.FontName = 'Arial';
    noteRange.CharacterFormat.FontSize = 9;
    noteRange.CharacterFormat.TextColor = wasmModule.Color.FromArgb(255, 89, 89, 89);

    // Save the result file
    const outputFileName = 'AddDatePickerContentControl.docx';
    doc.SaveToFile({ fileName: outputFileName, fileFormat: wasmModule.FileFormat.Docx2013 });
    doc.Dispose();

    // Read the generated file from the VFS and trigger the download
    const fileArray = window.dotnetRuntime.Module.FS.readFile(outputFileName);
    const blob = new Blob([fileArray], { type: 'application/vnd.openxmlformats-officedocument.wordprocessingml.document' });
    const url = URL.createObjectURL(blob);
    const a = document.createElement('a');
    a.href = url;
    a.download = outputFileName;
    a.click();
    URL.revokeObjectURL(url);
  };

  return (
    <div style={{ textAlign: 'center', height: '300px' }}>
      <h1>Add Date Picker Content Control</h1>
      <button onClick={addDatePicker}>Generate Document</button>
    </div>
  );
}

export default App;
Document after adding a date picker content control:
Date Formats and the Month in the JavaScript Date Object
DateFormat uses Word's date format placeholders, and upper and lower case have different meanings:
| Placeholder | Meaning | Example |
|---|---|---|
yyyy |
Four-digit year | 2026 |
MM |
Two-digit month, zero-padded | 11 |
dd |
Two-digit day, zero-padded | 03 |
FullDate requires a JavaScript Date object; passing a string triggers a type validation error. Note that the month in the Date constructor is zero-based, so new Date(2026, 10, 3) means November 3, 2026, not October.
Toggle Check Box States in Bulk
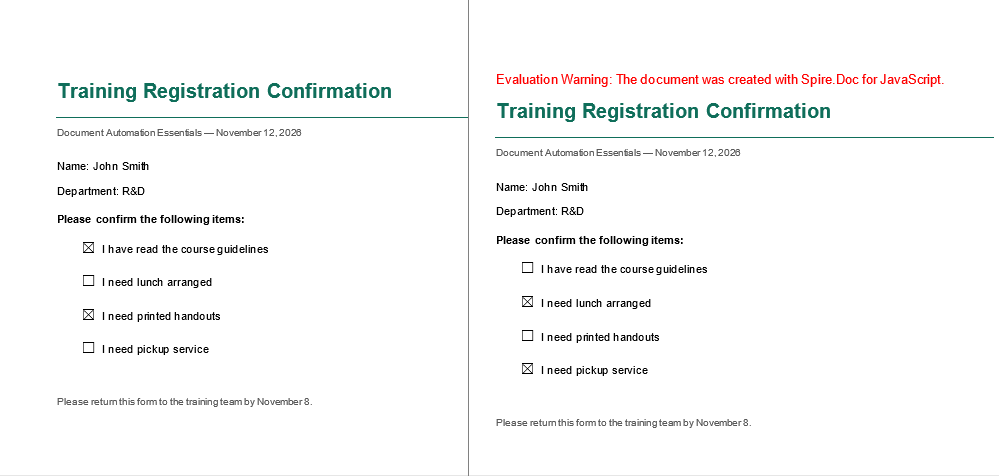
After confirmation forms are collected, a common requirement is to reverse all check states, or to reset them according to new registrations. Clicking each box by hand is slow and easy to get wrong. Iterating over the check box controls in the document with code, flipping Checked and updating the box symbols, handles every item in one pass.
The traversal is the same as above: first check whether a body object is a paragraph, then whether a child object of the paragraph is a StructureDocumentTagInline, and finally filter by SdtType.CheckBox. The example reads CheckBoxContentControl.docx from public/data, so put that file in the project's public/data directory before running it.
| Member | Purpose |
|---|---|
Document.LoadFromFile(path) |
Loads a document from the VFS |
SDTProperties.ControlProperties |
Gets the SdtCheckBox object |
SdtCheckBox.Checked |
Reads or writes the checked state |
SDTContent.ChildObjects |
Iterates over the symbol text inside the control and updates it |
The specific steps are as follows:
- Get the Spire.Doc WASM module and confirm that it is ready.
- Load the font, read
CheckBoxContentControl.docxinto the VFS and load it as aDocument. - Iterate over the body objects of each section and the child objects of each paragraph, and filter out the check box content controls.
- Flip
Checked, then update the text of everyTextRangeinside the control to the matching box symbol. - Save the result file with
SaveToFile(), read it from the VFS and trigger a browser download.
The code for toggling the check box states in bulk is as follows:
function App() {
  const updateCheckBox = async () => {
    // Get the Spire.Doc WASM module
    const wasmModule = window.wasmModule?.spiredoc;

    if (!wasmModule) {
      alert('Spire.Doc is not ready yet');
      return;
    }

    // Load the document to be processed
    await window.spire.FetchFileToVFS('CheckBoxContentControl.docx', '', `${process.env.PUBLIC_URL}/data/`);

    const doc = new wasmModule.Document();
    doc.LoadFromFile('CheckBoxContentControl.docx');

    // Iterate over the sections and find check box content controls
    for (let s = 0; s < doc.Sections.Count; s++) {
      const section = doc.Sections.get_Item(s);
      for (let i = 0; i < section.Body.ChildObjects.Count; i++) {
        const obj = section.Body.ChildObjects.get_Item(i);
        if (obj.DocumentObjectType !== wasmModule.DocumentObjectType.Paragraph) continue;

        for (let j = 0; j < obj.ChildObjects.Count; j++) {
          const child = obj.ChildObjects.get_Item(j);
          if (child.DocumentObjectType !== wasmModule.DocumentObjectType.StructureDocumentTagInline) continue;
          if (child.SDTProperties.SDTType !== wasmModule.SdtType.CheckBox) continue;

          // Toggle the checked state
          const box = child.SDTProperties.ControlProperties;
          box.Checked = !box.Checked;

          // Update the box symbol inside the control
          for (let k = 0; k < child.SDTContent.ChildObjects.Count; k++) {
            const inner = child.SDTContent.ChildObjects.get_Item(k);
            if (inner.DocumentObjectType === wasmModule.DocumentObjectType.TextRange) {
              inner.Text = box.Checked ? '☒' : '☐';
            }
          }
        }
      }
    }

    // Save the result file
    const outputFileName = 'UpdateCheckBox.docx';
    doc.SaveToFile({ fileName: outputFileName, fileFormat: wasmModule.FileFormat.Docx2013 });
    doc.Dispose();

    // Read the generated file from the VFS and trigger the download
    const fileArray = window.dotnetRuntime.Module.FS.readFile(outputFileName);
    const blob = new Blob([fileArray], { type: 'application/vnd.openxmlformats-officedocument.wordprocessingml.document' });
    const url = URL.createObjectURL(blob);
    const a = document.createElement('a');
    a.href = url;
    a.download = outputFileName;
    a.click();
    URL.revokeObjectURL(url);
  };

  return (
    <div style={{ textAlign: 'center', height: '300px' }}>
      <h1>Toggle Check Box States</h1>
      <button onClick={updateCheckBox}>Generate Document</button>
    </div>
  );
}

export default App;
The comparison before and after processing is shown below; the left image is the original document and the right image is the document after toggling:
FAQ
Why is no box displayed for a check box content control in Word
Cause: Checked only determines the logical state; Word does not draw a symbol from it. The box inside the control comes from the characters in SDTContent — the example writes ☒ (U+2612) or ☐ (U+2610) and specifies the MS Gothic font. Without this content the control appears blank in the document.
Solution: Write the box character into SDTContent at the same time as setting Checked, and choose the character according to the state so that the displayed symbol matches the stored value.
Why does passing a string to FullDate raise an error
Cause: SdtDate.FullDate expects a JavaScript Date object, not a formatted string. Assigning a string to it raises a type error when the property is saved or read.
Solution: Use date.FullDate = new Date(2026, 10, 3) and write the displayed text separately through a TextRange; keep in mind that the month argument is zero-based.
Why does the box in the document not change after toggling Checked
Cause: The logical state and the displayed content are separate. After the program changes Checked, the characters in SDTContent remain as they were, so the document still shows the old symbol.
Solution: Iterate over SDTContent.ChildObjects after changing Checked and update each TextRange.Text to the matching box character. Changing only one of the two leaves the state and the display inconsistent.
Is there a difference between MM and mm in a date format
Cause: In Word date formats, M/MM stands for the month and m/mm for the minute; d/dd stands for the day and y/yyyy for the year. Writing yyyy.mm.dd displays the minute in the month position, which is not the intended result.
Solution: Use yyyy.MM.dd as the example does, and check the case of every placeholder in the format string.
Get a Free License
Spire.Doc for JavaScript offers a 30-day full-featured free trial license with no functional limitations. Apply here to evaluate before purchasing.
