Custom Watermarks for the Spire.OfficeJS Editor
The Spire.OfficeJS editor supports custom watermarks. You only need to provide an external JS script; the editor loads and executes it while rendering the document, drawing a tiled watermark on the canvas of the editing area. The watermark is drawn on an overlay above the editing area and is not written into the document, so exported or downloaded files do not contain it. The text, density, and color of the watermark are all determined by the script: it can display fixed text or combine dynamic content such as user information and dates. The following sections describe the implementation; the same configuration works for Word, PowerPoint, and Excel.
- How It Works
- Configure the Watermark Script
- Write the Watermark Script
- Set the Watermark Prefix
- Watermark Effect
- FAQ
How It Works
A custom watermark involves the following configuration:
| Component | Purpose |
|---|---|
cusWaterMarkJs |
Initialization option that specifies the URL of the custom watermark script; the editor loads it. |
waterMark.js |
The watermark script; locates the editor container and calls canvasWM() to draw the watermark. |
iframe.name |
(Optional) The name of the editor iframe; used when the prefix must be set dynamically per user or deployment. |
The watermark script runs inside the editor iframe, so it can read window.name directly and access the editing area container. The following sections describe these settings in order.
Configure the Watermark Script
Add cusWaterMarkJs to user.customization.public.common, with the accessible URL of the watermark script as its value. This configuration is the same for all three editors:
<div id="editor"></div>
<script src="http://LocalExample:3000/web/editors/spireapi/SpireCloudEditor.js"></script>
<script>
var SERVER = 'http://LocalExample:3000';

var config = {
  fileAttrs: {
    fileInfo: { name: 'sample.docx', ext: 'docx' },
    sourceUrl: SERVER + '/samples/sample.docx'
  },
  user: {
    id: 'uid-1',
    name: 'Andy',
    customization: {
      public: {
        common: {
          cusWaterMarkJs: SERVER + '/files/waterMark.js' // custom watermark script
        }
      }
    }
  },
  editorAttrs: {
    editorMode: 'edit',
    editorType: 'document',
    editorWidth: '100%',
    editorHeight: '600px',
    viewLanguage: 'zh',
    useWebAssemblyDoc: true,
    serverless: {
      useServerless: true,
      baseUrl: SERVER
    }
  }
};

new SpireCloudEditor.OpenApi('editor', config);
</script>
cusWaterMarkJs is a string containing the script URL and is written the same way for all three editors. To switch document types, replace the corresponding options in the table below (set the WebAssembly switch to true in each case):
| Editor | editorType |
fileInfo.ext |
WebAssembly switch |
|---|---|---|---|
| Word | document |
docx |
useWebAssemblyDoc |
| Excel | spreadsheet |
xlsx |
useWebAssemblyExcel |
| PowerPoint | presentation |
pptx |
useWebAssemblyPpt |
Write the Watermark Script
Create a script named waterMark.js. Once loaded, it performs the following steps:
- Find the container: Word and PowerPoint use
id_main_view; Excel useseditor_sdk. - Build the text: Set the watermark prefix (the example reads
window.name; you can also use fixed text), and combine it with the current year, month, and day. - Draw the watermark: Pass the text to
canvasWM()to draw it tiled on the canvas. - Run automatically: The editor usually only loads the script and does not call it, so the script ends with a self-executing block to trigger drawing.
function insertWaterMark() {
  // find the container
  var container =
    document.getElementById('id_main_view') || // Word / PowerPoint
    document.getElementById('editor_sdk');      // Excel

  if (!container) return false;

  // build the text
  var prefix = window.name || 'SpireCloudEditor';
  var today = new Date();
  var content = prefix + today.getFullYear() + '-' + (today.getMonth() + 1) + '-' + today.getDate();

  canvasWM({ container: container, content: content });
  return true;
}

function canvasWM(options) {
  var container = options.container;
  var content = options.content;

  if (getComputedStyle(container).position === 'static') {
    container.style.position = 'relative';
  }

  var canvas = document.createElement('canvas');
  canvas.style.cssText =
    'position:absolute;left:0;top:0;width:100%;height:100%;pointer-events:none;z-index:9999;';
  container.appendChild(canvas);

  function draw() {
    var width = container.clientWidth;
    var height = container.clientHeight;
    canvas.width = width;
    canvas.height = height;

    var ctx = canvas.getContext('2d');
    ctx.clearRect(0, 0, width, height);
    ctx.fillStyle = 'rgba(220, 53, 69, 0.25)';
    ctx.font = '16px "Microsoft YaHei", Arial, sans-serif';
    ctx.textAlign = 'center';
    ctx.textBaseline = 'middle';

    for (var y = -150; y < height + 150; y += 150) {
      for (var x = -240; x < width + 240; x += 240) {
        ctx.save();
        ctx.translate(x, y);
        ctx.rotate(-Math.PI / 6);
        ctx.fillText(content, 0, 0);
        ctx.restore();
      }
    }
  }

  draw();
  window.addEventListener('resize', draw);
}

(function () {
  var tries = 0;
  (function run() {
    if (insertWaterMark() || ++tries > 20) return;
    setTimeout(run, 300);
  })();
})();
Set the Watermark Prefix
The window.name in the script is the name of the editor iframe. Its default value is SpireCloudEditor, which is also the default watermark prefix.
- Fixed prefix: Edit
waterMark.jsdirectly, for examplevar prefix = 'E-ICEBLUE';. - Per logged-in user: Keep
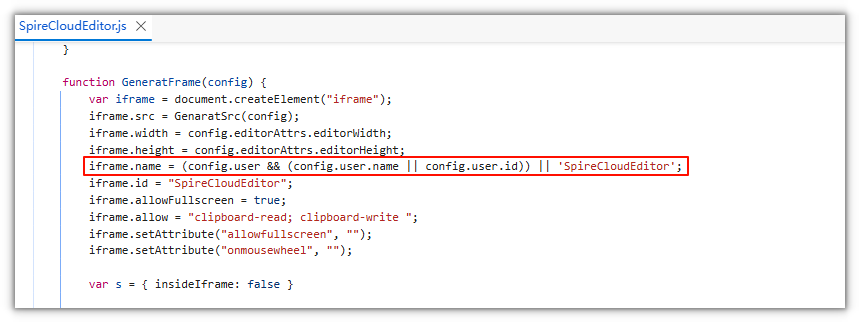
window.nameunchanged and write the current user into the iframe name inGeneratFrame(config)inweb/editors/spireapi/SpireCloudEditor.js:
iframe.name = (config.user && (config.user.name || config.user.id)) || 'SpireCloudEditor';
This way each user's window.name is their own user name or ID, and the prefix changes with the user.
Watermark Effect
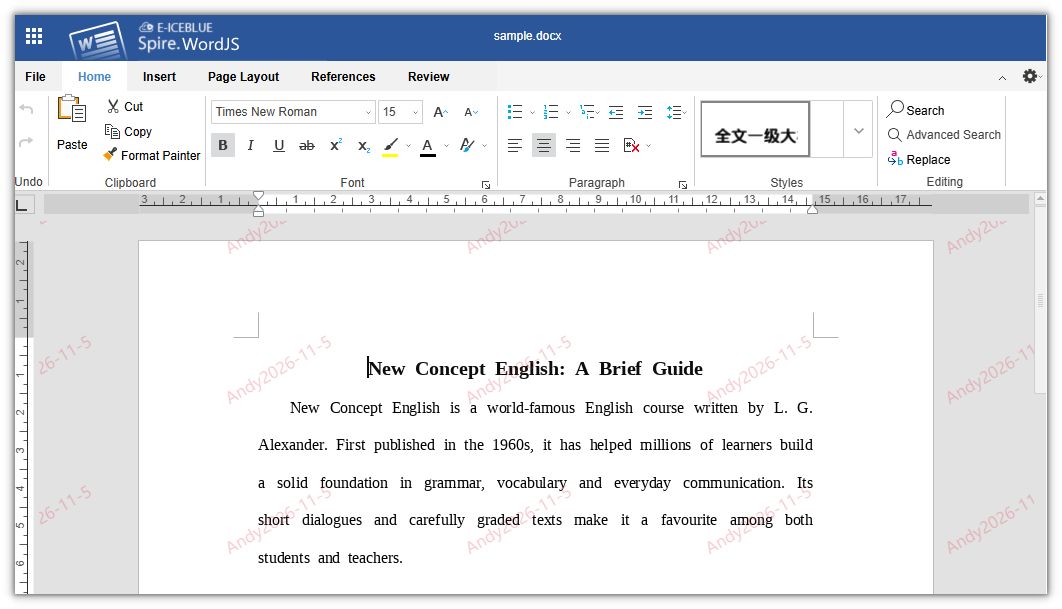
After completing the configuration above, open a document and the editing area displays a tiled, diagonal light-red watermark. The watermark in the example below is "user name + current date".
FAQ
Watermark does not appear
Check the following in order:
- Whether the
cusWaterMarkJsURL can be accessed directly in the browser and whether the script loads successfully. - Whether the container ID found by
insertWaterMark()matches the current editor (Word/PowerPoint:id_main_view; Excel:editor_sdk). - Whether the script executes on load: the editor usually only loads the script and does not call
insertWaterMark(); the self-executing code at the end of the example triggers drawing. If you changed or removed it, call the function yourself. - Whether
canvasWM()is implemented: the example includes a complete implementation. If you replace it with another drawing method, make sure the script still provides that function.
Changes to the script do not take effect
The URL referenced by cusWaterMarkJs should preferably be same-origin with the site. For cross-origin requests, configure CORS and return the script with a correct MIME type such as text/javascript. After modifying SpireCloudEditor.js or waterMark.js, clear the browser cache or force a refresh to avoid loading an old version.
Co-edit Documents with Spire.OfficeJS
Co-editing lets multiple users open the same document at the same time, with everyone's changes visible to everyone else, without sending files back and forth or merging manually. Spire.OfficeJS has co-editing built in: with the right page configuration, two browser tabs or two users can join the same editing session. This article uses Word as an example. It first explains how co-editing works and what it requires, then walks through the key configuration piece by piece, and finally gives a complete runnable example.
How Co-editing Works
The following diagram and steps explain how co-editing works in Spire.OfficeJS.
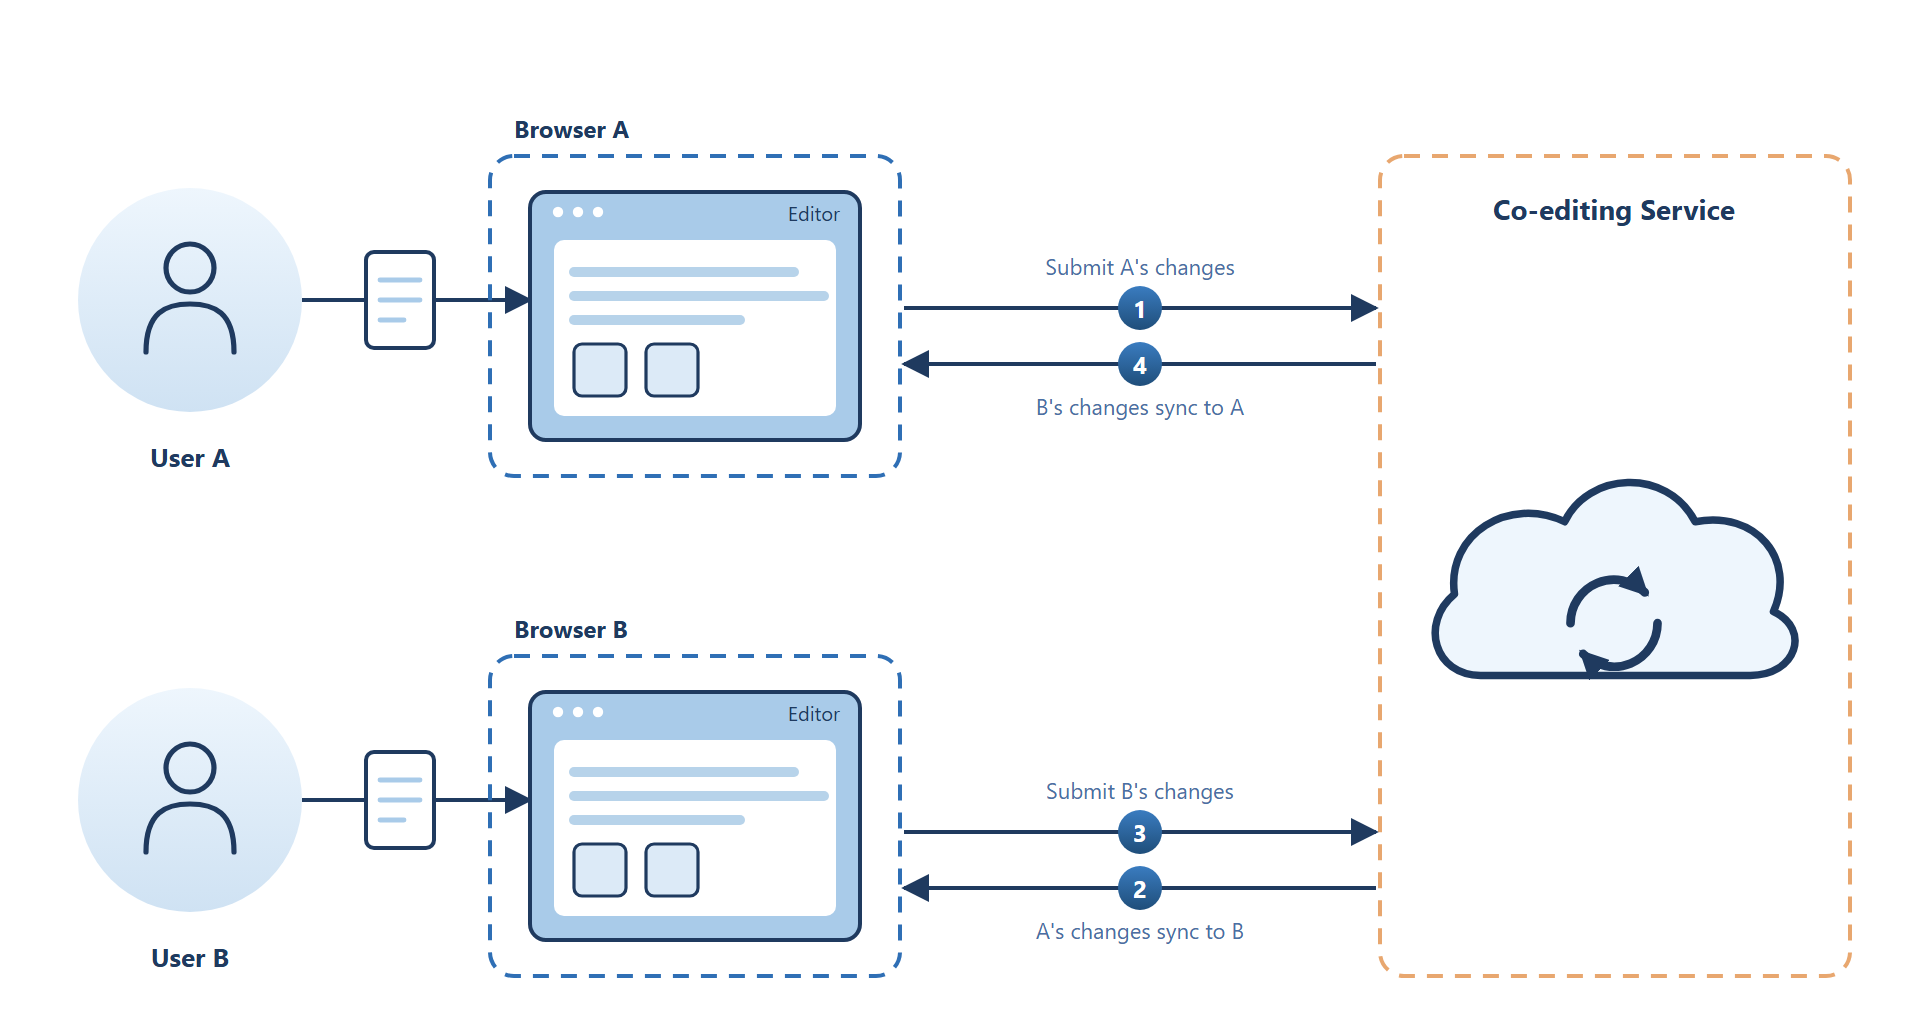
- User 1 and User 2 open the document with the same co-editing identifier (that is, the same
fileInfo.primary). - User 1 edits the document.
- The editor reports the changes to the co-authoring service (the service that
coAuthorUrlpoints to). - The co-authoring service distributes the changes to User 2's editor.
- User 2's editor applies the changes, so the same content appears on both screens.
The key point: the same co-editing session must use the same primary. In addition, you need to connect to an Office Server (see Prerequisites for Co-editing); everything else is configuration and state management built around these two things.
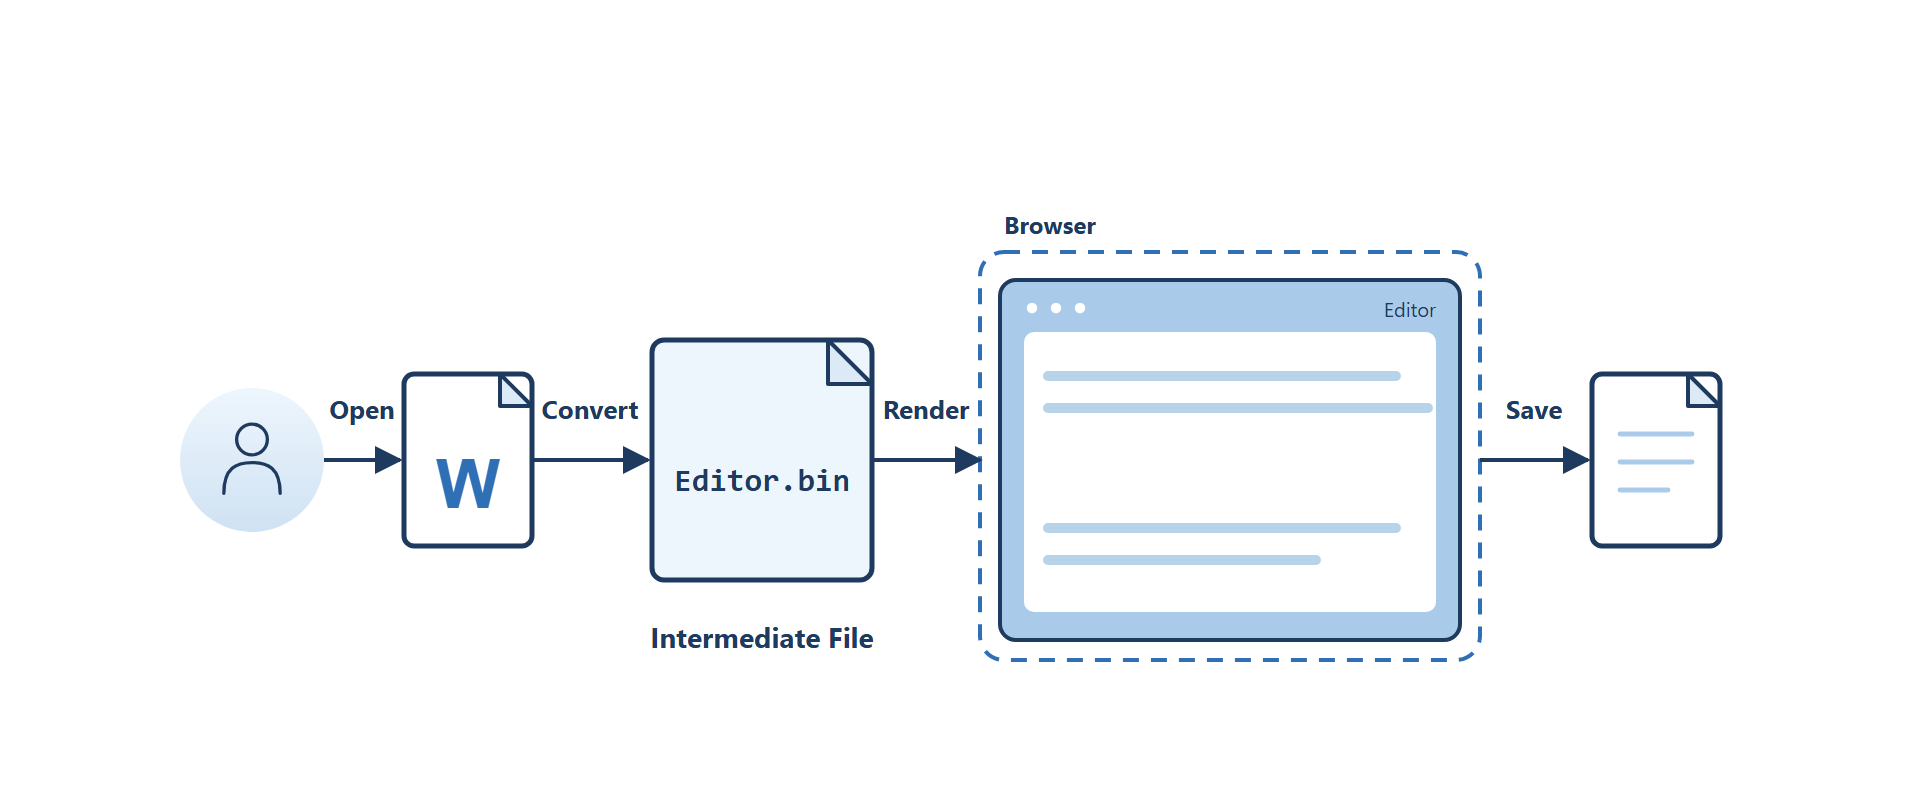
Many people assume when they first encounter online editing that the browser edits the Word file on the server directly. That is not the case. Spire.OfficeJS edits an internal cached editing file (Editor.bin), not the original Word file:
Prerequisites for Co-editing
Co-editing does not "just work" once you embed the editor in a page. For two users to join the same co-editing session and see each other's changes, two conditions must both hold:
- The same primary:
fileInfo.primaryis not an ordinary "file ID" but the identity of the current co-editing version. Make surefileInfo.primaryis the same (for how it works and how it is generated, see The Co-editing Identifier: fileInfo.primary). - Connect to an Office Server: the editor needs to connect to an Office Server (either locally started or remotely deployed) and use
coAuthorUrlto specify its address (see The Co-authoring Service Address: coAuthorUrl).
Both are required: with different primary values you get two separate sessions. Without a co-authoring service, changes have no channel to be distributed through.
The simplest way to verify: open the page in two tabs using the same fileInfo.primary but different user.id values. As long as primary matches, they join the same co-editing session — effectively "co-editing with yourself".
Tip
If you want some people to take part in co-editing in read-only mode, set their editorAttrs.canEdit to false. In fast mode they can still see other people's changes in real time but cannot edit, which suits observation, demonstration, or approval scenarios.
The Co-editing Identifier: fileInfo.primary
fileInfo.primary is the sole basis on which Spire.OfficeJS decides "is this the same document being co-edited?" All participants must use the same value to join the same co-editing session.
Generation and Reuse
- It must be supplied explicitly by the page and stay stable for the same session. If left empty, Spire.OfficeJS generates a random one, and each user gets a different value every time they open the page, so the sessions end up independent and unsynchronized.
- Character set: a randomly generated value consists of lowercase letters and digits and is about 20 characters long.
- Do not reuse: one "editing session" of a document corresponds to one
primary; a new round of editing should use a new value.
After a save completes, it is recommended to use a new primary the next time the document is opened: this isolates the "saved content" from "a new round of co-editing" and keeps the cache, version, and new changes of the previous session from mixing together. If you keep reusing an old value for repeated editing, content rollbacks or synchronization anomalies are easy to run into.
When you rotate primary, also point sourceUrl at the file saved in this round (usually the file address obtained from onSave). Otherwise, the first open with the new primary re-downloads and converts the old original file, and the content you just saved is lost.
Fast Mode and Strict Mode
Spire.OfficeJS provides two co-editing modes: fast mode and strict mode. You switch between them in the UI via "Review → Editing Mode" or "File → Advanced Settings → Co-editing Mode". Both let multiple people join the same session; the difference is when changes are synchronized and who triggers the save: fast mode syncs as you edit, while strict mode lets everyone edit their own copy and merges only on save.
Fast Mode (Default)
In fast mode, anyone's changes are broadcast to all participants in real time: text, cursor position, and selections are immediately visible with no need to save. Before editing a region (a paragraph, a cell, etc.), the editor first acquires a block lock on that region; others see the region as occupied until editing finishes or the lock is released.
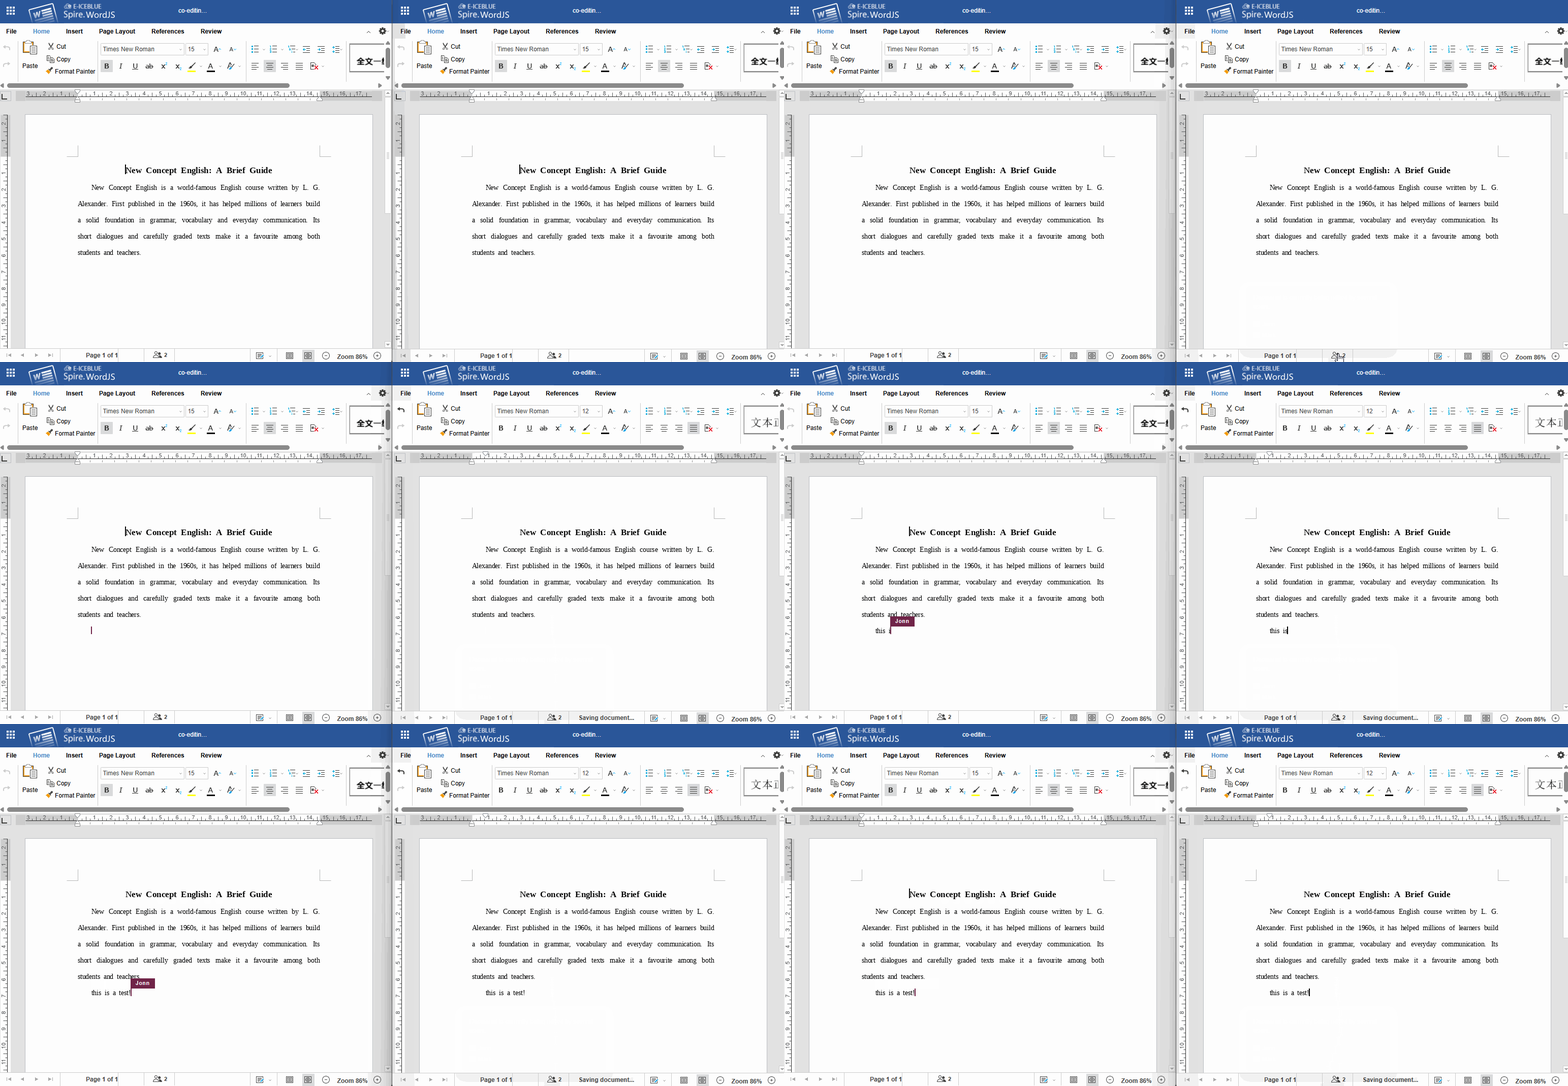
Strict Mode
In strict mode, everyone edits in their own isolated copy but still belongs to the same co-editing session: other people's changes stay hidden until saved, and regions edited by multiple people at the same time are marked with dashed lines in different colors. Only after you click "Save" is the whole document submitted to the co-authoring service for merging.
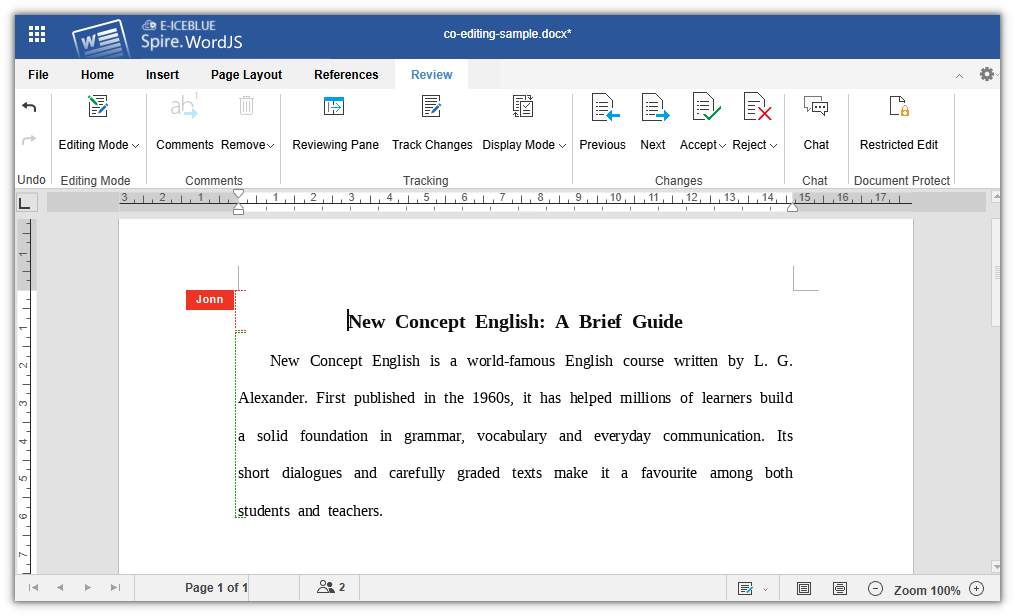
Comparison of the Two Modes
| Dimension | Fast Mode (Default) | Strict Mode |
|---|---|---|
| Change visibility | Broadcast in real time; other people's cursors and changes are immediately visible | Isolated; neither side sees the other's changes before saving |
| Saving | Automatic sync (no manual save needed) | Syncs only after you click "Save" manually |
| Undo / Redo | Unavailable | Available |
| Notification of others' changes | None (already seen in real time) | Click Save and reload |
| Suitable for | Multiple people making small, high-frequency collaborative edits | Large edits, isolated review, concerns about accidental overwrites |
Configuring the Default Mode
Controlled by two switches under user.customization.public.common:
user: {
  customization: {
    public: {
      common: {
        CollaborationModeIsFast: true,  // Enter fast mode on open
        CollaborationModeOnlyFast: false
      }
    }
  }
}
CollaborationModeIsFast: the initial mode when the document opens.truemeans fast mode,falsemeans strict mode. Fast mode is the default.CollaborationModeOnlyFast: when set totrue, locks fast mode; the strict option in "Co-editing Mode" is disabled and users cannot switch to strict mode. Suits scenarios that require everyone to always share changes in real time.
The Co-authoring Service Address: coAuthorUrl
coAuthorUrl points to the editor service that provides co-authoring capability (the Office Server) and must be configured explicitly. It is configured under editorAttrs.serverless; an example:
editorAttrs: {
  useWebAssemblyDoc: true,
  serverless: {
    useServerless: true,
    baseUrl: 'https://LocalExample:3000',    // Address of the front-end resources (web directory)
    coAuthorUrl: 'https://LocalExample:8000' // Co-authoring service (Office Server) address
  }
}
Note the distinction between the three kinds of addresses: the load address of SpireCloudEditor.js and baseUrl only determine where the front-end resources are loaded from; they are not the co-authoring service address. coAuthorUrl must point to an Office Server reachable by the browser; otherwise co-editing cannot work either.
Quick Start: Two People Editing the Same Document
This section assembles the preceding content into a minimal runnable page: just replace the script address, service address, document address, user information, and save handling.
Page Structure
Place a container div on the page, then include the Spire.OfficeJS editor script:
<div id="editor"></div>

<!-- The editor script is served by your Spire.OfficeJS service -->
<script src="https://LocalExample:3000/web/editors/spireapi/SpireCloudEditor.js"></script>
Initialization Configuration
<script>
  // Co-editing session primary: same document, same co-editing session — must be identical for all users
  const DOC_PRIMARY = 'a1b2c3d4e5f6g7h8i9j0';

  // Current user: id must be unique and stable; name is the display name during collaboration
  const currentUser = {
    id: 'user-1001',
    name: 'John Doe'
  };

  const config = {
    fileAttrs: {
      fileInfo: {
        name: 'project-plan.docx',
        ext: 'docx',
        primary: DOC_PRIMARY // Co-editing session primary
      },
      sourceUrl: 'https://your-file-host/files/project-plan.docx'
    },
    user: {
      id: currentUser.id,
      name: currentUser.name,
      customization: {
        public: {
          common: {
            CollaborationModeIsFast: true, // Enter fast mode on open
            CollaborationModeOnlyFast: false
          }
        }
      }
    },
    editorAttrs: {
      useWebAssemblyDoc: true,
      serverless: {
        useServerless: true,
        baseUrl: 'https://LocalExample:3000',    // Address of the front-end resources (web directory)
        coAuthorUrl: 'https://LocalExample:8000' // Co-authoring service (Office Server) address
      },
      editorMode: 'edit',
      editorType: 'document',
      editorWidth: '100%',
      editorHeight: '800px',
      viewLanguage: 'zh',
      canEdit: true,
      canReview: true,
      canComment: true,
      canChat: true,
      events: {
        // Handle the save in the page: event.data[1] is the File object of the current document
        onSave: function (event) {
          const fileName = event.data[0];
          const file = event.data[1];

          const form = new FormData();
          form.append('file', file, fileName);
          form.append('primary', DOC_PRIMARY);
          fetch('https://your-file-host/save-file', {
            method: 'POST',
            body: form
          });
        }
      }
    }
  };

  new SpireCloudEditor.OpenApi('editor', config);
</script>
FAQ
Both Users Open the Page but Changes Do Not Sync
Troubleshoot in this order:
- Whether
fileAttrs.fileInfo.primaryis the same. Differentprimaryvalues lead to two independent sessions; even ifsourceUrlis exactly the same, they will not sync. - Whether an Office Server is configured and connected.
editorAttrs.serverless.coAuthorUrlmust point to an Office Server reachable by the browser: either started locally (for examplehttp://127.0.0.1:8000) or deployed remotely. If it is missing or misconfigured, co-editing fails (see The Co-authoring Service Address: coAuthorUrl). sourceUrlonly takes effect on the first open or a cache miss. Once the sameprimaryhits the cache, it is no longer read. To switch files, updatesourceUrland use a newprimaryat the same time.
The "Co-editing Mode" Entry Is Missing
The entry requires editorMode: 'edit'.
Cannot Undo / Redo in Fast Mode
This is by design in fast mode: changes are broadcast in real time and synced automatically, so they cannot be rolled back from a single client. If you need an undo history, switch to strict mode, edit in the isolated copy, and then save.
Co-editing Breaks or Content Rolls Back After Saving
It is most likely that an old primary was reused. After a save completes (onSave has received the file), the next time you open the document you should use a new primary and point sourceUrl at the saved file; do not keep using the old value of a completed save for a new session.
How to Destroy the Spire.OfficeJS Editor
On a business page, users open the editor to edit a document and then need to close it. Many pages simply remove the editor from the page when the user closes it. The editor is no longer visible, but some of its listeners are still running in the background. If the editor is opened and closed repeatedly, the old listeners may still respond to operations on the new document, and the page becomes slower. When the editor is no longer needed, clean it up with destroyEditor(). This article uses Word as an example to explain how to destroy a Spire.OfficeJS editor.
Destroy process
Destroying the editor can be summarized in three steps: open the editor, call destroyEditor(), and restore the page to its original state.
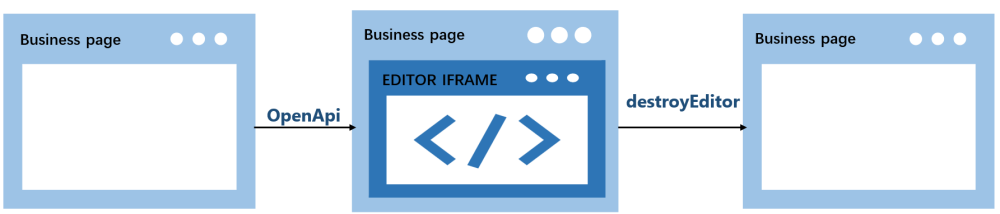
- The user opens the editor.
OpenApicreates the editor on the business page, and the original placeholder<div>is replaced. - Call
destroyEditor()to remove the editor. It unbinds themessagelistener and themouseuplistener on the business page, then replaces the editor iframe with the original placeholder<div>. - The page returns to its state before opening, and the placeholder
<div>appears again.
How to call it
destroyEditor() is not a global method, nor is it on the editor iframe element. It is a method on the object returned by new SpireCloudEditor.OpenApi(). Save the returned object when you create the editor, and call the method on that object when you destroy the editor.
Example code:
var editor = new SpireCloudEditor.OpenApi('editor', config);

editor.destroyEditor();
editor = null;
Note
Call destroyEditor() only once per editor instance; calling it again on the same instance throws an error. After a successful destroy, set editor to null to avoid using the stale object. To open the editor again, create a new instance.
Complete example
Below is a complete example: the page creates the editor and saves the returned object when the page loads, then calls destroyEditor() when the user clicks the "Destroy Editor" button. Replace LocalExample:3000 with the actual deployment address before running.
<!DOCTYPE html>
<html lang="en">
<head>
  <meta charset="UTF-8">
  <title>Spire.OfficeJS Destroy Editor</title>
  <style>
    html, body { height: 100%; margin: 0; background-color: #cbe4f3;}
    body { display: flex; flex-direction: column; }
    #editor { flex: 1; min-height: 0; }
    #editor iframe { width: 100%; height: 100%; border: 0; }
  </style>
</head>
<body>
  <button id="destroyBtn">Destroy Editor</button>
  <div id="editor"></div>
  <script src="http://LocalExample:3000/web/editors/spireapi/SpireCloudEditor.js"></script>
  <script>
    var SERVER = 'http://LocalExample:3000';

    var config = {
      fileAttrs: {
        fileInfo: { name: 'sample.docx', ext: 'docx' },
        sourceUrl: SERVER + '/samples/sample.docx'
      },
      user: { id: 'uid-1', name: 'Jonn' },
      editorAttrs: {
        editorMode: 'edit',
        editorType: 'document',
        viewLanguage: 'en',
        useWebAssemblyDoc: true,
        spireOfficeJsLicense: '',
        serverless: {
          useServerless: true,
          baseUrl: SERVER
        }
      }
    };

    var editor = new SpireCloudEditor.OpenApi('editor', config);

    document.getElementById('destroyBtn').addEventListener('click', function () {
      editor.destroyEditor();
      editor = null;
    });
  </script>
</body>
</html>
After you open the document and click the "Destroy Editor" button, the editor is destroyed:
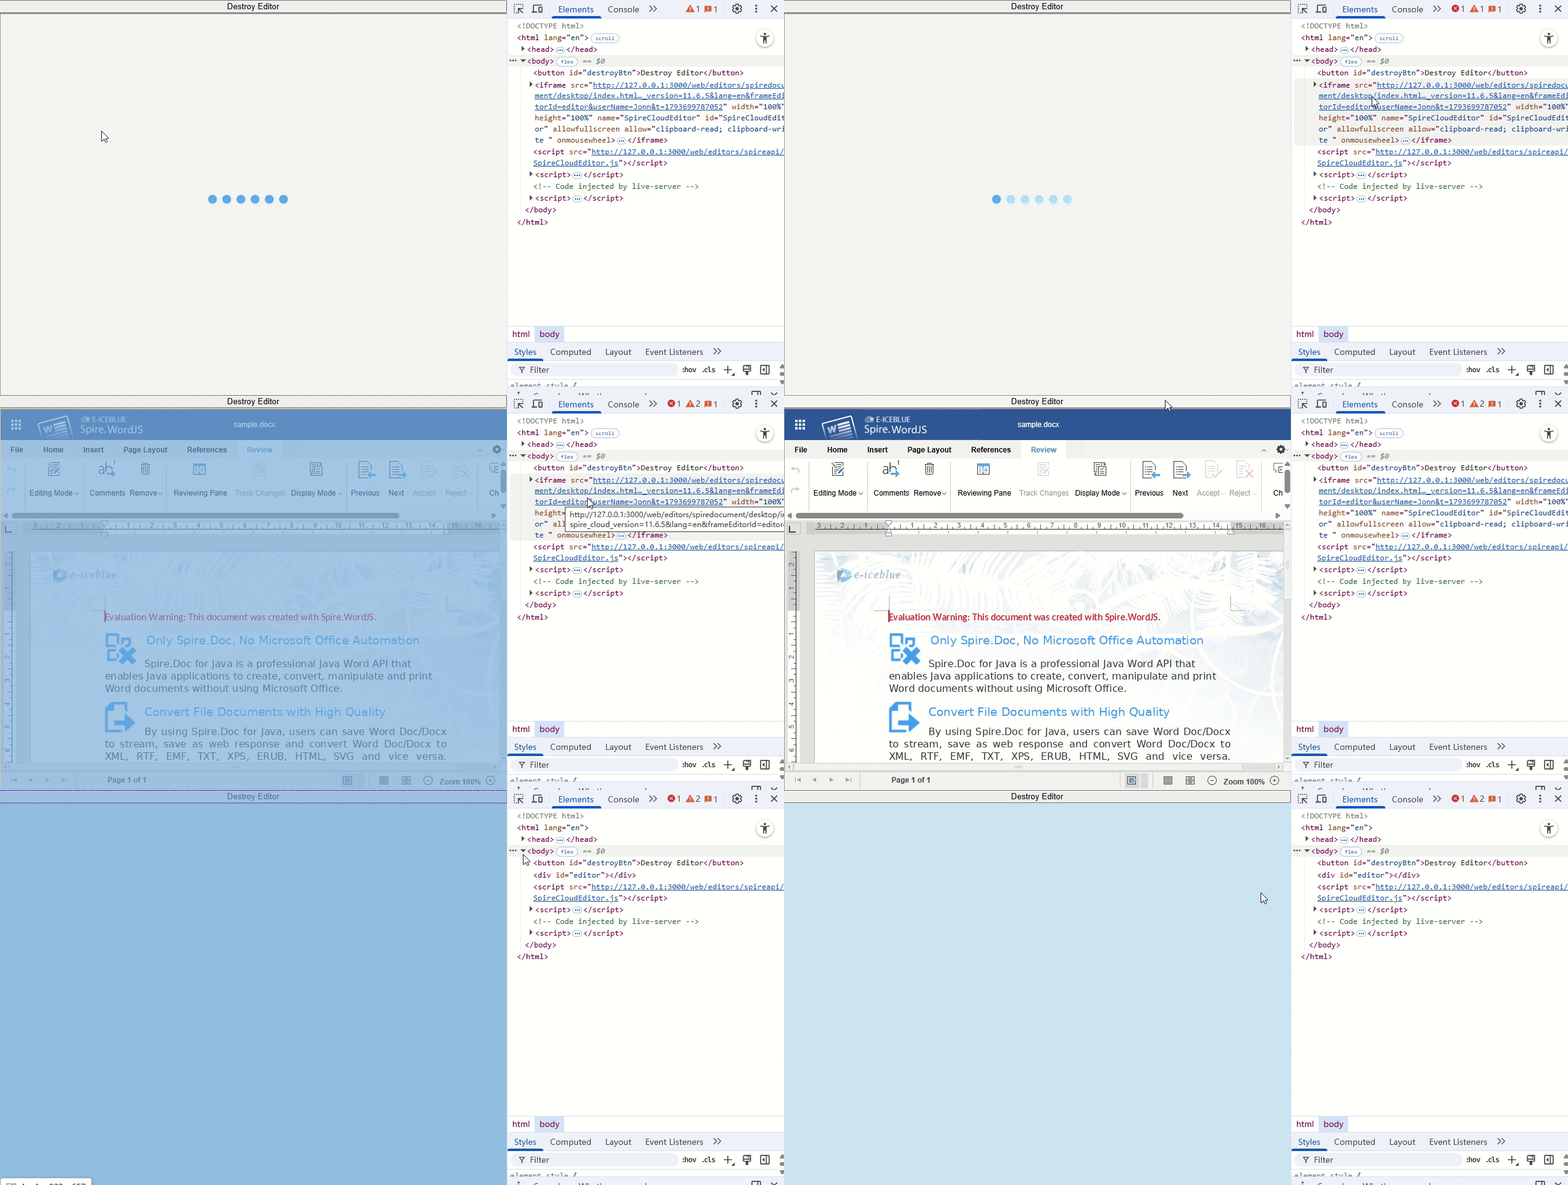
Note
destroyEditor() does not save the document and does not cancel save or download requests that have already been sent. If you need to keep changes, save first and wait for the save to complete before destroying the editor.
FAQ
The container style changes after destroying the editor
Cause: The placeholder <div> restored by destroyEditor() has only its id set; its original class and inline style are not restored.
Solution: Put the container's size and styles in an ID selector, for example #editor { flex: 1; min-height: 0; }.
Can I still use methods such as downloadAs after calling destroyEditor()?
Cause: destroyEditor() unbinds the listeners on the business page, so the returned object no longer receives responses from the editor.
Solution: Do not use other methods on the returned object after calling destroyEditor().
Does destroyEditor() clear localStorage or the server-side cache?
Cause: destroyEditor() only performs cleanup on the business page; it does not clear browser storage or the server-side cache.
Solution: If cleanup is needed, handle it separately in the business system.
Spire.OfficeJS Editor UI Configuration
When the editor is integrated into a business system, its UI usually needs to follow the product. Some products do not want users to see the vendor branding; some pages already have a header, so the editor's title bar looks redundant; sometimes the editor only occupies a narrow side panel where the full toolbar does not fit; and some products want documents to open at a suitable zoom level. All of these can be configured through customization, without changing the editor itself. The examples below use Word. The table below summarizes the Spire.OfficeJS UI settings; each is explained in the following sections.
| Setting | Purpose | Default |
|---|---|---|
whiteLabel |
Remove the vendor logo and branding text | false |
hideTitle |
Hide the top title bar | false |
hideStatusBar |
Hide the bottom status bar | false |
hideRuler |
Hide the ruler | false |
defToolbar |
Toolbar mode | full |
defaultZoom |
Zoom level at open | 1 |
zoomFit |
Fit width or page at open | None |
White-labeling
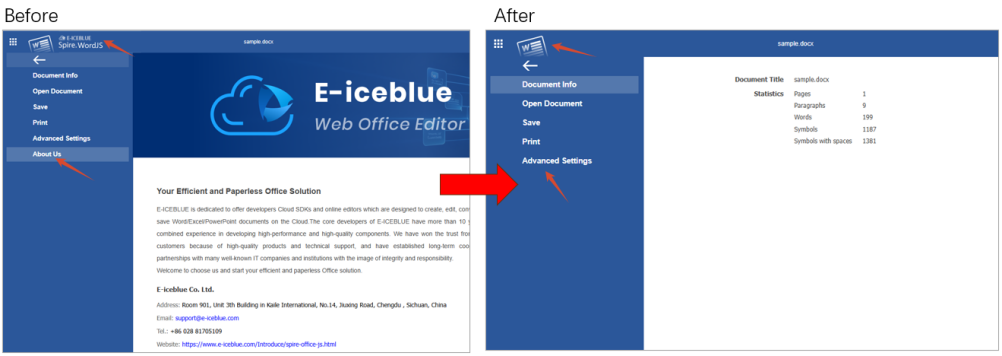
whiteLabel removes vendor branding from the editor UI. When enabled, the vendor logo on the right side of the title bar is hidden and the "File → About Us" entry disappears. Other menus, the toolbar, and document content are unaffected.
common: {
  whiteLabel: true
}
The figure below shows the before and after.
Hide UI regions
The title bar, status bar, and ruler sit at the top, bottom, and above the document page. When space is tight, hide any of them as needed; the three settings are independent.
Hide the title bar
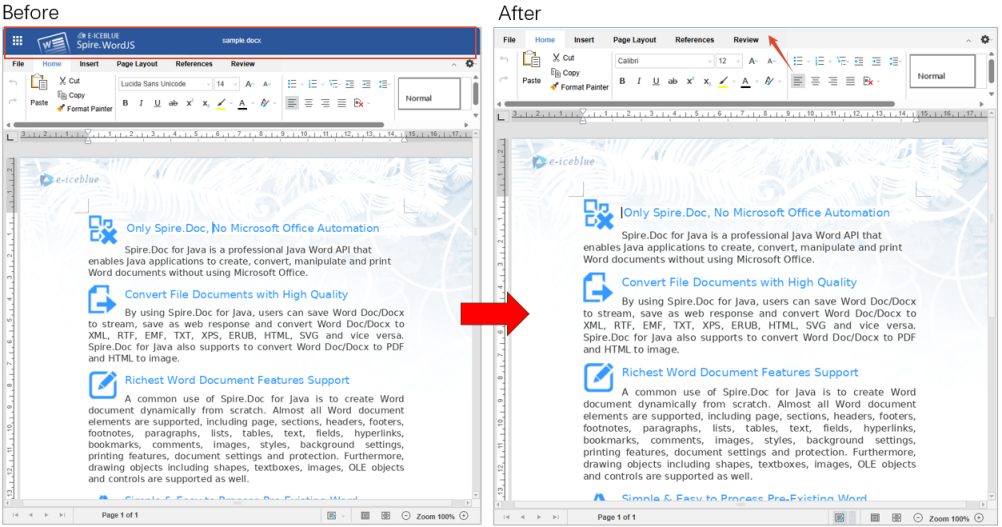
hideTitle hides the title bar at the top of the editor and gives the document more room. Use it when the surrounding page already has its own header.
common: {
  header: {
    hideTitle: true
  }
}
The figure below shows the before and after.
Hide the status bar
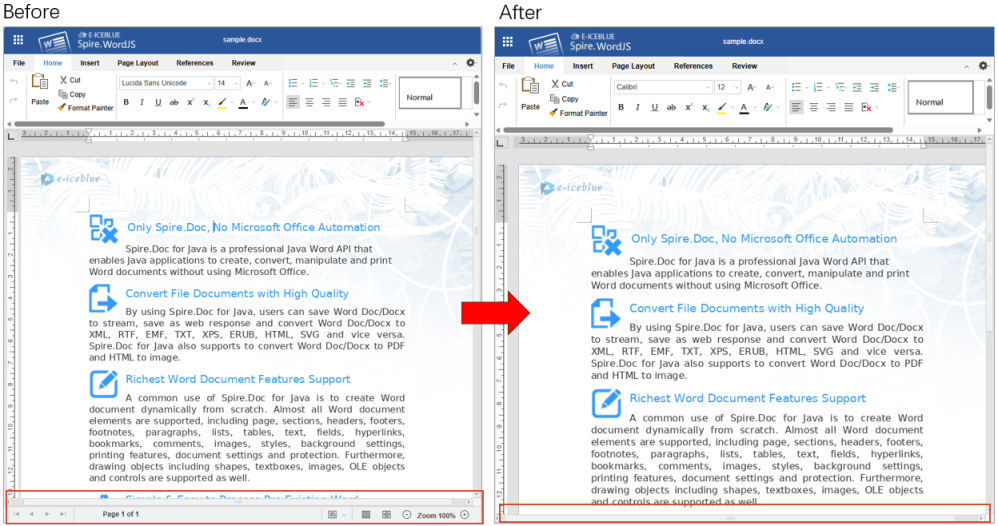
hideStatusBar hides the status bar at the bottom of the editor. The status bar shows page numbers, word count, zoom, and similar information; hiding it gives the document more height.
common: {
  hideStatusBar: true
}
The figure below shows the before and after.
Hide the ruler
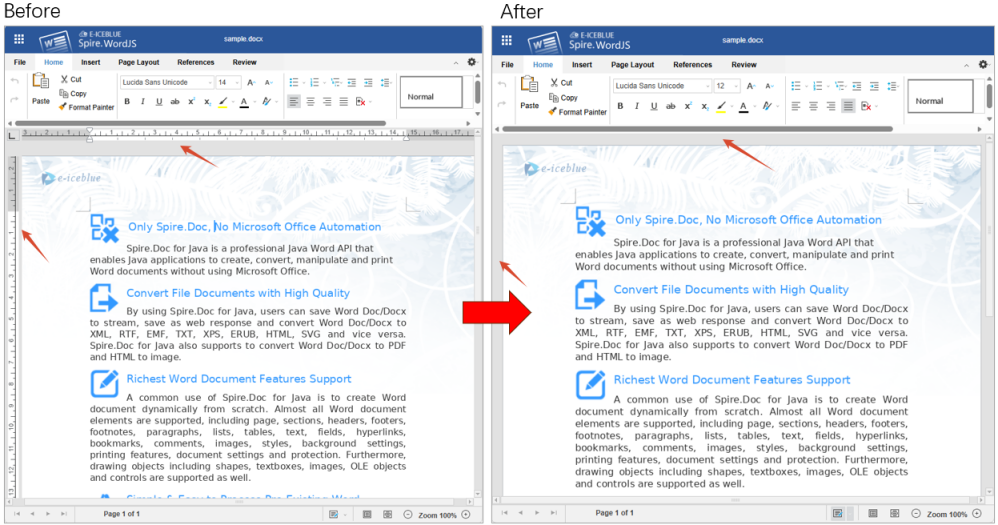
The ruler is a quick way to adjust indents and margins. hideRuler controls whether it is shown in WordJS and PresentationJS. The ruler is visible by default; set it to true to hide it.
common: {
  hideRuler: true
}
The figure below shows the before and after.
Note
These options only set the initial state when the document opens. Users can still show the title bar, status bar, or ruler again from the toolbar; they will be hidden again the next time the document opens.
Toolbar mode
defToolbar sets the toolbar style used when a document opens.
| Value | Description |
|---|---|
full |
Full toolbar (default), commands grouped by tab |
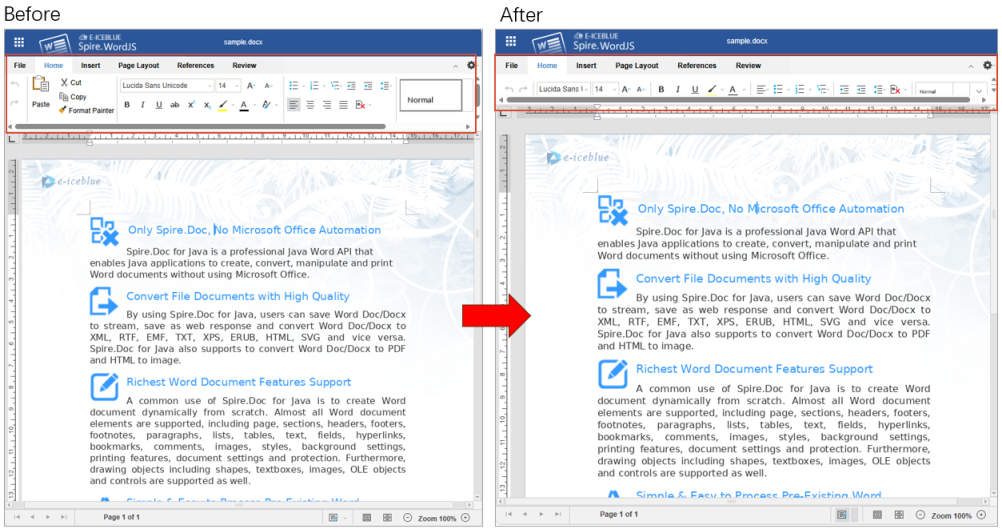
short |
Compact toolbar, buttons condensed into one row for narrow containers |
common: {
  header: {
    defToolbar: 'short'
  }
}
The figure below compares the two modes.
Zoom
A document can open at a fixed zoom level, or automatically fit the editor width or the full page. The first uses defaultZoom; the second uses zoomFit.
Default zoom
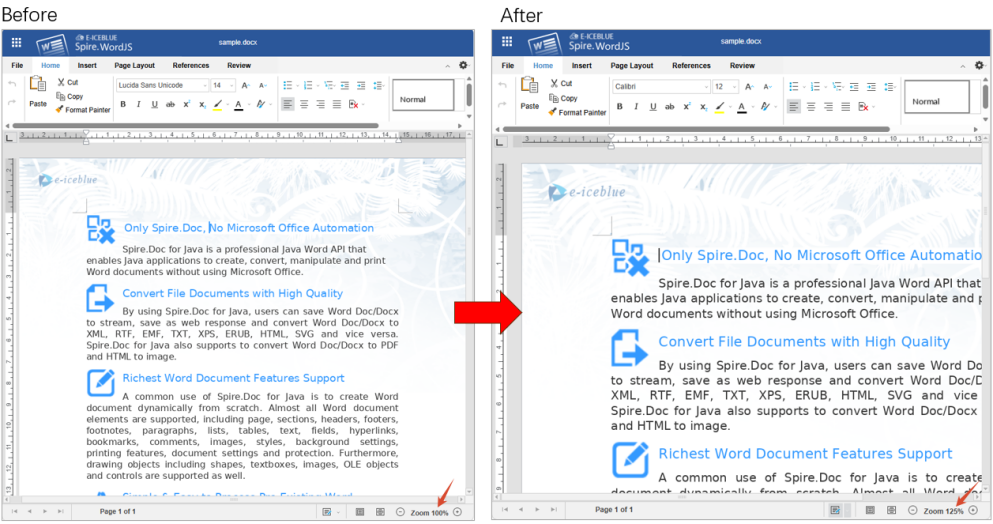
defaultZoom sets the zoom level used when a document opens. 1 means 100% and 1.25 means 125%.
common: {
  defaultZoom: 1.25
}
The figure below shows the status bar at 125%.
Zoom range
The supported range is 0.5–5. Values outside the range are clamped to 0.5 or 5, and a notice appears on the page.
Fit width / fit page
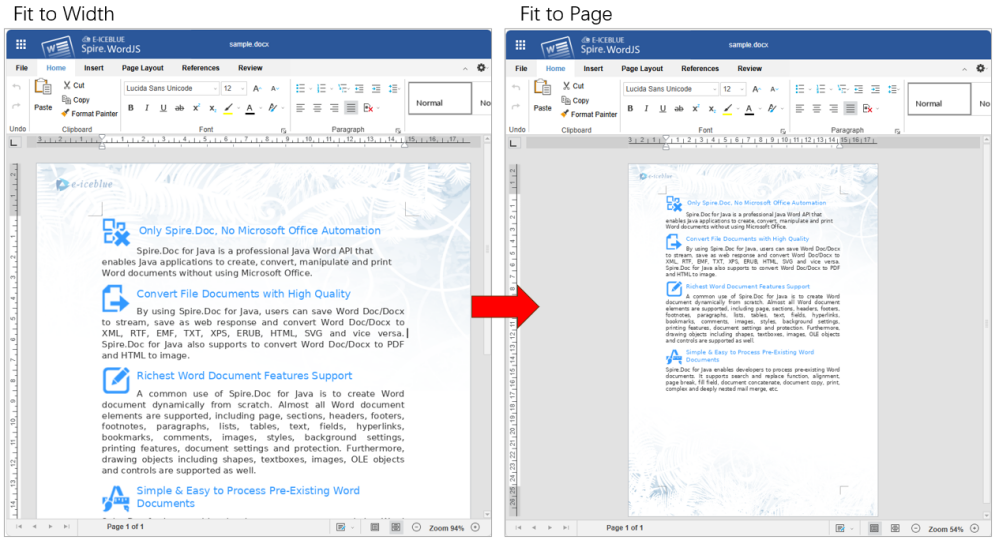
zoomFit makes the document fit the editor width or the full page when it opens. width fits the width; page fits the whole page.
| Value | Description |
|---|---|
width |
Fit width: the page width fills the editor |
page |
Fit page: the whole page is visible in the editor |
common: {
  zoomFit: 'width'
}
The figure below compares fit width and fit page.
Complete example
The configuration above, combined, is shown below:
<div id="editor"></div>
<script src="http://LocalExample:3000/web/editors/spireapi/SpireCloudEditor.js"></script>
<script>
var SERVER = 'http://LocalExample:3000';

var config = {
  fileAttrs: {
    fileInfo: { name: 'sample.docx', ext: 'docx' },
    sourceUrl: SERVER + '/samples/sample.docx'
  },
  user: {
    id: 'uid-1',
    name: 'Jonn',
    canSave: true,
    customization: {
      public: {
        common: {
          whiteLabel: true,
          defaultZoom: 1.25, // fixed zoom; use zoomFit instead to fit the container
          // zoomFit: 'width', // width = fit width, page = fit page
          hideStatusBar: true,
          hideRuler: true,
          header: {
            hideTitle: true,
            defToolbar: 'short'
          }
        }
      }
    }
  },
  editorAttrs: {
    editorMode: 'edit',
    editorType: 'document',
    viewLanguage: 'en',
    useWebAssemblyDoc: true,
    serverless: {
      useServerless: true,
      baseUrl: SERVER
    }
  }
};

new SpireCloudEditor.OpenApi('editor', config);
</script>
FAQ
The UI does not change after editing the configuration
Cause: The browser may have cached the old page. If you use the bundled example system, it reads its configuration at startup, so changes require a restart.
Solution: Force-refresh the page first. With the example system, restart the service and reopen the page.
hideTitle or defToolbar has no effect
Cause: hideTitle and defToolbar are title-bar settings and must be placed under common.header; placed directly under common, they are ignored.
Solution: Use the structure user.customization.public.common.header.hideTitle and user.customization.public.common.header.defToolbar.
White-labeling is on but the red notice or watermark remains
Cause: whiteLabel only removes vendor branding from the UI and does not handle the warning watermark. Without a valid License, the document still shows the trial notice and restricts content.
Solution: Contact [email protected] to purchase a License or apply for a temporary License, then fill in the License Key for the product in editorAttrs, for example spireDocJsLicense for Word.
Configure Document Comments with Spire.OfficeJS
The comments feature in Spire.OfficeJS lets readers leave feedback on a specific passage without changing the body text. Comments are independent of revisions: they can be replied to, resolved, or removed without accepting or rejecting a revision. Using Word as an example, this article describes the comment operations that Spire.OfficeJS provides, and explains how to enable, restrict, or hide them as needed.
Comment Capabilities at a Glance
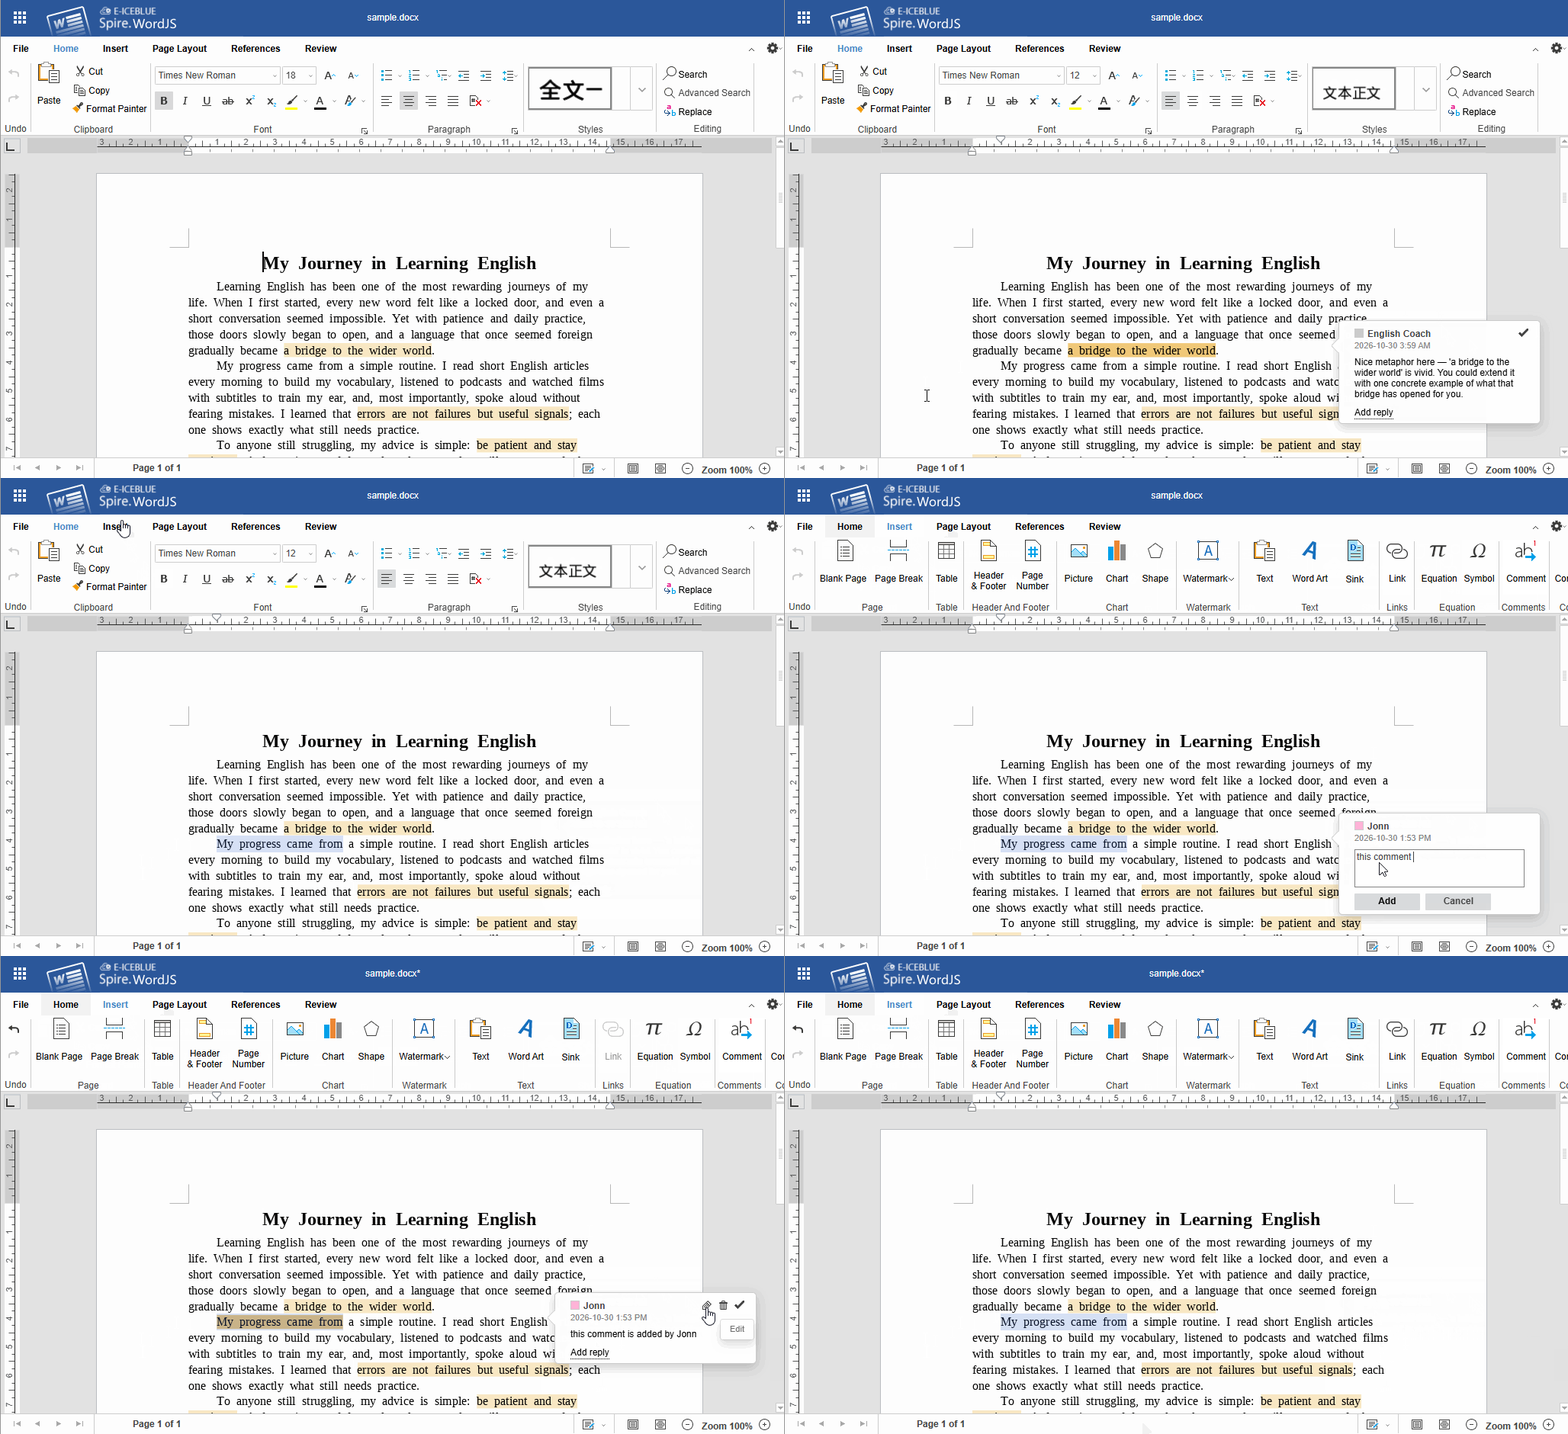
Comment entry points are available on the Insert and Review tabs, and in the floating button that appears after you select text. The comments pane lists every comment in the document in one place and provides centralized management.
| Capability | UI Location | Description |
|---|---|---|
| Add comment | Insert → Comment; floating button after selecting text | Adds a comment to the selected text |
| Reply to comment | Comment bubble or comments pane | Appends a reply under an existing comment, forming a thread |
| Resolve comment | Comment bubble or comments pane | Marks a handled comment as "Resolved"; the comment stays in the document |
| Reopen comment | Comment bubble | Restores a resolved comment to the unresolved state |
| Edit comment | Comment bubble | Changes the comment text; with commentAuthorOnly enabled, users can only edit their own comments |
| Remove comments | Review → Remove Comments | Removes the current, all, "my" comments |
| Show all comments | Review → Show All Comments | Opens the comments pane to review and manage comments in one place |
| Restrict Editing → Comment | Review → Restrict Editing | Protects the document and allows only comments to be inserted |
The "Remove Comments" drop-down menu provides four options: Remove Current Comments, Remove All Comments (regardless of author), Remove My Comments (only those created by the current user), and Remove My Current Comments. Removing a comment deletes only the comment itself. It does not modify the body text or affect other comments anchored at the same location.
Configure Comment Capabilities
Commenting is switched on or off by canComment in editorAttrs. The pane state on open and the author's editing scope are controlled by the switches under user.customization.public.common.
Expand the Comments Pane on Open
openAllComments controls whether the comments pane expands automatically when a document opens; the default is false. Setting it to true is equivalent to clicking "Show All Comments" right after the document opens, which suits review workflows centered on comments.
user: {
  customization: {
    public: {
      common: {
        openAllComments: true // expands the comments pane when the document opens
      }
    }
  }
}

Only Authors Can Edit Their Comments
With commentAuthorOnly enabled, users can edit or delete only the comments and replies they created themselves. Comments from other authors can still be viewed, replied to, or resolved, which suits scenarios that need to preserve the original comment record.
user: {
  customization: {
    public: {
      common: {
        commentAuthorOnly: true // only the author can edit their own comments
      }
    }
  }
}
Disable Comments
canComment controls whether commenting is allowed; the default is true. When set to false, the comment button group on the Review tab is hidden. Existing comments in the document remain visible but are read-only. Body editing is unaffected.
editorAttrs: {
  canComment: false
}
Note
canComment affects comments only; it does not change body editing or track changes. If the entire document must be read-only, use editorMode: 'view'.

Control Comment-Related Buttons
canComment only switches the commenting capability as a whole. If you want to hide only some buttons (for example, remove the "New Comment" entry while keeping viewing and navigation), configure user.customization.public.common.btnPermissions.docBtnPermissions. Removed buttons and their corresponding shortcuts are disabled as well:
user: {
  customization: {
    public: {
      common: {
        btnPermissions: {
          docBtnPermissions: [
            { modular: 'Toolbar', subModule: ['btnInsertComments'] }
          ]
        }
      }
    }
  }
}
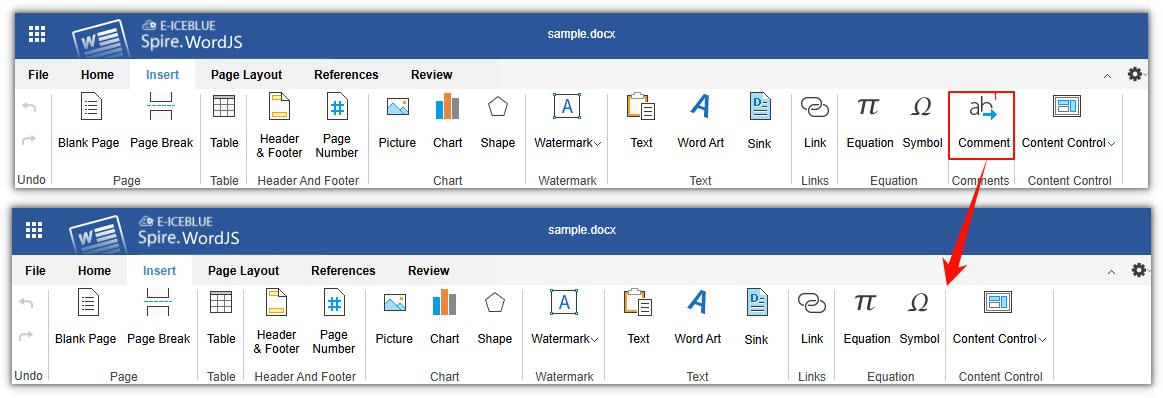
For more about button permission configuration, see the documentation on customizing the toolbar menu.
FAQ
The New Comment button is unavailable or grayed out
Common causes:
- No text is selected. A comment must be anchored to selected content.
- The cursor is inside a chart, shape, or a content control that does not support comments (such as a check box, picture, or drop-down list).
Comment authors appear as "Guest" or are all identical
Comment authors come from user.name in the current session, and the user identity comes from user.id. Pass a unique, stable id and the correct display name for each user. If no display name is provided, the author appears as "Guest"; if several users share a fixed account, all their comments show the same author.
Save Documents with Spire.OfficeJS
When a user finishes editing, where the document goes and how it is stored is usually up to the business system. Saving in Spire.OfficeJS leaves that control with you: the editor only generates the current document in the browser, and you can either send it to a backend endpoint or handle it in the page. Whether it overwrites the original document, creates a new version, or saves a copy can follow your own rules. The examples below use Word to show how to save documents with Spire.OfficeJS:
Document saving process
The save takes five steps. "Business page" in the figure refers to the page that hosts the editor; the term is used throughout below.
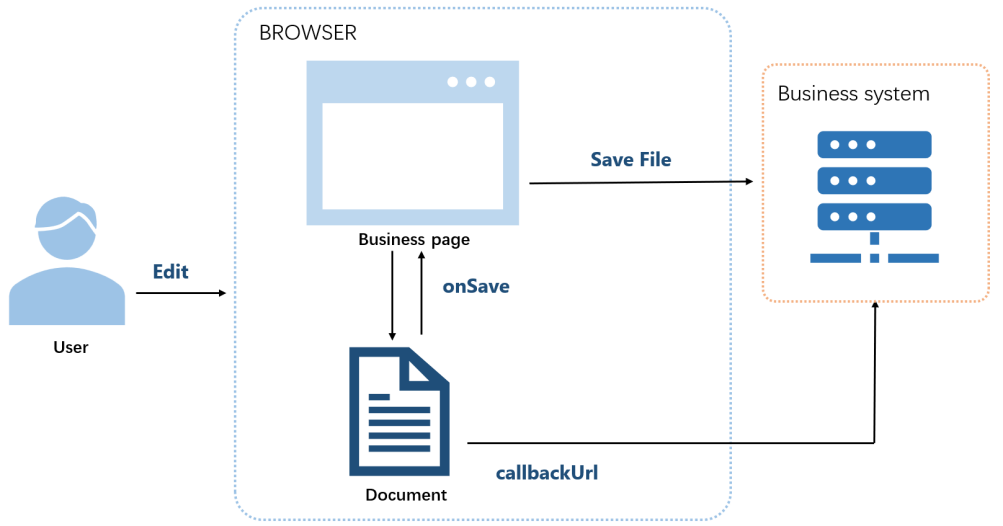
- The user edits the document.
- The user saves.
- The editor generates the current document.
- With
callbackUrl, the document is sent to that address; withonSave, the business page receives it. - The editor shows "Saved successfully".
Before you save
Saving requires the following configuration:
user.canSaveset totrue(the default).editorAttrs.editorModeset toedit.
Both examples below include these settings. Replace LocalExample with the actual deployment address.
Ways to save a document
Spire.OfficeJS supports two ways to save a document: use callbackUrl when the document should be saved by your backend, and use onSave when the page should handle the save result itself. The steps for each option are described below.
Save a document with callbackUrl
Use this when your backend saves the document. With callbackUrl configured, the editor sends the current document to that address on save, and the endpoint receives and stores it.
- Create an
.htmlpage to open the document. - Configure the save endpoint in
config.fileAttrs.callbackUrl. - Open the page, edit the document, and save. The editor shows "Saved successfully" once the endpoint returns success.
Example configuration:
var config = {
  fileAttrs: {
    fileInfo:
    { name: 'sample.docx',
      ext: 'docx',
      primary: '001'
    },
    sourceUrl: 'http://LocalExample:3000/samples/sample.docx',
    callbackUrl: 'http://LocalExample:3001/saveWebAssembly'
  },
  user:
  { id: 'uid-1',
    name: 'Jonn',
    canSave: true
  },
  editorAttrs: {
    editorMode: 'edit',
    editorType: 'document',
    viewLanguage: 'en',
    useWebAssemblyDoc: true,
    canForcesave: true,
    serverless: {
      useServerless: true,
      baseUrl: 'http://LocalExample:3000'
    },
  }
};

new SpireCloudEditor.OpenApi('editor', config);
Save a document with onSave
Use this when you have no save endpoint, or you want the page to handle the save result itself. On save, the editor calls onSave and passes the result in event.data:
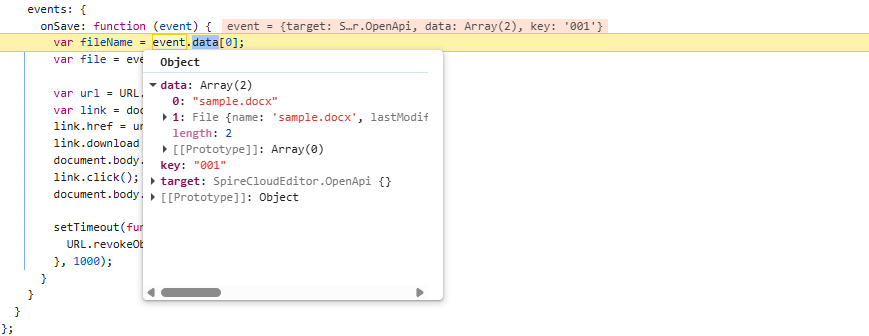
event.data[0]is the file name, a string such assample.docx.event.data[1]is the current document content, a standard browserFileobject you can download or upload directly.
What you do with these two items is up to the page: download locally, upload to a backend, rename the document, or just show a message. The editor only generates the save result and calls the callback.
Example configuration (do not set callbackUrl in fileAttrs, or set it to empty):
var config = {
  fileAttrs: {
    fileInfo:
    { name: 'sample.docx',
      ext: 'docx',
      primary: '001' },
    sourceUrl: 'http://LocalExample:3000/samples/sample.docx'
  },
  user:
  { id: 'uid-1',
    name: 'Jonn',
    canSave: true
  },
  editorAttrs: {
    editorMode: 'edit',
    editorType: 'document',
    viewLanguage: 'en',
    useWebAssemblyDoc: true,
    serverless: {
      useServerless: true,
      baseUrl: 'http://LocalExample:3000'
    },
    events: {
      onSave: function (event) {
        var fileName = event.data[0]; // file name (FileName), e.g. sample.docx
        var file = event.data[1];     // file object (File), the current document
        var key = event.key;          // document key, equal to fileInfo.primary, e.g. 001

        // The handling below is entirely up to the page.
        // Example: download locally
        var url = URL.createObjectURL(file);
        var link = document.createElement('a');
        link.href = url;
        link.download = fileName;
        document.body.appendChild(link);
        link.click();
        document.body.removeChild(link);
        setTimeout(function () {
          URL.revokeObjectURL(url);
        }, 1000);
      },
      onDocumentStateChange: function (event) {
        console.log(event.data ? 'Unsaved' : 'Saved');
      }
    }
  }
};

new SpireCloudEditor.OpenApi('editor', config);
This is what event.data looks like at an onSave :
FAQ
Will saving overwrite the original document automatically
Cause: Spire.OfficeJS does not write the edits back to sourceUrl automatically. Saving only generates the current document and hands it to your business system.
Solution: Handle it in the callbackUrl endpoint or the onSave callback: whether to overwrite the original document, create a new version, or save a copy is up to your business system.
Both callbackUrl and onSave are configured, but onSave does not run
Cause: When both are configured, callbackUrl takes precedence and onSave does not run; with neither, the editor offers no save function.
Solution: Keep only one save outlet. If the page should handle the document itself, remove fileAttrs.callbackUrl or set it to empty.
Open Documents with Spire.OfficeJS
For many business systems, previewing a document means asking the user to download it and open it locally, or relying on a browser plug-in. Spire.OfficeJS supports opening documents directly in the page, and users do not need to install Office. The document can come from an address the business system can already access or from the user's local selection. This article uses Word as an example to explain how to open documents with Spire.OfficeJS:
Document opening process
The figure and steps below describe the process of opening a document. "Business page" refers to the page in your own business system that hosts the editor.
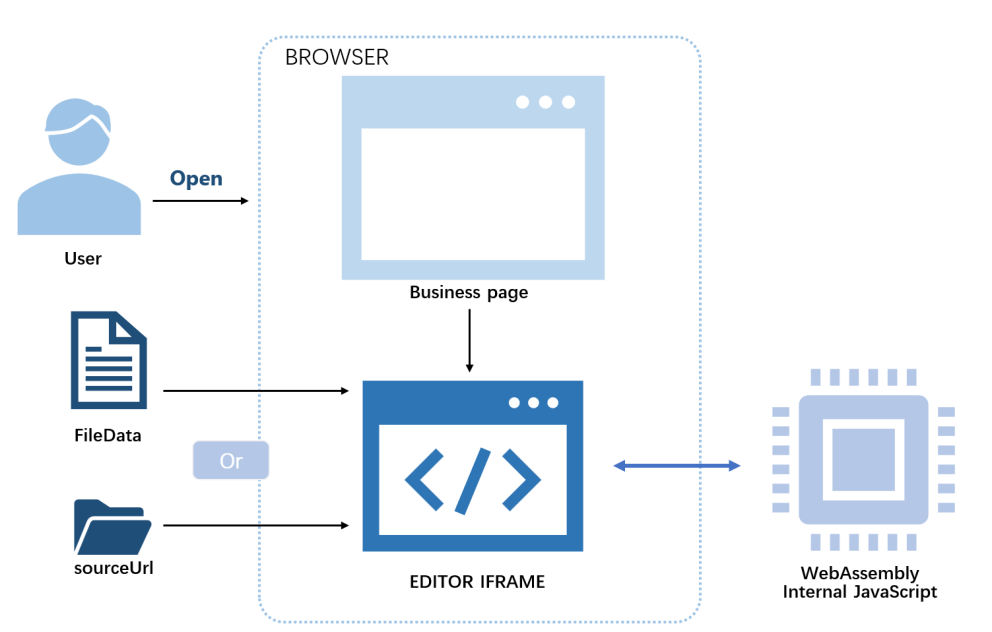
- The user opens the document through the business page to view or edit it.
- The business page prepares the
config:sourceUrl(orserverless.fileData),fileInfo,user, andeditorAttrs. SpireCloudEditor.OpenApicreates the editor iframe.- In
sourceUrlmode, the browser reads the document from your business storage; infileDatamode, the bytes passed in by the page are used directly. - WebAssembly converts the Office document into the editor's internal format, and the internal JavaScript renders the content on the page.
Ways to open a document
Spire.OfficeJS supports two ways to open a document: use sourceUrl when the document already has an accessible URL, and use fileData when the document comes from the user's local selection and has not been uploaded yet. The steps for each option are described below.
Open a document with sourceUrl
Use this option when the document already has an accessible URL. Create an empty .html file and add the key content following the steps below; replace LocalExample with the actual deployment address.
Add the editor container:
<div id="editor"></div>Include the editor script:
<script src="http://LocalExample:3000/web/editors/spireapi/SpireCloudEditor.js"></script>Prepare the
config. The important parts are the document URL and thewebresource URL:var config = { fileAttrs: { fileInfo: { name: 'sample.docx', ext: 'docx' }, sourceUrl: 'http://LocalExample:3000/samples/sample.docx' }, user: { id: 'uid-1', name: 'Jonn' }, editorAttrs: { editorMode: 'edit', editorType: 'document', viewLanguage: 'en', useWebAssemblyDoc: true, serverless: { useServerless: true, baseUrl: 'http://LocalExample:3000' } } };Initialize the editor:
new SpireCloudEditor.OpenApi('editor', config);
Open a document with fileData
Use this option when the document comes from the user's local selection and has not been uploaded yet. The page structure is the same as in the sourceUrl option (container + editor script); the difference is that you add a file selector and put the document bytes into serverless.fileData.
Add the file selector and the editor container:
<input type="file" id="fileInput" accept=".doc,.docx">
<div id="editor"></div>
Read the file, build the
config, and initialize:var opened = false; document.getElementById('fileInput').addEventListener('change', function (e) { var file = e.target.files[0]; if (!file) return; var ext = file.name.split('.').pop().toLowerCase(); var reader = new FileReader(); reader.onload = function (event) { var config = { fileAttrs: { fileInfo: { name: file.name, ext: ext }, sourceUrl: 'offline' // placeholder; it is not requested in fileData mode }, user: { id: 'uid-1', name: 'Jonn' }, editorAttrs: { editorMode: 'edit', editorType: 'document', viewLanguage: 'zh', useWebAssemblyDoc: true, serverless: { useServerless: true, baseUrl: 'http://LocalExample:3000', fileData: event.target.result } } }; var targetId = opened ? 'SpireCloudEditor' : 'editor'; opened = true; new SpireCloudEditor.OpenApi(targetId, config); }; reader.readAsArrayBuffer(file); });
FAQ
sourceUrl is configured but the document fails to load
Cause: The document is read directly by the browser. If sourceUrl cannot be reached, the editor cannot get the document and it will not open.
Solution: Set sourceUrl to an address the browser can open directly, and make sure the document can be accessed in the browser.
Do I need sourceUrl when using the fileData option
Cause: In fileData mode, the editor uses the bytes passed in by the page directly and does not request sourceUrl; however, sourceUrl must not be empty.
Solution: Set sourceUrl to a placeholder value such as offline.
The document content is incomplete and a watermark is shown
Cause: A valid license is not configured, or the license does not match the product that opens the document. Without a license, the editor shows red watermark text in the document and limits the document length, so the content is displayed incompletely.
Solution: Fill in the license field for the corresponding product in editorAttrs; for example, fill in spireDocJsLicense for WordJS. If you use the bundled example system, configure the License Key under server.customization in example/config/default.json.
Convert and Download Documents with Spire.OfficeJS
Contract delivery usually calls for PDF, archiving may call for DOCX, and some pages also need to export HTML or TXT. Spire.OfficeJS converts the document currently in the editor into these formats and hands it to the browser for download. This article uses Word as an example to explain how to convert and download documents with Spire.OfficeJS:
Document conversion and download process
The download takes four steps:
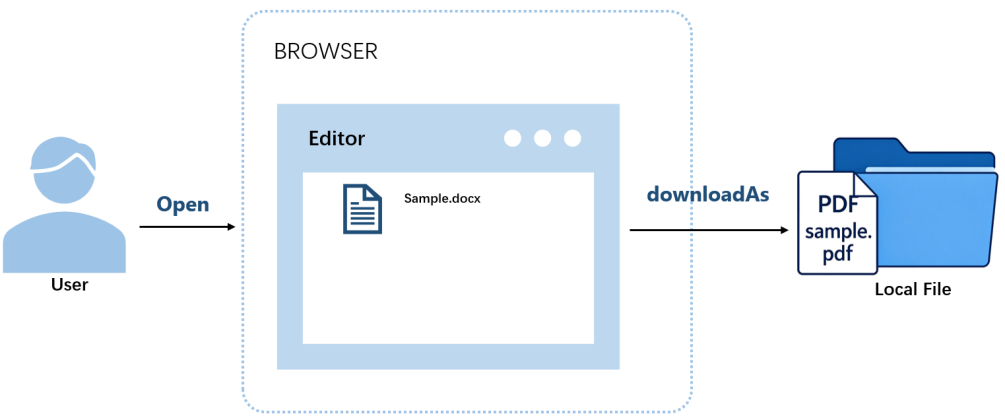
- The user opens a document in the editor.
- The user clicks the convert-and-download button on the page, which calls
docEditor.downloadAs()with the target format. - The editor converts the current document to the target format.
- The browser downloads the document locally.
Using downloadAs
The editor provides the downloadAs() method to convert the current document to a specified format and hand it to the browser for download. You can call it once the editor is initialized; the conversion runs in the browser, and the result is a local copy.
Example configuration (converting to PDF):
var onDownloadAs = function () {
  docEditor.downloadAs({ format: 'pdf'});
};
format takes the target format's file extension and is case-insensitive.
Complete code:
<!DOCTYPE html>
<html lang="en">
<head>
  <meta charset="UTF-8">
  <title>Spire.OfficeJS Convert File - downloadAs</title>
  <style>
    html, body { height: 100%; margin: 0; }
    body { display: flex; flex-direction: column; }
    #editor { flex: 1; min-height: 0; }
    #editor iframe { width: 100%; height: 100%; border: 0; }
  </style>
</head>
<body>
  <button type="button" id="download" onclick="onDownloadAs()" disabled>Download PDF</button>
  <div id="editor"></div>
  <script src="http://LocalExample:3000/web/editors/spireapi/SpireCloudEditor.js"></script>
  <script>
    var SERVER = 'http://LocalExample:3000';
    var downloadButton = document.getElementById('download');

    var config = {
      fileAttrs: {
        fileInfo: { name: 'sample.docx', ext: 'docx' },
        sourceUrl: SERVER + '/samples/sample.docx'
      },
      user: { id: 'uid-1', name: 'Jonn' },
      editorAttrs: {
        editorMode: 'edit',
        editorType: 'document',
        viewLanguage: 'en',
        canDownload: true,
        useWebAssemblyDoc: true,
        serverless: { useServerless: true, baseUrl: SERVER },
        events: {
          onStart: function () {
            downloadButton.disabled = false;
          }
        }
      }
    };

    var docEditor = new SpireCloudEditor.OpenApi('editor', config);

    function onDownloadAs() {
      docEditor.downloadAs({ format: 'pdf' });
    }
  </script>
</body>
</html>
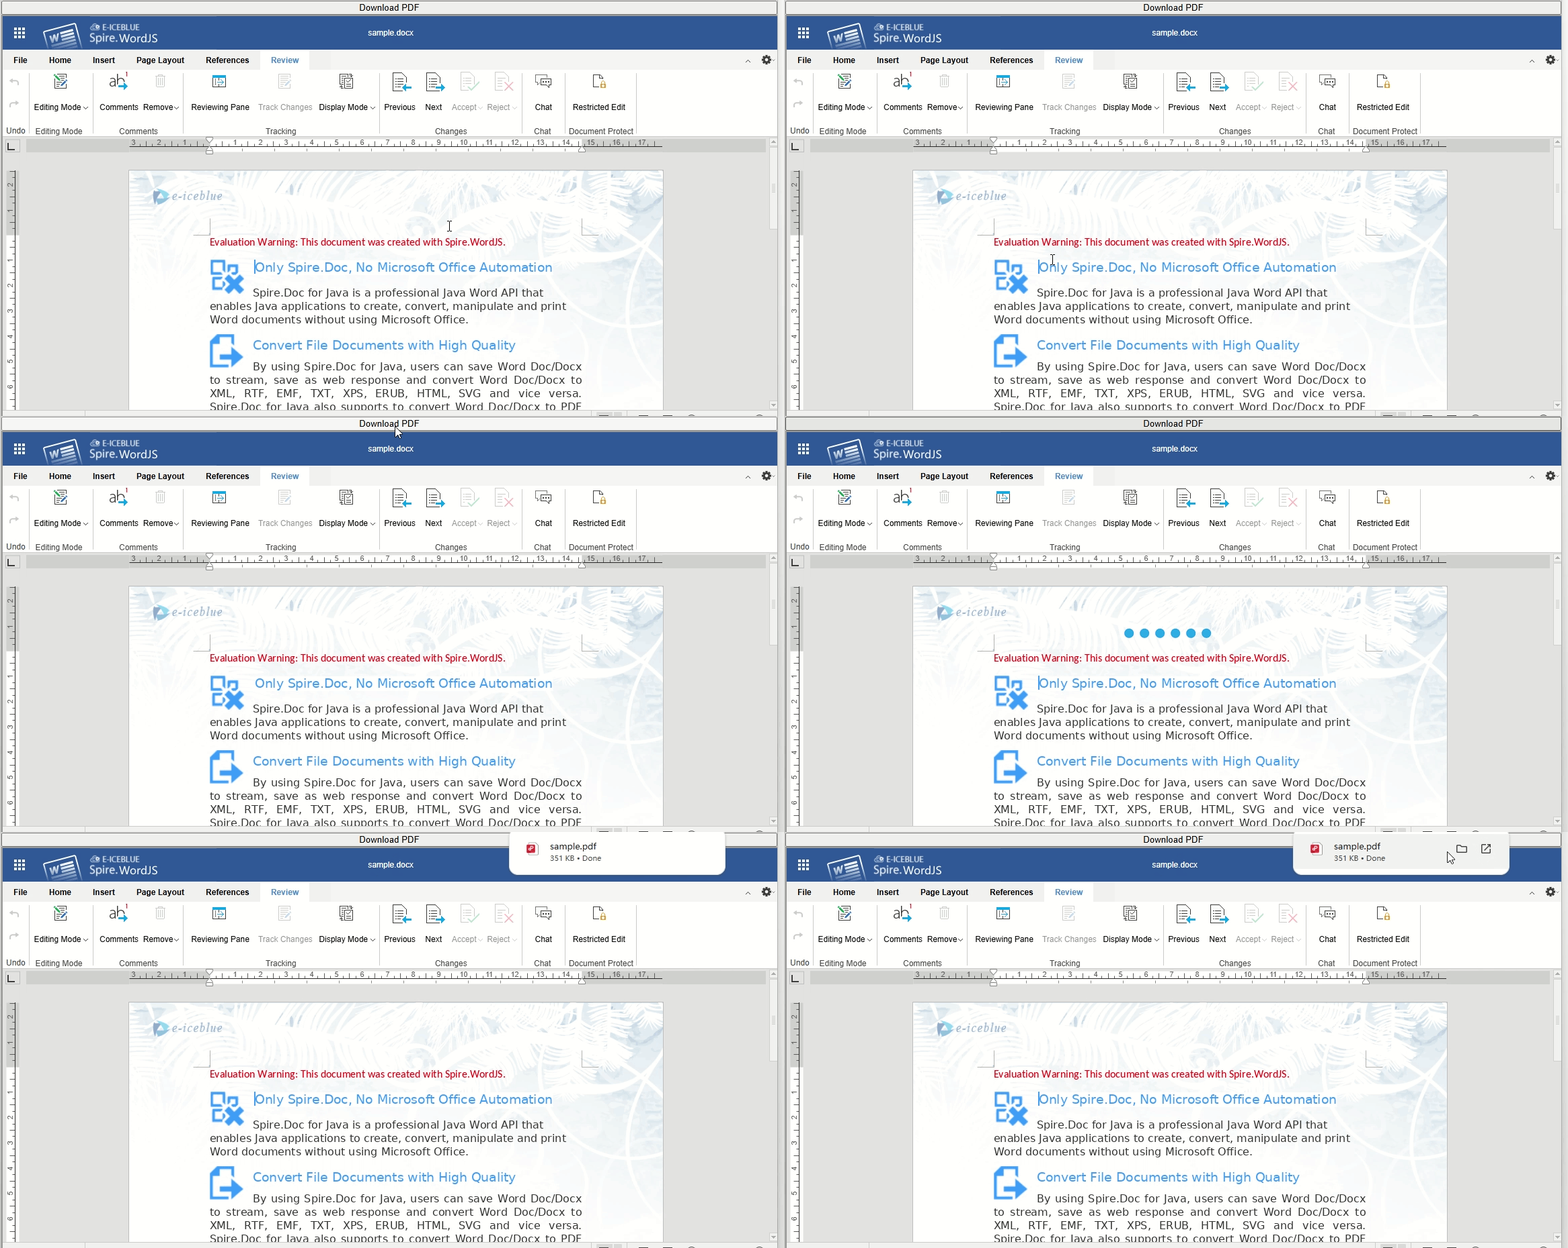
After selecting a document and clicking the download button, the editor converts it and the browser downloads the resulting PDF:
Supported formats
The formats you can convert to depend on the editor that opened the document. Word, Excel, and Presentation load on different pages and support different target formats, so pick the format for the editor that matches the document. The target formats supported by each editor are listed below:
| Editor | Supported formats |
|---|---|
| Spire.WordJS | DOCX, PDF, PDFA, ODT, DOTX, OTT, RTF, HTML, TXT |
| Spire.ExcelJS | XLSX, XLTX, PDF, PDFA, CSV, ODS, OTS |
| Spire.PresentationJS | PPTX, PDF, ODP, POTX, OTP |
FAQ
Does downloading modify the original document or trigger save callbacks
Cause: Downloading does not call callbackUrl or onSave, and it does not write back to sourceUrl; it only generates the document in the browser and downloads it.
Solution: No extra handling is needed. The download is a local copy; neither the original document nor the one in your business system is modified.
format is set, but the downloaded document's format does not change
Cause: If format is unrecognized, the document editor falls back to the document's original format.
Solution: Use the target formats listed for the matching editor in the supported formats table. For example, with sample.docx as the original and format: 'bogus', the downloaded document is still sample.docx.
Can multiple documents be converted at once
Cause: downloadAs() converts only the document currently open in the editor, and one call produces one document in the target format.
Solution: To convert multiple documents, open each document in turn and call downloadAs() for each one, for example by opening the next document after each conversion on the business page.
Configure Document Review with Spire.OfficeJS
The Spire.OfficeJS review feature records modifications as revision marks instead of overwriting the original text. This state is often called review mode (also known as track-changes mode), where all changes are kept as suggestions layered over the original text, waiting for a reviewer to handle them. Once Track Changes is on, insertions, deletions, and formatting adjustments are recorded with their author, and other people can inspect, accept, or reject them one by one. This article uses Word as an example to explain the operations and permission configuration. In this article, "review" refers to the revision-related features on the Review tab.
Review Tab Capabilities
The Review tab in the Word editor provides the following revision-related capabilities:
| Capability | UI Location | Description |
|---|---|---|
| Track Changes toggle | Review → Track Changes | When on, new edits are recorded as revisions instead of changing the body text directly |
| Display mode | Review → Display Mode | Switches the view between "All Markup", "No Markup", and "Original" |
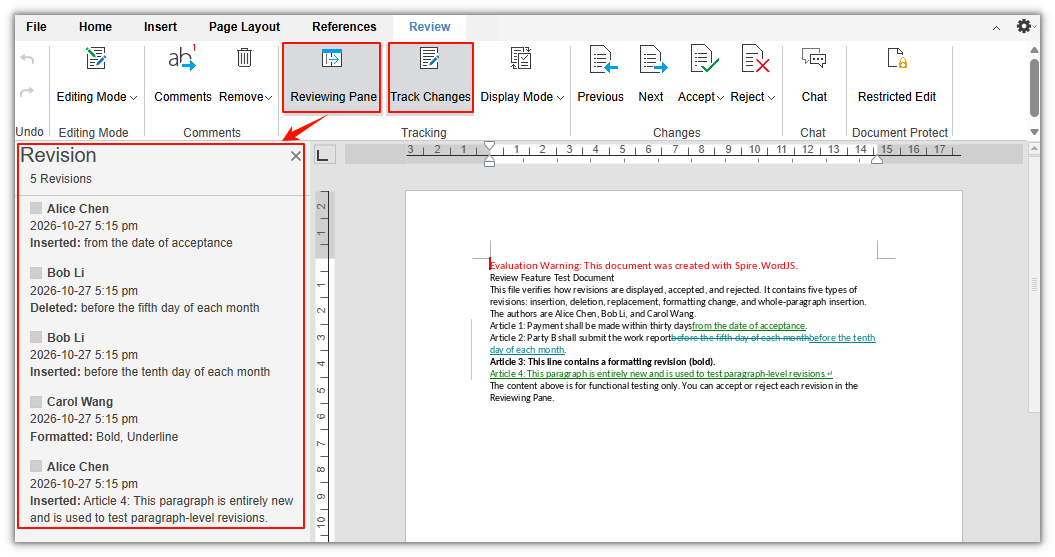
| Reviewing pane | Review → Reviewing Pane | Lists the revisions in the document in one place, click a revision to jump to its location |
| Previous / Next | Review | Browses revisions one by one |
| Accept / Reject | Review | Accepts or rejects the current revision, or processes all revisions at once |
| Restrict Editing | Review → Restrict Editing | Protects the document, can be set to read-only, or to allow changes only as tracked changes |
The following sections explain display modes and the accept and reject operations. The other capabilities can be used directly from the locations listed in the table.
Display Modes
| Option | UI Description | Actual Meaning |
|---|---|---|
| All Markup | All changes (edits) | Shows all revision marks, suitable for editing and reviewing one by one |
| No Markup | Accepted all changes (preview) | Previews the result after "Accept All", without actually accepting revisions |
| Original | Rejected all changes (preview) | Previews the result after "Reject All", without actually rejecting revisions |
Note
"No Markup" and "Original" are previews only. To truly remove revisions, you must use "Accept" or "Reject". If you switch the display mode and then save, the revisions remain in the document.
Accept and Reject Revisions
"Accept" and "Reject" process one revision at a time by default and then jump to the next one. The drop-down menu can process all revisions at once, or you can click a revision mark in the body text to choose directly. Accepting or rejecting changes the body text directly, and you can undo before saving.
Configure Review Capabilities
Revision capabilities are controlled by editorAttrs: canReview determines whether review is enabled, and canEdit determines whether editing is allowed.
editorAttrs: {
  editorMode: 'edit',
  canEdit: true,
  canReview: true
}
Review State on Open
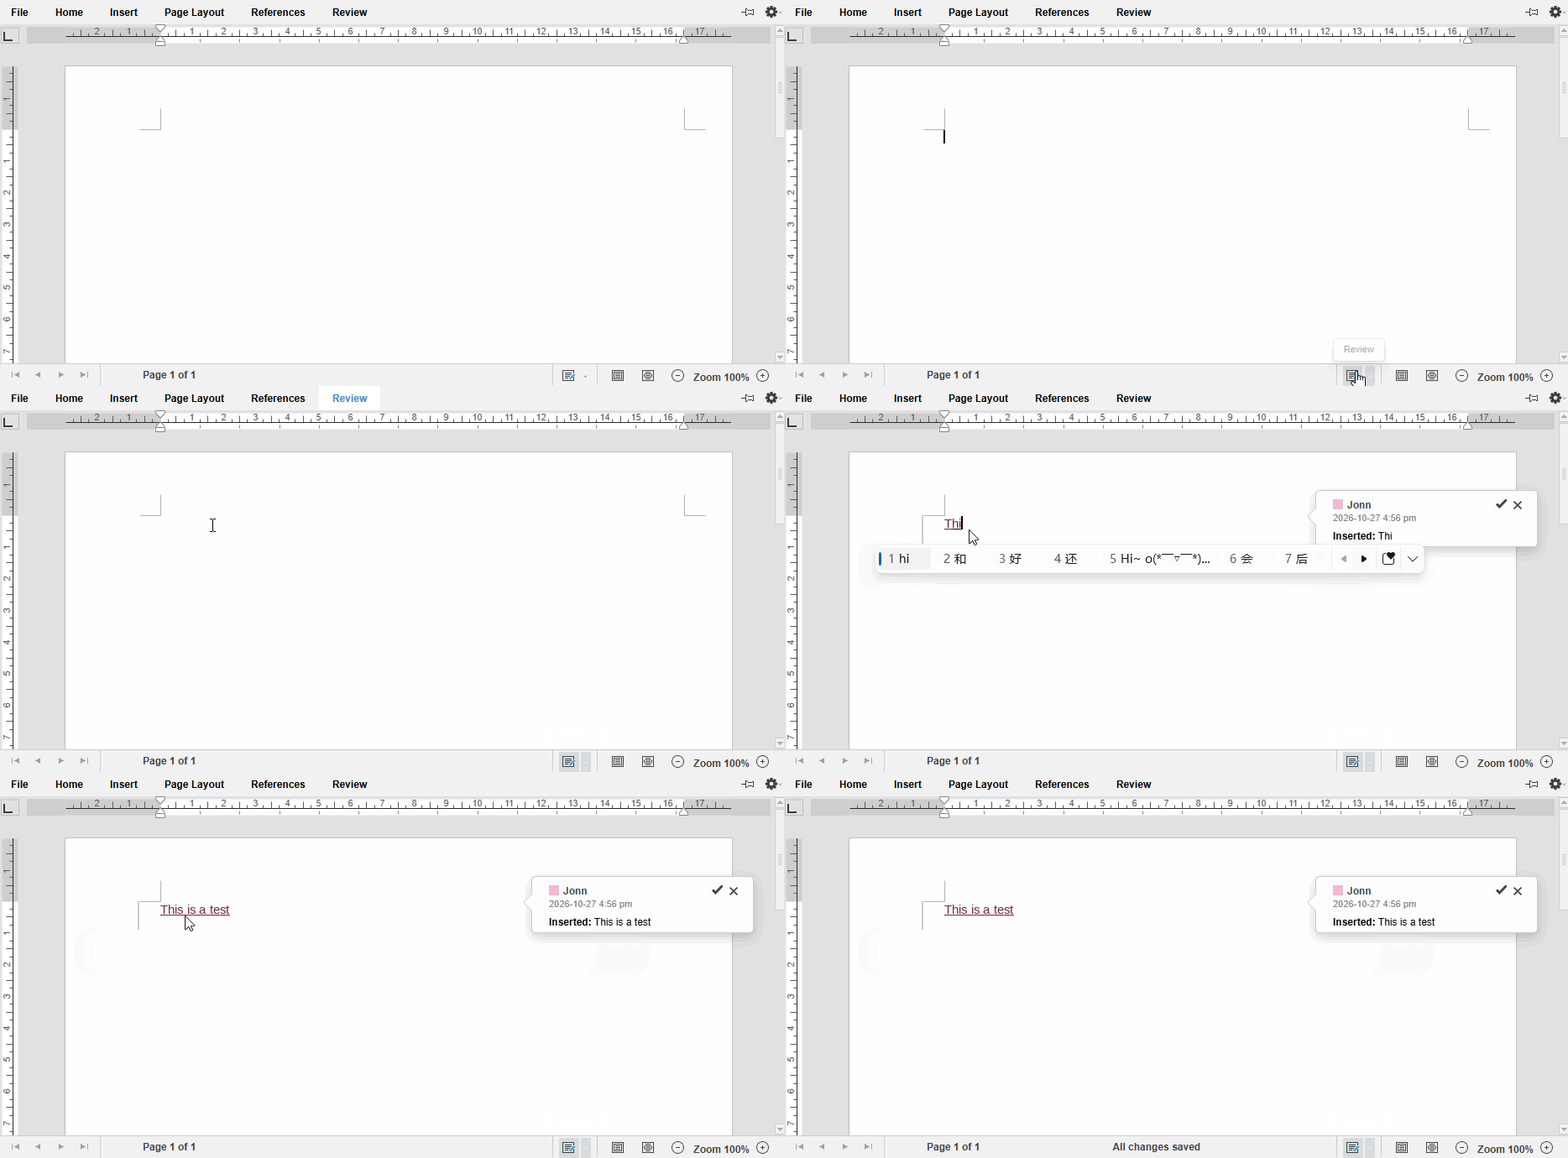
The review state when a document opens is controlled by two switches under user.customization.public.common. Both are false by default, and you can turn them on individually as needed:
openReviewChanges: true: enters the track-changes state immediately after the document opens, so you do not need to click "Track Changes" manually.openReviewPanel: true: expands the reviewing pane when the document opens, suitable for handling revisions in one place, and requirescanReviewto betrue.
user: {
  customization: {
    public: {
      common: {
        openReviewChanges: true, // enters the track-changes state immediately after the document opens
        openReviewPanel: true    // expands the reviewing pane when the document opens
      }
    }
  }
}
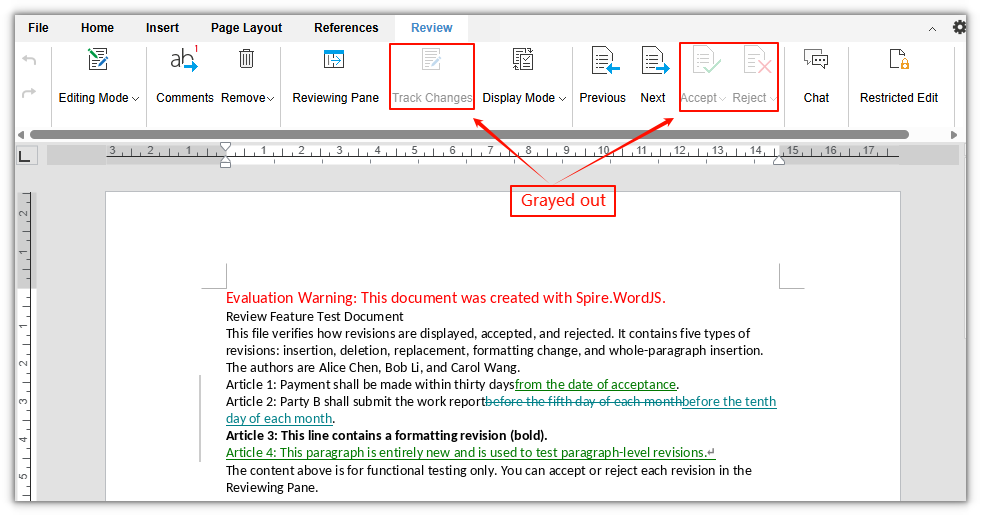
Read-Only Review
External reviewers can only view revisions and the reviewing pane. They cannot change the body text, and they cannot accept or reject revisions:
editorAttrs: {
  editorMode: 'edit',
  canEdit: false,
  canReview: true
}
Disable Review
editorAttrs: {
  canReview: false
}
Users can still edit normally, but the Review tab no longer provides revision-related capabilities. 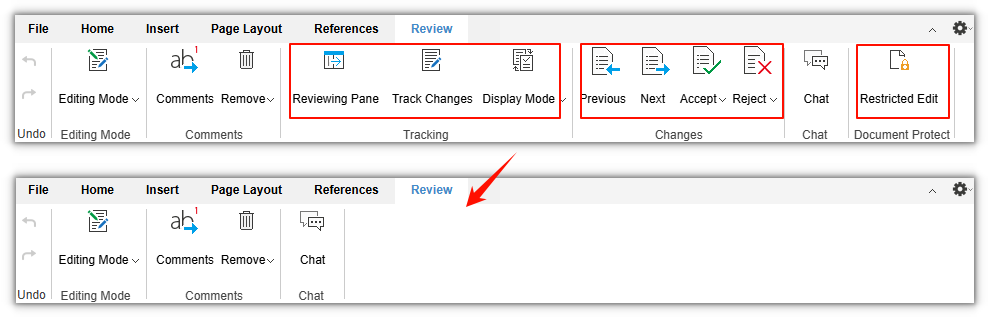
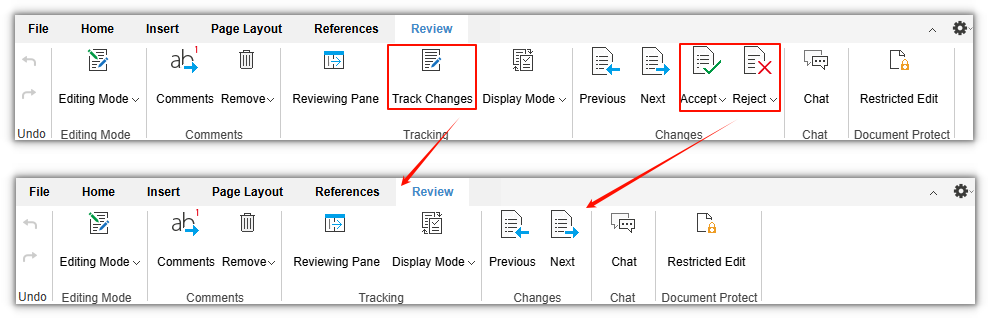
Control Review-Related Buttons
canReview only toggles the review capability as a whole. If you want to hide only some buttons (for example, keep viewing and navigation but remove "Accept" and "Reject"), configure user.customization.public.common.btnPermissions.docBtnPermissions. Removed buttons and their corresponding shortcuts are disabled as well:
user: {
  customization: {
    public: {
      common: {
        btnPermissions: {
          docBtnPermissions: [
            { modular: 'Toolbar', subModule: ['btnTurnOn', 'Accept', 'Reject'] }
          ]
        }
      }
    }
  }
}
For more about button permission configuration, see the documentation on customizing the toolbar menu.
FAQ
The Track Changes toggle or Accept/Reject buttons are unavailable
Common causes are that the current session is in read-only review (canEdit: false, canReview: true), the document is protected, or the user does not have edit permission. Read-only review can view revisions but cannot toggle Track Changes or accept or reject revisions. If a reviewer needs to handle revisions, they must be given edit permission. If they need to handle revisions but should not change the body text freely, enable "Restrict Editing → Tracked Changes", so that all modifications can only be produced as tracked changes.
The Review tab is not visible after opening a document
Check the following in order:
- Whether
editorAttrs.editorModeisedit.viewmode does not provide editing or review. - Whether
editorAttrs.canReviewistrue, and whether bothcanEdit: trueand a valid license are available. - Whether
btnReviewwas removed throughbtnPermissions, or the document is protected as read-only.
Revision authors are wrong or all the same
Revision authors come from user.name in the current session, and the user identity comes from user.id. Make sure each user uses a unique, stable id, pass the correct display name when opening the document, and do not let multiple users share a fixed account.