An Excel comment usually carries a paragraph of text, explaining a number or adding a note. When the thing to be explained is itself a picture -- a supplier mark, a product photo, a sketch of a part -- text alone will not do. Spire.XLS for JavaScript can fill a comment's background with a picture, so the image appears beside the cell without a separate floating picture object being placed on the sheet. A comment's background is controlled by its fill object, and switching to a solid colour likewise changes only that one object. Spire.XLS for JavaScript performs these operations in the browser through WebAssembly; input and output files are managed by a virtual file system (VFS), with no backend service required.
This article covers two feature points:
For installation and project setup, see Integrating Spire.XLS for JavaScript in a React Project. The examples below assume Spire.XLS is installed and the WebAssembly module has been initialized.
Insert a picture comment into a cell
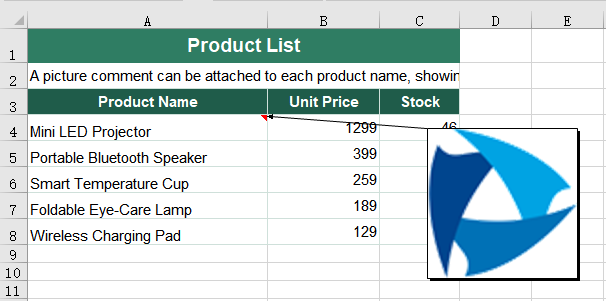
A comment is attached to a cell; giving one a picture means first obtaining the comment object on the target cell and then filling it. The picture becomes the comment box's background, replacing the default pale-yellow shading, and it is this picture that appears when the mouse moves over the cell or the file is opened. The picture is scaled to the size of the comment box, and the default box is a flat rectangle, so a square picture is stretched out of shape; after filling, the width and height must therefore be set so that the box matches the picture's proportions. Where the box sits on the sheet is decided by a separate pair of position properties, so it does not have to follow the cell border. The steps are:
- Load the font, the picture and the test data file into the VFS.
- Load the workbook with
workbook.LoadFromFile. - Take the cell the comment will be attached to with
sheet.Range.get('A4'). - Create a comment object on the cell with
range.AddComment(). - Fill the comment background with the picture using
comment.Fill.CustomPicture, passing the picture as a stream built bynew xlsModule.Stream('logo.png')and'None'for thenameargument. - Set
comment.Widthandcomment.Heightso the comment box is square, matching the square picture, which keeps the picture from being stretched. - Place the comment box relative to the top-left corner of the worksheet with
comment.Topandcomment.Left, so that it covers the content below without obscuring its own row. - Set
comment.Visibleto show the comment as soon as the file is opened. - Save the workbook with
workbook.SaveToFile. - Dispose of the workbook with
workbook.Disposeto free resources.
The complete code example below shows how to insert a picture comment into an Excel cell in React:
function App() {
  const addPictureComment = async () => {
    // get the Spire.XLS WASM module
    const xlsModule = window.wasmModule?.spirexls;

    // check that the module is ready
    if (!xlsModule) {
      alert('Spire.Xls is not ready yet');
      return;
    }

    // load the font, the picture and the test data file into the VFS
    await window.spire.FetchFileToVFS('ARIAL.TTF', '/Library/Fonts/', `${process.env.PUBLIC_URL}/font/`);
    await window.spire.FetchFileToVFS('logo.png', '', `${process.env.PUBLIC_URL}data/`);
    const inputFileName = 'ProductList.xlsx';
    await window.spire.FetchFileToVFS(inputFileName, '', `${process.env.PUBLIC_URL}data/`);

    // load the workbook
    const workbook = new xlsModule.Workbook();
    workbook.LoadFromFile({ fileName: inputFileName });

    // take the first worksheet and add a comment to cell A4, filled with the picture
    const sheet = workbook.Worksheets.get(0);
    const range = sheet.Range.get('A4');
    const comment = range.AddComment();
    comment.Fill.CustomPicture({ im: new xlsModule.Stream('logo.png'), name: 'None' });

    // set the width and height of the comment box
    comment.Width = 150;
    comment.Height = 150;

    // place the comment box relative to the top-left corner of the worksheet
    comment.Top = 100;
    comment.Left = 400;

    // make the comment show as soon as the file is opened
    comment.Visible = true;

    // save the workbook
    const outputFileName = 'PictureComment.xlsx';
    workbook.SaveToFile({ fileName: outputFileName, version: xlsModule.ExcelVersion.Version2010 });

    // dispose of the workbook to free resources
    workbook.Dispose();

    // read the result file from the VFS and start the download
    const fileArray = window.dotnetRuntime.Module.FS.readFile(outputFileName);
    const blob = new Blob([fileArray], { type: 'application/vnd.openxmlformats-officedocument.spreadsheetml.sheet' });
    const url = URL.createObjectURL(blob);
    const a = document.createElement('a');
    a.href = url;
    a.download = outputFileName;
    a.click();
    URL.revokeObjectURL(url);
  };

  return (
    <div style={{ textAlign: 'center', height: '300px' }}>
      <h1>Insert Comments with Pictures</h1>
      <button id="picture-comment" onClick={addPictureComment}>Insert a picture comment into a cell</button>
    </div>
  );
}

export default App;
After running, the effect of inserting a picture comment into a cell:
Fill a comment with a solid colour
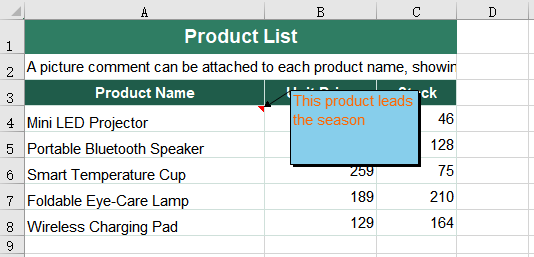
A comment background need not be a picture. When all that is needed is for one comment to stand out from the pale-yellow shading around it, specifying a solid colour is more straightforward than preparing an image. Filling with a picture and filling with a solid colour use the same comment.Fill object; only the fill type changes from picture to solid. The steps are:
- Load the font and the test data file into the VFS.
- Load the workbook with
workbook.LoadFromFile. - Take the cell the comment will be attached to with
sheet.Range.get('A4')and create the comment withrange.AddComment(). - Write the comment text with
comment.Text. - Create a font with
workbook.CreateFont()and set the whole text to it withcomment.RichText.SetFont. - Set
comment.Fill.FillTypeto the solid fill type,xlsModule.ShapeFillType.SolidColor. - Pick the colour with
comment.Fill.ForeColor. - Set
comment.Visibleto show the comment as soon as the file is opened. - Save the workbook with
workbook.SaveToFile. - Dispose of the workbook with
workbook.Disposeto free resources.
The complete code example below shows how to fill an Excel comment with a solid colour in React:
function App() {
  const fillCommentColor = async () => {
    // get the Spire.XLS WASM module
    const xlsModule = window.wasmModule?.spirexls;

    // check that the module is ready
    if (!xlsModule) {
      alert('Spire.Xls is not ready yet');
      return;
    }

    // load the font and the test data file into the VFS
    await window.spire.FetchFileToVFS('ARIAL.TTF', '/Library/Fonts/', `${process.env.PUBLIC_URL}/font/`);
    const inputFileName = 'ProductList.xlsx';
    await window.spire.FetchFileToVFS(inputFileName, '', `${process.env.PUBLIC_URL}data/`);

    // load the workbook
    const workbook = new xlsModule.Workbook();
    workbook.LoadFromFile({ fileName: inputFileName });

    // take the first worksheet and add a comment to cell A4
    const sheet = workbook.Worksheets.get(0);
    const range = sheet.Range.get('A4');

    // create the font the comment text will use
    const font = workbook.CreateFont();
    font.FontName = 'Arial';
    font.Size = 11;
    font.KnownColor = xlsModule.ExcelColors.Orange;

    // write the comment text and set the whole text to that font
    const commentText = 'This product leads the season';
    range.Comment.Text = commentText;
    range.Comment.RichText.SetFont(0, commentText.length - 1, font);

    // set the comment fill to a solid colour and pick the colour
    range.Comment.Fill.FillType = xlsModule.ShapeFillType.SolidColor;
    range.Comment.Fill.ForeColor = xlsModule.Color.get_SkyBlue();
    range.Comment.Visible = true;

    // save the workbook
    const outputFileName = 'CommentFillColor.xlsx';
    workbook.SaveToFile({ fileName: outputFileName, version: xlsModule.ExcelVersion.Version2010 });

    // dispose of the workbook to free resources
    workbook.Dispose();

    // read the result file from the VFS and start the download
    const fileArray = window.dotnetRuntime.Module.FS.readFile(outputFileName);
    const blob = new Blob([fileArray], { type: 'application/vnd.openxmlformats-officedocument.spreadsheetml.sheet' });
    const url = URL.createObjectURL(blob);
    const a = document.createElement('a');
    a.href = url;
    a.download = outputFileName;
    a.click();
    URL.revokeObjectURL(url);
  };

  return (
    <div style={{ textAlign: 'center', height: '300px' }}>
      <h1>Insert Comments with Pictures</h1>
      <button id="comment-fill-color" onClick={fillCommentColor}>Fill a comment with a solid colour</button>
    </div>
  );
}

export default App;
After running, the effect of filling a comment with a solid colour:
FAQ
Why does the picture comment not appear when the result file is opened
Reason: Comments are hidden by default and appear only when the mouse moves over the cell. If the comment was not set to visible before saving, reopening the file shows an ordinary worksheet, and the picture comment does not appear on its own.
Solution: Set comment.Visible to true, and the comment appears as soon as the file is opened:
comment.Visible = true;
Get a Free License
Spire.XLS for JavaScript offers a 30-day full-featured free trial license with no functional limitations. Apply here to evaluate before purchasing.
