When citing specific content in reference documents, legal documents or technical documentation, it is often necessary to point out both the page number and the line number. Line numbers are added automatically by Word per page or per section, so they do not have to be typed into the text by hand. The starting number, the numbering interval, the distance between the line numbers and the text and the way numbering restarts can all be adjusted in the page setup. The paper size, the paper orientation and the margins determine the area available for layout on a page, and they also need to be set consistently when a document is delivered for printing or archived in a fixed format.
This article uses Spire.Doc for JavaScript to perform the page setup described above in the browser. The document is loaded through the virtual file system (VFS), saved after the settings are applied and downloaded directly. The whole process runs on the client side with WebAssembly, requires no Office installation and depends on no backend service.
This article covers three features:
- Add Line Numbers to a Word Document
- Set Paper Size and Orientation for a Word Document
- Set Page Margins for a Word Document
The examples read Sample.docx from public/data; put that file into the public/data directory of the project before running them.
For installation and project setup, refer to Integrating Spire.Doc for JavaScript in a React Project. The examples below assume that Spire.Doc is installed and the WebAssembly module is initialized.
Add Line Numbers to a Word Document
To add line numbers to a Word document, the numbering is controlled by the page setup of the section; four properties on PageSetup together determine the effect:
| Property | Purpose | Example |
|---|---|---|
PageSetup.LineNumberingStartValue |
The starting number of the line numbering | 1 |
PageSetup.LineNumberingStep |
The numbering interval, that is, how many lines apart a line number appears | 1 |
PageSetup.LineNumberingDistanceFromText |
The distance between the line numbers and the text, in points | 40 |
PageSetup.LineNumberingRestartMode |
How the numbering restarts | Continuous |
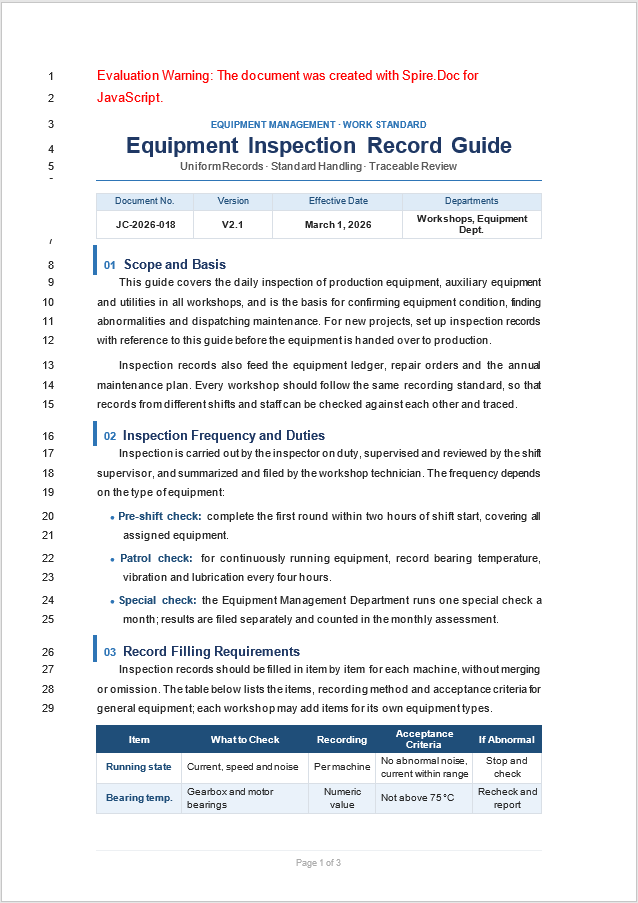
The sample document is A4 portrait, with margins of 2.19 cm at the top and bottom and 3.17 cm on the left and right, and line numbering is not enabled. The following code sets the starting number to 1, numbers every 1 line, places the line numbers 40 points from the text, and numbers continuously throughout the section.
The specific steps are as follows:
- Get the Spire.Doc WASM module and confirm that it is ready.
- Load the font, read the sample document into the VFS and load it as a
Document. - Take the first section and set the starting number, the interval, the distance and the numbering mode of the line numbering through
PageSetup. - Save the result file with
SaveToFile(). - Read the result file from the VFS and trigger a browser download.
The code for adding line numbers to a Word document is as follows:
function App() {
  const addLineNumbers = async () => {
    // Get the Spire.Doc WASM module
    const wasmModule = window.wasmModule?.spiredoc;

    // Check if the module is ready
    if (!wasmModule) {
      alert('Spire.Doc is not ready yet');
      return;
    }

    // Load the document to be processed
    await window.spire.FetchFileToVFS('Sample.docx', '', `${process.env.PUBLIC_URL}/data/`);

    // Create a Document instance and load the document
    const doc = new wasmModule.Document();
    doc.LoadFromFile('Sample.docx');

    // Line numbers apply per section, so take the page setup of the first section
    const pageSetup = doc.Sections.get_Item(0).PageSetup;

    // Set the starting number of the line numbering
    pageSetup.LineNumberingStartValue = 1;

    // Set the numbering interval: show one line number every 1 line
    pageSetup.LineNumberingStep = 1;

    // Set the distance between the line numbers and the text, in points
    pageSetup.LineNumberingDistanceFromText = 40;

    // Set the numbering mode to continuous throughout the section
    pageSetup.LineNumberingRestartMode = wasmModule.LineNumberingRestartMode.Continuous;

    // Save the result file
    const outputFileName = 'AddLineNumbers.docx';
    doc.SaveToFile({ fileName: outputFileName, fileFormat: wasmModule.FileFormat.Docx2013 });
    doc.Dispose();

    // Read the generated file from the VFS and trigger the download
    const fileArray = window.dotnetRuntime.Module.FS.readFile(outputFileName);
    const blob = new Blob([fileArray], { type: 'application/vnd.openxmlformats-officedocument.wordprocessingml.document' });
    const url = URL.createObjectURL(blob);
    const a = document.createElement('a');
    a.href = url;
    a.download = outputFileName;
    a.click();
    URL.revokeObjectURL(url);
  };

  return (
    <div style={{ textAlign: 'center', height: '300px' }}>
      <h1>Add Line Numbers to a Word Document</h1>
      <button onClick={addLineNumbers}>
        Add Line Numbers
      </button>
    </div>
  );
}

export default App;
The page after line numbers have been added to the Word document is shown below:
How the Line Numbering Restarts
LineNumberingRestartMode determines where the line numbers are counted from again. The available values are as follows:
| Value | Numbering behavior |
|---|---|
LineNumberingRestartMode.Continuous |
Number continuously throughout the section |
LineNumberingRestartMode.RestartPage |
Restart from the starting number on every page |
LineNumberingRestartMode.RestartSection |
Restart from the starting number in every section |
LineNumberingRestartMode.None |
Do not specify a restart; number continuously through the document |
To restart the count from the starting number on every page, change the numbering mode to RestartPage:
// Restart from the starting number on every page
pageSetup.LineNumberingRestartMode = wasmModule.LineNumberingRestartMode.RestartPage;
Set Paper Size and Orientation for a Word Document
To set the paper size and orientation of a Word document, use the PageSize and Orientation properties in the page setup of the section. PageSize accepts a size object, and Spire.Doc for JavaScript provides a set of common predefined paper sizes that are returned as static methods in the JavaScript binding:
| Method | Paper size |
|---|---|
PageSize.A4() |
A4, 210 × 297 mm |
PageSize.Letter() |
Letter, 8.5 × 11 in |
PageSize.A3() |
A3, 297 × 420 mm |
PageSize.A5() |
A5, 148 × 210 mm |
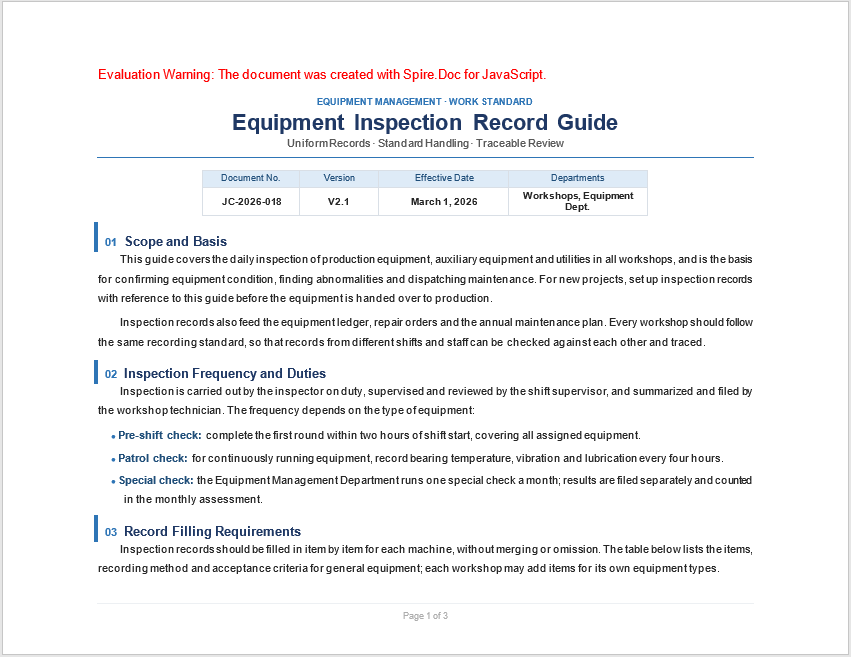
The paper orientation is specified by the PageOrientation enumeration, where Portrait is upright and Landscape is sideways. The following code sets the paper size of the sample document to Letter and changes the orientation to landscape.
The specific steps are as follows:
- Get the Spire.Doc WASM module and confirm that it is ready.
- Load the font, read the sample document into the VFS and load it as a
Document. - Take the first section and set the paper size and the paper orientation through
PageSetup. - Save the result file with
SaveToFile(). - Read the result file from the VFS and trigger a browser download.
The code for setting the paper size and orientation of a Word document is as follows:
function App() {
  const setPaperSize = async () => {
    // Get the Spire.Doc WASM module
    const wasmModule = window.wasmModule?.spiredoc;

    // Check if the module is ready
    if (!wasmModule) {
      alert('Spire.Doc is not ready yet');
      return;
    }

    // Load the document to be processed
    await window.spire.FetchFileToVFS('Sample.docx', '', `${process.env.PUBLIC_URL}/data/`);

    // Create a Document instance and load the document
    const doc = new wasmModule.Document();
    doc.LoadFromFile('Sample.docx');

    // The paper size also applies per section, so take the page setup of the first section
    const pageSetup = doc.Sections.get_Item(0).PageSetup;

    // Set the paper size to Letter; in the JavaScript binding the size object is obtained by calling the method
    pageSetup.PageSize = wasmModule.PageSize.Letter();

    // Set the page orientation to landscape
    pageSetup.Orientation = wasmModule.PageOrientation.Landscape;

    // Save the result file
    const outputFileName = 'SetPaperSize.docx';
    doc.SaveToFile({ fileName: outputFileName, fileFormat: wasmModule.FileFormat.Docx2013 });
    doc.Dispose();

    // Read the generated file from the VFS and trigger the download
    const fileArray = window.dotnetRuntime.Module.FS.readFile(outputFileName);
    const blob = new Blob([fileArray], { type: 'application/vnd.openxmlformats-officedocument.wordprocessingml.document' });
    const url = URL.createObjectURL(blob);
    const a = document.createElement('a');
    a.href = url;
    a.download = outputFileName;
    a.click();
    URL.revokeObjectURL(url);
  };

  return (
    <div style={{ textAlign: 'center', height: '300px' }}>
      <h1>Set Paper Size and Orientation for a Word Document</h1>
      <button onClick={setPaperSize}>
        Set Paper Size
      </button>
    </div>
  );
}

export default App;
The page after it has been set to Letter size and landscape orientation is shown below:
Set Page Margins for a Word Document
To set the page margins of a Word document, specify the values for the top, bottom, left and right sides through PageSetup.Margins. These values are all in points, and 1 cm is approximately 28.35 points; the common conversions are as follows:
| Side | Property | Example value (points) | Equivalent |
|---|---|---|---|
| Top | PageSetup.Margins.Top |
85 |
3 cm |
| Bottom | PageSetup.Margins.Bottom |
85 |
3 cm |
| Left | PageSetup.Margins.Left |
127.5 |
4.5 cm |
| Right | PageSetup.Margins.Right |
127.5 |
4.5 cm |
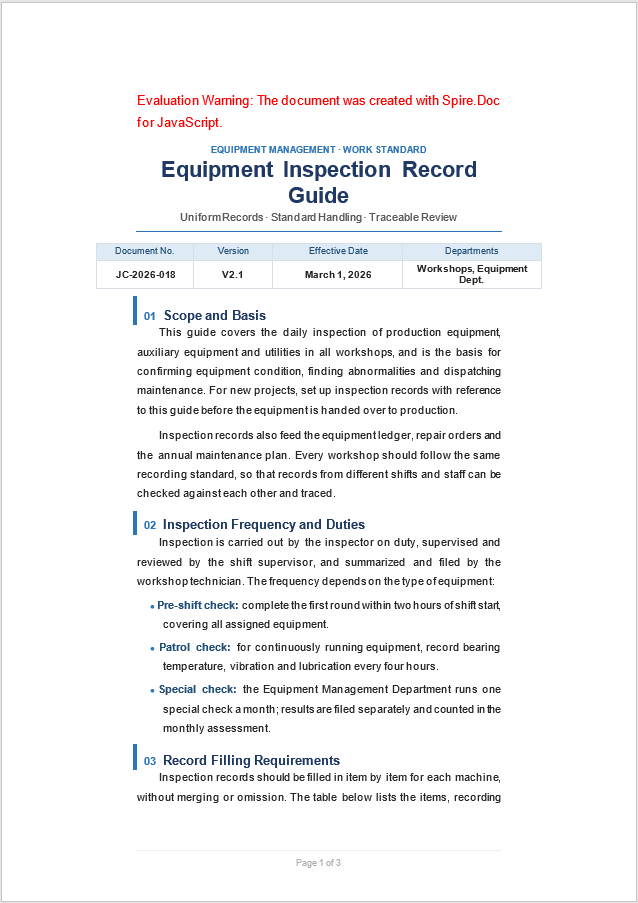
The original margins of the sample document are 2.19 cm at the top and bottom and 3.17 cm on the left and right. The following code changes the top and bottom margins to 3 cm and the left and right margins to 4.5 cm, and the area available for layout on the page narrows accordingly.
The specific steps are as follows:
- Get the Spire.Doc WASM module and confirm that it is ready.
- Load the font, read the sample document into the VFS and load it as a
Document. - Take the first section and set the margins of the four sides through
PageSetup.Margins. - Save the result file with
SaveToFile(). - Read the result file from the VFS and trigger a browser download.
The code for setting the page margins of a Word document is as follows:
function App() {
  const setPageMargins = async () => {
    // Get the Spire.Doc WASM module
    const wasmModule = window.wasmModule?.spiredoc;

    // Check if the module is ready
    if (!wasmModule) {
      alert('Spire.Doc is not ready yet');
      return;
    }

    // Load the document to be processed
    await window.spire.FetchFileToVFS('Sample.docx', '', `${process.env.PUBLIC_URL}/data/`);

    // Create a Document instance and load the document
    const doc = new wasmModule.Document();
    doc.LoadFromFile('Sample.docx');

    // Margins also apply per section, so take the page setup of the first section
    const pageSetup = doc.Sections.get_Item(0).PageSetup;

    // Set the margins of the four sides, in points
    pageSetup.Margins.Top = 85;      // about 3 cm
    pageSetup.Margins.Bottom = 85;   // about 3 cm
    pageSetup.Margins.Left = 127.5;  // about 4.5 cm
    pageSetup.Margins.Right = 127.5; // about 4.5 cm

    // Save the result file
    const outputFileName = 'SetPageMargins.docx';
    doc.SaveToFile({ fileName: outputFileName, fileFormat: wasmModule.FileFormat.Docx2013 });
    doc.Dispose();

    // Read the generated file from the VFS and trigger the download
    const fileArray = window.dotnetRuntime.Module.FS.readFile(outputFileName);
    const blob = new Blob([fileArray], { type: 'application/vnd.openxmlformats-officedocument.wordprocessingml.document' });
    const url = URL.createObjectURL(blob);
    const a = document.createElement('a');
    a.href = url;
    a.download = outputFileName;
    a.click();
    URL.revokeObjectURL(url);
  };

  return (
    <div style={{ textAlign: 'center', height: '300px' }}>
      <h1>Set Page Margins for a Word Document</h1>
      <button onClick={setPageMargins}>
        Set Page Margins
      </button>
    </div>
  );
}

export default App;
The page after the margins of the four sides have been adjusted is shown below:
FAQ
Why are the line numbers not visible in the document after they have been added
Line numbers belong to the page setup of the section and are normally shown in Word's page view (print layout); the reading view and the web layout may not display them. If they are still missing after switching to page view, check whether the code changed the section that holds the body text: line numbers are stored per section, so in a document with several sections, setting only the first section leaves the other sections without line numbers.
Why do the line numbers still start from 1 after the starting number has been set
Line numbers are stored per section, and the starting number only takes effect in the section it is assigned to. The examples take the first section, so if the body text sits in another section, that section has to be used instead. The default value of LineNumberingStartValue is 1, which is why numbering naturally begins at 1 when no value is assigned; after it is set to 5, the first line of that section shows 5 and the following lines are numbered from there.
What unit do the margins use, and why is a value of 2.54 not 2.54 cm
The values of PageSetup.Margins are in points, while Word's interface displays centimeters or inches. One centimeter is approximately 28.35 points, so 2.54 cm is approximately 72 points; when laying out in centimeters, convert the value before assigning it.
Why does the layout of the existing content change after the paper size or orientation is modified
Once the paper size changes, the width and height available on the page change with it, the body text is rewrapped to the new width, and tables and pictures may be compressed or shifted. When the orientation is switched to landscape, width and height are exchanged, and tables laid out for a portrait page are more likely to run across pages. To preserve the original layout, first confirm which sections are affected, then decide whether to adjust the font size or the table column widths.
Why is it written as PageSize.Letter() in JavaScript instead of using PageSize.Letter directly
The JavaScript binding exposes the predefined paper sizes as static methods, and only a call returns the size object that can be assigned to PageSetup.PageSize. PageSize.Letter itself is a function, so assigning it directly does not produce a paper size, and the parentheses are required.
Get a Free License
Spire.Doc for JavaScript offers a 30-day full-featured free trial license with no functional limitations. Apply here to evaluate before purchasing.
