
Knowledgebase (2337)
Children categories

Modern web applications increasingly require built-in document capabilities for viewing and editing Word, Excel, and PowerPoint files directly in the browser. Instead of redirecting users to external applications, developers often need to embed an Office editor in a web page as part of their existing interface.
Building a fully functional online document editor from scratch can be complex, involving document rendering, format compatibility, editing workflows, and responsive UI integration. With Spire.OfficeJS from e-iceblue, developers can quickly integrate a browser-based Office editor into HTML pages using JavaScript without requiring Microsoft Office installations on client devices.
This article demonstrates how to embed a document editor in HTML, including page layout design, editor initialization, and dynamic document loading with practical examples.
Table of Contents
- Why Embed an Office Editor into a Web Page?
- Prerequisites
- Basic Page Layout for Integration
- Embed the Office Editor into a Container
- Load and Switch Documents Dynamically
- Customize Editor Behavior
- Integrating the Editor into Existing Business Systems
- Framework Integration (React, Vue, Angular)
- Common Integration Issues
- Conclusion
- FAQ
Why Embed an Office Editor into a Web Page?
Embedding a document editor as part of your page layout enables seamless workflows and better user experience. Common use cases include:
- Document management systems (DMS) where users view and edit files without leaving the interface
- CRM or ERP platforms with integrated file editing capabilities
- Online collaboration tools requiring real-time document editing
- Internal business dashboards with document preview functionality
Instead of opening documents in a separate application or dedicated page, users can work with documents directly inside the current web interface.
Embedded vs Full-Page Editors
There are two common integration approaches:
| Approach | Description |
|---|---|
| Full-page editor | The entire page is dedicated to document editing |
| Embedded editor | The editor is integrated as part of a larger UI |
This tutorial focuses on the embedded approach, where the document editor works alongside sidebars, file lists, navigation menus, and other application components.
Prerequisites
Before integrating the editor, ensure you have:
Server Setup
-
Download and Extract Spire.OfficeJS
Download the Spire.OfficeJS package and extract it to a local directory.
-
Start Spire.OfficeJS Backend Service
cd Spire.OfficeJS.Windows_10.11.4
run_servers.bat
This starts the editor service on
http://localhost:8001 -
Start Example Server (provides sample documents) The example server runs on
http://localhost:3000with sample documents available at/public/samples/
If you need a complete setup guide for installing and deploying Spire.OfficeJS in JavaScript applications, see: How to Deploy Spire.OfficeJS in JavaScript
Requirements
- Document files accessible from the browser
- Modern browser with WebAssembly support
Note: The code examples below use localhost addresses for local development and testing. In production environments, replace them with your actual server URLs or domain names.
Basic Page Layout for Integration
The first step is to design a layout where the editor occupies only part of the page. Here's a common structure with a sidebar and editor area:
<!DOCTYPE html>
<html>
<head>
  <title>Document Editor Integration</title>
  <style>
    .app-container {
      display: flex;
      height: 100vh;
    }

    .sidebar {
      width: 250px;
      border-right: 1px solid #ddd;
      padding: 10px;
      background: #f5f5f5;
    }

    .editor-container {
      flex: 1;
      position: relative;
    }
  </style>
</head>
<body>
  <div class="app-container">
    <div class="sidebar">
      <h3>Documents</h3>
      <ul>
        <li onclick="openDocument('http://localhost:3000/public/samples/sample.docx', 'docx')">Sample Document.docx</li>
        <li onclick="openDocument('http://localhost:3000/public/samples/sample.xlsx', 'xlsx')">Sample Spreadsheet.xlsx</li>
        <li onclick="openDocument('http://localhost:3000/public/samples/sample.pptx', 'pptx')">Sample Presentation.pptx</li>
      </ul>
    </div>

    <div class="editor-container" id="editor"></div>
  </div>
</body>
</html>
A simple embedded document management interface may look like this before a document is opened:

Layout Explanation
- The sidebar displays a file list with clickable document names
- The editor-container is a flex item that will host the document editor
- The editor fills the remaining space using
flex: 1
This structure reflects a real-world application layout rather than a simple demo page.
Embed the Office Editor into a Container
Load the Spire.OfficeJS script and initialize the editor inside your designated container:
<script src="http://localhost:8001/web/editors/spireapi/SpireCloudEditor.js"></script>

<script>
function initEditor() {
  const config = {
    user: {
      id: 'user1',
      name: 'Demo User'
    },
    fileAttrs: {
      sourceUrl: "http://localhost:3000/public/samples/sample.docx",
      fileInfo: {
        ext: "docx",
        name: "sample.docx"
      }
    },
    editorAttrs: {
      editorType: "document",
      editorMode: "edit",
      editorWidth: "100%",
      editorHeight: "100%",
      platform: "desktop",
      viewLanguage: "en",
      canEdit: true,
      canDownload: true,
      canForcesave: true,
      useWebAssemblyDoc: true,
      useWebAssemblyExcel: true,
      useWebAssemblyPpt: true,
      useWebAssemblyPdf: true,
      serverless: {
        useServerless: true,
        baseUrl: "http://localhost:8001"
      },
      embedded: {
        saveUrl: "",
        toolbarDocked: 'top'
      },
      events: {
        onDocumentReady: function() {
          console.log('Document is ready');
        },
        onError: function(event) {
          console.error('Editor error:', event);
        },
        onSave: function(data) {
          console.log('Document saved', data);
          if (data && data.data && data.data.length >= 2) {
            downloadFile(data.data[1], data.data[0]);
          }
        }
      }
    }
  };

  new SpireCloudEditor.OpenApi("editor", config);
}

function downloadFile(file, fileName) {
  const a = document.createElement('a');
  const url = URL.createObjectURL(file);
  a.href = url;
  a.download = fileName;
  document.body.appendChild(a);
  a.click();
  document.body.removeChild(a);
  URL.revokeObjectURL(url);
}

initEditor();
</script>
After initialization, the embedded Office editor loads directly inside the target container:

To help you get started quickly, you can download the complete runnable HTML example used in this article:
Download Embedded Editor Example
Note: Start the Spire.OfficeJS service before opening the sample editor. The downloadable demo dynamically detects the current host using window.location.hostname, so it should be opened via an HTTP server. For direct browser file preview, replace it with a fixed host address.
Configuration Breakdown
- user: Required user configuration with customization settings
- fileAttrs: Document source URL and file metadata
- editorAttrs: Editor behavior including mode, dimensions, and language
The editor renders inside the specified container element with ID "editor", allowing it to function as a UI component rather than taking over the entire page.
You can further customize the editor experience by adding your own fonts for branding or multilingual documents. For more details, see: How to Add Custom Fonts to the Office Editor
Load and Switch Documents Dynamically
In real applications, users need to open different files dynamically. You can achieve this by reinitializing the editor with new configurations:
let editorInstance = null;

function openDocument(sourceUrl, ext) {
  const fileName = sourceUrl.split('/').pop();

  if (editorInstance) {
    editorInstance.destroy();
  }

  const container = document.getElementById("editor");
  container.innerHTML = "";

  const config = {
    user: {
      id: 'user1',
      name: 'Demo User'
    },
    fileAttrs: {
      sourceUrl: sourceUrl,
      fileInfo: {
        ext: ext,
        name: fileName
      }
    },
    editorAttrs: {
      editorType: getEditorType(ext),
      editorMode: "edit",
      editorWidth: "100%",
      editorHeight: "100%",
      platform: "desktop",
      viewLanguage: "en",
      canEdit: true,
      canDownload: true,
      canForcesave: true,
      useWebAssemblyDoc: true,
      useWebAssemblyExcel: true,
      useWebAssemblyPpt: true,
      useWebAssemblyPdf: true,
      serverless: {
        useServerless: true,
        baseUrl: "http://localhost:8001"
      },
      embedded: {
        saveUrl: "",
        toolbarDocked: 'top'
      },
      events: {
        onSave: function(data) {
          if (data && data.data && data.data.length >= 2) {
            downloadFile(data.data[1], data.data[0]);
          }
        }
      }
    }
  };

  editorInstance = new SpireCloudEditor.OpenApi("editor", config);
}

function getEditorType(ext) {
  const extLower = ext.toLowerCase();
  switch (extLower) {
    case 'docx':
    case 'doc':
    case 'rtf':
    case 'txt':
    case 'odt':
      return 'document';
    case 'xlsx':
    case 'xls':
    case 'csv':
    case 'ods':
      return 'spreadsheet';
    case 'pptx':
    case 'ppt':
    case 'odp':
      return 'presentation';
    default:
      return 'document';
  }
}
How It Works
- Clicking a file in the sidebar triggers
openDocumentwith the file URL and extension - The previous editor instance is destroyed and container is cleared
- The editor reloads with the selected document
- No page refresh is required, maintaining application state
This pattern is essential for building interactive document management systems.
Best Practices for Document Switching
When switching between documents dynamically, proper cleanup prevents UI issues:
Error Handling and Loading States
Always use try-catch for error handling and consider adding loading indicators:
let editorInstance = null;

async function openDocument(sourceUrl, ext) {
  try {
    if (editorInstance) {
      editorInstance.destroy();
    }

    const container = document.getElementById("editor");
    container.innerHTML = "";

    const config = { /* ... configuration ... */ };
    editorInstance = new SpireCloudEditor.OpenApi("editor", config);
  } catch (error) {
    console.error('Failed to load document:', error);
  }
}
Key points:
- Always destroy old instances before creating new ones
- Clear the container element to prevent UI conflicts
- Use try-catch for robust error handling
Customize Editor Behavior
You can fine-tune the editor's behavior using configuration options in editorAttrs.
Read-Only Mode
Set the editor to view-only mode:
editorAttrs: {
  editorMode: "view",
  isReadOnly: true
}
Control User Permissions
Restrict specific actions:
editorAttrs: {
  canEdit: false,
  canDownload: false,
  canComment: true,
  canPrint: true
}
Change UI Language
Support internationalization by setting the interface language:
editorAttrs: {
  viewLanguage: "zh"
}
Supported languages include English ("en") and Chinese ("zh").
Configure Save Functionality
In serverless mode, saving is handled through the onSave event callback:
editorAttrs: {
  embedded: {
    saveUrl: "",  // Keep empty in serverless mode
    toolbarDocked: 'top'
  },
  events: {
    onSave: function(data) {
      console.log('Document saved', data);
      if (data && data.data && data.data.length >= 2) {
        // data.data[0] = filename, data.data[1] = file blob
        downloadFile(data.data[1], data.data[0]);
      }
    }
  }
}

function downloadFile(file, fileName) {
  const a = document.createElement('a');
  const url = URL.createObjectURL(file);
  a.href = url;
  a.download = fileName;
  document.body.appendChild(a);
  a.click();
  document.body.removeChild(a);
  URL.revokeObjectURL(url);
}
When users click save, the document is automatically downloaded to their local machine.
Dynamic Protocol Configuration
To support both HTTP and HTTPS environments, use dynamic protocol detection:
const currentHost = window.location.hostname;
const currentProtocol = window.location.protocol;

const baseUrl = `${currentProtocol}//${currentHost}:8001`;
const exampleBaseUrl = `${currentProtocol}//${currentHost}:3000`;
This prevents mixed content errors when the page is served over HTTPS.
Upload Local Files
Users can upload local documents for editing:
<input type="file" id="fileInput" accept=".docx,.xlsx,.pptx,.doc,.xls,.ppt"
       onchange="handleFileUpload(event)">
async function handleFileUpload(event) {
  const file = event.target.files[0];
  const fileName = file.name;
  const ext = fileName.split('.').pop().toLowerCase();

  const fileData = await new Promise((resolve) => {
    const reader = new FileReader();
    reader.onload = (e) => resolve(e.target.result);
    reader.readAsArrayBuffer(file);
  });

  const config = {
    user: {
      id: 'user1',
      name: 'Demo User'
    },
    fileAttrs: {
      sourceUrl: 'upload://' + fileName,
      fileInfo: { ext, name: fileName }
    },
    editorAttrs: {
      editorType: getEditorType(ext),
      serverless: {
        useServerless: true,
        baseUrl: baseUrl,
        fileData: fileData  // Pass file data directly
      }
    }
  };

  editorInstance = new SpireCloudEditor.OpenApi("editor", config);
}
Integrating the Editor into Existing Business Systems
In most real-world scenarios, the online document editor is not the entire application. Instead, it functions as one module within a larger business system.
Typical integration patterns include:
- CRM systems with contract editing and proposal generation
- ERP systems with invoice review and report modification
- Document management systems (DMS) with embedded preview and editing workflows
- Customer portals with downloadable and editable forms
- Internal collaboration platforms combining document editing with chat, comments, and version control
Because the browser-based office editor is mounted into a standard DOM container, it can coexist seamlessly with:
- Sidebars and navigation menus
- File trees and folder structures
- Tab systems for multi-document editing
- Chat panels and comment threads
- Dashboards and analytics widgets
This modular architecture allows developers to build rich document-centric applications without sacrificing existing UI patterns or user workflows.
Framework Integration (React, Vue, Angular)
Although the example uses plain JavaScript, the same concept applies to modern frameworks. The key principle remains the same: initialize the editor after the component is mounted and render it into a DOM container.
React
useEffect(() => {
  new SpireCloudEditor.OpenApi("editor-container", config);
}, []);
Vue
mounted() {
  new SpireCloudEditor.OpenApi("editor-container", config);
}
Angular
ngAfterViewInit(): void {
  new SpireCloudEditor.OpenApi("editor-container", config);
}
For complete framework-specific setup and deployment instructions, see the dedicated integration guides:
- How to Integrate Spire.OfficeJS in React
- How to Integrate Spire.OfficeJS in Vue
- How to Integrate Spire.OfficeJS in Angular
Common Integration Issues
Here are common problems developers encounter and their solutions:
Editor Does Not Load
- Cause: Backend service is not running or script URL is incorrect
- Solution: Verify the service is running on port 8001 and use the correct script path:
http://localhost:8001/web/editors/spireapi/SpireCloudEditor.js
Script Loading Failed (CORS Error)
- Cause: Opening HTML file directly using
file://protocol - Solution: Start a local HTTP server (
python -m http.server 8080ornpx http-server -p 8080) and access viahttp://localhost:8080/your-file.html
File Fails to Load
- Cause: Document URL is inaccessible or blocked by CORS
- Solution: Ensure
sourceUrlis publicly accessible via HTTP. Replace placeholder URLs likehttps://example.com/with real accessible document URLs
404 Errors for /doc/*/c/info Endpoints
- Cause: Missing
serverlessconfiguration ineditorAttrs - Solution: Add
serverlessanduseWebAssembly*settings to your configuration
Multiple Editors Overlapping
- Cause: Old editor instance not properly destroyed before creating new one
- Solution: Always call
editorInstance.destroy()before creating a new instance
Blank Editor Container
- Cause: Browser cache issues or missing dependencies
- Solution: Clear browser cache, try incognito mode, or check browser console for errors
Service Connection Refused
- Cause: Required ports are blocked or service is not started
- Solution: Make sure port 8001 is open and the Spire.OfficeJS service is running
Editor Overflows Container
- Cause: Incorrect width/height settings
- Solution: Set
editorWidthandeditorHeightto"100%"and ensure the container has defined dimensions
Conclusion
In this article, we demonstrated how to embed a web-based Office document editor into an existing HTML page using Spire.OfficeJS. By treating the editor as a modular component, developers can integrate document editing capabilities directly into their web applications without redirecting users to separate pages.
The approach enables building rich document management interfaces where editors coexist with navigation, file lists, and other UI components. With proper configuration, the embedded editor provides the same powerful features as a full-page solution while maintaining a seamless user experience.
Spire.OfficeJS supports multiple document formats including Word (DOCX), Excel (XLSX), and PowerPoint (PPTX), making it a comprehensive solution for web-based document processing needs.
If you'd like to test Spire.OfficeJS in a real project environment, you can request a free temporary license here: Apply for a Temporary License
FAQ
How do I embed a document editor in a web page?
You can embed a document editor by initializing SpireCloudEditor.OpenApi inside a specific HTML container element with proper configuration for the document source and editor settings.
Does embedding require Microsoft Office installation?
No. Spire.OfficeJS uses WebAssembly for browser-side document processing while relying on the backend service to provide the editor interface and related resources. No Microsoft Office installation is required on client machines.
Can I integrate the editor into React or Vue applications?
Yes. The editor can be integrated into any JavaScript framework by mounting it into a DOM element during the component's lifecycle, such as useEffect in React or mounted in Vue.
What document formats are supported?
Spire.OfficeJS supports Word documents (DOCX, DOC), Excel spreadsheets (XLSX, XLS), and PowerPoint presentations (PPTX, PPT), as well as PDF viewing.
How do I handle document save operations?
In serverless mode, configure the onSave event callback in editorAttrs.events. When users save, the callback receives the file data which can be automatically downloaded or processed further.

PowerPoint presentations are widely used for training materials, product demos, online courses, and business reporting. However, sharing raw PPT or PPTX files can be problematic—recipients may not have PowerPoint installed, animations may not play correctly, and manual exporting becomes inefficient for bulk processing.
Converting PowerPoint to video formats like MP4 or WMV solves these challenges by creating universally playable content that preserves formatting and animations. With Spire.Presentation from e-iceblue, developers can automate PowerPoint-to-video conversion programmatically without requiring Microsoft PowerPoint installation.
This article demonstrates how to convert PowerPoint presentations to MP4 and WMV video in C# using Spire.Presentation for .NET, including configuration options for frame rate, slide duration, and transition preservation.
1. Why Convert PowerPoint to Video Programmatically?
Developers often need to convert PowerPoint presentations to video as part of larger business workflows. Compared with manually exporting files in Microsoft PowerPoint, programmatic conversion offers more flexibility and scalability.
Common scenarios include:
- Automatically converting uploaded PPT/PPTX files into MP4 videos in web applications
- Batch-processing training presentations for LMS platforms
- Generating product demo videos from presentation templates
- Converting presentations on servers where Microsoft PowerPoint is not installed
- Standardizing presentation delivery across different devices
Programmatic conversion is especially useful when you need repeatable workflows, server-side processing, or integration with existing document automation systems.
2. Set Up the Environment
Before converting PowerPoint presentations to video, you need to prepare two components:
- Spire.Presentation for .NET – used to load and process PPT/PPTX files
- FFmpeg – used to encode slide frames into MP4 or WMV video files
Spire handles presentation rendering, while FFmpeg generates the final video output. Both are required for successful conversion.
Install Spire.Presentation for .NET
Install the library from NuGet:
Install-Package Spire.Presentation
You can also download Spire.Presentation for .NET package and install it manually.
This package allows your C# application to open PowerPoint presentations, access slides, and export them programmatically.
Install FFmpeg
Spire.Presentation relies on FFmpeg to combine rendered slide frames into a playable video file. If FFmpeg is not installed or the path is configured incorrectly, the export process will fail.
- On Windows
Follow these steps to install FFmpeg:
-
Download the FFmpeg essentials build
-
Extract the package to your local machine
-
Locate the bin folder path
Example:
D:\tools\ffmpeg\bin
This path will be used later when configuring SaveToVideoOption.
- On Linux (CentOS)
Install FFmpeg using the following commands:
sudo yum install epel-release
sudo yum localinstall --nogpgcheck https://download1.rpmfusion.org/free/el/rpmfusion-free-release-7.noarch.rpm
sudo yum install ffmpeg ffmpeg-devel
After installation, you can run the following command to locate the FFmpeg path:
which ffmpeg
Note: Older FFmpeg versions may not fully support certain slide transition effects.
3. Convert PowerPoint to MP4 in C#
Once the environment is configured, you can convert PowerPoint presentations to MP4 using just a few lines of code.
The basic workflow includes:
- Load the PowerPoint file
- Configure video export settings
- Export the presentation as MP4
Basic Conversion Example
The following example converts a PPTX file into an MP4 video:
using Spire.Presentation;

namespace PowerPointToVideo
{
    class Program
    {
        static void Main(string[] args)
        {
            string inputFile = "ProductDemo.pptx";
            string outputFile = "ProductDemo.mp4";

            Presentation presentation = new Presentation();
            presentation.LoadFromFile(inputFile);

            presentation.SaveToVideoOption = new SaveToVideoOption(
                @"D:\tools\ffmpeg\bin"
            );

            presentation.SaveToVideoOption.Fps = 30;
            presentation.SaveToVideoOption.DurationForEachSlide = 2;

            presentation.SaveToFile(outputFile, FileFormat.MP4);

            presentation.Dispose();
        }
    }
}
After running the code:
- The PPTX file is loaded into memory
- Each slide is rendered as individual video frames
- FFmpeg combines the frames into a final MP4 file
- Supported animations, transitions, and embedded videos are preserved during export
Below is a sample PowerPoint presentation along with its converted video output.
Input: PowerPoint Presentation

Output: Converted MP4 Video
Click the preview above to watch how PowerPoint slides are converted into an MP4 video while preserving transitions and animations.
How the Core API Works
This example uses several key API methods:
- LoadFromFile() loads the PowerPoint presentation into memory
- SaveToVideoOption configures the FFmpeg path and playback settings
- Fps controls video smoothness
- DurationForEachSlide controls how long each slide appears
- SaveToFile() exports the final video file
- Dispose() releases system resources after conversion
This basic workflow is enough for most standard PowerPoint-to-video conversion tasks. If you need additional formats or customization options, continue to the advanced scenarios below.
If you need a static sharing format, you can also convert PowerPoint presentations to images (JPG/PNG) in C# for easier distribution and web display.
4. More PowerPoint to Video Options in C#
The basic example works for most scenarios, but some applications may require different output formats, custom playback settings, or bulk conversion workflows.
Convert PowerPoint to WMV
While MP4 is the most widely used video format, some legacy enterprise systems and Windows-based environments may still require WMV output.
To export a PowerPoint file as WMV, simply change the output file extension:
using Spire.Presentation;

Presentation presentation = new Presentation();
presentation.LoadFromFile("TrainingSlides.pptx");

presentation.SaveToVideoOption = new SaveToVideoOption(
    @"D:\tools\ffmpeg\bin"
);

presentation.SaveToFile("TrainingVideo.wmv", FileFormat.WMV);

presentation.Dispose();
Customize Video Settings
If your presentation contains complex animations or requires specific playback timing, you can adjust frame rate and slide duration settings.
using Spire.Presentation;

Presentation presentation = new Presentation();
presentation.LoadFromFile("MarketingPitch.pptx");

presentation.SaveToVideoOption = new SaveToVideoOption(
    @"D:\tools\ffmpeg\bin"
);

// Higher FPS for smoother playback
presentation.SaveToVideoOption.Fps = 60;

// Longer display time per slide
presentation.SaveToVideoOption.DurationForEachSlide = 10;

presentation.SaveToFile("MarketingPitch_HD.mp4", FileFormat.MP4);

presentation.Dispose();
Video Settings Reference
| Setting | Default | Maximum | Purpose |
|---|---|---|---|
| Fps | 30 | 60 | Controls playback smoothness |
| DurationForEachSlide | 5 seconds | 5 minutes | Controls slide display duration |
Higher values may increase processing time and temporary storage usage.
Batch Convert Multiple PPTX Files
Batch conversion is useful for LMS platforms, enterprise reporting systems, and document automation workflows that need to process multiple presentations automatically.
using Spire.Presentation;
using System.IO;

string ffmpegPath = @"D:\tools\ffmpeg\bin";
string inputFolder = @"C:\Presentations\";
string outputFolder = @"C:\Videos\";

string[] pptxFiles = Directory.GetFiles(inputFolder, "*.pptx");

foreach (string inputFile in pptxFiles)
{
    string fileName = Path.GetFileNameWithoutExtension(inputFile);
    string outputFile = Path.Combine(outputFolder, fileName + ".mp4");

    Presentation presentation = new Presentation();
    presentation.LoadFromFile(inputFile);

    presentation.SaveToVideoOption = new SaveToVideoOption(ffmpegPath);
    presentation.SaveToVideoOption.Fps = 30;
    presentation.SaveToVideoOption.DurationForEachSlide = 3;

    presentation.SaveToFile(outputFile, FileFormat.MP4);
    presentation.Dispose();
}
This approach helps automate large-scale PowerPoint-to-video conversion workflows without requiring manual exports in Microsoft PowerPoint.
You can edit the PowerPoint presentation in C# before conversion to ensure the resulting video has better layout and animation effects.
5. Supported Transitions and Animations
During PowerPoint-to-video conversion, Spire.Presentation preserves key visual effects to ensure the output video closely matches the original presentation experience.
Slide Transitions
PowerPoint slide transitions are rendered during video generation to maintain smooth visual flow between slides.
The following transitions are supported:
- Fade
- Push
- Wipe (up, down, left, right)
- Reveal
- Cover
- Split
- Dissolve
- Clockwise Clock
These transitions are applied during frame rendering to simulate natural slide progression in the final video.
Animation Effects
Animations are processed and rendered during video generation to simulate PowerPoint playback behavior.
Entrance Animations:
- Fly In
- Float In
- Appear
- Fade
- Split
- Wipe
Exit Animations:
- Fly Out
- Float Out
- Disappear
- Fade
- Split
- Wipe
Animation sequences are processed as a single playback unit to ensure consistent rendering in the final video.
Additional Features
- Embedded Videos
Embedded media inside PowerPoint slides is included in the exported video, making it suitable for presentations with multimedia content.
- Automatic Duration Handling
Slide timing and animation durations are automatically interpreted during conversion to ensure accurate playback in the final video output.
- Cross-Platform Support
The conversion process can run on both Windows and Linux environments, making it suitable for server-side automation and enterprise workflows.
For more information on supported features, refer to the Spire.Presentation for .NET API documentation.
6. Common Pitfalls
When converting PowerPoint presentations to video, there are a few common issues that may affect output quality or runtime execution. Being aware of these helps ensure a smoother conversion process in production environments.
FFmpeg Path Not Found
The video export process depends on FFmpeg for encoding the final MP4 or WMV file.
Ensure that the FFmpeg path is correctly configured and points to the bin directory containing the FFmpeg executable.
On Windows, this typically looks like:
D:\tools\ffmpeg\bin
If the FFmpeg path is incorrect or not accessible, the video export process will fail at runtime.
Insufficient Disk Space
PowerPoint-to-video conversion involves rendering slides into intermediate frames before encoding them into a final video file.
As a result, disk usage may increase significantly depending on:
- Number of slides
- Slide duration
- Frame rate (FPS)
- Presentation resolution and content complexity
For high-quality or long-duration presentations, temporary disk usage can become substantial. It is recommended to ensure sufficient free disk space before processing large batch conversions.
Unsupported or Inconsistent Transitions
Most common PowerPoint transitions are supported during conversion. However, some complex or advanced transition effects may not be rendered exactly the same as in Microsoft PowerPoint.
In such cases, the final video will still preserve slide flow, but the visual effect may appear simplified compared to the original presentation.
It is recommended to test presentations with advanced transitions before using them in production workflows.
Font Rendering Differences
PowerPoint presentations rely on system-installed fonts. If a required font is missing on the environment where conversion is executed, the layout or text appearance in the final video may change.
To ensure consistent rendering:
- Install required fonts on the system
- Use widely available standard fonts when possible
- Verify output on target deployment environments
This is especially important for multilingual presentations or server-side conversion scenarios.
Conclusion
In this article, we demonstrated how to convert PowerPoint presentations to MP4 and WMV video in C# using Spire.Presentation. By leveraging the Spire API, developers can automate video generation with customizable frame rates, slide durations, and transition preservation.
Beyond video conversion, Spire.Presentation can also be used for tasks such as slide editing, media extraction, and presentation generation, making it useful for broader document automation workflows.
If you would like to evaluate the full functionality without limitations, you can apply for a temporary license.
FAQ
Can I convert PowerPoint to MP4 without Microsoft PowerPoint?
Yes. Spire.Presentation performs conversion independently and does not require Microsoft PowerPoint installation.
Are animations preserved in the video?
Yes, many common slide transitions and entrance/exit animations are preserved during conversion.
What video formats are supported?
Currently, MP4 and WMV formats are supported for video export.
Is Spire.Presentation suitable for server-side applications?
Yes. Spire.Presentation supports server environments and is widely used in automated document processing workflows.
How much disk space does video conversion require?
Video generation creates temporary image frames. A presentation with 5 slides at 60 FPS and 5-minute duration may require approximately 25GB of temporary storage.
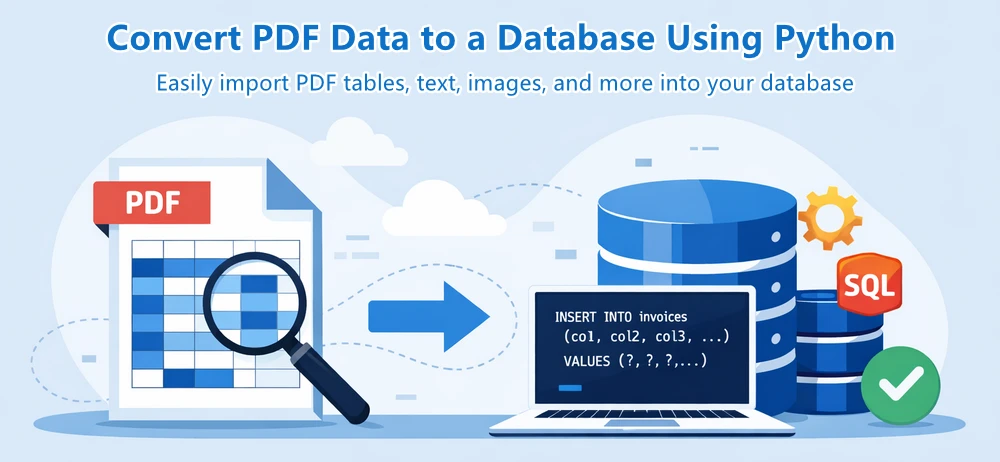
Converting PDF to database is a common requirement in data-driven applications. Many business documents—such as invoices, reports, and financial records—store structured information in PDF format, but this data is not directly usable for querying or analysis.
To make this data accessible, developers often need to convert PDF to SQL by extracting structured content and inserting it into relational databases like SQL Server, MySQL, or PostgreSQL. Manually handling this process is inefficient and error-prone, especially at scale.
In this guide, we focus on extracting table data from PDFs and building a complete pipeline to transform and insert it into an SQL database in Python with Spire.PDF for Python. This approach reflects the most practical and scalable solution for real-world PDF to database workflows.
Quick Navigation
- Understanding the Workflow
- Prerequisites
- Step 1: Extract Table Data from PDF
- Step 2: Transform and Insert Data into Database
- Complete Pipeline: From PDF Extraction to SQL Storage
- Adapting to Other SQL Databases
- Handling Other Types of PDF Data
- Common Pitfalls When Converting PDF Data to a Database
- Conclusion
- FAQ
Understanding the Workflow
Before diving into the implementation, it's important to understand the overall process of converting PDF data into a database.
Instead of treating each operation as completely separate, this workflow can be viewed as two main stages:

Each stage plays a distinct role in the pipeline:
-
Extract Tables: Retrieve structured table data from the PDF document
-
Process & Store Data: Clean, structure, and insert the extracted data into a relational database
- Transform Data: Convert raw rows into structured, database-ready records
- Insert into SQL Database: Persist the processed data into an SQL database
This end-to-end pipeline reflects how most real-world systems handle PDF to database workflows—by first extracting usable data, then processing and storing it in a database for querying and analysis.
Prerequisites
Before getting started, make sure you have the following:
-
Python 3.x installed
-
Spire.PDF for Python installed:
pip install Spire.PDFYou can also download Spire.PDF for Python and add it to your project manually.
-
A relational database system (e.g., SQLite, SQL Server, MySQL, or PostgreSQL)
This guide demonstrates the workflow using SQLite for simplicity, while also showing how the same approach can be applied to other SQL databases.
Step 1: Extract Table Data from PDF
In most business documents, such as invoices or reports, data is organized in tables. These tables already follow a row-and-column structure, making them ideal for direct insertion into an SQL database.
Table data in PDFs is typically already structured in rows and columns, making it the most suitable format for database storage.
Extract Tables Using Python
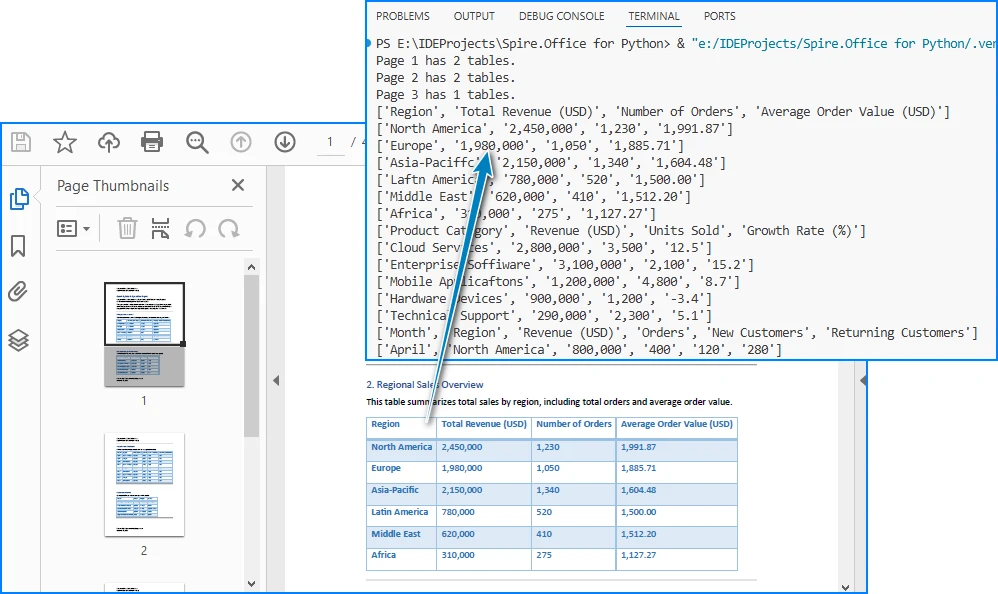
Below is an example of how to extract table data from a PDF file using Spire.PDF:
from spire.pdf import *
from spire.pdf.common import *

# Load PDF document
pdf = PdfDocument()
pdf.LoadFromFile("Quarterly Sales.pdf")

# Method for ligature normalization
def normalize_text(text: str) -> str:
    if not text:
        return text
    ligature_map = {
        '\ue000': 'ff', '\ue001': 'ft', '\ue002': 'ffi', '\ue003': 'ffl', '\ue004': 'ti', '\ue005': 'fi',
    }
    for k, v in ligature_map.items():
        text = text.replace(k, v)
    return text.strip()

table_data = []

# Iterate through pages
for i in range(pdf.Pages.Count):
    # Extract tables from pages
    extractor = PdfTableExtractor(pdf)
    tables = extractor.ExtractTable(i)

    if tables:
        print(f"Page {i} has {len(tables)} tables.")
        for table in tables:
            rows = []
            for row in range(table.GetRowCount()):
                row_data = []
                for col in range(table.GetColumnCount()):
                    text = table.GetText(row, col)
                    text = normalize_text(text)
                    row_data.append(text.strip() if text else "")
                rows.append(row_data)
            table_data.extend(rows)

pdf.Close()

# Print extracted data
for row in table_data:
    print(row)
Below is a preview of the extracting result:
Code Explanation
- LoadFromFile: Loads the PDF document
- PdfTableExtractor: Identifies tables within each page
- GetText(row, col): Retrieves cell content
- table_data: Stores extracted rows as a list of lists
At this stage, the data is extracted but still unstructured in terms of database usage. Once the table data is extracted, we need to convert it into a structured format for SQL insertion.
Alternatively, you can export the extracted data to a CSV file for validation or batch import. See: Convert PDF Tables to CSV in Python
Step 2: Transform and Insert Data into Database
Raw table data extracted from PDFs often requires cleaning and structuring before it can be inserted into an SQL database.
For simplicity, the following examples demonstrate how to process a single extracted table. In real-world scenarios, PDFs may contain multiple tables, which can be handled using the same logic in a loop.
Transform Data (Single Table Example)
structured_data = []

# Assume first row is header
headers = table_data[0]

for row in table_data[1:]:
    if not any(row):
        continue

    record = {}
    for i in range(len(headers)):
        value = row[i] if i < len(row) else ""
        record[headers[i]] = value

    structured_data.append(record)

# Preview structured data
for item in structured_data:
    print(item)
What This Step Does
- Converts rows into dictionary-based records
- Maps column headers to values
- Filters out empty rows
- Prepares structured data for database insertion
You can also:
- Normalize column names for SQL compatibility
- Convert numeric fields
- Standardize date formats
Transforming raw PDF data into a structured format ensures it can be reliably inserted into a relational database. After transformation, the data is immediately ready for database insertion, which completes the pipeline.
Insert Data into SQLite (Single Table Example)
Using the structured data from a single table, we can dynamically create a database schema and insert records without hardcoding column names.
import sqlite3

# Connect to SQLite database
conn = sqlite3.connect("sales_data.db")
cursor = conn.cursor()

# Create table dynamically based on headers
columns_def = ", ".join([f'"{h}" TEXT' for h in headers])

cursor.execute(f"""
CREATE TABLE IF NOT EXISTS invoices (
    id INTEGER PRIMARY KEY AUTOINCREMENT,
    {columns_def}
)
""")

# Prepare insert statement
placeholders = ", ".join(["?" for _ in headers])
column_names = ", ".join([f'"{h}"' for h in headers])

# Insert data
for record in structured_data:
    values = [record.get(h, "") for h in headers]
    cursor.execute(f"""
    INSERT INTO invoices ({column_names})
    VALUES ({placeholders})
    """, values)

# Commit and close
conn.commit()
conn.close()
Key Points
- Dynamically creates database tables based on extracted headers
- Uses parameterized queries (
?) to prevent SQL injection - Keeps the schema flexible without hardcoding column names
- Column names can be normalized to ensure SQL compatibility
- Batch inserts can improve performance for large datasets
This section demonstrates the core workflow for converting PDF table data into a relational database using a single table example. In the next section, we extend this approach to handle multiple tables automatically.
Complete Pipeline: From PDF Extraction to SQL Storage
Here's a complete runnable example that demonstrates the entire workflow from PDF to database:
from spire.pdf import *
from spire.pdf.common import *
import sqlite3
import re

# ---------------------------
# Utility Functions
# ---------------------------

def normalize_text(text: str) -> str:
    if not text:
        return ""
    ligature_map = {
        '\ue000': 'ff', '\ue001': 'ft', '\ue002': 'ffi',
        '\ue003': 'ffl', '\ue004': 'ti', '\ue005': 'fi',
    }
    for k, v in ligature_map.items():
        text = text.replace(k, v)
    return text.strip()


def normalize_column_name(name: str, index: int) -> str:
    if not name:
        return f"column_{index}"
    name = name.lower()
    name = re.sub(r'[^a-z0-9]+', '_', name).strip('_')
    return name or f"column_{index}"


def deduplicate_columns(columns):
    seen = set()
    result = []
    for col in columns:
        base = col
        count = 1
        while col in seen:
            col = f"{base}_{count}"
            count += 1
        seen.add(col)
        result.append(col)
    return result


# ---------------------------
# Step 1: Extract Tables (STRUCTURED)
# ---------------------------

pdf = PdfDocument()
pdf.LoadFromFile("Quarterly Sales.pdf")

extractor = PdfTableExtractor(pdf)

all_tables = []

for i in range(pdf.Pages.Count):
    tables = extractor.ExtractTable(i)

    if tables:
        for table in tables:
            table_rows = []

            for row in range(table.GetRowCount()):
                row_data = []
                for col in range(table.GetColumnCount()):
                    text = table.GetText(row, col)
                    row_data.append(normalize_text(text))
                table_rows.append(row_data)

            if table_rows:
                all_tables.append(table_rows)

pdf.Close()

if not all_tables:
    raise ValueError("No tables found in PDF.")

# ---------------------------
# Step 2 & 3: Process + Insert Each Table
# ---------------------------

conn = sqlite3.connect("sales_data.db")
cursor = conn.cursor()

for table_index, table in enumerate(all_tables):

    if len(table) < 2:
        continue  # skip invalid tables

    raw_headers = table[0]

    # Normalize headers
    normalized_headers = [
        normalize_column_name(h, i)
        for i, h in enumerate(raw_headers)
    ]
    normalized_headers = deduplicate_columns(normalized_headers)

    # Generate table name
    table_name = f"table_{table_index+1}"

    # Create table
    columns_def = ", ".join([f'"{col}" TEXT' for col in normalized_headers])

    cursor.execute(f"""
    CREATE TABLE IF NOT EXISTS "{table_name}" (
        id INTEGER PRIMARY KEY AUTOINCREMENT,
        {columns_def}
    )
    """)

    # Prepare insert
    placeholders = ", ".join(["?" for _ in normalized_headers])
    column_names = ", ".join([f'"{col}"' for col in normalized_headers])

    insert_sql = f"""
    INSERT INTO "{table_name}" ({column_names})
    VALUES ({placeholders})
    """

    # Insert data
    batch = []
    for row in table[1:]:
        if not any(row):
            continue

        values = [
            row[i] if i < len(row) else ""
            for i in range(len(normalized_headers))
        ]
        batch.append(values)

    if batch:
        cursor.executemany(insert_sql, batch)

    print(f"Inserted {len(batch)} rows into {table_name}")

conn.commit()
conn.close()

print(f"Processed {len(all_tables)} tables from PDF.")
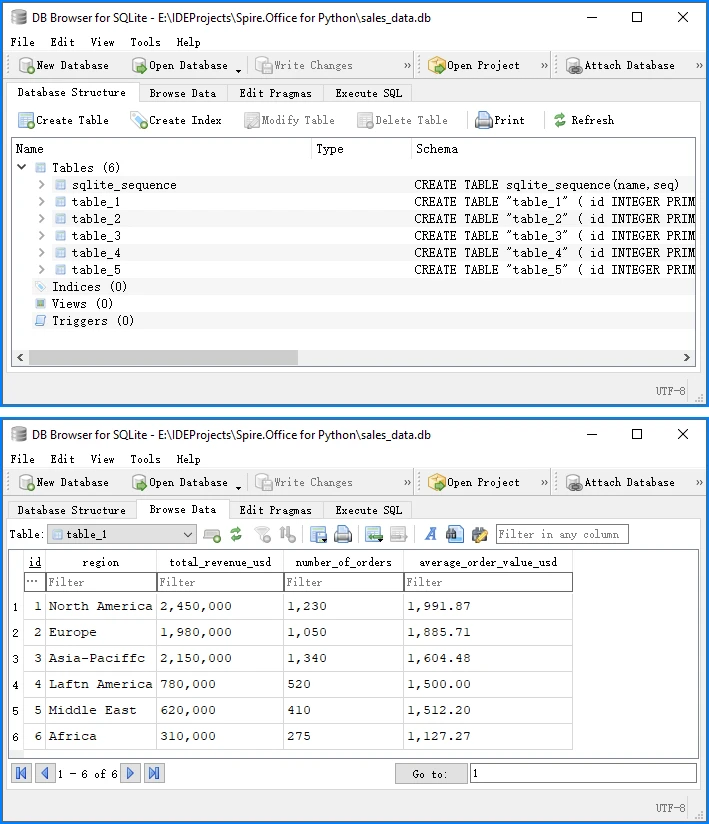
Below is a preview of the insertion result in the database:
This complete example demonstrates the full PDF to database pipeline:
- Load and extract table data from PDF using Spire.PDF
- Transform raw data into structured records
- Insert into SQLite database with proper schema
SQLite automatically creates a system table called sqlite_sequence when using AUTOINCREMENT to track the current maximum ID. This is expected behavior and does not affect your data. You can run this code directly to convert PDF table data into a database.
Adapting to Other SQL Databases
While this guide uses SQLite for simplicity, the same approach works for other SQL databases. The extraction and transformation steps remain identical—only the database connection and insertion syntax vary slightly.
The following examples assume you are using the normalized column names (headers) generated in the previous step.
SQL Server Example
import pyodbc

# Connect to SQL Server
conn_str = (
    "DRIVER={SQL Server};"
    "SERVER=your_server_name;"
    "DATABASE=your_database_name;"
    "UID=your_username;"
    "PWD=your_password"
)
conn = pyodbc.connect(conn_str)
cursor = conn.cursor()

# Generate dynamic column definitions using normalized headers
columns_def = ", ".join([f"[{h}] NVARCHAR(MAX)" for h in headers])

# Create table dynamically
cursor.execute(f"""
IF NOT EXISTS (SELECT * FROM sys.tables WHERE name = 'invoices')
BEGIN
    CREATE TABLE invoices (
        id INT IDENTITY(1,1) PRIMARY KEY,
        {columns_def}
    )
END
""")

# Prepare insert statement
placeholders = ", ".join(["?" for _ in headers])
column_names = ", ".join([f"[{h}]" for h in headers])

# Insert data
for record in structured_data:
    values = [record.get(h, "") for h in headers]
    cursor.execute(f"""
    INSERT INTO invoices ({column_names})
    VALUES ({placeholders})
    """, values)

# Commit and close
conn.commit()
conn.close()
MySQL Example
import mysql.connector

conn = mysql.connector.connect(
    host="localhost",
    user="your_username",
    password="your_password",
    database="your_database"
)
cursor = conn.cursor()

# Use the same dynamic table creation and insert logic as shown earlier,
# with minor syntax adjustments if needed
PostgreSQL Example
import psycopg2

conn = psycopg2.connect(
    host="localhost",
    database="your_database",
    user="your_username",
    password="your_password"
)
cursor = conn.cursor()

# Use the same dynamic table creation and insert logic as shown earlier,
# with minor syntax adjustments if needed
The core extraction and transformation steps remain the same across different SQL databases, especially when using normalized column names for compatibility.
Handling Other Types of PDF Data
While this guide focuses on table extraction, PDFs often contain other types of data that can also be integrated into a database, depending on your use case.
Text Data (Unstructured → Structured)
In many documents, important information such as invoice numbers, customer names, or dates is embedded in plain text rather than tables.
You can extract raw text using:
from spire.pdf import *

pdf = PdfDocument()
pdf.LoadFromFile("Quarterly Sales.pdf")

for i in range(pdf.Pages.Count):
    page = pdf.Pages.get_Item(i)
    extractor = PdfTextExtractor(page)
    options = PdfTextExtractOptions()
    options.IsExtractAllText = True
    text = extractor.ExtractText(options)
    print(text)
However, raw text cannot be directly inserted into a database. It typically requires parsing into structured fields, for example:
- Using regular expressions to extract key-value pairs
- Identifying patterns such as dates, IDs, or totals
- Converting text into dictionaries or structured records
Once structured, the data can be inserted into a database as part of the same transformation and insertion pipeline described earlier.
For more advanced techniques, you can learn more in the detailed Python PDF text extraction guide.
Images (OCR or File Reference)
Images in PDFs are usually not directly usable as structured data, but they can still be integrated into database workflows in two ways:
Option 1: OCR (Recommended for data extraction) Convert images to text using OCR tools, then process and store the extracted content.
Option 2: File Storage (Recommended for document systems) Store images as:
- File paths in the database
- Binary (BLOB) data if needed
Below is an example of extracting images:
from spire.pdf import *

pdf = PdfDocument()
pdf.LoadFromFile("Quarterly Sales.pdf")

helper = PdfImageHelper()

for i in range(pdf.Pages.Count):
    page = pdf.Pages.get_Item(i)
    images = helper.GetImagesInfo(page)
    for j, img in enumerate(images):
        img.Image.Save(f"image_{i}_{j}.png")
To further process image-based content, you can use OCR to extract text from images with Spire.OCR for Python.
Full PDF Storage (BLOB or File Reference)
In some scenarios, the goal is not to extract structured data, but to store the entire PDF file in a database.
This is commonly used in:
- Document management systems
- Archival systems
- Compliance and auditing workflows
You can store PDFs as:
- BLOB data in the database
- File paths referencing external storage
This approach represents another meaning of "PDF in database", but it is different from structured data extraction.
Key Takeaway
While PDFs can contain multiple types of content, table data remains the most efficient and scalable format for database integration. Other data types typically require additional processing before they can be stored or queried effectively.
Common Pitfalls When Converting PDF Data to a Database
While the process of converting PDF to a database may seem straightforward, several practical challenges can arise.
1. Inconsistent Table Structures
Not all PDFs follow a consistent table format:
- Missing columns
- Merged cells
- Irregular layouts
Solution:
- Validate row lengths
- Normalize structure
- Handle missing values
2. Poor Table Detection
Some PDFs do not define tables properly internally, such as no grid structure or irregular cell sizes.
Solution:
- Test with multiple files
- Use fallback parsing logic
- Preprocess PDFs if needed
3. Data Cleaning Issues
Extracted data may contain:
- Extra spaces
- Line breaks
- Formatting issues
Solution:
- Strip whitespace
- Normalize values
- Validate types
4. Character Encoding Issues (Ligatures & Fonts)
PDF table extraction can introduce unexpected characters due to font encoding and ligatures. For example, common letter combinations such as:
fi,ff,ffi,ffl,ft,ti
may be stored as single glyphs in the PDF. When extracted, they may appear as:
di\ue000erence   → difference
o\ue002ce        → office
\ue005le         → file
These are typically private Unicode characters (e.g., \ue000–\uf8ff) caused by custom font mappings.
Solution:
-
Detect private Unicode characters (
\ue000–\uf8ff) -
Build a mapping table for ligatures, such as:
\ue000 → ff\ue001 → ft\ue002 → ffi\ue003 → ffl\ue004 → ti\ue005 → fi
-
Normalize text before inserting into the database
-
Optionally log unknown characters for further analysis
Handling encoding issues properly ensures data accuracy and prevents subtle corruption in downstream processing.
5. Cross-Page Table Fragmentation
Large tables in PDFs are often split across multiple pages. When extracted, each page may be treated as a separate table, leading to:
- Broken datasets
- Repeated headers
- Incomplete records
Solution:
- Compare column counts between consecutive tables
- Check header consistency or data type patterns in the first row
- Merge tables when structure and schema match
- Skip duplicated header rows when concatenating data
In practice, combining column structure and value pattern detection provides a reliable way to reconstruct full tables across pages.
6. Database Schema Mismatch
Incorrect mapping between extracted data and database columns can cause errors.
Solution:
- Align headers with schema
- Use explicit field mapping
7. Performance Issues with Large Files
Processing large PDFs can be slow.
Solution:
- Use batch processing
- Optimize insert operations
By anticipating these issues, you can build a more reliable PDF to database workflow.
Conclusion
Converting PDF to a database is not a one-step operation, but a structured process involving extracting data and processing it for database storage (including transformation and insertion)
By focusing on table data and using Python, you can efficiently implement a complete PDF to database pipeline, making it easier to automate data integration tasks.
This approach is especially useful for handling invoices, reports, and other structured business documents that need to be stored in SQL Server or other relational databases.
If you want to evaluate the performance of Spire.PDF for Python and remove any limitations, you can apply for a 30-day free trial.
FAQ
What does "PDF to database" mean?
It refers to the process of extracting structured data from PDF files and storing it in a database. This typically involves parsing PDF content, transforming it into structured formats, and inserting it into SQL databases for further querying and analysis.
Can Python convert PDF directly to a database?
No. Python cannot directly convert a PDF into a database in one step. The process usually involves extracting data from the PDF first, transforming it into structured records, and then inserting it into a database using SQL connectors.
How do I convert PDF to SQL using Python?
The typical workflow includes:
- Extracting table or text data from the PDF
- Converting it into structured records (rows and columns)
- Inserting the processed data into an SQL database such as SQLite, MySQL, or SQL Server using Python database libraries
Can I store PDF files directly in a database?
Yes. PDF files can be stored as binary (BLOB) data in a database. However, this approach is mainly used for document storage systems, while structured extraction is preferred for data analysis and querying.
What SQL databases can I use for PDF data integration?
You can use almost any SQL database, including SQLite, SQL Server, MySQL, and PostgreSQL. The overall extraction and transformation process remains the same, while only the database connection and insertion syntax differ slightly.
