Python: Replace Videos and Audio in PowerPoint Presentations
Incorporating audio and videos in slides has become a common practice for creating interactive and dynamic PowerPoint presentations, which helps the presenter in sharing information, engaging the audience, and delivering impactful messages. However, as content requirements change, there arises a need to replace or update these multimedia elements. This article will show how to use Spire.Presentation for Python to replace audio and videos in PowerPoint presentations for content updating needs such as updating outdated videos, enhancing audio quality, or simply swapping in new content.
- Replace a Video in a PowerPoint Presentation with Python
- Replace an Audio in a PowerPoint Presentation with Python
Install Spire.Presentation for Python
This scenario requires Spire.Presentation for Python and plum-dispatch v1.7.4. They can be easily installed in your VS Code through the following pip command.
pip install Spire.Presentation
If you are unsure how to install, please refer to: How to Install Spire.Presentation for Python on Windows
Replace a Video in a PowerPoint Presentation with Python
With Spire.Presentation for Python, developers can find the video shapes in slides and replace the video data through IVideo.EmbeddedVideoData property. It is important to note that, after replacing the video, the preview of the video should also be updated with the IVideo.PictureFill.Picture property. The detailed steps are as follows:
- Create an object of Presentation class and load a PowerPoint presentation file using Presentation.LoadFromFile() method.
- Get the collection of the videos embedded in the presentation through Presentation.Videos property.
- Get the slide that contains the video to be replaced through Presentation.Slides[] property.
- Iterate through the shapes in the slide and determine if a shape is an instance of IVideo class. If it is, append the new video to the video collection using VideoCollection.AppendByStream() method and replace the original video with the new video through IVideo.EmbeddedVideoData property.
- Embed a new image to the presentation using Presentation.Images.AppendStream() method and set it as the preview of the video through IVideo.PictureFill.Picture.EmbedImage property. You can also set an online image as the preview through IVideo.PictureFill.Picture.Url property.
- Save the presentation using Presentation.SaveToFile() method.
- Python
from spire.presentation import *
from spire.presentation.common import *

# Create an object of the Presentation class
pres = Presentation()

# Load a PowerPoint presentation
pres.LoadFromFile("Sample.pptx")

# Get the second slide
slide = pres.Slides[1]

# Get the videos in the presentation
videos = pres.Videos

# Iterate through the shapes on the slide
for shape in slide.Shapes:
    # Check if the shape is a video
    if isinstance(shape, IVideo):
        video = shape if isinstance(shape, IVideo) else None
        # Append a new video to the video collection
        videoData = videos.AppendByStream(Stream("Ocean2.mp4"))
        # Replace the video in the shape with the new video
        video.EmbeddedVideoData = videoData
        # Embed a picture in the presentation
        imageData = pres.Images.AppendStream(Stream("Ocean2.png"))
        # Set the new picture as the preview of the video
        video.PictureFill.Picture.EmbedImage = imageData

# Save the presentation
pres.SaveToFile("output/ReplaceVideo.pptx", FileFormat.Pptx2016)
pres.Dispose()

Replace an Audio in a PowerPoint Presentation with Python
Similarly, developers can also use Spire.Presentation for Python to find specific audio in a presentation slide and replace the audio data. The detailed steps are as follows:
- Create an object of Presentation class and load a PowerPoint presentation file using Presentation.LoadFromFile() method.
- Get the collection of the audio embedded in the presentation through Presentation.WavAudios property.
- Get the slide that contains audio to be replaced through Presentation.Slides[] property.
- Iterate through each shape in the slide and check if a shape is an instance of IAudio class. If it is, append the new audio to the audio collection using WavAudioCollection.Append() method and replace the original audio with the new audio through IAudio.Data property.
- Save the presentation using Presentation.SaveToFile() method.
- Python
from spire.presentation import *
from spire.presentation.common import *

# Create an object of the Presentation class
pres = Presentation()

# Load a PowerPoint presentation file
pres.LoadFromFile("Sample.pptx")

# Get the audio collection from the presentation
audios = pres.WavAudios

# Get the slide that contains the audio
slide = pres.Slides[0]

# Iterate through each shape in the slide
for shape in slide.Shapes:
    # Check if the shape is an audio shape
    if isinstance(shape, IAudio):
        audio = shape if isinstance(shape, IAudio) else None
        # Load an audio file
        stream = Stream("Wave.wav")
        # Replace the audio in the shape
        audioData = audios.Append(stream)
        audio.Data = audioData

# Save the presentation
pres.SaveToFile("output/ReplaceAudio.pptx", FileFormat.Pptx2016)
pres.Dispose()
Apply for a Temporary License
If you'd like to remove the evaluation message from the generated documents, or to get rid of the function limitations, please request a 30-day trial license for yourself.
Python: Extract Text from PowerPoint Presentations
Directly extracting text has emerged as a crucial method for obtaining textual information from information-dense PowerPoint presentations. By utilizing Python programs, users can conveniently and quickly access the content within slides, enabling efficient collection of information and further data processing. This article shows how to use Spire.Presentation for Python to extract text from PowerPoint presentations, including text in slides, speaker notes, and comments.
- Extract Text from Presentation Slides with Python
- Extract Text from Speaker Notes with Python
- Extract Text from Presentation Comments with Python
Install Spire.Presentation for Python
This scenario requires Spire.Presentation for Python and plum-dispatch v1.7.4. They can be easily installed in your VS Code through the following pip commands.
pip install Spire.Presentation
If you are unsure how to install, please refer to: How to Install Spire.Presentation for Python on Windows
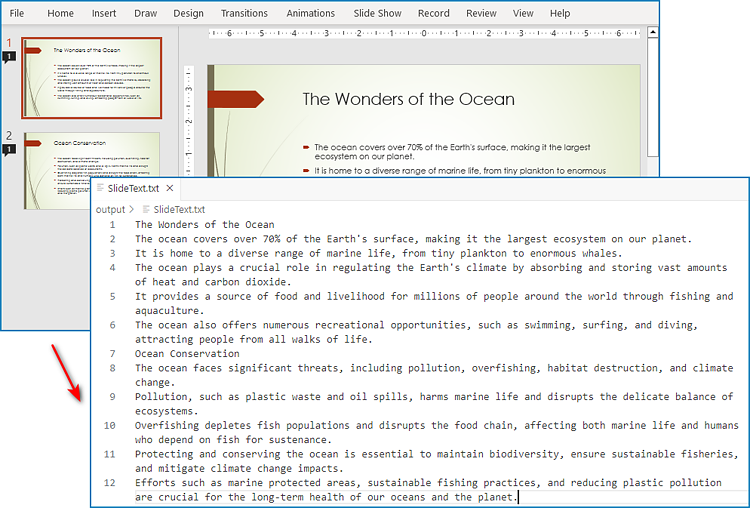
Extract Text from Presentation Slides with Python
The text within PowerPoint presentation slides is placed within shapes. Therefore, developers can extract the text from the presentation by accessing all the shapes within each slide and extracting the text contained within them. The detailed steps are as follows:
- Create an object of Presentation class and load PowerPoint presentation using Presentation.LoadFromFile() method.
- Iterate through the slides in the presentation and then iterate through the shapes in each slide.
- Check if a shape is an IAutoShape instance. If it is, get the paragraphs in the shape through IAutoShape.TextFrame.Paragraphs property and then get the text in the paragraphs through Paragraph.Text property.
- Write the slide text to a text file.
- Python
from spire.presentation import *
from spire.presentation.common import *

# Create an object of Presentation class
pres = Presentation()

# Load a PowerPoint presentation
pres.LoadFromFile("Sample.pptx")

text = []
# Loop through each slide
for slide in pres.Slides:
    # Loop through each shape
    for shape in slide.Shapes:
        # Check if the shape is an IAutoShape instance
        if isinstance(shape, IAutoShape):
            # Extract the text from the shape
            for paragraph in (shape if isinstance(shape, IAutoShape) else None).TextFrame.Paragraphs:
                text.append(paragraph.Text)

# Write the text to a text file
f = open("output/SlideText.txt","w", encoding = 'utf-8')
for s in text:
    f.write(s + "\n")
f.close()
pres.Dispose()
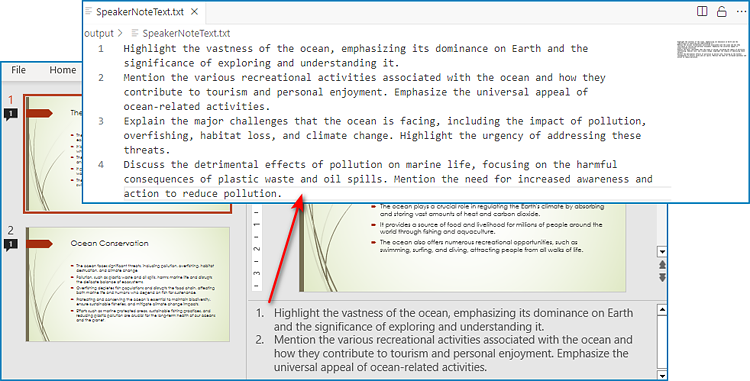
Extract Text from Speaker Notes with Python
Speaker notes are additional information that provides guidance to the presenter and are not visible to the audience. The text in speaker notes of each slide is stored in the notes slide and developers can extract the text through NotesSlide.NotesTextFrame.Text property. The detailed steps for extracting text in speaker notes are as follows:
- Create an object of Presentation class and load PowerPoint presentation using Presentation.LoadFromFile() method.
- Iterate through each slide.
- Get the note slide through ISlide.NotesSlide property and retrieve the text through NotesSlide.NotesTextFrame.Text property.
- Write the speaker note text to a text file.
- Python
from spire.presentation import *
from spire.presentation.common import *

# Create an object of Presentation class
pres = Presentation()

# Load a PowerPoint presentation
pres.LoadFromFile("Sample.pptx")

list = []
# Iterate through each slide
for slide in pres.Slides:
    # Get the notes slide
    notesSlide = slide.NotesSlide
    # Get the notes
    notes = notesSlide.NotesTextFrame.Text
    list.append(notes)

# Write the notes to a text file
f = open("output/SpeakerNoteText.txt", "w", encoding="utf-8")
for note in list:
    f.write(note)
    f.write("\n")
f.close()
pres.Dispose()
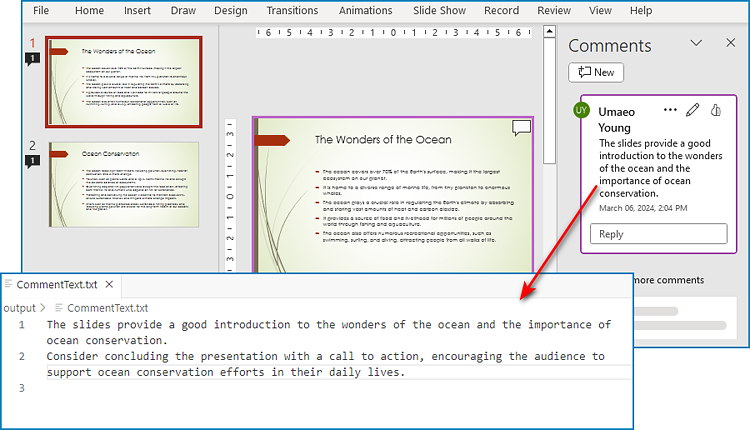
Extract Text from Presentation Comments with Python
With Spire.Presentation for Python, developers can also extract the text from comments in PowerPoint presentations by getting comments from slides with ISlide.Comments property and retrieving text from comments with Comment.Text property. The detailed steps are as follows:
- Create an object of Presentation class and load PowerPoint presentation using Presentation.LoadFromFile() method.
- Iterate through each slide and get the comment from each slide through ISlide.Comments property.
- Iterate through each comment and retrieve the text from each comment through Comment.Text property.
- Write the comment text to a text file.
- Python
from spire.presentation import *
from spire.presentation.common import *

# Create an object of Presentation class
pres = Presentation()

# Load a PowerPoint presentation
pres.LoadFromFile("Sample.pptx")

list = []
# Iterate through all slides
for slide in pres.Slides:
    # Get all comments from the slide
    comments = slide.Comments
    # Iterate through the comments
    for comment in comments:
        # Get the comment text
        commentText = comment.Text
        list.append(commentText)

# Write the comments to a text file
f = open("output/CommentText.txt", "w", encoding="utf-8")
for i in range(len(list)):
    f.write(list[i] + "\n")
f.close()
pres.Dispose()
Apply for a Temporary License
If you'd like to remove the evaluation message from the generated documents, or to get rid of the function limitations, please request a 30-day trial license for yourself.
Python: Move or Delete Worksheets in Excel
Moving and deleting worksheets in Excel are essential operations that allow you to organize and manage your workbook efficiently. Moving worksheets enables you to adjust the order of worksheets to match your specific needs or bring related information together. While deleting worksheets helps you eliminate unwanted or redundant sheets, creating a cleaner and more organized workspace. In this article, we will demonstrate how to move and delete worksheets in Excel in Python using Spire.XLS for Python.
Install Spire.XLS for Python
This scenario requires Spire.XLS for Python and plum-dispatch v1.7.4. They can be easily installed in your VS Code through the following pip command.
pip install Spire.XLS
If you are unsure how to install, please refer to this tutorial: How to Install Spire.XLS for Python on Windows
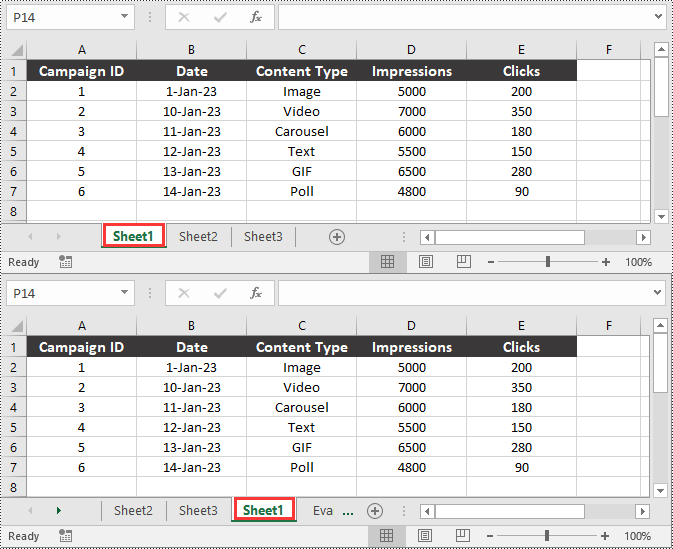
Move a Worksheet in Excel in Python
You can easily move a worksheet in an Excel file to another position by using the Worksheet.MoveWorksheet() method provided by Spire.XLS for Python. The detailed steps are as follows.
- Create an object of the Workbook class.
- Load an Excel file using the Workbook.LoadFromFile() method.
- Get a specific worksheet in the file using the Workbook.Worksheet[] property.
- Move the worksheet to another position in the file using the Worksheet.MoveWorksheet() method.
- Save the result file using the Workbook.SaveToFile() method.
- Python
from spire.xls import *
from spire.xls.common import *

# Create an object of the Workbook class
workbook = Workbook()
# Load a sample Excel file
workbook.LoadFromFile("Sample.xlsx")

# Get a specific worksheet in the file by its index
sheet = workbook.Worksheets[0]
# Or get a specific worksheet in the file by its name
# sheet = workbook.Worksheets["Sheet1"]

# Move the worksheet to the 3rd position in the file
sheet.MoveWorksheet(2)

# Save the result file
workbook.SaveToFile("MoveWorksheet.xlsx", ExcelVersion.Version2016)
workbook.Dispose()
Delete a Worksheet in Excel in Python
You can delete a specific worksheet from an Excel file by using the Workbook.Worksheets.RemoveAt() or Workbook.Worksheets.Remove() method provided by Spire.XLS for Python. The detailed steps are as follows.
- Create an object of the Workbook class.
- Load an Excel file using the Workbook.LoadFromFile() method.
- Remove a specific worksheet from the file using the Workbook.Worksheets.RemoveAt() or Workbook.Worksheets.Remove() method.
- Save the result file using the Workbook.SaveToFile() method.
- Python
from spire.xls import *
from spire.xls.common import *

# Create an object of the Workbook class
workbook = Workbook()
# Load a sample Excel file
workbook.LoadFromFile("Sample.xlsx")

# Remove a specific worksheet in the file by its index
workbook.Worksheets.RemoveAt(0)

# Or get a specific worksheet in the file by its name and then remove it
# worksheet = workbook.Worksheets["Sheet1"]
# workbook.Worksheets.Remove(worksheet)

# Save the result file
workbook.SaveToFile("DeleteWorksheet.xlsx", ExcelVersion.Version2016)
workbook.Dispose()
Apply for a Temporary License
If you'd like to remove the evaluation message from the generated documents, or to get rid of the function limitations, please request a 30-day trial license for yourself.
Spire.Presentation 9.3.0 supports AI features
We are excited to announce the release of Spire.Presentation 9.3.0. This version adds the PresentationAI feature to the original Spire.Presentation product. By sending requests to the AI model, it is possible to achieve functions such as text refinement, translation, text summarization, text continuation, presentation generation, and image generation with the help of AI. More details are listed below.
Here is a list of the main AI functions and their APIs
| Function | API |
| Text polishing | public string Polish(IShape shape,string language); |
| Translation | public string Translate(ISlide slide, string language); |
| Summarization | public string Summarize(IShape shape, string language); |
| Presentation generation | public Presentation Generate(string describe, string language, bool genareteBackGroundImage); |
| Questioning | public string Ask(string question, bool enableHistory = false); |
| Document search | public string DocumentSearch(string question, string file_server_path, bool enableHistory = false); |
| Image generation | public Stream ImageGenerate(string description); |
Python: Compare Two Versions of a Word Document
Comparing two Word documents for differences is a crucial task when reviewing changes, ensuring accuracy, and collaborating on content. This process allows you to identify additions, deletions, and modifications made between different document iterations. By comparing versions, you can efficiently track alterations, verify updates, and maintain document integrity. In this article, you will learn how to compare two versions of a Word document in Python using the Spire.Doc for Python library.
- Compare Two Versions of a Word Document in Python
- Compare Two Versions of a Word Document While Ignoring Formatting in Python
Install Spire.Doc for Python
This scenario requires Spire.Doc for Python and plum-dispatch v1.7.4. They can be easily installed in your VS Code through the following pip command.
pip install Spire.Doc
If you are unsure how to install, please refer to: How to Install Spire.Doc for Python on Windows
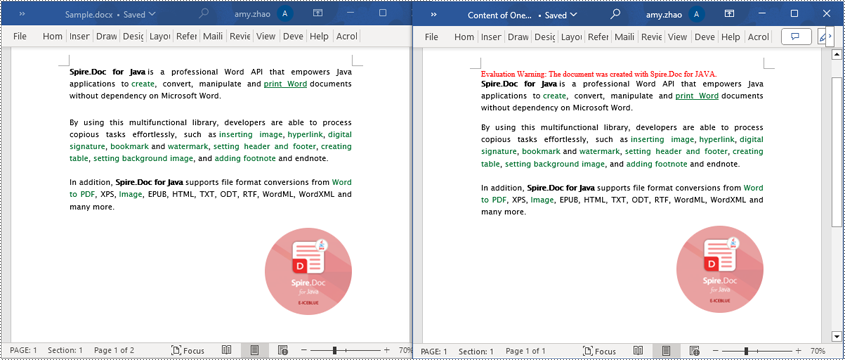
Compare Two Versions of a Word Document in Python
MS Word also offers a "Compare" feature that allows you to directly compare two versions of a document. This feature generates a new document that highlights the differences between the two versions.
To achieve similar results using Spire.Doc for Python, load the original and revised versions into two separate Document objects. Then, use the Compare() method to compare the revised version against the original. Finally, save the comparative document, which highlights the alterations, using the SaveToFile() method.
The steps to compare two version of a Word document using Python are as follows.
- Load the first document (original version) while initializing the Document object.
- Load the second document (revised version) while initializing the Document object.
- Call Compare() method of the first Document object to compare the revised version against the original version.
- Save the comparison results in a new Word document.
- Python
from spire.doc import *
from spire.doc.common import *

# Load the first document while initializing the Document object
firstDoc = Document("C:\\Users\\Administrator\\Desktop\\Original.docx")

# Load the second document while initializing the Document object
secondDoc = Document("C:\\Users\\Administrator\\Desktop\\Revised.docx")

# Compare two documents
firstDoc.Compare(secondDoc, "E-ICEBLUE")

# Save the comparison results in a new document
firstDoc.SaveToFile("Output/Differences.docx", FileFormat.Docx2016)

# Dispose resources
firstDoc.Dispose()
secondDoc.Dispose()
Compare Two Versions of a Word Document While Ignoring Formatting in Python
Comparing two versions of a Word document while ignoring formatting can be useful when you want to focus solely on the textual changes and disregard any formatting modifications.
To customize the comparison options in Spire.Doc for Python, use the CompareOptions class. If you want to exclude formatting from the comparison process, you can set the IgnoreFormatting property of the CompareOptions object to True. When you call the Compare() method, simply pass the CompareOptions object as an argument to achieve the desired comparison behavior.
The following are the steps to compare two versions of a Word document while ignoring formatting using Python.
- Load the first document (original version) while initializing the Document object.
- Load the second document (revised version) while initializing the Document object.
- Create a CompareOptions object and set its IgnoreFormatting property to True.
- Call Compare() method of the first Document object, passing the CompareOptions object as a parameter, to compare the revision against the original while ignoring formatting.
- Save the comparison results in a new Word document.
- Python
from spire.doc import *
from spire.doc.common import *

# Load the first document while initializing the Document object
firstDoc = Document("C:\\Users\\Administrator\\Desktop\\Original.docx")

# Load the second document while initializing the Document object
secondDoc = Document("C:\\Users\\Administrator\\Desktop\\Revised.docx")

# Set compare option to ignore formatting changes
compareOptions = CompareOptions()
compareOptions.IgnoreFormatting = True

# Compare the two Word documents with options
firstDoc.Compare(secondDoc, "E-ICEBLUE", compareOptions)

# Save the comparison results in a new document
firstDoc.SaveToFile("Output/DifferencesWithoutFormattingChanges.docx", FileFormat.Docx2016)

# Dispose resources
firstDoc.Dispose()
secondDoc.Dispose()
Apply for a Temporary License
If you'd like to remove the evaluation message from the generated documents, or to get rid of the function limitations, please request a 30-day trial license for yourself.
Java: Read Content from a Word Document
Extracting content from Word documents plays a crucial role in both work and study. Extracting one page of content helps in quickly browsing and summarizing key points, while extracting content from one section aids in in-depth study of specific topics or sections. Extracting the entire document allows you to have a comprehensive understanding of the document content, facilitating deep analysis and comprehensive comprehension. This article will introduce how to use Spire.Doc for Java to read a page, a section, and the entire content of a Word document in a Java project.
- Read a Page from a Word Document in Java
- Read a Section from a Word Document in Java
- Read the Entire Content from a Word Document in Java
Install Spire.Doc for Java
First, you're required to add the Spire.Doc.jar file as a dependency in your Java program. The JAR file can be downloaded from this link. If you use Maven, you can easily import the JAR file in your application by adding the following code to your project's pom.xml file.
<repositories>
    <repository>
        <id>com.e-iceblue</id>
        <name>e-iceblue</name>
        <url>https://repo.e-iceblue.com/nexus/content/groups/public/</url>
    </repository>
</repositories>
<dependencies>
    <dependency>
        <groupId>e-iceblue</groupId>
        <artifactId>spire.doc</artifactId>
        <version>12.4.6</version>
    </dependency>
</dependencies>
Read a Page from a Word Document in Java
Using the FixedLayoutDocument class and FixedLayoutPage class makes it easy to extract content from a specified page. To facilitate viewing the extracted content, the following example code saves the extracted content to a new Word document. The detailed steps are as follows:
- Create a Document object.
- Load a Word document using the Document.loadFromFile() method.
- Create a FixedLayoutDocument object.
- Obtain a FixedLayoutPage object for a page in the document.
- Use the FixedLayoutPage.getSection() method to get the section where the page is located.
- Get the index position of the first paragraph on the page within the section.
- Get the index position of the last paragraph on the page within the section.
- Create another Document object.
- Add a new section using Document.addSection().
- Clone the properties of the original section to the new section using Section.cloneSectionPropertiesTo(newSection) method.
- Copy the content of the page from the original document to the new document.
- Save the resulting document using the Document.saveToFile() method.
- Java
import com.spire.doc.*;
import com.spire.doc.pages.*;
import com.spire.doc.documents.*;

public class ReadOnePage {
    public static void main(String[] args) {
        // Create a new document object
        Document document = new Document();

        // Load document content from the specified file
        document.loadFromFile("Sample.docx");

        // Create a fixed layout document object
        FixedLayoutDocument layoutDoc = new FixedLayoutDocument(document);

        // Get the first page
        FixedLayoutPage page = layoutDoc.getPages().get(0);

        // Get the section where the page is located
        Section section = page.getSection();

        // Get the first paragraph of the page
        Paragraph paragraphStart = page.getColumns().get(0).getLines().getFirst().getParagraph();
        int startIndex = 0;
        if (paragraphStart != null) {
            // Get the index of the paragraph in the section
            startIndex = section.getBody().getChildObjects().indexOf(paragraphStart);
        }

        // Get the last paragraph of the page
        Paragraph paragraphEnd = page.getColumns().get(0).getLines().getLast().getParagraph();

        int endIndex = 0;
        if (paragraphEnd != null) {
            // Get the index of the paragraph in the section
            endIndex = section.getBody().getChildObjects().indexOf(paragraphEnd);
        }

        // Create a new document object
        Document newdoc = new Document();

        // Add a new section
        Section newSection = newdoc.addSection();

        // Clone the properties of the original section to the new section
        section.cloneSectionPropertiesTo(newSection);

        // Copy the content of the original document's page to the new document
        for (int i = startIndex; i <=endIndex; i++)
        {
            newSection.getBody().getChildObjects().add(section.getBody().getChildObjects().get(i).deepClone());
        }

        // Save the new document to the specified file
        newdoc.saveToFile("Content of One Page.docx", FileFormat.Docx);

        // Close and release the new document
        newdoc.close();
        newdoc.dispose();

        // Close and release the original document
        document.close();
        document.dispose();
    }
}
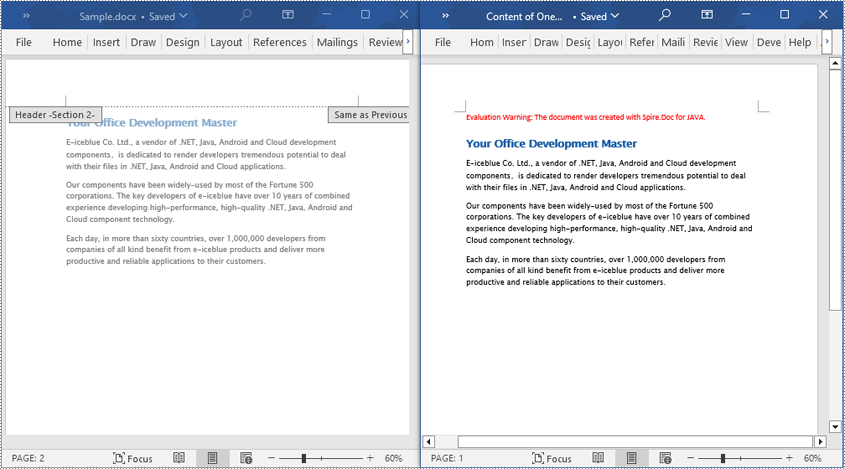
Read a Section from a Word Document in Java
Using Document.Sections[index], you can access specific Section objects that contain the header, footer, and body content of a document. The following example demonstrates a simple method to copy all content from one section to another document. The detailed steps are as follows:
- Create a Document object.
- Load a Word document using the Document.loadFromFile() method.
- Use Document.getSections().get(1) to retrieve the second section of the document.
- Create another new Document object.
- Clone the default style of the original document to the new document using Document.cloneDefaultStyleTo(newdoc) method.
- Use Document.getSections().add(section.deepClone()) to clone the content of the second section of the original document to the new document.
- Save the resulting document using the Document.saveToFile() method.
- Java
import com.spire.doc.*;

public class ReadOneSection {
    public static void main(String[] args) {
        // Create a new document object
        Document document = new Document();

        // Load a Word document from a file
        document.loadFromFile("Sample.docx");

        // Get the second section of the document
        Section section = document.getSections().get(1);

        // Create a new document object
        Document newdoc = new Document();

        // Clone the default style to the new document
        document.cloneDefaultStyleTo(newdoc);

        // Clone the second section to the new document
        newdoc.getSections().add(section.deepClone());

        // Save the new document to a file
        newdoc.saveToFile("Content of One Section.docx", FileFormat.Docx);

        // Close and release the new document object
        newdoc.close();
        newdoc.dispose();

        // Close and release the original document object
        document.close();
        document.dispose();
    }
}
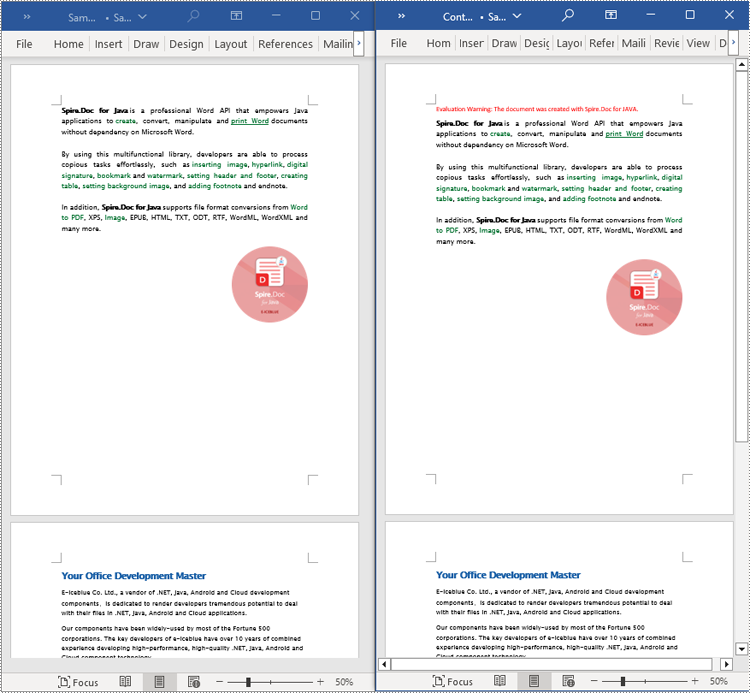
Read the Entire Content from a Word Document in Java
This example demonstrates how to iterate through each section of the original document to read the entire content of the document and clone each section into a new document. This method can help you quickly replicate both the structure and content of the entire document, preserving the format and layout of the original document in the new document. Such operations are very useful for maintaining the integrity and consistency of the document structure. The detailed steps are as follows:
- Create a Document object.
- Load a Word document using the Document.loadFromFile() method.
- Create another new Document object.
- Clone the default style of the original document to the new document using the Document.cloneDefaultStyleTo(newdoc) method.
- Iterate through each section of the original document using a for loop and clone it into the new document.
- Save the resulting document using the Document.saveToFile() method.
- Java
import com.spire.doc.*;

public class ReadOneDocument {
    public static void main(String[] args) {
        // Create a new document object
        Document document = new Document();

        // Load a Word document from a file
        document.loadFromFile("Sample.docx");

        // Create a new document object
        Document newdoc = new Document();

        // Clone the default style to the new document
        document.cloneDefaultStyleTo(newdoc);

        // Iterate through each section in the original document and clone it to the new document
        for (Section sourceSection : (Iterable) document.getSections()) {
            newdoc.getSections().add(sourceSection.deepClone());
        }

        // Save the new document to a file
        newdoc.saveToFile("Content of the entire document.docx", FileFormat.Docx);

        // Close and release the new document object
        newdoc.close();
        newdoc.dispose();

        // Close and release the original document object
        document.close();
        document.dispose();
    }
}
Apply for a Temporary License
If you'd like to remove the evaluation message from the generated documents, or to get rid of the function limitations, please request a 30-day trial license for yourself.
Translate Excel using AI
Excel documents, being a widely-used electronic spreadsheet across the globe, often involve multi-language collaboration in various scenarios. Against this backdrop, we introduce AI-powered translation technology, which not only accurately identifies and translates text content but also preserves the original data formats and structures, significantly enhancing work efficiency and accuracy while reducing communication costs incurred by language differences. In this article, we will introduce how to translate Excel using Spire.XLS AI.
Install Spire.XLS for .NET
The Excel AI integrated into Spire.XLS for .NET package, hence to begin with, you need to add the DLL files included in the Spire.XLS for .NET package as references in your .NET project. The DLL files can be either downloaded from this link or installed via NuGet.
PM> Install-Package Spire.XLS
Request a License Key of AI Product
A license key is required to run Spire.XLS AI, please contact our sales department (sales@e-iceblue.com) to request one.
Use AI to Translate Excel
Spire.XLS AI provides the ExcelAI class, which supports intelligent translation of either all content within a worksheet or specific ranges within specific worksheets. Below is an overview of the key methods involved in implementing this functionality:
- UploadWorkbook(Workbook wb): This method is used to upload a Workbook object processed by Spire.XLS to the AI server, facilitating the integration of Excel content with the AI system's data.
- ExcelTranslate(List<CellRange> srcRanges, string language): This method is designed to translate the content within specified cell ranges from worksheets into the specified target language.
- ExcelTranslate(List<Worksheet> srcWorksheets, string language, bool translateSheetName = true): This method is responsible for translating all content across a list of source worksheets, optionally including worksheet names, into the specified target language.
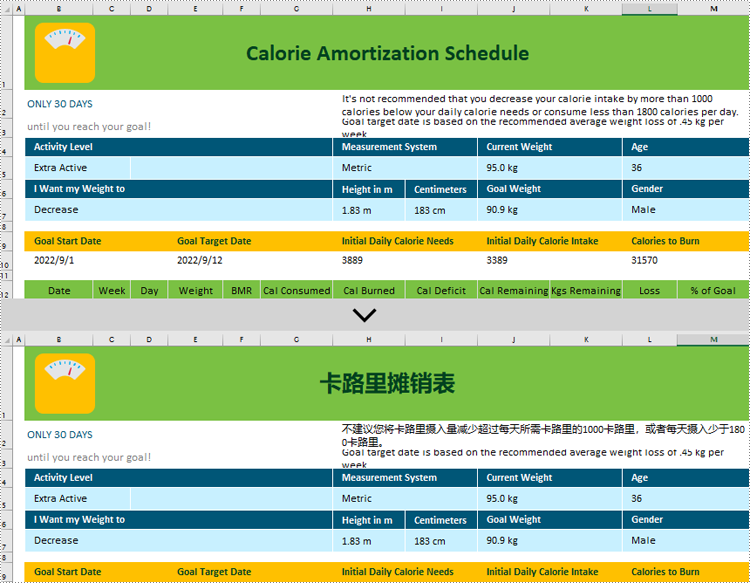
Translate Contents from Worksheets in C#
The following steps introduce how to translate the content within worksheets:
- Create a Workbook class instance.
- Load an Excel document using Workbook.LoadFromFile() method.
- Create an ExcelAI class instance.
- Upload the workbook to AI system using ExcelAI.UploadWorkbook() method.
- Create a list and store all worksheets from workbook.
- Translate content within worksheets into specified language using ExcelTranslate(List<Worksheet> srcWorksheets, string language, bool translateSheetName = true) method.
- Save the translated workbook using Workbook.SaveToFile () method.
- C#
using Spire.Xls;
using Spire.Xls.AI;
using System.Collections.Generic;

// Define the file path of the Excel document
string inputfile = "Input.xlsx";

// Create a new instance of the Workbook
Workbook wb = new Workbook();

// Load the Excel file
wb.LoadFromFile(inputfile);

// Create a new instance of the ExcelAI
ExcelAI excelAI = new ExcelAI();

// Upload the workbook to AI system
excelAI.UploadWorkbook(wb);

// Create a list to store worksheets
List worksheets = new List();

// Iterate through each worksheet
foreach (Worksheet worksheet in wb.Worksheets)
{
    // Add the worksheet to the list
    worksheets.Add(worksheet);
}

// Translate the content of worksheets into Spanish
excelAI.ExcelTranslate(worksheets, "spanish");

// Save the translated workbook to a new Excel file
wb.SaveToFile("output.xlsx", ExcelVersion.Version2016);
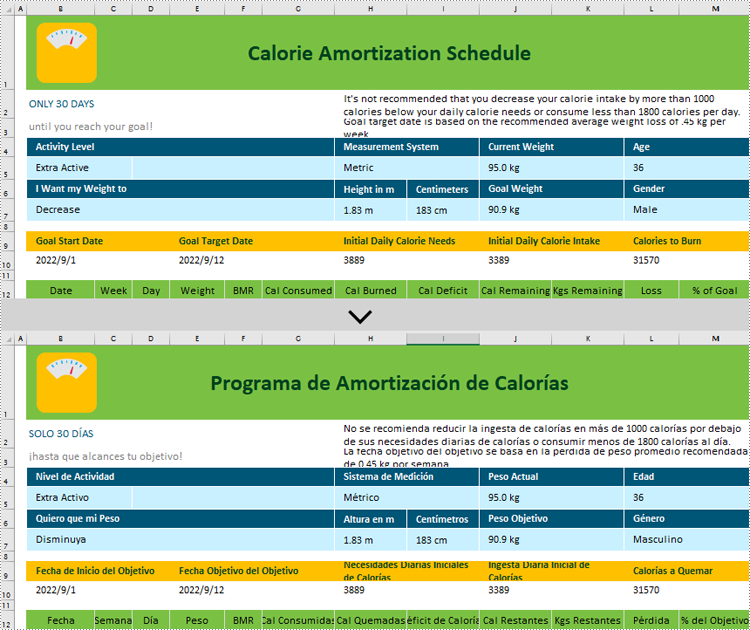
Translate Contents from Ranges in C#
The following steps introduce how to translate the content within specified ranges:
- Create a Workbook class instance.
- Load an Excel document using Workbook.LoadFromFile() method.
- Create an ExcelAI class instance.
- Upload the workbook to AI system using ExcelAI.UploadWorkbook() method.
- Create a list to store cell ranges.
- Get the specified worksheet and add some cell ranges into the list.
- Translate content within the ranges into specified language using ExcelTranslate(List<CellRange> srcRanges, string language) method.
- Save the translated workbook using Workbook.SaveToFile () method.
- C#
using Spire.Xls;
using Spire.Xls.AI;
using System.Collections.Generic;

// Define the file path of the Excel document
string inputfile = "Input.xlsx";

// Create a new instance of the Workbook
Workbook wb = new Workbook();

// Load the Excel file
wb.LoadFromFile(inputfile);

// Create a new instance of the ExcelAI
ExcelAI excelAI = new ExcelAI();

// Upload the workbook to AI system
excelAI.UploadWorkbook(wb);

// Get the first worksheet
Worksheet worksheet = wb.Worksheets[0];

// Create a list to store cell ranges
List ranges = new List();

// Add two ranges to the list
ranges.Add(worksheet.Range["B1"]);
ranges.Add(worksheet.Range["H2"]);

// Translate the content of ranges into Chinese
excelAI.ExcelTranslate(ranges, "chinese");

// Save the translated workbook to a new Excel file
wb.SaveToFile("output.xlsx", ExcelVersion.Version2016);
Spire.XLS for Python 14.2.2 supports macOS system
We're pleased to announce the release of Spire.XLS for Python 14.2.2. This latest version of the library now includes support for macOS system and addresses a previously identified issue. More details are as follows.
Here is a list of changes made in this release
| Category | ID | Description |
| New feature | SPIREXLS-5002 | Supports macOS System. |
| Bug | SPIREXLS-5109 | Fixes the issue that running an application with Python 3.7 threw the exception "cannot import name 'get_args' from 'typing' ". |
Spire.Presentation for Python 9.3.0 fixes the issue that getting custom properties of a document failed
We are pleased to announce the release of Spire.Presentation for Python 9.3.0. This version fixes some known issues, such as the issue that getting custom properties of a document failed. More details are listed below.
Here is a list of changes made in this release
| Category | ID | Description |
| Bug | SPIREPPT-2433 | Fixes the issue that the position of shapes changed after ungrouping them. |
| Bug | SPIREPPT-2444 | Fixes the issue that getting custom properties of a document failed. |
| Bug | SPIREPPT-2446 | Fixes the issue that added custom properties were displayed incorrectly. |
Python: Add or Remove Cell Borders in Excel
Cell borders play a crucial role in enhancing the visual clarity and organization of data in Excel spreadsheets. Adding borders to cells can help draw attention to specific data points, highlight headers, or create clear boundaries between different sections of your worksheet. On the other hand, removing borders can provide a sleek and seamless appearance, especially when you want to eliminate distractions and focus solely on the data itself.
In this comprehensive guide, we will walk you through the process of adding or removing cell borders in Excel by using the Spire.XLS for Python library.
- Add Borders to a Selected Cell or Cell Range in a Worksheet
- Add Borders to the Cell Range Containing Data in a Worksheet
- Add Left, Top, Right, Bottom, Diagonal Borders to a Cell
- Remove Borders of a Cell or Cell Range in a Worksheet
Install Spire.XLS for Python
This scenario requires Spire.XLS for Python and plum-dispatch v1.7.4. They can be easily installed in your VS Code through the following pip command.
pip install Spire.XLS
If you are unsure how to install, please refer to this tutorial: How to Install Spire.XLS for Python on Windows
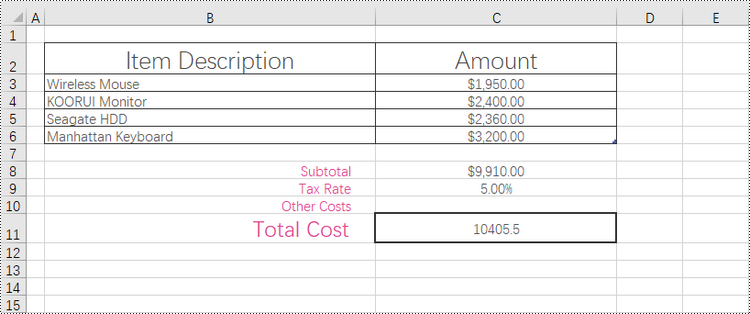
Add Borders to a Selected Cell or Cell Range in a Worksheet in Python
Borders can be applied to individual cells, groups of cells, or even entire ranges to create clear boundaries and make data stand out. By adding borders, you can effectively organize and structure your data, making it easier to analyze and understand.
With Spire.XLS for Python, accessing specific cells or cell ranges is made easy through the Worksheet.Range[name: str] property. Once you have obtained the desired cell or cell range, you can apply an outside border using the CellRange.BorderAround() method. Additionally, you can apply inside borders to a cell range using the CellRange.BorderInside() method.
To apply borders to a cell or cell range, follow the steps below.
- Create a Workbook object.
- Load an Excel document from the specified path.
- Get a specific worksheet from the workbook.
- Get a cell or cell range using Worksheet.Range[name: str] property.
- Apply outside borders to the cell or cell range using CellRange.BorderAround() method.
- Apply inside borders to the cell range using CellRange.BorderInside() method.
- Save the workbook to a new Excel file.
- Python
from spire.xls import *
from spire.xls.common import *

# Create a Workbook object
workbook = Workbook()

# Load an Excel document
workbook.LoadFromFile("C:\\Users\\Administrator\\Desktop\\sample.xlsx")

# Get the first worksheet
worksheet = workbook.Worksheets[0]

# Get a specific cell
cell = worksheet.Range["C11"]

# Apply borders to the cell
cell.BorderAround(LineStyleType.Medium, Color.get_Black())

# Get a cell range
cellRange = worksheet.Range["B2:C6"]

# Apply outside borders to the cell range
cellRange.BorderAround(LineStyleType.Thin, Color.get_Black())

# Apply inside borders to the cell range
cellRange.BorderInside(LineStyleType.Thin, Color.get_Black())

# Save the document
workbook.SaveToFile("Output/AddBordersToCellRange.xlsx", ExcelVersion.Version2016)

# Dispose resources
workbook.Dispose()
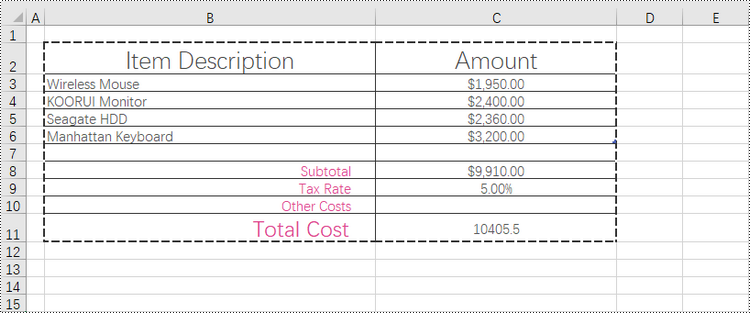
Add Borders to the Cell Range Containing Data in a Worksheet in Python
The range that contains data in a worksheet is commonly referred to as the "allocated range" or "used range". It represents the rectangular area that encompasses all the cells with data, including text, numbers, formulas, and other types of content.
To retrieve the cell range having data, use the Worksheet.AllocatedRange property. Then, you can easily apply borders to this range using the BorderAround() and BorderInside() methods.
The steps to add borders to the cell range containing data are as follows.
- Create a Workbook object.
- Load an Excel document from the specified path.
- Get a specific worksheet from the workbook.
- Get the cell range that contains data using Worksheet.AllocatedRange property.
- Apply outside borders to the cell or cell range using CellRange.BorderAround() method.
- Apply inside borders to the cell range using CellRange.BorderInside() method.
- Save the workbook to a new Excel file.
- Python
from spire.xls import *
from spire.xls.common import *

# Create a Workbook object
workbook = Workbook()

# Load an Excel document
workbook.LoadFromFile("C:\\Users\\Administrator\\Desktop\\sample.xlsx")

# Get the first worksheet
worksheet = workbook.Worksheets[0]

# Get the cell range that contains data
locatedRange = worksheet.AllocatedRange

# Apply outside borders to the cell range
locatedRange .BorderAround(LineStyleType.MediumDashed, Color.get_Black())

# Apply inside borders to the cell range
locatedRange .BorderInside(LineStyleType.Thin, Color.get_Black())

# Save the document
workbook.SaveToFile("Output/AddBordersToLocatedRange.xlsx", ExcelVersion.Version2016)

# Dispose resources
workbook.Dispose()
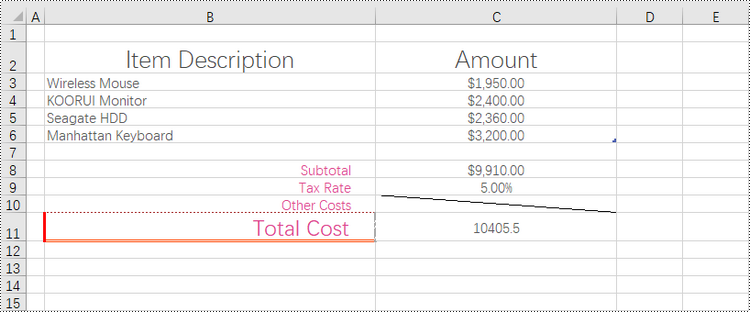
Add Left, Top, Right, Bottom, Diagonal Borders to a Cell in Python
In addition to applying outside and inside borders, you have the option to add left, top, right, bottom, and diagonal borders to individual cells or cell ranges. This feature allows you to go beyond basic border customization and provides additional flexibility to highlight important information, separate sections within your worksheet, or provide a visual structure to your data.
Spire.XLS provides convenient access to specific borders, including the left, right, top, bottom, and diagonal borders, through properties such as CellRange.Borders[BordersLineType.EdgeLeft]. Once you have obtained the desired border, you have the flexibility to customize its appearance by utilizing the IBorder.LineStyle property and the IBorder.Color property.
To add left, top, right, bottom, diagonal borders to a cell, follow the following steps.
- Create a Workbook object.
- Load an Excel document from the specified path.
- Get a specific worksheet from the workbook.
- Get a specific cell using Worksheet.Range property.
- Get the left, top, right, bottom and diagonal borders of the cell using the properties such as CellRange.Borders[BordersLineType.EdgeLeft].
- Set the line style of the border using IBorder.LineStyle property
- Set the color of the border using IBorder.Color property.
- Save the workbook to a new Excel file.
- Python
from spire.xls import *
from spire.xls.common import *

# Create a Workbook object
workbook = Workbook()

# Load an Excel document
workbook.LoadFromFile("C:\\Users\\Administrator\\Desktop\\sample.xlsx")

# Get the first worksheet
worksheet = workbook.Worksheets[0]

# Get a cell
cell = worksheet.Range["B11"]

# Get the left, top, right, bottom border of the cell
leftBorder = cell.Borders[BordersLineType.EdgeLeft]
topBorder = cell.Borders[BordersLineType.EdgeTop]
rightBorder = cell.Borders[BordersLineType.EdgeRight]
bottomBorder = cell.Borders[BordersLineType.EdgeBottom]

# Set the border type respectively
leftBorder.LineStyle = LineStyleType.Thick
topBorder.LineStyle = LineStyleType.Dotted
rightBorder.LineStyle = LineStyleType.SlantedDashDot
bottomBorder.LineStyle = LineStyleType.Double

# Set the border color respectively
leftBorder.Color = Color.get_Red()
topBorder.Color = Color.get_Brown()
rightBorder.Color = Color.get_DarkGray()
bottomBorder.Color = Color.get_OrangeRed()

# Get a specific cell
cell = worksheet.Range["C10"]

# Get the diagonal border of the cell
diagonalBorder = cell.Borders[BordersLineType.DiagonalDown]

# Set the border style
diagonalBorder.LineStyle = LineStyleType.Thin

# Save the document
workbook.SaveToFile("Output/BorderOfEdge.xlsx", ExcelVersion.Version2016)

# Dispose resources
workbook.Dispose()
Remove Borders of a Cell or Cell Range in a Worksheet in Python
Borders can be removed from individual cells, groups of cells, or even entire ranges, allowing you to reduce visual noise and clutter, making your data easier to interpret and analyze. Additionally, you can choose to remove borders from specific sides of a cell, such as the left, top, right, or bottom, which can alter the visual appearance and enhance the overall presentation.
To eliminate borders surrounding or within a cell or cell range, you can easily achieve this by setting the CellRange.Borders.LineStyle property to LineStyleType.none. Similarly, if you want to remove a border on a specific side, such as the left side, you can accomplish this by setting the CellRange.Borders[BordersLineType.EdgeLeft].LineStyle property to LineStyleType.none.
The steps to remove borders of a cell or cell range as follows.
- Create a Workbook object.
- Load an Excel document from the specified path.
- Get a specific worksheet from the workbook.
- Get a specific cell or cell range using Worksheet.Range property.
- Remove all borders of the cell or cell range by setting CellRange.Borders.LineStyle property to LineStyleType.none.
- Save the workbook to a new Excel file.
- Python
from spire.xls import *
from spire.xls.common import *

# Create a Workbook object
workbook = Workbook()

# Load an Excel document
workbook.LoadFromFile("C:\\Users\\Administrator\\Desktop\\BorderExample.xlsx")

# Get the first worksheet
worksheet = workbook.Worksheets[0]

# Get a cell
cell = worksheet.Range["C11"]

# Remove borders by setting line style to none
cell.Borders.LineStyle = LineStyleType.none

# Remove border on a specific side
# cell.Borders[BordersLineType.EdgeLeft].LineStyle = LineStyleType.none

# Get a cell range
cellRange = worksheet.Range["B2:C6"]

# Remove borders by setting line style to none
cellRange.Borders.LineStyle = LineStyleType.none

# Save the document
workbook.SaveToFile("Output/RemoveBorders.xlsx", ExcelVersion.Version2016)

# Dispose resources
workbook.Dispose()
Apply for a Temporary License
If you'd like to remove the evaluation message from the generated documents, or to get rid of the function limitations, please request a 30-day trial license for yourself.