Python: Convert HTML to Image
The conversion from HTML to image allows you to capture the appearance and layout of the HTML content as a static image file. It can be useful for various purposes, such as generating website previews, creating screenshots, archiving web pages, or integrating HTML content into applications that primarily deal with images. In this article, you will learn how to convert an HTML file or an HTML string to an image in Python using Spire.Doc for Python.
Install Spire.Doc for Python
This scenario requires Spire.Doc for Python and plum-dispatch v1.7.4. They can be easily installed in your VS Code through the following pip command.
pip install Spire.Doc
If you are unsure how to install, please refer to this tutorial: How to Install Spire.Doc for Python in VS Code
Convert an HTML File to an Image in Python
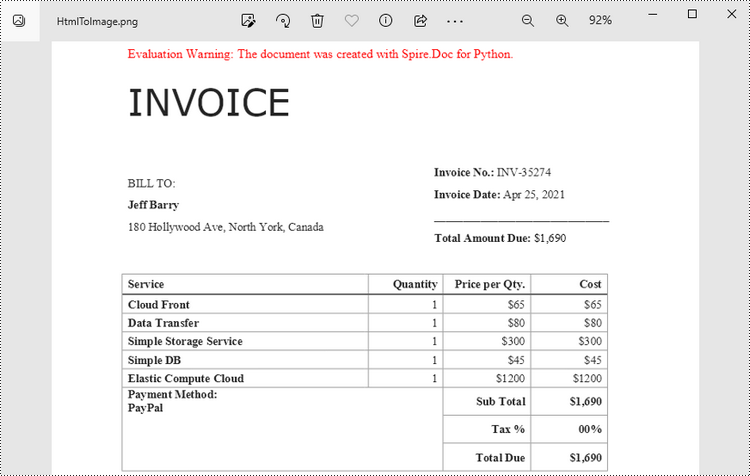
When an HTML file is loaded into the Document object using the Document.LoadFromFile() method, its contents are automatically rendered as the contents of a Word page. Then, a specific page can be saved as an image stream using the Document.SaveImageToStreams() method.
The following are the steps to convert an HTML file to an image with Python.
- Create a Document object.
- Load a HTML file using Document.LoadFromFile() method.
- Convert a specific page to an image stream using Document.SaveImageToStreams() method.
- Save the image stream as a PNG file using BufferedWriter.write() method.
- Python
from spire.doc import *
from spire.doc.common import *

# Create a Document object
document = Document()

# Load an HTML file
document.LoadFromFile("C:\\Users\\Administrator\\Desktop\\Sample.html", FileFormat.Html, XHTMLValidationType.none)

# Save the first page as an image stream
imageStream = document.SaveImageToStreams(0, ImageType.Bitmap)

# Convert the image stream as a PNG file
with open("output/HtmlToImage.png",'wb') as imageFile:
imageFile.write(imageStream.ToArray())
document.Close()
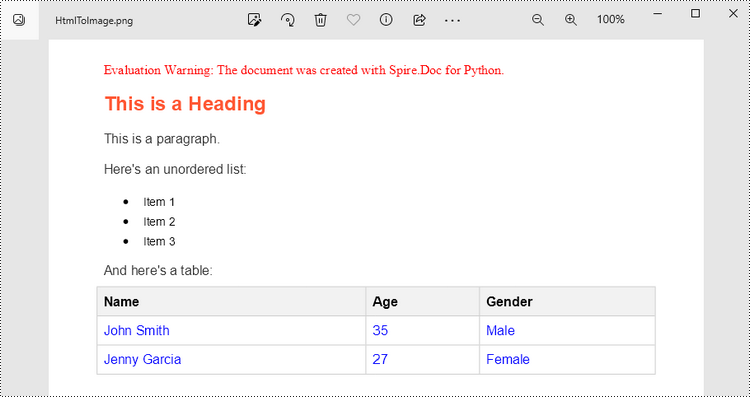
Convert an HTML String to an Image in Python
To render uncomplicated HTML strings (typically text and its formatting) as a Word page, you can utilize the Paragraph.AppendHTML() method. Afterwards, you can convert it to an image stream using the Document.SaveImageToStreams() method.
The following are the steps to convert an HTML string to an image in Python.
- Create a Document object.
- Add a section using Document.AddSection() method.
- Add a paragraph using Section.AddParagraph() method.
- Specify the HTML string, and add the it to the paragraph using Paragraph.AppendHTML() method.
- Convert a specific page to an image stream using Document.SaveImageToStreams() method.
- Save the image stream as a PNG file using BufferedWriter.write() method.
- Python
from spire.doc import *
from spire.doc.common import *

# Create a Document object
document = Document()

# Add a section to the document
sec = document.AddSection()

# Add a paragraph to the section
paragraph = sec.AddParagraph()

# Specify the HTML string
htmlString = """
<html>
<head>
    <title>HTML to Word Example</title>
    <style>
        body {
            font-family: Arial, sans-serif;
        }
        h1 {
            color: #FF5733;
            font-size: 24px;
            margin-bottom: 20px;
        }
        p {
            color: #333333;
            font-size: 16px;
            margin-bottom: 10px;
        }
        ul {
            list-style-type: disc;
            margin-left: 20px;
            margin-bottom: 15px;
        }
        li {
            font-size: 14px;
            margin-bottom: 5px;
        }
        table {
            border-collapse: collapse;
            width: 100%;
            margin-bottom: 20px;
        }
        th, td {
            border: 1px solid #CCCCCC;
            padding: 8px;
            text-align: left;
        }
        th {
            background-color: #F2F2F2;
            font-weight: bold;
        }
        td {
            color: #0000FF;
        }
    </style>
</head>
<body>
    <h1>This is a Heading</h1>
    <p>This is a paragraph.</p>
    <p>Here's an unordered list:</p>
    <ul>
        <li>Item 1</li>
        <li>Item 2</li>
        <li>Item 3</li>
    </ul>
    <p>And here's a table:</p>
    <table>
        <tr>
            <th>Name</th>
            <th>Age</th>
            <th>Gender</th>
        </tr>
        <tr>
            <td>John Smith</td>
            <td>35</td>
            <td>Male</td>
        </tr>
        <tr>
            <td>Jenny Garcia</td>
            <td>27</td>
            <td>Female</td>
        </tr>
    </table>
</body>
</html>
"""

# Append the HTML string to the paragraph
paragraph.AppendHTML(htmlString)

# Save the first page as an image stream
imageStream = document.SaveImageToStreams(0, ImageType.Bitmap)

# Convert the image stream as a PNG file
with open("output/HtmlToImage2.png",'wb') as imageFile:
    imageFile.write(imageStream.ToArray())
document.Close()
Apply for a Temporary License
If you'd like to remove the evaluation message from the generated documents, or to get rid of the function limitations, please request a 30-day trial license for yourself.
Python: Add or Remove Captions in Word Documents
Captions play a significant role in Word documents by serving as markers, explanations, navigation aids, and accessibility features. They are crucial elements for creating professional, accurate, and user-friendly documents. Captions help improve the readability, usability, and accessibility of the document and are essential for understanding and effectively processing the document's content. This article will explain how to use Spire.Doc for Python to add or remove captions in Word documents using Python programs.
- Add Image Captions to a Word document in Python
- Add Table Captions to a Word document in Python
- Remove Captions from a Word document in Python
Install Spire.Doc for Python
This scenario requires Spire.Doc for Python and plum-dispatch v1.7.4. They can be easily installed in your VS Code through the following pip command.
pip install Spire.Doc
If you are unsure how to install, please refer to this tutorial: How to Install Spire.Doc for Python in VS Code
Add Image Captions to a Word document in Python
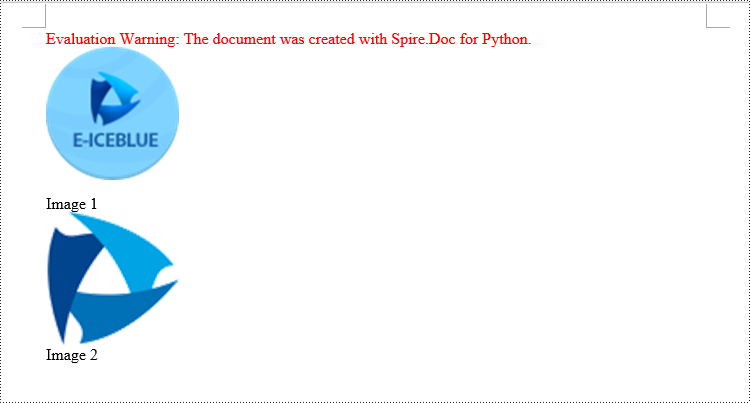
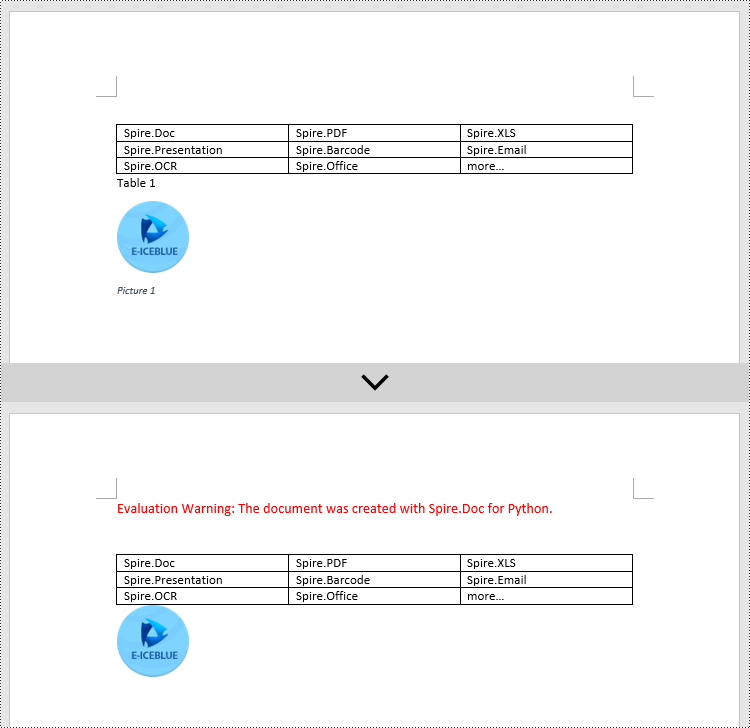
Spire.Doc for Python provides a convenient method to add captions to images. Simply call the DocPicture.AddCaption(self, name: str, numberingFormat: 'CaptionNumberingFormat', captionPosition: 'CaptionPosition') method to add a caption for the image. The detailed steps are as follows:
- Create an object of the Document class.
- Use the Document.AddSection() method to add a section.
- Add a paragraph using Section.AddParagraph() method.
- Use the Paragraph.AppendPicture(self ,imgFile:str) method to add a DocPicture image object to the paragraph.
- Use the DocPicture.AddCaption(self ,name:str,numberingFormat:'CaptionNumberingFormat',captionPosition:'CaptionPosition') method to add a caption with numbering format as CaptionNumberingFormat.Number.
- Set the Document.IsUpdateFields property to true to update all fields.
- Use the Document.SaveToFile() method to save the resulting document.
- Python
from spire.doc import *
from spire.doc.common import *

# Create a Word document object
document = Document()

# Add a section
section = document.AddSection()

# Add a new paragraph and add an image to it
pictureParagraphCaption = section.AddParagraph()
pictureParagraphCaption.Format.AfterSpacing = 10
pic1 = pictureParagraphCaption.AppendPicture("Data\\1.png")
pic1.Height = 100
pic1.Width = 100

# Add a caption to the image
format = CaptionNumberingFormat.Number
pic1.AddCaption("Image", format, CaptionPosition.BelowItem)

# Add another new paragraph and add an image to it
pictureParagraphCaption = section.AddParagraph()
pic2 = pictureParagraphCaption.AppendPicture("Data\\2.png")
pic2.Height = 100
pic2.Width = 100

# Add a caption to the image
pic2.AddCaption("Image", format, CaptionPosition.BelowItem)

# Update all fields in the document
document.IsUpdateFields = True

# Save the document as a docx file
result = "AddImageCaption.docx"
document.SaveToFile(result, FileFormat.Docx2016)

# Close the document object and release resources
document.Close()
document.Dispose()
Add Table Captions to a Word document in Python
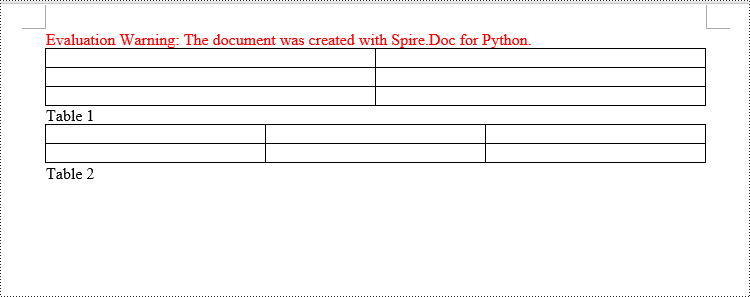
To facilitate the addition of captions to tables, Spire.Doc for Python also provides a convenient method similar to adding captions to images. You can use the Table.AddCaption(self, name:str, format:'CaptionNumberingFormat', captionPosition:'CaptionPosition') method to create a caption for the table. The following are the detailed steps:
- Create an object of the Document class.
- Use the Document.AddSection() method to add a section.
- Create a Table object and add it to the specified section in the document.
- Use the Table.ResetCells(self ,rowsNum:int,columnsNum:int) method to set the number of rows and columns in the table.
- Add a caption to the table using the Table.AddCaption(self ,name:str,format:'CaptionNumberingFormat',captionPosition:'CaptionPosition') method, specifying the caption numbering format as CaptionNumberingFormat.Number.
- Set the Document.IsUpdateFields property to true to update all fields.
- Use the Document.SaveToFile() method to save the resulting document.
- Python
from spire.doc import *
from spire.doc.common import *

# Create a Word document object
document = Document()

# Add a section
section = document.AddSection()

# Add a table
tableCaption = section.AddTable(True)
tableCaption.ResetCells(3, 2)

# Add a caption to the table
tableCaption.AddCaption("Table", CaptionNumberingFormat.Number, CaptionPosition.BelowItem)

# Add another table and caption to it
tableCaption = section.AddTable(True)
tableCaption.ResetCells(2, 3)
tableCaption.AddCaption("Table", CaptionNumberingFormat.Number, CaptionPosition.BelowItem)

# Update all fields in the document
document.IsUpdateFields = True

# Save the document as a docx file
result = "AddTableCaption.docx"
document.SaveToFile(result, FileFormat.Docx2016)

# Close the document object and release resources
document.Close()
document.Dispose()
Remove Captions from a Word document in Python
Spire.Doc for Python also supports removing captions from Word documents. Here are the detailed steps:
- Create an object of the Document class.
- Use the Document.LoadFromFile() method to load a Word document.
- Create a custom method, named detect_caption_paragraph(paragraph), to determine if a paragraph contains a caption.
- Iterate through all the Paragraph objects in the document using a loop and utilize the custom method, detect_caption_paragraph(paragraph), to identify and delete paragraphs that contain captions.
- Use the Document.SaveToFile() method to save the resulting document.
- Python
from spire.doc import *
from spire.doc.common import *

# Method to detect if a paragraph is a caption paragraph
def detect_caption_paragraph(paragraph):
    tag = False
    field = None

# Iterate through the child objects in the paragraph
    for i in range(len(paragraph.ChildObjects)):
        if paragraph.ChildObjects[i].DocumentObjectType == DocumentObjectType.Field:
            # Check if the child object is of Field type
            field = paragraph.ChildObjects[i]
            if field.Type == FieldType.FieldSequence:
                # Check if the Field type is FieldSequence, indicating a caption field type
                return True

    return tag

# Create a Word document object
document = Document()
# Load the sample.docx file
document.LoadFromFile("Data/sample.docx")

# Iterate through all sections
for i in range(len(document.Sections)):
    section = document.Sections.get_Item(i)

    # Iterate through paragraphs in reverse order within the section
    for j in range(len(section.Body.Paragraphs) - 1, -1, -1):
        # Check if the paragraph is a caption paragraph
        if detect_caption_paragraph(section.Body.Paragraphs[j]):
            # If it's a caption paragraph, remove it
            section.Body.Paragraphs.RemoveAt(j)

# Save the document after removing captions
result = "DeleteCaptions.docx"
document.SaveToFile(result, FileFormat.Docx2016)

# Close the document object and release resources
document.Close()
document.Dispose()
Apply for a Temporary License
If you'd like to remove the evaluation message from the generated documents, or to get rid of the function limitations, please request a 30-day trial license for yourself.
Spire.Doc for Java 12.1.0 removes the dependency on Spire.Pdf.jar
We are pleased to announce the release of Spire.Doc for Java 12.1.0. This version removes the dependency on Spire.Pdf.jar and changes the method of license application to "com.spire.doc.license.LicenseProvider.setLicenseKey(key)". In addition, a number of new features have also been added, such as a new method for adding image watermarks. More details are listed below.
Here is a list of changes made in this release
| Category | ID | Description |
| Adjustment | - | Removes the dependency on Spire.Pdf.jar. |
| Adjustment | - | Changes the method of license application to "com.spire.doc.license.LicenseProvider.setLicenseKey(key)". |
| New feature | - | Deprecates the following methods, classes and interfaces.
The "newEngine" parameter in the Document constructor no longer has any effect. The internal mechanism now defaults to using the new engine. The HeaderType enum. The GroupedShapeCollection class. The ShapeObjectTextCollection class. The MailMergeData interface. The EnumInterface interface. The public PictureWaterMark(InputStream inputeStream, boolean washout) constructor. The public PictureWaterMark(String filename, boolean washout) constructor. The downloadImage method in the Field class. The IDocOleObject interface. The PointsConverter class. |
| New feature | - | Deprecates the "getWidth()" and "setWidth()" methods in the TableCell class and replaces them with the "getCellWidth()" and "setCellWidth()" methods. |
| New feature | - | Changes the following namespaces.
com.spire.license.LicenseProvider -> com.spire.doc.License.LicenseProvider |
| New feature | - | Changes the inheritance relationship: changes "ShapeGroup implements ShapeObject" to "ShapeGroup implements ShapeBase". |
| New feature | - | Supports destroying data related to customized fonts when destroying the Document at the same time.
// Set custom fonts
Document.setCustomFontsFolders(string filePath);

// Dispose of custom fonts
Document.clearCustomFontsFolders();

// Clear system font cache that occupies memory in the cache
Document.clearSystemFontCache();

Example code:
Document doc = new Document();
doc.loadFromFile("inputFile.docx");
doc.setCustomFontsFolders(@"d:\Fonts");
doc.saveToFile("output.pdf", FileFormat.PDF);
doc.close();
doc.dispose();
|
| New feature | - | Changes the following enumerated classes.
com.spire.doc.FileFormat.WPS -> com.spire.doc.FileFormat.Wps com.spire.doc.FileFormat.WPT -> com.spire.doc.FileFormat.Wpt ComparisonLevel -> TextDiffMode |
| New feature | - | Changes the following methods.
ComparisonLevel getLevel() -> getTextCompareLevel() setLevel(ComparisonLevel value) -> setTextCompareLevel(TextDiffMode) IsPasswordProtect() -> isEncrypted() getFillEfects() -> getFillEffects() |
| New feature | - | Adds a new method to add image watermark.
File imageFile = new File("data/E-iceblue.png");
BufferedImage bufferedImage = ImageIO.read(imageFile);
// Create a new instance of the PictureWatermark class with the input BufferedImage, and set the scaling factor for the watermark image
PictureWatermark picture = new PictureWatermark(bufferedImage,false);
		// Or another way to create PictureWatermark
		// PictureWatermark picture = new PictureWatermark();
		// picture.setPicture(bufferedImage);
		// picture.isWashout(false);
		// Set the scaling factor for the watermark image
picture.setScaling(250);
// Set the watermark to be applied to the document
document.setWatermark(picture);
|
| New feature | - | shape exposes the "getFill()" method to manipulate the fill of a shape; please use "getFill().setOn(false)" instead of "setFillColor(null)". |
| New feature | SPIREDOC-10005 | Supports adding charts.
// Create a new instance of Document
Document document = new Document();

// Add a section to the document
Section section = document.addSection();

// Add a paragraph to the section and append text to it
section.addParagraph().appendText("Line chart.");

// Add a new paragraph to the section
Paragraph newPara = section.addParagraph();

// Append a line chart shape to the paragraph with specified width and height
ShapeObject shape = newPara.appendChart(ChartType.Line, 500, 300);

// Get the chart object from the shape
Chart chart = shape.getChart();

// Get the title of the chart
ChartTitle title = chart.getTitle();

 // Set the text of the chart title
title.setText("My Chart");

 // Clear any existing series in the chart
ChartSeriesCollection seriesColl = chart.getSeries();
seriesColl.clear();

// Define categories (X-axis values)
String[] categories = { "C1", "C2", "C3", "C4", "C5", "C6" };

// Add two series to the chart with specified categories and Y-axis values
seriesColl.add("AW Series 1", categories, new double[] { 1, 2, 2.5, 4, 5, 6 });
seriesColl.add("AW Series 2", categories, new double[] { 2, 3, 3.5, 6, 6.5, 7 });

 // Save the document to a file in Docx format
document.saveToFile("AppendLineChart.docx", FileFormat.Docx_2016);

// Dispose of the document object when finished using it
document.dispose();
|
| New feature | SPIREDOC-7515 | Provides the page model "Spire.Doc.Pages" to get the content of the page.
// Create a new instance of Document
Document doc = new Document();

// Load the document from the specified file
doc.loadFromFile(inputFile);

// Create a FixedLayoutDocument object using the loaded document
FixedLayoutDocument layoutDoc = new FixedLayoutDocument(doc);

// Create a StringBuilder to store the extracted text
StringBuilder stringBuilder = new StringBuilder();

// Get the first line on the first page and append it to the StringBuilder
FixedLayoutLine line = layoutDoc.getPages().get(0).getColumns().get(0).getLines().get(0);
stringBuilder.append("Line: " + line.getText() + "\r\n");

// Retrieve the original paragraph associated with the line and append its text to the StringBuilder
Paragraph para = line.getParagraph();
stringBuilder.append("Paragraph text: " + para.getText() + "\r\n");

// Retrieve all the text on the first page, including headers and footers, and append it to the StringBuilder
String pageText = layoutDoc.getPages().get(0).getText();
stringBuilder.append(pageText + "\r\n");

// Iterate through each page in the document and print the number of lines on each page
for (Object obj : layoutDoc.getPages()) {
	FixedLayoutPage page = (FixedLayoutPage) obj;
	LayoutCollection<LayoutElement> lines = page.getChildEntities(LayoutElementType.Line, true);
	stringBuilder.append("Page " + page.getPageIndex() + " has " + lines.getCount() + " lines." + "\r\n");
}

// Perform a reverse lookup of layout entities for the first paragraph and append them to the StringBuilder
stringBuilder.append("\r\n");
stringBuilder.append("The lines of the first paragraph:" + "\r\n");

for (Object object : layoutDoc.getLayoutEntitiesOfNode(((Section) doc.getFirstChild()).getBody().getParagraphs().get(0))) {
	FixedLayoutLine paragraphLine = (FixedLayoutLine) object;

	stringBuilder.append(paragraphLine.getText().trim() + "\r\n");
	stringBuilder.append(paragraphLine.getRectangle().toString() + "\r\n");
	stringBuilder.append("");
}

// Write the extracted text to a file
FileWriter fileWriter = new FileWriter(new File(outputFile));
fileWriter.write(stringBuilder.toString());
fileWriter.flush();
fileWriter.close();

// Dispose of the document resources
doc.close();
doc.dispose();
|
| New feature | - | Supports adding SVG graphics.
// Create a new Document object Document document = new Document(); // Add a new Section to the document Section section = document.addSection(); // Add a new Paragraph to the section Paragraph paragraph = section.addParagraph(); // Append the picture (SVG) to the paragraph paragraph.appendPicture(inputSvg); // Save the document to the specified output file document.saveToFile(outputFile, FileFormat.Docx_2013); // Close the document document.dispose(); |
Java: Add or Remove Captions in Word Documents
Captions play multiple important roles in a document. They not only provide explanations for images or tables but also help in organizing the document structure, referencing specific content, and ensuring consistency and standardization. They serve as guides, summaries, and emphasis within the document, enhancing readability and assisting readers in better understanding and utilizing the information presented in the document. This article will demonstrate how to use Spire.Doc for Java to add or remove captions in Word documents within a Java project.
- Add Image Captions to a Word document in Java
- Add Table Captions to a Word document in Java
- Remove Captions from a Word document in Java
Install Spire.Doc for Java
First, you're required to add the Spire.Doc.jar file as a dependency in your Java program. The JAR file can be downloaded from this link. If you use Maven, you can easily import the JAR file in your application by adding the following code to your project's pom.xml file.
<repositories>
    <repository>
        <id>com.e-iceblue</id>
        <name>e-iceblue</name>
        <url>https://repo.e-iceblue.com/nexus/content/groups/public/</url>
    </repository>
</repositories>
<dependencies>
    <dependency>
        <groupId>e-iceblue</groupId>
        <artifactId>spire.doc</artifactId>
        <version>12.4.6</version>
    </dependency>
</dependencies>
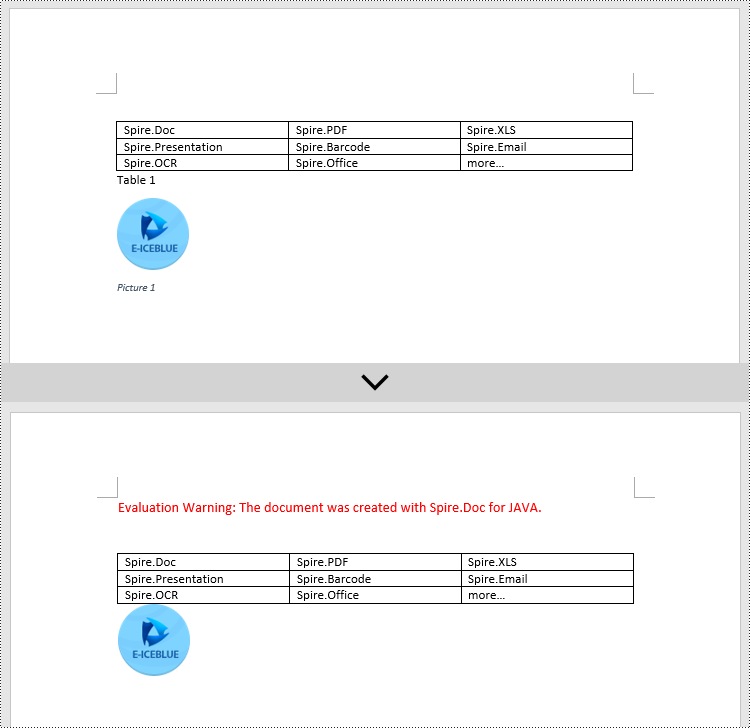
Add Image Captions to a Word document in Java
By using the DocPicture.addCaption(String name, CaptionNumberingFormat format, CaptionPosition captionPosition) method, you can easily add descriptive captions to images within a Word document. The following are the detailed steps:
- Create an object of the Document class.
- Use the Document.addSection() method to add a section.
- Add a paragraph using Section.addParagraph() method.
- Use the Paragraph.appendPicture(String filePath) method to add a DocPicture image object to the paragraph.
- Add a caption using the DocPicture.addCaption(String name, CaptionNumberingFormat format, CaptionPosition captionPosition) method, numbering the captions in CaptionNumberingFormat.Number format.
- Update all fields using the Document.isUpdateFields(true) method.
- Save the resulting document using the Document.saveToFile() method.
- Java
import com.spire.doc.*;
import com.spire.doc.documents.*;
import com.spire.doc.fields.*;
public class addPictureCaption {
    public static void main(String[] args) {

        // Create a Word document object
        Document document = new Document();

        // Add a section to the document
        Section section = document.addSection();

        // Add a new paragraph and insert an image into it
        Paragraph pictureParagraphCaption = section.addParagraph();
        pictureParagraphCaption.getFormat().setAfterSpacing(10);
        DocPicture pic1 = pictureParagraphCaption.appendPicture("Data\\1.png");
        pic1.setHeight(100);
        pic1.setWidth(100);

        // Add a caption to the image
        CaptionNumberingFormat format = CaptionNumberingFormat.Number;
        pic1.addCaption("Image", format, CaptionPosition.Below_Item);

        // Add another paragraph and insert another image into it
        pictureParagraphCaption = section.addParagraph();
        DocPicture pic2 = pictureParagraphCaption.appendPicture("Data\\2.png");
        pic2.setHeight(100);
        pic2.setWidth(100);

        // Add a caption to the second image
        pic2.addCaption("Image", format, CaptionPosition.Below_Item);

        // Update all fields in the document
        document.isUpdateFields(true);

        // Save the document as a docx file
        String result = "AddImageCaption.docx";
        document.saveToFile(result, FileFormat.Docx_2016);

        // Close and dispose the document object to release resources
        document.close();
        document.dispose();
    }
}

Add Table Captions to a Word document in Java
Similar to adding captions to images, to add a caption to a table, you need to call the Table.addCaption(String name, CaptionNumberingFormat format, CaptionPosition captionPosition) method. The detailed steps are as follows:
- Create an object of the Document class.
- Use the Document.addSection() method to add a section.
- Create a Table object and add it to the specified section in the document.
- Use the Table.resetCells(int rowsNum, int columnsNum) method to set the number of rows and columns in the table.
- Add a caption using the Table.addCaption(String name, CaptionNumberingFormat format, CaptionPosition captionPosition) method, numbering the captions in CaptionNumberingFormat.Number format.
- Update all fields using the Document.isUpdateFields(true) method.
- Save the resulting document using the Document.saveToFile() method.
- Java
import com.spire.doc.*;
public class addTableCaption {
    public static void main(String[] args) {

        // Create a Word document object
        Document document = new Document();

        // Add a section to the document
        Section section = document.addSection();

        // Add a table to the section
        Table tableCaption = section.addTable(true);
        tableCaption.resetCells(3, 2);

        // Add a caption to the table
        tableCaption.addCaption("Table", CaptionNumberingFormat.Number, CaptionPosition.Below_Item);

        // Add another table to the section
        tableCaption = section.addTable(true);
        tableCaption.resetCells(2, 3);

        // Add a caption to the second table
        tableCaption.addCaption("Table", CaptionNumberingFormat.Number, CaptionPosition.Below_Item);

        // Update all fields in the document
        document.isUpdateFields(true);

        // Save the document as a docx file
        String result = "AddTableCaption.docx";
        document.saveToFile(result, FileFormat.Docx_2016);

        // Close and dispose the document object to release resources
        document.close();
        document.dispose();
    }
}
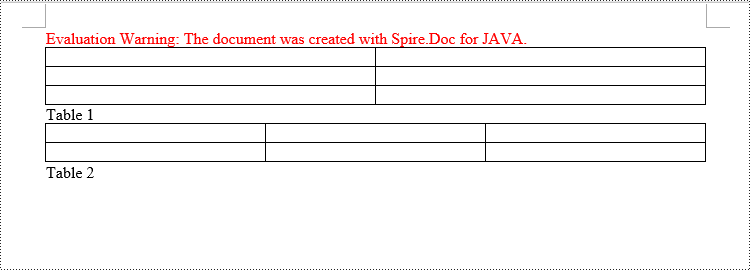
Remove Captions from a Word document in Java
In addition to adding captions, Spire.Doc for Java also supports deleting captions from a Word document. The steps involved are as follows:
- Create an object of the Document class.
- Use the Document.loadFromFile() method to load a Word document.
- Create a custom method named DetectCaptionParagraph(Paragraph paragraph), to determine if the paragraph contains a caption.
- Iterate through all the Paragraph objects in the document using a loop and use the custom method, DetectCaptionParagraph(Paragraph paragraph), to identify the paragraphs that contain captions and delete them.
- Save the resulting document using the Document.saveToFile() method.
- Java
import com.spire.doc.*;
import com.spire.doc.documents.*;
import com.spire.doc.fields.*;

public class deleteCaptions {
    public static void main(String[] args) {

        // Create a Word document object
        Document document = new Document();

        // Load the sample.docx file
        document.loadFromFile("Data/sample.docx");

        Section section;

        // Iterate through all sections
        for (int i = 0; i < document.getSections().getCount(); i++) {
            section = document.getSections().get(i);

        // Iterate through paragraphs in reverse order
            for (int j = section.getBody().getParagraphs().getCount() - 1; j >= 0; j--) {
                // Check if the paragraph is a caption paragraph
                if (DetectCaptionParagraph(section.getBody().getParagraphs().get(j))) {
                    // If it is a caption paragraph, remove it
                    section.getBody().getParagraphs().removeAt(j);
                }
            }
        }

        // Save the document after removing captions
        String result = "RemoveCaptions.docx";
        document.saveToFile(result, FileFormat.Docx_2016);

        // Close and dispose the document object to release resources
        document.close();
        document.dispose();
    }

    // Method to detect if a paragraph is a caption paragraph
    static Boolean DetectCaptionParagraph(Paragraph paragraph) {
        Boolean tag = false;
        Field field;

        // Iterate through child objects of the paragraph
        for (int i = 0; i < paragraph.getChildObjects().getCount(); i++) {
            if (paragraph.getChildObjects().get(i).getDocumentObjectType().equals(DocumentObjectType.Field)) {
                // Check if the child object is of type Field
                field = (Field) paragraph.getChildObjects().get(i);
                if (field.getType().equals(FieldType.Field_Sequence)) {
                    // Check if the Field type is FieldSequence, indicating a caption field
                    return true;
                }
            }
        }

        return tag;
    }
}
Apply for a Temporary License
If you'd like to remove the evaluation message from the generated documents, or to get rid of the function limitations, please request a 30-day trial license for yourself.
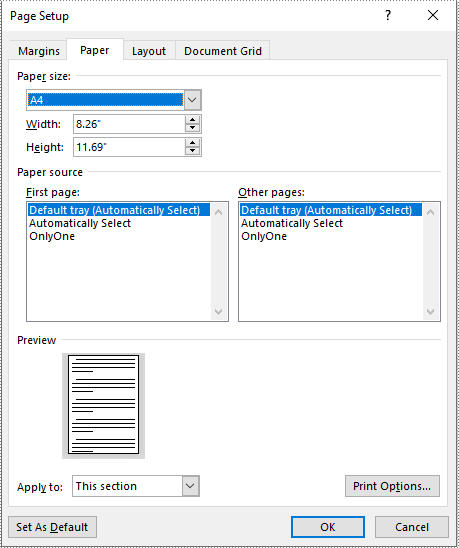
Python: Adjust the Page Size of a Word Document
Page size refers to the dimensions of a document's page. It determines the width and height of the printable area and plays a crucial role in the overall layout and design of the document. Different types of documents may require specific page sizes, such as standard letter size (8.5 x 11 inches) for business letters or A4 size (210 x 297 mm) for international correspondence. Adjusting the page size ensures that your document is compatible with the intended output or presentation medium. In this article, we will demonstrate how to adjust the page size of a Word document in Python using Spire.Doc for Python.
- Adjust the Page Size of a Word Document to a Standard Page Size in Python
- Adjust the Page Size of a Word Document to a Custom Page Size in Python
Install Spire.Doc for Python
This scenario requires Spire.Doc for Python and plum-dispatch v1.7.4. They can be easily installed in your VS Code through the following pip commands.
pip install Spire.Doc
If you are unsure how to install, please refer to this tutorial: How to Install Spire.Doc for Python in VS Code
Adjust the Page Size of a Word Document to a Standard Page Size in Python
With Spire.Doc for Python, you can easily adjust the page sizes of Word documents to a variety of standard page sizes, such as A3, A4, A5, A6, B4, B5, B6, letter, legal, and tabloid. The following steps explain how to change the page size of a Word document to a standard page size using Spire.Doc for Python:
- Create an instance of the Document class.
- Load a Word document using the Document.LoadFromFile() method.
- Iterate through the sections in the document.
- Set the page size of each section to a standard page size, such as A4, by setting the Section.PageSetup.PageSize property to PageSize.A4().
- Save the result document using the Document.SaveToFile() method.
- Python
from spire.doc import *
from spire.doc.common import *

# Create an instance of the Document class
doc = Document()
# Load a Word document
doc.LoadFromFile("Input.docx")

# Iterate through the sections in the document
for i in range(doc.Sections.Count):
    section = doc.Sections.get_Item(i)
    # Change the page size of each section to A4
    section.PageSetup.PageSize = PageSize.A4()

# Save the result document
doc.SaveToFile("StandardSize.docx", FileFormat.Docx2016)
doc.Close()
Adjust the Page Size of a Word Document to a Custom Page Size in Python
If you plan to print your document on paper with dimensions that don't match any standard paper size, you can change the page size of your document to a custom page size that matches the exact dimensions of the paper. The following steps explain how to change the page size of a Word document to a custom page size using Spire.Doc for Python:
- Create an instance of the Document class.
- Load a Word document using the Document.LoadFromFile() method.
- Create an instance of the SizeF class with customized dimensions.
- Iterate through the sections in the document.
- Set the page size of each section to a custom page size by assigning the SizeF instance to the Section.PageSetup.PageSize property.
- Save the result document using the Document.SaveToFile() method.
- Python
from spire.doc import *
from spire.doc.common import *

# Create an instance of the Document class
doc = Document()
# Load a Word document
doc.LoadFromFile("Input.docx")

# Create an instance of the SizeF class with customized dimensions
customSize = SizeF(600.0, 800.0)

# Iterate through the sections in the document
for i in range(doc.Sections.Count):
    section = doc.Sections.get_Item(i)
    # Change the page size of each section to the specified dimensions
    section.PageSetup.PageSize = customSize

# Save the result document
doc.SaveToFile("CustomSize.docx", FileFormat.Docx2016)
doc.Close()
Apply for a Temporary License
If you'd like to remove the evaluation message from the generated documents, or to get rid of the function limitations, please request a 30-day trial license for yourself.
C#: Add or Remove Captions in Word Documents
Captions are important elements in a Word document that enhance readability and organizational structure. They provide explanations and supplementary information for images, tables, and other content, improving the clarity and comprehensibility of the document. Captions are also used to emphasize key points and essential information, facilitating referencing and indexing of specific content. By using captions effectively, readers can better understand and interpret data and images within the document while quickly locating the desired information. This article will demonstrate how to use Spire.Doc for .NET to add or remove captions in a Word document within a C# project.
- Add Image Captions to a Word document in C#
- Add Table Captions to a Word document in C#
- Remove Captions from a Word document in C#
Install Spire.Doc for .NET
To begin with, you need to add the DLL files included in the Spire.Doc for .NET package as references in your .NET project. The DLL files can be either downloaded from this link or installed via NuGet.
PM> Install-Package Spire.Doc
Add Image Captions to a Word document in C#
To add captions to images in a Word document, you can achieve it by creating a paragraph, adding an image, and calling the method DocPicture.AddCaption(string name, CaptionNumberingFormat format, CaptionPosition captionPosition) to generate the caption with a specified name, numbering format, and caption position. The following are the detailed steps:
- Create an object of the Document class.
- Use the Document.AddSection() method to add a section.
- Add a paragraph using Section.AddParagraph() method.
- Use the Paragraph.AppendPicture(Image image) method to add a DocPicture image object to the paragraph.
- Use the DocPicture.AddCaption(string name, CaptionNumberingFormat format, CaptionPosition captionPosition) method to add a caption with numbering format as CaptionNumberingFormat.Number.
- Set the Document.IsUpdateFields property to true to update all fields.
- Use the Document.SaveToFile() method to save the resulting document.
- C#
using Spire.Doc;
using Spire.Doc.Documents;
using Spire.Doc.Fields;
using System.Drawing;
namespace AddPictureCaption
{
    internal class Program
    {
        static void Main(string[] args)
        {
            // Create a Word document object
            Document document = new Document();

            // Add a section
            Section section = document.AddSection();

            // Add a new paragraph and insert an image
            Paragraph pictureParagraphCaption = section.AddParagraph();
            pictureParagraphCaption.Format.AfterSpacing = 10;
            DocPicture pic1 = pictureParagraphCaption.AppendPicture(Image.FromFile("Data\\1.png"));
            pic1.Height = 100;
            pic1.Width = 100;

            // Add a caption to the image
            CaptionNumberingFormat format = CaptionNumberingFormat.Number;
            pic1.AddCaption("Image", format, CaptionPosition.BelowItem);

            // Add another paragraph and insert another image
            pictureParagraphCaption = section.AddParagraph();
            DocPicture pic2 = pictureParagraphCaption.AppendPicture(Image.FromFile("Data\\2.png"));
            pic2.Height = 100;
            pic2.Width = 100;

            // Add a caption to the second image
            pic2.AddCaption("Image", format, CaptionPosition.BelowItem);

            // Update all fields in the document
            document.IsUpdateFields = true;

            // Save to a docx document
            string result = "AddImageCaption.docx";
            document.SaveToFile(result, Spire.Doc.FileFormat.Docx2016);

            // Close and dispose of the document object to release resources
            document.Close();
            document.Dispose();
        }
    }
}
Add Table Captions to a Word document in C#
To add captions to a table in a Word document, you can achieve this by creating the table and using the Table.AddCaption(string name, CaptionNumberingFormat format, CaptionPosition captionPosition) method to generate a numbered caption. The steps involved are as follows:
- Create an object of the Document class.
- Use the Document.AddSection() method to add a section.
- Create a Table object and add it to the specified section in the document.
- Use the Table.ResetCells(int rowsNum, int columnsNum) method to set the number of rows and columns in the table.
- Add a caption to the table using the Table.AddCaption(string name, CaptionNumberingFormat format, CaptionPosition captionPosition) method, specifying the caption numbering format as CaptionNumberingFormat.Number.
- Set the Document.IsUpdateFields property to true to update all fields.
- Use the Document.SaveToFile() method to save the resulting document.
- C#
using Spire.Doc;
namespace AddTableCation
{
    internal class Program
    {
        static void Main(string[] args)
        {
            // Create a Word document object
            Document document = new Document();

            // Add a section
            Section section = document.AddSection();

            // Add a table
            Table tableCaption = section.AddTable(true);
            tableCaption.ResetCells(3, 2);

            // Add a caption to the table
            tableCaption.AddCaption("Table", CaptionNumberingFormat.Number, CaptionPosition.BelowItem);

            // Add another table and caption
            tableCaption = section.AddTable(true);
            tableCaption.ResetCells(2, 3);
            tableCaption.AddCaption("Table", CaptionNumberingFormat.Number, CaptionPosition.BelowItem);

            // Update all fields in the document
            document.IsUpdateFields = true;

            // Save to a docx document
            string result = "AddTableCaption.docx";
            document.SaveToFile(result, Spire.Doc.FileFormat.Docx2016);

            // Close and dispose of the document object to release resources
            document.Close();
            document.Dispose();
        }
    }
}
Remove Captions from a Word document in C#
Spire.Doc for .NET can also facilitate the removal of captions from an existing Word document. Here are the detailed steps:
- Create an object of the Document class.
- Use the Document.LoadFromFile() method to load a Word document.
- Create a custom method, named DetectCaptionParagraph(Paragraph paragraph), to determine if a paragraph contains a caption.
- Iterate through all the Paragraph objects in the document using a loop and utilize the custom method, DetectCaptionParagraph(Paragraph paragraph), to identify and delete paragraphs that contain captions.
- Use the Document.SaveToFile() method to save the resulting document.
- C#
using Spire.Doc;
using Spire.Doc.Documents;
using Spire.Doc.Fields;
namespace DeleteCaptions
{
    internal class Program
    {
        static void Main(string[] args)
        {
            // Create a Word document object
            Document document = new Document();

            // Load the example.docx file
            document.LoadFromFile("Data/Sample.docx");
            Section section;

            // Iterate through all sections
            for (int i = 0; i < document.Sections.Count; i++)
            {
                section = document.Sections[i];

                // Iterate through paragraphs in reverse order
                for (int j = section.Body.Paragraphs.Count - 1; j >= 0; j--)
                {
                    // Check if the paragraph is a caption paragraph
                    if (DetectCaptionParagraph(section.Body.Paragraphs[j]))
                    {
                        // If it's a caption paragraph, remove it
                        section.Body.Paragraphs.RemoveAt(j);
                    }
                }
            }

            // Save the document after removing captions
            string result = "RemoveCaptions.docx";
            document.SaveToFile(result, Spire.Doc.FileFormat.Docx2016);

            // Close and dispose of the document object to release resources
            document.Close();
            document.Dispose();
        }
        // Method to detect if a paragraph is a caption paragraph
        static bool DetectCaptionParagraph(Paragraph paragraph)
        {
            bool tag = false;
            Field field;

            // Iterate through the child objects in the paragraph
            for (int i = 0; i < paragraph.ChildObjects.Count; i++)
            {
                if (paragraph.ChildObjects[i].DocumentObjectType == DocumentObjectType.Field)
                {
                    // Check if the child object is of Field type
                    field = (Field)paragraph.ChildObjects[i];
                    if (field.Type == FieldType.FieldSequence)
                    {
                        // Check if the Field type is FieldSequence, indicating a caption field type
                        return true;
                    }
                }
            }
            return tag;
        }
    }
}
Apply for a Temporary License
If you'd like to remove the evaluation message from the generated documents, or to get rid of the function limitations, please request a 30-day trial license for yourself.
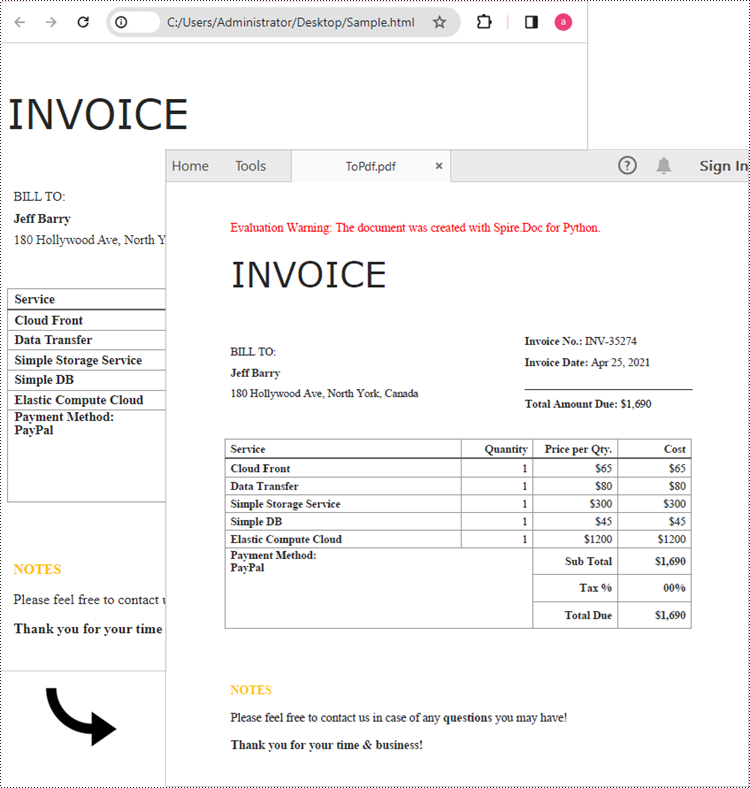
Python: Convert HTML to PDF
HTML is the standard markup language for creating web pages, while PDF is a widely accepted format for sharing and preserving documents with consistent formatting across different platforms. By converting HTML to PDF, you can create printable documents, share web content offline, or generate reports with ease. In this article, you will learn how to convert a HTML file or a HTML string to PDF in Python using Spire.Doc for Python.
Install Spire.Doc for Python
This scenario requires Spire.Doc for Python and plum-dispatch v1.7.4. They can be easily installed in your VS Code through the following pip command.
pip install Spire.Doc
If you are unsure how to install, please refer to this tutorial: How to Install Spire.Doc for Python in VS Code
Convert an HTML File to PDF in Python
The Document.LoadFromFile method supports loading not only Doc or Docx files, but also HTML files. You can load an HTML file using this method and save it as a PDF file using the Document.SaveToFile() method. The following are the steps to convert an HTML file to PDF in Python.
- Create a Document object.
- Load an HTML file using Document.LoadFromFile() method.
- Convert it to PDF using Document.SaveToFile() method.
- Python
from spire.doc import *
from spire.doc.common import *

# Create a Document object
document = Document()

# Load an HTML file
document.LoadFromFile("C:\\Users\\Administrator\\Desktop\\Sample.html", FileFormat.Html, XHTMLValidationType.none)

# Save the HTML file to a pdf file
document.SaveToFile("output/ToPdf.pdf", FileFormat.PDF)
document.Close()
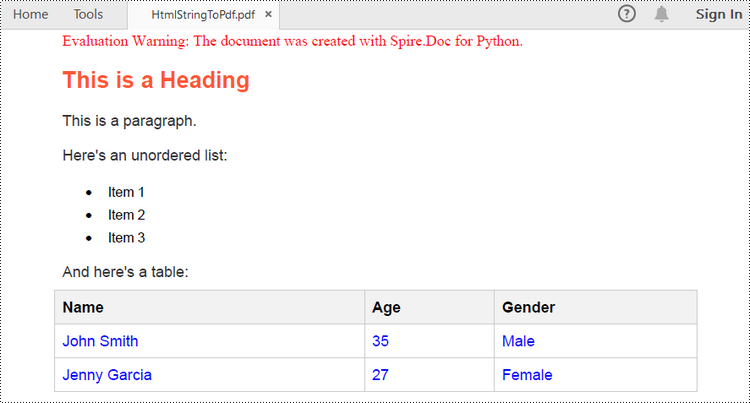
Convert an HTML String to PDF in Python
To render uncomplicated HTML strings (usually text and its formatting) on Word pages, you can use the Paragraph.AppendHTML() method. The Word document can be then saved as a PDF file using the Document.SaveToFile() method. The following are the steps to convert an HTML string to PDF in Python.
- Create a Document object.
- Add a section using Document.AddSection() method.
- Add a paragraph using Section.AddParagraph() method.
- Specify the HTML string.
- Add the HTML string to the paragraph using Paragraph.AppendHTML() method.
- Save the document as a PDF file using Document.SaveToFile() method.
- Python
from spire.doc import *
from spire.doc.common import *

# Create a Document object
document = Document()

# Add a section to the document
sec = document.AddSection()

# Add a paragraph to the section
paragraph = sec.AddParagraph()

# Specify the HTML string
htmlString = """
<html>
<head>
    <title>HTML to Word Example</title>
    <style>
        body {
            font-family: Arial, sans-serif;
        }
        h1 {
            color: #FF5733;
            font-size: 24px;
            margin-bottom: 20px;
        }
        p {
            color: #333333;
            font-size: 16px;
            margin-bottom: 10px;
        }
        ul {
            list-style-type: disc;
            margin-left: 20px;
            margin-bottom: 15px;
        }
        li {
            font-size: 14px;
            margin-bottom: 5px;
        }
        table {
            border-collapse: collapse;
            width: 100%;
            margin-bottom: 20px;
        }
        th, td {
            border: 1px solid #CCCCCC;
            padding: 8px;
            text-align: left;
        }
        th {
            background-color: #F2F2F2;
            font-weight: bold;
        }
        td {
            color: #0000FF;
        }
    </style>
</head>
<body>
    <h1>This is a Heading</h1>
    <p>This is a paragraph.</p>
    <p>Here's an unordered list:</p>
    <ul>
        <li>Item 1</li>
        <li>Item 2</li>
        <li>Item 3</li>
    </ul>
    <p>And here's a table:</p>
    <table>
        <tr>
            <th>Name</th>
            <th>Age</th>
            <th>Gender</th>
        </tr>
        <tr>
            <td>John Smith</td>
            <td>35</td>
            <td>Male</td>
        </tr>
        <tr>
            <td>Jenny Garcia</td>
            <td>27</td>
            <td>Female</td>
        </tr>
    </table>
</body>
</html>
"""

# Append the HTML string to the paragraph
paragraph.AppendHTML(htmlString)

# Save the document as a pdf file
document.SaveToFile("output/HtmlStringToPdf.pdf", FileFormat.PDF)
document.Close()
Apply for a Temporary License
If you'd like to remove the evaluation message from the generated documents, or to get rid of the function limitations, please request a 30-day trial license for yourself.
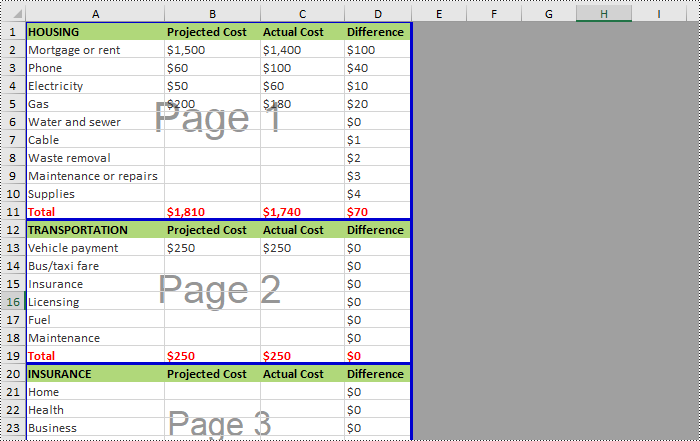
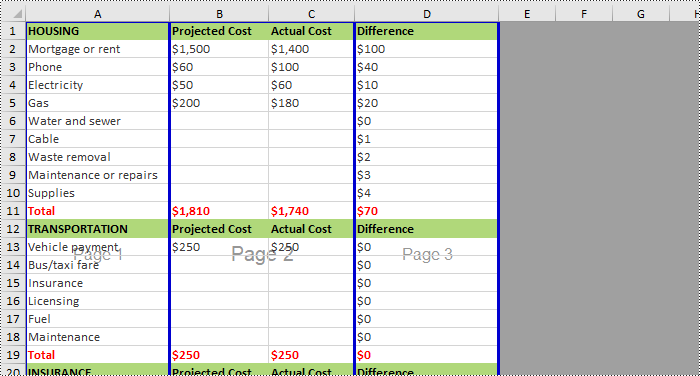
Python: Insert or Remove Page Breaks in Excel
A page break is a markup that divides the content of a document or spreadsheet into multiple pages for printing or display. This feature can be used to adjust the page layout of a document to ensure that each page contains the appropriate information. By placing page breaks appropriately, you can also ensure that your document is presented in a better format and layout when printed. This article will explain how to insert or remove horizontal/vertical page breaks in Excel on the Python platform by using Spire.XLS for Python.
- Insert Horizontal Page Breaks in Excel Using Python
- Insert Vertical Page Breaks in Excel Using Python
- Remove Horizontal Page Breaks from Excel Using Python
- Remove Vertical Page Breaks from Excel Using Python
Install Spire.XLS for Python
This scenario requires Spire.XLS for Python and plum-dispatch v1.7.4. They can be easily installed in your VS Code through the following pip commands.
pip install Spire.XLS
If you are unsure how to install, please refer to this tutorial: How to Install Spire.XLS for Python in VS Code
Insert Horizontal Page Breaks in Excel Using Python
Spire.XLS for Python supports inserting horizontal page breaks to specified cell ranges by calling Worksheet.HPageBreaks.Add(CellRange) method. The following are detailed steps.
- Create a Workbook instance.
- Load an Excel file from disk using Workbook.LoadFromFile() method.
- Get a specified worksheet using Workbook.Worksheets[] property.
- Insert horizontal page breaks to specified cell ranges using Worksheet.HPageBreaks.Add(CellRange) method.
- Set view mode to Preview mode by Worksheet.ViewMode property.
- Save the result file using Workbook.SaveToFile() method.
- Python
from spire.xls import *
from spire.xls.common import *

inputFile = "C:/Users/Administrator/Desktop/Sample.xlsx"
outputFile = "C:/Users/Administrator/Desktop/InsertHPageBreak.xlsx"

#Create a Workbook instance
workbook = Workbook()

#Load an Excel file from disk
workbook.LoadFromFile(inputFile)

#Get the first worksheet of this file
sheet = workbook.Worksheets[0]

#Insert horizontal page breaks to specified cell ranges
sheet.HPageBreaks.Add(sheet.Range["A12"])
sheet.HPageBreaks.Add(sheet.Range["A20"])

#Set view mode to Preview mode
sheet.ViewMode = ViewMode.Preview

#Save the result file
workbook.SaveToFile(outputFile, ExcelVersion.Version2013)
workbook.Dispose()
Insert Vertical Page Breaks in Excel Using Python
Spire.XLS for Python also supports inserting vertical page breaks to specified cell ranges by calling Worksheet.VPageBreaks.Add(CellRange) method. The following are detailed steps.
- Create a Workbook instance.
- Load an Excel file from disk using Workbook.LoadFromFile() method.
- Get a specified worksheet using Workbook.Worksheets[] property.
- Insert vertical page breaks to specified cell ranges using Worksheet.VPageBreaks.Add(CellRange) method.
- Set view mode to Preview mode using Worksheet.ViewMode property.
- Save the result file using Workbook.SaveToFile() method.
- Python
from spire.xls import *
from spire.xls.common import *

inputFile = "C:/Users/Administrator/Desktop/Sample.xlsx"
outputFile = "C:/Users/Administrator/Desktop/InsertVPageBreak.xlsx"

#Create a Workbook instance
workbook = Workbook()

#Load an Excel file from disk
workbook.LoadFromFile(inputFile)

#Get the first worksheet of this file
sheet = workbook.Worksheets[0]

#Insert vertical page breaks to specified cell ranges
sheet.VPageBreaks.Add(sheet.Range["B1"])
sheet.VPageBreaks.Add(sheet.Range["D3"])

#Set view mode to Preview mode
sheet.ViewMode = ViewMode.Preview

#Save the result file
workbook.SaveToFile(outputFile, ExcelVersion.Version2013)
workbook.Dispose()
Remove Horizontal Page Breaks from Excel Using Python
If you want to remove horizontal page breaks from Excel, call the Worksheet.HPageBreaks.RemoveAt() or Worksheet.HPageBreaks.Clear() methods. The following are detailed steps.
- Create a Workbook instance.
- Load an Excel file from disk using Workbook.LoadFromFile() method.
- Get a specified worksheet using Workbook.Worksheets[] property.
- Remove all the horizontal page breaks by calling Worksheet.HPageBreaks.Clear() method or remove a specific horizontal page break by calling Worksheet.HPageBreaks.RemoveAt() method.
- Set view mode to Preview mode using Worksheet.ViewMode property.
- Save the result file using Workbook.SaveToFile() method.
- Python
from spire.xls import *
from spire.xls.common import *

inputFile = "C:/Users/Administrator/Desktop/InsertHPageBreak.xlsx"
outputFile = "C:/Users/Administrator/Desktop/RemoveHPageBreak.xlsx"

#Create a Workbook instance
workbook = Workbook()

#Load an Excel file from disk
workbook.LoadFromFile(inputFile)

#Get the first worksheet from this file
sheet = workbook.Worksheets[0]

#Clear all the horizontal page breaks
#sheet.HPageBreaks.Clear()

#Remove the first horizontal page break
sheet.HPageBreaks.RemoveAt(0)

#Set view mode to Preview mode
sheet.ViewMode = ViewMode.Preview

#Save the result file
workbook.SaveToFile(outputFile, ExcelVersion.Version2013)
workbook.Dispose()

Remove Vertical Page Breaks from Excel Using Python
If you want to remove vertical page breaks from Excel, call the Worksheet.VPageBreaks.RemoveAt() or Worksheet.VPageBreaks.Clear() methods. The following are detailed steps.
- Create a Workbook instance.
- Load an Excel file from disk using Workbook.LoadFromFile() method.
- Get a specified worksheet using Workbook.Worksheets[] property.
- Remove all the vertical page breaks by calling Worksheet.VPageBreaks.Clear() method or remove a specific vertical page break by calling Worksheet.VPageBreaks.RemoveAt() method.
- Set view mode to Preview mode using Worksheet.ViewMode property.
- Save the result file using Workbook.SaveToFile() method.
- Python
from spire.xls import *
from spire.xls.common import *

inputFile = "C:/Users/Administrator/Desktop/InsertVPageBreak.xlsx"
outputFile = "C:/Users/Administrator/Desktop/RemoveVPageBreak.xlsx"

#Create a Workbook instance
workbook = Workbook()

#Load an Excel file from disk
workbook.LoadFromFile(inputFile)

#Get the first worksheet from this file
sheet = workbook.Worksheets[0]

#Clear all the vertical page breaks
#sheet.VPageBreaks.Clear()

#Remove the first vertical page break
sheet.VPageBreaks.RemoveAt(0)

#Set view mode to Preview mode
sheet.ViewMode = ViewMode.Preview

#Save the result file
workbook.SaveToFile(outputFile, ExcelVersion.Version2013)
workbook.Dispose()
Apply for a Temporary License
If you'd like to remove the evaluation message from the generated documents, or to get rid of the function limitations, please request a 30-day trial license for yourself.
Python: Convert Word to EPUB
EPUB, short for Electronic Publication, is a widely used standard format for eBooks. It is an open and free format based on web standards, enabling compatibility with various devices and software applications. EPUB files are designed to provide a consistent reading experience across different platforms, including e-readers, tablets, smartphones, and computers. By converting your Word document to EPUB, you can ensure that your content is accessible and enjoyable to a broader audience, regardless of the devices and software they use. In this article, we will demonstrate how to convert Word documents to EPUB format in Python using Spire.Doc for Python.
Install Spire.Doc for Python
This scenario requires Spire.Doc for Python and plum-dispatch v1.7.4. They can be easily installed in your VS Code through the following pip commands.
pip install Spire.Doc
If you are unsure how to install, please refer to this tutorial: How to Install Spire.Doc for Python in VS Code
Convert Word to EPUB in Python
The Document.SaveToFile(fileName:str, fileFormat:FileFormat) method provided by Spire.Doc for Python supports converting a Word document to EPUB format. The detailed steps are as follows.
- Create an object of the Document class.
- Load a Word document using Document.LoadFromFile() method.
- Save the Word document to EPUB format using Document.SaveToFile(fileName:str, fileFormat:FileFormat) method.
- Python
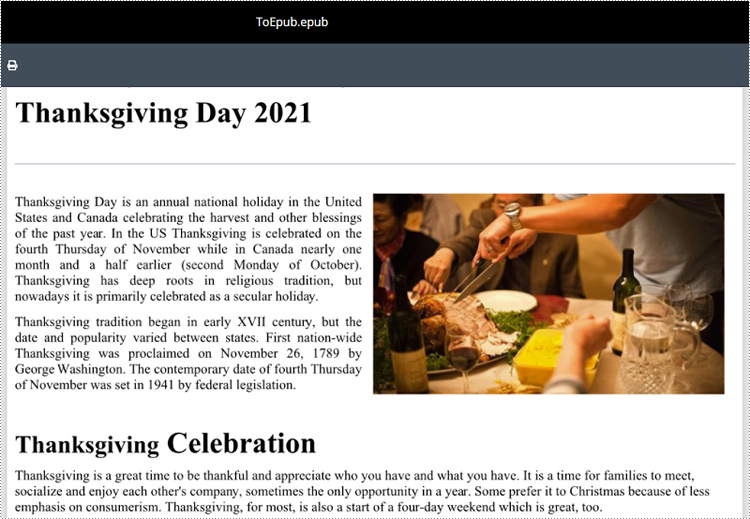
from spire.doc import *
from spire.doc.common import *

# Specify the input Word document and output EPUB file paths
inputFile = "Sample.docx"
outputFile = "ToEpub.epub"

# Create an object of the Document class
doc = Document()
# Load a Word document
doc.LoadFromFile(inputFile)

# Save the Word document to EPUB format
doc.SaveToFile(outputFile, FileFormat.EPub)
# Close the Document object
doc.Close()
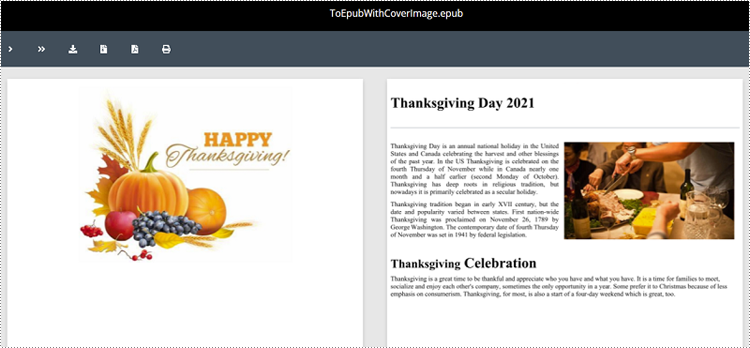
Convert Word to EPUB with a Cover Image in Python
Spire.Doc for Python enables you to convert a Word document to EPUB format and set a cover image for the resulting EPUB file by using the Document.SaveToEpub(fileName:str, coverImage:DocPicture) method. The detailed steps are as follows.
- Create an object of the Document class.
- Load a Word document using Document.LoadFromFile() method.
- Create an object of the DocPicture class, and then load an image using DocPicture.LoadImage() method.
- Save the Word document as an EPUB file and set the loaded image as the cover image of the EPUB file using Document.SaveToEpub(fileName:str, coverImage:DocPicture) method.
- Python
from spire.doc import *
from spire.doc.common import *

# Specify the input Word document and output EPUB file paths
inputFile = "Sample.docx"
outputFile = "ToEpubWithCoverImage.epub"
# Specify the file path for the cover image
imgFile = "Cover.png"

# Create a Document object
doc = Document()
# Load the Word document
doc.LoadFromFile(inputFile)

# Create a DocPicture object
picture = DocPicture(doc)
# Load the cover image file
picture.LoadImage(imgFile)

# Save the Word document as an EPUB file and set the cover image
doc.SaveToEpub(outputFile, picture)
# Close the Document object
doc.Close()
Apply for a Temporary License
If you'd like to remove the evaluation message from the generated documents, or to get rid of the function limitations, please request a 30-day trial license for yourself.
Spire.Presentation for Java 8.12.1 supports loading encrypted stream files
We are excited to announce the release of Spire.Presentation for Java 8.12.1. This version improves the speed of converting PowerPoint to SVG. Moreover, it supports loading encrypted stream files, creating irregular polygons using coordinates, and drawing lines using two points. More details are listed below.
Here is a list of changes made in this release
| Category | ID | Description |
| New feature | SPIREPPT-2395 | Improves the speed of converting PowerPoint to SVG. |
| New feature | SPIREPPT-2400 | Adds a method to load encrypted stream files.
presentation.loadFromStream(inputStream, FileFormat.AUTO,"password"); |
| New feature | SPIREPPT-2405 | Supports creating irregular polygons using coordinates.
Presentation ppt = new Presentation();
ISlide slide = ppt.getSlides().get(0);
List<Point2D> points = new ArrayList<>();
points.add(new Point2D.Float(50f, 50f));
points.add(new Point2D.Float(50f, 150f));
points.add(new Point2D.Float(60f, 200f));
points.add(new Point2D.Float(200f, 200f));
points.add(new Point2D.Float(220f, 150f));
points.add(new Point2D.Float(150f, 90f));
points.add(new Point2D.Float(50f, 50f));
IAutoShape autoShape = slide.getShapes().appendFreeformShape(points);
autoShape.getFill().setFillType(FillFormatType.NONE);
ppt.saveToFile("out.pptx", FileFormat.PPTX_2013);
ppt.dispose();
|
| New feature | SPIREPPT-2406 | Supports drawing lines using two points.
Presentation ppt = new Presentation(); ppt.getSlides().get(0).getShapes().appendShape(ShapeType.LINE, new Point2D.Float(50, 70), new Point2D.Float(150, 120)); ppt.saveToFile( "result.pptx ,FileFormat.PPIX_2013), ppt.dispose(). |