How to Open and View Excel in Windows Form using Spire.Speadsheet
Spire.Spreadsheet is a .NET Excel viewer control that allows programmers to load Excel spreadsheet in Windows form, manipulate the data in it and save to file. This guide will introduce how to add Spire.Spreadsheet controls to Toolbox and how to create a Windows Form Application to display Excel spreadsheet.
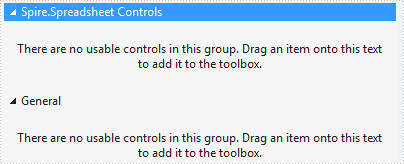
Add Spire.Spreadsheet Controls to Toolbox
Right-click on the white space of the Toolbox – "Add Tab" - name the new Tab "Spire.Spreadsheet Controls":
Right-click on the blank part below "Spire.Spreadsheet Controls" - "Choose Items" - ".NET Framework Components" - "Browse" to the "Bin" folder - find the file "Spire.Spreadsheet.dll" - "Open".
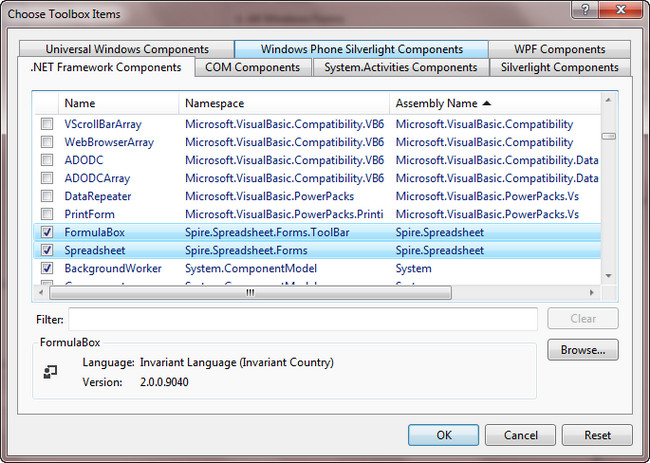
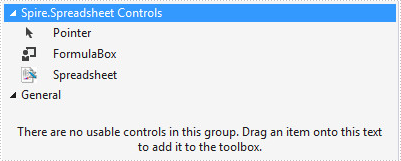
Click "OK". Then you have added controls to Toolbox successfully.
Create a Windows Form Application to Display Spreadsheet
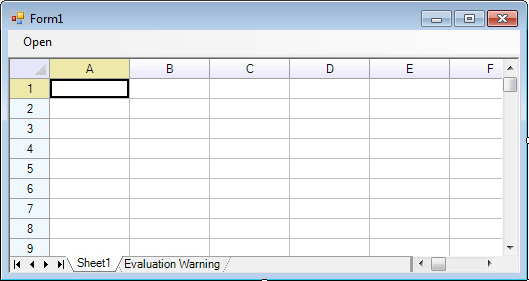
Create a Windows Form Application, drag Spreadsheet control to form1 and add an openToolStrip in menuStrip to open an Excel file.
Double click openToolStrip to write code. The spreadsheet1 that represents Spreadsheet control can easily load an Excel file by LoadFromFile() method.
private void openToolStripMenuItem_Click(object sender, EventArgs e)
{
    OpenFileDialog ofDialog = new OpenFileDialog();
    ofDialog.Filter = "All files|*.*|Microsoft Excel Files(*.xls;*.xlsx;*.ods;*.xlsb)|*.xls;*.xlsx;*.xlsb;*.ods";
    if (ofDialog.ShowDialog() == DialogResult.OK)
        spreadsheet1.LoadFromFile(ofDialog.FileName);
}
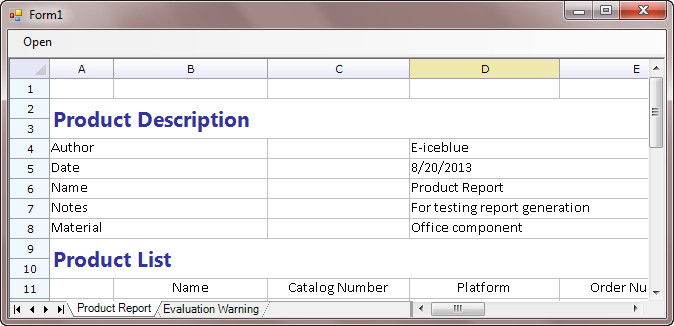
Run the program and open an existing Excel file, you’ll get following output:
How to rotate a certain page within PDF document in WPF
It seems very easy to rotate the PDF page. However, we often find that the rotation is applied to the whole PDF document when we try to rotate a particular page. Is there an easy and fast way to rotate a certain PDF page within the DPF document?
In the following sections, I will demonstrate how to rotate a certain PDF page within PDF document in WPF with several lines of codes.
The code snippets are as followed:
Step 1: Initialize a new instance of PdfDocument class and load the PDF document from the file.
PdfDocument doc = new PdfDocument();
doc.LoadFromFile("LeavesOfGrass.pdf");
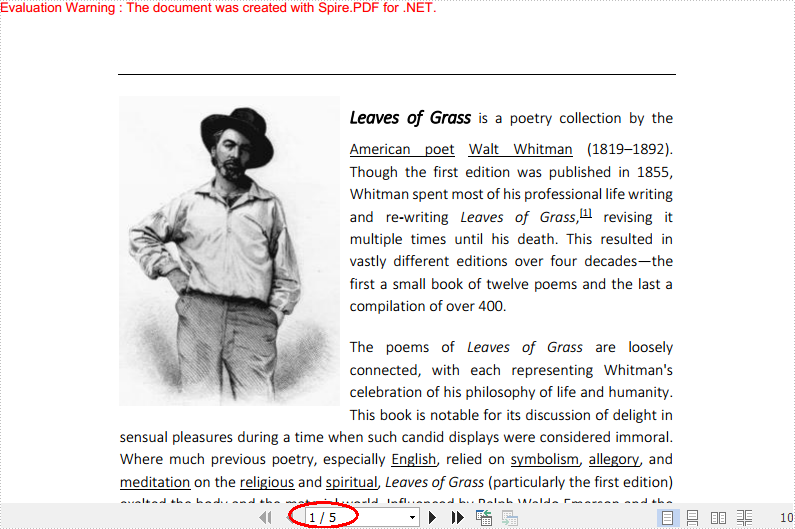
Step 2: For rotation, Spire.PDF enables you to define 0, 90, 180 and 270 degrees. In this example, my PDF file has five pages. I want to rotate the fifth page by 270 degrees and make other pages remain the same.
PdfPageBase page = doc.Pages[4];
page.Rotation = PdfPageRotateAngle.RotateAngle270;
Step 3: Save the PDF document and launch the file.
doc.SaveToFile("RotatedLeavesOfGrass.pdf");
System.Diagnostics.Process.Start("RotatedLeavesOfGrass.pdf");
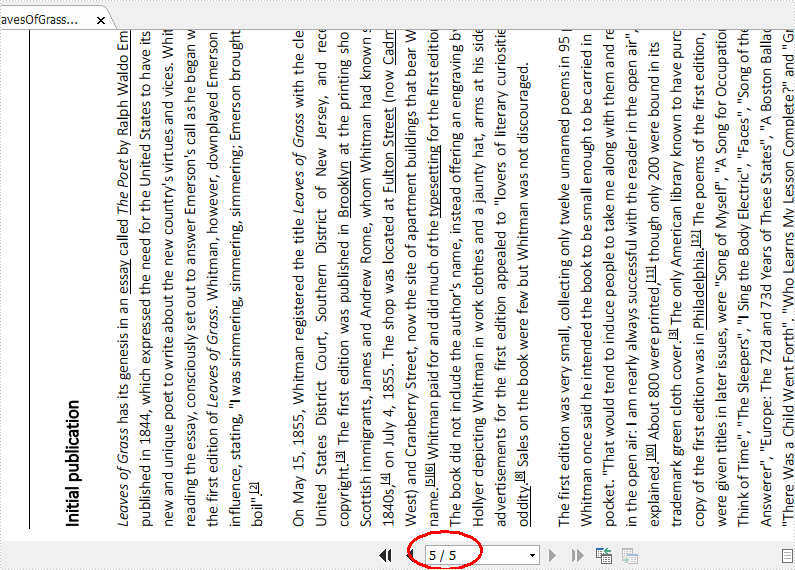
Effective screenshot:
Full Codes:
using System.Windows;
using Spire.Pdf;

namespace Rotate_PDF_page
{
    ///
    /// Interaction logic for MainWindow.xaml
    ///
    public partial class MainWindow : Window
    {
        public MainWindow()
        {
            InitializeComponent();
        }

        private void button1_Click(object sender, RoutedEventArgs e)
        {
            PdfDocument doc = new PdfDocument();
            doc.LoadFromFile("LeavesOfGrass.pdf");
            PdfPageBase page = doc.Pages[4];
            page.Rotation = PdfPageRotateAngle.RotateAngle270;
            doc.SaveToFile("RotatedLeavesOfGrass.pdf");
            System.Diagnostics.Process.Start("RotatedLeavesOfGrass.pdf");
        }
    }
}
Imports System.Windows
Imports Spire.Pdf

Namespace Rotate_PDF_page
	'''
	''' Interaction logic for MainWindow.xaml
	'''
	Public Partial Class MainWindow
		Inherits Window
		Public Sub New()
			InitializeComponent()
		End Sub

		Private Sub button1_Click(sender As Object, e As RoutedEventArgs)
			Dim doc As New PdfDocument()
			doc.LoadFromFile("LeavesOfGrass.pdf")
			Dim page As PdfPageBase = doc.Pages(4)
			page.Rotation = PdfPageRotateAngle.RotateAngle270
			doc.SaveToFile("RotatedLeavesOfGrass.pdf")
			System.Diagnostics.Process.Start("RotatedLeavesOfGrass.pdf")
		End Sub
	End Class
End Namespace
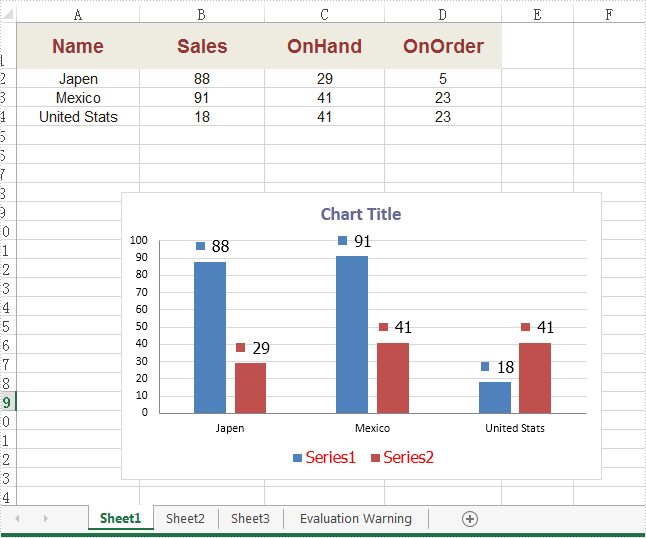
How to set the font for legend and datalable in Excel Chart
With the help of Spire.XLS, developers can easily set the font for the text for Excel chart. We have already demonstrate how to set the font for TextBox in Excel Chart, this article will focus on demonstrating how to set the font for legend and datalable in Excel chart by using the SetFont() method to change the font for the legend and datalable easily in C#.
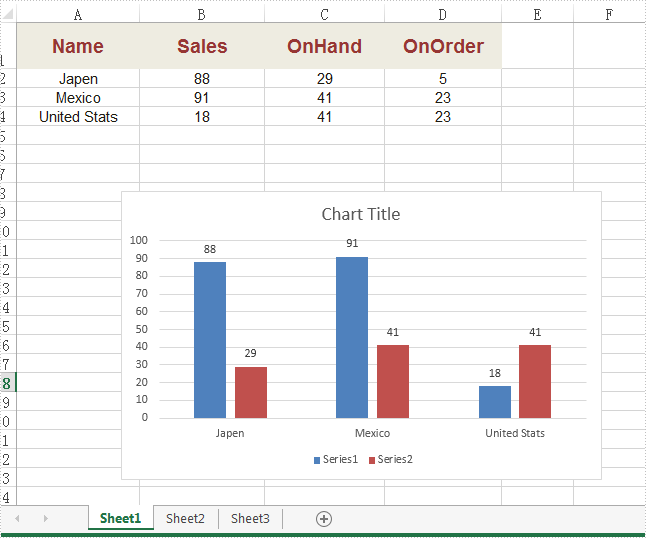
Firstly, please view the Excel worksheet with chart which the font will be changed later:
Note: Before Start, please download the latest version of Spire.XLS and add Spire.Xls.dll in the bin folder as the reference of Visual Studio.
Step 1: Create a new Excel workbook and load from file.
Workbook workbook = new Workbook();
workbook.LoadFromFile("Sample.xlsx");
Step 2: Get the first worksheet from workbook.
Worksheet ws = workbook.Worksheets[0];
Spire.Xls.Chart chart = ws.Charts[0];
Step 3: Create a font with specified size and color.
ExcelFont font = workbook.CreateFont();
font.Size =12.0;
font.Color = Color.Red;
Step 4: Apply the font to chart Legend.
chart.Legend.TextArea.SetFont(font);
Step 5: Apply the font to chart DataLabel.
foreach (ChartSerie cs in chart.Series)
   {
     cs.DataPoints.DefaultDataPoint.DataLabels.TextArea.SetFont(font);
   }
Step 6: Save the document to file.
workbook.SaveToFile("result.xlsx", ExcelVersion.Version2010);
Effective screenshot after changing the text font.
Full codes:
using Spire.Xls;
using Spire.Xls.Charts;
using System.Drawing;
namespace SetFont
{

    class Program
    {

        static void Main(string[] args)
        {
            {
                Workbook workbook = new Workbook();
                workbook.LoadFromFile("Sample.xlsx");

                Worksheet ws = workbook.Worksheets[0];
                Spire.Xls.Chart chart = ws.Charts[0];

                ExcelFont font = workbook.CreateFont();
                font.Size = 12.0;
                font.Color = Color.Red;

                chart.Legend.TextArea.SetFont(font);

                foreach (ChartSerie cs in chart.Series)
                {
                    cs.DataPoints.DefaultDataPoint.DataLabels.TextArea.SetFont(font);
                }

                workbook.SaveToFile("result.xlsx", ExcelVersion.Version2010);


            }
        }
    }
}
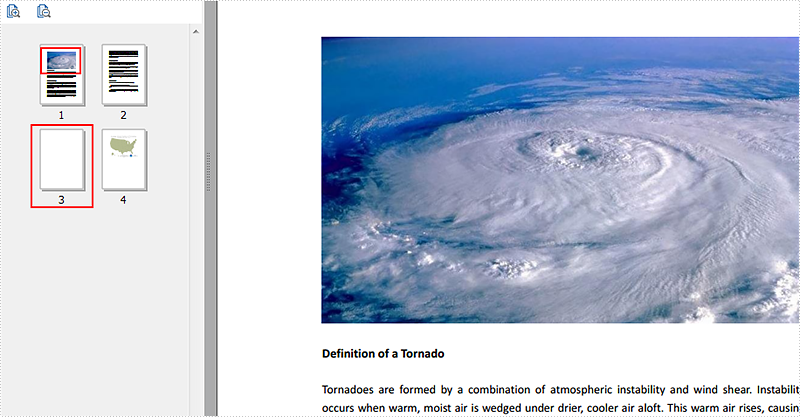
How to remove blank page from PDF file in WPF
Everyone knows how to open and save a PDF file. Sometimes you run into the situation that your PDF file has one or more blank pages. You want to get rid of the blank page to make you PDF file look more neat. Many people don't know how to do this.
In the following sections, I will demonstrate how to remove blank page from PDF file in WPF very easily and effortlessly.
Here is the original PDF document:
The code snippets are as followed:
Step 1: Initialize a new instance of PdfDocument class and load the PDF document from the file.
PdfDocument document = new PdfDocument();
document.LoadFromFile("Tornado.pdf");
Step 2: Traverse the PDF file and detect the content. If the page is blank, then remove it.
for (int i = 0; i < document.Pages.Count; i++)
{
    PdfPageBase originalPage = document.Pages[i];
    if (originalPage.IsBlank())
    {
       document.Pages.Remove(originalPage);
       i--;
     }
}
Step 3: Save the PDF and launch the file.
document.SaveToFile("Tornadowithoutblankpage.pdf", FileFormat.PDF);
System.Diagnostics.Process.Start("Tornadowithoutblankpage.pdf");
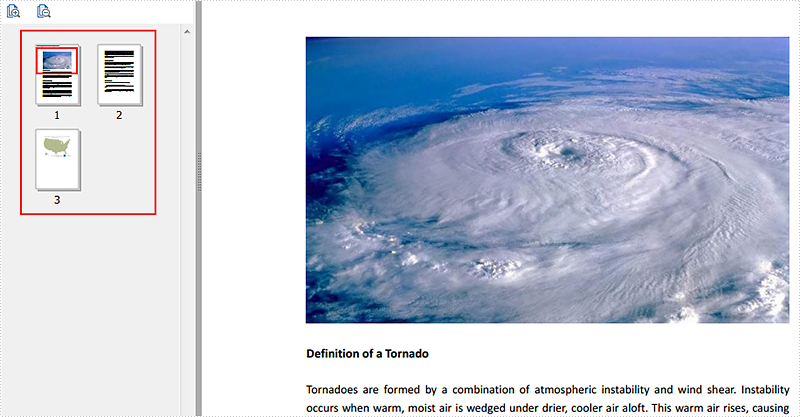
Effective screenshot:
Full Codes:
using System.Windows;
using Spire.Pdf;
using System.Drawing;

namespace Tornadoes
{
    ///
    /// Interaction logic for MainWindow.xaml
    ///
    public partial class MainWindow : Window
    {
        public MainWindow()
        {
            InitializeComponent();
        }

        private void button1_Click(object sender, RoutedEventArgs e)
        {
            PdfDocument document = new PdfDocument();
            document.LoadFromFile("Tornado.pdf");
            for (int i = 0; i < document.Pages.Count; i++)
            {
                PdfPageBase originalPage = document.Pages[i];
                if (originalPage.IsBlank())
                {
                    document.Pages.Remove(originalPage);
                    i--;
                }
            }
            document.SaveToFile("Tornadoeswithtidypage.pdf", FileFormat.PDF);
            System.Diagnostics.Process.Start("Tornadoeswithtidypage.pdf");

        }
    }
}
Imports System.Windows
Imports Spire.Pdf
Imports System.Drawing

Namespace Tornadoes
	'''
	''' Interaction logic for MainWindow.xaml
	'''
	Public Partial Class MainWindow
		Inherits Window
		Public Sub New()
			InitializeComponent()
		End Sub

		Private Sub button1_Click(sender As Object, e As RoutedEventArgs)
			Dim document As New PdfDocument()
			document.LoadFromFile("Tornado.pdf")
			For i As Integer = 0 To document.Pages.Count - 1
				Dim originalPage As PdfPageBase = document.Pages(i)
				If originalPage.IsBlank() Then
					document.Pages.Remove(originalPage)
					i -= 1
				End If
			Next
			document.SaveToFile("Tornadoeswithtidypage.pdf", FileFormat.PDF)
			System.Diagnostics.Process.Start("Tornadoeswithtidypage.pdf")

		End Sub
	End Class
End Namespace
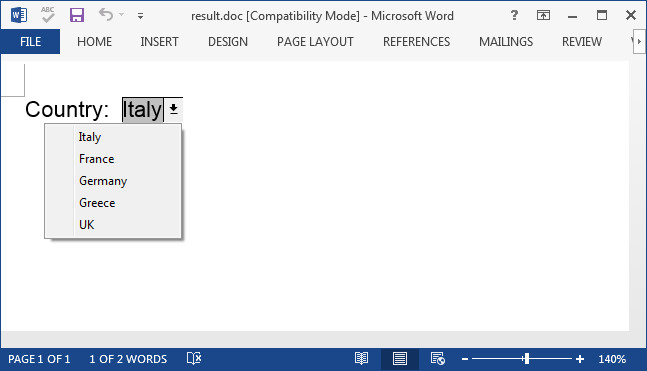
How to Create Dropdown Form Field in Word in WPF
Dropdown list in Word is one type of forms that restricts the data entry to an item in the predefined list. Spire.Doc supports to add old dropdown list form field (Legacy Forms) to Word document. This dropdown list is limited to 25 items and requires forms protection. The following section will demonstrate how to create a dropdown form filed in Word in a WPF application.
Code Snippet:
Step 1: Initialize a new instance of Document class, add a section to it.
Document doc = new Document();
Spire.Doc.Section s = doc.AddSection();
Step 2: Add a paragraph to the section and append text.
Spire.Doc.Documents.Paragraph p = s.AddParagraph();
p.AppendText("Country:  ");
Step 3: Call Paragraph.AppendField() method to insert a dropdown list and call DropDownItems.Add() method to add items.
string fieldName = "DropDownList";
DropDownFormField list = p.AppendField(fieldName, FieldType.FieldFormDropDown) as DropDownFormField;
list.DropDownItems.Add("Italy");
list.DropDownItems.Add("France");
list.DropDownItems.Add("Germany");
list.DropDownItems.Add("Greece");
list.DropDownItems.Add("UK");
Step 4: Add protection to the document by setting the protection type as AllowOnlyFormFields and also setting a password. Note: If you choose not to use a password, anyone can change your editing restrictions.
doc.Protect(ProtectionType.AllowOnlyFormFields,"e-iceblue");
Step 5: Save and launch the file.
doc.SaveToFile("result.doc", FileFormat.Doc);
System.Diagnostics.Process.Start("result.doc");
Output:
Full Code:
using Spire.Doc;
using Spire.Doc.Documents;
using Spire.Doc.Fields;
using System.Windows;

namespace WpfApplication1
{
    public partial class MainWindow : Window
    {
        public MainWindow()
        {
            InitializeComponent();
        }
        private void button1_Click(object sender, RoutedEventArgs e)
        {
            Document doc = new Document();
            Spire.Doc.Section s = doc.AddSection();
            Spire.Doc.Documents.Paragraph p = s.AddParagraph();
            p.AppendText("Country:  ");

            ParagraphStyle style = new ParagraphStyle(doc);
            style.Name = "FontStyle";
            style.CharacterFormat.FontName = "Arial";
            style.CharacterFormat.FontSize = 12;
            doc.Styles.Add(style);
            p.ApplyStyle(style.Name);

            string fieldName = "DropDownList";
            DropDownFormField list = p.AppendField(fieldName, FieldType.FieldFormDropDown) as DropDownFormField;
            list.DropDownItems.Add("Italy");
            list.DropDownItems.Add("France");
            list.DropDownItems.Add("Germany");
            list.DropDownItems.Add("Greece");
            list.DropDownItems.Add("UK");

            doc.Protect(ProtectionType.AllowOnlyFormFields, "e-iceblue");
            doc.SaveToFile("result.doc", FileFormat.Doc);
            System.Diagnostics.Process.Start("result.doc");

        }
    }
}
How to Copy Excel Worksheet in WPF
Commonly, there are two possibilities when copying excel worksheet: copy worksheet within an excel workbook and copy worksheet to other excel workbooks. This article will be divided into two sections to introduce how to copy excel worksheet in WPF applications using Spire.XLS for WPF.
Section 1: Copy Excel Worksheet within an excel workbook
By invoking the Worksheet.CopyFrom() method, we can easily copy an excel worksheet including its cell format, image or something else to another worksheet of the same workbook.
Detail steps as below:
Step 1: Initialize a new instance of Workbook class, load the excel workbook from file and get the worksheet which needs to be copied. Here we choose the first worksheet.
Workbook workbook = new Workbook();
workbook.LoadFromFile("Sample.xlsx");
Worksheet worksheet = workbook.Worksheets[0];
Step 2: Add a new worksheet named copy of sheet1 to the excel workbook, and copy the first worksheet to the new added worksheet.
workbook.Worksheets.Add("copy of sheet1");
workbook.Worksheets[1].CopyFrom(worksheet);
Step 3: Save to the same workbook and launch the file.
workbook.SaveToFile("Sample.xlsx");
System.Diagnostics.Process.Start("Sample.xlsx");
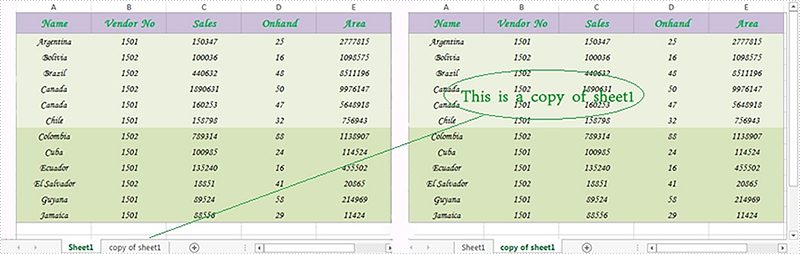
Effective screenshot:
Section 2: Copy excel worksheet to other excel workbooks
If you need to copy a worksheet and save to another excel workbook, please refer to following code snippets:
Step 1: Load the excel workbook and get its first worksheet.
Workbook workbook1 = new Workbook();
workbook1.LoadFromFile("Sale.xlsx");
Worksheet worksheet = workbook1.Worksheets[0];
Step 2: Clone the first worksheet, then add to the excel workbook as a new worksheet.
Worksheet newsheet = (Worksheet)worksheet.Clone(worksheet.Parent);
workbook1.Worksheets.Add(newsheet);
Step 3: Save to another workbook and launch the file.
workbook1.SaveToFile("NewWorkbook.xlsx");
System.Diagnostics.Process.Start("NewWorkbook.xlsx");
Besides, Spire.XLS also provides another method which allows us to copy an excel worksheet from one excel workbook to another existing workbook, like following:
workbook.Worksheets.AddCopy(worksheet);
Full codes:
Section 1:
using Spire.Xls;
using System.Windows;

namespace WpfApplication1
{
    public partial class MainWindow : Window
    {
        public MainWindow()
        {
            InitializeComponent();
        }
        private void button1_Click(object sender, RoutedEventArgs e)
        {

            Workbook workbook = new Workbook();
            workbook.LoadFromFile("Sample.xlsx");
            Worksheet worksheet = workbook.Worksheets[0];

            workbook.Worksheets.Add("copy of sheet1");
            workbook.Worksheets[1].CopyFrom(worksheet);

            workbook.SaveToFile("Sample.xlsx");
            System.Diagnostics.Process.Start("Sample.xlsx");
        }
    }
}
Section 2:
using Spire.Xls;
using System.Windows;

namespace WpfApplication1
{
    public partial class MainWindow : Window
    {
        public MainWindow()
        {
            InitializeComponent();
        }
        private void button2_Click(object sender, RoutedEventArgs e)
        {
            Workbook workbook1 = new Workbook();
            workbook1.LoadFromFile("Sale.xlsx");
            Worksheet worksheet = workbook1.Worksheets[0];

            Worksheet newsheet = (Worksheet)worksheet.Clone(worksheet.Parent);
            workbook1.Worksheets.Add(newsheet);

            workbook1.SaveToFile("NewWorkbook.xlsx");
            System.Diagnostics.Process.Start("NewWorkbook.xlsx");
        }

    }
}
How to extract all images from a specific slide
We usually add lots of images to make the PowerPoint presentation obvious and attractive. With Spire.Presentation, we can easily extract the text from the presentation slides, and we can extract all the images from the whole PowerPoint document file. From Spire.Presentation v 2.5.21, now it supports to get all images from a single specific slide. This article will demonstrate you how to extract all images from a slide.
Firstly, please view the whole PowerPoint slides with images and these images need to be extracted.
Note: Before Start, please download the latest version of Spire.Presentation and add Spire.Presentaion.dll in the bin folder as the reference of Visual Studio.
Here come to the code snippet of how to extract the images from a slide.
Step 1: Create a Presentation document and load from file.
Presentation PPT = new Presentation();
PPT.LoadFromFile("sample.pptx");
Step 2: Get the pictures on the first slide and save them to image file.
int i = 0;
foreach (IShape s in PPT.Slides[0].Shapes)
{
    if (s is SlidePicture)
    {
        SlidePicture ps = s as SlidePicture;
        ps.PictureFill.Picture.EmbedImage.Image.Save(string.Format("{0}.png", i));
        i++;
    }
    if (s is PictureShape)
    {
        PictureShape ps = s as PictureShape;
        ps.EmbedImage.Image.Save(string.Format("{0}.png", i));
        i++;
    }
}
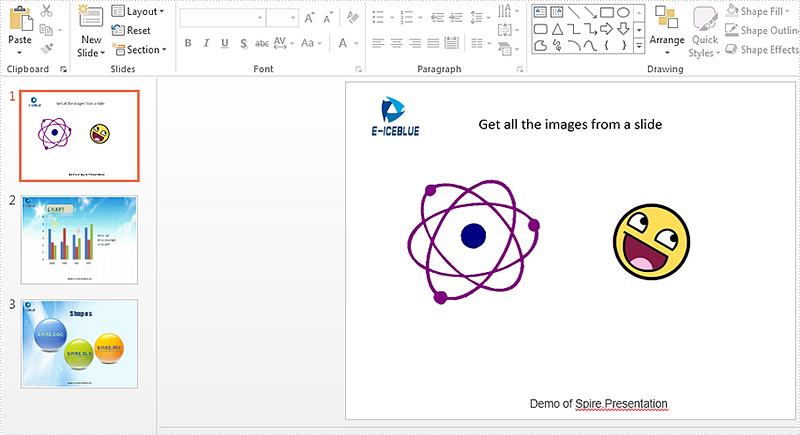
Effective screenshots of the extracted images:

Full codes:
using Spire.Presentation;

namespace ExtractImage
{

    class Program
    {

        static void Main(string[] args)
        {
            Presentation PPT = new Presentation();
            PPT.LoadFromFile("sample.pptx");

            int i = 0;
            foreach (IShape s in PPT.Slides[0].Shapes)
            {
                if (s is SlidePicture)
                {
                    SlidePicture ps = s as SlidePicture;
                    ps.PictureFill.Picture.EmbedImage.Image.Save(string.Format("{0}.png", i));
                    i++;
                }
                if (s is PictureShape)
                {
                    PictureShape ps = s as PictureShape;
                    ps.EmbedImage.Image.Save(string.Format("{0}.png", i));
                    i++;
                }
            }
        }
    }
}
How to Add Attachments to PDF in WPF
In PDF, an attachment is an additional file that is attached to a PDF document. There are many kinds of attachments, such as a document, an image file or other supported file types.
Spire.PDF, as a professional library, enables us to add various attachments as per our needs without having Adobe Acrobat been installed on system. This article demonstrates how to add attachments - a word document and an image to PDF in WPF applications using Spire.PDF for WPF.
Please see the following effective screenshot after adding attachments:
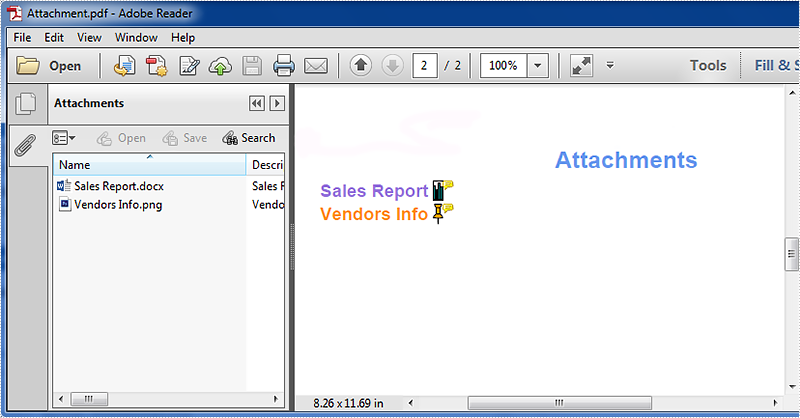
Double click the attachment icon, the attached file will be open automatically.
Detail steps:
Use following namespace:
using System;
using System.Drawing;
using System.IO;
using System.Windows;
using Spire.Pdf;
using Spire.Pdf.Annotations;
using Spire.Pdf.Graphics;
Step 1: Load the original PDF document and add a new page to it.
PdfDocument doc = new PdfDocument("Sales Report.pdf");
PdfPageBase page = section.Pages.Add();
Step 2: In the new page, draw a title for the attachments.
float y = 10;
PdfBrush brush1 = PdfBrushes.CornflowerBlue;
PdfTrueTypeFont font1 = new PdfTrueTypeFont(new Font("Arial", 16f, System.Drawing.FontStyle.Bold));
PdfStringFormat format1 = new PdfStringFormat(PdfTextAlignment.Center);
page.Canvas.DrawString("Attachments", font1, brush1, page.Canvas.ClientSize.Width / 2, y, format1);
Step 3: Load the file that needs to be attached using the File.ReadAllBytes(string path) method, then add the file to the specified page of the PDF document as attachment.
Add Word document attachment with attachment annotation:
PdfTrueTypeFont font2 = new PdfTrueTypeFont(new Font("Arial", 12f, System.Drawing.FontStyle.Bold));
PointF location = new PointF(50, y);
String label = "Sales Report";
byte[] data = File.ReadAllBytes("Sales Report.docx");
SizeF size = font2.MeasureString(label);
RectangleF bounds = new RectangleF(location, size);
page.Canvas.DrawString(label, font2, PdfBrushes.MediumPurple, bounds);
bounds = new RectangleF(bounds.Right + 3, bounds.Top, font2.Height / 2, font2.Height);
PdfAttachmentAnnotation annotation1 = new PdfAttachmentAnnotation(bounds, "Sales Report.docx", data);
annotation1.Color = Color.Teal;
annotation1.Flags = PdfAnnotationFlags.NoZoom;
annotation1.Icon = PdfAttachmentIcon.Graph;
annotation1.Text = "Sales Report.docx";
(page as PdfNewPage).Annotations.Add(annotation1);
Add image attachment is similar with adding Word attachment, refer to following codes:
location = new PointF(50, y);
label = "Vendors Info";
data = File.ReadAllBytes("Vendors Info.png");
size = font2.MeasureString(label);
bounds = new RectangleF(location, size);
page.Canvas.DrawString(label, font2, PdfBrushes.DarkOrange, bounds);
bounds = new RectangleF(bounds.Right + 3, bounds.Top, font2.Height / 2, font2.Height);
PdfAttachmentAnnotation annotation2 = new PdfAttachmentAnnotation(bounds, "Vendors Info.png", data);
annotation2.Color = Color.Orange;
annotation2.Flags = PdfAnnotationFlags.ReadOnly;
annotation2.Icon = PdfAttachmentIcon.PushPin;
annotation2.Text = "Vendors info image";
(page as PdfNewPage).Annotations.Add(annotation2);
Step 4: Save and launch the file.
doc.SaveToFile("Attachment.pdf");
System.Diagnostics.Process.Start("Attachment.pdf");
Full codes:
private void button1_Click(object sender, RoutedEventArgs e)
{
    //Load the original PDF document.
    PdfDocument doc = new PdfDocument("Sales Report.pdf");
    //Add a new page
    PdfPageBase page = doc.Pages.Add();

    float y = 10;
    //Set title text
    PdfBrush brush1 = PdfBrushes.CornflowerBlue;
    PdfTrueTypeFont font1 = new PdfTrueTypeFont(new Font("Arial", 16f,   System.Drawing.FontStyle.Bold));
    PdfStringFormat format1 = new PdfStringFormat(PdfTextAlignment.Center);
    page.Canvas.DrawString("Attachments", font1, brush1, page.Canvas.ClientSize.Width / 2, y, format1);
    y = y + font1.MeasureString("Attachments", format1).Height;
    y = y + 5;

    //Add Word document attachment
    PdfTrueTypeFont font2 = new PdfTrueTypeFont(new Font("Arial", 12f, System.Drawing.FontStyle.Bold));
    PointF location = new PointF(50, y);
    String label = "Sales Report";
    byte[] data = File.ReadAllBytes("Sales Report.docx");
    SizeF size = font2.MeasureString(label);
    RectangleF bounds = new RectangleF(location, size);
    page.Canvas.DrawString(label, font2, PdfBrushes.MediumPurple, bounds);
    bounds = new RectangleF(bounds.Right + 3, bounds.Top, font2.Height / 2, font2.Height);
    PdfAttachmentAnnotation annotation1 = new PdfAttachmentAnnotation(bounds, "Sales  Report.docx", data);
    annotation1.Color = Color.Teal;
    annotation1.Flags = PdfAnnotationFlags.NoZoom;
    annotation1.Icon = PdfAttachmentIcon.Graph;
    annotation1.Text = "Sales Report.docx";
    (page as PdfNewPage).Annotations.Add(annotation1);
    y = y + size.Height + 2;

    //Add image attachment
    location = new PointF(50, y);
    label = "Vendors Info";
    data = File.ReadAllBytes("Vendors Info.png");
    size = font2.MeasureString(label);
    bounds = new RectangleF(location, size);
    page.Canvas.DrawString(label, font2, PdfBrushes.DarkOrange, bounds);
    bounds = new RectangleF(bounds.Right + 3, bounds.Top, font2.Height / 2, font2.Height);
    PdfAttachmentAnnotation annotation2 = new PdfAttachmentAnnotation(bounds, "Vendors  Info.png", data);
    annotation2.Color = Color.Orange;
    annotation2.Flags = PdfAnnotationFlags.ReadOnly;
    annotation2.Icon = PdfAttachmentIcon.PushPin;
    annotation2.Text = "Vendors info image";
    (page as PdfNewPage).Annotations.Add(annotation2);

    //Save and launch the file.
    doc.SaveToFile("Attachment.pdf");
    System.Diagnostics.Process.Start("Attachment.pdf");
}
Insert a background image to PDF file in WPF
Usually, when you open a PDF document, the blank background looks a little drab. You might want to create background for your PDF document to make them more visually appealing through the using of a background image.
In the following sections, I will demonstrate how to insert PDF background image in WPF.
Here is the original PDF document without background image.

The code snippets are as followed:
Step 1: Initialize a new instance of PdfDocument class and load the PDF document from the file.
PdfDocument doc = new PdfDocument();
doc.LoadFromFile("To a Skylark.pdf");
Step 2: In this example, we choose the first page of PDF file to insert the background image.
PdfPageBase page = doc.Pages[0];
Step 3: Load the image from file and set it as background image.
System.Drawing.Image backgroundImage = System.Drawing.Image.FromFile("Sky.jpg");
page.BackgroundImage = backgroundImage;
Step 4: Save the PDF document and launch the file.
doc.SaveToFile("With Background Image.pdf");
System.Diagnostics.Process.Start("With Background Image.pdf");
Effective screenshot:

Full Codes:
using System.Windows;
using Spire.Pdf;

namespace Poetic_Works
{
    ///
    /// Interaction logic for MainWindow.xaml
    ///
    public partial class MainWindow : Window
    {
        public MainWindow()
        {
            InitializeComponent();
        }

        private void button2_Click(object sender, RoutedEventArgs e)
        {
            PdfDocument doc = new PdfDocument();
            doc.LoadFromFile("To a Skylark.pdf");
            PdfPageBase page = doc.Pages[0];
            System.Drawing.Image backgroundImage = System.Drawing.Image.FromFile("Sky.jpg");
            page.BackgroundImage = backgroundImage;
            doc.SaveToFile("With Background Image.pdf");
            System.Diagnostics.Process.Start("With Background Image.pdf");
        }
    }
}
Imports System.Windows
Imports Spire.Pdf

Namespace Poetic_Works
	'''
	''' Interaction logic for MainWindow.xaml
	'''
	Public Partial Class MainWindow
		Inherits Window
		Public Sub New()
			InitializeComponent()
		End Sub

		Private Sub button2_Click(sender As Object, e As RoutedEventArgs)
			Dim doc As New PdfDocument()
			doc.LoadFromFile("To a Skylark.pdf")
			Dim page As PdfPageBase = doc.Pages(0)

			Dim backgroundImage As System.Drawing.Image = System.Drawing.Image.FromFile("Sky.jpg")
			page.BackgroundImage = backgroundImage
			doc.SaveToFile("With Background Image.pdf")
			System.Diagnostics.Process.Start("With Background Image.pdf")
		End Sub
	End Class
End Namespace
Add Tooltip for PDF Form Field in C#/VB.NET
Tooltip is a message box that appears when users hover the pointer over the form field, providing users with instructions about the field, for instance, some extra information that users may find helpful in filling in the form field. This article presents how to add a tooltip to PDF form field using Spire.PDF in C# and VB.NET.
Code Snippet
Step 1: Initialize a new object of PdfDcoument class, add a page to it.
PdfDocument doc = new PdfDocument();
PdfPageBase page = doc.Pages.Add(PdfPageSize.A4, new PdfMargins(0));
Step 2: Add some text and a textbox on the PDF page.
PdfFont font = new PdfFont(PdfFontFamily.Helvetica, 12f,PdfFontStyle.Bold);
PdfBrush brush = PdfBrushes.Black;
float x = 50;
float y = 50;
float tempX = 0;
string text = "E-mail: ";
page.Canvas.DrawString(text, font, brush, x, y);
tempX = font.MeasureString(text).Width + x+15;
PdfTextBoxField textbox = new PdfTextBoxField(page, "TextBox");
textbox.Bounds = new RectangleF(tempX, y, 100, 15);
textbox.BorderWidth = 0.75f;
textbox.BorderStyle = PdfBorderStyle.Solid;
doc.Form.Fields.Add(textbox);
Step 3: The PdfDocument class provides a Fields collection which represents all form fields in the PDF document. You can get the specific field by its index or name, then set the value of ToolTip property to add a tooltip.
doc.Form.Fields["TextBox"].ToolTip = "Please insert a valid email address";
Step 4: Save and launch the file.
doc.SaveToFile("sample.pdf", FileFormat.PDF);
System.Diagnostics.Process.Start("sample.pdf");
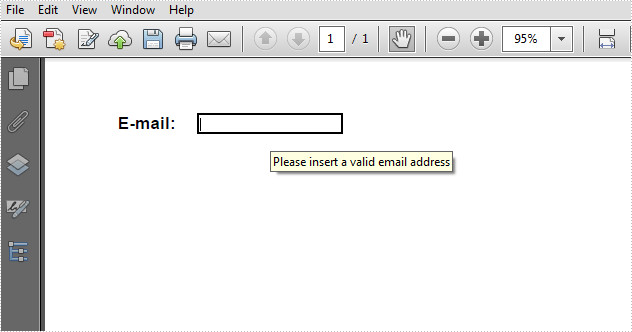
Output:
Full Code:
using Spire.Pdf;
using Spire.Pdf.Fields;
using Spire.Pdf.Graphics;
using System.Drawing;


namespace AddTooltip
{
    class Program
    {
        static void Main(string []args)
        {
            PdfDocument doc = new PdfDocument();
            PdfPageBase page = doc.Pages.Add(PdfPageSize.A4, new PdfMargins(0));

            PdfFont font = new PdfFont(PdfFontFamily.Helvetica, 12f, PdfFontStyle.Bold);
            PdfBrush brush = PdfBrushes.Black;
            float x = 50;
            float y = 50;
            float tempX = 0;
            string text = "E-mail: ";
            page.Canvas.DrawString(text, font, brush, x, y);
            tempX = font.MeasureString(text).Width + x + 15;
            PdfTextBoxField textbox = new PdfTextBoxField(page, "TextBox");
            textbox.Bounds = new RectangleF(tempX, y, 100, 15);
            textbox.BorderWidth = 0.75f;
            textbox.BorderStyle = PdfBorderStyle.Solid;
            doc.Form.Fields.Add(textbox);

            doc.Form.Fields["TextBox"].ToolTip = "Please insert a valid email address";

            doc.SaveToFile("sample.pdf", FileFormat.PDF);
            System.Diagnostics.Process.Start("sample.pdf");
        }
    }
}
Imports Spire.Pdf
Imports Spire.Pdf.Fields
Imports Spire.Pdf.Graphics
Imports System.Drawing


Namespace AddTooltip
	Class Program
		Private Shared Sub Main(args As String())
			Dim doc As New PdfDocument()
			Dim page As PdfPageBase = doc.Pages.Add(PdfPageSize.A4, New PdfMargins(0))

			Dim font As New PdfFont(PdfFontFamily.Helvetica, 12F, PdfFontStyle.Bold)
			Dim brush As PdfBrush = PdfBrushes.Black
			Dim x As Single = 50
			Dim y As Single = 50
			Dim tempX As Single = 0
			Dim text As String = "E-mail: "
			page.Canvas.DrawString(text, font, brush, x, y)
			tempX = font.MeasureString(text).Width + x + 15
			Dim textbox As New PdfTextBoxField(page, "TextBox")
			textbox.Bounds = New RectangleF(tempX, y, 100, 15)
			textbox.BorderWidth = 0.75F
			textbox.BorderStyle = PdfBorderStyle.Solid
			doc.Form.Fields.Add(textbox)

			doc.Form.Fields("TextBox").ToolTip = "Please insert a valid email address"

			doc.SaveToFile("sample.pdf", FileFormat.PDF)
			System.Diagnostics.Process.Start("sample.pdf")
		End Sub
	End Class
End Namespace