Python: Expand or Collapse Bookmarks in PDF
PDF bookmarks are key tools for optimizing reading navigation. When expanded, users can click on the titles to jump to the corresponding chapters and display sub-level directories, enabling intuitive access and positioning within the document's deep structure. Collapsing bookmarks, on the other hand, allows users to hide all sub-bookmark information at the current level with a single click, simplifying the view and focusing on higher-level structure. These two operations work together to significantly enhance the efficiency and experience of reading complex, multi-level PDF documents. This article will introduce how to programmatically expand and collapse bookmarks in a PDF using Spire.PDF for Python.
Install Spire.PDF for Python
This scenario requires Spire.PDF for Python and plum-dispatch v1.7.4. They can be easily installed in your VS Code through the following pip command.
pip install Spire.PDF
If you are unsure how to install, please refer to this tutorial: How to Install Spire.PDF for Python in VS Code
Expand or Collapse all Bookmarks in Python
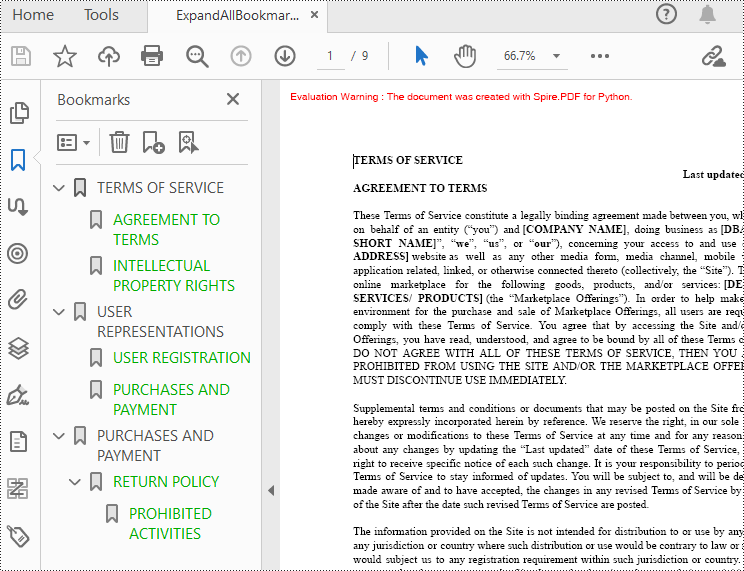
Spire.PDF for Python provides the property BookMarkExpandOrCollapse to expand or collapse bookmarks, when set to True, it expands all bookmarks. Conversely, setting it to False will collapses all bookmarks. The following are the detailed steps for expanding bookmarks in a PDF document.
- Create a PdfDocument class instance.
- Load a PDF document using PdfDocument.LoadFromFile() method.
- Expand all bookmarks using BookMarkExpandOrCollapse property.
- Save the document using PdfDocument.SaveToFile() method.
- Python
from spire.pdf.common import *
from spire.pdf import *

# Create a PdfDocument object
doc = PdfDocument()

# Load a PDF file
doc.LoadFromFile("Terms of service.pdf")

# Set BookMarkExpandOrCollapse as True to expand all bookmarks, set False to collapse all bookmarks
doc.ViewerPreferences.BookMarkExpandOrCollapse = True

# Save the document
outputFile="ExpandAllBookmarks.pdf"
doc.SaveToFile(outputFile)

# Close the document
doc.Close()
Expand or Collapse a specific Bookmark in Python
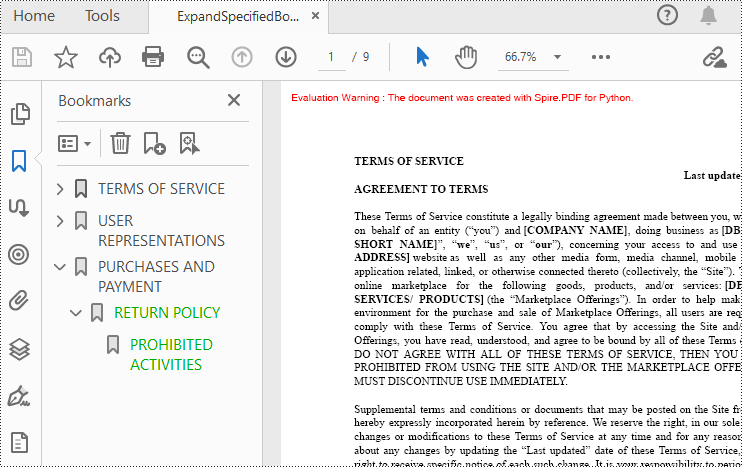
If you need to expand or collapse only a specific bookmark, you can use the property ExpandBookmark. The following are the detailed steps.
- Create a PdfDocument class instance.
- Load a PDF document using PdfDocument.LoadFromFile() method.
- Get a specific bookmark using PdfDocument.Bookmarks.get_Item() method.
- Expand the bookmark using ExpandBookmark property.
- Save the result document using PdfDocument.SaveToFile() method.
- Python
from spire.pdf.common import *
from spire.pdf import *

# Create a PdfDocument object
doc = PdfDocument()

# Load a PDF file
doc.LoadFromFile("Terms of service.pdf")

# Set ExpandBookmark as True for the third bookmark
doc.Bookmarks.get_Item(2).ExpandBookmark = True

# Save the document
outputFile="ExpandSpecifiedBookmarks.pdf"
doc.SaveToFile(outputFile)

# Close the document
doc.Close()
Apply for a Temporary License
If you'd like to remove the evaluation message from the generated documents, or to get rid of the function limitations, please request a 30-day trial license for yourself.
Spire.PDF for Python 10.1.1 adds the custom exception class SpireException
We are delighted to announce the release of Spire.PDF for Python 10.1.1. This version adds the custom exception class SpireException. More details are listed below.
Here is a list of changes made in this release
| Category | ID | Description |
| New feature | - | Adds the custom exception class SpireException. |
Spire.Doc for Python 12.1.0 adds a new custom exception class SpireException
We are pleased to announce the release of Spire.Doc for Python 12.1.0. This version adds a new custom exception class SpireException. In addition, the issue that setting table borders was invalid has also been fixed. More details are listed below.
Here is a list of changes made in this release
| Category | ID | Description |
| New feature | - | Adds a new custom exception class SpireException. |
| Bug | SPIREDOC-10028 | Fixes the issue that setting table borders was invalid. |
Python: Create a Fillable Form in Word
Creating a fillable form in Word allows you to design a document that can be easily completed and customized by others. Whether you need to collect information, gather feedback, or create an interactive document, fillable forms provide a convenient way to capture data electronically. By adding various elements such as text fields, checkboxes, dropdown menus, and more, you can tailor the form to your specific requirements.
To create a fillable form in Word, you probably need to use the following tools.
- Content Controls: The areas where users input information in a form.
- Tables: Tables are used in forms to align text and form fields, and to create borders and boxes.
- Protection: Allows users to populate fields but not to make changes to the rest of the document.
In Word, content controls serve as containers for structured documents, allowing users to organize content within a document. Word 2013 provides ten types of content controls. This article introduces how to create a fillable form in Word that includes the following seven commonly-used content controls using Spire.Doc for Python.
| Content Control | Description |
| Plain Text | A text field limited to plain text, so no formatting can be included. |
| Rich Text | A text field that can contain formatted text or other items, such as tables, pictures, or other content controls. |
| Picture | Accepts a single picture. |
| Drop-Down List | A drop-down list displays a predefined list of items for the user to choose from. |
| Combo Box | A combo box enables users to select a predefined value in a list or type their own value in the text box of the control. |
| Check Box | A check box provides a graphical widget that allows the user to make a binary choice: yes (checked) or no (not checked). |
| Date Picker | Contains a calendar control from which the user can select a date. |
Install Spire.Doc for Python
This scenario requires Spire.Doc for Python and plum-dispatch v1.7.4. They can be easily installed in your VS Code through the following pip command.
pip install Spire.Doc
If you are unsure how to install, please refer to this tutorial: How to Install Spire.Doc for Python in VS Code
Create a Fillable Form in Word in Python
Spire.Doc for Python offers the StructureDocumentTagInline class, which is utilized to generate structured document tags within a paragraph. By utilizing the SDTProperties property and SDTContent property of this class, one can define the properties and content of the current structured document tag. Below are the step-by-step instructions for creating a fill form in a Word document in Python.
- Create a Document object.
- Add a section using Document.AddSection() method.
- Add a table using Section.AddTable() method.
- Add a paragraph to a specific table cell using TableCell.AddParagraph() method.
- Create an instance of StructureDocumentTagInline class, and add it to the paragraph as a child object using Paragraph.ChildObjects.Add() method.
- Specify the type, content and other attributes of the structured document tag through the SDTProperties property and the SDTContent property of the StructureDocumentTagInline object.
- Prevent users from editing content outside form fields using Document.Protect() method.
- Save the document using Document.SaveToFile() method.
- Python
from spire.doc import *
from spire.doc.common import *
# Create a Document object
doc = Document()
# Add a section
section = doc.AddSection()
# Add a table
table = section.AddTable(True)
table.ResetCells(7, 2)
table.SetColumnWidth(0, 120, CellWidthType.Point)
table.SetColumnWidth(1, 350, CellWidthType.Point)
# Add text to the cells of the first column
paragraph = table.Rows[0].Cells[0].AddParagraph()
paragraph.AppendText("Name")
paragraph = table.Rows[1].Cells[0].AddParagraph()
paragraph.AppendText("Profile")
paragraph = table.Rows[2].Cells[0].AddParagraph()
paragraph.AppendText("Photo")
paragraph = table.Rows[3].Cells[0].AddParagraph()
paragraph.AppendText("Country")
paragraph = table.Rows[4].Cells[0].AddParagraph()
paragraph.AppendText("Hobbies")
paragraph = table.Rows[5].Cells[0].AddParagraph()
paragraph.AppendText("Birthday")
paragraph = table.Rows[6].Cells[0].AddParagraph()
paragraph.AppendText("Sex")
# Add a plain text content control to the cell (0,1)
paragraph = table.Rows[0].Cells[1].AddParagraph()
sdt = StructureDocumentTagInline(doc)
paragraph.ChildObjects.Add(sdt)
sdt.SDTProperties.SDTType = SdtType.Text
sdt.SDTProperties.Alias = "Plain Text"
sdt.SDTProperties.Tag = "Plain Text"
sdt.SDTProperties.IsShowingPlaceHolder = True
text = SdtText(True)
text.IsMultiline = False
sdt.SDTProperties.ControlProperties = text
textRange = TextRange(doc)
textRange.Text = "your name here"
sdt.SDTContent.ChildObjects.Add(textRange)
# Add a rich text content control to the cell (1,1)
paragraph = table.Rows[1].Cells[1].AddParagraph()
sdt = StructureDocumentTagInline(doc)
paragraph.ChildObjects.Add(sdt)
sdt.SDTProperties.SDTType = SdtType.RichText
sdt.SDTProperties.Alias = "Rich Text"
sdt.SDTProperties.Tag = "Rich Text"
sdt.SDTProperties.IsShowingPlaceHolder = True
text = SdtText(True)
text.IsMultiline = False
sdt.SDTProperties.ControlProperties = text
textRange = TextRange(doc)
textRange.Text = "brief introduction of yourself"
sdt.SDTContent.ChildObjects.Add(textRange )
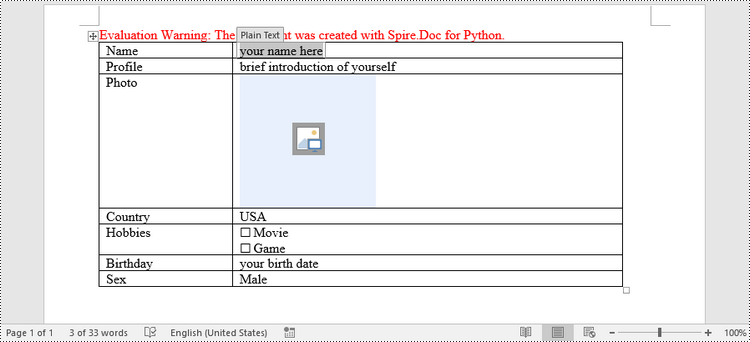
# Add a picture content control to the cell (2,1)
paragraph = table.Rows[2].Cells[1].AddParagraph()
sdt = StructureDocumentTagInline(doc)
paragraph.ChildObjects.Add(sdt)
sdt.SDTProperties.SDTType = SdtType.Picture
sdt.SDTProperties.Alias = "Picture"
sdt.SDTProperties.Tag = "Picture"
sdtPicture = SdtPicture(True)
sdt.SDTProperties.ControlProperties = sdtPicture
pic = DocPicture(doc)
pic.LoadImage("C:\\Users\\Administrator\\Desktop\\placeHolder.png")
sdt.SDTContent.ChildObjects.Add(pic)
# Add a dropdown list content control to the cell (3,1)
paragraph = table.Rows[3].Cells[1].AddParagraph();
sdt = StructureDocumentTagInline(doc)
sdt.SDTProperties.SDTType = SdtType.DropDownList
sdt.SDTProperties.Alias = "Dropdown List"
sdt.SDTProperties.Tag = "Dropdown List"
paragraph.ChildObjects.Add(sdt)
stdList = SdtDropDownList()
stdList.ListItems.Add(SdtListItem("USA", "1"))
stdList.ListItems.Add(SdtListItem("China", "2"))
stdList.ListItems.Add(SdtListItem("Briza", "3"))
stdList.ListItems.Add(SdtListItem("Austrilia", "4"))
sdt.SDTProperties.ControlProperties = stdList;
textRange = TextRange(doc)
textRange .Text = stdList.ListItems[0].DisplayText
sdt.SDTContent.ChildObjects.Add(textRange )
# Add two check box content controls to the cell (4,1)
paragraph = table.Rows[4].Cells[1].AddParagraph()
sdt = StructureDocumentTagInline(doc)
paragraph.ChildObjects.Add(sdt)
sdt.SDTProperties.SDTType = SdtType.CheckBox
sdtCheckBox = SdtCheckBox()
sdt.SDTProperties.ControlProperties = sdtCheckBox
textRange = TextRange(doc)
sdt.ChildObjects.Add(textRange)
sdtCheckBox.Checked = False
paragraph.AppendText(" Movie")
paragraph = table.Rows[4].Cells[1].AddParagraph();
sdt = StructureDocumentTagInline(doc)
paragraph.ChildObjects.Add(sdt)
sdt.SDTProperties.SDTType = SdtType.CheckBox
sdtCheckBox = SdtCheckBox()
sdt.SDTProperties.ControlProperties = sdtCheckBox
textRange = TextRange(doc)
sdt.ChildObjects.Add(textRange)
sdtCheckBox.Checked = False
paragraph.AppendText(" Game")
# Add a date picker content control to the cell (5,1)
paragraph = table.Rows[5].Cells[1].AddParagraph()
sdt = StructureDocumentTagInline(doc)
paragraph.ChildObjects.Add(sdt)
sdt.SDTProperties.SDTType = SdtType.DatePicker
sdt.SDTProperties.Alias = "Date Picker"
sdt.SDTProperties.Tag = "Date Picker"
stdDate = SdtDate()
stdDate.CalendarType = CalendarType.Default
stdDate.DateFormat = "yyyy.MM.dd"
stdDate.FullDate = DateTime.get_Now()
sdt.SDTProperties.ControlProperties = stdDate
textRange = TextRange(doc)
textRange.Text = "your birth date"
sdt.SDTContent.ChildObjects.Add(textRange)
# Add a combo box content control to the cell (6,1)
paragraph = table.Rows[6].Cells[1].AddParagraph()
sdt = StructureDocumentTagInline(doc)
paragraph.ChildObjects.Add(sdt)
sdt.SDTProperties.SDTType = SdtType.ComboBox
sdt.SDTProperties.Alias = "Combo Box"
sdt.SDTProperties.Tag = "Combo Box"
stdComboBox = SdtComboBox()
stdComboBox.ListItems.Add(SdtListItem("Male"))
stdComboBox.ListItems.Add(SdtListItem("Female"))
sdt.SDTProperties.ControlProperties = stdComboBox
textRange = TextRange(doc)
textRange.Text = stdComboBox.ListItems[0].DisplayText
sdt.SDTContent.ChildObjects.Add(textRange)
# Allow users to edit the form fields only
doc.Protect(ProtectionType.AllowOnlyFormFields, "permission-psd")
# Save to file
doc.SaveToFile("output/Form.docx", FileFormat.Docx2013)
Apply for a Temporary License
If you'd like to remove the evaluation message from the generated documents, or to get rid of the function limitations, please request a 30-day trial license for yourself.
Create PDF Files with Python
Table of Contents
Install with Pip
pip install Spire.PDF
Related Links
PDF (Portable Document Format) is a popular file format widely used for generating legal documents, contracts, reports, invoices, manuals, eBooks, and more. It provides a versatile and reliable format for sharing, storing and presenting electronic documents in a consistent manner, independent of any software, hardware or operating systems.
Given these advantages, automated generation of PDF documents is becoming increasingly important in various fields. To automate the PDF creation process in Python, you can write scripts that generate PDFs based on specific requirements or input data. This article will give detailed examples to demonstrate how to use Python to create PDF files programmatically.
- How to Create PDF Using Python
- Python to Create PDF Files from Scratch
- Python to Generate PDF from Text File
- Python to Create a Multi-Column PDF
Python PDF Generator Library
To generate PDF using Python, we will need to use the Spire.PDF for Python library. It is a powerful Python library that provide PDF generation and processing capabilities. With it, we can use python to create PDFs from scratch and add various PDF elements to PDF pages.
To install the Python PDF generator library, simply use the following pip command to install from PyPI:
pip install Spire.PDF
Background Knowledge
Before we start, let's learn some background about creating a PDF file using the Spire.PDF for Python library.
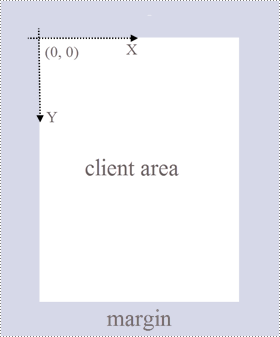
PDF Page: A page in Spire.PDF for Python is represented by PdfPageBase class, which consists of a client area and margins all around. The content area is for users to write various contents, and the margins are usually blank edges.
Coordinate System: As shown in the figure below, the origin of the coordinate system on the page is located at the top left corner of the client area, with the x-axis extending horizontally to the right and the y-axis extending vertically down. All elements added to the client area are based on the specified X and Y coordinates.
Classes and Methods: The following table lists some of the core classes and methods used to create PDFs in Python.
| Member | Description |
| PdfDocument class | Represents a PDF document model. |
| PdfPageBase class | Represents a page in a PDF document. |
| PdfSolidBrush class | Represents a brush that fills any object with a solid color. |
| PdfTrueTypeFont class | Represents a true type font. |
| PdfStringFormat class | Represents text format information, such as alignment, characters spacing and indent. |
| PdfTextWidget class | Represents the text area with the ability to span several pages. |
| PdfTextLayout class | Represents the text layout information. |
| PdfDocument.Pages.Add() method | Adds a page to a PDF document. |
| PdfPageBase.Canvas.DrawString() method | Draws string at the specified location on a page with specified font and brush objects. |
| PdfPageBase.Canvas.DrawImage() method | Draws an image at a specified location on a page. |
| PdfTextWidget.Draw() method | Draws the text widget at the specified location on a page. |
| PdfDocument.SaveToFile() method | Saves the document to a PDF file. |
How to Create PDF Using Python
The following are the main steps for creating PDF files in Python:
- Install Spire.PDF for Python.
- Import modules.
- Create a PDF document through the PdfDocument class.
- Add a page to the PDF using PdfDocument.Pages.Add() method and return an object of PdfPageBase class.
- Create desired PDF brush and font.
- Draw text string or text widget at a specified coordinate on the PDF page using PdfPageBase.Canvas.DrawString() or PdfTextWidget.Draw() method.
- Save the PDF document using PdfDocument.SaveToFile() method.
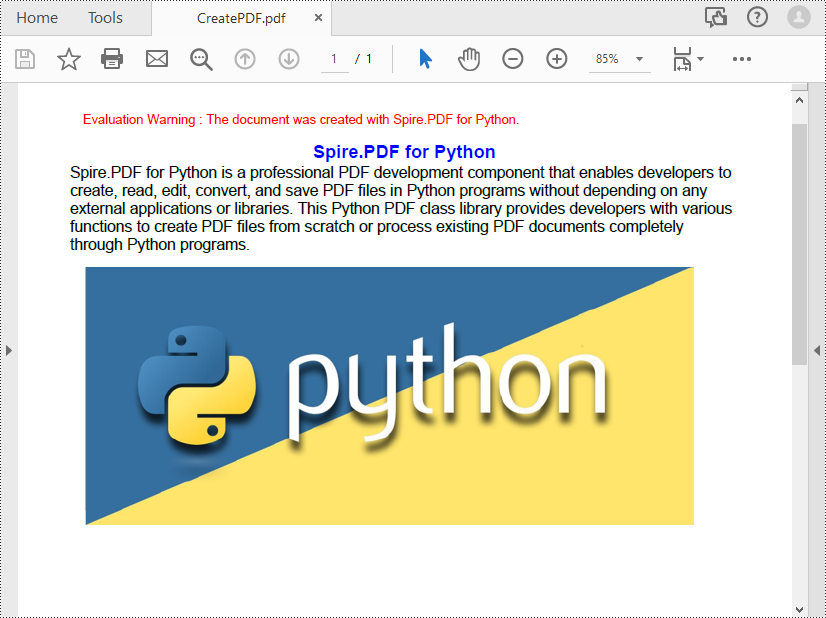
Python to Create PDF Files from Scratch
The following code example demonstrates how to use Python to create a PDF file and insert text and images. With Spire.PDF for Python, you can also insert other PDF elements such as lists, hyperlinks, forms, and stamps.
- Python
from spire.pdf.common import *
from spire.pdf import *

# Create a pdf document
pdf = PdfDocument()

# Add a page to the PDF
page = pdf.Pages.Add()

# Specify title text and paragraph content
titleText = "Spire.PDF for Python"
paraText = "Spire.PDF for Python is a professional PDF development component that enables developers to create, read, edit, convert, and save PDF files in Python programs without depending on any external applications or libraries. This Python PDF class library provides developers with various functions to create PDF files from scratch or process existing PDF documents completely through Python programs."

# Create solid brushes
titleBrush = PdfSolidBrush(PdfRGBColor(Color.get_Blue()))
paraBrush = PdfSolidBrush(PdfRGBColor(Color.get_Black()))

# Create fonts
titleFont = PdfFont(PdfFontFamily.Helvetica, 14.0, PdfFontStyle.Bold)
paraFont = PdfTrueTypeFont("Arial", 12.0, PdfFontStyle.Regular, True)

# Set the text alignment
textAlignment = PdfStringFormat(PdfTextAlignment.Center, PdfVerticalAlignment.Middle)

# Draw title on the page
page.Canvas.DrawString(titleText, titleFont, titleBrush, page.Canvas.ClientSize.Width / 2, 40.0, textAlignment)

# Create a PdfTextWidget object to hold the paragraph content
textWidget = PdfTextWidget(paraText, paraFont, paraBrush)

# Create a rectangle where the paragraph content will be placed
rect = RectangleF(PointF(0.0, 50.0), page.Canvas.ClientSize)

# Set the text layout
textLayout = PdfTextLayout()
textLayout.Layout = PdfLayoutType.Paginate

# Draw the widget on the page
textWidget.Draw(page, rect, textLayout)

# Load an image
image = PdfImage.FromFile("Python.png")

# Draw the image at a specified location on the page
page.Canvas.DrawImage(image, 12.0, 130.0)

#Save the PDF document
pdf.SaveToFile("CreatePDF.pdf")
pdf.Close()
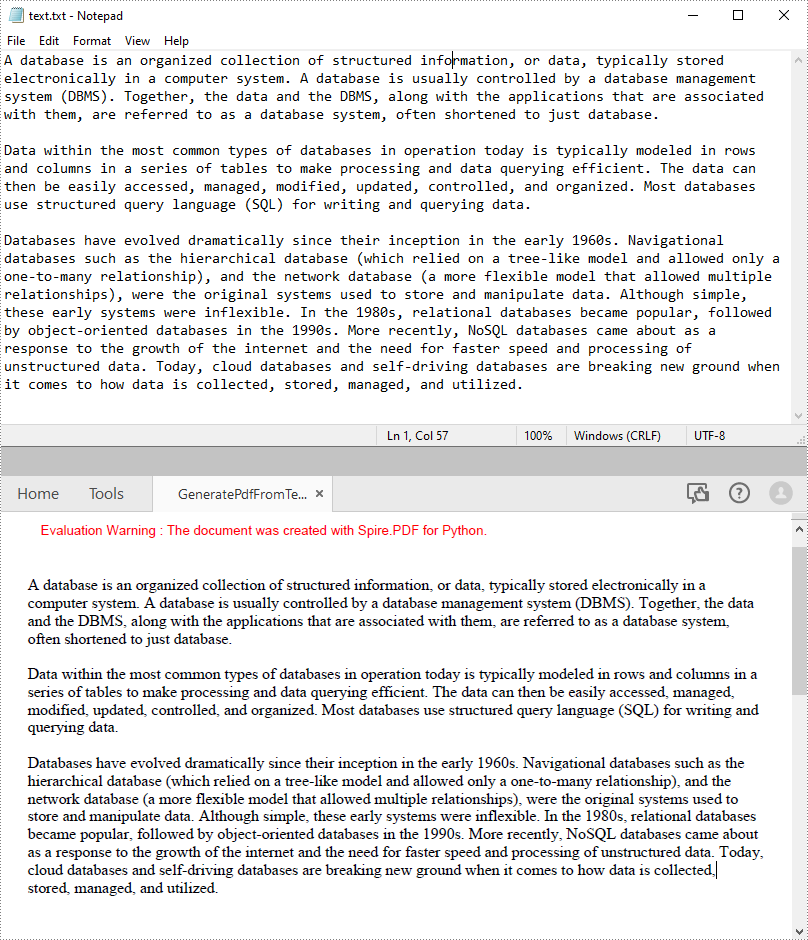
Python to Generate PDF from Text File
The following code example shows the process of reading text from a .txt file and drawing it to a specified location on a PDF page.
- Python
from spire.pdf.common import *
from spire.pdf import *

def ReadFromTxt(fname: str) -> str:
    with open(fname, 'r') as f:
        text = f.read()
    return text

# Create a pdf document
pdf = PdfDocument()

# Add a page to the PDF
page = pdf.Pages.Add(PdfPageSize.A4(), PdfMargins(20.0, 20.0))

# Create a PdfFont and brush
font = PdfFont(PdfFontFamily.TimesRoman, 12.0)
brush = PdfBrushes.get_Black()

# Get content from a .txt file
text = ReadFromTxt("text.txt")

# Create a PdfTextWidget object to hold the text content
textWidget = PdfTextWidget(text, font, brush)

# Create a rectangle where the text content will be placed
rect = RectangleF(PointF(0.0, 50.0), page.Canvas.ClientSize)

# Set the text layout
textLayout = PdfTextLayout()
textLayout.Layout = PdfLayoutType.Paginate

# Draw the widget on the page
textWidget.Draw(page, rect, textLayout)

# Save the generated PDF file
pdf.SaveToFile("GeneratePdfFromText.pdf", FileFormat.PDF)
pdf.Close()
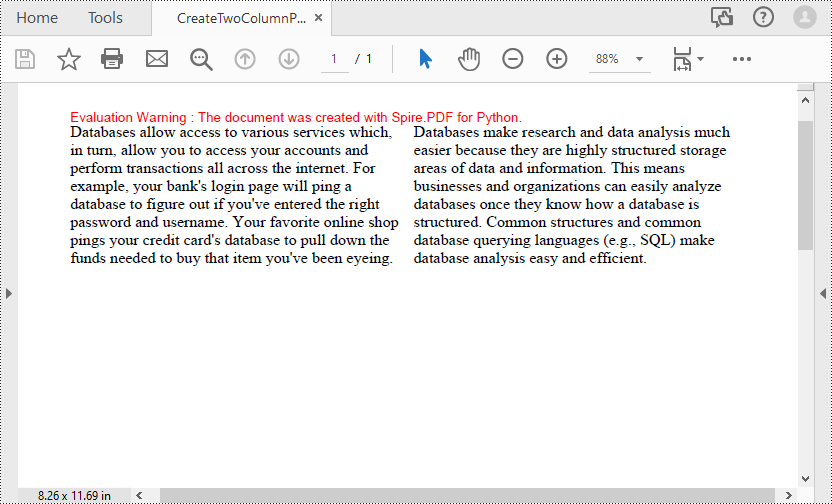
Python to Create a Multi-Column PDF
Multi-column PDF are commonly used in magazines or newspapers. The following code example shows the process of creating a two-column PDF by drawing text in two separate rectangular areas on a PDF page.
- Python
from spire.pdf.common import *
from spire.pdf import *

# Creates a PDF document
pdf = PdfDocument()

# Add a page to the PDF
page = pdf.Pages.Add()

# Define paragraph text
s1 = "Databases allow access to various services which, in turn, allow you to access your accounts and perform transactions all across the internet. " + "For example, your bank's login page will ping a database to figure out if you've entered the right password and username. " + "Your favorite online shop pings your credit card's database to pull down the funds needed to buy that item you've been eyeing."
s2 = "Databases make research and data analysis much easier because they are highly structured storage areas of data and information. " + "This means businesses and organizations can easily analyze databases once they know how a database is structured. " + "Common structures and common database querying languages (e.g., SQL) make database analysis easy and efficient."

# Get width and height of page
pageWidth = page.GetClientSize().Width
pageHeight = page.GetClientSize().Height

# Create a PDF font and brush
font = PdfFont(PdfFontFamily.TimesRoman, 12.0)
brush = PdfBrushes.get_Black()

# Set the text alignment
format = PdfStringFormat(PdfTextAlignment.Left)

# Draws text at a specified location on the page
page.Canvas.DrawString(s1, font, brush, RectangleF(10.0, 20.0, pageWidth / 2 - 8, pageHeight), format)
page.Canvas.DrawString(s2, font, brush, RectangleF(pageWidth / 2 + 8, 20.0, pageWidth / 2 - 8, pageHeight), format)

# Save the PDF document
pdf.SaveToFile("CreateTwoColumnPDF.pdf")
pdf.Close()
Free License for Creating PDF in Python
You can get a free temporary license of Spire.PDF for Python to generate PDF documents without any watermarks and limitations.
Conclusion
This blog post has provided a step-by-step guide on how to create PDF files based on the coordinate system defined in the Spire.PDF for Python library. In the code samples, you can learn about the process and methods of inserting text, images into PDFs and converting TXT files to PDFs. If you want to explore other PDF processing and conversion features of the Python PDF library, you can check out its online documentation.
For any issues while using, reaching out our technical support team via email or forum.
Python: Extract Form Field Values from PDF
PDF forms are commonly used to collect user information, and extracting form values programmatically allows for automated processing of submitted data, ensuring accurate data collection and analysis. After extraction, you can generate reports based on form field values or migrate them to other systems or databases. In this article, you will learn how to extract form field values from PDF with Python using Spire.PDF for Python.
Install Spire.PDF for Python
This scenario requires Spire.PDF for Python and plum-dispatch v1.7.4. They can be easily installed in your VS Code through the following pip command.
pip install Spire.PDF
If you are unsure how to install, please refer to this tutorial: How to Install Spire.PDF for Python in VS Code
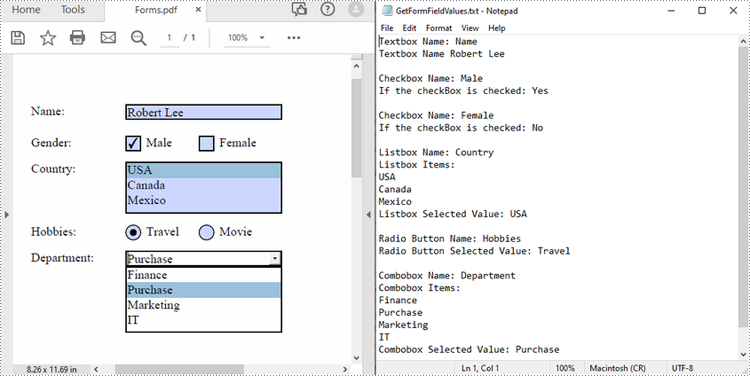
Extract Form Field Values from PDF with Python
Spire.PDF for Python supports various types of PDF form fields, including:
- Text box field (represented by the PdfTextBoxFieldWidget class)
- Check box field (represented by the PdfCheckBoxWidgetFieldWidget class)
- Radio button field (represented by the PdfRadioButtonListFieldWidget class)
- List box field (represented by the PdfListBoxWidgetFieldWidget class)
- Combo box field (represented by the PdfComboBoxWidgetFieldWidget class)
Before extracting data from the PDF forms, it is necessary to determine the specific type of each form field first, and then you can use the properties of the corresponding form field class to extract their values accurately. The following are the detailed steps.
- Initialize an instance of the PdfDocument class.
- Load a PDF document using PdfDocument.LoadFromFile() method.
- Get the form in the PDF document using PdfDocument.Form property.
- Create a list to store the extracted form field values.
- Iterate through all fields in the PDF form.
- Determine the types of the form fields, then get the names and values of the form fields using the corresponding properties.
- Write the results to a text file.
- Python
from spire.pdf.common import *
from spire.pdf import *

inputFile = "Forms.pdf"
outputFile = "GetFormFieldValues.txt"

# Create a PdfDocument instance
pdf = PdfDocument()

# Load a PDF document
pdf.LoadFromFile(inputFile)

# Get PDF forms
pdfform = pdf.Form
formWidget = PdfFormWidget(pdfform)
sb = []

# Iterate through all fields in the form
if formWidget.FieldsWidget.Count > 0:
    for i in range(formWidget.FieldsWidget.Count):
        field = formWidget.FieldsWidget.get_Item(i)

        # Get the name and value of the textbox field
        if isinstance(field, PdfTextBoxFieldWidget):
            textBoxField = field if isinstance(field, PdfTextBoxFieldWidget) else None
            name = textBoxField.Name
            value = textBoxField.Text
            sb.append("Textbox Name: " + name + "\r")
            sb.append("Textbox Name " + value + "\r\n")

        # Get the name of the listbox field
        if isinstance(field, PdfListBoxWidgetFieldWidget):
            listBoxField = field if isinstance(field, PdfListBoxWidgetFieldWidget) else None
            name = listBoxField.Name
            sb.append("Listbox Name: " + name + "\r")

            # Get the items of the listbox field
            sb.append("Listbox Items: \r")
            items = listBoxField.Values
            for i in range(items.Count):
                item = items.get_Item(i)
                sb.append(item.Value + "\r")

            # Get the selected item of the listbox field
            selectedValue = listBoxField.SelectedValue
            sb.append("Listbox Selected Value: " + selectedValue + "\r\n")

        # Get the name of the combo box field
        if isinstance(field, PdfComboBoxWidgetFieldWidget):
            comBoxField = field if isinstance(field, PdfComboBoxWidgetFieldWidget) else None
            name = comBoxField.Name
            sb.append("Combobox Name: " + name + "\r");

            # Get the items of the combo box field
            sb.append("Combobox Items: \r");
            items = comBoxField.Values
            for i in range(items.Count):
                item = items.get_Item(i)
                sb.append(item.Value + "\r")

            # Get the selected item of the combo box field
            selectedValue = comBoxField.SelectedValue
            sb.append("Combobox Selected Value: " + selectedValue + "\r\n")

        # Get the name and selected item of the radio button field
        if isinstance(field, PdfRadioButtonListFieldWidget):
            radioBtnField = field if isinstance(field, PdfRadioButtonListFieldWidget) else None
            name = radioBtnField.Name
            selectedValue = radioBtnField.SelectedValue
            sb.append("Radio Button Name: " + name + "\r");
            sb.append("Radio Button Selected Value: " + selectedValue + "\r\n")

       # Get the name and status of the checkbox field
        if isinstance(field, PdfCheckBoxWidgetFieldWidget):
            checkBoxField = field if isinstance(field, PdfCheckBoxWidgetFieldWidget) else None
            name = checkBoxField.Name
            sb.append("Checkbox Name: " + name + "\r")

            state = checkBoxField.Checked
            stateValue = "Yes" if state else "No"
            sb.append("If the checkBox is checked: " + stateValue + "\r\n")

# Write the results to a text file
f2=open(outputFile,'w', encoding='UTF-8')
for item in sb:
        f2.write(item)
f2.close()
pdf.Close()
Apply for a Temporary License
If you'd like to remove the evaluation message from the generated documents, or to get rid of the function limitations, please request a 30-day trial license for yourself.
Python: Group or Ungroup Rows and Columns in Excel
Grouping rows and columns in Excel provides a more organized and structured view of data, making it easier to analyze and understand complex datasets. After grouping related rows or columns, you can collapse or expand them as needed to focus on specific subsets of information while hiding details. In this article, you will learn how to group or ungroup rows and columns , as well as how to collapse or expand groups in Excel in Python using Spire.XLS for Python.
- Group Rows and Columns in Excel in Python
- Ungroup Rows and Columns in Excel in Python
- Expand or Collapse Groups in Excel in Python
Install Spire.XLS for Python
This scenario requires Spire.XLS for Python and plum-dispatch v1.7.4. They can be easily installed in your VS Code through the following pip command.
pip install Spire.XLS
If you are unsure how to install, please refer to this tutorial: How to Install Spire.XLS for Python in VS Code
Group Rows and Columns in Excel in Python
Spire.XLS for Python provides the Worksheet.GroupByRows() and Worksheet.GroupByColumns() methods to group specific rows and columns in an Excel worksheet. The following are the detailed steps:
- Create a Workbook object.
- Load a sample Excel file using Workbook.LoadFromFile() method.
- Get the specified worksheet using Workbook.Worksheets[] property.
- Group rows using Worksheet.GroupByRows() method.
- Group columns using Worksheet.GroupByColumns() method.
- Save the result file using Workbook.SaveToFile() method.
- Python
from spire.xls import *
from spire.xls.common import *

inputFile = "Data.xlsx"
outputFile = "GroupRowsAndColumns.xlsx"

# Create a Workbook object
workbook = Workbook()

# Load a sample Excel file
workbook.LoadFromFile(inputFile)

# Get the first worksheet
sheet = workbook.Worksheets[0]

# Group rows
sheet.GroupByRows(2, 6, False)
sheet.GroupByRows(8, 13, False)

# Group columns
sheet.GroupByColumns(4, 6, False)

# Save the result file
workbook.SaveToFile(outputFile, ExcelVersion.Version2016)
workbook.Dispose()
Ungroup Rows and Columns in Excel in Python
Ungrouping rows and columns in Excel refer to the process of reversing the grouping operation and restoring the individual rows or columns to their original state.
To ungroup rows and columns in an Excel worksheet, you can use the Worksheet.UngroupByRows() and Worksheet.UngroupByColumns() methods. The following are the detailed steps:
- Create a Workbook object.
- Load a sample Excel file using Workbook.LoadFromFile() method.
- Get the specified worksheet using Workbook.Worksheets[] property.
- Ungroup rows using Worksheet.UngroupByRows() method.
- Ungroup columns using Worksheet.UngroupByColumns() method.
- Save the result file using Workbook.SaveToFile() method.
- Python
from spire.xls import *
from spire.xls.common import *

inputFile = "GroupRowsAndColumns.xlsx"
outputFile = "UnGroupRowsAndColumns.xlsx"

# Create a Workbook object
workbook = Workbook()

# Load a sample Excel file
workbook.LoadFromFile(inputFile)

# Get the first worksheet
sheet = workbook.Worksheets[0]

# UnGroup rows
sheet.UngroupByRows(2, 6)
sheet.UngroupByRows(8, 13)

# UnGroup columns
sheet.UngroupByColumns(4, 6)

# Save the result file
workbook.SaveToFile(outputFile, ExcelVersion.Version2016)
workbook.Dispose()
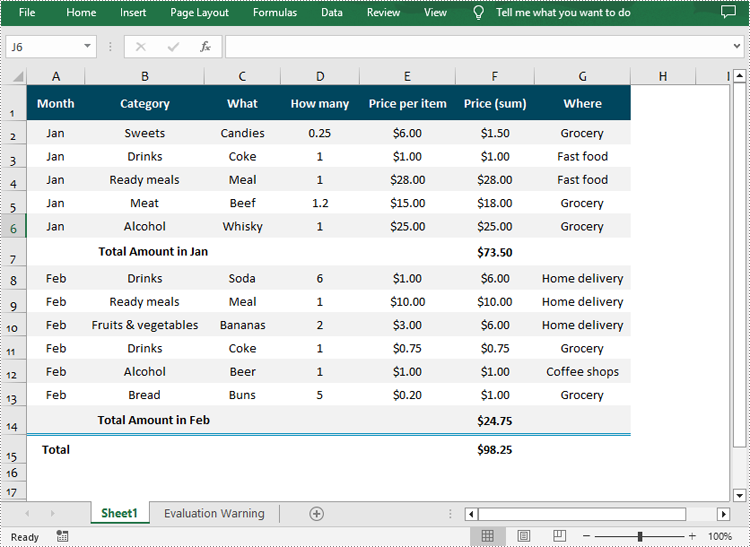
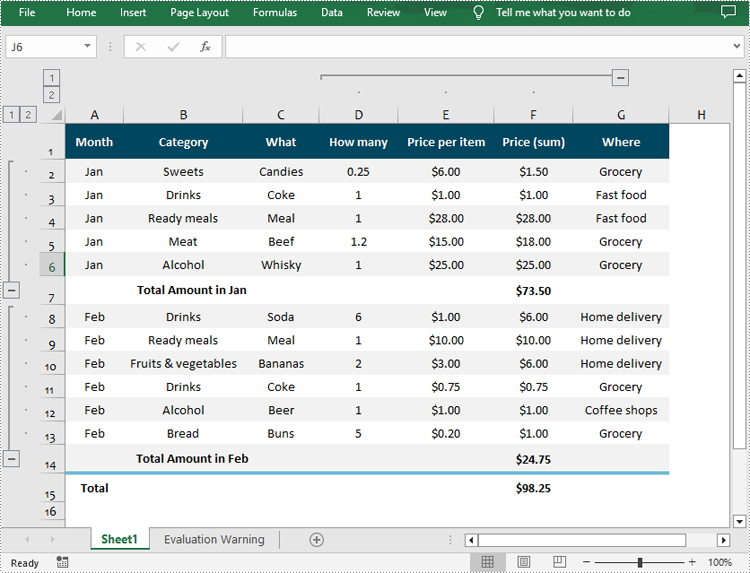
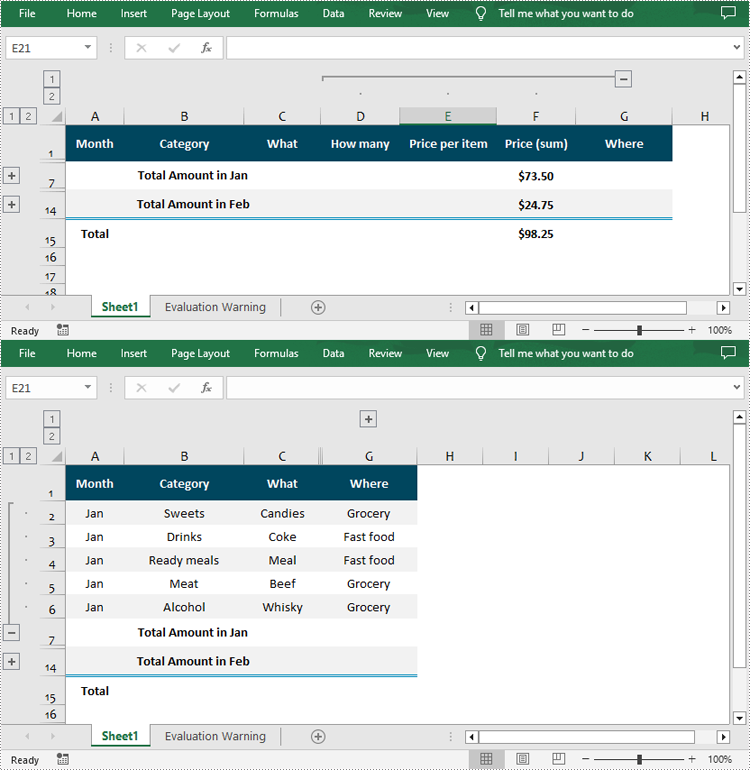
Expand or Collapse Groups in Excel in Python
Expanding or collapsing groups in Excel refers to the action of showing or hiding the detailed information within a grouped section. With Spire.XLS for Python, you can expand or collapse groups through the Worksheet.Range[].ExpandGroup() or Worksheet.Range[].CollapseGroup() methods. The following are the detailed steps:
- Create a Workbook object.
- Load a sample Excel file using Workbook.LoadFromFile() method.
- Get the specified worksheet using Workbook.Worksheets[] property.
- Expand a specific group using the Worksheet.Range[].ExpandGroup() method.
- Collapse a specific group using the Worksheet.Range[].CollapseGroup() method.
- Save the result file using Workbook.SaveToFile() method.
- Python
from spire.xls import *
from spire.xls.common import *

inputFile = "Grouped.xlsx"
outputFile = "ExpandOrCollapseGroups.xlsx"

# Create a Workbook object
workbook = Workbook()

# Load a sample Excel file
workbook.LoadFromFile(inputFile)

# Get the first worksheet
sheet = workbook.Worksheets[0]

# Expand a group
sheet.Range["A2:G6"].ExpandGroup(GroupByType.ByRows)

# Collapse a group
sheet.Range["D1:F15"].CollapseGroup(GroupByType.ByColumns)

# Save the result file
workbook.SaveToFile(outputFile, ExcelVersion.Version2016)
workbook.Dispose()
Apply for a Temporary License
If you'd like to remove the evaluation message from the generated documents, or to get rid of the function limitations, please request a 30-day trial license for yourself.
Spire.PDF for Java 10.1.3 adds the PdfTextReplacer interface to implement text replacement functionality
We are delighted to announce the release of Spire.PDF for Java 10.1.3. This version adds the PdfTextReplacer interface to implement text replacement function and the PdfImageHelper interface to implement image deletion, extraction, replacement, and compression functions. Besides, it improves the efficiency of drawing watermarks. More details are listed below.
Here is a list of changes made in this release
| Category | ID | Description |
| New feature | SPIREPDF-6454 | Improves the efficiency of drawing watermarks. |
| New feature | SPIREPDF-6459 | Adds the PdfTextReplacer interface to implement text replacement function.
PdfDocument pdf = new PdfDocument();
pdf.loadFromFile("sample.pdf");
PdfPageBase page = pdf.getPages().get(0);
PdfTextReplacer replacer = new PdfTextReplacer(page);
PdfTextReplaceOptions options= new PdfTextReplaceOptions();
options.setReplaceType(EnumSet.of(ReplaceActionType.WholeWord));
replacer.replaceText("www.google.com", "1234567");
pdf.saveToFile(outputFile);
|
| New feature | - | Adds the PdfImageHelper interface to implement image deletion, extraction, replacement, and compression functions. Key code snippet: PdfImageHelper imageHelper = new PdfImageHelper();
PdfImageInfo[] imageInfoCollection= imageHelper.getImagesInfo(page);
Delete image:
imageHelper.deleteImage(imageInfoCollection[0]);
Extract image:
int index = 0;
for (com.spire.pdf.utilities.PdfImageInfo img : imageInfoCollection) {
BufferedImage image = img.getImage();
File output = new File(outputFile_Img + String.format("img_%d.png", index));
ImageIO.write(image, "PNG", output);
index++;
}
PdfImage image = PdfImage.fromFile("ImgFiles/E-iceblue logo.png");
imageHelper.replaceImage(imageInfoCollection[i], image);
Compress image:
for (PdfPageBase page : (Iterable<PdfPageBase>)doc.getPages())
        {
            if (page != null)
            {
                if (imageHelper.getImagesInfo(page) != null)
                {
                    for (com.spire.pdf.utilities.PdfImageInfo info : imageHelper.getImagesInfo(page))
                    {
                        info.tryCompressImage();
                    }
                }
            }
        }
|
| Bug | SPIREPDF-6468 | Fixes the issue that the program threw java.lang.StringIndexOutOfBoundsException exception when saving documents. |
Spire.PDF 10.1 enhances the conversion from PDF to images
We are pleased to announce the release of Spire.PDF 10.1. This version enhances the conversion from PDF to images on the .NET Standard platform. In addition, some known issues have been fixed, such as the issue that the content was not displayed clearly when printing PDF. More details are listed below.
Here is a list of changes made in this release
| Category | ID | Description |
| Bug | SPIREPDF-6328 | Fixes the issue that the content was not displayed clearly when printing PDF. |
| Bug | SPIREPDF-6414 | Fixes the issue that the signature was damaged after reading a PDF containing a signature and saving it to a new document. |
| Bug | SPIREPDF-6431 | Fixes the issue that the value was rotated 90 degrees after modifying the value of a PDF form field. |
| Bug | SPIREPDF-6443 | Fixes the issue that text was not displayed clearly when converting PDF to images on the .NET Standard platform. |
Python Merge PDF Files with Simple Code
Table of Contents
Install with Pip
pip install Spire.PDF
Related Links
Merging PDF is the integration of multiple PDF files into a single PDF file. It allows users to combine the contents of multiple related PDF files into a single PDF file to better categorize, manage, and share files. For example, before sharing a document, similar documents can be merged into one file to simplify the sharing process. This post will show you how to use Python to merge PDF files with simple code.
- Python Library for Merging PDF Files
- Merge PDF Files in Python
- Merge PDF Files by Cloning Pages in Python
- Merge Selected Pages of PDF Files in Python
Python Library for Merging PDF Files
Spire.PDF for Python is a powerful Python library for creating and manipulating PDF files. With it, you are also able to use Python to merge PDF files effortlessly. Before that, we need to install Spire.PDF for Python and plum-dispatch v1.7.4, which can be easily installed in VS Code using the following pip commands.
pip install Spire.PDF
This article covers more details of the installation: How to Install Spire.PDF for Python in VS Code
Merge PDF Files in Python
This method supports directly merging multiple PDF files into a single file.
Steps
- Import the required library modules.
- Create a list containing the paths of PDF files to be merged.
- Use the Document.MergeFiles(inputFiles: List[str]) method to merge these PDFs into a single PDF.
- Call the PdfDocumentBase.Save(filename: str, FileFormat.PDF) method to save the merged file in PDF format to the specified output path and release resources.
Sample Code
- Python
from spire.pdf.common import *
from spire.pdf import *

# Create a list of the PDF file paths
inputFile1 = "C:/Users/Administrator/Desktop/PDFs/Sample-1.pdf"
inputFile2 = "C:/Users/Administrator/Desktop/PDFs/Sample-2.pdf"
inputFile3 = "C:/Users/Administrator/Desktop/PDFs/Sample-3.pdf"
files = [inputFile1, inputFile2, inputFile3]

# Merge the PDF documents
pdf = PdfDocument.MergeFiles(files)

# Save the result document
pdf.Save("C:/Users/Administrator/Desktop/MergePDF.pdf", FileFormat.PDF)
pdf.Close()

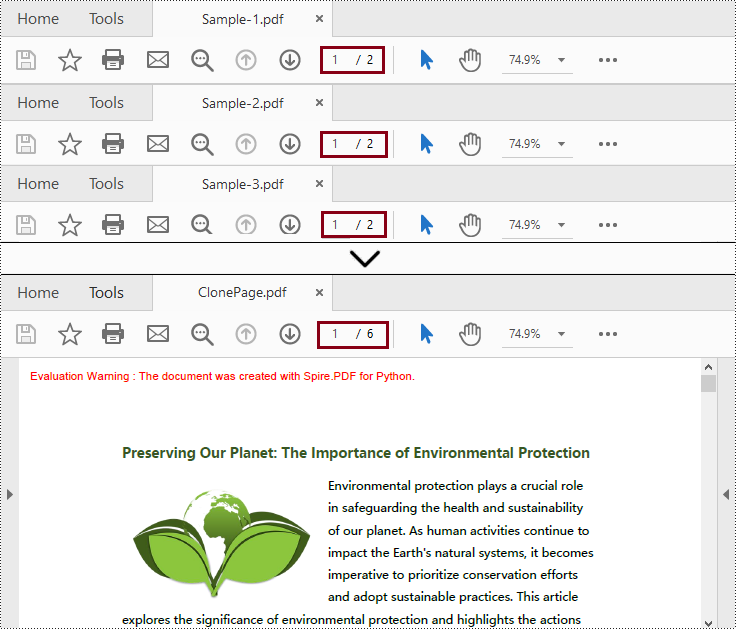
Merge PDF Files by Cloning Pages in Python
Unlike the above method, this method merges multiple PDF files by copying document pages and inserting them into a new file.
Steps
- Import the required library modules.
- Create a list containing the paths of PDF files to be merged.
- Loop through each file in the list and load it as a PdfDocument object; then add them to a new list.
- Create a new PdfDocument object as the destination file.
- Iterate through the PdfDocument objects in the list and append their pages to the new PdfDocument object.
- Finally, call the PdfDocument.SaveToFile() method to save the new PdfDocument object to the specified output path.
Sample Code
- Python
from spire.pdf.common import *
from spire.pdf import *

# Create a list of the PDF file paths
file1 = "C:/Users/Administrator/Desktop/PDFs/Sample-1.pdf"
file2 = "C:/Users/Administrator/Desktop/PDFs/Sample-2.pdf"
file3 = "C:/Users/Administrator/Desktop/PDFs/Sample-3.pdf"
files = [file1, file2, file3]

# Load each PDF file as an PdfDocument object and add them to a list
pdfs = []
for file in files:
    pdfs.append(PdfDocument(file))

# Create an object of PdfDocument class
newPdf = PdfDocument()

# Insert the pages of the loaded PDF documents into the new PDF document
for pdf in pdfs:
    newPdf.AppendPage(pdf)

# Save the new PDF document
newPdf.SaveToFile("C:/Users/Administrator/Desktop/ClonePage.pdf")
Merge Selected Pages of PDF Files in Python
This method is similar to merging PDFs by cloning pages, and you can specify the desired pages when merging.
Steps
- Import the required library modules.
- Create a list containing the paths of PDF files to be merged.
- Loop through each file in the list and load it as a PdfDocument object; then add them to a new list.
- Create a new PdfDocument object as the destination file.
- Insert the selected pages from the loaded files into the new PdfDocument object using PdfDocument.InsertPage(PdfDocument, pageIndex: int) method or PdfDocument.InsertPageRange(PdfDocument, startIndex: int, endIndex: int) method.
- Finally, call the PdfDocument.SaveToFile() method to save the new PdfDocument object to the specified output path.
Sample Code
- Python
from spire.pdf import *
from spire.pdf.common import *

# Create a list of the PDF file paths
file1 = "C:/Users/Administrator/Desktop/PDFs/Sample-1.pdf"
file2 = "C:/Users/Administrator/Desktop/PDFs/Sample-2.pdf"
file3 = "C:/Users/Administrator/Desktop/PDFs/Sample-3.pdf"
files = [file1, file2, file3]

# Load each PDF file as an PdfDocument object and add them to a list
pdfs = []
for file in files:
    pdfs.append(PdfDocument(file))

# Create an object of PdfDocument class
newPdf = PdfDocument()

# Insert the selected pages from the loaded PDF documents into the new document
newPdf.InsertPage(pdfs[0], 0)
newPdf.InsertPage(pdfs[1], 1)
newPdf.InsertPageRange(pdfs[2], 0, 1)

# Save the new PDF document
newPdf.SaveToFile("C:/Users/Administrator/Desktop/SelectedPages.pdf")

Get a Free License for the Library to Merge PDF in Python
You can get a free 30-day temporary license of Spire.PDF for Python to merge PDF files in Python without evaluation limitations.
Conclusion
In this article, you have learned how to merge PDF files in Python. Spire.PDF for Python provides two different ways to merge multiple PDF files, including merging files directly and copying pages. Also, you can merge selected pages of multiple PDF files based on the second method. In a word, this library simplifies the process and allows developers to focus on building powerful applications that involve PDF manipulation tasks.