Spire.Barcode for Java 5.1.3 supports adding pictures to the center of QR code
We are happy to announce the release of Spire.Barcode for Java 5.1.3. This version supports adding pictures to the center of QR code. It also fixes the issue that barcode recognition failed in vertical orientation. More details are listed below.
Here is a list of changes made in this release
| Category | ID | Description |
| New feature | - | The method for applying a license has been changed to com.spire.barcode.license.LicenseProvider.setLicenseKey(key). |
| New feature | SPIREBARCODE-244 | Supports adding pictures to the center of QR code.
BarcodeSettings barCodeSetting = new BarcodeSettings();
BufferedImage image = ImageIO.read(new File("Image/1.png"));
barCodeSetting.setQRCodeLogoImage(image);
|
| Bug | SPIREBARCODE-243 | Fixes the issue that barcode recognition failed in vertical orientation. |
Read PDF File in C#
Table of Contents
Installed via NuGet
PM> Install-Package Spire.PDF
Related Links
Many financial reports, research papers, legal documents, or invoices are often distributed in PDF format. Reading PDF files enables you to extract information, analyze content, and perform data processing tasks such as text extraction, keyword search, document classification, and data mining.
By using C# to read PDF, you can automate the repetitive task to realize efficient retrieval of specific information from a large collection of PDF files. This is valuable for applications that require searching through extensive archives, digital libraries, or document repositories. This article will give the following examples to show you how to read PDF file in C#.
- Read Text from a PDF Page in C#
- Read Text from a PDF Page Area in C#
- Read PDF Without Preserving Text Layout in C#
- Extract Images and Tables in PDF in C#
C# PDF Reader Library
Spire.PDF for .NET library can serve as a PDF reader library that allows developers to integrate PDF reading capabilities into their applications. It provides functions and APIs for parsing, rendering, and processing of PDF files within .NET applications.
You can either download the C# PDF reader to manually add the DLL files as references in your .NET project, or install it directly via NuGet.
PM> Install-Package Spire.PDF
Read Text from a PDF Page in C#
Spire.PDF for .NET makes it easy to read PDF text in C# through the PdfTextExtractor class. The following are the steps to read all text from a specified PDF page.
- Create a PdfDocument object.
- Load a PDF file using PdfDocument.LoadFromFile() method.
- Get the specific page through PdfDocument.Pages[index] property.
- Create a PdfTextExtractor object.
- Create a PdfTextExtractOptions object, and set the IsExtractAllText property to true.
- Extract text from the selected page using PdfTextExtractor.ExtractText() method.
- Write the extracted text to a TXT file.
The following code example shows how to use C# to read PDF text from a specified page.
- C#
using System;
using System.IO;
using Spire.Pdf;
using Spire.Pdf.Texts;

namespace ExtractTextFromPage
{
    class Program
    {
        static void Main(string[] args)
        {
            //Create a PdfDocument object
            PdfDocument doc = new PdfDocument();

            //Load a PDF file
            doc.LoadFromFile("TestPDF.pdf");

            //Get the first page
            PdfPageBase page = doc.Pages[0];

            //Create a PdfTextExtractot object
            PdfTextExtractor textExtractor = new PdfTextExtractor(page);

            //Create a PdfTextExtractOptions object
            PdfTextExtractOptions extractOptions = new PdfTextExtractOptions();

            //Set isExtractAllText to true
            extractOptions.IsExtractAllText = true;

            //Read text from the PDF page
            string text = textExtractor.ExtractText(extractOptions);

            //Write to a txt file
            File.WriteAllText("ReadPDF.txt", text);
        }
    }
}
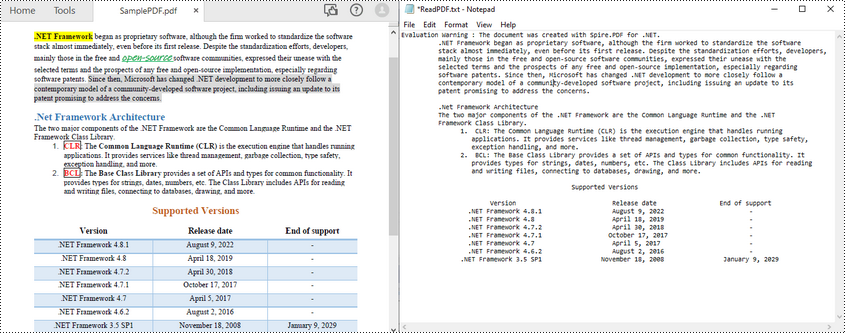
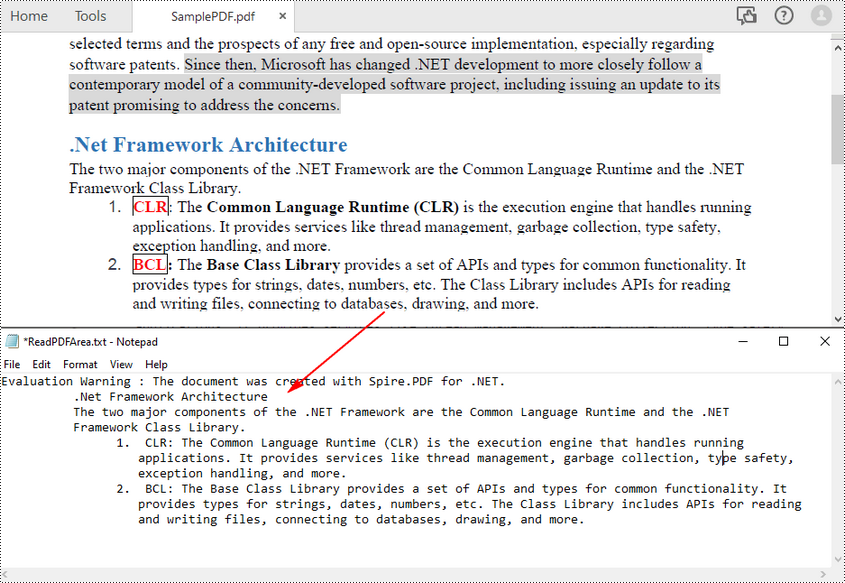
Read Text from a PDF Page Area in C#
To read PDF text from a specified page area in PDF, you can first define a rectangle area and then call the setExtractArea() method of PdfTextExtractOptions class to extract text from it. The following are the steps to extract PDF text from a rectangle area of a page.
- Create a PdfDocument object.
- Load a PDF file using PdfDocument.LoadFromFile() method.
- Get the specific page through PdfDocument.Pages[index] property.
- Create a PdfTextExtractor object.
- Create a PdfTextExtractOptions object, and specify the rectangle area through the ExtractArea property of it.
- Extract text from the rectangle using PdfTextExtractor.ExtractText() method.
- Write the extracted text to a TXT file.
The following code sample shows how to use C# to read PDF text from a specified page area.
- C#
using Spire.Pdf;
using Spire.Pdf.Texts;
using System.IO;
using System.Drawing;

namespace ExtractTextFromRectangleArea
{
    class Program
    {
        static void Main(string[] args)
        {
            //Create a PdfDocument object
            PdfDocument doc = new PdfDocument();

            //Load a PDF file
            doc.LoadFromFile("TestPDF.pdf");

            //Get the first page
            PdfPageBase page = doc.Pages[0];

            //Create a PdfTextExtractot object
            PdfTextExtractor textExtractor = new PdfTextExtractor(page);

            //Create a PdfTextExtractOptions object
            PdfTextExtractOptions extractOptions = new PdfTextExtractOptions();

            //Specify a rectangle area
            extractOptions.ExtractArea = new RectangleF(0, 180, 800, 160);

            //Read PDF text from the rectangle
            string text = textExtractor.ExtractText(extractOptions);

            //Write to a txt file
            File.WriteAllText("ReadPDFArea.txt", text);
        }
    }
}
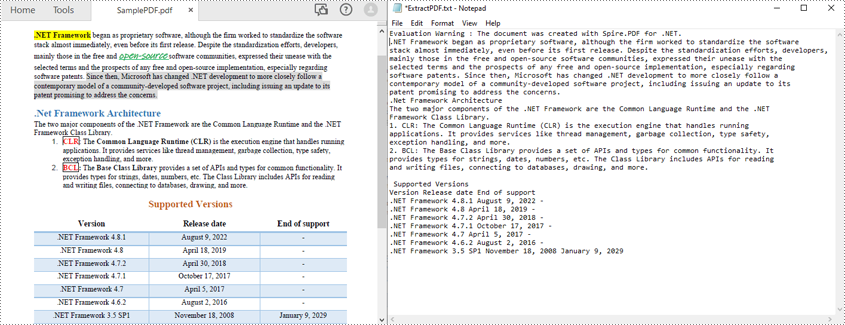
Read PDF Without Preserving Text Layout in C#
The above methods read PDF text line by line. You can also read PDF text simply without retain its layout using the SimpleExtraction strategy. It keeps track of the current Y position of each string and inserts a line break into the output if the Y position has changed. The following are the steps to read PDF text simply.
- Create a PdfDocument object.
- Load a PDF file using PdfDocument.LoadFromFile() method.
- Get the specific page through PdfDocument.Pages[index] property.
- Create a PdfTextExtractor object.
- Create a PdfTextExtractOptions object and set the IsSimpleExtraction property to true.
- Extract text from the selected page using PdfTextExtractor.ExtractText() method.
- Write the extracted text to a TXT file.
The following code sample shows how to use C# to read PDF text without preserving text layout.
- C#
using System.IO;
using Spire.Pdf;
using Spire.Pdf.Texts;

namespace SimpleExtraction
{
    class Program
    {
        static void Main(string[] args)
        {
            //Create a PdfDocument object
            PdfDocument doc = new PdfDocument();

            //Load a PDF file
            doc.LoadFromFile("TestPDF.pdf");

            //Get the first page
            PdfPageBase page = doc.Pages[0];

            //Create a PdfTextExtractor object
            PdfTextExtractor textExtractor = new PdfTextExtractor(page);

            //Create a PdfTextExtractOptions object
            PdfTextExtractOptions extractOptions = new PdfTextExtractOptions();

            //Set IsSimpleExtraction to true to
            extractOptions.IsSimpleExtraction = true;

            //Read text from the PDF page
            string text = textExtractor.ExtractText(extractOptions);

            //Write to a txt file
            File.WriteAllText("ExtractPDF.txt", text);
        }
    }
}
Extract Images and Tables in PDF in C#
In addition to read PDF text in C#, Spire.PDF for .NET library also allows you to extract images from PDF or read only the table data in a PDF file. The following links will direct you to the relevant official tutorials:
- Extract Images from PDF in C#
- Extract Table Data from PDF in C#
- Extract Tables from PDF to Excel in C#
Conclusion
This article introduced various ways to read PDF file in C#. You can learn from the given examples on how to read PDF text from a specified page, from a specified rectangle area, or read PDF files without preserving text layout. In addition, extracting images or tables in a PDF file can also be achieved with the Spire.PDF for .NET library.
Explore more PDF processing and conversion capabilities of the .NET PDF library using the documentation. If any issues occurred while testing, feel free to contact technical support team via email or forum.
C# to Read Excel Files and Export Data to DataTable & Database
Table of Contents
Installed via NuGet
PM> Install-Package Spire.XLS
Related Links
Excel files remain a ubiquitous format for storing tabular data, making the ability to efficiently read and extract information from them crucial. C#, benefiting from the extensive functionality of the .NET Framework, is capable of efficient data manipulation. Utilizing C# to read Excel files and write their data to databases and data tables, or use the data for other purposes, is an excellent solution for developers to manipulate Excel data.
This article focuses on how to use C# to read Excel files. It includes the following parts:
- Advantages and API for Reading Excel Files in C#
- Getting Started with Excel File Reading Using C#
- Read Excel Files into Text with C# Code
- Script in C# for Reading Excel Files into DataTable
- C# Code to Read Excel Files and Insert into Databases
- Get a Free License for the API
Advantages and API for Reading Excel Files in C#
Leveraging C# for reading Excel files brings the following advantages:
- Automation and scalability: C#, with .NET Framework and APIs, allows automating Excel file reading tasks, making it possible to process large volumes of data efficiently. Developers can create scripts or applications that can handle batch processing, scheduled tasks, or data import/export operations, saving time and effort.
- Flexibility and customization: The .NET Framework along with the APIs provides a high level of flexibility and customization when working with Excel files. Developers can define custom logic to extract and transform data, apply specific formatting, or perform calculations. This allows tailoring the reading process to specific requirements or business rules.
However, reading Excel files with only C# and the .NET Framework can be a challenging task. The native library provided by the .NET Framework for handling Excel files is Microsoft.Office.Interop.Excel. However, the usage of this library requires the installation of MS Excel, and the code logic for processing Excel files with it is extremely complex, making it difficult to efficiently read Excel files. As a result, developers prefer third-party libraries to work with Excel files efficiently and conveniently.
Spire.XLS for .NET is a professional C# API for Excel file processing. It features in extensive format support and efficient Excel data manipulation, including reading Excel files and writing the data to database, datatable, etc. Users can download Spire.XLS for .NET from the official site or install it through NuGet.
PM> Install-Package Spire.XLS
Getting Started with Excel File Reading in C#
Spire.XLS for .NET allows developers to create, read, write, and manipulate Excel files in their .NET applications with simple code.
To effectively work with Spire.XLS, you'll interact with various classes, properties, and methods. Here's a table summarizing some of the main ones along with their descriptions:
| Item | Description |
| Workbook class | Represents an Excel workbook and provides methods for reading and manipulating its contents. |
| Worksheet class | Represents an individual worksheet within a workbook. |
| Workbook.LoadFromFile method | Loads an Excel workbook from a file. |
| Workbook.Worksheets property | Gets the collection of worksheets in the workbook. |
| Worksheet.Range[] property | Gets a cell range in the worksheet (indexes are 1-based). |
| CellRange.Value property | Gets or sets the value of a cell. |
| CellRange.Text property | Gets or sets the displayed text of a cell. |
The typical workflow of using Spire.XLS for .NET to read Excel files involves these steps:
- Load the Excel file using Workbook.LoadFromFile() method.
- Access worksheets through the Workbook.Worksheets[] property.
- Access cells through the Worksheet.Range[] property.
- Access displayed text in cells through the CellRange.Text property or access the value of cells (text, numbers, formulas, etc.) through the CellRange.Value property
- Retrieve the data, write the data to text files, databases, etc., or perform other desired operations.
- To export cell values to a data table, developers can directly use the Worksheet.ExportDataTable() method and it will return a DataTable object.
- Alternatively, developers can also directly convert workbook using Workbook.SaveToFile() method to any supported format.
In short, this API provides classes and properties that allow developers to load Excel files and read their contents using straightforward code, making reading Excel files with C# efficient and simple. Additionally, it enables direct conversion of workbooks and worksheets to PDF, HTML, XML, and other file formats.
C# to Read Excel Files into Text
Steps for reading Excel files and write the data to text files with C#:
- Import the needed namespaces.
- Create an object of Workbook class and load an Excel file using the Workbook.LoadFromFile() method.
- Get the first worksheet through the Workbook.Worksheets[] property.
- Create a text file to write the data in the worksheet.
- Iterate through the allocated rows and columns, access cells through the Worksheet.Range[] property, and get the displayed text of each cell through the CellRange.Text property and write it to the text file.
- Release resources.
Code Example:
- C#
using Spire.Xls;
using System.IO;

class Program
{
    static void Main(string[] args)
    {
        // Load the Excel file
        Workbook workbook = new Workbook();
        workbook.LoadFromFile("Sample.xlsx");

        // Get the first worksheet
        Worksheet worksheet = workbook.Worksheets[0];

        // Create an output text file
        string outputFile = "Output.txt";
        StreamWriter writer = new StreamWriter(outputFile);

        // Iterate through the rows and columns of the worksheet and write the data to the text file
        for (int row = 1; row <= worksheet.LastRow; row++)
        {
            for (int col = 1; col <= worksheet.LastColumn; col++)
            {
                CellRange range = worksheet.Range[row, col];
                string cellValue = range.Text == null ? string.Empty : range.Text.ToString();
                writer.Write(cellValue + "\t"); // Separate cell data using a tab character
            }
            writer.WriteLine(); // Write a line break
        }

        // Close the writer and save the text file
        writer.Close();

        // Release resources
        workbook.Dispose();
    }
}
The reading result:
Code in C Sharp for Reading Excel Files into DataTables
DataTable is an object that represents a data table in the .NET Framework. It is used to store and manipulate data in memory and can perform operations such as sorting, filtering, modifying, and exporting. Developers can use C# to read Excel file data and write it to the DataTable object, thus facilitating further processing of the data. The following are the steps:
- Import the needed namespaces.
- Create an object of Workbook class and load an Excel file using the Workbook.LoadFromFile() method.
- Get the first worksheet through the Workbook.Worksheets[] property.
- Export the data from the worksheet to a DataTable object using the Worksheet.ExportDataTable() method.
- Release resources.
Code Example:
- C#
using Spire.Xls;
using System.Data;

namespace ExcelToAccess
{
    class Program
    {
        static void Main(string[] args)
        {
            // Create an object of Workbook class
            Workbook workbook = new Workbook();

            // Load an Excel file
            workbook.LoadFromFile("Sample.xlsx");

            // Get the first worksheet
            Worksheet worksheet = workbook.Worksheets[0];

            // Export the data from the worksheet to a DataTable object
            DataTable dataTable = worksheet.ExportDataTable();

            workbook.Dispose();
        }
    }
}
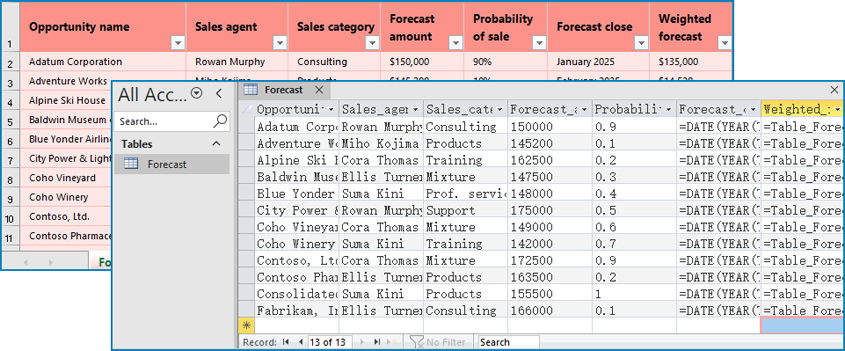
C# Code to Read Excel Files and Insert into Databases
This example shows how to use C# code to write Excel worksheet data to a database using an Access database. This method also requires the System.Data.OleDB namespace. If the .NET Framework you are using does not have it, you can install it by entering the following code in the Package Management Console:
Install-Package System.Data.OleDb
The steps for reading an Excel file and inserting into a database are as follows:
- Import the needed namespaces.
- Create an object of Workbook class and load an Excel file using the Workbook.LoadFromFile() method.
- Retrieve the first worksheet with the Workbook.Worksheets[] property.
- Get the worksheet name as the table name by accessing the Worksheet.Name property.
- Retrieve the first row as column names by accessing the CellRange object of the first row with Worksheet.Rows[] property and storing the value of each column in a string array.
- Connect to the Access database using the OleDbConnection by specifying the connection string and the file path of the database.
- Create the data table by dynamically generating an SQL query string for creating the table, including the table name, column names, and data types.
- Execute the create table query using an OleDbCommand object and the ExecuteNonQuery method.
- Insert the data by iterating through each row of the Excel worksheet (starting from the second row) and constructing an insert statement with parameterized queries. Insert each row of data into the Access database table.
- Close the database connection and release resources.
Code Example:
- C#
using Spire.Xls;
using System.Data.OleDb;

class Program
{
    static void Main(string[] args)
    {
        // Set the Excel file path
        string excelFilePath = "Sample.xlsx";
        // Set the Access database file path
        string accessDbFilePath = "Sample.accdb";

        // Load the Excel file
        Workbook workbook = new Workbook();
        workbook.LoadFromFile(excelFilePath);

        // Get the first worksheet
        Worksheet worksheet = workbook.Worksheets[0];

        // Use the worksheet name as the table name
        string tableName = worksheet.Name;

        // Get the first row as column names
        CellRange headerRange = worksheet.Rows[0];
        string[] columnNames = new string[headerRange.Columns.Length];
        for (int i = 0; i < headerRange.Columns.Length; i++)
        {
            columnNames[i] = headerRange.Columns[i].Value.Replace(" ", "_");
        }

        // Connect to the Access database
        string connectionString = $"Provider=Microsoft.ACE.OLEDB.12.0;Data Source={accessDbFilePath};Persist Security Info=False;";
        using (OleDbConnection connection = new OleDbConnection(connectionString))
        {
            connection.Open();

            // Create the table
            string createTableQuery = $"CREATE TABLE [{tableName}] ({string.Join(", ", columnNames.Select(c => $"[{c}] Memo"))})";
            using (OleDbCommand createTableCommand = new OleDbCommand(createTableQuery, connection))
            {
                createTableCommand.ExecuteNonQuery();
            }

            // Insert data
            string insertQuery = $"INSERT INTO [{tableName}] ({string.Join(", ", columnNames.Select(c => $"[{c}]"))}) VALUES ({string.Join(", ", columnNames.Select(c => $"@{c}"))})";
            using (OleDbCommand insertCommand = new OleDbCommand(insertQuery, connection))
            {
                foreach (CellRange row in worksheet.Rows.Cast().Skip(1))
                {
                    for (int i = 0; i < row.Columns.Length; i++)
                    {
                        insertCommand.Parameters.AddWithValue($"@{columnNames[i]}", row.Columns[i].Value);
                    }

                    insertCommand.ExecuteNonQuery();
                    insertCommand.Parameters.Clear();
                }
            }

            connection.Close();
            workbook.Dispose();
        }
    }
}
The reading and inserting result:
Get a Free License for the API
Spire.XLS for .NET provides a free trial license, allowing developers, businesses, and individual users to explore its powerful Excel file processing capabilities without any usage restrictions or watermarks. By obtaining a free license, users can maximize the potential of Spire.XLS for .NET, expand their file handling capabilities, and significantly improve their efficiency in processing Excel files.
Conclusion
In this article, we explore how to use C# to read Excel files and extract data for various purposes. By leveraging the powerful features of Spire.XLS for .NET, developers can efficiently manipulate Excel data, export it to different formats, and enhance data-driven applications. With step-by-step instructions, code examples, and graphical presentations of processing results, this guide helps optimize file processing efficiency and unlock the full potential of data analysis in C# projects.
Python: Add or Remove Sections in PowerPoint
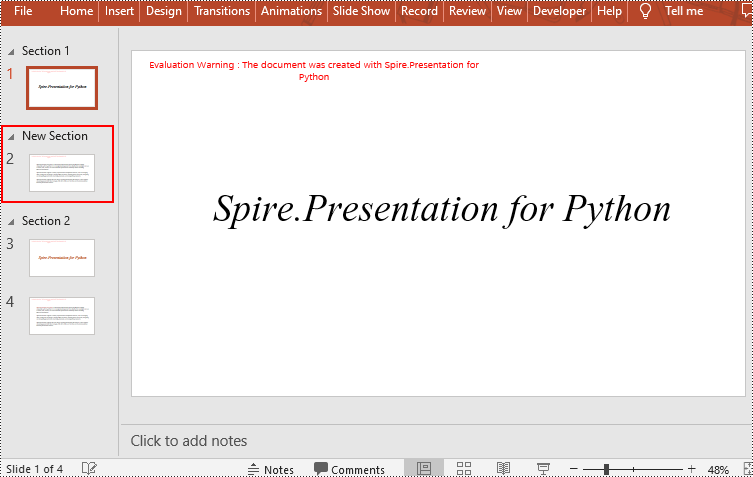
In PowerPoint, sections are a powerful tool for organizing and managing slides. By dividing slides into different sections, you can better organize content, navigate through your presentation, and present information in a more structured manner. This article will demonstrate how to add and remove sections in a PowerPoint presentation using Spire.Presentation for Python.
- Add a Section at the End of a PowerPoint
- Insert a Section Before a Specified Section
- Add a Section Before a Specified Slide in PowerPoint
- Remove a Section from a PowerPoint
Install Spire.PDF for Python
This scenario requires Spire.Presentation for Python and plum-dispatch v1.7.4. They can be easily installed in your Windows through the following pip command.
pip install Spire.Presentation
If you are unsure how to install, please refer to this tutorial: How to Install Spire.Presentation for Python on Windows
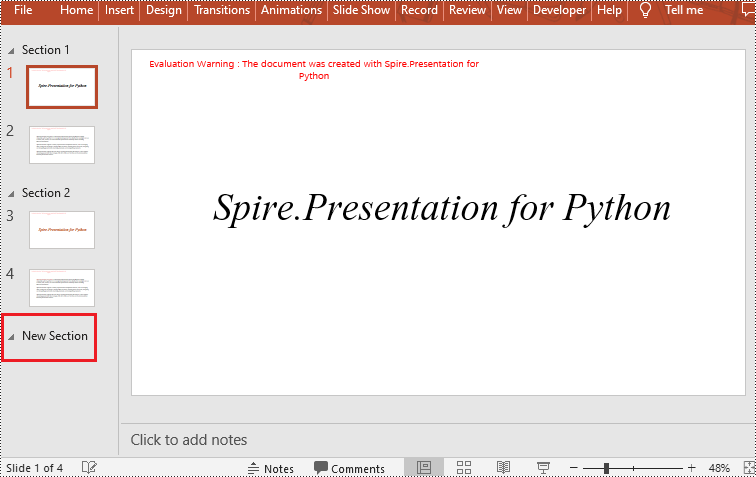
Add a Section at the End of a PowerPoint in Python
Spire.Presentation for Python provides the Presentation.SectionList.Append(section_name) method to add a section at the end of a presentation. Here are the specific steps to perform this operation:
- Create a Presentation class instance.
- Load a PowerPoint document using Presentation.LoadFromFile() method.
- Add a section at the end using the Presentation.SectionList.Append() method.
- Save the document using Presentation.SaveToFile() method.
- Python
from spire.presentation.common import *
from spire.presentation import *

# Create a new presentation object
presentation = Presentation()

# Load a sample PowerPoint presentation
presentation.LoadFromFile("sample.pptx")

# Append a new section
presentation.SectionList.Append("New Section")

# Save the presentation
presentation.SaveToFile("AddSection.pptx", FileFormat.Pptx2013)

# Dispose of the presentation object
presentation.Dispose()
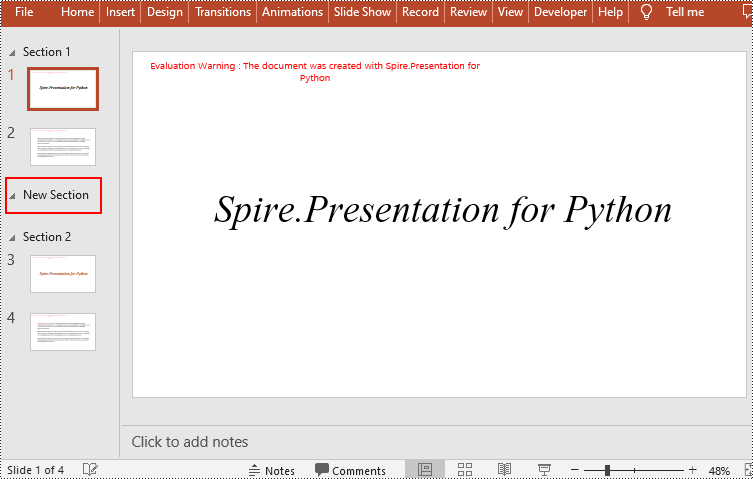
Insert a Section Before a Specified Section in Python
You can also use the Presentation.SectionList.Insert(index, section_name) method to insert a new section before a specific section. Here are the detailed steps:
- Create a Presentation class instance.
- Load a PowerPoint document using Presentation.LoadFromFile() method.
- Insert a new section before a specific section using the Presentation.SectionList.Insert() method, where index is the position of the specific section.
- Save the document using Presentation.SaveToFile() method.
- Python
from spire.presentation.common import *
from spire.presentation import *

# Create a new presentation object
presentation = Presentation()

# Load a sample PowerPoint presentation
presentation.LoadFromFile("sample.pptx")

# Insert a new section before the second section
presentation.SectionList.Insert(1," New Section")

# Save the presentation
presentation.SaveToFile("AddSection.pptx", FileFormat.Pptx2013)

# Dispose of the presentation object
presentation.Dispose()
Add a Section Before a Specified Slide in Python
You can also use the Presentation.SectionList.Add(section_name, slide) method to insert a new section before a specific slide. Here are the detailed steps:
- Create a Presentation class instance.
- Load a PowerPoint document using Presentation.LoadFromFile() method.
- Insert a new section before a specific slide using the Presentation.SectionList.Add() method
- Save the document using Presentation.SaveToFile() method.
- Python
from spire.presentation.common import *
from spire.presentation import *

# Create a new presentation object
presentation = Presentation()

# Load a sample PowerPoint presentation
presentation.LoadFromFile("sample.pptx")

# Get the second slide
slide=presentation.Slides[1]

# Add a new section before the second slide
presentation.SectionList.Add("New Section",slide)

# Save the presentation
presentation.SaveToFile("AddSection.pptx", FileFormat.Pptx2013)

# Dispose of the presentation object
presentation.Dispose()
Remove a Section from a PowerPoint in Python
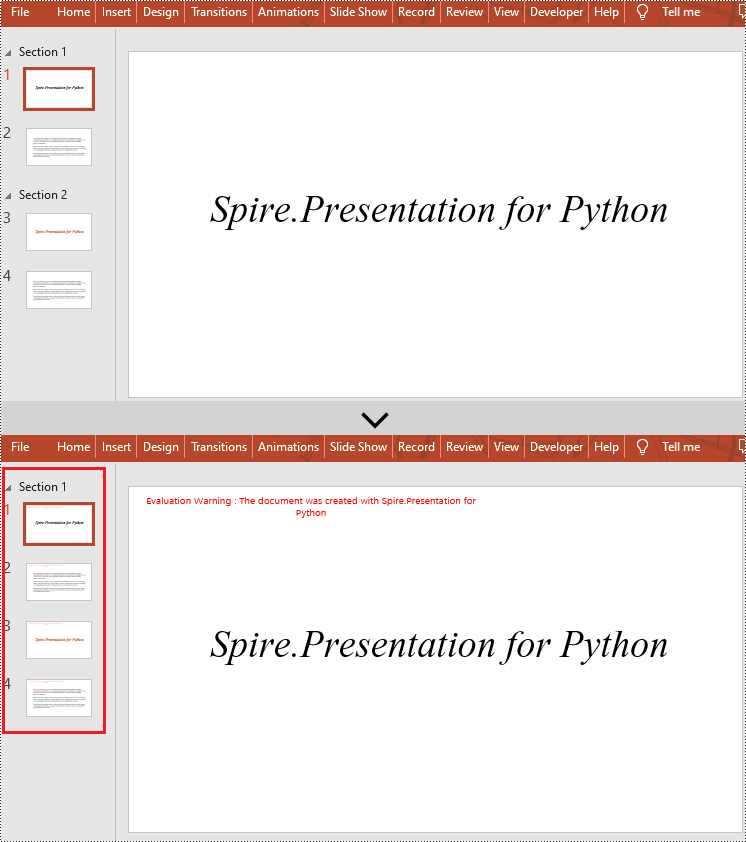
If you don't need a specific section, you can simply remove it using the Presentation.SectionList.RemoveAt(index_to_remove) method. Please note that removing a section does not delete the slides within that section. Here are the steps to delete a specific section while preserving its slides:
- Create a Presentation class instance.
- Load a PowerPoint document using Presentation.LoadFromFile() method.
- Remove a specific section using the Presentation.SectionList.RemoveAt(index_to_remove) method, which takes an integer index as a parameter. You can also remove all sections using the Presentation.Slides.RemoveAll() method.
- Save the document using Presentation.SaveToFile() method.
- Python
from spire.presentation.common import *
from spire.presentation import *

# Create a new presentation object
presentation = Presentation()

# Load a sample PowerPoint presentation
presentation.LoadFromFile("sample.pptx")

# Remove the second section
presentation.SectionList.RemoveAt(1);

# # Remove all sections
# presentation.SectionList.RemoveAll();

# Save the presentation
presentation.SaveToFile("RemoveSection.pptx", FileFormat.Pptx2013)

# Dispose of the presentation object
presentation.Dispose()
Apply for a Temporary License
If you'd like to remove the evaluation message from the generated documents, or to get rid of the function limitations, please request a 30-day trial license for yourself.
Apply Various Types of Conditional Formatting to Excel with Python
Table of Contents
Install with Pip
pip install Spire.XLS
Related Links
Conditional formatting is a feature in Microsoft Excel that enables you to apply formatting rules to cells based on specific conditions or criteria. These conditions can be based on cell values, formulas, or other specified criteria. Conditional formatting allows you to dynamically change the appearance of cells, such as font color, cell background color, borders, and data bars, to visually highlight or emphasize certain data points. In this blog, we will explore how to apply conditional formatting to Excel using Python.
We will discuss some commonly used types of conditional formatting rules in Excel:
Python Library to Apply Conditional Formatting to Excel
To apply conditional formatting to Excel files using Python, we need to install a Python module that supports this functionality. In this blog post, we will use the Spire.XLS for Python library, which offers a comprehensive set of functions and properties specifically designed for applying conditional formatting rules to Excel files based on various criteria like cell values, formulas, and more.
To install Spire.XLS for Python, you can run the following pip command:
pip install Spire.XLS
Highlight Cell Rules
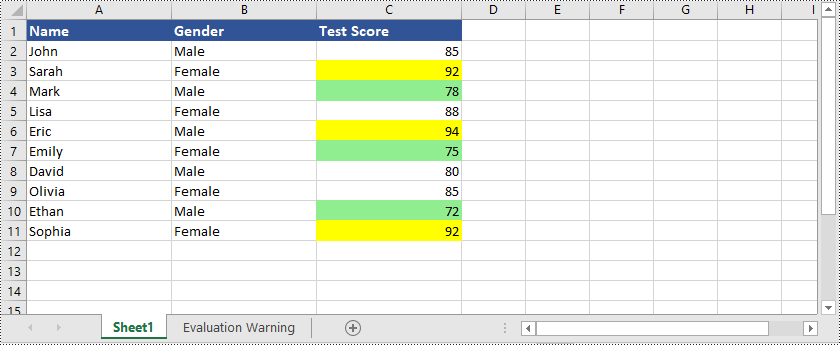
Highlight Cell Rules are a type of conditional formatting in Excel that allows you to highlight cells based on their values. You can set conditions such as greater than, less than, equal to, between, and more to determine which cells should be formatted. You can choose formatting options like font color, background color, and borders.
Here is an example that shows how to highlight cells containing values greater or less than a specific value in Excel using Python and Spire.XLS for Python:
- Python
from spire.xls import *
from spire.xls.common import *

# Create an object of the Workbook class
workbook = Workbook()
# Load an Excel file
workbook.LoadFromFile("Example1.xlsx")
# Get the first worksheet
sheet = workbook.Worksheets[0]

# Add a conditional format to the sheet
conditionalFormat = sheet.ConditionalFormats.Add()
# Specify the cell range to apply the conditional format
conditionalFormat.AddRange(sheet.Range["C2:C11"])

# Create the first condition to highlight cells containing values greater than a specific value
condition1 = conditionalFormat.AddCondition()
condition1.FormatType = ConditionalFormatType.CellValue
condition1.FirstFormula = "90"
condition1.Operator = ComparisonOperatorType.Greater
condition1.BackColor = Color.get_Yellow()

# Create the second condition to highlight cells containing values less than a specific value
condition2 = conditionalFormat.AddCondition()
condition2.FormatType = ConditionalFormatType.CellValue
condition2.FirstFormula = "80"
condition2.Operator = ComparisonOperatorType.Less
condition2.BackColor = Color.get_LightGreen()

# Save the result file
workbook.SaveToFile("HighlightCellRules.xlsx", ExcelVersion.Version2016)
workbook.Dispose()
In addition to highlighting cells with values that are greater or less than a specific value, Spire.XLS for Python also supports many other options, for example, you can highlight cells with duplicate or unique values, highlight cells with dates that fall within a specified time period, and many more.
Here is an example that shows how to highlight cells with duplicate or unique values in Excel using Python and Spire.XLS for Python:
- Python
from spire.xls import *
from spire.xls.common import *

# Create an object of the Workbook class
workbook = Workbook()
# Load an Excel file
workbook.LoadFromFile("Example1.xlsx")
# Get the first worksheet
sheet = workbook.Worksheets[0]

# Add a conditional format to the worksheet
conditionalFormat = sheet.ConditionalFormats.Add()
# Specify the cell range to apply the conditional format
conditionalFormat.AddRange(sheet.Range["C2:C11"])

# Create the first condition to highlight cells containing duplicate values
condition1 = conditionalFormat.AddCondition()
condition1.FormatType = ConditionalFormatType.DuplicateValues
condition1.BackColor = Color.get_IndianRed()

# Create the second condition to highlight cells containing unique values
condition2 = conditionalFormat.AddCondition()
condition2.FormatType = ConditionalFormatType.UniqueValues
condition2.BackColor = Color.get_Yellow()

# Save the result file
workbook.SaveToFile("HighlightCellRules.xlsx", ExcelVersion.Version2016)
workbook.Dispose()

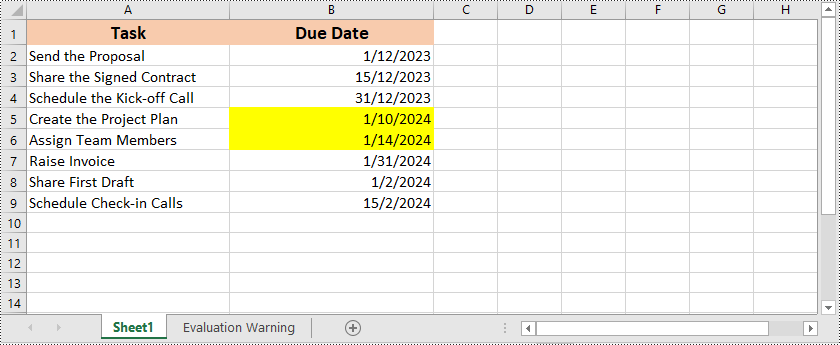
Here is an example that shows how to highlight cells with dates that fall within a specific time period in Excel using Python and Spire.XLS for Python:
- Python
from spire.xls import *
from spire.xls.common import *

# Create an object of the Workbook class
workbook = Workbook()
# Load an Excel file
workbook.LoadFromFile("Example2.xlsx")
# Get the first worksheet
sheet = workbook.Worksheets[0]

# Add a conditional format to the worksheet
conditionalFormat = sheet.ConditionalFormats.Add()
# Specify the cell range to apply the conditional format
conditionalFormat.AddRange(sheet.Range["B2:B9"])

# Create a condition to highlight cells with dates that fall within a specific time period
condition = conditionalFormat.AddTimePeriodCondition(TimePeriodType.Last7Days)
condition.BackColor = Color.get_Yellow()

# Save the result file
workbook.SaveToFile("HighlightCellRules.xlsx", ExcelVersion.Version2016)
workbook.Dispose()
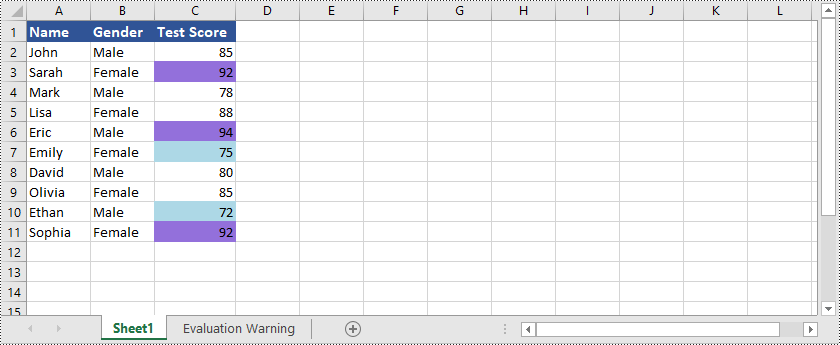
Top or Bottom Rules
Top/Bottom Rules are another type of conditional formatting in Excel that enables you to highlight cells containing the highest or lowest values within a range. You can specify the number of top or bottom values to highlight, and Excel will automatically apply the formatting based on the selected rule.
Here is an example that shows how to highlight cells containing the top or bottom ranked values in Excel using Python and Spire.XLS for Python:
- Python
from spire.xls import *
from spire.xls.common import *

# Create an object of the Workbook class
workbook = Workbook()
# Load an Excel file
workbook.LoadFromFile("Example1.xlsx")
# Get the first worksheet
sheet = workbook.Worksheets[0]

# Add a conditional format to the worksheet
conditionalFormat = sheet.ConditionalFormats.Add()
# Specify the cell range to apply the conditional format
conditionalFormat.AddRange(sheet.Range["C2:C11"])

# Add the first condition to highlight the top 2 ranked values
condition1 = conditionalFormat.AddTopBottomCondition(TopBottomType.Top, 2)
condition1.BackColor = Color.get_MediumPurple()

# Add the second condition to highlight the bottom 2 ranked values
condition2 = conditionalFormat.AddTopBottomCondition(TopBottomType.Bottom, 2)
condition2.BackColor = Color.get_LightBlue()

# Save the result file
workbook.SaveToFile("TopOrBottomRules.xlsx", ExcelVersion.Version2016)
workbook.Dispose()
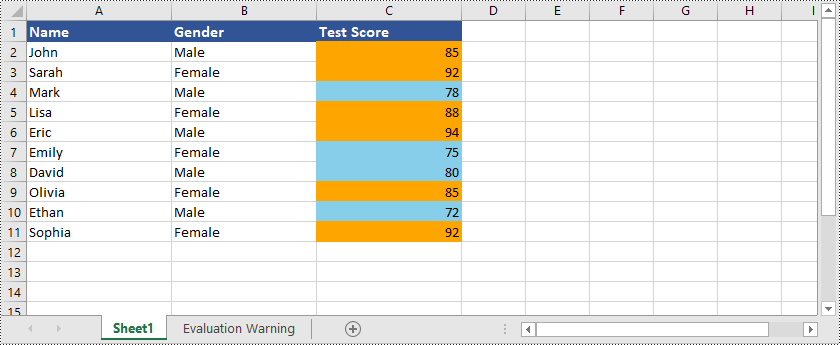
In addition to highlighting cells containing the top or bottom ranked values, Spire.XLS for Python is also capable of highlighting cells with values above or below the average value in Excel. You can refer to the following example:
- Python
from spire.xls import *
from spire.xls.common import *

# Create an object of the Workbook class
workbook = Workbook()
# Load an Excel file
workbook.LoadFromFile("Example1.xlsx")
# Get the first worksheet
sheet = workbook.Worksheets[0]

# Add a conditional format to the worksheet
conditionalFormat1 = sheet.ConditionalFormats.Add()
# Specify the cell range to apply the conditional format
conditionalFormat1.AddRange(sheet.Range["C2:C11"])

# Create a condition to highlight cells with values below the average
condition1 = conditionalFormat1.AddAverageCondition(AverageType.Below)
condition1.BackColor = Color.get_SkyBlue()

# Add a conditional format to the worksheet
conditionalFormat2 = sheet.ConditionalFormats.Add()
# Specify the cell range to apply the conditional format
conditionalFormat2.AddRange(sheet.Range["C2:C11"])

# Create a condition to highlight cells with values above the average
condition2 = conditionalFormat2.AddAverageCondition(AverageType.Above)
condition2.BackColor = Color.get_Orange()

# Save the result file
workbook.SaveToFile("HighlightValuesAboveOrBelowAverage.xlsx", ExcelVersion.Version2016)
workbook.Dispose()
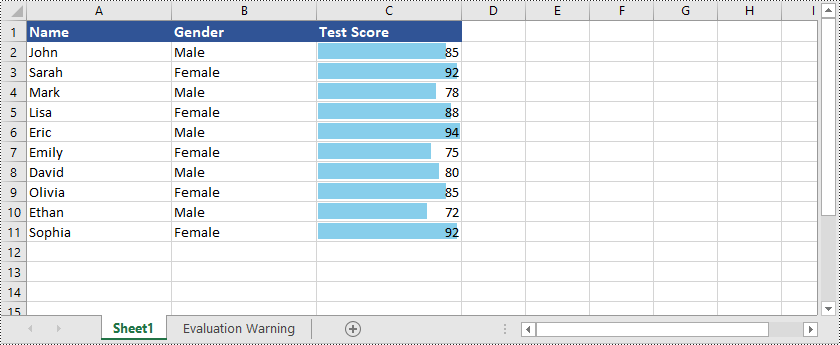
Data Bars
Data Bars are a visual representation of conditional formatting in Excel. They create horizontal bars within cells that visually represent the relative values of the data. The length of the bar corresponds to the value in the cell, allowing for easy comparison of data points.
Here is an example that shows how to create data bars in Excel using Python and Spire.XLS for Python:
- Python
from spire.xls import *
from spire.xls.common import *

# Create an object of the Workbook class
workbook = Workbook()
# Load an Excel file
workbook.LoadFromFile("Example1.xlsx")
# Get the first worksheet
sheet = workbook.Worksheets[0]

# Add a conditional format to the worksheet
conditionalFormat = sheet.ConditionalFormats.Add()
# Specify the cell range to apply the conditional format
conditionalFormat.AddRange(sheet.Range["C2:C11"])

# Add a condition and set its format type to DataBar
condition = conditionalFormat.AddCondition()
condition.FormatType = ConditionalFormatType.DataBar
# Set fill effect for data bars
# condition.DataBar.BarFillType = DataBarFillType.DataBarFillGradient
# Set bar color
condition.DataBar.BarColor = Color.get_SkyBlue()

# Save the result file
workbook.SaveToFile("DataBars.xlsx", ExcelVersion.Version2016)
workbook.Dispose()
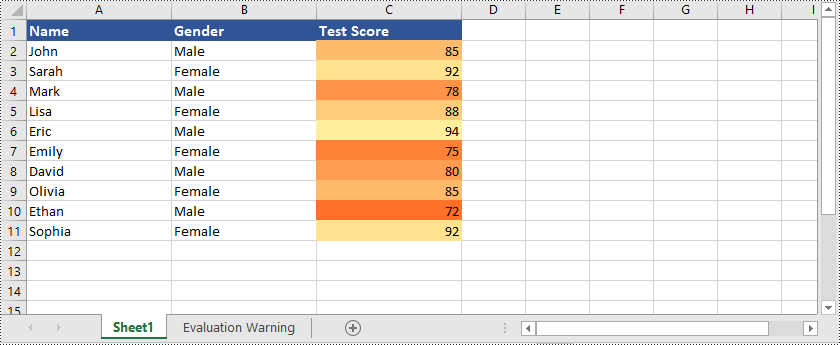
Color Scales
Color Scales are a type of conditional formatting that applies color gradients to cells based on their values. Excel uses a range of colors to represent the distribution of values within a selected range of cells. Higher values are assigned one color, while lower values are assigned another color, with shades in between for intermediate values. Color Scales provide a visual representation of the data distribution, allowing you to easily identify high and low values, as well as the relative positioning of values within the data set.
Here is an example that shows how to create color scales in Excel using Python and Spire.XLS for Python:
- Python
from spire.xls import *
from spire.xls.common import *

# Create an object of the Workbook class
workbook = Workbook()
# Load an Excel file
workbook.LoadFromFile("Example1.xlsx")
# Get the first worksheet
sheet = workbook.Worksheets[0]

# Add a conditional format to the worksheet
conditionalFormat = sheet.ConditionalFormats.Add()
# Specify the cell range to apply the conditional format
conditionalFormat.AddRange(sheet.Range["C2:C11"])

# Add a condition and set its format type to ColorScale
condition = conditionalFormat.AddCondition()
condition.FormatType = ConditionalFormatType.ColorScale

# Save the result file
workbook.SaveToFile("ColorScales.xlsx", ExcelVersion.Version2016)
workbook.Dispose()
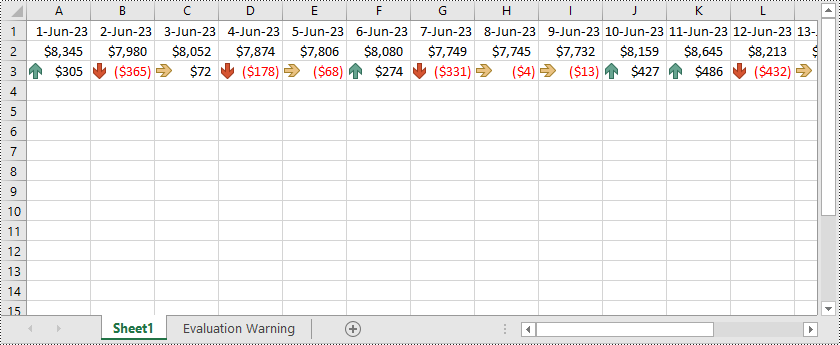
Icon Sets
Icon Sets are a type of conditional formatting that uses visual icons, such as arrows, symbols, or traffic lights, to represent different conditions or values within cells. Excel provides predefined sets of icons that you can apply based on specific criteria or value ranges. For example, you can use arrow icons to indicate whether values are increasing or decreasing, or use traffic light icons to represent the status of certain metrics. Icon Sets offer a visually intuitive way to interpret and compare data based on the assigned icons.
Here is an example that shows how to create icon sets in Excel using Python and Spire.XLS for Python:
- Python
from spire.xls import *
from spire.xls.common import *

# Create an object of the Workbook class
workbook = Workbook()
# Load an Excel file
workbook.LoadFromFile("Example3.xlsx")
# Get the first worksheet
sheet = workbook.Worksheets[0]

# Add a conditional format to the worksheet
conditionalFormat = sheet.ConditionalFormats.Add()
# Specify the cell range to apply the conditional format
conditionalFormat.AddRange(sheet.Range["A3:R3"])

# Add a condition and set its format type to IconSet
condition = conditionalFormat.AddCondition()
condition.FormatType = ConditionalFormatType.IconSet
# Set the type of icon sets to ThreeArrows
condition.IconSet.IconSetType = IconSetType.ThreeArrows

# Save the result file
workbook.SaveToFile("IconSets.xlsx", ExcelVersion.Version2013)
workbook.Dispose()
Formula-Based Rules
Formula-based conditional formatting gives you the flexibility to create custom rules using formulas. You can define complex conditions by utilizing functions, operators, and cell references. This allows for highly tailored formatting based on specific calculations or comparisons.
Here is an example that shows how to apply formula-based conditional formatting to Excel using Python and Spire.XLS for Python:
- Python
from spire.xls import *
from spire.xls.common import *

# Create an object of the Workbook class
workbook = Workbook()
# Load an Excel file
workbook.LoadFromFile("Example1.xlsx")
# Get the first worksheet
sheet = workbook.Worksheets[0]

# Add a conditional format to the worksheet
conditionalFormat = sheet.ConditionalFormats.Add()
# Specify the cell range to apply the conditional format
conditionalFormat.AddRange(sheet.Range["A2:C11"])

# Add a condition and set its format type to Formula
condition = conditionalFormat.AddCondition()
condition.FormatType = ConditionalFormatType.Formula
condition.FirstFormula = "=MOD(ROW(),2)=1"
condition.BackColor = Color.get_LightGray()

# Save the result file
workbook.SaveToFile("FormulaBasedRules.xlsx", ExcelVersion.Version2016)
workbook.Dispose()

Get a Free License
To fully experience the capabilities of Spire.XLS for Python without any evaluation limitations, you can request a free 30-day trial license.
Conclusion
This blog explained how to apply different types of conditional formatting to Excel using Spire.XLS for Python. If you have any questions, please feel free to post them on our forum or send them to our support team via email.
Python: Add Tables to Excel Documents or Delete Tables from Excel Documents
Tables in Excel are powerful tools for organizing, storing, analyzing, and visualizing data. They are widely used in various industries and fields, including finance, business, science, education, and more. The table functionality in Excel makes data processing easier and provides users with flexibility and efficiency to make decisions and solve problems. This article will explain how to use Spire.XLS for Python to add or delete tables in Excel documents using Python.
Install Spire.XLS for Python
This scenario requires Spire.XLS for Python and plum-dispatch v1.7.4. They can be easily installed in your Windows through the following pip commands.
pip install Spire.XLS
If you are unsure how to install, please refer to this tutorial: How to Install Spire.XLS for Python on Windows
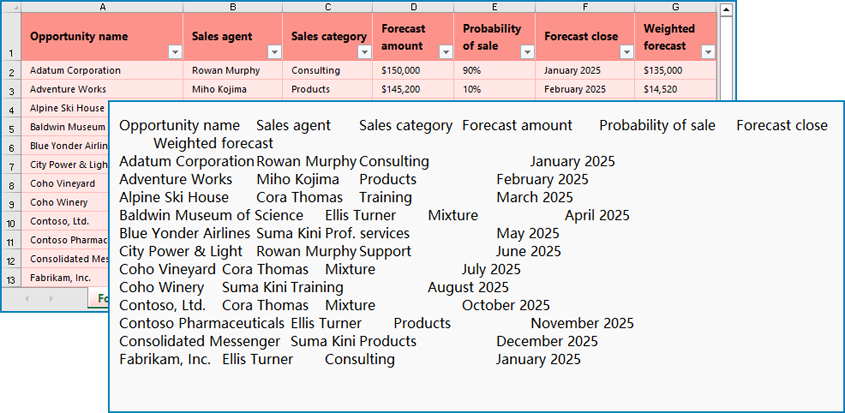
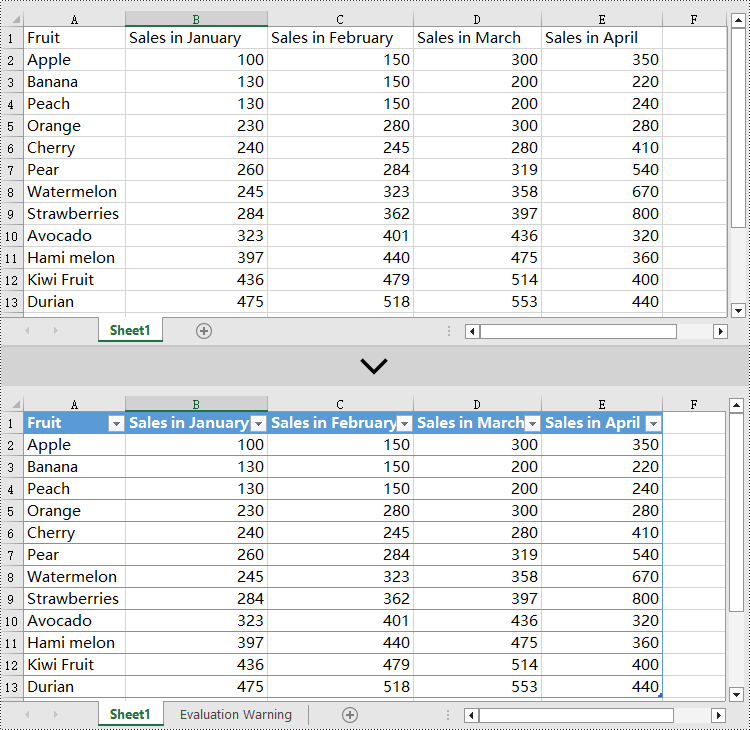
Add Tables to an Excel Document in Python
Spire.XLS for Python creates table objects for the specified data source using the Worksheet.ListObjects.Create(tableName, range) method. The following are the detailed steps:
- Create an object of the Workbook class.
- Use the Workbook.LoadFromFile() method to load an Excel document.
- Use the Workbook.Worksheets[] property to retrieve the desired worksheet.
- Create a table object using the Worksheet.ListObjects.Create() method.
- Set the table style using the Worksheet.ListObjects[].BuiltInTableStyle property.
- Use the Workbook.SaveToFile() method to save the resulting file.
- Python
from spire.xls import *
from spire.xls.common import *

# Create a Workbook object
workbook = Workbook()

# Load an .xlsx document
workbook.LoadFromFile("Data/sample1.xlsx")

# Get the first worksheet
sheet = workbook.Worksheets[0]

# Create a table named "table" in the worksheet, with range [1,1,13,5]
sheet.ListObjects.Create("table", sheet.Range[1,1,13,5])

# Set the built-in table style of the first table to TableStyleLight9
sheet.ListObjects[0].BuiltInTableStyle = TableBuiltInStyles.TableStyleLight9

# Save the workbook to a file
workbook.SaveToFile("AddTable.xlsx", ExcelVersion.Version2016)

# Release resources and clean up the workbook object
workbook.Dispose()
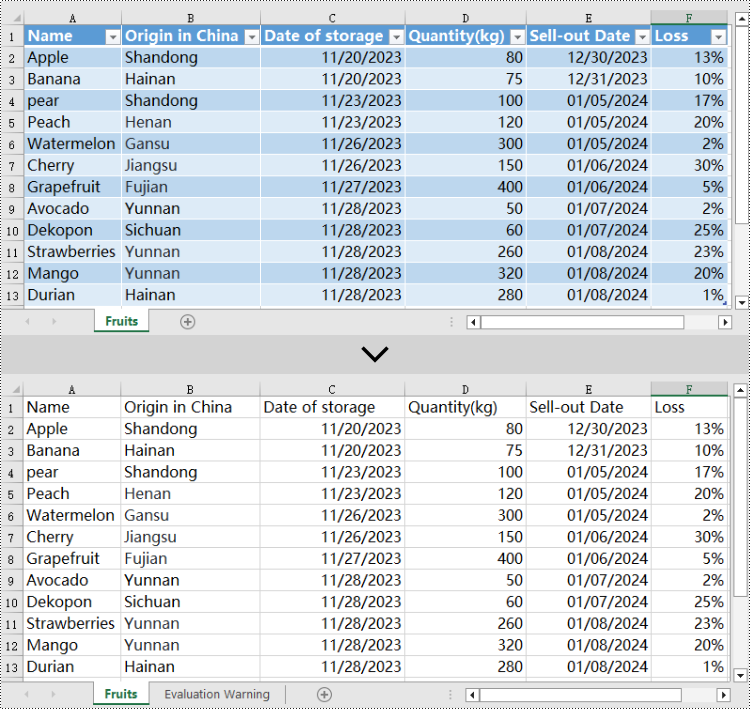
Delete Tables from an Excel Document in Python
Excel table objects are located in the Worksheet.ListObjects collection. To delete a table object, you need to iterate through the collection, find the table object based on its name, and remove it from the collection. Here are the detailed steps:
- Create an object of the Workbook class.
- Use the Workbook.LoadFromFile() method to load an Excel document.
- Use the Workbook.Worksheets[] property to retrieve the desired worksheet.
- Iterate through the Worksheet.ListObjects collection in the worksheet to obtain the name of each ListObject object for finding the table object to delete.
- Use the Worksheet.ListObjects.RemoveAt() method to remove the table object.
- Use the Workbook.SaveToFile() method to save the resulting file.
- Python
from spire.xls import *
from spire.xls.common import *

# Create a Workbook object
workbook = Workbook()

# Load an .xlsx document
workbook.LoadFromFile("Data/Sample2.xlsx")

# Get the first worksheet
sheet = workbook.Worksheets[0]

# Iterate through all the tables in the worksheet
for i in range(len(sheet.ListObjects)):

    # Check if the table's name is "FruitTable"
if sheet.ListObjects[i].Name == "FruitTable":

        # If a matching table is found, remove it
        sheet.ListObjects.RemoveAt(i)

# Save the workbook to a file
workbook.SaveToFile("DeleteTable.xlsx", ExcelVersion.Version2016)

# Release resources and clean up the workbook object
workbook.Dispose()
Apply for a Temporary License
If you'd like to remove the evaluation message from the generated documents, or to get rid of the function limitations, please request a 30-day trial license for yourself.
Spire.Presentation 9.1 upgrades the VS2019 project framework to version 4.6.2
We are pleased to announce the release of Spire.Presentation 9.1. This version upgrades the VS2019 project framework to version 4.6.2. In addition, a series of other adjustments have been made, such as the removal of MonoAndroid and Xamarin.iOS. More details are listed below.
Here is a list of changes made in this release
| Category | ID | Description |
| Adjustment | - | Upgrades the VS2019 project framework to version 4.6.2. |
| Adjustment | - | Removes MonoAndroid and Xamarin.iOS. |
| Adjustment | - | Removes the reference of Spire.Pdf.dll from the product. |
| Adjustment | - | "Spire.Pdf.PdfConformanceLevel" has been deprecated and replaced with the new interface "Spire.Presentation.External.pdf.PdfConformanceLevel".
presentation.SaveToPdfOption.PdfConformanceLevel = Spire.Presentation.External.Pdf.PdfConformanceLevel.Pdf_A1A; |
| Adjustment | - | "Spire.Pdf.Sercurity.PdfSecurity" has been deprecated and replaced with the new interface "Spire.Presentation.External.Pdf.PdfSecurity". |
Python: Attach Files to a PDF Document
By incorporating supplemental resources directly into the PDF, it consolidates all relevant information in a single file, making it easier to organize, share, and archive. This feature enables users to seamlessly share supporting documents, images, or multimedia elements, eliminating the need for separate file transfers or external links. It streamlines communication, improves efficiency, and ensures that recipients have convenient access to all the necessary resources within the PDF itself. In this article, you will learn how to attach files to a PDF document in Python with the help of Spire.PDF for Python.
Install Spire.PDF for Python
This scenario requires Spire.PDF for Python and plum-dispatch v1.7.4. They can be easily installed in your Windows through the following pip command.
pip install Spire.PDF
If you are unsure how to install, please refer to this tutorial: How to Install Spire.PDF for Python on Windows
Background Knowledge
There are generally two types of attachments in PDF, namely document level attachment and annotation attachment. Both are supported by Spire.PDF for Python. The table below lists the differences between them.
| Attachment type | Represented by | Definition |
| Document level attachment | PdfAttachment class | A file attached to a PDF at the document level won't appear on a page, but can be viewed in the "Attachments" panel of a PDF reader. |
| Annotation attachment | PdfAnnotationAttachment class | A file attached as an annotation can be found on a page or in the "Attachment" panel. An Annotation attachment is shown as a paper clip icon on the page; reviewers can double-click the icon to open the file. |
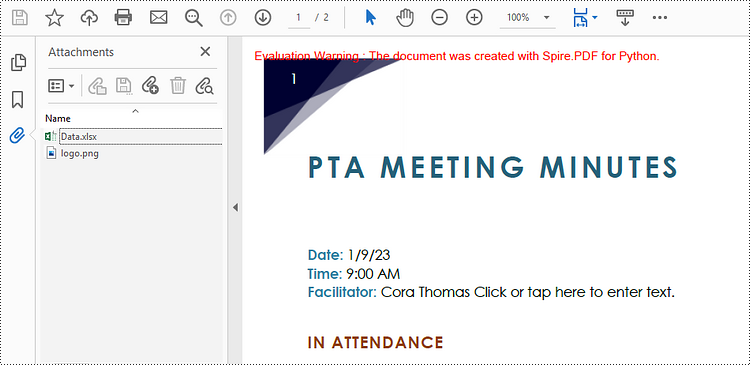
Attach Files to a PDF Document in Python
To attach files to PDFs at the document level, you first need to create a PdfAttachment object based on an external file, and then you can add it to a PDF document using the PdfDocument.Attachments.Add() method. The following are the detailed steps.
- Create a PdfDocument object.
- Load a PDF document using PdfDocument.LoadFromFile() method.
- Create a PdfAttachment object based on an external file.
- Add the attachment to the document using PdfDocument.Attachments.Add() method.
- Save the document to a different PDF file using PdfDocument.SaveToFile() method.
- Python
from spire.pdf import *
from spire.pdf.common import *

# Create a PdfDocument object
doc = PdfDocument()

# Load a sample PDF file
doc.LoadFromFile("C:\\Users\\Administrator\\Desktop\\Input.pdf")

# Create PdfAttachment objects based on external files
attachment_one = PdfAttachment("C:\\Users\\Administrator\\Desktop\\Data.xlsx")
attachment_two = PdfAttachment("C:\\Users\\Administrator\\Desktop\\logo.png")

# Add the attachments to PDF
doc.Attachments.Add(attachment_one)
doc.Attachments.Add(attachment_two)

# Save to file
doc.SaveToFile("output/Attachment.pdf")
Attach Files as Annotations in PDF in Python
An annotation attachment is represented by the PdfAttachmentAnnotation class. Create an instance of this class, specify its attributes such as bounds, flag and text, and then add it to a specified page using the PdfPageBase.AnnotationsWidget.Add() method.
Below are the steps to attach files as annotations in PDF using Spire.PDF for Python.
- Create a PdfDocument object.
- Load a PDF document using PdfDocument.LoadFromFile() method.
- Get a specific page to add annotation through PdfDocument.Pages[] property.
- Create a PdfAttachmentAnnotation object based on an external file.
- Add the annotation attachment to the page using PdfPageBase.AnnotationsWidget.Add() method.
- Save the document to a different PDF file using PdfDocument.SaveToFile() method.
- Python
from spire.pdf import *
from spire.pdf.common import *

# Create a PdfDocument object
doc = PdfDocument()

# Load a sample PDF file
doc.LoadFromFile("C:\\Users\\Administrator\\Desktop\\Input.pdf")

# Get a specific page
page = doc.Pages[1]

# Draw a string on PDF
str = "Here is the report:"
font = PdfTrueTypeFont("Times New Roman", 16.0, PdfFontStyle.Bold, True)
x = 50.0
y = doc.Pages[0].ActualSize.Height - 300.0
page.Canvas.DrawString(str, font, PdfBrushes.get_Blue(), x, y)

# Create a PdfAttachmentAnnotation object based on an external file
data = Stream("C:\\Users\\Administrator\\Desktop\\Data.xlsx")
size = font.MeasureString(str);
bounds = RectangleF((x + size.Width + 5.0), y, 10.0, 15.0)
annotation = PdfAttachmentAnnotation(bounds, "Report.docx", data);

# Set color, flag, icon and text of the annotation
annotation.Color = PdfRGBColor(Color.get_Blue())
annotation.Flags = PdfAnnotationFlags.Default
annotation.Icon = PdfAttachmentIcon.Graph
annotation.Text = "Click to open the file"

# Add the attachment annotation to PDF
page.AnnotationsWidget.Add(annotation)

# Save to file
doc.SaveToFile("output/AnnotationAttachment.pdf")
Apply for a Temporary License
If you'd like to remove the evaluation message from the generated documents, or to get rid of the function limitations, please request a 30-day trial license for yourself.
Spire.PDF for Android via Java 10.1.1 supports converting PDF to SVGZ
We are excited to announce the release of Spire.PDF for Android via Java 10.1.1. This version supports converting PDF documents to SVGZ documents and comparing PDF documents. More details are listed below.
Here is a list of changes made in this release
| Category | ID | Description |
| New feature | - | Supports comparing PDF documents.
PdfDocument pdf1 = new PdfDocument(inputFile_1); PdfDocument pdf2 = new PdfDocument(inputFile_2); PdfComparer compare = new PdfComparer(pdf1, pdf2); compare.getOptions().setPageRanges(0, pdf1.getPages().getCount() - 1, 0, pdf2.getPages().getCount() - 1); compare.compare(outputFile); |
| New feature | - | Supports converting PDF documents to SVGZ documents.
PdfDocument pdf = new PdfDocument(inputFile); pdf.saveToFile(outputFile, FileFormat.SVGZ); |
Spire.Office for Java 9.1.4 is released
We are delighted to announce the release of Spire.Office for Java 9.1.4. In this version, Spire.PDF for Java improves the efficiency of drawing watermarks; Spire.Doc for Java adds a new method to add image watermark; Spire.Presentation for Java improves the speed of converting PowerPoint to SVG. In addition, many known issues are fixed in this version. More details are listed below.
Here is a list of changes made in this release
Spire.PDF for Java
| Category | ID | Description |
| New feature | SPIREPDF-6454 | Improves the efficiency of drawing watermarks. |
| New feature | SPIREPDF-6459 | Adds the PdfTextReplacer interface to implement text replacement function.
PdfDocument pdf = new PdfDocument();
pdf.loadFromFile("sample.pdf");
PdfPageBase page = pdf.getPages().get(0);
PdfTextReplacer replacer = new PdfTextReplacer(page);
PdfTextReplaceOptions options= new PdfTextReplaceOptions();
options.setReplaceType(EnumSet.of(ReplaceActionType.WholeWord));
replacer.replaceText("www.google.com", "1234567");
pdf.saveToFile(outputFile);
|
| New feature | - | Adds the PdfImageHelper interface to implement image deletion, extraction, replacement, and compression functions. Key code snippet: PdfImageHelper imageHelper = new PdfImageHelper();
PdfImageInfo[] imageInfoCollection= imageHelper.getImagesInfo(page);
Delete image:
imageHelper.deleteImage(imageInfoCollection[0]);
Extract image:
int index = 0;
for (com.spire.pdf.utilities.PdfImageInfo img : imageInfoCollection) {
BufferedImage image = img.getImage();
File output = new File(outputFile_Img + String.format("img_%d.png", index));
ImageIO.write(image, "PNG", output);
index++;
}
PdfImage image = PdfImage.fromFile("ImgFiles/E-iceblue logo.png");
imageHelper.replaceImage(imageInfoCollection[i], image);
Compress image:
for (PdfPageBase page : (Iterable<PdfPageBase>)doc.getPages())
        {
            if (page != null)
            {
                if (imageHelper.getImagesInfo(page) != null)
                {
                    for (com.spire.pdf.utilities.PdfImageInfo info : imageHelper.getImagesInfo(page))
                    {
                        info.tryCompressImage();
                    }
                }
            }
        }
|
| Bug | SPIREPDF-6468 | Fixes the issue that the program threw java.lang.StringIndexOutOfBoundsException exception when saving documents. |
| Bug | SPIREPDF-6484 | Fixes the issue that no resulting documents were generated after performing batch text replacement on multiple PDF documents under multi-threading. |
Spire.XLS for Java
| Category | ID | Description |
| Bug | SPIREXLS-5020 | Fixes the issue that the margins of saved XLSX documents were incorrect when printed and previewed with the WPS tool. |
| Bug | SPIREXLS-5037 | Fixes the issue that the obtained fill color value for cells without fill color was (0,0,0). |
| Bug | SPIREXLS-5047 | Fixes the issue that the border styles of cells were lost when converting HTML documents to XLSX documents. |
Spire.Doc for Java
| Category | ID | Description |
| Adjustment | - | Removes the dependency on Spire.Pdf.jar. |
| Adjustment | - | Changes the method of license application to "com.spire.doc.license.LicenseProvider.setLicenseKey(key)". |
| Adjustment | - | Changes the namespace com.spire.ms.Printing.* to com.spire.doc.printing.* |
| New feature | - | Deprecates the following methods, classes and interfaces.
The "newEngine" parameter in the Document constructor no longer has any effect. The internal mechanism now defaults to using the new engine. The HeaderType enum. The GroupedShapeCollection class. The ShapeObjectTextCollection class. The MailMergeData interface. The EnumInterface interface. The public PictureWaterMark(InputStream inputeStream, boolean washout) constructor. The public PictureWaterMark(String filename, boolean washout) constructor. The downloadImage method in the Field class. The IDocOleObject interface. The PointsConverter class. |
| New feature | - | Deprecates the "getWidth()" and "setWidth()" methods in the TableCell class and replaces them with the "getCellWidth()" and "setCellWidth()" methods. |
| New feature | - | Changes the following namespaces.
com.spire.license.LicenseProvider -> com.spire.doc.License.LicenseProvider |
| New feature | - | Changes the inheritance relationship: changes "ShapeGroup implements ShapeObject" to "ShapeGroup implements ShapeBase". |
| New feature | - | Supports destroying data related to customized fonts when destroying the Document at the same time.
// Set custom fonts
Document.setCustomFontsFolders(string filePath);

// Dispose of custom fonts
Document.clearCustomFontsFolders();

// Clear system font cache that occupies memory in the cache
Document.clearSystemFontCache();

Example code:
Document doc = new Document();
doc.loadFromFile("inputFile.docx");
doc.setCustomFontsFolders(@"d:\Fonts");
doc.saveToFile("output.pdf", FileFormat.PDF);
doc.close();
doc.dispose();
|
| New feature | - | Changes the following enumerated classes.
com.spire.doc.FileFormat.WPS -> com.spire.doc.FileFormat.Wps com.spire.doc.FileFormat.WPT -> com.spire.doc.FileFormat.Wpt ComparisonLevel -> TextDiffMode |
| New feature | - | Changes the following methods.
ComparisonLevel getLevel() -> getTextCompareLevel() setLevel(ComparisonLevel value) -> setTextCompareLevel(TextDiffMode) IsPasswordProtect() -> isEncrypted() getFillEfects() -> getFillEffects() |
| New feature | - | Adds a new method to add image watermark.
File imageFile = new File("data/E-iceblue.png");
BufferedImage bufferedImage = ImageIO.read(imageFile);
// Create a new instance of the PictureWatermark class with the input BufferedImage, and set the scaling factor for the watermark image
PictureWatermark picture = new PictureWatermark(bufferedImage,false);
		// Or another way to create PictureWatermark
		// PictureWatermark picture = new PictureWatermark();
		// picture.setPicture(bufferedImage);
		// picture.isWashout(false);
		// Set the scaling factor for the watermark image
picture.setScaling(250);
// Set the watermark to be applied to the document
document.setWatermark(picture);
|
| New feature | - | shape exposes the "getFill()" method to manipulate the fill of a shape; please use "getFill().setOn(false)" instead of "setFillColor(null)". |
| New feature | - | Supports adding charts.
// Create a new instance of Document
Document document = new Document();

// Add a section to the document
Section section = document.addSection();

// Add a paragraph to the section and append text to it
section.addParagraph().appendText("Line chart.");

// Add a new paragraph to the section
Paragraph newPara = section.addParagraph();

// Append a line chart shape to the paragraph with specified width and height
ShapeObject shape = newPara.appendChart(ChartType.Line, 500, 300);

// Get the chart object from the shape
Chart chart = shape.getChart();

// Get the title of the chart
ChartTitle title = chart.getTitle();

 // Set the text of the chart title
title.setText("My Chart");

 // Clear any existing series in the chart
ChartSeriesCollection seriesColl = chart.getSeries();
seriesColl.clear();

// Define categories (X-axis values)
String[] categories = { "C1", "C2", "C3", "C4", "C5", "C6" };

// Add two series to the chart with specified categories and Y-axis values
seriesColl.add("AW Series 1", categories, new double[] { 1, 2, 2.5, 4, 5, 6 });
seriesColl.add("AW Series 2", categories, new double[] { 2, 3, 3.5, 6, 6.5, 7 });

 // Save the document to a file in Docx format
document.saveToFile("AppendLineChart.docx", FileFormat.Docx_2016);

// Dispose of the document object when finished using it
document.dispose();
|
| New feature | - | Provides the page model "Spire.Doc.Pages" to get the content of the page.
// Create a new instance of Document
Document doc = new Document();

// Load the document from the specified file
doc.loadFromFile(inputFile);

// Create a FixedLayoutDocument object using the loaded document
FixedLayoutDocument layoutDoc = new FixedLayoutDocument(doc);

// Create a StringBuilder to store the extracted text
StringBuilder stringBuilder = new StringBuilder();

// Get the first line on the first page and append it to the StringBuilder
FixedLayoutLine line = layoutDoc.getPages().get(0).getColumns().get(0).getLines().get(0);
stringBuilder.append("Line: " + line.getText() + "\r\n");

// Retrieve the original paragraph associated with the line and append its text to the StringBuilder
Paragraph para = line.getParagraph();
stringBuilder.append("Paragraph text: " + para.getText() + "\r\n");

// Retrieve all the text on the first page, including headers and footers, and append it to the StringBuilder
String pageText = layoutDoc.getPages().get(0).getText();
stringBuilder.append(pageText + "\r\n");

// Iterate through each page in the document and print the number of lines on each page
for (Object obj : layoutDoc.getPages()) {
	FixedLayoutPage page = (FixedLayoutPage) obj;
	LayoutCollection<LayoutElement> lines = page.getChildEntities(LayoutElementType.Line, true);
	stringBuilder.append("Page " + page.getPageIndex() + " has " + lines.getCount() + " lines." + "\r\n");
}

// Perform a reverse lookup of layout entities for the first paragraph and append them to the StringBuilder
stringBuilder.append("\r\n");
stringBuilder.append("The lines of the first paragraph:" + "\r\n");

for (Object object : layoutDoc.getLayoutEntitiesOfNode(((Section) doc.getFirstChild()).getBody().getParagraphs().get(0))) {
	FixedLayoutLine paragraphLine = (FixedLayoutLine) object;

	stringBuilder.append(paragraphLine.getText().trim() + "\r\n");
	stringBuilder.append(paragraphLine.getRectangle().toString() + "\r\n");
	stringBuilder.append("");
}

// Write the extracted text to a file
FileWriter fileWriter = new FileWriter(new File(outputFile));
fileWriter.write(stringBuilder.toString());
fileWriter.flush();
fileWriter.close();

// Dispose of the document resources
doc.close();
doc.dispose();
|
| New feature | - | Supports adding SVG graphics.
// Create a new Document object Document document = new Document(); // Add a new Section to the document Section section = document.addSection(); // Add a new Paragraph to the section Paragraph paragraph = section.addParagraph(); // Append the picture (SVG) to the paragraph paragraph.appendPicture(inputSvg); // Save the document to the specified output file document.saveToFile(outputFile, FileFormat.Docx_2013); // Close the document document.dispose(); |
| Bug | SPIREDOC-8618 | Fixes the issue that the program threw "Error loading file: Unsupported file format" exception when converting Doc to Docx. |
| Bug | SPIREDOC-8694 | Fixes the issue that the position of the shape was shifted when converting Word to PDF. |
| Bug | SPIREDOC-8779 | Fixes the issue that the program threw "java.lang.OutOfMemoryError" exception when converting Word to PDF. |
| Bug | SPIREDOC-8981 | Fixes the issue that there were extra borders around images when converting Word to PDF. |
| Bug | SPIREDOC-9321 | Fixes the issue that the table width was incorrect when converting Word to PDF. |
| Bug | SPIREDOC-9426 SPIREDOC-9427 SPIREDOC-9953 SPIREDOC-9964 SPIREDOC-10131 |
Fixes the issue that the pagination was incorrect when converting Word to PDF. |
| Bug | SPIREDOC-9465 | Fixes the issue that the content was lost when converting Doc to XML. |
| Bug | SPIREDOC-9551 | Fixes the issue that the program hung when saving document data to a memory stream. |
| Bug | SPIREDOC-9633 | Fixes the issue that text became garbled when converting Word to PDF. |
| Bug | SPIREDOC-9695 | Fixes the issue that the program threw "This is not a structured storage file." exception when converting Word to a PDF. |
| Bug | SPIREDOC-9874 | Fixes the issue that the table styles were incorrect when converting Word to PDF. |
| Bug | SPIREDOC-9917 SPIREDOC-9937 |
Fixes the issue that the program threw "java.lang.AssertionError" exception when converting Word to PDF. |
| Bug | SPIREDOC-9951 | Fixes the issue that the content was lost when converting Word to PDF. |
| Bug | SPIREDOC-9968 | Fixes the issue that the table format was incorrect after adding new rows and merging rows. |
| Bug | SPIREDOC-9984 | Fixes the issue that the program threw "java.lang.NullPointerException" exception when converting Word to PDF. |
| Bug | SPIREDOC-10041 | Fixes the issue that the program threw "java.lang.ClassCastException" exception when converting Word to PDF. |
| Bug | SPIREDOC-10075 | Fixes the issue that the formulas could not be edited after merging Word documents. |
| Bug | SPIREDOC-10076 | Fixes the issue that the chart data format was incorrect when converting Word to PDF. |
| Bug | SPIREDOC-10115 | Fixes the issue that the program threw "java.lang.NullPointerException" exception when loading a Word document. |
| Bug | SPIREDOC-10125 | Fixes the issue that the background of some content was blackened after setting a document password protection. |
| Bug | SPIREDOC-10136 | Fixes the issue that the tables were misaligned after splitting cells. |
Spire.OCR for Java
| Category | ID | Description |
| Bug | - | Fixes the issue that the program threw “java.lang.NoClassDefFoundError” exception when running under JDK17 and JDK21. |
Spire.Presentation for Java
| Category | ID | Description |
| New feature | SPIREPPT-2395 | Improves the speed of converting PowerPoint to SVG. |
| New feature | SPIREPPT-2400 | Adds a method to load encrypted stream files.
presentation.loadFromStream(inputStream, FileFormat.AUTO,"password"); |
| New feature | SPIREPPT-2405 | Supports creating irregular polygons using coordinates.
Presentation ppt = new Presentation();
ISlide slide = ppt.getSlides().get(0);
List<Point2D> points = new ArrayList<>();
points.add(new Point2D.Float(50f, 50f));
points.add(new Point2D.Float(50f, 150f));
points.add(new Point2D.Float(60f, 200f));
points.add(new Point2D.Float(200f, 200f));
points.add(new Point2D.Float(220f, 150f));
points.add(new Point2D.Float(150f, 90f));
points.add(new Point2D.Float(50f, 50f));
IAutoShape autoShape = slide.getShapes().appendFreeformShape(points);
autoShape.getFill().setFillType(FillFormatType.NONE);
ppt.saveToFile("out.pptx", FileFormat.PPTX_2013);
ppt.dispose();
|
| New feature | SPIREPPT-2406 | Supports drawing lines using two points.
Presentation ppt = new Presentation(); ppt.getSlides().get(0).getShapes().appendShape(ShapeType.LINE, new Point2D.Float(50, 70), new Point2D.Float(150, 120)); ppt.saveToFile( "result.pptx ,FileFormat.PPIX_2013), ppt.dispose(). |