Set Table Row Height and Column Width in PowerPoint
This article demonstrates how to set the row height and column width of an existing table in PowerPoint document using Spire.Presentation in C# and VB.NET.
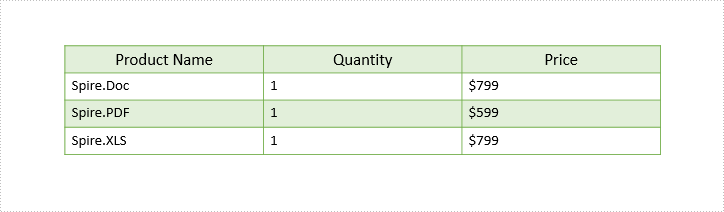
The following screenshot shows the table before setting row height and column width.
Detail steps:
Step 1: Instantiate a Presentation object and load the PowerPoint document.
Presentation ppt = new Presentation();
ppt.LoadFromFile("Input.pptx");
Step 2: Get the first slide.
ISlide slide = ppt.Slides[0];
Step 3: Get the first table on the slide.
ITable table = ppt.Slides[0].Shapes[0] as ITable;
Step 4: Set table row height and column width.
table.TableRows[1].Height = 50;
table.ColumnsList[1].Width = 100;
Step 5: Save the document.
ppt.SaveToFile("Output.pptx", FileFormat.Pptx2013);
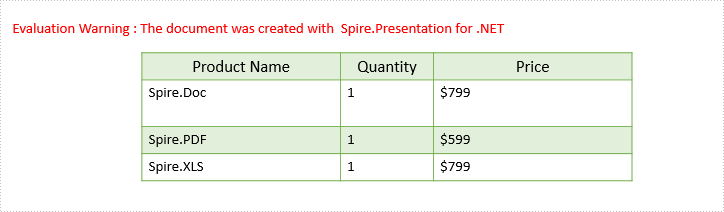
Screenshot:
Full code:
using Spire.Presentation;

namespace Set_table_column_width_and_row_height
{
    class Program
    {
        static void Main(string[] args)
        {
            Presentation ppt = new Presentation();
            ppt.LoadFromFile("Input.pptx");

            ISlide slide = ppt.Slides[0];

            ITable table = ppt.Slides[0].Shapes[0] as ITable;

            table.TableRows[1].Height = 50;
            table.ColumnsList[1].Width = 100;

            ppt.SaveToFile("Output.pptx", FileFormat.Pptx2013);
        }
    }
}
Imports Spire.Presentation

Namespace Set_table_column_width_and_row_height
	Class Program
		Private Shared Sub Main(args As String())
			Dim ppt As New Presentation()
			ppt.LoadFromFile("Input.pptx")

			Dim slide As ISlide = ppt.Slides(0)

			Dim table As ITable = TryCast(ppt.Slides(0).Shapes(0), ITable)

			table.TableRows(1).Height = 50
			table.ColumnsList(1).Width = 100

			ppt.SaveToFile("Output.pptx", FileFormat.Pptx2013)
		End Sub
	End Class
End Namespace
Convert EML/EMLX to MHTML or MSG in C#, VB.NET
A file with the EMLX or EML file extension is a Mail Message file used to store an email message. EML/EMLX file can converted to MHTML or MSG file format with few lines of core code by using Spire.Email.
Convert EML/EMLX to MHTML
using Spire.Email;
using System;

namespace ConvertEMLandEMLXtoMHTML
{
    class Program
    {
        static void Main(string[] args)
        {
            MailMessage message = MailMessage.Load("example.eml");
            message.Save("ToMhtml.mhtml", MailMessageFormat.Mhtml);
            Console.WriteLine("Done");
        }
    }
}
Imports Spire.Email

Namespace ConvertEMLandEMLXtoMHTML
	Class Program
		Private Shared Sub Main(args As String())
			Dim message As MailMessage = MailMessage.Load("example.eml")
			message.Save("ToMhtml.mhtml", MailMessageFormat.Mhtml)
			Console.WriteLine("Done")
		End Sub
	End Class
End Namespace
Convert EML/EMLX to MSG
using Spire.Email;
using System;

namespace ConvertEMLandEMLXtoMSG
{
    class Program
    {
        static void Main(string[] args)
        {
            MailMessage message = MailMessage.Load("example.eml");
            message.Save("ToMsg.msg", MailMessageFormat.Msg);
            Console.WriteLine("Done");
        }
    }
}
Imports Spire.Email

Namespace ConvertEMLandEMLXtoMSG
	Class Program
		Private Shared Sub Main(args As String())
			Dim message As MailMessage = MailMessage.Load("example.eml")
			message.Save("ToMsg.msg", MailMessageFormat.Msg)
			Console.WriteLine("Done")
		End Sub
	End Class
End Namespace
How to remove shape from word document in C# and VB.NET
We have already demonstrated how to use Spire.Doc to add shapes to word document from code. Spire.Doc also supports to remove a single shape by index or clear all the shapes from the word document. This article will illustrates how to remove the shape from word document in C# and VB.NET.
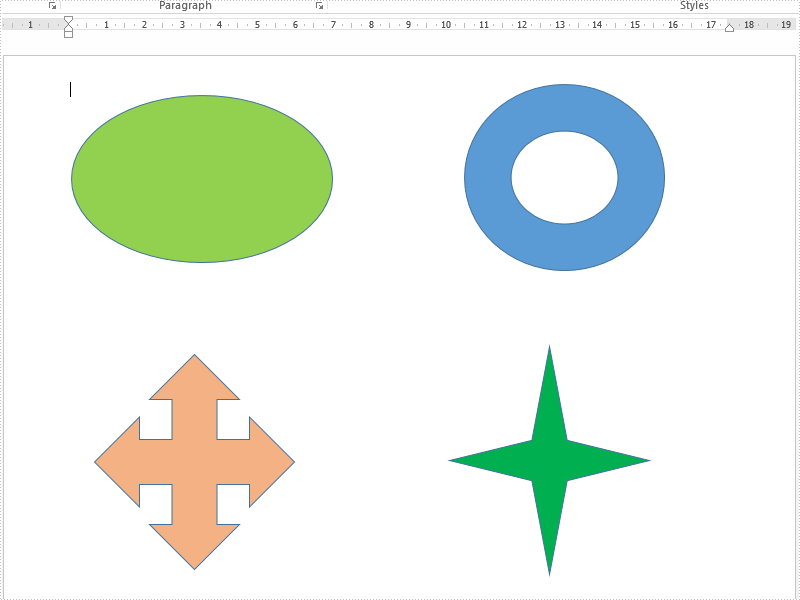
Sample word document with shapes:
Step 1: Initialize a new instance of Document class and load the document from file.
Document doc = new Document();
doc.LoadFromFile("Shapes.docx",FileFormat.Docx2010);
Step 2: Get the first section from the document and the first paragraph from the section.
Section section = doc.Sections[0];
Paragraph para = section.Paragraphs[0];
Step 3: Get shapes from the first paragraph.
ShapeObject shape = para.ChildObjects[0] as ShapeObject;
Step 4: Remove the shape or all the shapes.
//remove the third shape.
para.ChildObjects.RemoveAt(2);

////clear all the shapes.
//para.ChildObjects.Clear();
Step 5: Save the document to file.
doc.SaveToFile("Removeshape.docx",FileFormat.Docx2010);
Effective screenshot after removing one shape from the word document:

Full codes:
using Spire.Doc;
using Spire.Doc.Documents;
using Spire.Doc.Fields;
namespace RemoveShape
{
    class Program
    {
        static void Main(string[] args)
        {
            Document doc = new Document();
            doc.LoadFromFile("Shapes.docx", FileFormat.Docx2010);

            Section section = doc.Sections[0];

            Paragraph para = section.Paragraphs[0];
            ShapeObject shape = para.ChildObjects[0] as ShapeObject;

            //remove the third shape.
            para.ChildObjects.RemoveAt(2);

            ////clear all the shapes.
            //para.ChildObjects.Clear();

            doc.SaveToFile("Removeshape.docx", FileFormat.Docx2010);
        }
    }
}
Imports Spire.Doc
Imports Spire.Doc.Documents
Imports Spire.Doc.Fields
Namespace RemoveShape
	Class Program
		Private Shared Sub Main(args As String())
			Dim doc As New Document()
			doc.LoadFromFile("Shapes.docx", FileFormat.Docx2010)

			Dim section As Section = doc.Sections(0)

			Dim para As Paragraph = section.Paragraphs(0)
			Dim shape As ShapeObject = TryCast(para.ChildObjects(0), ShapeObject)

			'remove the third shape.
			para.ChildObjects.RemoveAt(2)

			'''/clear all the shapes.
			'para.ChildObjects.Clear();

			doc.SaveToFile("Removeshape.docx", FileFormat.Docx2010)
		End Sub
	End Class
End Namespace
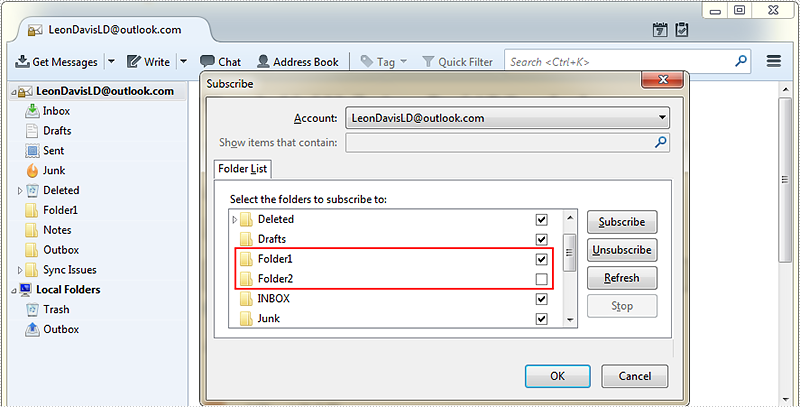
Subscribe and Unsubscribe Folders in C#, VB.NET
Spire.Email supports to manage folder subscriptions by using ImapClient.Subscribe and ImapClient.Unsubscribe method.
The following example shows how to subscribe to a folder and unsubscribe from a folder using Spire.Email component.
Detail steps:
Step 1: Create an ImapClient instance.
ImapClient imap = new ImapClient();
Step 2: Set host, port, authentication and connection protocol.
imap.Host = "outlook.office365.com";
imap.Port = 143;
imap.Username = "LeonDavisLD@outlook.com";
imap.Password = "password";
imap.ConnectionProtocols = ConnectionProtocols.Ssl;
Step 3: Connect the imap server.
imap.Connect();
Step 4: Subscribe folder using its name.
imap.Subscribe("Folder1");
Step 5: Unsubscribe folder.
imap.Unsubscribe("Folder2");
Screenshot:
Full code:
using Spire.Email;
using Spire.Email.IMap;

namespace SubscribAndUnsubscribeFolders
{
    class Program
    {
        static void Main(string[] args)
        {
            //Create an ImapClient instance
            ImapClient imap = new ImapClient();

            //Set host, port, authentication and connection protocol
            imap.Host = "outlook.office365.com";
            imap.Port = 143;
            imap.Username = "LeonDavisLD@outlook.com";
            imap.Password = "password";
            imap.ConnectionProtocols = ConnectionProtocols.Ssl;

            //Connect the imap server
            imap.Connect();

            //subscribe folder using its name
            imap.Subscribe("Folder1");

            //Unsubscribe folder
            imap.Unsubscribe("Folder2");
        }
    }
}
Imports Spire.Email
Imports Spire.Email.IMap

Namespace SubscribAndUnsubscribeFolders
	Class Program
		Private Shared Sub Main(args As String())
			'Create an ImapClient instance
			Dim imap As New ImapClient()

			'Set host, port, authentication and connection protocol
			imap.Host = "outlook.office365.com"
			imap.Port = 143
			imap.Username = "LeonDavisLD@outlook.com"
			imap.Password = "password"
			imap.ConnectionProtocols = ConnectionProtocols.Ssl

			'Connect the imap server
			imap.Connect()

			'subscribe folder using its name
			imap.Subscribe("Folder1")

			'Unsubscribe folder
			imap.Unsubscribe("Folder2")
		End Sub
	End Class
End Namespace
Append HTML String to PowerPoint in C#, VB.NET
Spire.Presentation supports to insert HTML formatted text to PowerPoint slide. The following code snippets demonstrate how to.
Step 1: Create an instance of Presentation class.
Presentation ppt = new Presentation();
Step 2: Insert an autoshape (rectangle) in slide.
IAutoShape shape = ppt.Slides[0].Shapes.AppendShape(ShapeType.Rectangle, new RectangleF(50, 50, 400, 100));
Step 3: Clear default paragraphs in the shape.
shape.TextFrame.Paragraphs.Clear();
Step 4: Add paragraphs to shape from HTML code. Make sure your HTML segments are written between <html><body> and </body></html> tags, otherwise, AddFromHtml method will fail to work.
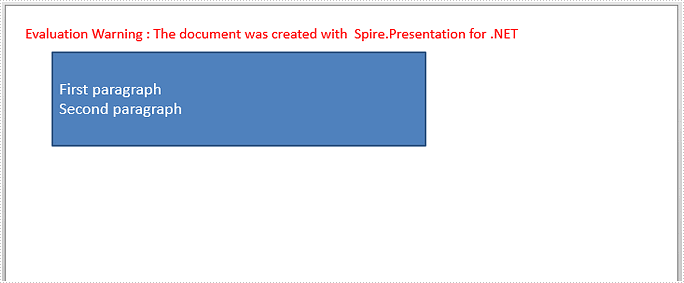
string htmlText= "<html><body><p>First paragraph</p><p>Second paragraph</p></body></html>";
shape.TextFrame.Paragraphs.AddFromHtml(htmlText);
Step 5: Save to file.
ppt.SaveToFile("output.pptx", FileFormat.Pptx2013);
Output:
Full Code:
using Spire.Presentation;
using System.Drawing;
namespace AppendHTMLString
{
class Program
{
static void Main(string[] args)
{
Presentation ppt = new Presentation();
IAutoShape shape = ppt.Slides[0].Shapes.AppendShape(ShapeType.Rectangle, new RectangleF(50, 50, 400, 100));
shape.TextFrame.Paragraphs.Clear();
string htmlText = "First paragraph
Second paragraph
";
shape.TextFrame.Paragraphs.AddFromHtml(htmlText);
ppt.SaveToFile("output.pptx", FileFormat.Pptx2013);
}
}
}
Imports Spire.Presentation Imports System.Drawing Namespace AppendHTMLString Class Program Private Shared Sub Main(args As String()) Dim ppt As New Presentation() Dim shape As IAutoShape = ppt.Slides(0).Shapes.AppendShape(ShapeType.Rectangle, New RectangleF(50, 50, 400, 100)) shape.TextFrame.Paragraphs.Clear() Dim htmlText As String = "First paragraph
Second paragraph
" shape.TextFrame.Paragraphs.AddFromHtml(htmlText) ppt.SaveToFile("output.pptx", FileFormat.Pptx2013) End Sub End Class End Namespace
Update the send to email address for Email message
When we operate the email messages, we may need to send the message to many more email address. Spire.Email supports to send a message to many email addresses at one time. This article demonstrates how to add the new send To and Cc email address from an existing email message via Spire.Email in C# and VB.NET.
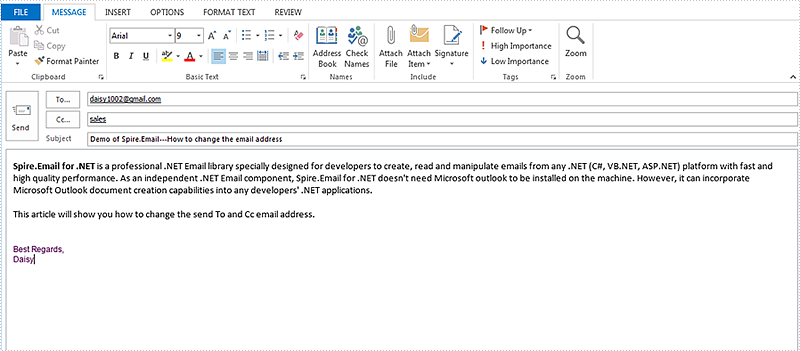
Firstly, please view the sample email message with one to and cc email address:
How to add new send to and cc email addresses:
using Spire.Email;

namespace Update
{
    class Program
    {
        static void Main(string[] args)
        {
            //Load the mail message from file
            MailMessage mail = MailMessage.Load("Sample.msg");

            //add a new To email address and its display name
            mail.To.Add(new MailAddress("support@e-iceblue.com", "E-iceblue Support"));

            // add a new Cc email address and its display name
            mail.Cc.Add(new MailAddress("comments@e-iceblue.com", "Comments"));


            // Save the message
            mail.Save("ChangeEmailAddress.msg", MailMessageFormat.Msg);
        }
    }
}
Imports Spire.Email

Namespace Update
	Class Program
		Private Shared Sub Main(args As String())
			'Load the mail message from file
			Dim mail As MailMessage = MailMessage.Load("Sample.msg")

			'add a new To email address and its display name
			mail.[To].Add(New MailAddress("support@e-iceblue.com", "E-iceblue Support"))

			' add a new Cc email address and its display name
			mail.Cc.Add(New MailAddress("comments@e-iceblue.com", "Comments"))


			' Save the message
			mail.Save("ChangeEmailAddress.msg", MailMessageFormat.Msg)
		End Sub
	End Class
End Namespace
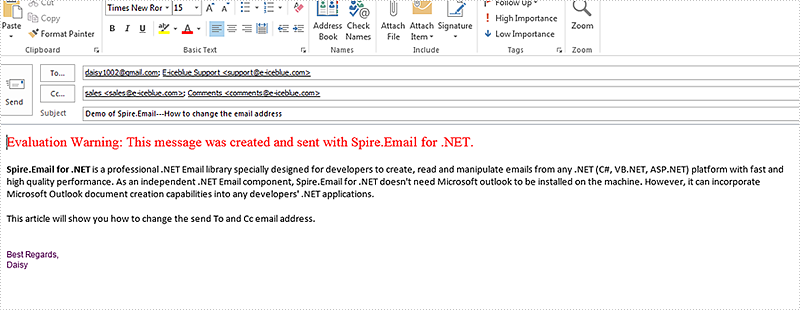
Effective screenshot after changing the email address:
Search Email Messages in C#, VB.NET
Spire.Email allows developers to search mailbox for email messages that match the given search criteria. This article illustrates how to search email messages using Spire.Email component.
Detail steps:
Step 1: Create an ImapClient instance.
ImapClient imap = new ImapClient();
Step 2: Set host, port, authentication and connection protocol.
imap.Host = "outlook.office365.com";
imap.Port = 143;
imap.Username = "LeonDavisLD@outlook.com";
imap.Password = "password";
imap.ConnectionProtocols = ConnectionProtocols.Ssl;
Step 3: connect the imap server.
imap.Connect();
Step 4: Select Inbox folder.
imap.Select("Inbox");
Step 5: Search email messages in the folder that match the search criteria.
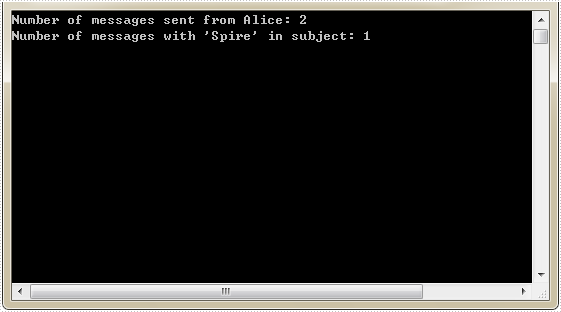
//Search email messages sent from “Alice”
ImapMessageCollection messages = imap.Search("'From' Contains 'Alice'");
Console.WriteLine("Number of messages sent from Alice: " + messages.Count);

//Search email messages with “Spire” string in subject
messages = imap.Search("'Subject' Contains 'Spire'");
Console.WriteLine("Number of messages with 'Spire' in subject: " + messages.Count);
Screenshot:
Full code:
using Spire.Email;
using Spire.Email.IMap;
using System;

namespace SearchEmailMessages
{
    class Program
    {
        static void Main(string[] args)
        {
            //Create an ImapClient instance
            ImapClient imap = new ImapClient();

            //Set host, port, authentication and connection protocol
            imap.Host = "outlook.office365.com";
            imap.Port = 143;
            imap.Username = "LeonDavisLD@outlook.com";
            imap.Password = "password";
            imap.ConnectionProtocols = ConnectionProtocols.Ssl;

            //Connect the imap server
            imap.Connect();

            //Select Inbox folder
            imap.Select("Inbox");

            //Search email messages sent from "Alice"
            ImapMessageCollection messages = imap.Search("'From' Contains 'Alice'");
            Console.WriteLine("Number of messages sent from Alice: " + messages.Count);

            //Search email messages with “Spire” string in subject
            messages = imap.Search("'Subject' Contains 'Spire'");
            Console.WriteLine("Number of messages with 'Spire' in subject: " + messages.Count);
        }
    }
}
Imports Spire.Email
Imports Spire.Email.IMap

Namespace SearchEmailMessages
	Class Program
		Private Shared Sub Main(args As String())
			'Create an ImapClient instance
			Dim imap As New ImapClient()

			'Set host, port, authentication and connection protocol
			imap.Host = "outlook.office365.com"
			imap.Port = 143
			imap.Username = "LeonDavisLD@outlook.com"
			imap.Password = "password"
			imap.ConnectionProtocols = ConnectionProtocols.Ssl

			'Connect the imap server
			imap.Connect()

			'Select Inbox folder
			imap.[Select]("Inbox")

			'Search email messages sent from "Alice"
			Dim messages As ImapMessageCollection = imap.Search("'From' Contains 'Alice'")
			Console.WriteLine("Number of messages sent from Alice: " + messages.Count)

			'Search email messages with “Spire” string in subject
			messages = imap.Search("'Subject' Contains 'Spire'")
			Console.WriteLine("Number of messages with 'Spire' in subject: " + messages.Count)
		End Sub
	End Class
End Namespace
Delete Email messages in C#, VB.NET
This article demonstrates how to delete a specific email message along with all email messages using Spire.Email component.
Detail steps:
Step 1: Create a POP3 client.
Pop3Client pop3 = new Pop3Client();
Step 2: Set host, authentication, port and connection protocol.
pop3.Host = "outlook.office365.com";
pop3.Username = "LeonDavisLD@outlook.com";
pop3.Password = "password";
pop3.Port = 995;
pop3.EnableSsl = true;
Step 3: Connect the pop server.
pop3.Connect();
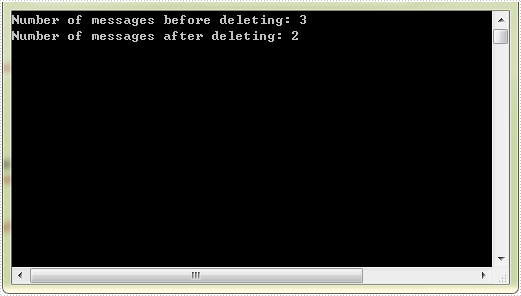
Step 4: Get the number of messages before deleting message(s).
//Get the number of messages before deleting message(s)
Pop3MessageInfoCollection messages = pop3.GetAllMessages();
Console.WriteLine("Number of messages before deleting: " + messages.Count);
Step 5: Delete message(s).
//Delete an email message by its sequence number
pop3.DeleteMessage(2);

//Delete all messages
//pop3.DeleteAllMessages();
Step 6: Get the number of messages after deleting message(s).
//Get the number of messages after deleting message(s)
messages = pop3.GetAllMessages();
Console.WriteLine("Number of messages after deleting: " + messages.Count);
Full code:
using Spire.Email;
using Spire.Email.Pop3;
using System;

namespace DeleteEmailMessages
{
    class Program
    {
        static void Main(string[] args)
        {
            //Create a POP3 client
            Pop3Client pop3 = new Pop3Client();

            //Set host, authentication, port and connection protocol
            pop3.Host = "outlook.office365.com";
            pop3.Username = "LeonDavisLD@outlook.com";
            pop3.Password = "password";
            pop3.Port = 995;
            pop3.EnableSsl = true;

            //Connect the pop server
            pop3.Connect();

            //Get the number of messages before deleting message(s)
            Pop3MessageInfoCollection messages = pop3.GetAllMessages();
            Console.WriteLine("Number of messages before deleting: " + messages.Count);

            //Delete an email message by its sequence number
            pop3.DeleteMessage(2);

            //Delete all messages
            //pop3.DeleteAllMessages();

            //Get the number of messages after deleting message(s)
            messages = pop3.GetAllMessages();
            Console.WriteLine("Number of messages after deleting: " + messages.Count);
        }
    }
}
Imports Spire.Email
Imports Spire.Email.Pop3

Namespace DeleteEmailMessages
	Class Program
		Private Shared Sub Main(args As String())
			'Create a POP3 client
			Dim pop3 As New Pop3Client()

			'Set host, authentication, port and connection protocol
			pop3.Host = "outlook.office365.com"
			pop3.Username = "LeonDavisLD@outlook.com"
			pop3.Password = "password"
			pop3.Port = 995
			pop3.EnableSsl = True

			'Connect the pop server
			pop3.Connect()

			'Get the number of messages before deleting message(s)
			Dim messages As Pop3MessageInfoCollection = pop3.GetAllMessages()
			Console.WriteLine("Number of messages before deleting: " + messages.Count)

			'Delete an email message by its sequence number
			pop3.DeleteMessage(2)

			'Delete all messages
			'pop3.DeleteAllMessages();

			'Get the number of messages after deleting message(s)
			messages = pop3.GetAllMessages()
			Console.WriteLine("Number of messages after deleting: " + messages.Count)
		End Sub
	End Class
End Namespace
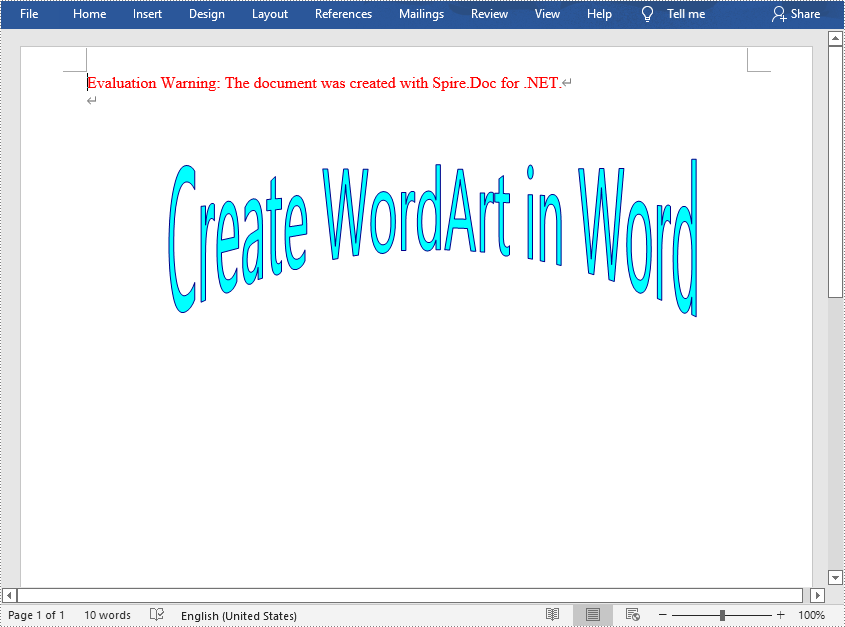
C#/VB.NET: Insert WordArt in Word
WordArt is a feature in MS Word that allows you to insert colorful and stylish text into your document. Apart from that, it can also bend, stretch, or skew the shape of the text, which is a quick way to make the text stand out with special effects. In this article, you will learn how to programmatically insert WordArt in a Word document using Spire.Doc for .NET.
Install Spire.Doc for .NET
To begin with, you need to add the DLL files included in the Spire.Doc for .NET package as references in your .NET project. The DLL files can be either downloaded from this link or installed via NuGet.
PM> Install-Package Spire.Doc
Insert WordArt in Word
The ShapeType enumeration provided by Spire.Doc for .NET defines a variety of WordArt shape types whose names begin with "Text". In order to create a WordArt in Word, you need to initialize an instance of ShapeObject and specify the WordArt type and text content. The detailed steps are as follows:
- Create a Document instance.
- Add a section to the document using Document.AddSection() method, and then add a paragraph to the section using Section.AddParagraph() method.
- Append a shape to the paragraph and specify the shape size and type using Paragraph.AppendShape(float width, float height, ShapeType shapeType) method.
- Set the position of the shape using ShapeObject.VerticalPosition and ShapeObject.HorizontalPosition properties.
- Set the text of WordArt using WordArt.Text property.
- Set the fill color and stroke color of WordArt using ShapeObject.FillColor and ShapeObject.StrokeColor properties.
- Save the document to another file using Document.SaveToFile() method.
- C#
- VB.NET
using Spire.Doc;
using Spire.Doc.Documents;
using Spire.Doc.Fields;
namespace CreatWordArt
{
    class Program
    {
        static void Main(string[] args)
        {
            //Create a Document instance
            Document doc = new Document();

            //Add a section
            Section section = doc.AddSection();

            //Add a paragraph
            Paragraph paragraph = section.AddParagraph();

            //Append a shape to the paragraph and specify the shape size and type
            ShapeObject shape = paragraph.AppendShape(400, 150, ShapeType.TextDeflateBottom);

            //Set the position of the shape
            shape.VerticalPosition = 60;
            shape.HorizontalPosition = 60;

            //Set the text of WordArt
            shape.WordArt.Text = "Create WordArt in Word";

            //Set the fill color and stroke color of WordArt
            shape.FillColor = System.Drawing.Color.Cyan;
            shape.StrokeColor = System.Drawing.Color.DarkBlue;

            //Save the document
            doc.SaveToFile("CreateWordArt.docx", FileFormat.Docx2013);
        }
    }
}
Apply for a Temporary License
If you'd like to remove the evaluation message from the generated documents, or to get rid of the function limitations, please request a 30-day trial license for yourself.
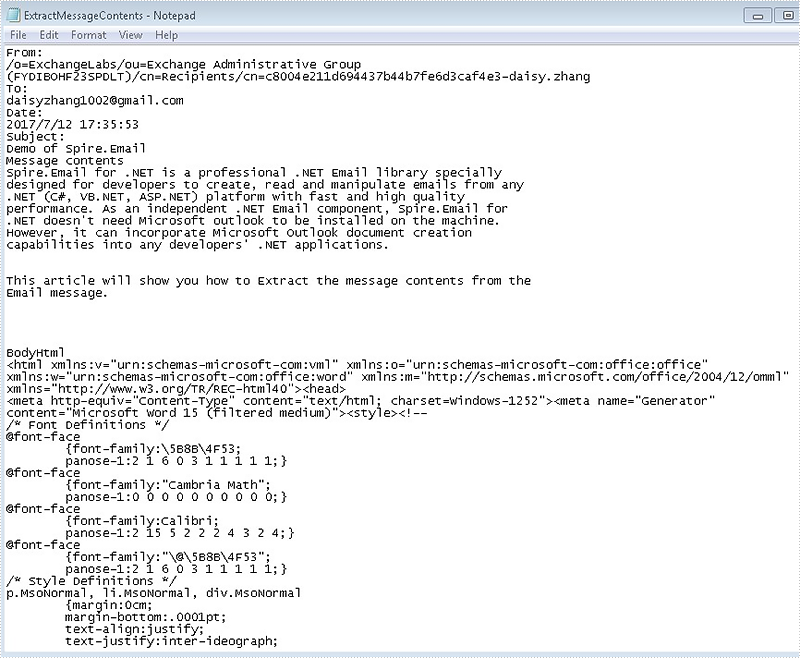
Extract message contents in C#, VB.NET
This article illustrates how to get message contents such as from address, send to address, subject, date and the body of the message by using Spire.Email.
Code snippets of how to extract the message contents:
Step 1: Load the mail message.
MailMessage mail = MailMessage.Load("Sample.msg");
Step 2: Create a new instance of StringBuilder.
StringBuilder sb = new StringBuilder();
Step 3: Get the message contents as we want.
//get the From address
sb.AppendLine("From:");
sb.AppendLine(mail.From.Address);

//get the To address
sb.AppendLine("To:");
foreach (MailAddress toAddress in mail.To)
{
    sb.AppendLine(toAddress.Address);
}

//get the date
sb.AppendLine("Date:");
sb.AppendLine(mail.Date.ToString());

//get the subject
sb.AppendLine("Subject:");
sb.AppendLine(mail.Subject);

//get the BodyText
sb.AppendLine("Message contents");
sb.AppendLine(mail.BodyText);

//get the BodyHtml
sb.AppendLine("BodyHtml");
sb.AppendLine(mail.BodyHtml);
Step 4: Write all contents in .txt
File.WriteAllText("ExtractMessageContents.txt", sb.ToString());
The extracted message contents in .txt file format.
Full codes:
using Spire.Email;
using System.IO;
using System.Text;

namespace ExtractMessage
{
    class Program
    {
        static void Main(string[] args)
        {

            MailMessage mail = MailMessage.Load("Sample.msg");

            StringBuilder sb = new StringBuilder();

            sb.AppendLine("From:");
            sb.AppendLine(mail.From.Address);

            sb.AppendLine("To:");
            foreach (MailAddress toAddress in mail.To)
            {
                sb.AppendLine(toAddress.Address);
            }

            sb.AppendLine("Date:");
            sb.AppendLine(mail.Date.ToString());

            sb.AppendLine("Subject:");
            sb.AppendLine(mail.Subject);

            sb.AppendLine("Message contents");
            sb.AppendLine(mail.BodyText);

            sb.AppendLine("BodyHtml");
            sb.AppendLine(mail.BodyHtml);

            File.WriteAllText("ExtractMessageContents.txt", sb.ToString());
        }
    }
}
Dim mail As MailMessage = MailMessage.Load("Sample.msg")

Dim sb As New StringBuilder()

sb.AppendLine("From:")
sb.AppendLine(mail.From.Address)

sb.AppendLine("To:")
For Each toAddress As MailAddress In mail.[To]
	sb.AppendLine(toAddress.Address)
Next

sb.AppendLine("Date:")
sb.AppendLine(mail.[Date].ToString())

sb.AppendLine("Subject:")
sb.AppendLine(mail.Subject)

sb.AppendLine("Message contents")
sb.AppendLine(mail.BodyText)

sb.AppendLine("BodyHtml")
sb.AppendLine(mail.BodyHtml)

File.WriteAllText("ExtractMessageContents.txt", sb.ToString())