Hide or Show Row Column Headers in Excel with C#
In Spire.XLS, we can hide or show the headers of rows and columns by setting the RowColumnHeadersVisible property of XlsWorksheet class. This article elaborates the steps of how to accomplish this function using Spire.XLS.
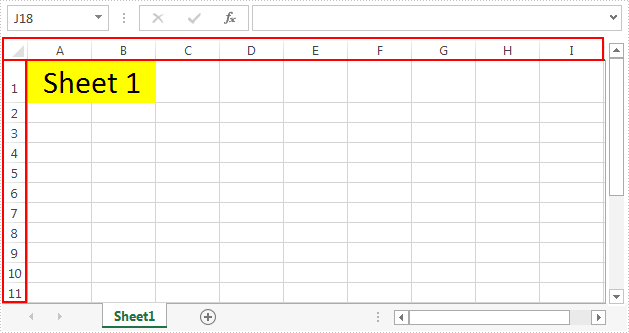
The following screenshot shows the input file which contain one worksheet with row and column headers.
Detail steps:
Step 1: Instantiate a Workbook instance and load the Excel file.
Workbook workbook = new Workbook();
workbook.LoadFromFile("Input.xlsx");
Step 2: Get the first worksheet.
Worksheet sheet = workbook.Worksheets[0];
Step 3: Hide or show the headers of rows and columns in the worksheet.
//Hide the headers of rows and columns
sheet.RowColumnHeadersVisible = false;

//Show the headers of rows and columns
//sheet.RowColumnHeadersVisible = true;
Step 4: Save the file.
workbook.SaveToFile("Output.xlsx");
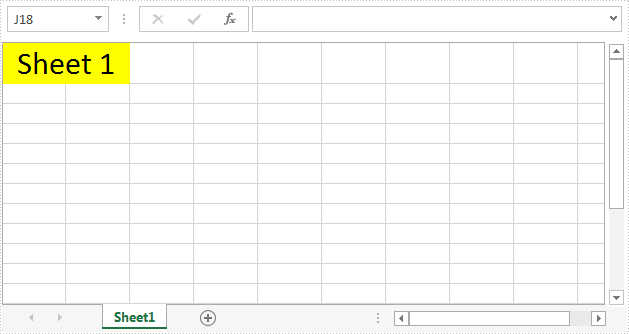
The screenshot after hiding the row and column headers:
Full code:
using Spire.Xls;
namespace ShowRowColumnHeader
{
    class Program
    {

        static void Main(string[] args)
        {
            // Instantiate a Workbook instance
            Workbook workbook = new Workbook();
            //Load the Excel file
            workbook.LoadFromFile("Input.xlsx");

            //Get the first worksheet
            Worksheet sheet = workbook.Worksheets[0];

            //Hide the headers of rows and columns
            sheet.RowColumnHeadersVisible = false;

            //Show the headers of rows and columns
            //sheet.RowColumnHeadersVisible = true;

            //Save the file
            workbook.SaveToFile("Output.xlsx");
        }
    }
}
Expand and Collapse Groups in Excel with C#
When we group rows or columns in Excel, we can use the expand/collapse button to show/hide the grouped data. This article demonstrates how to expand and collapse the groups in an Excel file programmatically using Spire.XLS.
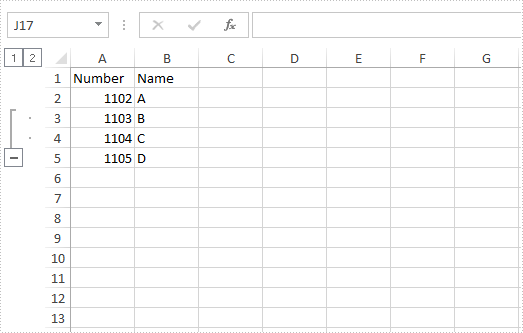
Below screenshot shows the sample Excel file with rows 3 and 4 grouped:
Detail steps:
Step 1: Create a Workbook instance and load the Excel file.
Workbook workbook = new Workbook();
workbook.LoadFromFile("Input.xlsx");
Step 2: Get the first worksheet.
Worksheet sheet = workbook.Worksheets[0];
Step 3: Expand or Collapse the grouped rows with ExpandCollapseFlags set to expand parent.
//Expand group
sheet.Range["A3:B4"].ExpandGroup(GroupByType.ByRows, ExpandCollapseFlags.ExpandParent);

//Collapse group
//sheet.Range["A3:B4"].CollapseGroup(GroupByType.ByRows);
Step 4: Save the file.
workbook.SaveToFile("Output.xlsx");
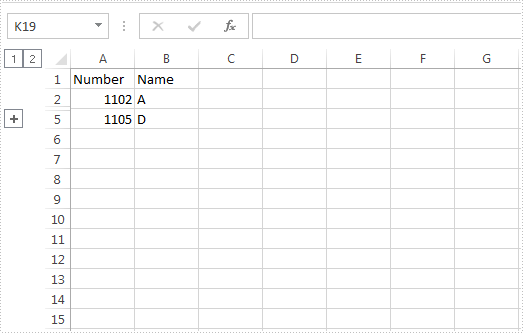
The screenshot after running the project:
Full code:
using Spire.Xls;
namespace ExpandandCollapseGroups
{
    class Program
    {
        static void Main(string[] args)
        {
            //Create Workbook instance
            Workbook workbook = new Workbook();
            //Load the Excel file
            workbook.LoadFromFile("Input.xlsx");

            //Get the first worksheet
            Worksheet sheet = workbook.Worksheets[0];

            //Expand the grouped rows with ExpandCollapseFlags set to expand parent
            sheet.Range["A3:B4"].ExpandGroup(GroupByType.ByRows, ExpandCollapseFlags.ExpandParent);

            //Collapse the grouped rows
            //sheet.Range["A3:B4"].CollapseGroup(GroupByType.ByRows);

            //Save the file
            workbook.SaveToFile("Output.xlsx");
        }
    }
}
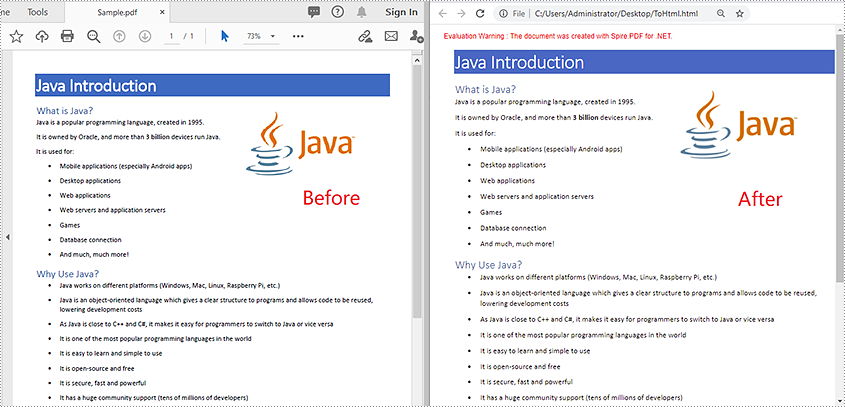
C#/VB.NET: Convert PDF to HTML
For various reasons, you may want to convert PDF to HTML. For example, you need to share PDF documents on social media or publish PDF content on the web. In this article, you will learn how to convert PDF to HTML in C# and VB.NET using Spire.PDF for .NET.
Install Spire.PDF for .NET
To begin with, you need to add the DLL files included in the Spire.PDF for.NET package as references in your .NET project. The DLL files can be either downloaded from this link or installed via NuGet.
PM> Install-Package Spire.PDF
Convert PDF to HTML in C# and VB.NET
The following are the steps to convert a PDF document to HTML:
- Initialize an instance of PdfDocument class.
- Load a PDF document using PdfDocument.LoadFromFile(filePath) method.
- Save the PDF document as HTML using PdfDocument.SaveToFile(filePath, FileFormat.HTML) method.
- C#
- VB.NET
using Spire.Pdf;

namespace ConvertPdfToHtml
{
    class Program
    {
        static void Main(string[] args)
        {
            //Create a PdfDocument instance
            PdfDocument pdf = new PdfDocument();
            //Load a PDF document
            pdf.LoadFromFile(@"C:\Users\Administrator\Desktop\Sample.pdf");

            //Save the PDF document as HTML
            pdf.SaveToFile(@"C:\Users\Administrator\Desktop\ToHtml.html", FileFormat.HTML);
        }
    }
}
Apply for a Temporary License
If you'd like to remove the evaluation message from the generated documents, or to get rid of the function limitations, please request a 30-day trial license for yourself.
How to Create Barcode Using Spire.Barcode for Java
This article presents how to import Spire.Barcode.jar in Java application and create barcode image using the classes involved.
Import Spire.Barcode.jar file
Step 1: Download Spire.Barcode for Java from the following URL. Unzip the package into a directory, you'll get Spire.Barcode.jar and Spire.Common.jar in the lib folder.
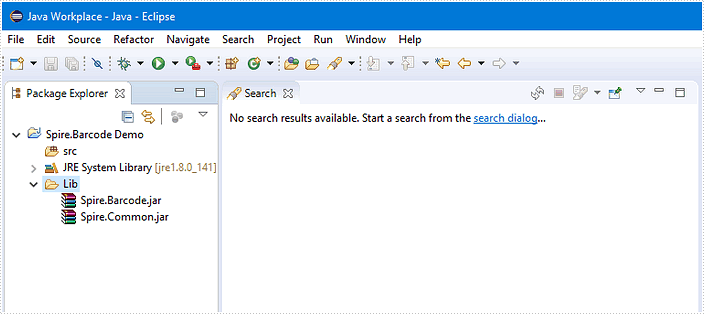
Step 2: Create a Java project in Eclipse.
Step 3: Right click the project name, select "New" - "Folder" to create a folder named "Lib".

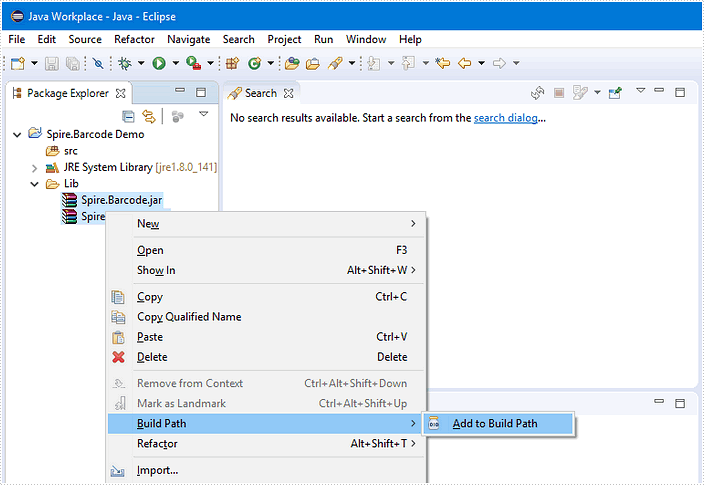
Step 4: Copy the Spire.Barcode.jar file and Spire.Common.jar file to this folder.
Step 5: Select all the jar files, then right click on one of them and select "Build Path" – "Add to Build Path".
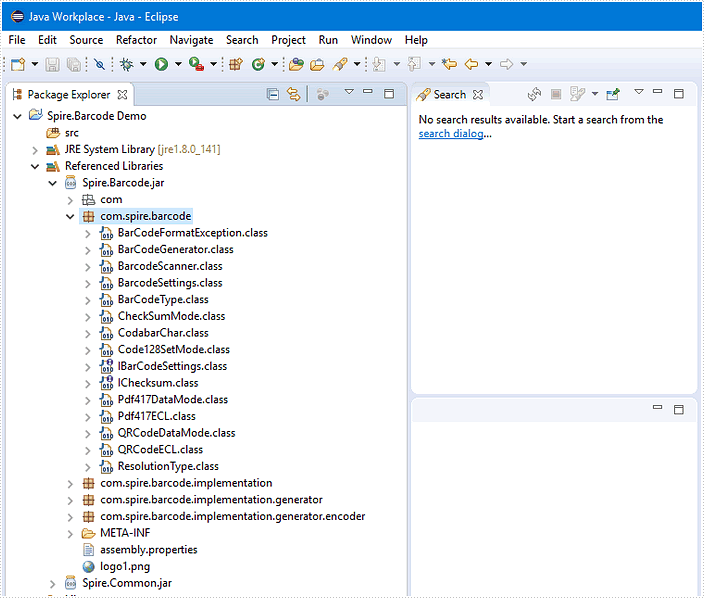
Until now, Spire.Barcode.jar and Spire.Common.jar have been referenced in your Java project. Expand the specific jar file in the “Package Explore” pane, and you’ll be able to view the classes, methods, properties, etc. inside the jar file.
Using the code
Following code snippet provides an example of creating Code 128 barcode using Spire.Barcode for Java.
import java.awt.image.BufferedImage;
import java.io.File;
import java.io.IOException;

import javax.imageio.ImageIO;

import com.spire.barcode.BarCodeGenerator;
import com.spire.barcode.BarCodeType;
import com.spire.barcode.BarcodeSettings;

public class CODE_128 {

	public static void main(String[] args) throws IOException {

		//create an instance of BarcodeSetteings
        BarcodeSettings settings = new BarcodeSettings();
        //set barcode type
        settings.setType(BarCodeType.CODE_128);
        //set barcode data
        settings.setData("123456789");
        //set the display text
        settings.setData2D("123456789");
        //show text on bottom
        settings.setShowTextOnBottom(true);
        //set the border invisible
        settings.hasBorder(false);
        //create BarCodeGenerator object based on settings
        BarCodeGenerator barCodeGenerator = new BarCodeGenerator(settings);
        //generate image data and store in BufferedImage instance
        BufferedImage bufferedImage = barCodeGenerator.generateImage();
        //save to .png file format
        ImageIO.write(bufferedImage, "png", new File("CODE128.png"));
        System.out.println("Complete!");
	}
}
Output:

Remove/Delete Form Fields from PDF in C#
This article demonstrates how to remove a particular form field and all of the form fields from an existing PDF document using Spire.PDF.
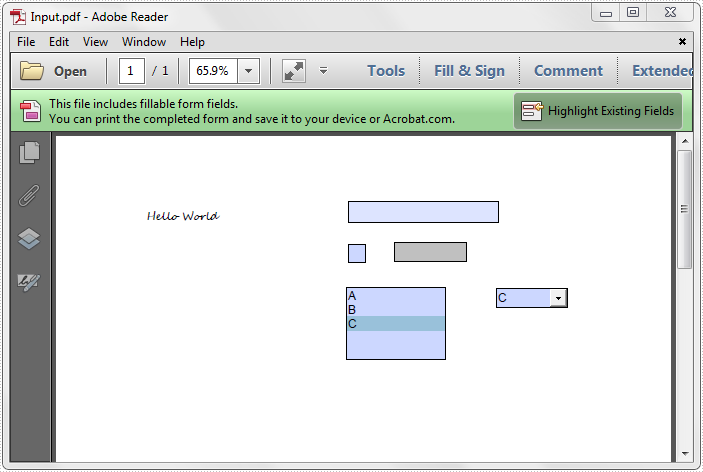
The below sample document contains some text and five different kinds of form fields:
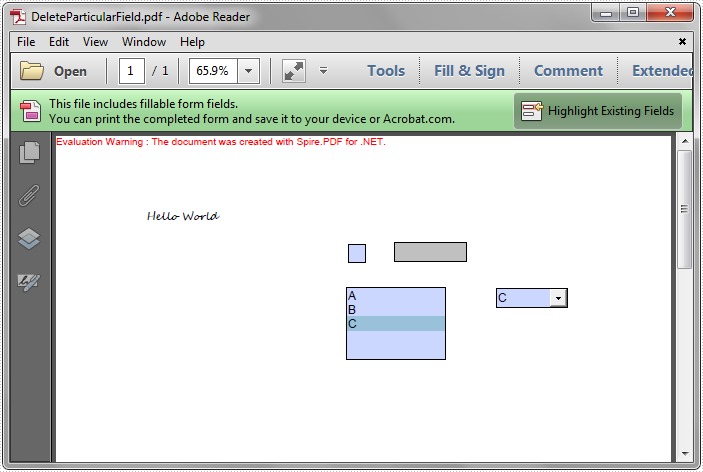
Remove a particular form field
We can remove a particular form field by calling the PdfFieldCollection.Remove method. To remove the form field by index, call the PdfFieldCollection.RemoveAt method and pass the corresponding index of the form field as the argument.
using Spire.Pdf;
using Spire.Pdf.Fields;
using Spire.Pdf.Widget;


namespace RemoveSpecifiedFormfield
{
    class Program
    {
        static void Main(string[] args)
        {
            //Create PdfDocument instance
            PdfDocument pdf = new PdfDocument();

            //Load PDF file
            pdf.LoadFromFile(@"Input.pdf");

            //Get form fields
            PdfFormWidget formWidget = pdf.Form as PdfFormWidget;

            //Get and remove the first form field
            PdfField textbox = formWidget.FieldsWidget.List[0] as PdfTextBoxFieldWidget;
            formWidget.FieldsWidget.Remove(textbox);

            //Get and remove the first form field using its name
            //PdfField field = formWidget.FieldsWidget["Text1"];
            //formWidget.FieldsWidget.Remove(field);

            //Remove the form field at index 0
            //formWidget.FieldsWidget.RemoveAt(0);

            pdf.SaveToFile("DeleteParticularField.pdf");
        }

    }
}
Remove all of the form fields
To remove all of the form fields, first we need to traverse the form fields and then remove them one by one.
using Spire.Pdf;
using Spire.Pdf.Fields;
using Spire.Pdf.Widget;


namespace RemoveSpecifiedFormfield
{
    class Program
    {
        static void Main(string[] args)
        {
            //Create PdfDocument instance
            PdfDocument pdf = new PdfDocument();

            //Load PDF file
            pdf.LoadFromFile(@"Input.pdf");

            //Get form fields
            PdfFormWidget formWidget = pdf.Form as PdfFormWidget;

            //Remove all of the form fields
            for (int i = formWidget.FieldsWidget.List.Count - 1; i >= 0; i--)
            {
                PdfField field = formWidget.FieldsWidget.List[i] as PdfField;
                formWidget.FieldsWidget.Remove(field);
            }

            pdf.SaveToFile("DeleteAllFields.pdf");
        }

    }
}

Add Message to PST File in C#, VB.NET
In the previous article, we have introduced how to read a PST file and get the folder information from it. This article will show you how we can add existing mail message files into PSF file for archiving.
Step 1: Load a PST file from disk into an instance of OutlookFile class.
OutlookFile outlookFile = new OutlookFile(@"C:\Users\Administrator\Documents\Outlook Files\Sample.pst");
Step 2: Load a MSG file into an instance of OutlookItme class.
OutlookItem item = new OutlookItem();
item.LoadFromFile(@"C:\Users\Administrator\Documents\Outlook Files\Sample.msg");
Step 3: Get inbox folder from PST file.
OutlookFolder inboxFolder = outlookFile.RootOutlookFolder.GetSubFolder("Inbox");
Step 4: Add the MSG file to inbox folder.
inboxFolder.AddItem(item);
Full Code:
using Spire.Email;
using Spire.Email.Outlook;
using System;

namespace AddMessageToPSTFile
{
    class Program
    {
        static void Main(string[] args)
        {
            OutlookFile outlookFile = new OutlookFile(@"C:\Users\Administrator\Documents\Outlook Files\Sample.pst");
            OutlookItem item = new OutlookItem();
            item.LoadFromFile(@"C:\Users\Administrator\Documents\Outlook Files\Sample.msg");
            OutlookFolder inboxFolder = outlookFile.RootOutlookFolder.GetSubFolder("Inbox");
            inboxFolder.AddItem(item);
            Console.WriteLine("Completed");
        }
    }
}
Imports Spire.Email
Imports Spire.Email.Outlook

Namespace AddMessageToPSTFile
	Class Program
		Private Shared Sub Main(args As String())
			Dim outlookFile As New OutlookFile("C:\Users\Administrator\Documents\Outlook Files\Sample.pst")
			Dim item As New OutlookItem()
			item.LoadFromFile("C:\Users\Administrator\Documents\Outlook Files\Sample.msg")
			Dim inboxFolder As OutlookFolder = outlookFile.RootOutlookFolder.GetSubFolder("Inbox")
			inboxFolder.AddItem(item)
			Console.WriteLine("Completed")
		End Sub
	End Class
End Namespace
Identify Merge Field Names in Word with C#
We often come across a scenario where we need to merge data to the merge fields which are created by some others, and we are not sure about the merge fields’ names. So in order to accomplish the mail merge purpose, first we need to read the names of all the merge fields.
The MailMerge class in Spire.Doc.Reporting namespace exposes the following methods which return a collection of merge field names or group (region) names in a word document.
- public string[] GetMergeFieldNames(): return a collection of all the merge field names.
- public string[] GetMergeFieldNames(string groupName): return a collection of merge field names within a specific group.
- public string[] GetMergeGroupNames(): return a collection of group names.
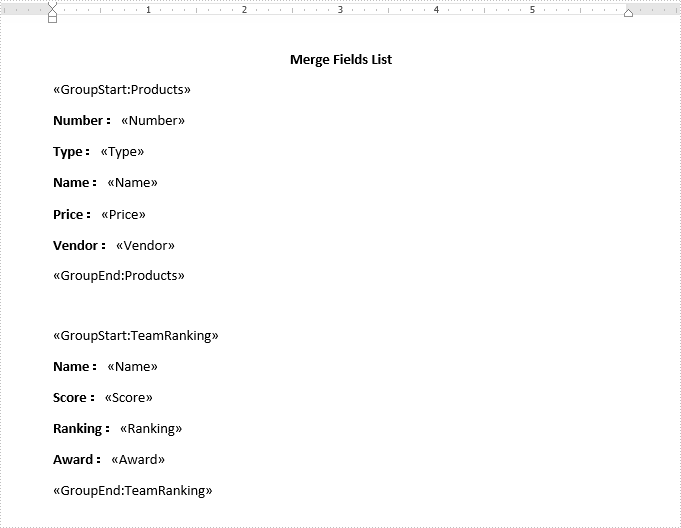
For better demonstration, we use the following sample document:
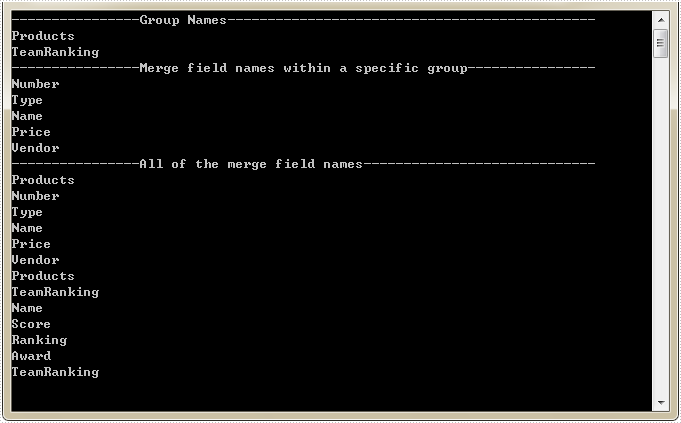
The following example elaborates how to read the names of groups and merge fields in above word document.
using Spire.Doc;
using System;
namespace MailMerge
{
    class Program
    {
        static void Main(string[] args)
        {

            //Creates Document instance
            Document document = new Document();

            //Loads the word document
            document.LoadFromFile("MergeFields.docx");

            //Gets the collection of group names
            string[] GroupNames = document.MailMerge.GetMergeGroupNames();

            //Gets the collection of merge field names in a specific group
            string[] MergeFieldNamesWithinRegion = document.MailMerge.GetMergeFieldNames("Products");

            // Gets the collection of all the merge field names
            string[] MergeFieldNames = document.MailMerge.GetMergeFieldNames();

            Console.WriteLine("----------------Group Names-----------------------------------------");
            for (int i = 0; i < GroupNames.Length; i++)
            {
                Console.WriteLine(GroupNames[i]);
            }

            Console.WriteLine("----------------Merge field names within a specific group-----------");
            for (int j = 0; j < MergeFieldNamesWithinRegion.Length; j++)
            {
                Console.WriteLine(MergeFieldNamesWithinRegion[j]);
            }

            Console.WriteLine("----------------All of the merge field names------------------------");
            for (int k = 0; k < MergeFieldNames.Length; k++)
            {
                Console.WriteLine(MergeFieldNames[k]);
            }

        }

    }
}
Screenshot:
Remove password from the encrypted PDF document
With Spire.PDF for .NET, we can easily set the password to encrypt the PDF document by password. We can also use Spire.PDF to remove the password from the encrypted PDF document in C# and VB.NET. We need to load the encrypted PDF file with password by calling the method PdfDocument.LoadFromFile (string filename, string password) and then set the password as empty to remove the password.
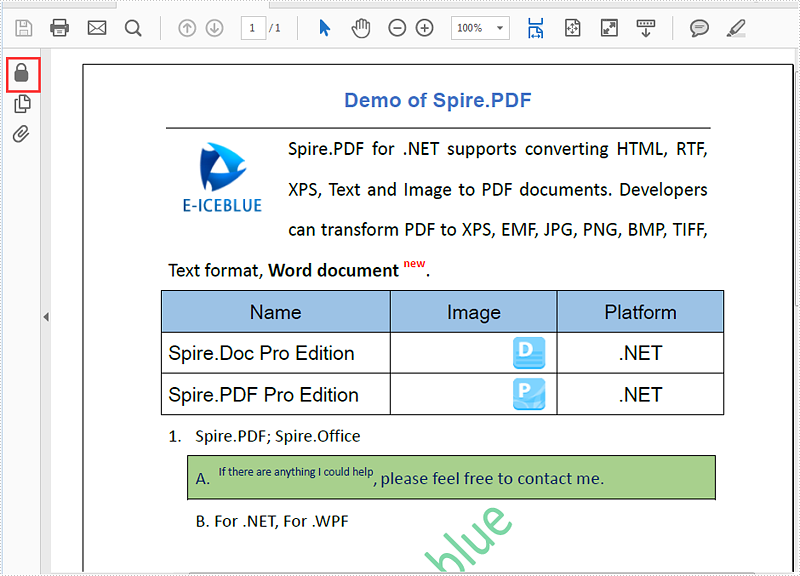
Firstly, view the PDF with user password:
Step 1: Load the password protected PDF document.
PdfDocument pdf = new PdfDocument();
pdf.LoadFromFile("Sample.pdf", "e-iceblue");
Step 2: Set the password as empty to remove the user password.
pdf.Security.UserPassword = string.Empty;
Step 3: Save the document to file.
pdf.SaveToFile("Decrypted.pdf");
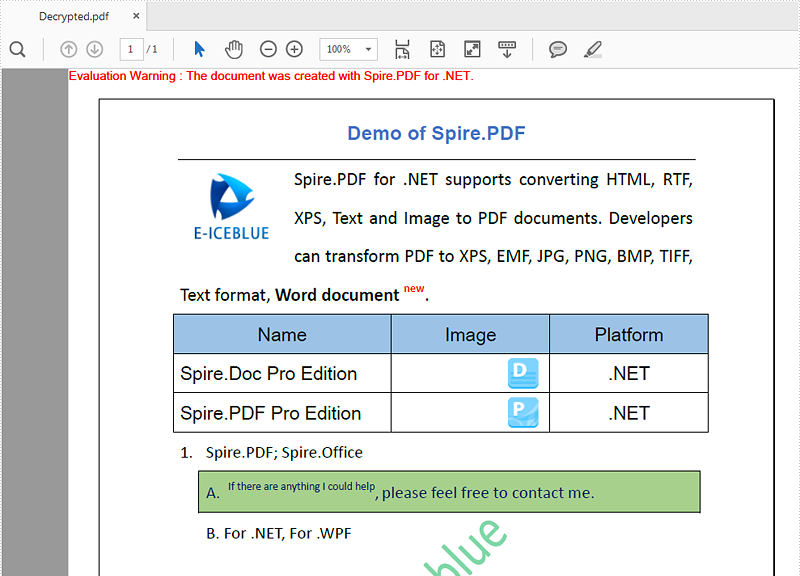
Effective screenshot after removing the password from the PDF document:
Full codes:
using Spire.Pdf;

namespace RemovePassword
{
    class Program
    {
        static void Main(string[] args)
        {
            PdfDocument pdf = new PdfDocument();
            pdf.LoadFromFile("Sample.pdf", "e-iceblue");

            pdf.Security.UserPassword = string.Empty;

            pdf.SaveToFile("Decrypted.pdf");
        }
    }
}
Imports Spire.Pdf

Namespace RemovePassword
	Class Program
		Private Shared Sub Main(args As String())
			Dim pdf As New PdfDocument()
pdf.LoadFromFile("Sample.pdf", "e-iceblue")
pdf.Security.UserPassword = String.Empty
pdf.SaveToFile("Decrypted.pdf")
		End Sub
	End Class
End Namespace
Creating MSG Files with RTF body and attachment
Spire.Email supports to create Outlook message (MSG) files with rich text bodies and attachments in C# and VB.NET. The RTF body supports to set the formatting for the font, such as in bold, underline and set the color and add lists to the message body. It makes the outlook message vivid and clear to view. Here comes to the steps of how to use Spire.Email to create and save the Outlook message with RTF body and attachment in C#.
Step 1: Create an instance of MailMessage class and specify sender and recipient address.
MailAddress addressFrom = new MailAddress("daisy.zhang@e-iceblue.com", "Daisy Zhang");
MailAddress addressTo = new MailAddress("susanwong32@outlook.com");
MailMessage mail = new MailMessage(addressFrom, addressTo);
Step 2: Add the subject, message body and attachment of the message.
mail.Subject = "This is a test message";

string htmlString = @"
   <p>Dear Ms. Susan,</p>
   <p>This is an example of creating an <b>outlook message</b> <u>(msg)</u>.</p>
   <ul>
   <li> Create a message with RTF file </li>
   <li> Create a message with attachment</li>
   </ul>
   <p style='color:red'>This text is in red </p>

   <p>Best regards, </p>
   <p>Daisy </p>";
 mail.BodyHtml = htmlString;

 mail.Attachments.Add(new Attachment("logo.png"));
Step 3: Save the message as MSG format.
mail.Save("Sample.msg", MailMessageFormat.Msg);
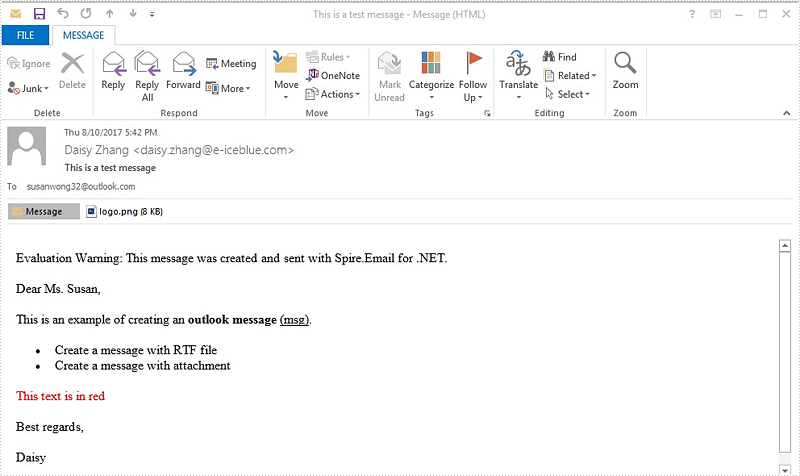
Effective screenshot:
Full codes:
using Spire.Email;

namespace CreatingMSGFiles
{
    class Program
    {
        static void Main(string[] args)
        {
            MailAddress addressFrom = new MailAddress("daisy.zhang@e-iceblue.com", "Daisy Zhang");
            MailAddress addressTo = new MailAddress("susanwong32@outlook.com");

            MailMessage mail = new MailMessage(addressFrom, addressTo);

            mail.Subject = "This is a test message";
            string htmlString = @"
           <p>Dear Ms. Susan,</p>
           <p>This is an example of creating an <b>outlook message</b> <u>(msg)</u>.</p>
           <ul>
           <li> Create a message with RTF file </li>
           <li> Create a message with attachment</li>
           </ul>
           <p style='color:red'>This text is in red </p>
           <p>Best regards, </p>
           <p>Daisy </p>";

            mail.BodyHtml = htmlString;

            mail.Attachments.Add(new Attachment("logo.png"));

            mail.Save("Sample.msg", MailMessageFormat.Msg);
        }
    }
}
Get Folder Information from PST File in C#, VB.NET
The PST files are used to store information that pertains to the e-mail folders, addresses, contact information, email messages and other data that is saved within Outlook and Exchange programs. Spire.Email supports to read PST files and get the folder information such as folder name, message count and unread message count.
Step 1: Load a PST file from disk into an instance of OutlookFile class.
OutlookFile olf = new OutlookFile(@"C:\Users\jack\Documents\Outlook Files\Sample.pst");
Step 2: Get the folders collection.
OutlookFolderCollection folderCollection = olf.RootOutlookFolder.GetSubFolders();
Step 3: Traverse the collection and get the folder information of each element in the collection.
foreach (OutlookFolder folder in folderCollection)
{
    Console.WriteLine("Folder: " + folder.Name);
    Console.WriteLine("Total items: " + folder.ItemCount);
    Console.WriteLine("Total unread items: " + folder.UnreadItemCount);
    Console.WriteLine("Whether this folder has subfolders: {0}", (folder.HasSubFolders)?"Yes":"No");
    Console.WriteLine("------------------Next Folder--------------------");
}
Output:

Full Code:
using Spire.Email;
using Spire.Email.Outlook;
using System;

namespace GetFolderInformation
{
    class Program
    {
        static void Main(string[] args)
        {
            OutlookFile olf = new OutlookFile(@"C:\Users\jack\Documents\Outlook Files\Sample.pst");
            OutlookFolderCollection folderCollection = olf.RootOutlookFolder.GetSubFolders();

            foreach (OutlookFolder folder in folderCollection)
            {
                Console.WriteLine("Folder: " + folder.Name);
                Console.WriteLine("Total items: " + folder.ItemCount);
                Console.WriteLine("Total unread items: " + folder.UnreadItemCount);
                Console.WriteLine("Whether this folder has subfolders: {0}", (folder.HasSubFolders) ? "Yes" : "No");
                Console.WriteLine("------------------Next Folder--------------------");
            }
            Console.WriteLine("Completed");
        }
    }
}
Imports Spire.Email
Imports Spire.Email.Outlook

Namespace GetFolderInformation
	Class Program
		Private Shared Sub Main(args As String())
			Dim olf As New OutlookFile("C:\Users\jack\Documents\Outlook Files\Sample.pst")
			Dim folderCollection As OutlookFolderCollection = olf.RootOutlookFolder.GetSubFolders()

			For Each folder As OutlookFolder In folderCollection
				Console.WriteLine("Folder: " + folder.Name)
				Console.WriteLine("Total items: " + folder.ItemCount)
				Console.WriteLine("Total unread items: " + folder.UnreadItemCount)
				Console.WriteLine("Whether this folder has subfolders: {0}", If((folder.HasSubFolders), "Yes", "No"))
				Console.WriteLine("------------------Next Folder--------------------")
			Next
			Console.WriteLine("Completed")
		End Sub
	End Class
End Namespace