Convert PDF to SVG with Custom Width and Height in C#, VB.NET
We've have demonstrated how to convert PDF page to SVG file format in the previous post. This guidance shows you how we can specify the width and height of output file using the latest version of Spire.PDF with C# and VB.NET.
Step 1: Load a sample PDF document to PdfDocument instance.
PdfDocument document = new PdfDocument();
document.LoadFromFile("pdf-sample.pdf");
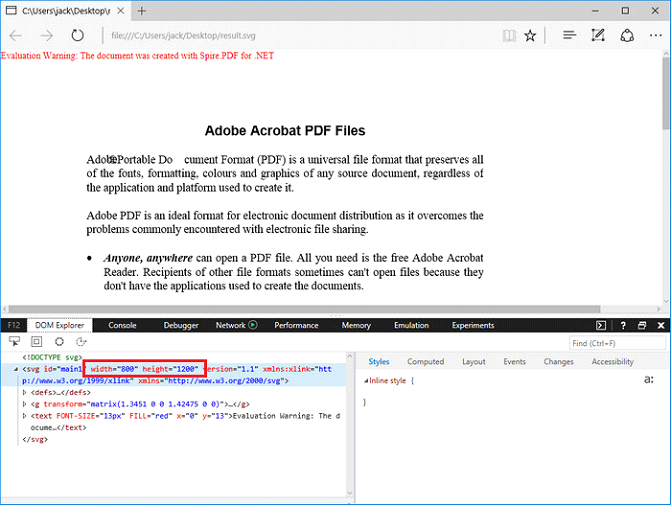
Step 2: Specify the output file size through ConvertOptions.SetPdfToSvgOptions() method.
document.ConvertOptions.SetPdfToSvgOptions(800f, 1200f);
Step 3: Save PDF to SVG file format.
document.SaveToFile("result.svg", FileFormat.SVG);
Output:
Full Code:
using Spire.Pdf;

namespace ConvertPDFtoSVG
{
    class Program
    {
        static void Main(string[] args)
        {
            PdfDocument document = new PdfDocument();
            document.LoadFromFile("pdf-sample.pdf");
            document.ConvertOptions.SetPdfToSvgOptions(800f, 1200f);
            document.SaveToFile("result.svg", FileFormat.SVG);
        }
    }
}
Imports Spire.Pdf

Namespace ConvertPDFtoSVG
	Class Program
		Private Shared Sub Main(args As String())
			Dim document As New PdfDocument()
document.LoadFromFile("pdf-sample.pdf")
document.ConvertOptions.SetPdfToSvgOptions(800F, 1200F)
document.SaveToFile("result.svg", FileFormat.SVG)
		End Sub
	End Class
End Namespace
Create Nested Group in Excel in C#, VB.NET
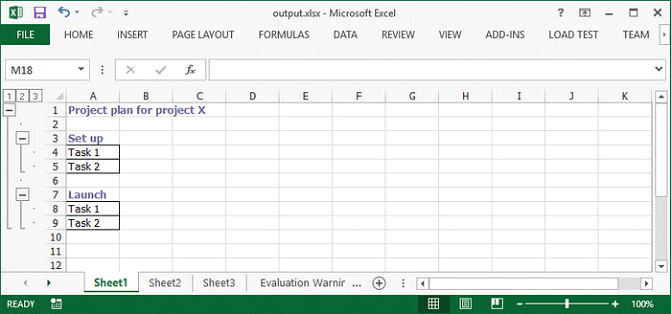
Nested group is a group that contains multiple inner, nested groups. This article demonstrates how to create groups and how to outline the outer and inner groups using Spire.XLS with C# and VB.NET.
Step 1: Create a Workbook instance and get the first worksheet.
Workbook workbook = new Workbook();
Worksheet sheet = workbook.Worksheets[0];
Step 2: Insert sample data to cells.
sheet.Range["A1"].Value = "Project plan for project X";
sheet.Range["A3"].Value = "Set up";
sheet.Range["A4"].Value = "Task 1";
sheet.Range["A5"].Value = "Task 2";
sheet.Range["A7"].Value = "Launch";
sheet.Range["A8"].Value = "Task 1";
sheet.Range["A9"].Value = "Task 2";
Step 3: Set the IsSummaryRowBelow property as false, which indicates the summary rows appear above detail rows.
sheet.PageSetup.IsSummaryRowBelow = false;
Step 4: Group the rows that you want to group.
sheet.GroupByRows(2, 9, false);
sheet.GroupByRows(4, 5, false);
sheet.GroupByRows(8, 9, false);
Step 5: Save the file.
workbook.SaveToFile("output.xlsx", ExcelVersion.Version2013);
Output:
Full Code:
using Spire.Xls;
using System.Drawing;
namespace CreateNestedGroup
{
    class Program
    {
        static void Main(string[] args)
        {
            Workbook workbook = new Workbook();
            Worksheet sheet = workbook.Worksheets[0];

            CellStyle style = workbook.Styles.Add("style");
            style.Font.Color = Color.CadetBlue;
            style.Font.IsBold = true;

            sheet.PageSetup.IsSummaryRowBelow = false;
            sheet.Range["A1"].Value = "Project plan for project X";
            sheet.Range["A1"].CellStyleName = style.Name;

            sheet.Range["A3"].Value = "Set up";
            sheet.Range["A3"].CellStyleName = style.Name;
            sheet.Range["A4"].Value = "Task 1";
            sheet.Range["A5"].Value = "Task 2";
            sheet.Range["A4:A5"].BorderAround(LineStyleType.Thin);
            sheet.Range["A4:A5"].BorderInside(LineStyleType.Thin);

            sheet.Range["A7"].Value = "Launch";
            sheet.Range["A7"].CellStyleName = style.Name;
            sheet.Range["A8"].Value = "Task 1";
            sheet.Range["A9"].Value = "Task 2";
            sheet.Range["A8:A9"].BorderAround(LineStyleType.Thin);
            sheet.Range["A8:A9"].BorderInside(LineStyleType.Thin);

            sheet.GroupByRows(2, 9, false);
            sheet.GroupByRows(4, 5, false);
            sheet.GroupByRows(8, 9, false);
            workbook.SaveToFile("output.xlsx", ExcelVersion.Version2013);
        }
    }
}
Imports Spire.Xls
Imports System.Drawing
Namespace CreateNestedGroup
	Class Program
		Private Shared Sub Main(args As String())
			Dim workbook As New Workbook()
			Dim sheet As Worksheet = workbook.Worksheets(0)

			Dim style As CellStyle = workbook.Styles.Add("style")
			style.Font.Color = Color.CadetBlue
			style.Font.IsBold = True

			sheet.PageSetup.IsSummaryRowBelow = False
			sheet.Range("A1").Value = "Project plan for project X"
			sheet.Range("A1").CellStyleName = style.Name

			sheet.Range("A3").Value = "Set up"
			sheet.Range("A3").CellStyleName = style.Name
			sheet.Range("A4").Value = "Task 1"
			sheet.Range("A5").Value = "Task 2"
			sheet.Range("A4:A5").BorderAround(LineStyleType.Thin)
			sheet.Range("A4:A5").BorderInside(LineStyleType.Thin)

			sheet.Range("A7").Value = "Launch"
			sheet.Range("A7").CellStyleName = style.Name
			sheet.Range("A8").Value = "Task 1"
			sheet.Range("A9").Value = "Task 2"
			sheet.Range("A8:A9").BorderAround(LineStyleType.Thin)
			sheet.Range("A8:A9").BorderInside(LineStyleType.Thin)

			sheet.GroupByRows(2, 9, False)
			sheet.GroupByRows(4, 5, False)
			sheet.GroupByRows(8, 9, False)
			workbook.SaveToFile("output.xlsx", ExcelVersion.Version2013)
		End Sub
	End Class
End Namespace
C#/VB.NET: Add, Hide or Delete Layers in PDF
PDF layer is a feature that arranges the content of a PDF file in layers, which allows users to selectively set some content to be visible and others to be invisible in the same PDF file. PDF layers are a common element used in layered artwork, maps and CAD drawings. This article will demonstrate how to programmatically add, hide or delete layers in a PDF file using Spire.PDF for .NET.
- Add Layers to a PDF Document in C# and VB.NET
- Set Visibility of Layers in a PDF Document in C# and VB.NET
- Delete Layers in a PDF Document in C# and VB.NET
Install Spire.PDF for .NET
To begin with, you need to add the DLL files included in the Spire.PDF for.NET package as references in your .NET project. The DLLs files can be either downloaded from this link or installed via NuGet.
PM> Install-Package Spire.PDF
Add Layers to a PDF Document in C# and VB.NET
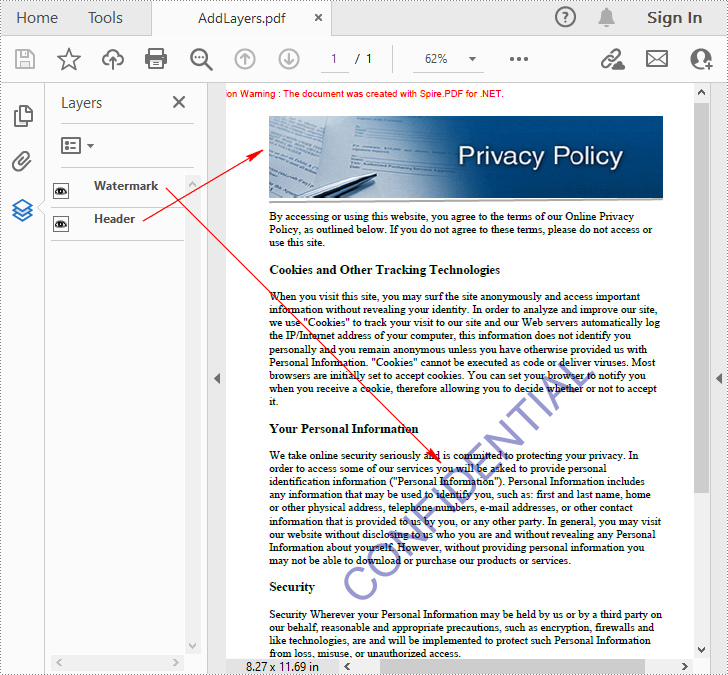
Spire.PDF for .NET provides PdfDocument.Layers.AddLayer() method to add a layer in a PDF document, and you can then draw text, lines, images or shapes on the PDF layer. The detailed steps are as follows.
- Create a PdfDocument instance.
- Load a sample PDF file using PdfDocument.LoadFromFile() method.
- Add a layer with specified name in the PDF using PdfDocument.Layers.AddLayer(String) method. Or you can also set the visibility of the layer while adding it using PdfDocument.Layers.AddLayer(String, PdfVisibility) method.
- Create a canvas for the layer using PdfLayer.CreateGraphics() method.
- Draw text, image or other elements on the canvas.
- Save the result document using PdfDocument.SaveToFile() method.
- C#
- VB.NET
using Spire.Pdf;
using Spire.Pdf.Graphics;
using Spire.Pdf.Graphics.Layer;
using System.Drawing;

namespace AddLayersToPdf
{
    class Program
    {
        static void Main(string[] args)
        {
            //Create a PdfDocument instance and load a sample PDF file
            PdfDocument pdf = new PdfDocument();
            pdf.LoadFromFile(@"C:\Users\Administrator\Desktop\Sample.pdf");

            //Invoke AddLayerWatermark method to add a watermark layer
            AddLayerWatermark(pdf);

            //Invoke AddLayerHeader method to add a header layer
            AddLayerHeader(pdf);

            //Save to file
            pdf.SaveToFile("AddLayers.pdf");
            pdf.Close();
        }

        private static void AddLayerWatermark(PdfDocument doc)
        {
            //Create a layer named "Watermark"
            PdfLayer layer = doc.Layers.AddLayer("Watermark");

            //Create a font
            PdfTrueTypeFont font = new PdfTrueTypeFont(new Font("Arial", 48), true);

            //Specify the watermark text
            string watermarkText = "CONFIDENTIAL";

            //Get text size
            SizeF fontSize = font.MeasureString(watermarkText);

            //Calculate two offsets
            float offset1 = (float)(fontSize.Width * System.Math.Sqrt(2) / 4);
            float offset2 = (float)(fontSize.Height * System.Math.Sqrt(2) / 4);

            //Get page count
            int pageCount = doc.Pages.Count;

            //Declare two variables
            PdfPageBase page;
            PdfCanvas canvas;

            //Loop through the pages
            for (int i = 0; (i < pageCount); i++)
            {
                page = doc.Pages[i];

                //Create a canvas from layer
                canvas = layer.CreateGraphics(page.Canvas);
                canvas.TranslateTransform(page.Canvas.Size.Width / 2 - offset1 - offset2, page.Canvas.Size.Height / 2 + offset1 - offset2);
                canvas.SetTransparency(0.4f);
                canvas.RotateTransform(-45);

                //Draw sting on the canvas of layer
                canvas.DrawString(watermarkText, font, PdfBrushes.DarkBlue, 0, 0);
            }
        }
        private static void AddLayerHeader(PdfDocument doc)
        {
            // Create a layer named "Header"
            PdfLayer layer = doc.Layers.AddLayer("Header");

            //Get page size
            SizeF size = doc.Pages[0].Size;

            //Specify the initial values of X and y
            float x = 90;
            float y = 40;

            //Get page count
            int pageCount = doc.Pages.Count;

            //Declare two variables
            PdfPageBase page;
            PdfCanvas canvas;

            //Loop through the pages
            for (int i = 0; (i < pageCount); i++)
            {
                //Draw an image on the layer
                PdfImage pdfImage = PdfImage.FromFile(@"C:\Users\Administrator\Desktop\img.jpg");
                float width = pdfImage.Width;
                float height = pdfImage.Height;
                page = doc.Pages[i];
                canvas = layer.CreateGraphics(page.Canvas);
                canvas.DrawImage(pdfImage, x, y, width, height);

                //Draw a line on the layer
                PdfPen pen = new PdfPen(PdfBrushes.DarkGray, 2);
                canvas.DrawLine(pen, x, (y + (height + 5)), (size.Width - x), (y + (height + 2)));
            }
        }
    }
}
Set Visibility of Layers in a PDF Document in C# and VB.NET
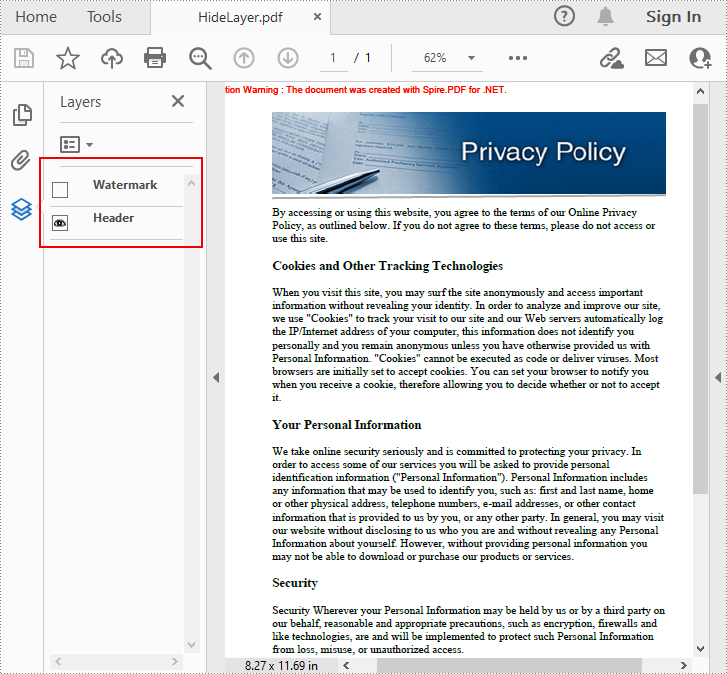
To set the visibility of an existing layer, you'll need to get a specified layer by its index or name using PdfDocument.Layers property, and then show or hide the layer using PdfLayer.Visibility property. The detailed steps are as follows.
- Create a PdfDocument instance.
- Load a sample PDF document using PdfDocument.LoadFromFile() method.
- Set the visibility of a specified layer using PdfDocument.Layers.Visibility property.
- Save the result document using PdfDocument.SaveToFile() method.
- C#
- VB.NET
using Spire.Pdf;
using Spire.Pdf.Graphics.Layer;

namespace HideLayer
{
    class Program
    {
        static void Main(string[] args)
        {
            //Create a PdfDocument instance
            PdfDocument pdf = new PdfDocument();

            //Load a sample PDF document
            pdf.LoadFromFile("AddLayers.pdf");

            //Hide a specified layer by index
            pdf.Layers[0].Visibility = PdfVisibility.Off;

            //Hide a specified layer by name
            //pdf.Layers["Watermark"].Visibility = PdfVisibility.Off;

            //Save the result document
            pdf.SaveToFile("HideLayer.pdf");
        }
    }
}
Delete Layers in a PDF Document in C# and VB.NET
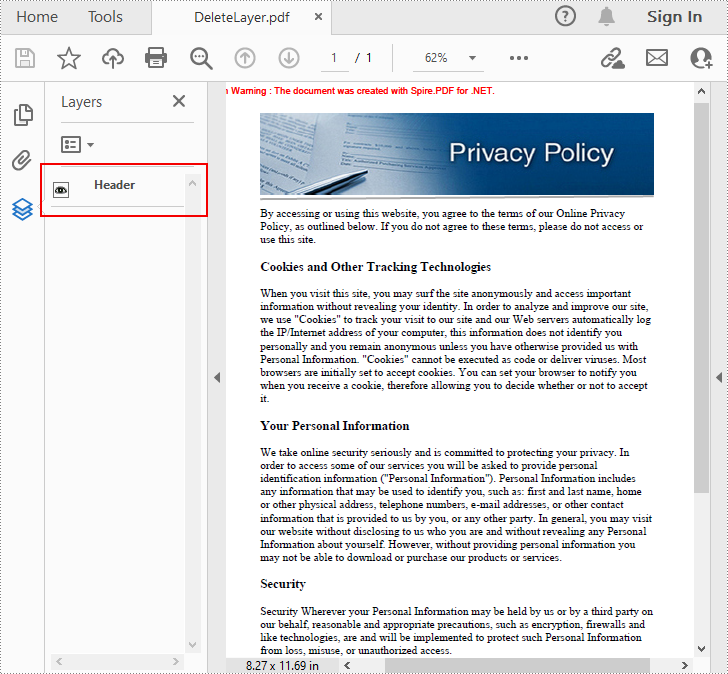
Spire.PDF for .NET also allows you to remove an existing layer by its name using PdfDocument.Layers.RemoveLayer(String) method. But kindly note that the names of PDF layers may not be unique and this method will remove all PDF layers with the same name. The detailed steps are as follows.
- Create a PdfDocument instance.
- Load a sample PDF document using PdfDocument.LoadFromFile() method.
- Delete a specified layer by its name using PdfDocument.Layers.RemoveLayer(String) method.
- Save the result document using PdfDocument.SaveToFile() method.
- C#
- VB.NET
using Spire.Pdf;

namespace DeleteLayer
{
    class Program
    {
        static void Main(string[] args)
        {
            //Create a PdfDocument instance
            PdfDocument pdf = new PdfDocument();

            //Load a sample PDF document
            pdf.LoadFromFile("AddLayers.pdf");

            //Remove a layer by name
            pdf.Layers.RemoveLayer(("Watermark"));

            //Save the result document
            pdf.SaveToFile("DeleteLayer.pdf", FileFormat.PDF);
        }
    }
}
Apply for a Temporary License
If you'd like to remove the evaluation message from the generated documents, or to get rid of the function limitations, please request a 30-day trial license for yourself.
C#/VB.NET: Convert PowerPoint to HTML
When you share a PowerPoint presentation online, people have to download it to their computers before they can view it. Sometimes the downloading process can be quite annoying and time-consuming, especially when the file is very large. A good solution to this problem is to convert your presentation to HTML so that people can view it directly online. In this article, we will demonstrate how to programmatically convert PowerPoint presentations to HTML format in C# and VB.NET using Spire.Presentation for .NET.
Install Spire.Presentation for .NET
To begin with, you need to add the DLL files included in the Spire.Presentation for.NET package as references in your .NET project. The DLL files can be either downloaded from this link or installed via NuGet.
PM> Install-Package Spire.Presentation
Convert a PowerPoint Presentation to HTML in C# and VB.NET
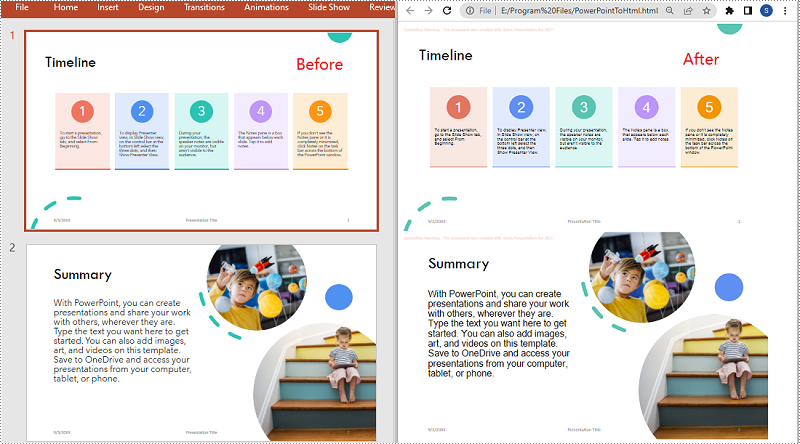
In Spire.Presentation for .NET, the Presentation.SaveToFile(String, FileFormat) method is used to convert a PowerPoint presentation to other file formats such as PDF, XPS, and HTML. In the following steps, we will show you how to convert a PowerPoint presentation to HTML using Spire.Presentation for .NET:
- Initialize an instance of the Presentation class.
- Load a PowerPoint presentation using Presentation.LoadFromFile(String) method.
- Save the PowerPoint presentation to HTML format using Presentation.SaveToFile(String, FileFormat) method.
- C#
- VB.NET
using Spire.Presentation;

namespace ConvertPowerPointToHtml
{
    class Program
    {
        static void Main(string[] args)
        {
            //Initialize an instance of the Presentation class
            Presentation ppt = new Presentation();
            //Load a PowerPoint presentation
            ppt.LoadFromFile(@"E:\Program Files\Sample.pptx");

            //Specify the file path of the output HTML file
            String result = @"E:\Program Files\PowerPointToHtml.html";

            //Save the PowerPoint presentation to HTML format
            ppt.SaveToFile(result, FileFormat.Html);
        }
    }
}
Convert a Specific PowerPoint Slide to HTML in C# and VB.NET
In some cases, you may need to convert a specific slide instead of the whole presentation to HTML. Spire.Presentation offers the ISlide.SaveToFile(String, FileFormat) method to convert a PowerPoint slide to HTML. The following are the detailed steps:
- Initialize an instance of the Presentation class.
- Load a PowerPoint presentation using Presentation.LoadFromFile() method.
- Get a specific slide in the PowerPoint presentation by its index through Presentation.Slides[int] property.
- Save the PowerPoint slide to HTML format using ISlide.SaveToFile(String, FileFormat) method.
- C#
- VB.NET
using Spire.Presentation;
using System;

namespace ConvertPowerPointSlideToHtml
{
    class Program
    {
        static void Main(string[] args)
        {
            //Initialize an instance of the Presentation class
            Presentation presentation = new Presentation();
            //Load the PowerPoint presentation
            presentation.LoadFromFile(@"E:\Program Files\Sample.pptx");

            //Get the first slide
            ISlide slide = presentation.Slides[0];

            //Specify the file path of the output HTML file
            String result = @"E:\Program Files\SlideToHtml.html";

            //Save the first slide to HTML format
            slide.SaveToFile(result, FileFormat.Html);
        }
    }
}

Apply for a Temporary License
If you'd like to remove the evaluation message from the generated documents, or to get rid of the function limitations, please request a 30-day trial license for yourself.
C#/VB.NET: Convert CSV to PDF
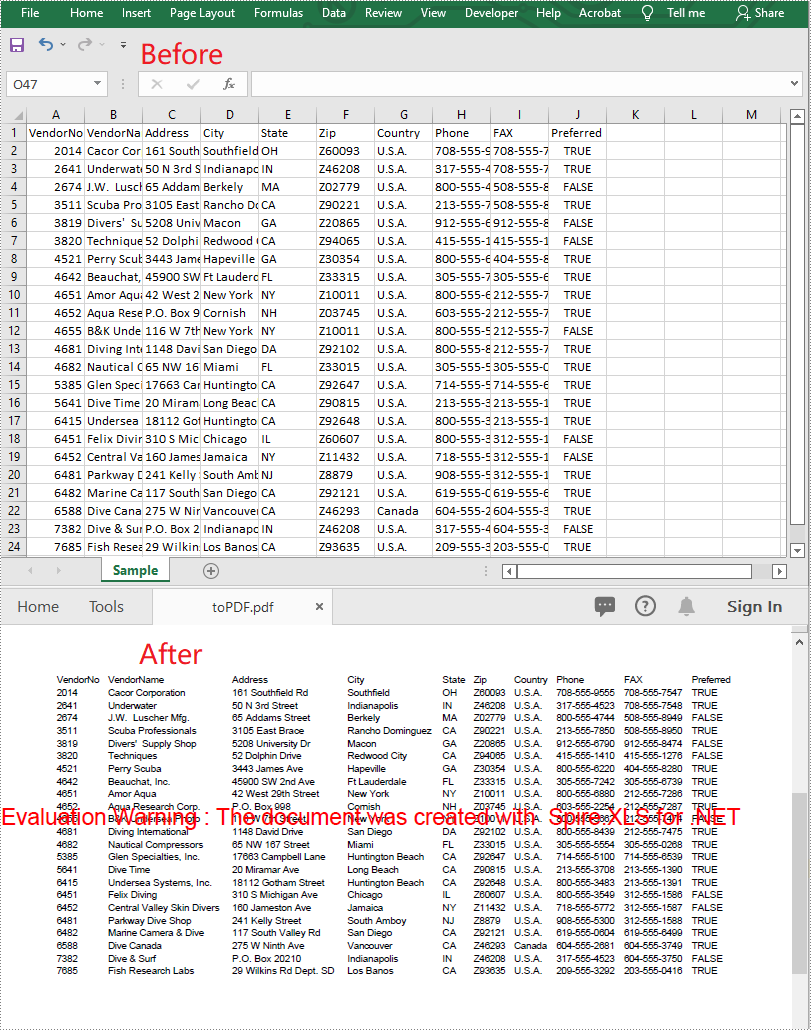
CSV is one of the commonly used file formats for exchanging tabular data between applications. However, in some circumstances, CSV may not be the most appropriate file format. For instance, if you have a CSV report that needs to be sent to an important customer, the best way to ensure the file appears as-is on the customer's device is to convert it to PDF. This article will demonstrate how to convert CSV to PDF in C# and VB.NET using Spire.XLS for .NET.
Install Spire.XLS for .NET
To begin with, you need to add the DLL files included in the Spire.XLS for .NET package as references in your .NET project. The DLL files can be either downloaded from this link or installed via NuGet.
PM> Install-Package Spire.XLS
Convert CSV to PDF in C# and VB.NET
The following are the steps to convert a CSV file to PDF:
- Create an instance of Workbook class.
- Load the CSV file using Workbook.LoadFromFile(filePath, separator) method.
- Set the Workbook.ConverterSetting.SheetFitToPage property as true to ensure the worksheet is rendered to one PDF page.
- Get the first worksheet in the Workbook using Workbook.Worksheets[0] property.
- Loop through the columns in the worksheet and auto-fit the width of each column using Worksheet.AutoFitColumn() method.
- Save the worksheet to PDF using Worksheet.SaveToPdf() method.
- C#
- VB.NET
using Spire.Xls;

namespace ConvertCsvToPdf
{
    class Program
    {
        static void Main(string[] args)
        {
            //Create a Workbook instance
            Workbook wb = new Workbook();
            //Load a CSV file
            wb.LoadFromFile("Sample.csv", ",");

            //Set SheetFitToPage property as true to ensure the worksheet is converted to 1 PDF page
            wb.ConverterSetting.SheetFitToPage = true;

            //Get the first worksheet
            Worksheet sheet = wb.Worksheets[0];

            //Loop through the columns in the worksheet
            for (int i = 1; i < sheet.Columns.Length; i++)
            {
                //AutoFit columns
                sheet.AutoFitColumn(i);
            }

            //Save the worksheet to PDF
            sheet.SaveToPdf("toPDF.pdf");
        }
    }
}
Apply for a Temporary License
If you'd like to remove the evaluation message from the generated documents, or to get rid of the function limitations, please request a 30-day trial license for yourself.
Insert Shapes to Excel Worksheet in C#
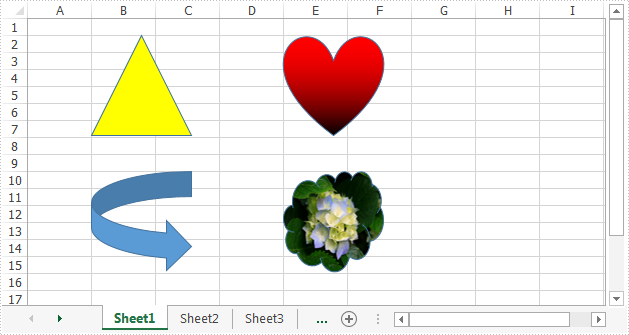
Spire.XLS supports to add up to 186 kinds of ready-made shapes, such as triangles, arrows and callouts to Excel worksheet. This article demonstrates how to insert shapes to excel worksheet and fill the shapes with color and picture using Spire.XLS and C#.
Detail steps:
Step 1: Instantiate a Workbook object and get the first worksheet.
Workbook workbook = new Workbook();
Worksheet sheet = workbook.Worksheets[0];
Step 2: Add a triangle shape and fill the shape with solid color.
//Add a triangle shape
IPrstGeomShape triangle = sheet.PrstGeomShapes.AddPrstGeomShape(2, 2, 100, 100, PrstGeomShapeType.Triangle);

//Fill the triangle with solid color
triangle.Fill.ForeColor = Color.Yellow;
triangle.Fill.FillType = ShapeFillType.SolidColor;
Step 3: Add a heart shape and fill the shape with gradient color.
//Add a heart shape
IPrstGeomShape heart = sheet.PrstGeomShapes.AddPrstGeomShape(2, 5, 100, 100, PrstGeomShapeType.Heart);

//Fill the heart with gradient color
heart.Fill.ForeColor = Color.Red;
heart.Fill.FillType = ShapeFillType.Gradient;
Step 4: Add an arrow shape with default color.
IPrstGeomShape arrow = sheet.PrstGeomShapes.AddPrstGeomShape(10, 2, 100, 100, PrstGeomShapeType.CurvedRightArrow);
Step 5: Add a cloud shape and fill the shape with custom picture.
//Add a cloud shape
IPrstGeomShape cloud = sheet.PrstGeomShapes.AddPrstGeomShape(10, 5, 100, 100, PrstGeomShapeType.Cloud);

//Fill the cloud with picture
cloud.Fill.CustomPicture(Image.FromFile("Hydrangeas.jpg"), "Hydrangeas.jpg");
cloud.Fill.FillType = ShapeFillType.Picture;
Step 6: Save the file.
workbook.SaveToFile("AddShapes.xlsx", ExcelVersion.Version2013);
Screenshot:
Full code:
using System.Drawing;
using Spire.Xls;
using Spire.Xls.Core;

namespace Add_shapes_to_Excel
{
    class Program
    {
        static void Main(string[] args)
        {
            //Instantiate a workbook object
            Workbook workbook = new Workbook();
            //Get the first worksheet
            Worksheet sheet = workbook.Worksheets[0];

            //Add a triangle shape
            IPrstGeomShape triangle = sheet.PrstGeomShapes.AddPrstGeomShape(2, 2, 100, 100, PrstGeomShapeType.Triangle);
            //Fill the triangle with solid color
            triangle.Fill.ForeColor = Color.Yellow;
            triangle.Fill.FillType = ShapeFillType.SolidColor;

            //Add a heart shape
            IPrstGeomShape heart = sheet.PrstGeomShapes.AddPrstGeomShape(2, 5, 100, 100, PrstGeomShapeType.Heart);
            //Fill the heart with gradient color
            heart.Fill.ForeColor = Color.Red;
            heart.Fill.FillType = ShapeFillType.Gradient;

            //Add an arrow shape with default color
            IPrstGeomShape arrow = sheet.PrstGeomShapes.AddPrstGeomShape(10, 2, 100, 100, PrstGeomShapeType.CurvedRightArrow);

            //Add a cloud shape
            IPrstGeomShape cloud = sheet.PrstGeomShapes.AddPrstGeomShape(10, 5, 100, 100, PrstGeomShapeType.Cloud);
            //Fill the cloud with custom picture
            cloud.Fill.CustomPicture(Image.FromFile("Hydrangeas.jpg"), "Hydrangeas.jpg");
            cloud.Fill.FillType = ShapeFillType.Picture;

            //Save the file
            workbook.SaveToFile("AddShapes.xlsx", ExcelVersion.Version2013);
        }
    }
}
Use PrintDocument object to print a PowerPoint document
Spire.Presentation has a powerful function to print PowerPoint document. From Spire.Presentation v 2.8.59, it supports to use the PrintDocument object to print the presentation slides. This example shows how to print presentation slides using C# via the following print methods:
- Print PowerPoint document to default printer.
- Print PowerPoint document to virtual printer.
- Print some pages from the PowerPoint document and set the document name, number of copies while printing the presentation slides.
Print presentation slides to default printer and print all the pages on the PowerPoint document.
using Spire.Presentation;
using System.Drawing.Printing;
namespace PrintPPT
{

    class Program
    {

        static void Main(string[] args)
        {
            Presentation ppt = new Presentation();
            ppt.LoadFromFile("Sample.pptx");

            PresentationPrintDocument document = new PresentationPrintDocument(ppt);
            document.PrintController = new StandardPrintController();

            ppt.Print(document);


        }
    }
}
Print PowerPoint document to virtual printer (Microsoft XPS Document Writer).
using Spire.Presentation;
namespace PrintPPT
{

    class Program
    {

        static void Main(string[] args)
        {
            Presentation ppt = new Presentation();
            ppt.LoadFromFile("Sample.pptx");

            PresentationPrintDocument document = new PresentationPrintDocument(ppt);
            document.PrinterSettings.PrinterName = "Microsoft XPS Document Writer";

            ppt.Print(document);


        }
    }
}
Print some pages from the PowerPoint document and set the document name, number of copies while printing the presentation slides.
using Spire.Presentation;
using System.Drawing.Printing;
namespace PrintPPT
{

    class Program
    {

        static void Main(string[] args)
        {
            Presentation ppt = new Presentation();
            ppt.LoadFromFile("Sample.pptx");

            PresentationPrintDocument document = new PresentationPrintDocument(ppt);

            //Set the document name to display while printing the document
            document.DocumentName = "Print PowerPoint";

            //Choose to print some pages from the PowerPoint document
            document.PrinterSettings.PrintRange = PrintRange.SomePages;
            document.PrinterSettings.FromPage = 1;
            document.PrinterSettings.ToPage = 2;

            //Set the number of copies of the document to print
            document.PrinterSettings.Copies = 2;

            ppt.Print(document);


        }
    }
}
C#/VB.NET: Print PDF Documents
Sending PDF to a physical printer is one of the most common tasks in our daily lives. For example, you may need to print contracts, invoices or resumes on paper so people are able to view them without the use of a device. This article shows you how to print PDF documents in C# and VB.NET using Spire.PDF for .NET with the following seven examples.
- Print PDF with the Default Printer
- Print Selected Pages with a Specified Printer
- Print PDF to XPS using Microsoft XPS Document Writer
- Print PDF Silently
- Print PDF in Duplex Mode
- Print PDF in Grayscale
- Print Different Page Ranges to Different Trays
Install Spire.PDF for .NET
To begin with, you need to add the DLL files included in the Spire.PDF for.NET package as references in your .NET project. The DLL files can be either downloaded from this link or installed via NuGet.
PM> Install-Package Spire.PDF
Print PDF with the Default Printer
The following are the steps to print PDF documents with the default printer in C# and VB.NET using Spire.PDF for .NET.
- Create a PdfDocument object.
- Load a PDF file using PdfDocument.LoadFromFile() method.
- Call PdfDocument.Print() method to directly print the document with the default printer.
- C#
- VB.NET
using Spire.Pdf;

namespace PrintWithDefaultPrinter
{
    class Program
    {
        static void Main(string[] args)
        {
            //Create PdfDocument object
            PdfDocument doc = new PdfDocument();

            //Load a PDF file
            doc.LoadFromFile(@"C:\Users\Administrator\Desktop\sample.pdf");

            //Print with default printer
            doc.Print();
        }
    }
}
Print Selected Pages with a Specified Printer
The following are the steps to print PDF documents with a specified printer in C# and VB.NET using Spire.PDF for .NET.
- Create a PdfDocument object.
- Load a PDF file using PdfDocument.LoadFromFile() method.
- Specify the printer name through the PrintSettings.PrinterName property.
- Select discontinuous pages or continuous pages to print using PrintSettings.SelectSomePages() method or PrintSettings.SelectPageRange() method.
- Call PdfDocument.Print() method to execute printing.
- C#
- VB.NET
using Spire.Pdf;

namespace PrintWithSpecifiedPrinter
{
    class Program
    {
        static void Main(string[] args)
        {
            //Create a PdfDocument object
            PdfDocument doc = new PdfDocument();

            //Load a PDF file
            doc.LoadFromFile(@"C:\Users\Administrator\Desktop\sample.pdf");

            //Specify printer name
            doc.PrintSettings.PrinterName = "HP LaserJet P1007";

            //Select a page range to print
            doc.PrintSettings.SelectPageRange(1, 5);

            //Select discontinuous pages to print
            //doc.PrintSettings.SelectSomePages(new int[] { 1, 3, 5, 7 });

            //Print document
            doc.Print();
        }
    }
}
Print PDF to XPS using Microsoft XPS Document Writer
The following are the steps to print PDF to XPS using Microsoft XPS Document Writer in C# and VB.NET.
- Create a PdfDocument object.
- Load a PDF file using PdfDocument.LoadFromFile() method.
- Set the printer name to Microsoft XPS Document Writer through PrintSettings.PrinterName property.
- Set the printed file’s path and name using PrintSettings.PrintToFile() method.
- Execute printing using PdfDocument.Print() method.
- C#
- VB.NET
using Spire.Pdf;

namespace PrintPdfToXps
{
    class Program
    {
        static void Main(string[] args)
        {
            //Create a PdfDocument object
            PdfDocument doc = new PdfDocument();

            //Load a PDF document
            doc.LoadFromFile(@"C:\Users\Administrator\Desktop\sample.pdf");

            //Set printer name to Microsoft XPS Document Writer
            doc.PrintSettings.PrinterName = "Microsoft XPS Document Writer";

            //Set the printed file path and name
            doc.PrintSettings.PrintToFile("PrintToXps.xps");

            //Execute printing
            doc.Print();
        }
    }
}
Print PDF Silently
The following are the steps to silently print PDF documents in C# and VB.NET using Spire.PDF for .NET.
- Create a PdfDocument object.
- Load a PDF file using PdfDocument.LoadFromFile() method.
- Specify the printer name through the PrintSettings.PrinterName property.
- Set the value of PrintSettings.PrintController property to an instance of StandardPrintController class, which will prevent the printing process from displaying.
- Execute printing using PdfDocument.Print() method.
- C#
- VB.NET
using Spire.Pdf;
using System.Drawing.Printing;

namespace PrintPdfSilently
{
    class Program
    {
        static void Main(string[] args)
        {
            //Create a PdfDocument object
            PdfDocument doc = new PdfDocument();

            //Load a PDF file
            doc.LoadFromFile(@"C:\Users\Administrator\Desktop\sample.pdf");

            //Specify printer name
            doc.PrintSettings.PrinterName = "HP LaserJet P1007";

            //Silent printing
            doc.PrintSettings.PrintController = new StandardPrintController();

            //Print document
            doc.Print();
        }
    }
}
Print PDF in Duplex Mode
The following are the steps to print PDF documents in duplex mode in C# and VB.NET using Spire.PDF for .NET.
- Create a PdfDocument object.
- Load a PDF file using PdfDocument.LoadFromFile() method.
- Specify the printer name through the PrintSettings.PrinterName property.
- Determine if the printer supports duplex printing through PrintSettings.CanDuplex property. If yes, set PrintSettings.Duplex property to Duplex.Defatult.
- Execute printing using PdfDocument.Print() method.
- C#
- VB.NET
using Spire.Pdf;
using System.Drawing.Printing;

namespace PrintInDuplexMode
{
    class Program
    {
        static void Main(string[] args)
        {
            //Create a PdfDocument object
            PdfDocument doc = new PdfDocument();

            //Load a PDF file
            doc.LoadFromFile(@"C:\Users\Administrator\Desktop\sample.pdf");

            //Specify printer name
            doc.PrintSettings.PrinterName = "HP LaserJet P1007";

            //Determine if the printer supports duplex printing
            if (doc.PrintSettings.CanDuplex)
            {
                //Set to duplex printing mode
                doc.PrintSettings.Duplex = Duplex.Default;

                //Print document
                doc.Print();
            }
        }
    }
}
Print PDF in Grayscale
The following are the steps to print PDF documents in grayscale in C# and VB.NET using Spire.PDF for .NET.
- Create a PdfDocument object.
- Load a PDF file using PdfDocument.LoadFromFile() method.
- Specify the printer name through the PrintSettings.PrinterName property.
- Set the PrintSettings.Color property to false, which will print a color PDF in black and white.
- Execute printing using PdfDocument.Print() method.
- C#
- VB.NET
using Spire.Pdf;

namespace PrintInGrayscale
{
    class Program
    {
        static void Main(string[] args)
        {
            //Create a PdfDocument object
            PdfDocument doc = new PdfDocument();

            //Load a PDF file
            doc.LoadFromFile(@"C:\Users\Administrator\Desktop\sample.pdf");

            //Specify printer name
            doc.PrintSettings.PrinterName = "HP LaserJet P1007";

            //Print in black and white
            doc.PrintSettings.Color = false;

            //Print document
            doc.Print();
        }
    }
}
Print Different Page Ranges to Different Trays
The following are the steps to print different page ranges to different trays in C# and VB.NET using Spire.PDF for .NET.
- Create a PdfDocument object.
- Load a PDF file using PdfDocument.LoadFromFile() method.
- Register the PrintSettings.PaperSettings event with a custom delegate which provides data for paper setting event.
- Set the paper source of the tray 1 and tray 2.
- Execute printing using PdfDocument.Print() method.
- C#
- VB.NET
using Spire.Pdf;
using Spire.Pdf.Print;

namespace PrintToDifferentTrays
{
    class Program
    {
        static void Main(string[] args)
        {
            //Create a PdfDocument object
            PdfDocument doc = new PdfDocument();

            //Load a PDF file
            doc.LoadFromFile(@"C:\Users\Administrator\Desktop\sample.pdf");

            //Register the PaperSettings event with a delegate that handles paper settings event
            doc.PrintSettings.PaperSettings += delegate (object sender, PdfPaperSettingsEventArgs e)
            {
                // Set the paper source of tray 1 to 1-10 pages
                if (1 <= e.CurrentPaper && e.CurrentPaper <= 10)
                {
                    e.CurrentPaperSource = e.PaperSources[0];
                }

                //Set the paper source of tray 2 to the rest pages
                else
                {
                    e.CurrentPaperSource = e.PaperSources[1];
                }
            };

            //Print document
            doc.Print();
        }
    }
}
Apply for a Temporary License
If you'd like to remove the evaluation message from the generated documents, or to get rid of the function limitations, please request a 30-day trial license for yourself.
C#/VB.NET: Hide or Show Comments in Excel
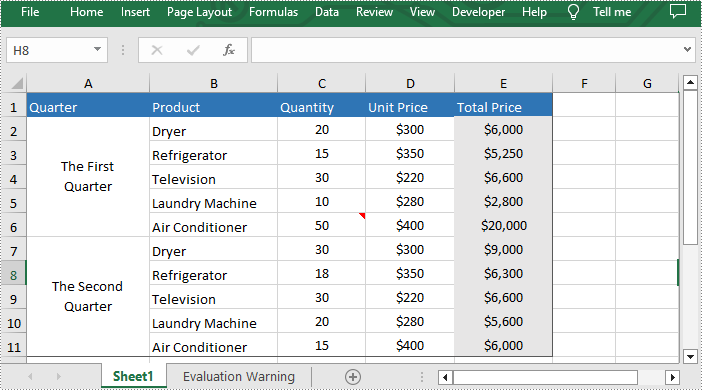
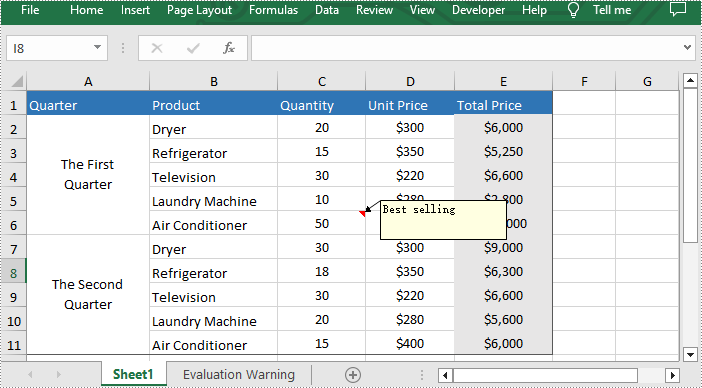
Comments in Excel are blocks of text that can be added to cells, mainly used to provide additional explanation or supplemental information about the cell contents. Users can add comments to the specific cells to better explain the data of worksheets. However, sometimes too many comments will cause visual clutter or obstruct other content. To avoid this issue, existing comments can be hidden programmatically to make the worksheet more organized and readable. Hidden comments can also be easily displayed when necessary. In this article, you will learn how to hide or show comments in excel by using Spire.XLS for .NET.
Install Spire.XLS for .NET
To begin with, you need to add the DLL files included in the Spire.XLS for.NET package as references in your .NET project. The DLLs files can be either downloaded from this link or installed via NuGet.
PM> Install-Package Spire.XLS
Hide Comments in Excel
Spire.XLS for .NET provides the Worksheet.Comments[].IsVisble property to control the visibility of comments. You can easily hide existing comments by setting this property to "false". The following are the detailed steps to hide comments in excel.
- Initialize a Workbook instance.
- Load a sample file using Workbook.LoadFromFile() method.
- Get the desired worksheet through Workbook.Worksheets[] property.
- Hide the specific comment in the worksheet by setting Worksheet.Comments[].IsVisble property to "false".
- Finally, save the result file using Workbook.SavaToFile() method.
- C#
- VB.NET
using Spire.Xls;

namespace ShowExcelComments
{
    class Program
    {
        static void Main(string[] args)
        {
            {
                //Initialize a Workbook instance and load the excel document
                Workbook workbook = new Workbook();
                workbook.LoadFromFile("Comments.xlsx");

                //Get the first worksheet
                Worksheet sheet = workbook.Worksheets[0];

                //Hide the specific comment in the worksheet
                sheet.Comments[0].IsVisible = false;

                //Save the document
                workbook.SaveToFile("HideComment.xlsx", ExcelVersion.Version2013);
                workbook.Dispose();
            }
        }
    }
}
Show Comments in Excel
Hidden comments can also be easily displayed when necessary. If you want to show it again, please set Worksheet.Comments[].IsVisble property to "ture". The following are the steps to show comments in excel.
- Initialize a Workbook instance.
- Load a sample file using Workbook.LoadFromFile() method.
- Get the desired worksheet through Workbook.Worksheets[] property.
- Show the specific comment in the worksheet By setting Worksheet.Comments[].IsVisble property to "true".
- Finally, save the result file using Workbook.SavaToFile() method.
- C#
- VB.NET
using Spire.Xls;

namespace ShowExcelComments
{
    class Program
    {
        static void Main(string[] args)
        {
            {
                //Initialize a Workbook instance and load the excel document
                Workbook workbook = new Workbook();
                workbook.LoadFromFile("HideComment.xlsx");

                //Get the first worksheet
                Worksheet sheet = workbook.Worksheets[0];

                //Show the specific comment in the worksheet
                sheet.Comments[0].IsVisible = true;

                //Save the document
                workbook.SaveToFile("ShowComment.xlsx", ExcelVersion.Version2013);
                workbook.Dispose();
            }
        }
    }
}
Apply for a Temporary License
If you'd like to remove the evaluation message from the generated documents, or to get rid of the function limitations, please request a 30-day trial license for yourself.
How to Change Text Direction in PowerPoint in C#, VB.NET
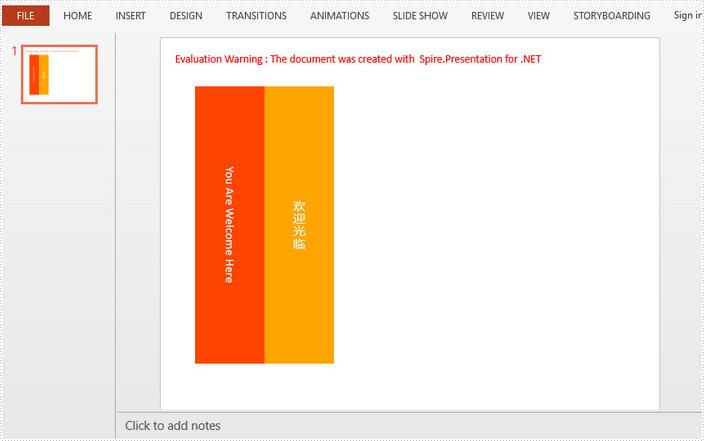
You may sometimes want your text to display vertically (letters stacked one on top of the other), horizontally, or rotated facing the right margin or the left margin. This tutorial shows you how to change the text direction using VerticalTextType property in Spire.Presentation.
Step 1: Initialize an instance of Prensentation class.
Presentation ppt = new Presentation();
Step 2: Append a shape with text to the first slide.
IAutoShape textboxShape = ppt.Slides[0].Shapes.AppendShape(ShapeType.Rectangle, new RectangleF(50, 70, 100, 400));
textboxShape.ShapeStyle.LineColor.Color = Color.Transparent;
textboxShape.Fill.FillType = Spire.Presentation.Drawing.FillFormatType.Solid;
textboxShape.Fill.SolidColor.Color = Color.OrangeRed;
textboxShape.TextFrame.Text = "You Are Welcome Here";
Step 3: Set the text direction to vertical.
textboxShape.TextFrame.VerticalTextType = VerticalTextType.Vertical;
Step 4: Append another shape with text to the slide.
textboxShape = ppt.Slides[0].Shapes.AppendShape(ShapeType.Rectangle, new RectangleF(150, 70, 100, 400));
textboxShape.ShapeStyle.LineColor.Color = Color.Transparent;
textboxShape.Fill.FillType = Spire.Presentation.Drawing.FillFormatType.Solid;
textboxShape.Fill.SolidColor.Color = Color.Orange;
textboxShape.TextFrame.Text = "欢迎光临";
Step 5: For asian characters, you can set the VerticalTextType as EastAsianVertical to aviod rotating text 90 degrees.
textboxShape.TextFrame.VerticalTextType = VerticalTextType.EastAsianVertical;
Step 6: Save the file.
ppt.SaveToFile("output.pptx", FileFormat.Pptx2013);
Output:
Full Code:
using Spire.Presentation;
using System.Drawing;
namespace ChangeTextDirection
{
    class Program
    {
        static void Main(string[] args)
        {

            Presentation ppt = new Presentation();

            IAutoShape textboxShape = ppt.Slides[0].Shapes.AppendShape(ShapeType.Rectangle, new RectangleF(50, 70, 100, 400));
            textboxShape.ShapeStyle.LineColor.Color = Color.Transparent;
            textboxShape.Fill.FillType = Spire.Presentation.Drawing.FillFormatType.Solid;
            textboxShape.Fill.SolidColor.Color = Color.OrangeRed;
            textboxShape.TextFrame.Text = "You Are Welcome Here";
            textboxShape.TextFrame.VerticalTextType = VerticalTextType.Vertical;

            textboxShape = ppt.Slides[0].Shapes.AppendShape(ShapeType.Rectangle, new RectangleF(150, 70, 100, 400));
            textboxShape.ShapeStyle.LineColor.Color = Color.Transparent;
            textboxShape.Fill.FillType = Spire.Presentation.Drawing.FillFormatType.Solid;
            textboxShape.Fill.SolidColor.Color = Color.Orange;
            textboxShape.TextFrame.Text = "欢迎光临";
            textboxShape.TextFrame.VerticalTextType = VerticalTextType.EastAsianVertical;

            ppt.SaveToFile("output.pptx", FileFormat.Pptx2013);

        }
    }
}
Imports Spire.Presentation
Imports System.Drawing
Namespace ChangeTextDirection
	Class Program
		Private Shared Sub Main(args As String())

			Dim ppt As New Presentation()

			Dim textboxShape As IAutoShape = ppt.Slides(0).Shapes.AppendShape(ShapeType.Rectangle, New RectangleF(50, 70, 100, 400))
			textboxShape.ShapeStyle.LineColor.Color = Color.Transparent
			textboxShape.Fill.FillType = Spire.Presentation.Drawing.FillFormatType.Solid
			textboxShape.Fill.SolidColor.Color = Color.OrangeRed
			textboxShape.TextFrame.Text = "You Are Welcome Here"
			textboxShape.TextFrame.VerticalTextType = VerticalTextType.Vertical

			textboxShape = ppt.Slides(0).Shapes.AppendShape(ShapeType.Rectangle, New RectangleF(150, 70, 100, 400))
			textboxShape.ShapeStyle.LineColor.Color = Color.Transparent
			textboxShape.Fill.FillType = Spire.Presentation.Drawing.FillFormatType.Solid
			textboxShape.Fill.SolidColor.Color = Color.Orange
			textboxShape.TextFrame.Text = "欢迎光临"
			textboxShape.TextFrame.VerticalTextType = VerticalTextType.EastAsianVertical

			ppt.SaveToFile("output.pptx", FileFormat.Pptx2013)

		End Sub
	End Class
End Namespace