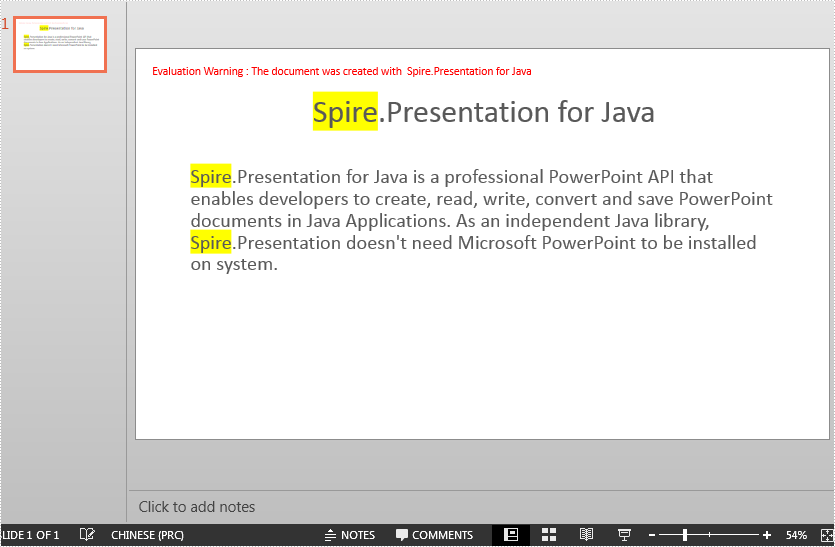
Java: Highlight Text in PowerPoint
When you want to emphasize a particular point in a PowerPoint presentation, you can highlight it with a bright color to help the audience catch it at first glance. In this article, we will explain how to highlight text in a PowerPoint presentation in Java using Spire.Presentation for Java.
Install Spire.Presentation for Java
First of all, you're required to add the Spire.Presentation.jar file as a dependency in your Java program. The JAR file can be downloaded from this link. If you use Maven, you can easily import the JAR file in your application by adding the following code to your project's pom.xml file.
<repositories>
    <repository>
        <id>com.e-iceblue</id>
        <name>e-iceblue</name>
        <url>https://repo.e-iceblue.com/nexus/content/groups/public/</url>
    </repository>
</repositories>
<dependencies>
    <dependency>
        <groupId>e-iceblue</groupId>
        <artifactId>spire.presentation</artifactId>
        <version>9.4.5</version>
    </dependency>
</dependencies>
Highlight Text in PowerPoint in Java
The following are the steps to highlight specific text in a PowerPoint document:
- Initialize an instance of Presentation class.
- Load a PowerPoint presentation using Presentation.loadFromFile() method.
- Loop through the slides in the presentation and the shapes on each slide.
- Check if the current shape is of IAutoShape type.
- If the result is true, typecast it to IAutoShape.
- Initialize an instance of TextHighLightingOptions class, and set the text highlighting options such as whole words only and case sensitive using TextHighLightingOptions.setWholeWordsOnly() and TextHighLightingOptions.setCaseSensitive() methods.
- Highlight a specific text in the shape using IAutoShape.getTextFrame().highLightText() method.
- Save the result file using Presentation.saveToFile() method.
- Java
import com.spire.presentation.*;

import java.awt.*;

public class HighlightTextInPPT {
    public static void main(String []args) throws Exception {
        //Create an instance of Presentation class
        Presentation presentation = new Presentation();
        //Load a PowerPoint file
        presentation.loadFromFile("Input.pptx");

        //Loop through all slides
        for (int i = 0; i < presentation.getSlides().getCount(); i++)
        {
            //Get the current slide
            ISlide slide = presentation.getSlides().get(i);
            //Loop through the shapes on the slide
            for (int j = 0; j < slide.getShapes().getCount(); j++)
            {
                //Check if the current shape is of IAutoShape type
                if (slide.getShapes().get(j) instanceof IAutoShape)
                {
                    //Typecast the shape to IAutoShape
                    IAutoShape shape = (IAutoShape)slide.getShapes().get(j);

                    //Create an instance of TextHighLightingOptions class
                    TextHighLightingOptions options = new TextHighLightingOptions();
                    //Set text highlighting options
                    options.setCaseSensitive(true);
                    options.setWholeWordsOnly(true);

                    //Highlight specific text within the shape with color
                    shape.getTextFrame().highLightText("Spire", Color.YELLOW, options);
                }
            }
        }

        //Save the result file
        presentation.saveToFile("HighlightText.pptx", FileFormat.PPTX_2013);

    }
}
Apply for a Temporary License
If you'd like to remove the evaluation message from the generated documents, or to get rid of the function limitations, please request a 30-day trial license for yourself.
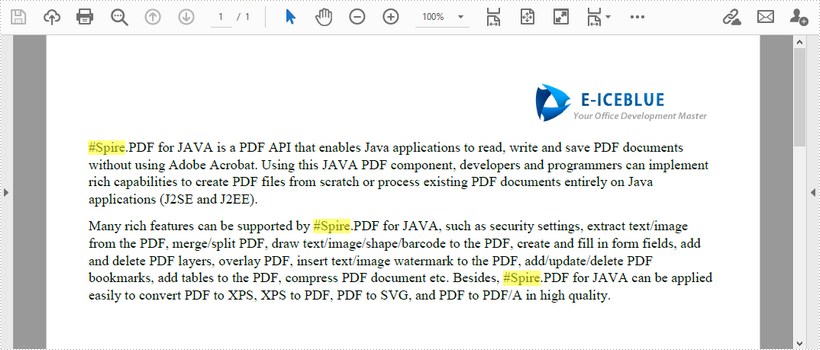
Find Text in PDF by Regular Expression in Java
This article demonstrates how to find the text that matches a specific regular expression in a PDF document using Spire.PDF for Java.
import com.spire.pdf.general.find.PdfTextFind;
import java.awt.*;

public class FindByRegularExpression {

    public static void main(String[] args) throws Exception {

        //Load a PDF document
        PdfDocument pdf = new PdfDocument();
        pdf.loadFromFile("C:\\Users\\Administrator\\Desktop\\test.pdf");

        //Create a object of PdfTextFind collection
        PdfTextFind[] results;

        //Loop through the pages
        for (Object page : (Iterable) pdf.getPages()) {
            PdfPageBase pageBase = (PdfPageBase) page;

            //Define a regular expression
            String pattern = "\\#\\w+\\b";

            //Find all results that match the pattern
            results = pageBase.findText(pattern).getFinds();

            //Highlight the search results with yellow
            for (PdfTextFind find : results) {
                find.applyHighLight(Color.yellow);
            }
        }

        //Save to file
        pdf.saveToFile("FindByPattern.pdf");
    }
}
Delete Images in Excel in Java
This article demonstrates how to remove a specific image or all images from an Excel worksheet using Spire.XLS for Java.
Delete specific image
import com.spire.xls.ExcelVersion;
import com.spire.xls.Workbook;
import com.spire.xls.Worksheet;

public class DeleteSpecificImage {

    public static void main(String[] args) {

        //Create a Workbook object
        Workbook workbook = new Workbook();

        //Load an Excel file
        workbook.loadFromFile("Input.xlsx");

        //Get the first worksheet
        Worksheet sheet = workbook.getWorksheets().get(0);

        //Delete a specific image by its index
        sheet.getPictures().get(1).remove();

        //Save the document
        workbook.saveToFile("DeleteSpecificImage.xlsx", ExcelVersion.Version2013);
    }
Delete all images
import com.spire.xls.ExcelVersion;
import com.spire.xls.Workbook;
import com.spire.xls.Worksheet;

public class DeleteAllImages {

    public static void main(String[] args) {

        //Create a Workbook object
        Workbook workbook = new Workbook();

        //Load an Excel file
        workbook.loadFromFile("Input.xlsx");

        //Get the first worksheet
        Worksheet sheet = workbook.getWorksheets().get(0);

        //Loop through the images inside the worksheet
        for (int i = sheet.getPictures().getCount() - 1; i >= 0; i--) {

            //Delete an image by its index
            sheet.getPictures().get(i).remove();
        }

        //Save the document
        workbook.saveToFile("DeleteAllImages.xlsx", ExcelVersion.Version2013);
    }
}
Java: Insert, Replace or Delete Images in PDF
Images play a vital role in various documents. They are helpful in conveying complex information that is difficult to present in plain text and making documents more visually appealing. In this article, we will focus on how to insert, replace or delete images in PDF documents in Java using Spire.PDF for Java.
- Insert an Image into a PDF Document
- Replace an Image with Another Image in a PDF Document
- Delete a Specific Image in a PDF Document
Install Spire.PDF for Java
First of all, you're required to add the Spire.Pdf.jar file as a dependency in your Java program. The JAR file can be downloaded from this link. If you use Maven, you can easily import the JAR file in your application by adding the following code to your project's pom.xml file.
<repositories>
    <repository>
        <id>com.e-iceblue</id>
        <name>e-iceblue</name>
        <url>https://repo.e-iceblue.com/nexus/content/groups/public/</url>
    </repository>
</repositories>
<dependencies>
    <dependency>
        <groupId>e-iceblue</groupId>
        <artifactId>spire.pdf</artifactId>
        <version>10.4.4</version>
    </dependency>
</dependencies>
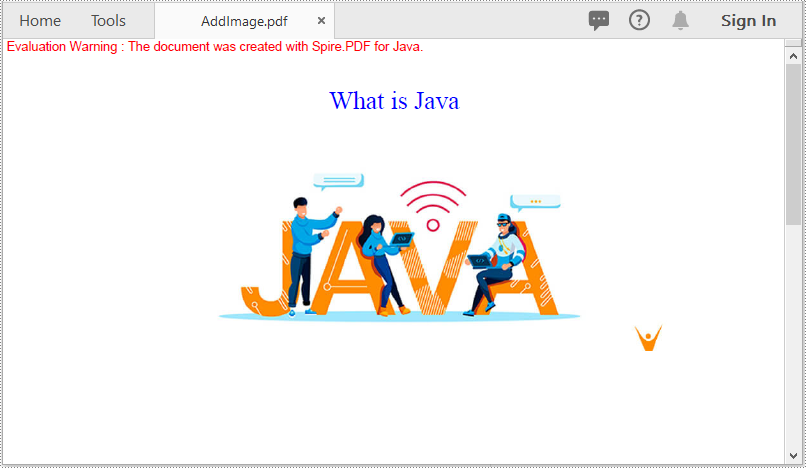
Insert an Image into a PDF Document in Java
The following steps demonstrate how to insert an image into an existing PDF document:
- Initialize an instance of the PdfDocument class.
- Load a PDF document using PdfDocument.loadFromFile() method.
- Get the desired page in the PDF document using PdfDocument.getPages().get() method.
- Load an image using PdfImage.fromFile() method.
- Specify the width and height of the image area on the page.
- Specify the X and Y coordinates to start drawing the image.
- Draw the image on the page using PdfPageBase.getCanvas().drawImage() method.
- Save the result document using PdfDocument.saveToFile() method.
- Java
import com.spire.pdf.FileFormat;
import com.spire.pdf.PdfDocument;
import com.spire.pdf.PdfPageBase;
import com.spire.pdf.graphics.*;

public class AddImage {
    public static void main(String []args){
        //Create a PdfDocument instance
        PdfDocument pdf = new PdfDocument();
        pdf.loadFromFile("Input.pdf");

        //Get the first page in the PDF document
        PdfPageBase page = pdf.getPages().get(0);

        //Load an image
        PdfImage image = PdfImage.fromFile("image.jpg");

        //Specify the width and height of the image area on the page
        float width = image.getWidth() * 0.50f;
        float height = image.getHeight() * 0.50f;

        //Specify the X and Y coordinates to start drawing the image
        float x = 100f;
        float y = 60f;

        //Draw the image at a specified location on the page
        page.getCanvas().drawImage(image, x, y, width, height);

        //Save the result document
        pdf.saveToFile("AddImage.pdf", FileFormat.PDF);
    }
}
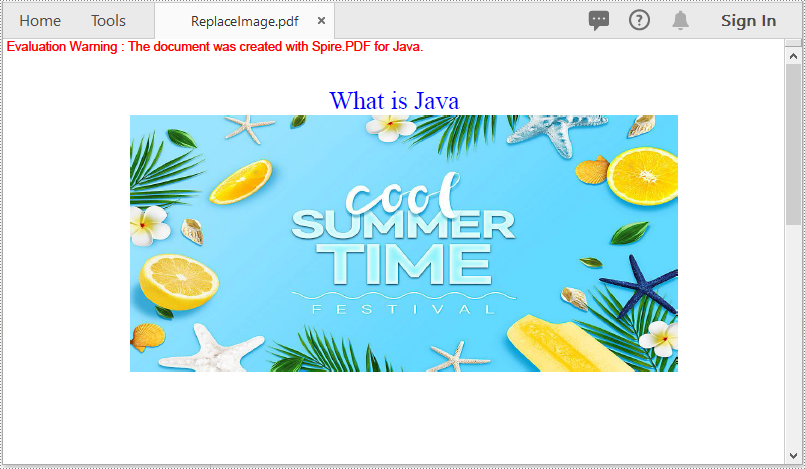
Replace an Image with Another Image in a PDF Document in Java
The following steps demonstrate how to replace an image with another image in a PDF document:
- Initialize an instance of the PdfDocument class.
- Load a PDF document using PdfDocument.loadFromFile() method.
- Get the desired page in the PDF document using PdfDocument.getPages().get() method.
- Load an image using PdfImage.fromFile() method.
- Replace a specific image on the page with the loaded image using PdfPageBase.replaceImage() method.
- Save the result document using PdfDocument.saveToFile() method.
- Java
import com.spire.pdf.FileFormat;
import com.spire.pdf.PdfDocument;
import com.spire.pdf.PdfPageBase;
import com.spire.pdf.graphics.PdfImage;

public class ReplaceImage {
    public static void main(String []args){
        //Create a PdfDocument instance
        PdfDocument doc = new PdfDocument();
        //Load a PDF document
        doc.loadFromFile("AddImage.pdf");

        //Get the first page
        PdfPageBase page = doc.getPages().get(0);

        //Load an image
        PdfImage image = PdfImage.fromFile("image1.jpg");

        //Replace the first image on the page with the loaded image
        page.replaceImage(0, image);

        //Save the result document
        doc.saveToFile("ReplaceImage.pdf", FileFormat.PDF);
    }
}
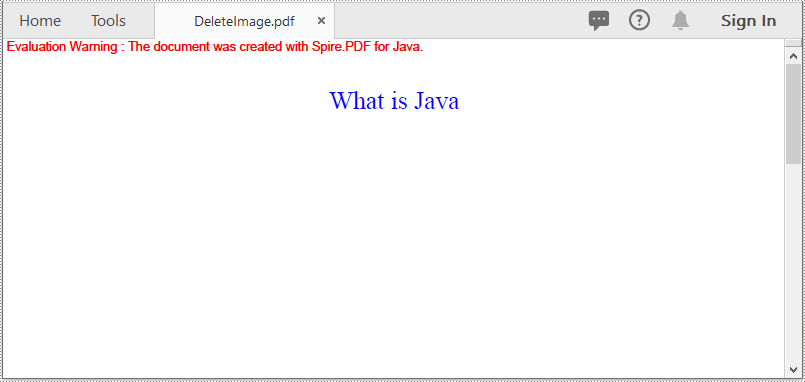
Delete a Specific Image in a PDF Document in Java
The following steps demonstrate how to delete an image from a PDF document:
- Initialize an instance of the PdfDocument class.
- Load a PDF document using PdfDocument.loadFromFile() method.
- Get the desired page in the PDF document using PdfDocument.getPages().get() method.
- Delete a specific image on the page using PdfPageBase.deleteImage() method.
- Save the result document using PdfDocument.saveToFile() method.
- Java
import com.spire.pdf.FileFormat;
import com.spire.pdf.PdfDocument;
import com.spire.pdf.PdfPageBase;

public class DeleteImage {
    public static void main(String []args){
        //Create a PdfDocument instance
        PdfDocument pdf = new PdfDocument();
        //Load a PDF document
        pdf.loadFromFile("AddImage.pdf");

        //Get the first page
        PdfPageBase page = pdf.getPages().get(0);

        //Delete the first image on the page
        page.deleteImage(0);

        //Save the result document
        pdf.saveToFile("DeleteImage.pdf", FileFormat.PDF);
    }
}
Apply for a Temporary License
If you'd like to remove the evaluation message from the generated documents, or to get rid of the function limitations, please request a 30-day trial license for yourself.
C#/VB.NET: Compare Two Word Documents
It is not uncommon at work that we may receive two versions of a Word document and face the need to find the differences between them. Document comparison is particularly important and popular in the fields of laws, regulations and education. In this article, you will learn how to compare two Word documents in C# and VB.NET by using Spire.Doc for .NET.
- Compare Two Documents and Save Result in a Third Word Document
- Compare Two Documents and Return Insertions and Deletions in Lists
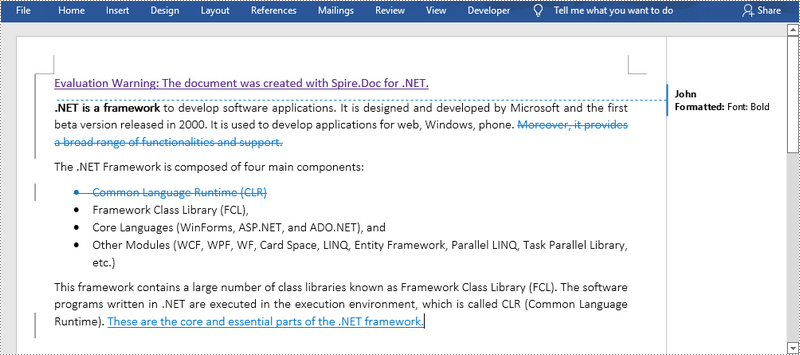
Below is a screenshot of the two Word documents that’ll be compared.

Install Spire.Doc for .NET
To begin with, you need to add the DLL files included in the Spire.Doc for .NET package as references in your .NET project. The DLL files can be either downloaded from this link or installed via NuGet.
PM> Install-Package Spire.Doc
Compare Two Documents and Save Result in a Third Word Document
Saving the comparison result in a separate Word document allows us to see all the changes made to the original document, including insertions, deletions as well as modifications on formatting. The following are the steps to compare two documents and save the result in a third Word document using Spire.Doc for .NET.
- Load two Word documents separately while initialing the Document objects.
- Compare these two documents using Document.Compare() method.
- Save the result in a third Word document using ;Document.SaveToFile() method.
- C#
- VB.NET
using Spire.Doc;

namespace CompareDocuments
{
    class Program
    {
        static void Main(string[] args)
        {
            //Load one Word document
            Document doc1 = new Document("C:\\Users\\Administrator\\Desktop\\original.docx");

            //Load the other Word document
            Document doc2 = new Document("C:\\Users\\Administrator\\Desktop\\revised.docx");

            //Compare two documents
            doc1.Compare(doc2, "John");

            //Save the differences in a third document
            doc1.SaveToFile("Differences.docx", FileFormat.Docx2013);
            doc1.Dispose();
        }
    }
}
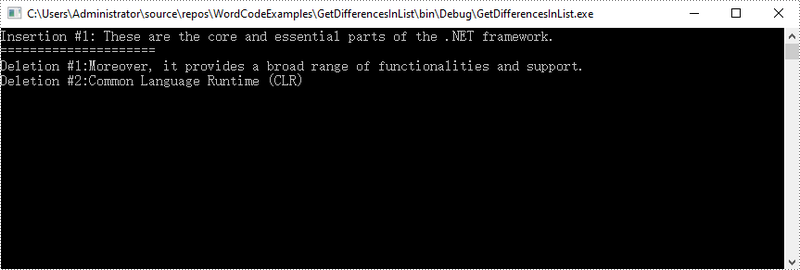
Compare Two Documents and Return Insertions and Deletions in Lists
Developers may only want to obtain the insertions and deletions instead of the whole differences. The following are the steps to get insertions and deletions in two separate lists.
- Load two Word documents separately while initialing the Document objects.
- Compare two documents using Document.Compare() method.
- Get the revisions using the constructor function of the DifferRevisions ;class.
- Get a list of insertions through DifferRevisions.InsertRevisions property.
- Get a list of deletions through DifferRevisions.DeleteRevisions property.
- Loop through the elements in the two lists to get the specific insertion and deletion.
- C#
- VB.NET
using Spire.Doc;
using Spire.Doc.Fields;
using System;

namespace GetDifferencesInList
{
    class Program
    {
        static void Main(string[] args)
        {
            //Load one Word document
            Document doc1 = new Document("C:\\Users\\Administrator\\Desktop\\original.docx");

            //Load the other Word document
            Document doc2 = new Document("C:\\Users\\Administrator\\Desktop\\revised.docx");

            //Compare the two Word documents
            doc1.Compare(doc2, "Author");

            //Get the revisions
            DifferRevisions differRevisions = new DifferRevisions(doc1);

            //Return the insertion revisions in a list
            var insetRevisionsList = differRevisions.InsertRevisions;

            //Return the deletion revisions in a list
            var deletRevisionsList = differRevisions.DeleteRevisions;

            //Create two int variables
            int m = 0;
            int n = 0;

            //Loop through the insertion revision list
            for (int i = 0; i < insetRevisionsList.Count; i++)
            {
                if (insetRevisionsList[i] is TextRange)
                {
                    m += 1;
                    //Get the specific revision and get its content
                    TextRange textRange = insetRevisionsList[i] as TextRange;
                    Console.WriteLine("Insertion #" + m + ":" + textRange.Text);
                }
            }
            Console.WriteLine("=====================");

            //Loop through the deletion revision list
            for (int i = 0; i < deletRevisionsList.Count; i++)
            {
                if (deletRevisionsList[i] is TextRange)
                {
                    n += 1;
                    //Get the specific revision and get its content
                    TextRange textRange = deletRevisionsList[i] as TextRange;
                    Console.WriteLine("Deletion #" + n + ":" + textRange.Text);
                }
            }
            Console.ReadKey();
        }
    }
}
Apply for a Temporary License
If you'd like to remove the evaluation message from the generated documents, or to get rid of the function limitations, please request a 30-day trial license for yourself.
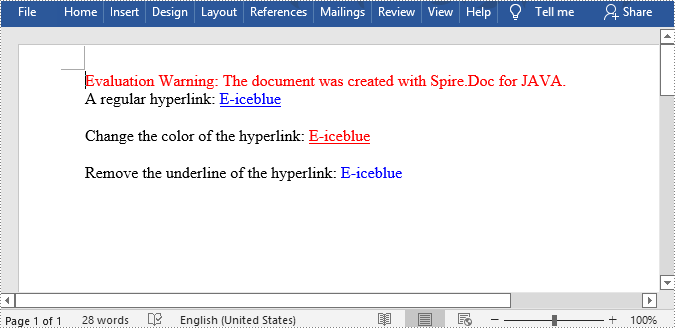
Java: Change the Color or Remove the Underline of Hyperlinks in Word
Hyperlinks in Word documents are usually displayed blue with an underline. Actually, if you don't like the default style of hyperlinks, you can change the color of hyperlinks or remove the underline to make your own hyperlink style while keeping the link. This article shows how to change the color or remove the underline of hyperlinks in Word by programming using Spire.Doc for Java.
Install Spire.Doc for Java
First, you're required to add the Spire.Doc.jar file as a dependency in your Java program. The JAR file can be downloaded from this link. If you use Maven, you can easily import the JAR file in your application by adding the following code to your project's pom.xml file.
<repositories>
    <repository>
        <id>com.e-iceblue</id>
        <name>e-iceblue</name>
        <url>https://repo.e-iceblue.com/nexus/content/groups/public/</url>
    </repository>
</repositories>
<dependencies>
    <dependency>
        <groupId>e-iceblue</groupId>
        <artifactId>spire.doc</artifactId>
        <version>12.4.6</version>
    </dependency>
</dependencies>
Change the Color of a Hyperlink or Remove the Underline of a Hyperlink in a Word Document
The detailed steps are as follows:
- Create an object of Document class.
- Add a section to the document using Document.addSection() method.
- Add a paragraph to the section using Section.addParagraph() method.
- Insert a normal hyperlink using Paragraph.appendHyperlink() method.
- Add a paragraph and a hyperlink, and then change the color of the hyperlink text to red using TextRange.getCharacterFormat().setTextColor() method.
- Add a paragraph and a hyperlink, and then remove the underline of the hyperlink using TextRange.getCharacterFormat().setUnderlineStyle() method.
- Save the document using Document.saveToFile() method.
- Java
import com.spire.doc.Document;
import com.spire.doc.FileFormat;
import com.spire.doc.Section;
import com.spire.doc.documents.*;
import com.spire.doc.fields.TextRange;

import java.awt.*;

public class ChangeHyperlink {

    public static void main(String[] args) {

        //Create a Document object
        Document document = new Document();

        //Add a section
        Section section = document.addSection();

        //Add a paragraph
        Paragraph para= section.addParagraph();
        para.appendText("A regular hyperlink: ");

        //Insert a hyperlink
        TextRange textRange = para.appendHyperlink("www.e-iceblue.com", "E-iceblue", HyperlinkType.Web_Link);
        textRange.getCharacterFormat().setFontName("Times New Roman");
        textRange.getCharacterFormat().setFontSize(12f);
        para.appendBreak(BreakType.Line_Break);


        //Add a paragraph
        para = section.addParagraph();
        para.appendText("Change the color of the hyperlink: ");

        //Insert a hyperlink
        textRange = para.appendHyperlink("www.e-iceblue.com", "E-iceblue", HyperlinkType.Web_Link);
        textRange.getCharacterFormat().setFontName("Times New Roman");
        textRange.getCharacterFormat().setFontSize(12f);
        //Change the color of the hyperlink to red
        textRange.getCharacterFormat().setTextColor(Color.RED);
        para.appendBreak(BreakType.Line_Break);

        //Add a paragraph
        para = section.addParagraph();
        para.appendText("Remove the underline of the hyperlink: ");

        //Insert a hyperlink
        textRange = para.appendHyperlink("www.e-iceblue.com", "E-iceblue", HyperlinkType.Web_Link);
        textRange.getCharacterFormat().setFontName("Times New Roman");
        textRange.getCharacterFormat().setFontSize(12f);
        //Remove the underline of the hyperlink
        textRange.getCharacterFormat().setUnderlineStyle(UnderlineStyle.None);

        //Save the document
        document.saveToFile("ChangeHyperlink.docx", FileFormat.Docx_2013);
    }
}
Apply for a Temporary License
If you'd like to remove the evaluation message from the generated documents, or to get rid of the function limitations, please request a 30-day trial license for yourself.
Java set the intents and spacing for paragraph on the presentation slide
There are two kinds of special indents styles for the paragraph on the presentation slides, first line and hanging. This article will demonstrate how to set the indents and spacing for the paragraph on presentation slide in Java applications.
import com.spire.presentation.*;

public class IndentStyle {
    public static void main(String[] args)  throws Exception{
        //Load the sample document
        Presentation presentation = new Presentation();
        presentation.loadFromFile("Indent.pptx");

        //get the shapes
        IAutoShape shape = (IAutoShape) presentation.getSlides().get(0).getShapes().get(0);

        //set the indent, margin and space for the first paragraph
        shape.getTextFrame().getParagraphs().get(0).setIndent(20);
        shape.getTextFrame().getParagraphs().get(0).setLeftMargin(10);
        shape.getTextFrame().getParagraphs().get(0).setSpaceAfter(10);

        //set the indent, margin and space for the third paragraph
        shape.getTextFrame().getParagraphs().get(2).setIndent(-100);
        shape.getTextFrame().getParagraphs().get(2).setLeftMargin(40);
        shape.getTextFrame().getParagraphs().get(2).setSpaceBefore(0);
        shape.getTextFrame().getParagraphs().get(2).setSpaceAfter(0);

        //save the document to file
        String output = "output/result.pptx";
        presentation.saveToFile(output, FileFormat.PPTX_2010);
    }
}
Effective screenshot after setting the indent style of paragraphs on presentation slide:
Java: Extract Attachments from PDF Documents
A large number of users today preserve different files within PDF documents as attachments. These attachments can be extracted and used for other purposes when necessary. Basically, there are two types of attachments in PDF: document level attachment and annotation attachment. Below are the differences between them.
- Document Level Attachment (represented by PdfAttachment class): A file attached to a PDF at the document level won't appear on a page, but can only be viewed in the "Attachments" panel of a PDF reader.
- Annotation Attachment (represented by PdfAttachmentAnnotation class): A file will be added to a specific position of a page. Annotation attachments are shown as a paper clip icon on the page; reviewers can double-click the icon to open the file.
In this article, you will learn how to extract these two kinds of attachments from a PDF document in Java using Spire.PDF for Java.
Install Spire.PDF for Java
First, you need to add the Spire.Pdf.jar file as a dependency in your Java program. The JAR file can be downloaded from this link. If you use Maven, you can easily import the JAR file by adding the following code to your project's pom.xml file.
<repositories>
    <repository>
        <id>com.e-iceblue</id>
        <name>e-iceblue</name>
        <url>https://repo.e-iceblue.com/nexus/content/groups/public/</url>
    </repository>
</repositories>
<dependencies>
    <dependency>
        <groupId>e-iceblue</groupId>
        <artifactId>spire.pdf</artifactId>
        <version>10.4.4</version>
    </dependency>
</dependencies>
Extract Attachments from PDF in Java
The document level attachments of a PDF document can be obtained using PdfDocument.getAttachments() method. The following steps show you how to extract attachments and save them to a local folder.
- Create a PdfDocument object.
- Load a PDF file using PdfDocument.loadFromFile() method.
- Get the attachment collection from the document using PdfDocument.getAttachments() method.
- Get a specific attachment using PdfAttachmentCollection.get() method and get its data using PdfAttachment.getData() method. Write the data to a file and save to a specified folder.
- Java
import com.spire.pdf.PdfDocument;
import com.spire.pdf.annotations.*;
import com.spire.pdf.attachments.PdfAttachmentCollection;

import java.io.*;

public class ExtractAttachments {

    public static void main(String[] args) throws Exception {

        //Create a PdfDocument object
        PdfDocument doc = new PdfDocument();

        //Load a PDF file that contains attachments
        doc.loadFromFile("C:\\Users\\Administrator\\Desktop\\Attachments.pdf");

        //Get the attachment collection of the PDF document
        PdfAttachmentCollection attachments = doc.getAttachments();

        //Loop through the collection
        for (int i = 0; i < attachments.getCount(); i++) {

        //Specify the output file path and name
        File file = new File("C:\\Users\\Administrator\\Desktop\\output\\" + attachments.get(i).getFileName());
        OutputStream output = new FileOutputStream(file);
        BufferedOutputStream bufferedOutput = new BufferedOutputStream(output);

        //Get a specific attachment and write to file
        bufferedOutput.write(attachments.get(i).getData());
        bufferedOutput.close();
        }
    }
}
Extract Annotation Attachments from PDF in Java
Annotation attachment is a page-based element. To get annotations from a specific page, use PdfPageBase.getAnnotationsWidget() method. After that, you'll need to determine if a specific annotation is an annotation attachment. The follows are the steps to extract annotation attachments from a whole document and save them to a local folder.
- Create a PdfDocument object.
- Load a PDF file using PdfDocument.loadFromFile() method.
- Get a specific page from the document using PdfDocument.getPages().get() method.
- Get the annotation collection from the page using PdfPageBase.getAnnotationsWidget() method.
- Determine if a specific annotation is an instance of PdfAttachmentAnnotationWidget. If yes, write the annotation attachment to a file and save it to a specified folder.
- Java
import com.spire.pdf.PdfDocument;
import com.spire.pdf.annotations.PdfAnnotationCollection;
import com.spire.pdf.annotations.PdfAttachmentAnnotationWidget;

import java.io.*;

public class ExtractAnnotationAttachments {

    public static void main(String[] args) throws Exception {

        //Create a PdfDocument object
        PdfDocument doc = new PdfDocument();

        //Load a PDF file that contains attachments
        doc.loadFromFile("C:\\Users\\Administrator\\Desktop\\AnnotationAttachments.pdf");

        //Loop through the pages
        for (int i = 0; i < doc.getPages().getCount(); i++) {

        //Get the annotation collection
        PdfAnnotationCollection collection = doc.getPages().get(i).getAnnotationsWidget();

        //Loop through the annotations
        for (Object annotation : collection) {

        //Determine if an annotation is an instance of PdfAttachmentAnnotationWidget
        if (annotation instanceof PdfAttachmentAnnotationWidget) {

        //Save the annotation attachment out of the document
        String fullPath = ((PdfAttachmentAnnotationWidget) annotation).getFileName();
        String fileName = fullPath.substring(fullPath.lastIndexOf("\\") + 1);
        File file = new File("C:\\Users\\Administrator\\Desktop\\output\\" + fileName);
        OutputStream output = new FileOutputStream(file);
        BufferedOutputStream bufferedOutput = new BufferedOutputStream(output);
        bufferedOutput.write(((PdfAttachmentAnnotationWidget) annotation).getData());
        bufferedOutput.close();
                }
            }
        }
    }
}
Apply for a Temporary License
If you'd like to remove the evaluation message from the generated documents, or to get rid of the function limitations, please request a 30-day trial license for yourself.
Java: Insert Superscripts and Subscripts into Word
In certain circumstances, you may need to insert superscripts and subscripts in Microsoft Word. For instance, when you are creating an academic document involving scientific formulas. In this article, you will learn how to insert superscripts and subscripts into Word documents in Java using Spire.Doc for Java library.
Install Spire.Doc for Java
First, you're required to add the Spire.Doc.jar file as a dependency in your Java program. The JAR file can be downloaded from this link. If you use Maven, you can easily import the JAR file in your application by adding the following code to your project's pom.xml file.
<repositories>
    <repository>
        <id>com.e-iceblue</id>
        <name>e-iceblue</name>
        <url>https://repo.e-iceblue.com/nexus/content/groups/public/</url>
    </repository>
</repositories>
<dependencies>
    <dependency>
        <groupId>e-iceblue</groupId>
        <artifactId>spire.doc</artifactId>
        <version>12.4.6</version>
    </dependency>
</dependencies>
Insert Superscripts and Subscripts into Word using Java
The following are the main steps to insert a superscript or subscript into a Word document using Spire.Doc for Java:
- Create a Document instance.
- Load a Word document using Document.loadFromFile() method.
- Get the specific section using Document.getSections().get(sectionIndex) method.
- Add a paragraph to the section using Section.addParagraph() method.
- Add normal text to the paragraph using Paragraph.appendText() method.
- Add superscript or subscript text to the paragraph using Paragraph.appendText() method.
- Apply superscript or subscript formatting to the superscript or subscript text through TextRange.getCharacterFormat().setSubSuperScript() method.
- Save the result document using Document.saveToFile() method.
- Java
import com.spire.doc.Document;
import com.spire.doc.FileFormat;
import com.spire.doc.Section;
import com.spire.doc.documents.BreakType;
import com.spire.doc.documents.Paragraph;
import com.spire.doc.documents.SubSuperScript;
import com.spire.doc.fields.TextRange;
public class InsertSuperscriptAndSubscript {
public static void main(String[] args){
//Create a Document instance
Document document = new Document();
//Load a Word document
document.loadFromFile("Sample.docx");
//Get the first section
Section section = document.getSections().get(0);
//Add a paragraph to the section
Paragraph paragraph = section.addParagraph();
//Add normal text to the paragraph
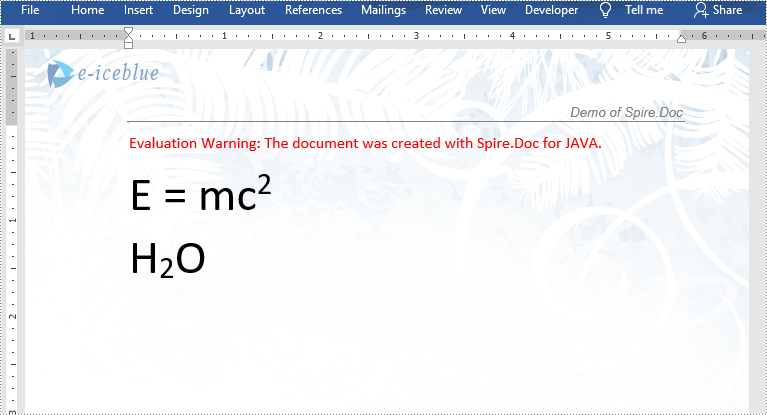
paragraph.appendText("E = mc");
//Add superscript text to the paragraph
TextRange superscriptText = paragraph.appendText("2");
//Apply superscript formatting to the superscript text
superscriptText.getCharacterFormat().setSubSuperScript(SubSuperScript.Super_Script);
//Start a new line
paragraph.appendBreak(BreakType.Line_Break);
//Add normal text to the paragraph
paragraph.appendText("H");
//Add subscript text to the paragraph
TextRange subscriptText = paragraph.appendText("2");
//Apply subscript formatting to the subscript text
subscriptText.getCharacterFormat().setSubSuperScript(SubSuperScript.Sub_Script);
//Add normal text to the paragraph
paragraph.appendText("O");
//Set font size for the text in the paragraph
for(Object item : paragraph.getItems())
{
if (item instanceof TextRange)
{
TextRange textRange = (TextRange)item ;
textRange.getCharacterFormat().setFontSize(36f);
}
}
//Save the result document
document.saveToFile("InsertSuperscriptAndSubscript.docx", FileFormat.Docx_2013);
}
}
Apply for a Temporary License
If you'd like to remove the evaluation message from the generated documents, or to get rid of the function limitations, please request a 30-day trial license for yourself.
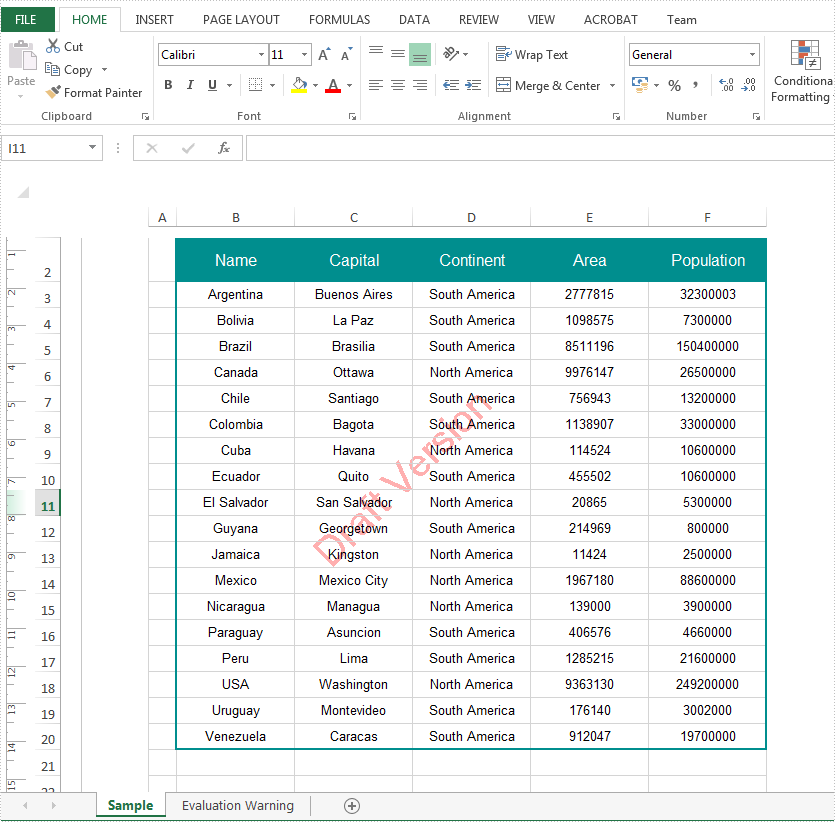
Java insert text and image watermark to Excel worksheet
This article will demonstrate how to insert text and image watermark to Excel worksheet in Java applications. The watermark in Excel worksheet could only be viewed under layout view mode.
import com.spire.xls.*;
import java.awt.*;
import java.awt.image.BufferedImage;
import static java.awt.image.BufferedImage.TYPE_INT_ARGB;

public class ExcelWatermark {
    public static void main(String[] args)  {

        //Initialize a new instance of workbook and load the test file
        Workbook workbook = new Workbook();
        workbook.loadFromFile("Sample.xlsx");

        //Set the text string and size
        Font font = new Font("Arial", Font.PLAIN, 40);
        String watermark = "Draft Version";

        for (Worksheet sheet : (Iterable) workbook.getWorksheets()) {
            //Call DrawText() method to insert the image
            BufferedImage imgWtrmrk = drawText(watermark, font, Color.pink, Color.white, sheet.getPageSetup().getPageHeight(), sheet.getPageSetup().getPageWidth());

            //Set the image as header
            sheet.getPageSetup().setLeftHeaderImage(imgWtrmrk);
            sheet.getPageSetup().setLeftHeader("&G");

            //Set the viewmode as Layout
            sheet.setViewMode(ViewMode.Layout);
        }

        //Save the document
        workbook.saveToFile("Watermark.xlsx", ExcelVersion.Version2010);
    }
    private static BufferedImage drawText (String text, Font font, Color textColor, Color backColor,double height, double width)
    {
        //define the width and height of image
        BufferedImage img = new BufferedImage((int) width, (int) height, TYPE_INT_ARGB);
        Graphics2D loGraphic = img.createGraphics();

        //set the font size
        FontMetrics loFontMetrics = loGraphic.getFontMetrics(font);
        int liStrWidth = loFontMetrics.stringWidth(text);
        int liStrHeight = loFontMetrics.getHeight();

        //set the text format
        loGraphic.setColor(backColor);
        loGraphic.fillRect(0, 0, (int) width, (int) height);
        loGraphic.translate(((int) width - liStrWidth) / 2, ((int) height - liStrHeight) / 2);
        loGraphic.rotate(Math.toRadians(-45));

        loGraphic.translate(-((int) width - liStrWidth) / 2, -((int) height - liStrHeight) / 2);
        loGraphic.setFont(font);
        loGraphic.setColor(textColor);
        loGraphic.drawString(text, ((int) width - liStrWidth) / 2, ((int) height - liStrHeight) / 2);
        loGraphic.dispose();
        return img;
    }
}
Effective screenshot of Excel text watermark: