Thursday, 20 October 2011 09:26
Word to EPUB in C#, VB.NET
The sample demonstrates how to export doc document to Epub file.

using Spire.Doc;

namespace DocToEpub
{
    class Program
    {
        static void Main(string[] args)
        {
            //Create word document
            Document doc = new Document();
            doc.LoadFromFile(@"..\..\..\..\..\..\Data\DocToEpub.docx", FileFormat.Docx);
            doc.SaveToFile(@"DocToEupb.epub",FileFormat.EPub);
            System.Diagnostics.Process.Start(@"DocToEupb.epub");
        }
    }
}
Imports Spire.Doc

Namespace DocToEpub
	Friend Class Program
	Shared Sub Main(ByVal args() As String)
        'Create word document
	Dim doc As New Document()
	doc.LoadFromFile("..\..\..\..\..\..\Data\DocToEpub.docx",FileFormat.Docx)
	doc.SaveToFile("DocToEupb.epub",FileFormat.EPub)
	Process.Start("DocToEupb.epub")
	End Sub
	End Class
End Namespace
Published in
Convertors
Tuesday, 12 July 2011 06:48
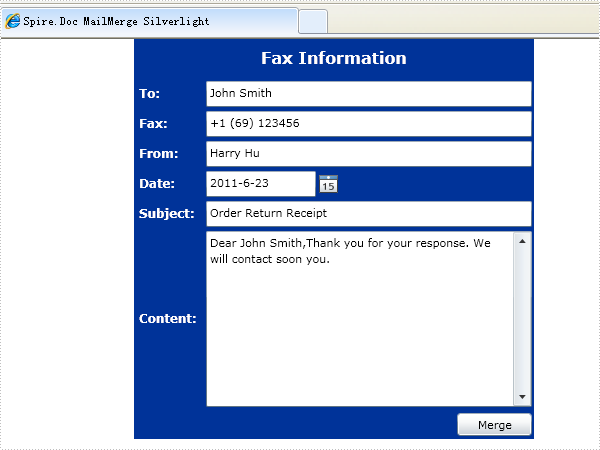
Doc MailMerge Silverlight
The sample demonstrates how to work with MailMerge in Silverlight via Spire.Doc.
<Application xmlns="http://schemas.microsoft.com/winfx/2006/xaml/presentation"
             xmlns:x="http://schemas.microsoft.com/winfx/2006/xaml"
             x:Class="MailMergeSL.App">
    <Application.Resources>
    </Application.Resources>
</Application>
using System;
using System.Windows;
using System.Windows.Browser;
using Spire.License;

namespace MailMergeSL
{
    public partial class App : Application
    {
        public App()
        {
            this.Startup += this.Application_Startup;
            this.Exit += this.Application_Exit;
            this.UnhandledException += this.Application_UnhandledException;

            InitializeComponent();
        }

        private void Application_Startup(object sender, StartupEventArgs e)
        {
            LicenseProvider.SetLicenseKey("your license key in license.elic.xml");
            this.RootVisual = new MainPage();
        }

        private void Application_Exit(object sender, EventArgs e)
        {

        }

        private void Application_UnhandledException(object sender, ApplicationUnhandledExceptionEventArgs e)
        {
            // If the app is running outside of the debugger then report the exception using
            // the browser's exception mechanism. On IE this will display it a yellow alert
            // icon in the status bar and Firefox will display a script error.
            if (!System.Diagnostics.Debugger.IsAttached)
            {

                // NOTE: This will allow the application to continue running after an exception has been thrown
                // but not handled.
                // For production applications this error handling should be replaced with something that will
                // report the error to the website and stop the application.
                e.Handled = true;
                Deployment.Current.Dispatcher.BeginInvoke(delegate { ReportErrorToDOM(e); });
            }
        }

        private void ReportErrorToDOM(ApplicationUnhandledExceptionEventArgs e)
        {
            try
            {
                string errorMsg = e.ExceptionObject.Message + e.ExceptionObject.StackTrace;
                errorMsg = errorMsg.Replace('"', '\'').Replace("\r\n", @"\n");

                String exp = "throw new Error(\"Unhandled Error in Silverlight Application " + errorMsg + "\");";
                HtmlPage.Window.Eval(exp);
            }
            catch (Exception)
            {
            }
        }
    }
}
 Partial Public Class App
    Inherits Application

    public Sub New()
        InitializeComponent()
    End Sub

    Private Sub Application_Startup(ByVal o As Object, ByVal e As StartupEventArgs) _
            Handles Me.Startup
        Me.RootVisual = New MainPage()
    End Sub

    Private Sub Application_Exit(ByVal o As Object, ByVal e As EventArgs) Handles Me.Exit

    End Sub

    Private Sub Application_UnhandledException(ByVal sender As object, _
            ByVal e As ApplicationUnhandledExceptionEventArgs) Handles Me.UnhandledException

        ' If the app is running outside of the debugger then report the exception using
        ' the browser's exception mechanism. On IE this will display it a yellow alert
        ' icon in the status bar and Firefox will display a script error.
        If Not System.Diagnostics.Debugger.IsAttached Then

            ' NOTE: This will allow the application to continue running after an exception has been thrown
            ' but not handled.
            ' For production applications this error handling should be replaced with something that will
            ' report the error to the website and stop the application.
            e.Handled = True
            Deployment.Current.Dispatcher.BeginInvoke( _
                New Action(Of ApplicationUnhandledExceptionEventArgs)(AddressOf ReportErrorToDOM), e)
        End If
    End Sub

   Private Sub ReportErrorToDOM(ByVal e As ApplicationUnhandledExceptionEventArgs)

        Try
            Dim errorMsg As String = e.ExceptionObject.Message + e.ExceptionObject.StackTrace
            errorMsg = errorMsg.Replace(""""c, "'"c).Replace(ChrW(13) & ChrW(10), "\n")

            System.Windows.Browser.HtmlPage.Window.Eval( _
                "throw new Error(""Unhandled Error in Silverlight Application " + errorMsg + """);")
        Catch

        End Try
    End Sub

End Class
<UserControl x:Class="MailMergeSL.MainPage"
    xmlns="http://schemas.microsoft.com/winfx/2006/xaml/presentation"
    xmlns:x="http://schemas.microsoft.com/winfx/2006/xaml"
    xmlns:d="http://schemas.microsoft.com/expression/blend/2008"
    xmlns:mc="http://schemas.openxmlformats.org/markup-compatibility/2006"
    mc:Ignorable="d"
    d:DesignHeight="600" d:DesignWidth="400"
             xmlns:dataInput="clr-namespace:System.Windows.Controls;assembly=System.Windows.Controls.Data.Input"
             xmlns:controls="clr-namespace:System.Windows.Controls;assembly=System.Windows.Controls">

    <Grid x:Name="LayoutRoot" Background="#FF003399" Loaded="LayoutRoot_Loaded"
          Width="400" Height="400" HorizontalAlignment="Center" VerticalAlignment="Top">
        <Grid.ColumnDefinitions>
            <ColumnDefinition MaxWidth="70" MinWidth="70" Width="70" />
            <ColumnDefinition MinWidth="300" Width="*" />
        </Grid.ColumnDefinitions>
        <Grid.RowDefinitions>
            <RowDefinition Height="40" MinHeight="40" />
            <RowDefinition Height="30" MaxHeight="30" MinHeight="30" />
            <RowDefinition Height="30" MaxHeight="30" MinHeight="30" />
            <RowDefinition Height="30" MaxHeight="30" MinHeight="30" />
            <RowDefinition Height="30" MaxHeight="30" MinHeight="30" />
            <RowDefinition Height="30" MaxHeight="30" MinHeight="30" />
            <RowDefinition />
            <RowDefinition Height="30" MaxHeight="30" MinHeight="30" />
        </Grid.RowDefinitions>
        <Button Content="Merge" Height="23" HorizontalAlignment="Right" Margin="0,0,2,0" Name="buttonMerge"
                VerticalAlignment="Center" Width="75" Click="buttonMerge_Click" IsEnabled="False"
                Grid.Row="7" Grid.ColumnSpan="2" />
        <dataInput:Label HorizontalAlignment="Center" Name="labelTitle" VerticalAlignment="Center"
                         Content="Fax Information" Foreground="White" FontWeight="Bold" FontSize="16"
                         Grid.ColumnSpan="2" />
        <dataInput:Label HorizontalAlignment="Left" Name="labelContactName" Foreground="White"
                         Content="To:" VerticalAlignment="Center" FontSize="12"
                         VerticalContentAlignment="Center" Grid.Row="1" FontWeight="Bold" Margin="5,0,0,0" />
        <dataInput:Label HorizontalAlignment="Left" Margin="5,0,0,0" Name="labelFax" Foreground="White"
                         Content="Fax:" FontSize="12" Grid.Row="2" FontWeight="Bold"
                         VerticalAlignment="Center" />
        <dataInput:Label HorizontalAlignment="Left" Margin="5,0,0,0" Name="labelFrom" Foreground="White"
                         Content="From:" FontSize="12" Grid.Row="3" FontWeight="Bold"
                         VerticalAlignment="Center" />
        <dataInput:Label HorizontalAlignment="Left" Margin="5,0,0,0" Name="labelDate" Foreground="White"
                         Content="Date:" FontSize="12" Grid.Row="4" FontWeight="Bold"
                         VerticalAlignment="Center" />
        <dataInput:Label HorizontalAlignment="Left" Margin="5,0,0,0" Name="labelSubject" Foreground="White"
                         Content="Subject:" FontSize="12" Grid.Row="5" FontWeight="Bold"
                         VerticalAlignment="Center" />
        <dataInput:Label HorizontalAlignment="Left" Margin="5,0,0,0" Name="labelContent" Foreground="White"
                         Content="Content:" FontSize="12" Grid.Row="6" FontWeight="Bold"
                         VerticalAlignment="Center" />
        <TextBox Grid.Column="1" Grid.Row="1" HorizontalAlignment="Stretch" Margin="2" Name="textBoxTo"
                 VerticalAlignment="Stretch" VerticalContentAlignment="Center"
                 HorizontalContentAlignment="Left" Text="John Smith" />
        <TextBox Grid.Column="1" Grid.Row="2" HorizontalAlignment="Stretch" Margin="2" Name="textBoxFax"
                 VerticalAlignment="Stretch" VerticalContentAlignment="Center"
                 HorizontalContentAlignment="Left" Text="+1 (69) 123456" />
        <TextBox Grid.Column="1" Grid.Row="3" HorizontalAlignment="Stretch" Margin="2" Name="textBoxFrom"
                 VerticalAlignment="Stretch" VerticalContentAlignment="Center"
                 HorizontalContentAlignment="Left" Text="Harry Hu" />
        <controls:DatePicker Grid.Column="1" Grid.Row="4" Grid.RowSpan="1" HorizontalAlignment="Left"
                             Margin="2" Name="datePickerFaxDate" VerticalAlignment="Stretch"
                             SelectedDate="6/23/2011" />
        <TextBox Grid.Column="1" Grid.Row="5" HorizontalAlignment="Stretch" Margin="2"
                 Name="textBoxSubject" VerticalAlignment="Stretch" VerticalContentAlignment="Center"
                 HorizontalContentAlignment="Left" Text="Order Return Receipt" />
        <TextBox Grid.Column="1" Grid.Row="6" HorizontalAlignment="Stretch" Margin="2"
                 Name="textBoxContent" VerticalAlignment="Stretch"
                 VerticalContentAlignment="Center" HorizontalContentAlignment="Left"
                 AcceptsReturn="True" VerticalScrollBarVisibility="Visible"
                 Text="Dear John Smith,Thank you for your response. We will contact soon you."
                 TextWrapping="Wrap" HorizontalScrollBarVisibility="Auto" />
    </Grid>
</UserControl>
using System;
using System.IO;
using System.Net;
using System.Reflection;
using System.Windows;
using System.Windows.Controls;

using Spire.Doc;

namespace MailMergeSL
{
    public partial class MainPage : UserControl
    {
        private SaveFileDialog saveFileDialog = null;
        private Document documentTemplate = null;
        public MainPage()
        {
            InitializeComponent();
            this.saveFileDialog = new SaveFileDialog();
            this.saveFileDialog.Filter = "Word Document (*.doc)|*.doc";
        }

        private void LayoutRoot_Loaded(object sender, RoutedEventArgs e)
        {
            Uri baseUri = App.Current.Host.Source;
            if ("file" == baseUri.Scheme)
            {
                Assembly assembly = this.GetType().Assembly;
                foreach (String name in assembly.GetManifestResourceNames())
                {
                    if (name.EndsWith(".Fax.doc"))
                    {
                        using (Stream docStream = assembly.GetManifestResourceStream(name))
                        {
                            this.documentTemplate = new Document(docStream, FileFormat.Doc);
                        }
                        this.buttonMerge.IsEnabled = true;
                    }
                }
            }
            else
            {
                Uri docUri = new Uri(baseUri, "../Fax.doc");

                WebClient webClient = new WebClient();
                webClient.AllowReadStreamBuffering = true;
                webClient.OpenReadAsync(docUri);
                webClient.OpenReadCompleted +=
                    delegate(object eventSender, OpenReadCompletedEventArgs eventArgs)
                {
                    using (Stream docStream = eventArgs.Result)
                    {
                        this.documentTemplate = new Document(docStream, FileFormat.Doc);
                    }
                    this.buttonMerge.IsEnabled = true;
                };
            }
        }

        private void buttonMerge_Click(object sender, RoutedEventArgs e)
        {
            String[] fieldNames
                = new String[] { "Contact Name", "Fax", "From", "Date", "Subject", "Content" };
            DateTime faxDate
                = this.datePickerFaxDate.SelectedDate.HasValue ?
                    this.datePickerFaxDate.SelectedDate.Value : DateTime.Now;
            String[] fieldValues
                = new String[]
                {
                    this.textBoxTo.Text,
                    this.textBoxFax.Text,
                    this.textBoxFrom.Text,
                    faxDate.ToShortDateString(),
                    this.textBoxSubject.Text,
                    this.textBoxContent.Text
                };
            this.documentTemplate.MailMerge.Execute(fieldNames, fieldValues);

            bool? result = this.saveFileDialog.ShowDialog();
            if (result.HasValue && result.Value)
            {
                using (Stream stream = this.saveFileDialog.OpenFile())
                {
                    this.documentTemplate.SaveToStream(stream, FileFormat.Doc);
                }
            }
        }
    }
}
Imports System
Imports System.IO
Imports System.Net
Imports System.Reflection
Imports System.Windows
Imports System.Windows.Controls

Imports Spire.Doc

Partial Public Class MainPage
    Inherits UserControl

    Private saveFileDialog As SaveFileDialog
    Private documentTemplate As Document

    Private WithEvents webClient As WebClient

    Public Sub New()
        InitializeComponent()
        Me.saveFileDialog = New SaveFileDialog()
        Me.saveFileDialog.Filter = "Word Document (*.doc)|*.doc"
    End Sub

    Private Sub LayoutRoot_Loaded(ByVal sender As System.Object, _
            ByVal e As System.Windows.RoutedEventArgs)
        Dim baseUri As Uri = App.Current.Host.Source
        If "file" = baseUri.Scheme Then
            Dim assembly As Assembly = Me.[GetType]().Assembly
            For Each name As [String] In assembly.GetManifestResourceNames()
                If name.EndsWith(".Fax.doc") Then
                    Using docStream As Stream = assembly.GetManifestResourceStream(name)
                        Me.documentTemplate = New Document(docStream, FileFormat.Doc)
                    End Using
                    Me.buttonMerge.IsEnabled = True
                End If
            Next
        Else
            Dim docUri As New Uri(baseUri, "../Fax.doc")

            webClient = New WebClient()
            webClient.AllowReadStreamBuffering = True
            webClient.OpenReadAsync(docUri)
        End If
    End Sub

    Private Sub DownloadFileCompleted(ByVal sender As Object, _
            ByVal e As OpenReadCompletedEventArgs) Handles webClient.OpenReadCompleted
        Using docStream As Stream = e.Result
            Me.documentTemplate = New Document(docStream, FileFormat.Doc)
        End Using
        Me.buttonMerge.IsEnabled = True
    End Sub

    Private Sub buttonMerge_Click(ByVal sender As System.Object, _
            ByVal e As System.Windows.RoutedEventArgs)
        Dim fieldNames As [String]() = _
            New [String]() {"Contact Name", "Fax", "From", "Date", "Subject", "Content"}
        Dim faxDate As DateTime = DateTime.Now
        If Me.datePickerFaxDate.SelectedDate.HasValue Then
            faxDate = Me.datePickerFaxDate.SelectedDate.Value
        End If

        Dim fieldValues As [String]() = _
            New [String]() {Me.textBoxTo.Text, Me.textBoxFax.Text, Me.textBoxFrom.Text, _
                            faxDate.ToShortDateString(), Me.textBoxSubject.Text, Me.textBoxContent.Text}
        Me.documentTemplate.MailMerge.Execute(fieldNames, fieldValues)

        Dim result As System.Nullable(Of Boolean) = Me.saveFileDialog.ShowDialog()
        If result.HasValue AndAlso result.Value Then
            Using stream As Stream = Me.saveFileDialog.OpenFile()
                Me.documentTemplate.SaveToStream(stream, FileFormat.Doc)
            End Using
        End If
    End Sub
End Class
Published in
Mail Merge
Thursday, 21 October 2010 14:19
Word Page Setup in C#, VB.NET
The sample demonstrates how to work with Word page setup.
//Create word document
Document document = new Document();

Section section = document.AddSection();

//the unit of all measures below is point, 1point = 0.3528 mm
section.PageSetup.PageSize = PageSize.A4;
section.PageSetup.Margins.Top = 72f;
section.PageSetup.Margins.Bottom = 72f;
section.PageSetup.Margins.Left = 89.85f;
section.PageSetup.Margins.Right = 89.85f;

String[] header = { "Name", "Capital", "Continent", "Area", "Population" };
String[][] data =
    {
        new String[]{"Argentina", "Buenos Aires", "South America", "2777815", "32300003"},
        new String[]{"Bolivia", "La Paz", "South America", "1098575", "7300000"},
        new String[]{"Brazil", "Brasilia", "South America", "8511196", "150400000"},
        new String[]{"Canada", "Ottawa", "North America", "9976147", "26500000"},
        new String[]{"Chile", "Santiago", "South America", "756943", "13200000"},
        new String[]{"Colombia", "Bagota", "South America", "1138907", "33000000"},
        new String[]{"Cuba", "Havana", "North America", "114524", "10600000"},
        new String[]{"Ecuador", "Quito", "South America", "455502", "10600000"},
        new String[]{"El Salvador", "San Salvador", "North America", "20865", "5300000"},
        new String[]{"Guyana", "Georgetown", "South America", "214969", "800000"},
        new String[]{"Jamaica", "Kingston", "North America", "11424", "2500000"},
        new String[]{"Mexico", "Mexico City", "North America", "1967180", "88600000"},
        new String[]{"Nicaragua", "Managua", "North America", "139000", "3900000"},
        new String[]{"Paraguay", "Asuncion", "South America", "406576", "4660000"},
        new String[]{"Peru", "Lima", "South America", "1285215", "21600000"},
        new String[]{"United States of America", "Washington", "North America", "9363130", "249200000"},
        new String[]{"Uruguay", "Montevideo", "South America", "176140", "3002000"},
        new String[]{"Venezuela", "Caracas", "South America", "912047", "19700000"}
    };
Spire.Doc.Table table = section.AddTable();
table.ResetCells(data.Length + 1, header.Length);

// ***************** First Row *************************
TableRow row = table.Rows[0];
row.IsHeader = true;
row.Height = 20;    //unit: point, 1point = 0.3528 mm
row.HeightType = TableRowHeightType.Exactly;
row.RowFormat.BackColor = Color.Gray;
for (int i = 0; i < header.Length; i++)
{
    row.Cells[i].CellFormat.VerticalAlignment = VerticalAlignment.Middle;
    Paragraph p = row.Cells[i].AddParagraph();
    p.Format.HorizontalAlignment = Spire.Doc.Documents.HorizontalAlignment.Center;
    TextRange txtRange = p.AppendText(header[i]);
    txtRange.CharacterFormat.Bold = true;
}

for (int r = 0; r < data.Length; r++)
{
    TableRow dataRow = table.Rows[r + 1];
    dataRow.Height = 20;
    dataRow.HeightType = TableRowHeightType.Exactly;
    dataRow.RowFormat.BackColor = Color.Empty;
    for (int c = 0; c < data[r].Length; c++)
    {
        dataRow.Cells[c].CellFormat.VerticalAlignment = VerticalAlignment.Middle;
        dataRow.Cells[c].AddParagraph().AppendText(data[r][c]);
    }
}

//Save doc file.
document.SaveToFile("Sample.doc",FileFormat.Doc);
'Create word document
Dim document_Renamed As New Document()

Dim section As Section = document.AddSection()

'the unit of all measures below is point, 1point = 0.3528 mm
section.PageSetup.PageSize = PageSize.A4
section.PageSetup.Margins.Top = 72.0F
section.PageSetup.Margins.Bottom = 72.0F
section.PageSetup.Margins.Left = 89.85F
section.PageSetup.Margins.Right = 89.85F

Dim header As String() = {"Name", "Capital", "Continent", "Area", "Population"}
Dim data As String()() = { _
        New String() {"Argentina", "Buenos Aires", "South America", "2777815", "32300003"}, _
        New String() {"Bolivia", "La Paz", "South America", "1098575", "7300000"}, _
        New String() {"Brazil", "Brasilia", "South America", "8511196", "150400000"}, _
        New String() {"Canada", "Ottawa", "North America", "9976147", "26500000"}, _
        New String() {"Chile", "Santiago", "South America", "756943", "13200000"}, _
        New String() {"Colombia", "Bagota", "South America", "1138907", "33000000"}, _
        New String() {"Cuba", "Havana", "North America", "114524", "10600000"}, _
        New String() {"Ecuador", "Quito", "South America", "455502", "10600000"}, _
        New String() {"El Salvador", "San Salvador", "North America", "20865", "5300000"}, _
        New String() {"Guyana", "Georgetown", "South America", "214969", "800000"}, _
        New String() {"Jamaica", "Kingston", "North America", "11424", "2500000"}, _
        New String() {"Mexico", "Mexico City", "North America", "1967180", "88600000"}, _
        New String() {"Nicaragua", "Managua", "North America", "139000", "3900000"}, _
        New String() {"Paraguay", "Asuncion", "South America", "406576", "4660000"}, _
        New String() {"Peru", "Lima", "South America", "1285215", "21600000"}, _
        New String() {"United States of America", "Washington", "North America", "9363130", "249200000"}, _
        New String() {"Uruguay", "Montevideo", "South America", "176140", "3002000"}, _
        New String() {"Venezuela", "Caracas", "South America", "912047", "19700000"} _
    }
Dim table As Spire.Doc.Table = section.AddTable()
table.ResetCells(data.Length + 1, header.Length)

' ***************** First Row *************************
Dim row As TableRow = table.Rows(0)
row.IsHeader = True
row.Height = 20    'unit: point, 1point = 0.3528 mm
row.HeightType = TableRowHeightType.Exactly
row.RowFormat.BackColor = Color.Gray
For i As Integer = 0 To header.Length - 1
    row.Cells(i).CellFormat.VerticalAlignment = VerticalAlignment.Middle
    Dim p As Paragraph = row.Cells(i).AddParagraph()
    p.Format.HorizontalAlignment = Spire.Doc.Documents.HorizontalAlignment.Center
    Dim txtRange As TextRange = p.AppendText(header(i))
    txtRange.CharacterFormat.Bold = True
Next

For r As Integer = 0 To data.Length - 1
    Dim dataRow As TableRow = table.Rows(r + 1)
    dataRow.Height = 20
    dataRow.HeightType = TableRowHeightType.Exactly
    dataRow.RowFormat.BackColor = Color.Empty
    For c As Integer = 0 To data(r).Length - 1
        dataRow.Cells(c).CellFormat.VerticalAlignment = VerticalAlignment.Middle
        dataRow.Cells(c).AddParagraph().AppendText(data(r)(c))
    Next
Next

'Save doc file.
document.SaveToFile("Sample.doc", FileFormat.Doc)
Published in
Setup
Thursday, 21 October 2010 14:16
Word document setup in C#, VB.NET
The sample demonstrates how to set document properties.
//Create word document
Document document = new Document();

document.BuiltinDocumentProperties.Title = "Document Demo Document";
document.BuiltinDocumentProperties.Subject = "demo";
document.BuiltinDocumentProperties.Author = "James";
document.BuiltinDocumentProperties.Company = "e-iceblue";
document.BuiltinDocumentProperties.Manager = "Jakson";
document.BuiltinDocumentProperties.Category = "Doc Demos";
document.BuiltinDocumentProperties.Keywords = "Document, Property, Demo";
document.BuiltinDocumentProperties.Comments = "This document is just a demo.";

Section section = document.AddSection();
section.PageSetup.Margins.Top = 72f;
section.PageSetup.Margins.Bottom = 72f;
section.PageSetup.Margins.Left = 89.85f;
section.PageSetup.Margins.Right = 89.85f;

String p1
    = "Microsoft Word is a word processor designed by Microsoft. "
    + "It was first released in 1983 under the name Multi-Tool Word for Xenix systems. "
    + "Subsequent versions were later written for several other platforms including "
    + "IBM PCs running DOS (1983), the Apple Macintosh (1984), the AT&T Unix PC (1985), "
    + "Atari ST (1986), SCO UNIX, OS/2, and Microsoft Windows (1989). ";
String p2
    = "Microsoft Office Word instead of merely Microsoft Word. "
    + "The 2010 version appears to be branded as Microsoft Word, "
    + "once again. The current versions are Microsoft Word 2010 for Windows and 2008 for Mac.";
section.AddParagraph().AppendText(p1).CharacterFormat.FontSize = 14;
section.AddParagraph().AppendText(p2).CharacterFormat.FontSize = 14;


//Save doc file.
document.SaveToFile("Sample.doc",FileFormat.Doc);
'Create word document
Dim document As New Document()

document.BuiltinDocumentProperties.Title = "Document Demo Document"
document.BuiltinDocumentProperties.Subject = "demo"
document.BuiltinDocumentProperties.Author = "James"
document.BuiltinDocumentProperties.Company = "e-iceblue"
document.BuiltinDocumentProperties.Manager = "Jakson"
document.BuiltinDocumentProperties.Category = "Doc Demos"
document.BuiltinDocumentProperties.Keywords = "Document, Property, Demo"
document.BuiltinDocumentProperties.Comments = "This document is just a demo."

Dim section As Section = document.AddSection()
section.PageSetup.Margins.Top = 72.0F
section.PageSetup.Margins.Bottom = 72.0F
section.PageSetup.Margins.Left = 89.85F
section.PageSetup.Margins.Right = 89.85F

Dim p1 As String _
    = "Microsoft Word is a word processor designed by Microsoft. " _
    + "It was first released in 1983 under the name Multi-Tool Word for Xenix systems. " _
    + "Subsequent versions were later written for several other platforms including " _
    + "IBM PCs running DOS (1983), the Apple Macintosh (1984), the AT&T Unix PC (1985), " _
    + "Atari ST (1986), SCO UNIX, OS/2, and Microsoft Windows (1989). "
Dim p2 As String _
    = "Microsoft Office Word instead of merely Microsoft Word. " _
    + "The 2010 version appears to be branded as Microsoft Word, " _
    + "once again. The current versions are Microsoft Word 2010 for Windows and 2008 for Mac."
section.AddParagraph().AppendText(p1).CharacterFormat.FontSize = 14
section.AddParagraph().AppendText(p2).CharacterFormat.FontSize = 14

'Save doc file.
document.SaveToFile("Sample.doc", FileFormat.Doc)
Published in
Setup
Thursday, 21 October 2010 13:51
Word merge event handler in C#, VB.NET
The sample demonstrates how to handle merge event.

public partial class Form1 : Form
{
    private int lastIndex = 0;
    public Form1()
    {
        InitializeComponent();
    }

    private void button1_Click(object sender, EventArgs e)
    {
        //Create word document
        Document document = new Document();
        document.LoadFromFile(@"..\..\..\..\..\..\Data\Fax2.doc");
        lastIndex = 0;

        List<CustomerRecord> customerRecords = new List<CustomerRecord>();
        CustomerRecord c1 = new CustomerRecord();
        c1.ContactName = "Lucy";
        c1.Fax = "786-324-10";
        c1.Date = DateTime.Now;
        customerRecords.Add(c1);

        CustomerRecord c2 = new CustomerRecord();
        c2.ContactName = "Lily";
        c2.Fax = "779-138-13";
        c2.Date = DateTime.Now;
        customerRecords.Add(c2);

        CustomerRecord c3 = new CustomerRecord();
        c3.ContactName = "James";
        c3.Fax = "363-287-02";
        c3.Date = DateTime.Now;
        customerRecords.Add(c3);

        //Execute mailmerge
        document.MailMerge.MergeField += new MergeFieldEventHandler(MailMerge_MergeField);
        document.MailMerge.ExecuteGroup(new MailMergeDataTable("Customer", customerRecords));

        //Save doc file.
        document.SaveToFile(@"Sample.doc", FileFormat.Doc);
    }

    void MailMerge_MergeField(object sender, MergeFieldEventArgs args)
    {
        //Next row
        if (args.RowIndex > lastIndex)
        {
            lastIndex = args.RowIndex;
            AddPageBreakForMergeField(args.CurrentMergeField);
        }
    }

    void AddPageBreakForMergeField(IMergeField mergeField)
    {
        //Find position of needing to add page break
        bool foundGroupStart = false;
        Paragraph paramgraph = mergeField.PreviousSibling.Owner as Paragraph;
        MergeField merageField = null;
        while (!foundGroupStart)
        {
            paramgraph = paramgraph.PreviousSibling as Paragraph;
            for (int i = 0; i < paramgraph.Items.Count; i++)
            {
                merageField = paramgraph.Items[i] as MergeField;
                if ((merageField != null) && (merageField.Prefix == "GroupStart"))
                {
                    foundGroupStart = true;
                    break;
                }
            }
        }

        paramgraph.AppendBreak(BreakType.PageBreak);
    }
}

public class CustomerRecord
{
    private string m_contactName;
    public string ContactName
    {
        get
        {
            return m_contactName;
        }
        set
        {
            m_contactName = value;
        }
    }

    private string m_fax;
    public string Fax
    {
        get
        {
            return m_fax;
        }
        set
        {
            m_fax = value;
        }
    }

    private DateTime m_date;
    public DateTime Date
    {
        get
        {
            return m_date;
        }
        set
        {
            m_date = value;
        }
    }
}
	Public Partial Class Form1
		Inherits Form
		Private lastIndex As Integer = 0
		Public Sub New()
			InitializeComponent()
		End Sub

		Private Sub button1_Click(sender As Object, e As EventArgs)
			'Create word document
			Dim document As New Document()
			document.LoadFromFile("..\..\..\..\..\Data\Fax2.doc")
			lastIndex = 0

			Dim customerRecords As New List(Of CustomerRecord)()

			Dim c1 As New CustomerRecord()
			c1.ContactName = "Lucy"
			c1.Fax = "786-324-10"
			c1.[Date] = DateTime.Now
			customerRecords.Add(c1)

			Dim c2 As New CustomerRecord()
			c2.ContactName = "Lily"
			c2.Fax = "779-138-13"
			c2.[Date] = DateTime.Now
			customerRecords.Add(c2)

			Dim c3 As New CustomerRecord()
			c3.ContactName = "James"
			c3.Fax = "363-287-02"
			c3.[Date] = DateTime.Now
			customerRecords.Add(c3)

			'Execute mailmerge
			document.MailMerge.MergeField += New MergeFieldEventHandler(AddressOf MailMerge_MergeField)
			document.MailMerge.ExecuteGroup(New MailMergeDataTable("Customer", customerRecords))

			'Save doc file.
			document.SaveToFile("Sample.doc", FileFormat.Doc)
		End Sub

		Private Sub MailMerge_MergeField(sender As Object, args As MergeFieldEventArgs)
			'Next row
			If args.RowIndex > lastIndex Then
				lastIndex = args.RowIndex
				AddPageBreakForMergeField(args.CurrentMergeField)
			End If
		End Sub

		Private Sub AddPageBreakForMergeField(mergeField As IMergeField)
			'Find position of needing to add page break
			Dim foundGroupStart As Boolean = False
			Dim paramgraph As Paragraph = TryCast(mergeField.PreviousSibling.Owner, Paragraph)
			Dim merageField As MergeField = Nothing
			While Not foundGroupStart
				paramgraph = TryCast(paramgraph.PreviousSibling, Paragraph)
				For i As Integer = 0 To paramgraph.Items.Count - 1
					merageField = TryCast(paramgraph.Items(i), MergeField)
					If (merageField IsNot Nothing) AndAlso (merageField.Prefix = "GroupStart") Then
						foundGroupStart = True
						Exit For
					End If
				Next
			End While

			paramgraph.AppendBreak(BreakType.PageBreak)
		End Sub
	End Class

	Public Class CustomerRecord
		Private m_contactName As String
		Public Property ContactName() As String
			Get
				Return m_contactName
			End Get
			Set
				m_contactName = value
			End Set
		End Property

		Private m_fax As String
		Public Property Fax() As String
			Get
				Return m_fax
			End Get
			Set
				m_fax = value
			End Set
		End Property

		Private m_date As DateTime
		Public Property [Date]() As DateTime
			Get
				Return m_date
			End Get
			Set
				m_date = value
			End Set
		End Property
	End Class
End Namespace
Published in
Mail Merge
Thursday, 21 October 2010 13:47
Word to pdf in C#, VB.NET
The sample demonstrates how to export doc document to PDF file.
//Create word document
Document document = new Document();

Section section = document.AddSection();
section.PageSetup.PageSize = PageSize.A4;
section.PageSetup.Margins.Top = 72f;
section.PageSetup.Margins.Bottom = 72f;
section.PageSetup.Margins.Left = 89.85f;
section.PageSetup.Margins.Right = 89.85f;

Paragraph paragraph = section.AddParagraph();
paragraph.Format.HorizontalAlignment = Spire.Doc.Documents.HorizontalAlignment.Left;
paragraph.AppendPicture(Image.FromFile("Word.png"));

String p1
    = "Microsoft Word is a word processor designed by Microsoft. "
    + "It was first released in 1983 under the name Multi-Tool Word for Xenix systems. "
    + "Subsequent versions were later written for several other platforms including "
    + "IBM PCs running DOS (1983), the Apple Macintosh (1984), the AT&T Unix PC (1985), "
    + "Atari ST (1986), SCO UNIX, OS/2, and Microsoft Windows (1989). ";
String p2
    = "Microsoft Office Word instead of merely Microsoft Word. "
    + "The 2010 version appears to be branded as Microsoft Word, "
    + "once again. The current versions are Microsoft Word 2010 for Windows and 2008 for Mac.";
section.AddParagraph().AppendText(p1).CharacterFormat.FontSize = 14;
section.AddParagraph().AppendText(p2).CharacterFormat.FontSize = 14;

//Save doc file to pdf.
document.SaveToFile("Sample.pdf", FileFormat.PDF);
'Create word document
Dim document As New Document()

Dim section As Section = document.AddSection()
section.PageSetup.PageSize = PageSize.A4
section.PageSetup.Margins.Top = 72.0F
section.PageSetup.Margins.Bottom = 72.0F
section.PageSetup.Margins.Left = 89.85F
section.PageSetup.Margins.Right = 89.85F

Dim paragraph As Paragraph = section.AddParagraph()
paragraph.Format.HorizontalAlignment = Spire.Doc.Documents.HorizontalAlignment.Left
paragraph.AppendPicture(Image.FromFile("Word.png"))

Dim p1 As String _
    = "Microsoft Word is a word processor designed by Microsoft. " _
    + "It was first released in 1983 under the name Multi-Tool Word for Xenix systems. " _
    + "Subsequent versions were later written for several other platforms including " _
    + "IBM PCs running DOS (1983), the Apple Macintosh (1984), the AT&T Unix PC (1985), " _
    + "Atari ST (1986), SCO UNIX, OS/2, and Microsoft Windows (1989). "
Dim p2 As String _
    = "Microsoft Office Word instead of merely Microsoft Word. " _
    + "The 2010 version appears to be branded as Microsoft Word, " _
    + "once again. The current versions are Microsoft Word 2010 for Windows and 2008 for Mac."
section.AddParagraph().AppendText(p1).CharacterFormat.FontSize = 14
section.AddParagraph().AppendText(p2).CharacterFormat.FontSize = 14

'Save doc file to pdf.
document.SaveToFile("Sample.pdf", FileFormat.PDF)
Published in
Convertors
Thursday, 21 October 2010 13:44
Word to xml in C#, VB.NET
The sample demonstrates how to export doc document to XML file.
//Create word document
Document document = new Document();

Section section = document.AddSection();

String[] header = { "Name", "Capital", "Continent", "Area", "Population" };
String[][] data =
    {
        new String[]{"Argentina", "Buenos Aires", "South America", "2777815", "32300003"},
        new String[]{"Bolivia", "La Paz", "South America", "1098575", "7300000"},
        new String[]{"Brazil", "Brasilia", "South America", "8511196", "150400000"},
        new String[]{"Canada", "Ottawa", "North America", "9976147", "26500000"},
        new String[]{"Chile", "Santiago", "South America", "756943", "13200000"},
        new String[]{"Colombia", "Bagota", "South America", "1138907", "33000000"},
        new String[]{"Cuba", "Havana", "North America", "114524", "10600000"},
        new String[]{"Ecuador", "Quito", "South America", "455502", "10600000"},
        new String[]{"El Salvador", "San Salvador", "North America", "20865", "5300000"},
        new String[]{"Guyana", "Georgetown", "South America", "214969", "800000"},
        new String[]{"Jamaica", "Kingston", "North America", "11424", "2500000"},
        new String[]{"Mexico", "Mexico City", "North America", "1967180", "88600000"},
        new String[]{"Nicaragua", "Managua", "North America", "139000", "3900000"},
        new String[]{"Paraguay", "Asuncion", "South America", "406576", "4660000"},
        new String[]{"Peru", "Lima", "South America", "1285215", "21600000"},
        new String[]{"United States of America", "Washington", "North America", "9363130", "249200000"},
        new String[]{"Uruguay", "Montevideo", "South America", "176140", "3002000"},
        new String[]{"Venezuela", "Caracas", "South America", "912047", "19700000"}
    };
Spire.Doc.Table table = section.AddTable();
table.ResetCells(data.Length + 1, header.Length);

// ***************** First Row *************************
TableRow row = table.Rows[0];
row.IsHeader = true;
row.Height = 20;    //unit: point, 1point = 0.3528 mm
row.HeightType = TableRowHeightType.Exactly;
row.RowFormat.BackColor = Color.Gray;
for (int i = 0; i < header.Length; i++)
{
    row.Cells[i].CellFormat.VerticalAlignment = VerticalAlignment.Middle;
    Paragraph p = row.Cells[i].AddParagraph();
    p.Format.HorizontalAlignment = Spire.Doc.Documents.HorizontalAlignment.Center;
    TextRange txtRange = p.AppendText(header[i]);
    txtRange.CharacterFormat.Bold = true;
}

for (int r = 0; r < data.Length; r++)
{
    TableRow dataRow = table.Rows[r + 1];
    dataRow.Height = 20;
    dataRow.HeightType = TableRowHeightType.Exactly;
    dataRow.RowFormat.BackColor = Color.Empty;
    for (int c = 0; c < data[r].Length; c++)
    {
        dataRow.Cells[c].CellFormat.VerticalAlignment = VerticalAlignment.Middle;
        dataRow.Cells[c].AddParagraph().AppendText(data[r][c]);
    }
}

//Save xml file.
document.SaveToFile("Sample.xml",FileFormat.Xml);
'Create word document
Dim document_Renamed As New Document()

Dim section As Section = document_Renamed.AddSection()

Dim header As String() = {"Name", "Capital", "Continent", "Area", "Population"}
Dim data As String()() = { _
        New String() {"Argentina", "Buenos Aires", "South America", "2777815", "32300003"}, _
        New String() {"Bolivia", "La Paz", "South America", "1098575", "7300000"}, _
        New String() {"Brazil", "Brasilia", "South America", "8511196", "150400000"}, _
        New String() {"Canada", "Ottawa", "North America", "9976147", "26500000"}, _
        New String() {"Chile", "Santiago", "South America", "756943", "13200000"}, _
        New String() {"Colombia", "Bagota", "South America", "1138907", "33000000"}, _
        New String() {"Cuba", "Havana", "North America", "114524", "10600000"}, _
        New String() {"Ecuador", "Quito", "South America", "455502", "10600000"}, _
        New String() {"El Salvador", "San Salvador", "North America", "20865", "5300000"}, _
        New String() {"Guyana", "Georgetown", "South America", "214969", "800000"}, _
        New String() {"Jamaica", "Kingston", "North America", "11424", "2500000"}, _
        New String() {"Mexico", "Mexico City", "North America", "1967180", "88600000"}, _
        New String() {"Nicaragua", "Managua", "North America", "139000", "3900000"}, _
        New String() {"Paraguay", "Asuncion", "South America", "406576", "4660000"}, _
        New String() {"Peru", "Lima", "South America", "1285215", "21600000"}, _
        New String() {"United States of America", "Washington", "North America", "9363130", "249200000"}, _
        New String() {"Uruguay", "Montevideo", "South America", "176140", "3002000"}, _
        New String() {"Venezuela", "Caracas", "South America", "912047", "19700000"} _
    }
Dim table As Spire.Doc.Table = section.AddTable()
table.ResetCells(data.Length + 1, header.Length)

' ***************** First Row *************************
Dim row As TableRow = table.Rows(0)
row.IsHeader = True
row.Height = 20    'unit: point, 1point = 0.3528 mm
row.HeightType = TableRowHeightType.Exactly
row.RowFormat.BackColor = Color.Gray
For i As Integer = 0 To header.Length - 1
    row.Cells(i).CellFormat.VerticalAlignment = VerticalAlignment.Middle
    Dim p As Paragraph = row.Cells(i).AddParagraph()
    p.Format.HorizontalAlignment = Spire.Doc.Documents.HorizontalAlignment.Center
    Dim txtRange As TextRange = p.AppendText(header(i))
    txtRange.CharacterFormat.Bold = True
Next

For r As Integer = 0 To data.Length - 1
    Dim dataRow As TableRow = table.Rows(r + 1)
    dataRow.Height = 20
    dataRow.HeightType = TableRowHeightType.Exactly
    dataRow.RowFormat.BackColor = Color.Empty
    For c As Integer = 0 To data(r).Length - 1
        dataRow.Cells(c).CellFormat.VerticalAlignment = VerticalAlignment.Middle
        dataRow.Cells(c).AddParagraph().AppendText(data(r)(c))
    Next
Next

'Save xml file.
document_Renamed.SaveToFile("Sample.xml", FileFormat.Xml)
Published in
Convertors
Thursday, 21 October 2010 13:34
Word to Tiff image in C#, VB.NET
The sample demonstrates how to export doc document to TIFF image.
//Create word document
Document document = new Document();

Section section = document.AddSection();
section.PageSetup.PageSize = PageSize.A4;
section.PageSetup.Margins.Top = 72f;
section.PageSetup.Margins.Bottom = 72f;
section.PageSetup.Margins.Left = 89.85f;
section.PageSetup.Margins.Right = 89.85f;

Paragraph paragraph = section.AddParagraph();
paragraph.Format.HorizontalAlignment = Spire.Doc.Documents.HorizontalAlignment.Left;
paragraph.AppendPicture(Image.FromFile("Word.png"));

String p1
    = "Microsoft Word is a word processor designed by Microsoft. "
    + "It was first released in 1983 under the name Multi-Tool Word for Xenix systems. "
    + "Subsequent versions were later written for several other platforms including "
    + "IBM PCs running DOS (1983), the Apple Macintosh (1984), the AT&T Unix PC (1985), "
    + "Atari ST (1986), SCO UNIX, OS/2, and Microsoft Windows (1989). ";
String p2
    = "Microsoft Office Word instead of merely Microsoft Word. "
    + "The 2010 version appears to be branded as Microsoft Word, "
    + "once again. The current versions are Microsoft Word 2010 for Windows and 2008 for Mac.";
section.AddParagraph().AppendText(p1).CharacterFormat.FontSize = 14;
section.AddParagraph().AppendText(p2).CharacterFormat.FontSize = 14;

//Save image file.
Image image = document.SaveToImages(0, ImageType.Bitmap);
image.Save("Sample.tif", ImageFormat.Tiff);
'Create word document
Dim document As New Document()

Dim section As Section = document.AddSection()
section.PageSetup.PageSize = PageSize.A4
section.PageSetup.Margins.Top = 72.0F
section.PageSetup.Margins.Bottom = 72.0F
section.PageSetup.Margins.Left = 89.85F
section.PageSetup.Margins.Right = 89.85F

Dim paragraph As Paragraph = section.AddParagraph()
paragraph.Format.HorizontalAlignment = Spire.Doc.Documents.HorizontalAlignment.Left
paragraph.AppendPicture(Image.FromFile("Word.png"))

Dim p1 As String _
    = "Microsoft Word is a word processor designed by Microsoft. " _
    + "It was first released in 1983 under the name Multi-Tool Word for Xenix systems. " _
    + "Subsequent versions were later written for several other platforms including " _
    + "IBM PCs running DOS (1983), the Apple Macintosh (1984), the AT&T Unix PC (1985), " _
    + "Atari ST (1986), SCO UNIX, OS/2, and Microsoft Windows (1989). "
Dim p2 As String _
    = "Microsoft Office Word instead of merely Microsoft Word. " _
    + "The 2010 version appears to be branded as Microsoft Word, " _
    + "once again. The current versions are Microsoft Word 2010 for Windows and 2008 for Mac."
section.AddParagraph().AppendText(p1).CharacterFormat.FontSize = 14
section.AddParagraph().AppendText(p2).CharacterFormat.FontSize = 14

'Save image file.
Dim image As Image = document.SaveToImages(0, ImageType.Bitmap)
image.Save("Sample.tif", ImageFormat.Tiff)
Published in
Convertors
Thursday, 21 October 2010 13:25
Word table in C#, VB.NET
The sample demonstrates how to create table in word document.
//Create word document
Document document = new Document();

Section section = document.AddSection();

String[] header = { "Name", "Capital", "Continent", "Area", "Population" };
String[][] data =
    {
        new String[]{"Argentina", "Buenos Aires", "South America", "2777815", "32300003"},
        new String[]{"Bolivia", "La Paz", "South America", "1098575", "7300000"},
        new String[]{"Brazil", "Brasilia", "South America", "8511196", "150400000"},
        new String[]{"Canada", "Ottawa", "North America", "9976147", "26500000"},
        new String[]{"Chile", "Santiago", "South America", "756943", "13200000"},
        new String[]{"Colombia", "Bagota", "South America", "1138907", "33000000"},
        new String[]{"Cuba", "Havana", "North America", "114524", "10600000"},
        new String[]{"Ecuador", "Quito", "South America", "455502", "10600000"},
        new String[]{"El Salvador", "San Salvador", "North America", "20865", "5300000"},
        new String[]{"Guyana", "Georgetown", "South America", "214969", "800000"},
        new String[]{"Jamaica", "Kingston", "North America", "11424", "2500000"},
        new String[]{"Mexico", "Mexico City", "North America", "1967180", "88600000"},
        new String[]{"Nicaragua", "Managua", "North America", "139000", "3900000"},
        new String[]{"Paraguay", "Asuncion", "South America", "406576", "4660000"},
        new String[]{"Peru", "Lima", "South America", "1285215", "21600000"},
        new String[]{"United States of America", "Washington", "North America", "9363130", "249200000"},
        new String[]{"Uruguay", "Montevideo", "South America", "176140", "3002000"},
        new String[]{"Venezuela", "Caracas", "South America", "912047", "19700000"}
    };
Spire.Doc.Table table = section.AddTable();
table.ResetCells(data.Length + 1, header.Length);

// ***************** First Row *************************
TableRow row = table.Rows[0];
row.IsHeader = true;
row.Height = 20;    //unit: point, 1point = 0.3528 mm
row.HeightType = TableRowHeightType.Exactly;
row.RowFormat.BackColor = Color.Gray;
for (int i = 0; i < header.Length; i++)
{
    row.Cells[i].CellFormat.VerticalAlignment = VerticalAlignment.Middle;
    Paragraph p = row.Cells[i].AddParagraph();
    p.Format.HorizontalAlignment = Spire.Doc.Documents.HorizontalAlignment.Center;
    TextRange txtRange = p.AppendText(header[i]);
    txtRange.CharacterFormat.Bold = true;
}

for (int r = 0; r < data.Length; r++)
{
    TableRow dataRow = table.Rows[r + 1];
    dataRow.Height = 20;
    dataRow.HeightType = TableRowHeightType.Exactly;
    dataRow.RowFormat.BackColor = Color.Empty;
    for (int c = 0; c < data[r].Length; c++)
    {
        dataRow.Cells[c].CellFormat.VerticalAlignment = VerticalAlignment.Middle;
        dataRow.Cells[c].AddParagraph().AppendText(data[r][c]);
    }
}

//Save doc file.
document.SaveToFile("Sample.doc",FileFormat.Doc);
'Create word document
Dim document_Renamed As New Document()

Dim section As Section = document_Renamed.AddSection()


Dim header As String() = {"Name", "Capital", "Continent", "Area", "Population"}
Dim data As String()() = { _
        New String() {"Argentina", "Buenos Aires", "South America", "2777815", "32300003"}, _
        New String() {"Bolivia", "La Paz", "South America", "1098575", "7300000"}, _
        New String() {"Brazil", "Brasilia", "South America", "8511196", "150400000"}, _
        New String() {"Canada", "Ottawa", "North America", "9976147", "26500000"}, _
        New String() {"Chile", "Santiago", "South America", "756943", "13200000"}, _
        New String() {"Colombia", "Bagota", "South America", "1138907", "33000000"}, _
        New String() {"Cuba", "Havana", "North America", "114524", "10600000"}, _
        New String() {"Ecuador", "Quito", "South America", "455502", "10600000"}, _
        New String() {"El Salvador", "San Salvador", "North America", "20865", "5300000"}, _
        New String() {"Guyana", "Georgetown", "South America", "214969", "800000"}, _
        New String() {"Jamaica", "Kingston", "North America", "11424", "2500000"}, _
        New String() {"Mexico", "Mexico City", "North America", "1967180", "88600000"}, _
        New String() {"Nicaragua", "Managua", "North America", "139000", "3900000"}, _
        New String() {"Paraguay", "Asuncion", "South America", "406576", "4660000"}, _
        New String() {"Peru", "Lima", "South America", "1285215", "21600000"}, _
        New String() {"United States of America", "Washington", "North America", "9363130", "249200000"}, _
        New String() {"Uruguay", "Montevideo", "South America", "176140", "3002000"}, _
        New String() {"Venezuela", "Caracas", "South America", "912047", "19700000"} _
    }
Dim table As Spire.Doc.Table = section.AddTable()
table.ResetCells(data.Length + 1, header.Length)

' ***************** First Row *************************
Dim row As TableRow = table.Rows(0)
row.IsHeader = True
row.Height = 20    'unit: point, 1point = 0.3528 mm
row.HeightType = TableRowHeightType.Exactly
row.RowFormat.BackColor = Color.Gray
For i As Integer = 0 To header.Length - 1
    row.Cells(i).CellFormat.VerticalAlignment = VerticalAlignment.Middle
    Dim p As Paragraph = row.Cells(i).AddParagraph()
    p.Format.HorizontalAlignment = Spire.Doc.Documents.HorizontalAlignment.Center
    Dim txtRange As TextRange = p.AppendText(header(i))
    txtRange.CharacterFormat.Bold = True
Next


For r As Integer = 0 To data.Length - 1
    Dim dataRow As TableRow = table.Rows(r + 1)
    dataRow.Height = 20
    dataRow.HeightType = TableRowHeightType.Exactly
    dataRow.RowFormat.BackColor = Color.Empty
    For c As Integer = 0 To data(r).Length - 1
        dataRow.Cells(c).CellFormat.VerticalAlignment = VerticalAlignment.Middle
        dataRow.Cells(c).AddParagraph().AppendText(data(r)(c))
    Next
Next

'Save doc file.
document_Renamed.SaveToFile("Sample.doc",FileFormat.Doc)
Published in
Context
Thursday, 21 October 2010 13:20
Word indent in C#, VB.NET
The sample demonstrates how to indent paragraph.
//Create word document
Document document = new Document();

//Create a new secition
Section section = document.AddSection();

//Create a new paragraph
Paragraph paragraph = section.AddParagraph();

//Append Text
paragraph.AppendText("Using items list to show Indent demo.");
paragraph.ApplyStyle(BuiltinStyle.Heading3);

paragraph = section.AddParagraph();
for (int i = 0; i < 10; i++)
{
    paragraph = section.AddParagraph();
    paragraph.AppendText(String.Format("Indent Demo Node{0}", i));


    if(i == 0)
    {
        paragraph.ListFormat.ApplyBulletStyle();
    }
    else
    {
        paragraph.ListFormat.ContinueListNumbering();
    }

    paragraph.ListFormat.CurrentListLevel.NumberPosition = -10;
}

//Save doc file.
document.SaveToFile("Sample.doc",FileFormat.Doc);
'Create word document
Dim document_Renamed As New Document()

'Create a new secition
Dim section_Renamed As Section = document_Renamed.AddSection()

'Create a new paragraph
Dim paragraph_Renamed As Paragraph = section_Renamed.AddParagraph()

      'Append Text
      paragraph_Renamed.AppendText("Using items list to show Indent demo.")

      paragraph_Renamed.ApplyStyle(BuiltinStyle.Heading3)

      paragraph_Renamed = section_Renamed.AddParagraph()
      For i As Integer = 0 To 9
          paragraph_Renamed = section_Renamed.AddParagraph()
          Dim text As String _
              = "Indent Demo Node" & i.ToString()
          Dim txtRange As TextRange = paragraph_Renamed.AppendText(text)


          If i = 0 Then
              paragraph_Renamed.ListFormat.ApplyBulletStyle()
          Else
              paragraph_Renamed.ListFormat.ContinueListNumbering()

          End If

          paragraph_Renamed.ListFormat.CurrentListLevel.NumberPosition = -10

      Next i

'Save doc file.
document_Renamed.SaveToFile("Sample.doc",FileFormat.Doc)
Published in
Formating