Introduction
A Marker Designer represents a single data point or value that gives a mean to Spire.XLS to place relevant data into different cells of the worksheet in a workbook. We make use of Designer spreadsheets in which we write marker designers into different cells. Normally a marker designer consists of DataSource and a Field Name and starts with "&=". The DataSource can be a DataSet, DataTable, DataView or an Object variable etc. You can also make use of dynamic formulas that allows you to insert MS Excel's formulas into cells even when the formula must reference rows that will be inserted during the export process. Moreover, you may calculate totals and sub totals of any data field too.
Marker designer is a way to let Spire.XLS know that what information you wish to place in an Excel designer spreadsheet. Marker designers allow you to create templates that contain only relevant information and are formatted to meet your needs.
Designer Spreadsheet and Marker Designers
Designer spreadsheets are standard Excel files that contain the visual formatting, formulas and marker designers. They can contain marker designers that reference one or more data sources such as information from a project and information for related contacts. Marker designers are written into cells where you want information to be filled in.
All marker designers start with "&=", without the quotes. An example of a data marker is &=Party.FullName. If the data marker results in more than one item, i.e. row then following rows will be moved down automatically to make room for all of the new information. Thus sub-totals and totals can be placed on the following row after the data marker to make calculations based on inserted data. In order to make calculations on the rows that are inserted, you must use Dynamic Formulas.
Marker designers consist of the Data Source and Field Name parts for most information. Special information may also be passed with variables and variable arrays. Variables always fill only one cell whereas variable arrays may fill several ones. You may only use one data marker per cell. Unused marker designers will be removed.
Marker designer may also contain parameters. Parameters allow you to modify how the information will be laid out. They are appended to the end of marker designer in parenthesis as a comma separated list.
Marker designer Options
&=DataSource.FieldName
&=[Data Source].[Field Name]
&=VariableName
Formulas
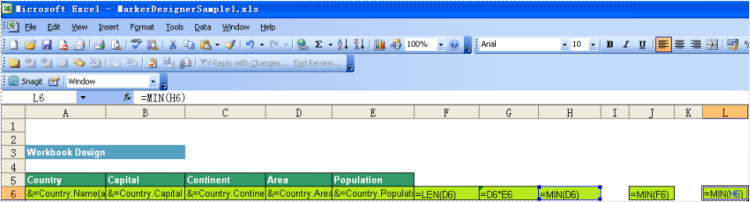
Formulas allow you to insert Excel's formulas into cells even when the formula must reference rows that will be inserted during the export process. And they can repeat for each inserted row or use only the cell where the data marker is placed for it.
If value of a cell referred to other cells, such as (copy:rc6), it means the value of the cell will be referred by cells of column 6. Multiple refer can be used like this: (copy:rc5,copy:rc7).
Note: Separate them with comma
Cell "G6" contains the formula = D6*E6, cell "G7" contains = D7*E7 and cell "G8" contains = D8*E8, etc.
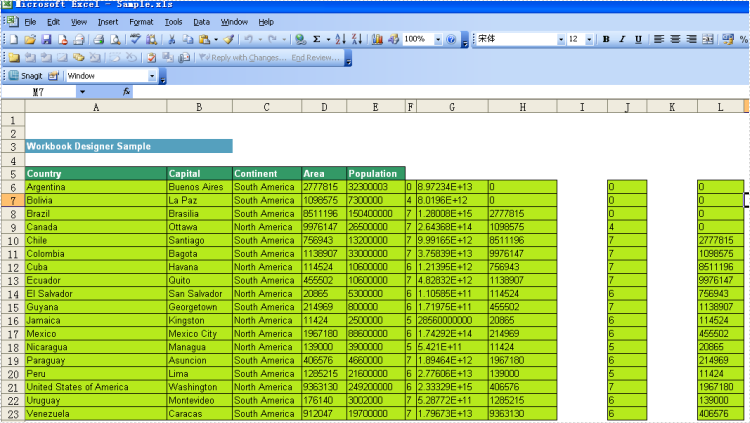
The following illustrates a repeating dynamic formula and the resulting Excel worksheet.
Result:
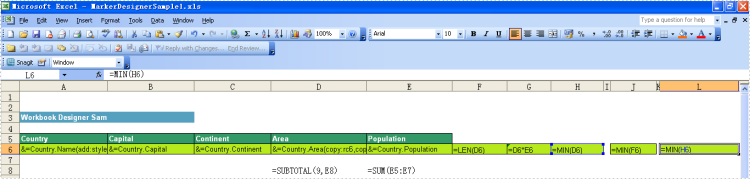
Sum and Subtotal
Below is showing you how to use these 2 formulas:
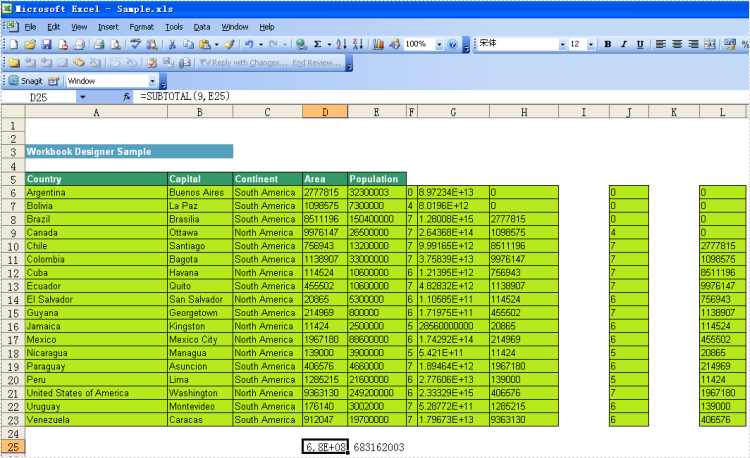
Result:
Code:
          Workbook workbook = new Workbook();

            workbook.LoadFromFile(@"..\..\..\..\..\..\Data\MarkerDesignerSample1.xls");
			DataTable dt = (DataTable)dataGrid1.DataSource;

			Worksheet sheet = workbook.Worksheets[0];
            //fill parameter
            workbook.MarkerDesigner.AddParameter("Variable1", 1234.5678);
            //fill DataTable
			workbook.MarkerDesigner.AddDataTable("Country",dt);
			workbook.MarkerDesigner.Apply();

            //AutoFit
			sheet.AllocatedRange.AutoFitRows();
			sheet.AllocatedRange.AutoFitColumns();

			workbook.SaveToFile("Sample.xls",ExcelVersion.Version97to2003);