
Table (19)
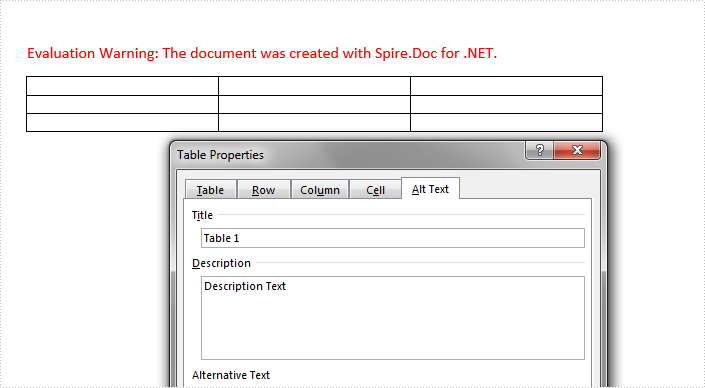
Alternative text (alt text) can help people with screen readers understand the content of our table. This article is going to demonstrate how to add or get the alternative text of a table in a word document using Spire.Doc.
In Spire.Doc, we can set or get the alternative text of a table using the Table.Title and Table.TableDescription properties. The following example shows how to add alternative text to a table.
Detail steps:
Step 1: Instantiate a Document object and load a word document.
Document doc = new Document();
doc.LoadFromFile("Input.docx");
Step 2: Get the first section.
Section section = doc.Sections[0];
Step 3: Get the first table in the section.
Table table = section.Tables[0] as Table;
Step 4: Add alt text to the table.
//Add title
table.Title = "Table 1";
//Add description
table.TableDescription = "Description Text";
Step 5: Save the document.
doc.SaveToFile("output.docx", FileFormat.Docx2013);
Screenshot:
Full code:
using Spire.Doc;

namespace Add_Alt_Text_To_Word_Table
{
    class Program
    {
        static void Main(string[] args)
        {
            //Instantiate a Document object
            Document doc = new Document();
            //Load a word document
            doc.LoadFromFile("Input.docx");

            //Get the first section
            Section section = doc.Sections[0];

            //Get the first table in the section
            Table table = section.Tables[0] as Table;

            //Add alt text

            //Add tile
            table.Title = "Table 1";
            //Add description
            table.TableDescription = "Description Text";

            //Save the document
            doc.SaveToFile("output.docx", FileFormat.Docx2013);
        }
    }
}
A nested table is one table placed inside of another, where the larger table functions as a container for the smaller one. Nested tables allow you to arrange different sets of data in groups to show clients.
This article presents how we can create a nested table using Spire.Doc in C#.
Step 1: Create a new PDF document and add a section to it.
Document doc = new Document();
Section section = doc.AddSection();
Step 2: Add a table to the section.
Table table = section.AddTable(true);
table.ResetCells(2, 3);
Step 3: Adjust the column with.
table.Rows[0].Cells[0].Width = table.Rows[0].Cells[2].Width = 50F;
table.Rows[1].Cells[0].Width = table.Rows[1].Cells[2].Width = 50F;
table.AutoFitBehavior(AutoFitBehaviorType.wdAutoFitWindow);
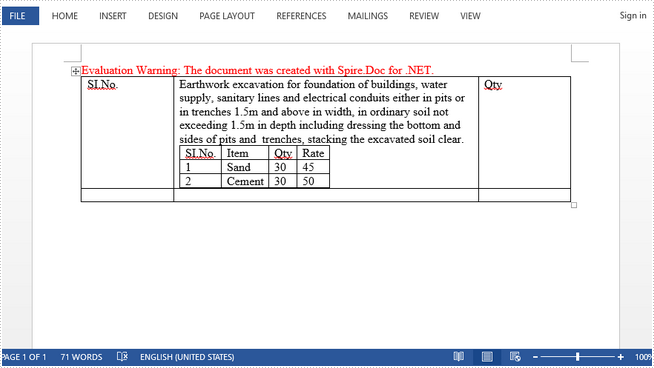
Step 4: Insert content to the cells of the table.
table[0, 0].AddParagraph().AppendText("SI.No.");
string text = "Earthwork excavation for foundation of buildings, water supply, "
             + "sanitary lines and electrical conduits either in pits or in "
             + "trenches 1.5m and above in width, in ordinary soil not exceeding "
             + "1.5m in depth including dressing the bottom and sides of pits and  "
             + "trenches, stacking the excavated soil clear.";
table[0, 1].AddParagraph().AppendText(text);
table[0, 2].AddParagraph().AppendText("Qty");
Step 5: Insert a nested table to the cell (first row, second column).
Table nestedTable= table[0, 1].AddTable(true);
nestedTable.ResetCells(3, 4);
nestedTable.AutoFitBehavior(AutoFitBehaviorType.wdAutoFitContents);
Step 6: Add content to nested cells.
nestedTable[0, 0].AddParagraph().AppendText("SI.No.");
nestedTable[0, 1].AddParagraph().AppendText("Item");
nestedTable[0, 2].AddParagraph().AppendText("Qty");
nestedTable[0, 3].AddParagraph().AppendText("Rate");
nestedTable[1, 0].AddParagraph().AppendText("1");
nestedTable[1, 1].AddParagraph().AppendText("Sand");
nestedTable[1, 2].AddParagraph().AppendText("30");
nestedTable[1, 3].AddParagraph().AppendText("45");
nestedTable[2, 0].AddParagraph().AppendText("2");
nestedTable[2, 1].AddParagraph().AppendText("Cement");
nestedTable[2, 2].AddParagraph().AppendText("30");
nestedTable[2, 3].AddParagraph().AppendText("50");
Step 7: Save the file.
doc.SaveToFile("Nested_Table.docx", FileFormat.Docx2013);
Output:
Full Code:
//create a new pdf document
Document doc = new Document();
Section section = doc.AddSection();

//add a table
Table table = section.AddTable(true);
table.ResetCells(2, 3);

//set column width
table.Rows[0].Cells[0].Width = table.Rows[0].Cells[2].Width = 50F;
table.Rows[1].Cells[0].Width = table.Rows[1].Cells[2].Width = 50F;
table.AutoFitBehavior(AutoFitBehaviorType.wdAutoFitWindow);

//insert content to cells
table[0, 0].AddParagraph().AppendText("SI.No.");
string text = "Earthwork excavation for foundation of buildings, water supply, "
             + "sanitary lines and electrical conduits either in pits or in "
             + "trenches 1.5m and above in width, in ordinary soil not exceeding "
             + "1.5m in depth including dressing the bottom and sides of pits and  "
             + "trenches, stacking the excavated soil clear.";
table[0, 1].AddParagraph().AppendText(text);
table[0, 2].AddParagraph().AppendText("Qty");

//add a nested table to cell(first row, second column)
Table nestedTable= table[0, 1].AddTable(true);
nestedTable.ResetCells(3, 4);
nestedTable.AutoFitBehavior(AutoFitBehaviorType.wdAutoFitContents);

//add content to nested cells
nestedTable[0, 0].AddParagraph().AppendText("SI.No.");
nestedTable[0, 1].AddParagraph().AppendText("Item");
nestedTable[0, 2].AddParagraph().AppendText("Qty");
nestedTable[0, 3].AddParagraph().AppendText("Rate");
nestedTable[1, 0].AddParagraph().AppendText("1");
nestedTable[1, 1].AddParagraph().AppendText("Sand");
nestedTable[1, 2].AddParagraph().AppendText("30");
nestedTable[1, 3].AddParagraph().AppendText("45");
nestedTable[2, 0].AddParagraph().AppendText("2");
nestedTable[2, 1].AddParagraph().AppendText("Cement");
nestedTable[2, 2].AddParagraph().AppendText("30");
nestedTable[2, 3].AddParagraph().AppendText("50");

//save
doc.SaveToFile("Nested_Table.docx", FileFormat.Docx2013);
How to Delete Rows and Columns from a Word Table in C#, VB.NET
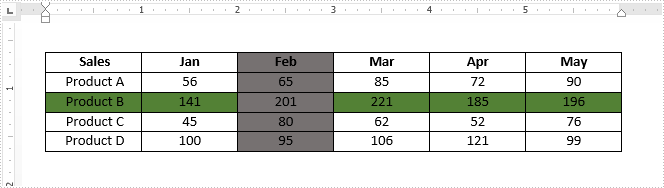
2016-12-22 09:23:02 Written by support iceblueAdding rows and columns are common tasks in Word table processing, on the contrary, sometimes we also have the requirement of deleting rows or columns from a table. This article demonstrates how to delete a row and a column from an existing Word table using Spire.Doc.
Below is the screenshot of the original table. Afterwards, we will remove the colored row and column from the table.
Detail steps:
Step 1: Instantiate a Document object and load the Word document.
Document doc = new Document();
doc.LoadFromFile("Sample.docx");
Step 2: Get the table from the document.
Table table = doc.Sections[0].Tables[0] as Table;
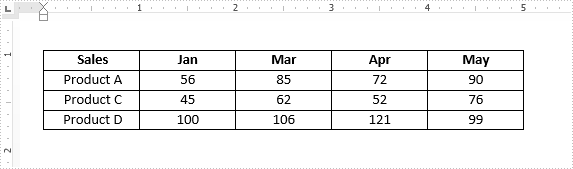
Step 3: Delete the third row from the table.
table.Rows.RemoveAt(2);
Step 4: Delete the third column from the table.
for (int i = 0; i < table.Rows.Count; i++)
{
    table.Rows[i].Cells.RemoveAt(2);
}
Step 5: Save the document.
doc.SaveToFile("result.docx",FileFormat.docx2013);
Output:
Full code:
using Spire.Doc;

namespace Delete_Rows_and_Columns
{
    class Program
    {
        static void Main(string[] args)
        {
            Document doc = new Document();
            doc.LoadFromFile("Sample.docx");
            Table table = doc.Sections[0].Tables[0] as Table;
            table.Rows.RemoveAt(2);
            for (int i = 0; i < table.Rows.Count; i++)
            {
                table.Rows[i].Cells.RemoveAt(2);
            }
            doc.SaveToFile("result.docx",FileFormat.docx2013);
        }
    }
}
Imports Spire.Doc

Namespace Delete_Rows_and_Columns
	Class Program
		Private Shared Sub Main(args As String())
			Dim doc As New Document()
			doc.LoadFromFile("Sample.docx")
			Dim table As Table = TryCast(doc.Sections(0).Tables(0), Table)
			table.Rows.RemoveAt(2)
			For i As Integer = 0 To table.Rows.Count - 1
				table.Rows(i).Cells.RemoveAt(2)
			Next
			doc.SaveToFile("result.docx",FileFormat.docx2013);
		End Sub
	End Class
End Namespace
C#/VB.NET: Insert or Extract Images from Tables in Word
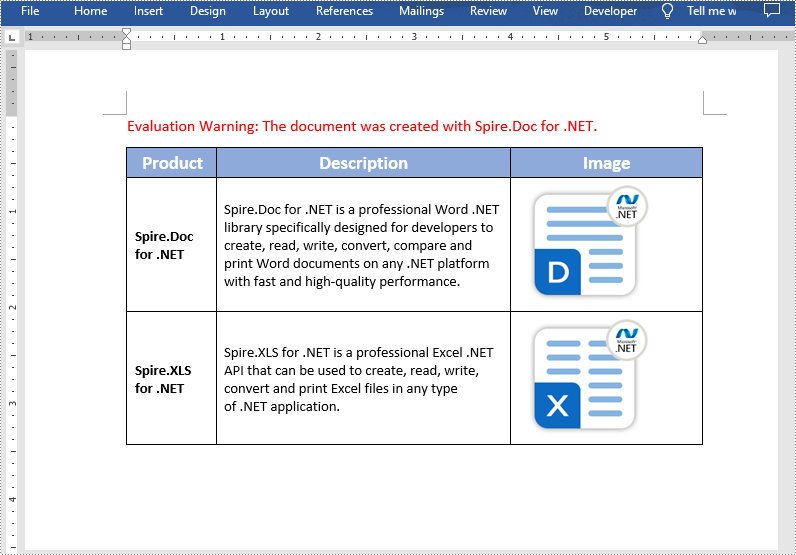
2023-01-06 01:25:00 Written by support iceblueA table in Microsoft Word can contain a variety of elements, including text, images, and many more. Sometimes, you may want to insert images into a table to present some information or extract images from a table for use in other documents. This article will teach you how to insert or extract images from tables in Word documents in C# and VB.NET using Spire.Doc for .NET.
Install Spire.Doc for .NET
To begin with, you need to add the DLL files included in the Spire.Doc for.NET package as references in your .NET project. The DLL files can be either downloaded from this link or installed via NuGet.
PM> Install-Package Spire.Doc
Insert Images into a Table in a Word Document in C# and VB.NET
Spire.Doc provides the TableCell.Paragraphs[int].AppendPicture() method which enables you to add an image to a specific table cell. The detailed steps are as follows:
- Initialize an instance of the Document class.
- Load a Word document using Document.LoadFromFile() method.
- Get a specific section in the document by its index through Document.Sections[int] property.
- Get a specific table in the section by its index through Section.Tables[int] property.
- Access a specific cell to which you want to add an image through Table.Row[int].Cells[int] property.
- Add an image to a specific paragraph of the cell using TableCell.Paragraphs[int].AppendPicture() method.
- Set image width and height through DocPicture.Width and DocPicture.Height properties.
- Save the result document using Document.SaveToFile() method.
- C#
- VB.NET
using Spire.Doc;
using Spire.Doc.Fields;
using System.Drawing;

namespace InsertImagesIntoTable
{
    class Program
    {
        static void Main(string[] args)
        {
            //Initialize an instance of the Document class
            Document doc = new Document();
            //Load a Word document
            doc.LoadFromFile("Table.docx");

            //Get the first section of the document
            Section section = doc.Sections[0];

            //Get the first table from the first section
            Table table = (Table)section.Tables[0];

            //Add an image to the 3rd cell of the second row in the table
            TableCell cell = table.Rows[1].Cells[2];
            DocPicture picture = cell.Paragraphs[0].AppendPicture(Image.FromFile("doc.png"));
            //Set image width and height
            picture.Width = 100;
            picture.Height = 100;
            //Add an image to the 3rd cell of the 3rd row in the table
            cell = table.Rows[2].Cells[2];
            picture = cell.Paragraphs[0].AppendPicture(Image.FromFile("xls.png"));
            //Set image width and height
            picture.Width = 100;
            picture.Height = 100;

            //Save the result document
            doc.SaveToFile("AddImageToTable.docx", FileFormat.Docx2013);
        }
    }
}
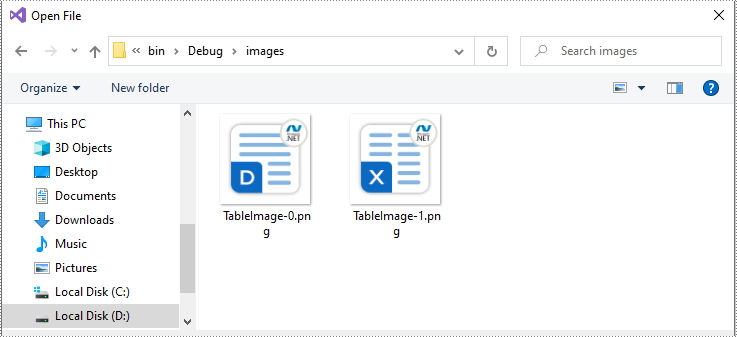
Extract Images from a Table in a Word Document in C# and VB.NET
To extract images from a table, you need to iterate through all rows in the tale, all cells in each row, all paragraphs in each cell and all child objects in each paragraph, then find the objects that are of DocPicture type and call DocPicture.Image.Save() method to save them to a specified file path. The detailed steps are as follows:
- Initialize an instance of the Document class.
- Load a Word document using Document.LoadFromFile() method.
- Get a specific section in the document by its index through Document.Sections[int] property.
- Get a specific table in the section by its index through Section.Tables[int] property.
- Iterate through all rows in the table.
- Iterate through all cells in each row.
- Iterate through all paragraphs in each cell.
- Iterate through all child objects in each paragraph.
- Check if the current child object is of DocPicture type.
- If the result is true, typecast the object as DocPicture and call DocPicture.Image.Save() method to save the image to a specified file path.
- C#
- VB.NET
using Spire.Doc;
using Spire.Doc.Documents;
using Spire.Doc.Fields;
using System;
using System.Drawing.Imaging;

namespace ExtractImagesFromTable
{
    class Program
    {
        static void Main(string[] args)
        {
            //Initialize an instance of the Document class
            Document doc = new Document();
            //Load a Word document
            doc.LoadFromFile("AddImageToTable.docx");

            //Get the first section of the document
            Section section = doc.Sections[0];

            //Get the first table from the first section
            Table table = (Table)section.Tables[0];

            int index = 0;
            string imageName = null;

            //Iterate through all rows in the table
            for (int i = 0; i < table.Rows.Count; i++)
            {
                //Iterate through all cells in each row
                for (int j = 0; j < table.Rows[i].Cells.Count; j++)
                {
                    //Iterate through all paragraphs in each cell
                    foreach (Paragraph para in table[i, j].Paragraphs)
                    {
                        //Iterate through all child objects in each paragraph
                        foreach (DocumentObject obj in para.ChildObjects)
                        {
                            //Check if the current child object is of DocPicture type
                            if (obj is DocPicture)
                            {
                                //Save the images to a specified file path
                                imageName = string.Format(@"images\TableImage-{0}.png", index);
                                (obj as DocPicture).Image.Save(imageName, ImageFormat.Png);
                                index++;
                            }
                        }
                    }
                }
            }
        }
    }
}
Apply for a Temporary License
If you'd like to remove the evaluation message from the generated documents, or to get rid of the function limitations, please request a 30-day trial license for yourself.
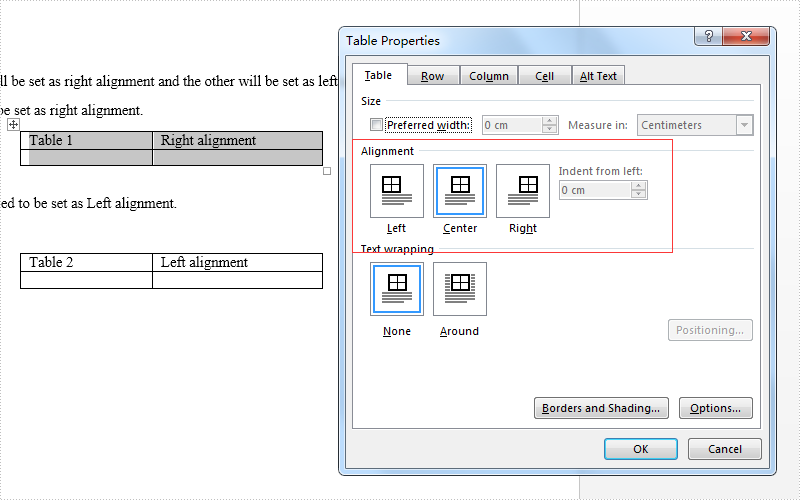
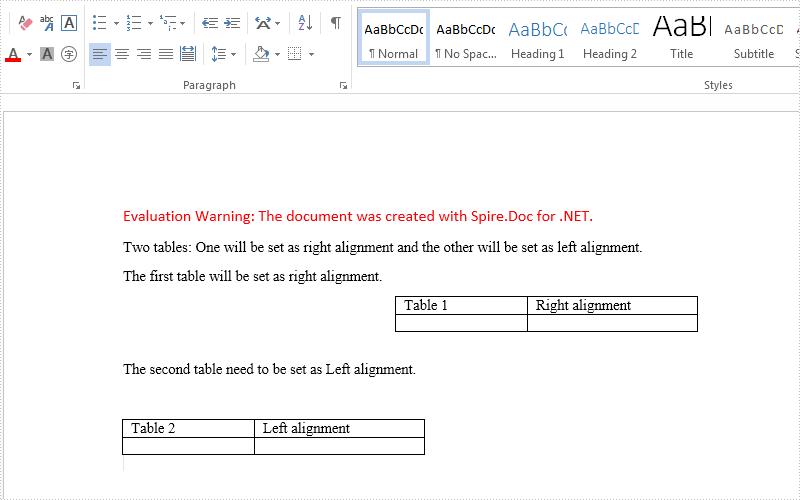
Usually there are three kinds of alignment style for a word table: left aligned, centered and right aligned. On Microsoft word, we can go to table properties to set the alignment for the whole table. Spire.Doc also offers a property table.TableFormat.HorizontalAlignment to enable developers to set the table alignment style easily in C#. This article will demonstrate how to align a table in C#.
Firstly, view the how to align a table for Microsoft word:
Here come to the code snippet of how Spire.Doc align a table.
Step 1: Create a word document and load from file.
Document doc = new Document();
doc.LoadFromFile("sample.docx");
Step 2: Get the first section and two tables from the word document.
Section section = doc.Sections[0];
Table table = section.Tables[0] as Table;
Table table1 = section.Tables[1] as Table;
Step 3: Set the different alignment properties for each table.
table.TableFormat.HorizontalAlignment = RowAlignment.Right;
table.TableFormat.LeftIndent = 34;

table1.TableFormat.HorizontalAlignment = RowAlignment.Left;
table1.TableFormat.LeftIndent = 34;
Step 4: Save the document to file:
doc.SaveToFile("result.docx", FileFormat.Docx);
Effective screenshots after align the table format:
Full codes:
using Spire.Doc;
using Spire.Doc.Documents;
namespace AlignTable
{
    class Program
    {

        static void Main(string[] args)
        {

            Document doc = new Document();
            doc.LoadFromFile("sample.docx");

            Section section = doc.Sections[0];
            Table table = section.Tables[0] as Table;
            Table table1 = section.Tables[1] as Table;

            table.TableFormat.HorizontalAlignment = RowAlignment.Right;
            table.TableFormat.LeftIndent = 34;

            table1.TableFormat.HorizontalAlignment = RowAlignment.Left;
            table1.TableFormat.LeftIndent = 34;

            doc.SaveToFile("result.docx", FileFormat.Docx);
        }
    }
}
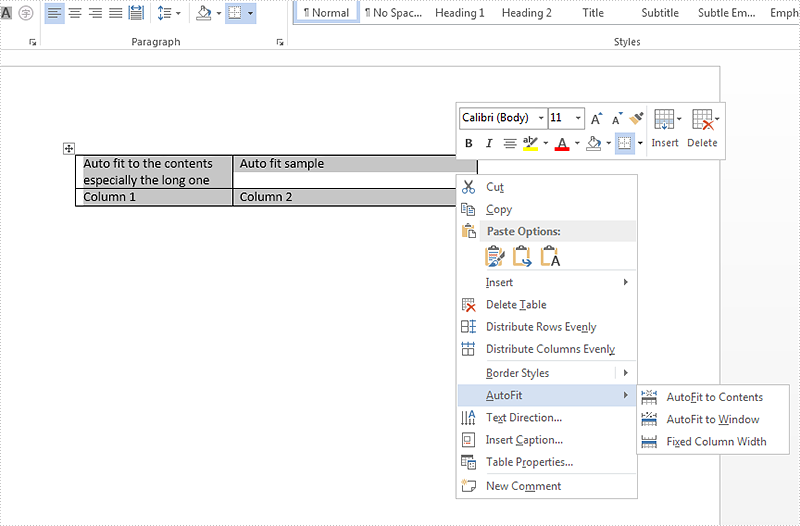
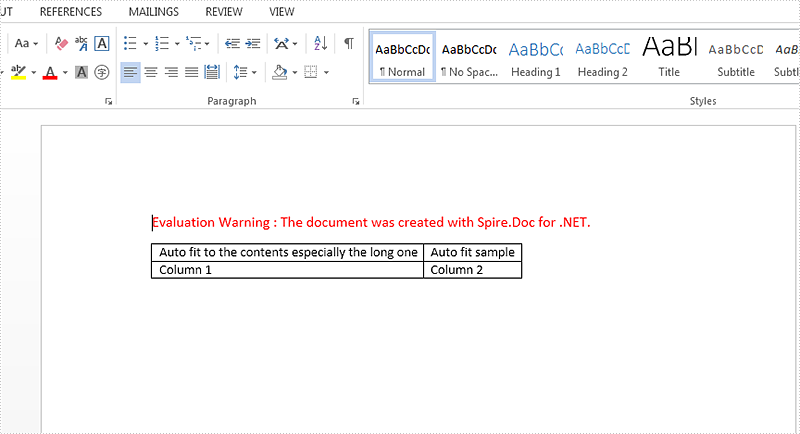
When the contents in the word table are with the different length, the cell height of the word table will be changed and the whole table looks untidy. Microsoft Word offers AutoFit option to enable users to size a table automatically to make the word table looks beautiful. Spire.Doc also offers a method table.AutoFit() to make the AutoFit feature works well in C# for word table. This article will show you how to set the auto fit option in C# by using Spire.Doc.
Firstly, please view the Microsoft word's AutoFit feature.
View the code snippets of how to set the AutoFit option for Sprie.Doc.
Step 1: Create a word document and load from file.
Document doc = new Document();
doc.LoadFromFile("sample.docx");
Step 2: Get the first section and the first table from the word document.
Section section = doc.Sections[0];
Table table1 = section.Tables[0] as Table;
Step 3: Call the method AutoFit() to set the rule of the AutoFit option.
table1.AutoFit(AutoFitBehaviorType.AutoFitToContents);
Step 4: Save the document to file:
doc.SaveToFile("result.docx", FileFormat.Docx);
Effective screenshot:
Full codes:
using Spire.Doc;
namespace SetAutofit
{
    class Program
    {

        static void Main(string[] args)
        {

            Document doc = new Document();
            doc.LoadFromFile("sample.docx");

            Section section = doc.Sections[0];
            Table table1 = section.Tables[0] as Table;

            table1.AutoFit(AutoFitBehaviorType.AutoFitToContents);

            doc.SaveToFile("result.docx", FileFormat.Docx);
        }
    }
}
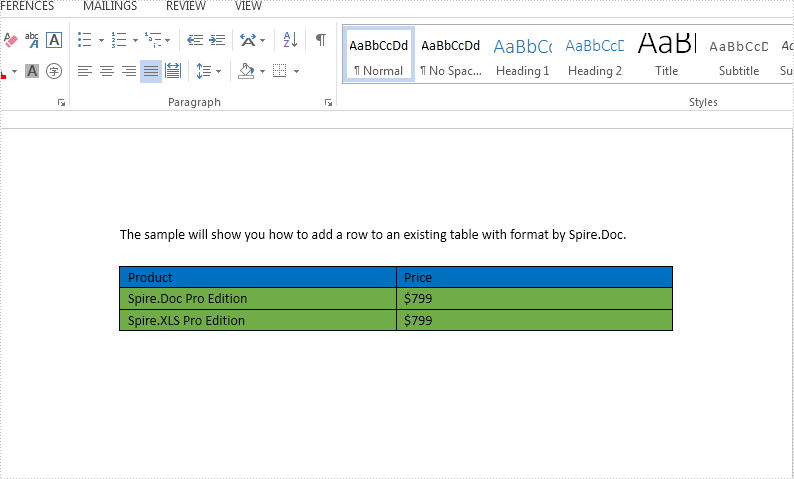
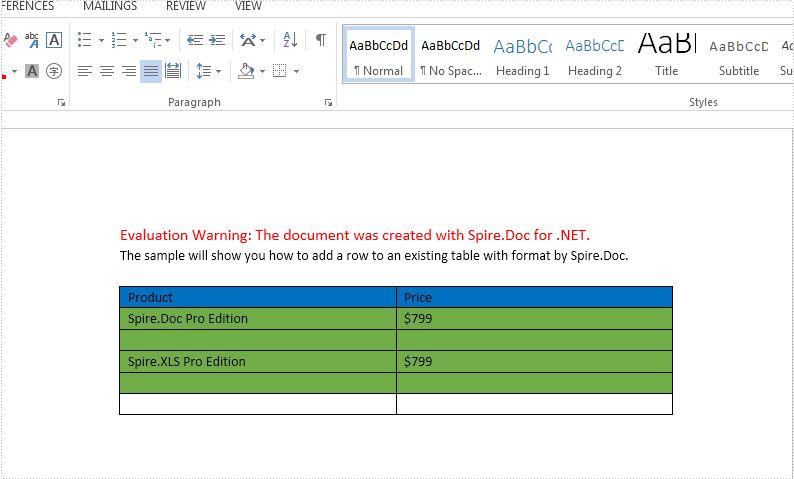
With the help of Spire.Doc, developers can easily add new table to the word document in C# and VB.NET. Spire.Doc offers a method of table.AddRow() to enable developers to insert the new rows easily with styles or not at the bottom of the table. It also offers a method of table.Rows.Insert(int index, TableRow row) to enable developers to insert a new row at any index as we want. This article will focus on demonstrating how to add new rows to an existing word table in C#.
Firstly, please view the original word table:
Note: Before Start, please download the latest version of Spire.Doc and add Spire.Doc.dll in the bin folder as the reference of Visual Studio.
Step 1: Create a new word document and load the document from file.
Document doc = new Document();
doc.LoadFromFile("sample.docx");
Step 2: Get the first table from the word document.
Table table = doc.Sections[0].Tables[0] as Spire.Doc.Table;
Step 3: Insert a new row as the third row.
TableRow row = table.AddRow();
table.Rows.Insert(2, row);
Step 4: Add two rows to the table at the end, one with format, the other one without format.
table.AddRow(true,2);
table.AddRow(false, 2);
Step 5: Save the document to file and set its file format.
doc.SaveToFile("Result.docx",FileFormat.Docx2013);
Effective screenshot after adding rows to the word table:
Full codes:
using Spire.Doc;
namespace AddRow
{
    class Program
    {

        static void Main(string[] args)
        {

            Document doc = new Document();
            doc.LoadFromFile("sample.docx");
            Table table = doc.Sections[0].Tables[0] as Spire.Doc.Table;

            //Insert a new row as the third row
            TableRow row = table.AddRow();
            table.Rows.Insert(2, row);

            //Add two rows at the end of the table
            table.AddRow(true, 2);
            table.AddRow(false, 2);

            doc.SaveToFile("Result.docx", FileFormat.Docx2013);
        }
    }
}
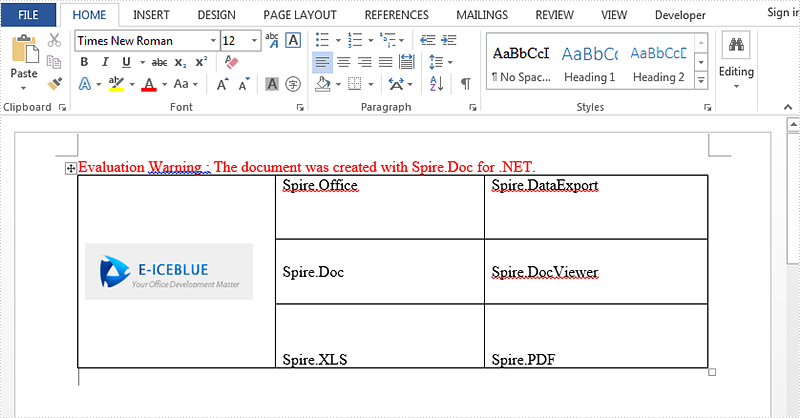
How to set Vertical Alignment for table in Word via Spire.Doc
2015-06-11 08:37:29 Written by support iceblueSet vertical alignment for table can show contents in different positions. There are three options including Top, Bottom, Middle. Default is Middle. This article talk about how to set vertical alignment for tables via Spire.Doc, the following is the detailed steps:
Step 1: Create a new Word document and add a new section.
Document document = new Document();
Section section = document.AddSection();
Step 2: Add a table with 3 columns and 3 rows. You can set showBoder property as true when you creating the table. Merge the first column as one cell.
Table table = section.AddTable(true);
table.ResetCells(3, 3);
table.ApplyVerticalMerge(0, 0, 2);
Step 3: Set the vertical alignment for each cell, default is top. Here we set the first row as Top, second row as Middle, third row as Bottom.
table.Rows[0].Cells[0].CellFormat.VerticalAlignment = VerticalAlignment.Middle;
table.Rows[0].Cells[1].CellFormat.VerticalAlignment = VerticalAlignment.Top;
table.Rows[0].Cells[2].CellFormat.VerticalAlignment = VerticalAlignment.Top;
table.Rows[1].Cells[1].CellFormat.VerticalAlignment = VerticalAlignment.Middle;
table.Rows[1].Cells[2].CellFormat.VerticalAlignment = VerticalAlignment.Middle;
table.Rows[2].Cells[1].CellFormat.VerticalAlignment = VerticalAlignment.Bottom;
table.Rows[2].Cells[2].CellFormat.VerticalAlignment = VerticalAlignment.Bottom;
Step 4: Append data to table.
Paragraph paraPic = table.Rows[0].Cells[0].AddParagraph();
DocPicture pic = paraPic.AppendPicture(Image.FromFile("1.png"));

String[][] data = {
                       new string[] {"","Spire.Office","Spire.DataExport"},
                       new string[] {"","Spire.Doc","Spire.DocViewer"},
                       new string[] {"","Spire.XLS","Spire.PDF"}
                            };

      for (int r = 0; r < 3; r++)
      {
        TableRow dataRow = table.Rows[r];
        dataRow.Height = 50;
        for (int c = 0; c < 3; c++)
           {
             if (c == 1)
               {
                  Paragraph par = dataRow.Cells[c].AddParagraph();
                  par.AppendText(data[r][c]);
                  dataRow.Cells[c].Width = (section.PageSetup.ClientWidth) / 2;
                }
             if (c == 2)
                {
                  Paragraph par = dataRow.Cells[c].AddParagraph();
                  par.AppendText(data[r][c]);
                  dataRow.Cells[c].Width = (section.PageSetup.ClientWidth) / 2;
                 }
              }
         }
Step 5: Save and review.
document.SaveToFile(@"result.docx", FileFormat.Docx2013);
System.Diagnostics.Process.Start(@"result.docx");
Result screenshot:
Full code:
using Spire.Doc;
using Spire.Doc.Documents;
using Spire.Doc.Fields;
using System;
using System.Drawing;
namespace SetVerticalAlignment
{
    class Program
    {

        static void Main(string[] args)
        {

            Document document = new Document();
            Section section = document.AddSection();

            Table table = section.AddTable(true);
            table.ResetCells(3, 3);

            table.ApplyVerticalMerge(0, 0, 2);

            table.Rows[0].Cells[0].CellFormat.VerticalAlignment = VerticalAlignment.Middle;
            table.Rows[0].Cells[1].CellFormat.VerticalAlignment = VerticalAlignment.Top;
            table.Rows[0].Cells[2].CellFormat.VerticalAlignment = VerticalAlignment.Top;
            table.Rows[1].Cells[1].CellFormat.VerticalAlignment = VerticalAlignment.Middle;
            table.Rows[1].Cells[2].CellFormat.VerticalAlignment = VerticalAlignment.Middle;
            table.Rows[2].Cells[1].CellFormat.VerticalAlignment = VerticalAlignment.Bottom;
            table.Rows[2].Cells[2].CellFormat.VerticalAlignment = VerticalAlignment.Bottom;

            Paragraph paraPic = table.Rows[0].Cells[0].AddParagraph();
            DocPicture pic = paraPic.AppendPicture(Image.FromFile("1.png"));

            String[][] data = {
                       new string[] {"","Spire.Office","Spire.DataExport"},
                       new string[] {"","Spire.Doc","Spire.DocViewer"},
                       new string[] {"","Spire.XLS","Spire.PDF"}
                            };

            for (int r = 0; r < 3; r++)
            {
                TableRow dataRow = table.Rows[r];
                dataRow.Height = 50;
                for (int c = 0; c < 3; c++)
                {
                    if (c == 1)
                    {
                        Paragraph par = dataRow.Cells[c].AddParagraph();
                        par.AppendText(data[r][c]);
                        dataRow.Cells[c].Width = (section.PageSetup.ClientWidth) / 2;
                    }
                    if (c == 2)
                    {
                        Paragraph par = dataRow.Cells[c].AddParagraph();
                        par.AppendText(data[r][c]);
                        dataRow.Cells[c].Width = (section.PageSetup.ClientWidth) / 2;
                    }
                }
            }
            document.SaveToFile(@"result.docx", FileFormat.Docx2013);
            System.Diagnostics.Process.Start(@"result.docx");
        }
    }
}
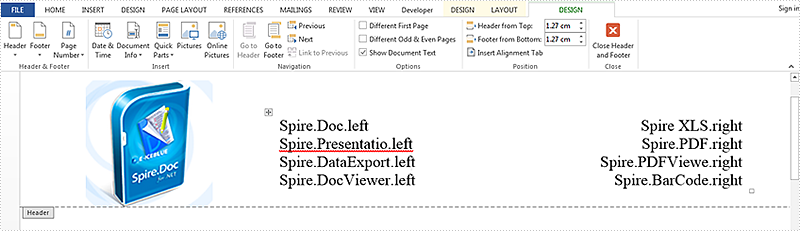
Set position of table in Word Document as outside via Spire.Doc
2015-05-22 08:57:03 Written by support iceblueTable in word document can make your data more logical and uncluttered, this article is talk about set absolute position of table in word document via Spire.Doc. Here try to realize placing a table on the right of an image on header.
Here are the steps:
Step 1: Create a new word document and add new section.
Document doc = new Document();
Section sec = doc.AddSection();
Step 2: Create header on Section[0].
HeaderFooter header = doc.Sections[0].HeadersFooters.Header;
Step 3: Add new paragraph on header and set HorizontalAlignment of the paragraph as left.
Paragraph paragraph = header.AddParagraph();
paragraph.Format.HorizontalAlignment = HorizontalAlignment.Left;
Step 4: Load an image for the paragraph.
DocPicture headerimage = paragraph.AppendPicture(Image.FromFile(@"1.png"));
Step 5: Add a table of 4 rows and 2 columns.
Table table = header.AddTable();
table.ResetCells(4, 2);
Step 6: Set the position of the table to the right of the image. Set WrapTextAround is true, HorizPositionAbs is outside, VertRelationTo is margin, and VertPosition is 43 to fit the height of the image.
table.TableFormat.WrapTextAround = true;
table.TableFormat.Positioning.HorizPositionAbs = HorizontalPosition.Outside;
table.TableFormat.Positioning.VertRelationTo = VerticalRelation.Margin;
table.TableFormat.Positioning.VertPosition = 43;
Step 7: Then add contents for the table, first column alignment set as left ,second column alignment set as right.
String[][] data = {
                    new string[] {"Spire.Doc.left","Spire XLS.right"},
                    new string[] {"Spire.Presentatio.left","Spire.PDF.right"},
                    new string[] {"Spire.DataExport.left","Spire.PDFViewe.right"},
                    new string []{"Spire.DocViewer.left","Spire.BarCode.right"}
                              };

            for (int r = 0; r < 4; r++)
            {
                TableRow dataRow = table.Rows[r];
                for (int c = 0; c < 2; c++)
                {
                    if (c == 0)
                    {
                        Paragraph par = dataRow.Cells[c].AddParagraph();
                        par.AppendText(data[r][c]);
                        par.Format.HorizontalAlignment = HorizontalAlignment.Left;
                        dataRow.Cells[c].Width = 180;
                    }
                    else
                    {
                        Paragraph par = dataRow.Cells[c].AddParagraph();
                        par.AppendText(data[r][c]);
                        par.Format.HorizontalAlignment = HorizontalAlignment.Right;
                        dataRow.Cells[c].Width = 180;
                    }
                }
            }
Step 8: Save the file and review it.
doc.SaveToFile("result.docx", FileFormat.Docx);
System.Diagnostics.Process.Start("result.docx");
Here is the screenshot:
Full Code:
using Spire.Doc;
using Spire.Doc.Documents;
using Spire.Doc.Fields;
using System;
using System.Drawing;
namespace SetPosition
{
    class Program
    {

        static void Main(string[] args)
        {

            Document doc = new Document();
            Section sec = doc.AddSection();

            HeaderFooter header = doc.Sections[0].HeadersFooters.Header;

            Paragraph paragraph = header.AddParagraph();
            paragraph.Format.HorizontalAlignment = HorizontalAlignment.Left;
            DocPicture headerimage = paragraph.AppendPicture(Image.FromFile(@"1.png"));

            Table table = header.AddTable();
            table.ResetCells(4, 2);

            table.TableFormat.WrapTextAround = true;
            table.TableFormat.Positioning.HorizPositionAbs = HorizontalPosition.Outside;
            table.TableFormat.Positioning.VertRelationTo = VerticalRelation.Margin;
            table.TableFormat.Positioning.VertPosition = 43;


            String[][] data = {
                    new string[] {"Spire.Doc.left","Spire XLS.right"},
                    new string[] {"Spire.Presentatio.left","Spire.PDF.right"},
                    new string[] {"Spire.DataExport.left","Spire.PDFViewe.right"},
                    new string []{"Spire.DocViewer.left","Spire.BarCode.right"}
                              };

            for (int r = 0; r < 4; r++)
            {
                TableRow dataRow = table.Rows[r];
                for (int c = 0; c < 2; c++)
                {
                    if (c == 0)
                    {
                        Paragraph par = dataRow.Cells[c].AddParagraph();
                        par.AppendText(data[r][c]);
                        par.Format.HorizontalAlignment = HorizontalAlignment.Left;
                        dataRow.Cells[c].Width = 180;
                    }
                    else
                    {
                        Paragraph par = dataRow.Cells[c].AddParagraph();
                        par.AppendText(data[r][c]);
                        par.Format.HorizontalAlignment = HorizontalAlignment.Right;
                        dataRow.Cells[c].Width = 180;
                    }
                }
            }
            doc.SaveToFile("result.docx",Spire.Doc.FileFormat.Docx);
            System.Diagnostics.Process.Start("result.docx");
        }
    }
}
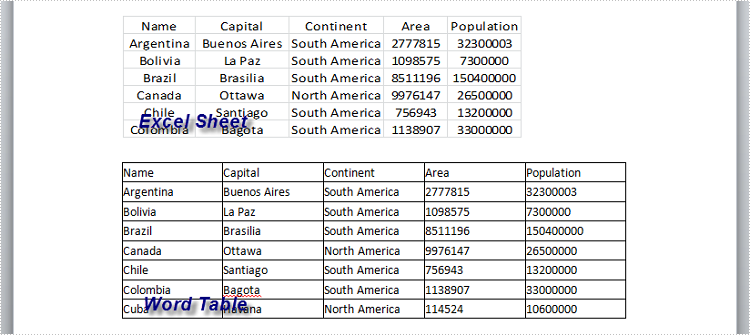
How to Convert Embedded Excel Sheet to Word Table in C#, VB.NET
2015-02-11 01:04:49 Written by support iceblueIn our daily work, we may receive Word documents that will sometimes contain embedded Excel object (sheet) and we need to convert embedded Excel sheet to Word table so that we can easily change the date or format the table with style. In this article, you will learn how to convert embedded Excel sheet to Word table using Spire.Doc and Spire.XLS in C#, VB.NET.
Firstly, you need to download Spire.Office because Spire.Doc and Spire.XLS will be used in the same program. Add Spire.Doc.dll and Spire.XLS.dll as references in your VS project. Then follow the program guidance below to finish this work.
Step 1: Create a new Word document, load the sample file. Get the paragraph that contains the Excel object from the section. Initialize a new datatable.
Document doc = new Document("Sample.docx", Spire.Doc.FileFormat.Docx2010);
Section section = doc.Sections[0];
Paragraph para = section.Paragraphs[2];
DataTable dt = new DataTable();
Step 2: Traverse every DocumentObject in the paragraph, use IF statement to test if DocumentObject is OLE object, use another IF statement to test if OLE object type is Excel.Sheet.12. If yes, save the data of OLE object to a workbook through LoadFromStrem(). Then export data from worksheet to datatable.
foreach (DocumentObject obj in para.ChildObjects)
{
    if (DocumentObjectType.OleObject == obj.DocumentObjectType)
    {
        DocOleObject dObj = obj as DocOleObject;
        if (dObj.ObjectType == "Excel.Sheet.12")
        {
            Workbook wb = new Workbook();
            wb.LoadFromStream(new MemoryStream(dObj.NativeData));
            Worksheet ws = wb.Worksheets[0];
            dt = ws.ExportDataTable(ws.AllocatedRange, false);
        }
    }
}
Step 3: Create a new Word table and set row number and column number according to rows and columns of datatable. Export data from datatable to Word table.
Table table = section.AddTable(true);
 table.ResetCells(dt.Rows.Count, dt.Columns.Count);

 for (int i = 0; i < dt.Rows.Count; i++)
 {
     for (int j = 0; j < dt.Columns.Count; j++)
     {
         string text = dt.Rows[i][j] as string;
         table.Rows[i].Cells[j].AddParagraph().AppendText(text);
     }
 }
Step 4: Save the file.
doc.SaveToFile("Result.docx", Spire.Doc.FileFormat.Docx2010);
Result:
Full Code:
using Spire.Doc;
using Spire.Doc.Documents;
using Spire.Doc.Fields;
using Spire.Xls;
using System.Data;
using System.IO;
namespace ApplyTableStyles
{
    class Program
    {

        static void Main(string[] args)
        {

            Document doc = new Document("Sample.docx", Spire.Doc.FileFormat.Docx2010);
            Section section = doc.Sections[0];
            Paragraph para = section.Paragraphs[2];
            DataTable dt = new DataTable();

            foreach (DocumentObject obj in para.ChildObjects)
            {
                if (DocumentObjectType.OleObject == obj.DocumentObjectType)
                {
                    DocOleObject dObj = obj as DocOleObject;
                    if (dObj.ObjectType == "Excel.Sheet.12")
                    {
                        Workbook wb = new Workbook();
                        wb.LoadFromStream(new MemoryStream(dObj.NativeData));
                        Worksheet ws = wb.Worksheets[0];
                        dt = ws.ExportDataTable(ws.AllocatedRange, false);
                    }
                }
            }

            Table table = section.AddTable(true);
            table.ResetCells(dt.Rows.Count, dt.Columns.Count);

            for (int i = 0; i < dt.Rows.Count; i++)
            {
                for (int j = 0; j < dt.Columns.Count; j++)
                {
                    string text = dt.Rows[i][j] as string;
                    table.Rows[i].Cells[j].AddParagraph().AppendText(text);
                }
            }

            doc.SaveToFile("Result.docx", Spire.Doc.FileFormat.Docx2010);
        }
    }
}
Imports Spire.Doc
Imports Spire.Doc.Documents
Imports Spire.Doc.Fields
Imports Spire.Xls
Imports System.Data
Imports System.IO
Namespace ApplyTableStyles
	Class Program

		Private Shared Sub Main(args As String())

			Dim doc As New Document("Sample.docx", Spire.Doc.FileFormat.Docx2010)
			Dim section As Section = doc.Sections(0)
			Dim para As Paragraph = section.Paragraphs(2)
			Dim dt As New DataTable()

			For Each obj As DocumentObject In para.ChildObjects
				If DocumentObjectType.OleObject = obj.DocumentObjectType Then
					Dim dObj As DocOleObject = TryCast(obj, DocOleObject)
					If dObj.ObjectType = "Excel.Sheet.12" Then
						Dim wb As New Workbook()
						wb.LoadFromStream(New MemoryStream(dObj.NativeData))
						Dim ws As Worksheet = wb.Worksheets(0)
						dt = ws.ExportDataTable(ws.AllocatedRange, False)
					End If
				End If
			Next

			Dim table As Table = section.AddTable(True)
			table.ResetCells(dt.Rows.Count, dt.Columns.Count)

			For i As Integer = 0 To dt.Rows.Count - 1
				For j As Integer = 0 To dt.Columns.Count - 1
					Dim text As String = TryCast(dt.Rows(i)(j), String)
					table.Rows(i).Cells(j).AddParagraph().AppendText(text)
				Next
			Next

			doc.SaveToFile("Result.docx", Spire.Doc.FileFormat.Docx2010)
		End Sub
	End Class
End Namespace
