
Page Setup (13)
Adding gutters on Word document pages can enhance the professionalism and aesthetics of the document. Gutters not only make the document appear neater and more organized but also serve as a guide when printing the document, making it easier for readers to navigate and browse through the content. By adding gutters on the document pages, you can simulate the common binding line effect found in physical documents, giving the document a more printed quality. This article will explain how to use Spire.Doc for .NET to add gutters on Word document pages within a C# project.
- Add a Gutter at the Top of a Word Document Page using C#
- Add a Gutter at the Left of a Word Document Page using C#
Install Spire.Doc for .NET
To begin with, you need to add the DLL files included in the Spire.Doc for .NET package as references in your .NET project. The DLL files can be either downloaded from this link or installed via NuGet.
PM> Install-Package Spire.Doc
Add a Gutter at the Top of a Word Document Page using C#
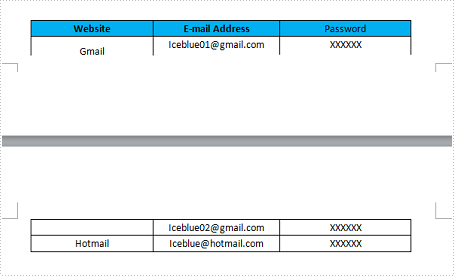
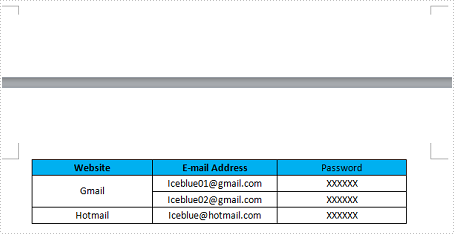
To enable the top gutter on a page, you can set the section.PageSetup.IsTopGutter = true. The default gutter area displays blank without content, and this example also includes how to add text within the gutter area. Here are the detailed steps:
- Create a Document object.
- Load a document using the Document.LoadFromFile() method.
- Iterate through all sections of the document using a for loop over the Document.Sections collection.
- Set Section.PageSetup.IsTopGutter to true to display the gutter at the top of the page.
- Use the Section.PageSetup.Gutter property to set the width of the gutter.
- Call the custom AddTopGutterText() method to add text to the gutter area.
- Save the document using the Document.SaveToFile() method.
- C#
using Spire.Doc;
using Spire.Doc.Documents;
using Spire.Doc.Fields;
using Spire.Doc.Formatting;
using System.Drawing;
using System.Text;

namespace SpireDocDemo
{
	internal class Program
	{
		static void Main(string[] args)
		{
			// Create a document object
			Document document = new Document();

			// Load the document
			document.LoadFromFile("Sample1.docx");

			// Iterate through all sections of the document
			for (int i = 0; i < document.Sections.Count; i++)
			{
				// Get the current section
				Section section = document.Sections[i];

				// Set whether to add a gutter at the top of the page to true
				section.PageSetup.IsTopGutter = true;

				// Set the width of the gutter to 100f
				section.PageSetup.Gutter = 100f;

				// Call a method to add text on the top gutter
				AddTopGutterText(section);
			}

			// Save the modified document to a file
			document.SaveToFile("Add Gutter Line at the Top of the Page.docx", FileFormat.Docx2016);

			// Release document resources
			document.Dispose();
		}
		// Method to add text on the top gutter
		static void AddTopGutterText(Section section)
		{
			// Get the header of the section
			HeaderFooter header = section.HeadersFooters.Header;

			// Set the width of the text box to the page width
			float width = section.PageSetup.PageSize.Width;

			// Set the height of the text box to 40
			float height = 40;

			// Add a text box in the header
			TextBox textBox = header.AddParagraph().AppendTextBox(width, height);

			// Set the text box without border
			textBox.Format.NoLine = true;

			// Set the vertical starting position of the text box to the top margin area
			textBox.VerticalOrigin = VerticalOrigin.TopMarginArea;

			// Set the vertical position of the text box
			textBox.VerticalPosition = 140;

			// Set the horizontal alignment of the text box to left
			textBox.HorizontalAlignment = ShapeHorizontalAlignment.Left;

			// Set the horizontal starting position of the text box to the left margin area
			textBox.HorizontalOrigin = HorizontalOrigin.LeftMarginArea;

			// Set the text anchor to bottom
			textBox.Format.TextAnchor = ShapeVerticalAlignment.Bottom;

			// Set the text wrapping style to in front of text
			textBox.Format.TextWrappingStyle = TextWrappingStyle.InFrontOfText;

			// Set the text wrapping type to both sides
			textBox.Format.TextWrappingType = TextWrappingType.Both;

			// Create a paragraph object
			Paragraph paragraph = new Paragraph(section.Document);

			// Set the paragraph to be horizontally centered
			paragraph.Format.HorizontalAlignment = HorizontalAlignment.Center;

			// Create a font object
			Font font = new Font("Times New Roman", 8);

			// Create a drawing object
			Graphics graphics = Graphics.FromImage(new Bitmap(1, 1));
			string text1 = " - ";
			SizeF size1 = graphics.MeasureString(text1, font);
			float textWidth1 = size1.Width / 96 * 72;
			int count = (int)(textBox.Width / textWidth1);
			StringBuilder stringBuilder = new StringBuilder();
			for (int i = 1; i < count; i++)
			{
				stringBuilder.Append(text1);
			}

			// Create a character format object
			CharacterFormat characterFormat = new CharacterFormat(section.Document);
			characterFormat.FontName = font.Name;
			characterFormat.FontSize = font.Size;
			TextRange textRange = paragraph.AppendText(stringBuilder.ToString());
			textRange.ApplyCharacterFormat(characterFormat);

			// Add the paragraph to the text box
			textBox.ChildObjects.Add(paragraph);
		}
	}
}

Add a Gutter at the Left of a Word Document Page using C#
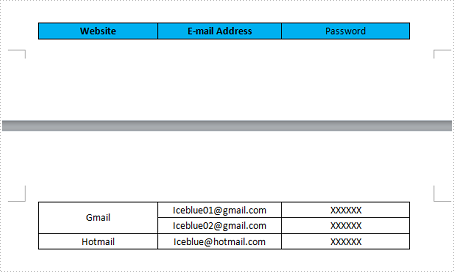
To set the left-side gutter on the page, ensure that you set the Section.PageSetup.IsTopGutter property to false. Here are the detailed steps:
- Create a Document object.
- Load a document using the Document.LoadFromFile() method.
- Iterate through all sections of the document using a for loop over the Document.Sections collection.
- Set Section.PageSetup.IsTopGutter to false to display the gutter on the left side of the page.
- Use the Section.PageSetup.Gutter property to set the width of the gutter.
- Call the custom AddLeftGutterText() method to add text to the gutter area.
- Save the document using the Document.SaveToFile() method.
- C#
using Spire.Doc;
using Spire.Doc.Documents;
using Spire.Doc.Fields;
using Spire.Doc.Formatting;
using System.Drawing;
using System.Text;

namespace SpireDocDemo
{
	internal class Program
	{
		static void Main(string[] args)
		{
			// Create a document object
			Document document = new Document();

			// Load the document
			document.LoadFromFile("Sample1.docx");

			// Iterate through all sections of the document
			for (int i = 0; i < document.Sections.Count; i++)
			{
				// Get the current section
				Section section = document.Sections[i];

				// Set whether to add a gutter at the top of the page to false, it will be added to the left side of the page
				section.PageSetup.IsTopGutter = false;

				// Set the width of the gutter to 100f
				section.PageSetup.Gutter = 100f;

				// Call a method to add text on the left gutter
				AddLeftGutterText(section);
			}

			// Save the modified document to a file
			document.SaveToFile("Add Gutter Line on the Left Side of the Page.docx", FileFormat.Docx2016);

			// Release document resources
			document.Dispose();
		}
		// Method to add text on the left gutter
		static void AddLeftGutterText(Section section)
		{
			// Get the header of the section
			HeaderFooter header = section.HeadersFooters.Header;

			// Set the width of the text box to 40
			float width = 40;

			// Get the page height
			float height = section.PageSetup.PageSize.Height;

			// Add a text box in the header
			TextBox textBox = header.AddParagraph().AppendTextBox(width, height);

			// Set the text box without border
			textBox.Format.NoLine = true;

			// Set the text direction in the text box from right to left
			textBox.Format.LayoutFlowAlt = TextDirection.RightToLeft;

			// Set the horizontal starting position of the text box
			textBox.HorizontalOrigin = HorizontalOrigin.LeftMarginArea;

			// Set the horizontal position of the text box
			textBox.HorizontalPosition = 140;

			// Set the vertical alignment of the text box to top
			textBox.VerticalAlignment = ShapeVerticalAlignment.Top;

			// Set the vertical starting position of the text box to the top margin area
			textBox.VerticalOrigin = VerticalOrigin.TopMarginArea;

			// Set the text anchor to top
			textBox.Format.TextAnchor = ShapeVerticalAlignment.Top;

			// Set the text wrapping style to in front of text
			textBox.Format.TextWrappingStyle = TextWrappingStyle.InFrontOfText;

			// Set the text wrapping type to both sides
			textBox.Format.TextWrappingType = TextWrappingType.Both;

			// Create a paragraph object
			Paragraph paragraph = new Paragraph(section.Document);

			// Set the paragraph to be horizontally centered
			paragraph.Format.HorizontalAlignment = HorizontalAlignment.Center;

			// Create a font object
			Font font = new Font("Times New Roman", 8);

			// Create a drawing object
			Graphics graphics = Graphics.FromImage(new Bitmap(1, 1));
			string text1 = " - ";

			// Measure the size of the text
			SizeF size1 = graphics.MeasureString(text1, font);
			float textWidth1 = size1.Width / 96 * 72;

			int count = (int)(textBox.Height / textWidth1);
			StringBuilder stringBuilder = new StringBuilder();
			for (int i = 1; i < count; i++)
			{
				stringBuilder.Append(text1);
			}

			// Create a character format object
			CharacterFormat characterFormat = new CharacterFormat(section.Document);
			characterFormat.FontName = font.Name;
			characterFormat.FontSize = font.Size;
			TextRange textRange = paragraph.AppendText(stringBuilder.ToString());
			textRange.ApplyCharacterFormat(characterFormat);

			// Add the paragraph to the text box
			textBox.ChildObjects.Add(paragraph);
		}
	}
}
Apply for a Temporary License
If you'd like to remove the evaluation message from the generated documents, or to get rid of the function limitations, please request a 30-day trial license for yourself.
In certain cases, you may need to adjust the page size of a Word document to ensure that it fits your specific needs or preferences. For instance, if you are creating a document that will be printed on a small paper size, such as a brochure or flyer, you may want to decrease the page size of the document to avoid any cropping or scaling issues during printing. In this article, we will explain how to adjust the page size of a Word document in C# and VB.NET using Spire.Doc for .NET.
- Adjust the Page Size of a Word Document to a Standard Page Size in C# and VB.NET
- Adjust the Page Size of a Word Document to a Custom Page Size in C# and VB.NET
Install Spire.Doc for .NET
To begin with, you need to add the DLL files included in the Spire.Doc for.NET package as references in your .NET project. The DLL files can be either downloaded from this link or installed via NuGet.
PM> Install-Package Spire.Doc
Adjust the Page Size of a Word Document to a Standard Page Size in C# and VB.NET
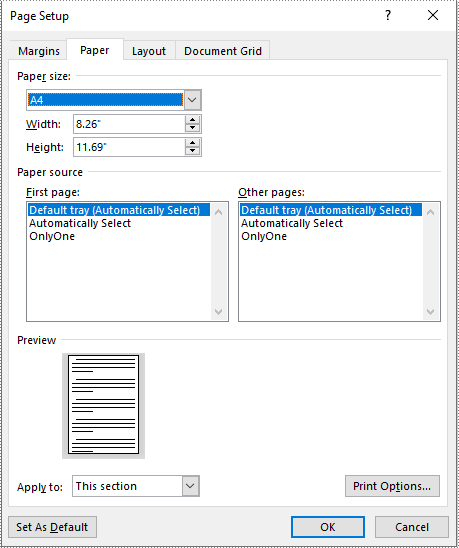
With Spire.Doc for .NET, you can easily adjust the page sizes of Word documents to a variety of standard page sizes, such as A3, A4, A5, A6, B4, B5, B6, letter, legal, and tabloid. The following steps explain how to change the page size of a Word document to a standard page size using Spire.Doc for .NET:
- Initialize an instance of the Document class.
- Load a Word document using the Document.LoadFromFile() method.
- Iterate through the sections in the document.
- Adjust the page size of each section to a standard page size by setting the value of the Section.PageSetup.PageSize property to a constant value of the PageSize enum.
- Save the result document using the Document.SaveToFile() method.
- C#
- VB.NET
using Spire.Doc;
using Spire.Doc.Documents;

namespace ChangePageSizeToStandardSize
{
    internal class Program
    {
        static void Main(string[] args)
        {
            //Initialize an instance of the Document class
            Document doc = new Document();
            //Load a Word document
            doc.LoadFromFile("Input.docx");

            //Iterate through the sections in the document
            foreach (Section section in doc.Sections)
            {
                //Change the page size of each section to A4
                section.PageSetup.PageSize = PageSize.A4;
            }

            //Save the result document
            doc.SaveToFile("StandardSize.docx", FileFormat.Docx2016);
        }
    }
}
Adjust the Page Size of a Word Document to a Custom Page Size in C# and VB.NET
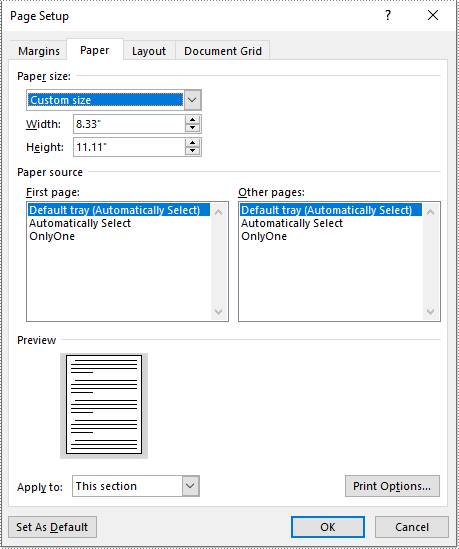
If you plan to print your document on paper with dimensions that don't match any standard paper size, you can change the page size of your document to a custom page size that matches the exact dimensions of the paper. The following steps explain how to change the page size of a Word document to a custom page size using Spire.Doc for .NET:
- Initialize an instance of the Document class.
- Load a Word document using the Document.LoadFromFile() method.
- Initialize an instance of the SizeF structure from specified dimensions.
- Iterate through the sections in the document.
- Adjust the page size of each section to the specified dimensions by assigning the SizeF instance to the Section.PageSetup.PageSize property.
- Save the result document using the Document.SaveToFile() method.
- C#
- VB.NET
using Spire.Doc;
using System.Drawing;

namespace ChangePageSizeToCustomSize
{
    internal class Program
    {
        static void Main(string[] args)
        {
            //Initialize an instance of the Document class
            Document doc = new Document();
            //Load a Word document
            doc.LoadFromFile("Input.docx");

            //Initialize an instance of the SizeF structure from specified dimensions
            SizeF customSize = new SizeF(600, 800);

            //Iterate through the sections in the document
            foreach (Section section in doc.Sections)
            {
                //Change the page size of each section to the specified dimensions
                section.PageSetup.PageSize = customSize;
            }

            //Save the result document
            doc.SaveToFile("CustomSize.docx", FileFormat.Docx2016);
        }
    }
}
Apply for a Temporary License
If you'd like to remove the evaluation message from the generated documents, or to get rid of the function limitations, please request a 30-day trial license for yourself.
Add page numbers in different sections in Word document via Spire.Doc
2015-06-25 08:04:08 Written by support iceblueSometimes in one Word document developers need to add page numbers for different sections, for example cover, directory and content are in different sections. This article talks about how to add page numbers for different sections via Spire.Doc.
Here will import a test document within 3 sections inside as followed screenshot.
Here are the detailed steps:
Step 1: Create a new document and load the test word file.
Document document = new Document("test.docx");
Step 2: Create footer for the first section and add page number inside.
HeaderFooter footer = document.Sections[0].HeadersFooters.Footer;
Paragraph footerParagraph = footer.AddParagraph();
footerParagraph.AppendField("page number", FieldType.FieldPage);
footerParagraph.AppendText(" of ");
footerParagraph.AppendField("number of pages", FieldType.FieldSectionPages);
footerParagraph.Format.HorizontalAlignment = HorizontalAlignment.Right;
Step 3: Restart page number of next section and set the starting page number to 1.
document.Sections[1].PageSetup.RestartPageNumbering = true;
document.Sections[1].PageSetup.PageStartingNumber = 1;
Step 4: Repeat step2 and Step3 for the rest sections, so change the code with for loop.
for (int i = 0; i < 3; i++)
            {
                HeaderFooter footer = document.Sections[i].HeadersFooters.Footer;
                Paragraph footerParagraph = footer.AddParagraph();
                footerParagraph.AppendField("page number", FieldType.FieldPage);
                footerParagraph.AppendText(" of ");
                footerParagraph.AppendField("number of pages", FieldType.FieldSectionPages);
                footerParagraph.Format.HorizontalAlignment = HorizontalAlignment.Right;

                if (i == 2)
                    break;
                else
                {
                    document.Sections[i + 1].PageSetup.RestartPageNumbering = true;
                    document.Sections[i + 1].PageSetup.PageStartingNumber = 1;
                }
            }
Step 5: Save and review.
document.SaveToFile("result.docx", FileFormat.Docx);
System.Diagnostics.Process.Start("result.docx");
Result screenshot:
Line numbers is used to display the number of lines counted automatically by Word next to each line of text. It's very useful when we need to refer to specific lines in a document such as contract or legal papers. Line numbers function in word allows us to set the start value, the number interval, the distance from text and the numbering mode of line numbers. Using Spire.Doc, we could achieve all of features mentioned above. This article is going to introduce how to add line numbers in C# using Spire.Doc.
Note: Before start, please download the latest version of Spire.Doc and add Spire.Doc .dll in the bin folder as the reference of visual studio.
Step 1: Load the sample document which only has text.
Document document = new Document();
document.LoadFromFile("T.docx");
Step 2: Set the start value of the line numbers.
document.Sections[0].PageSetup.LineNumberingStartValue = 1;
Step 3: Set the interval between displayed numbers.
document.Sections[0].PageSetup.LineNumberingStep = 6;
Step 4: Set the distance between line numbers and text.
document.Sections[0].PageSetup.LineNumberingDistanceFromText = 40f;
Step 5: Set the numbering mode of line numbers. Here we have four choices: None, Continuous, RestartPage and RestartSection.
document.Sections[0].PageSetup.LineNumberingRestartMode = LineNumberingRestartMode.Continuous;
Step 6: Save the document and launch to see effects.
document.SaveToFile("result.docx",FileFormat.docx2013);
System.Diagnostics.Process.Start("result.docx");
Effects:
Single Page:

Continuous Page:
Full Codes:
using System;
using System.Collections.Generic;
using System.Linq;
using System.Text;
using Spire.Doc;

namespace How_to_add_line_numbering
{
    class Program
    {
        static void Main(string[] args)
        {
            Document document = new Document();
            document.LoadFromFile("T.docx");

            document.Sections[0].PageSetup.LineNumberingStartValue = 1;
            document.Sections[0].PageSetup.LineNumberingStep = 6;
            document.Sections[0].PageSetup.LineNumberingDistanceFromText = 40f;
            document.Sections[0].PageSetup.LineNumberingRestartMode = LineNumberingRestartMode.Continuous;

            document.SaveToFile("result.docx",FileFormat.docx2013);
            System.Diagnostics.Process.Start("result.docx");
        }
    }
}
A table of contents, usually shorten as 'Contents' and abbreviated as TOC, is one of the most common function used in the professional documents. It gives readers clear and brief information of the document. This How To Guide for developers will explain the steps of create table of contents in C# with the help of a .NET word API Spire.Doc for .NET.
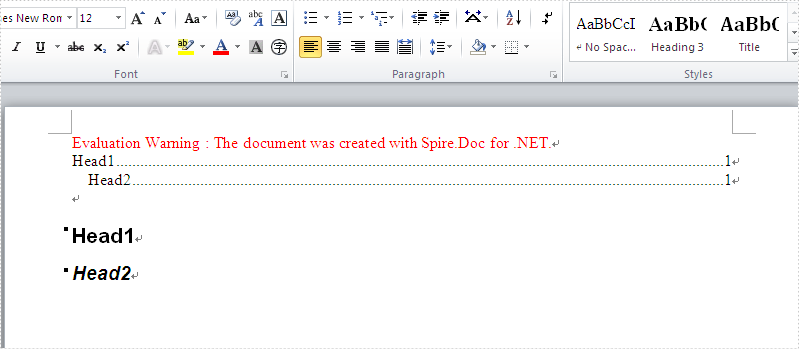
Firstly, view the screenshot of the table of contents created by the Spire.Doc in C#.
In this example, we call the method of AppendTOC to add the table of contents directly and use ApplyStyle to set the styles. Here comes to the steps of how to create TOC in C#.
Name Space we will use:
using Spire.Doc;
using Spire.Doc.Documents;
Step 1: Create a new document and add section and paragraph to the document.
Document doc = new Document();
Section section = doc.AddSection();
Paragraph para = section.AddParagraph();
Step 2: Add the Table of Contents and add the text that you want to appear in the table of contents.
para.AppendTOC(1, 3);
//Add a new paragraph to the section
Paragraph para1 = section.AddParagraph();
//Add text to the paragraph
para1.AppendText("Head1");
Step 3: Set the style for the paragraph.
para1.ApplyStyle(BuiltinStyle.Heading1);
Step 4: Add the second paragraph and set the style.
Paragraph para2 = section.AddParagraph();
para2.AppendText("Head2");
para2.ApplyStyle(BuiltinStyle.Heading2);
Step 5: Update the table of contents and save the document to file.
doc.UpdateTableOfContents();
doc.SaveToFile("CreateTableOfContent.docx", FileFormat.Docx);
Full codes:
using Spire.Doc;
using Spire.Doc.Documents;

namespace TableofContents
{
    class Program
    {
        static void Main(string[] args)
        {
            Document doc = new Document();
            Section section = doc.AddSection();
            Paragraph para = section.AddParagraph();

            para.AppendTOC(1, 3);
            Paragraph para1 = section.AddParagraph();
            para1.AppendText("Head1");

            para1.ApplyStyle(BuiltinStyle.Heading1);

            Paragraph para2 = section.AddParagraph();
            para2.AppendText("Head2");
            para2.ApplyStyle(BuiltinStyle.Heading2);

            doc.UpdateTableOfContents();
            doc.SaveToFile("CreateTableOfContent.docx", FileFormat.Docx);

        }
    }
}
Spire.Doc supports to insert page breaks in C# and VB.NET. We have already had a tutorial article of how to insert a page break after a paragraph. This article we will demonstrate how to add a page break at a specified location by searching a single word.
First, download Spire.Doc and install on your system. The Spire.Doc installation is clean, professional and wrapped up in a MSI installer. Then adds Spire.Doc.dll as reference in the downloaded Bin folder though the below path: "..\Spire.Doc\Bin\NET4.0\ Spire.Doc.dll".
Here comes to the steps of how to insert a page break at a specified location.
Step 1: Create a new word document and load the document from the file.
Document doc = new Document();
doc.LoadFromFile("Test.docx");
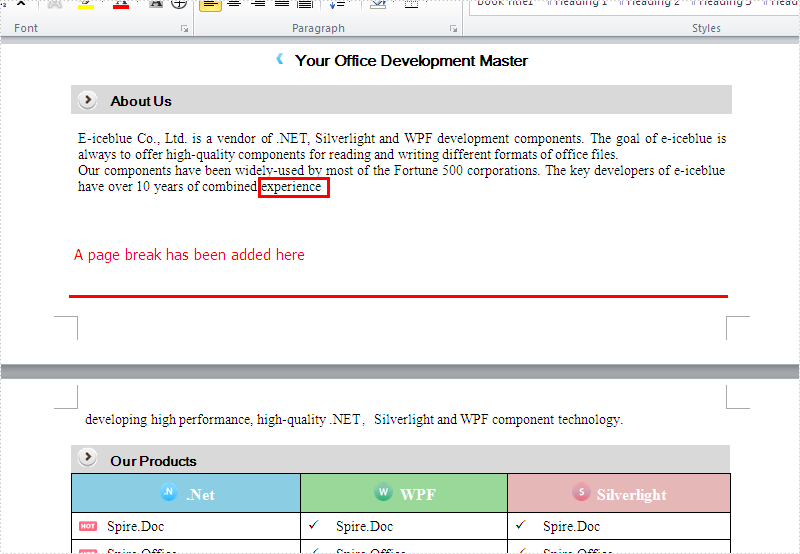
Step 2: Find the specified word "experience" where we want to insert the page break.
TextSelection[] selections = doc.FindAllString("experience", true, true);
Step 3: Traverse each word "experience".
foreach (TextSelection ts in selections)
   {
     TextRange range = ts.GetAsOneRange();
     Paragraph paragraph = range.OwnerParagraph;
     int index = paragraph.ChildObjects.IndexOf(range);
     Break pageBreak = new Break(doc, BreakType.PageBreak);
   }
Step 4: Create a new instance of page break and insert a page break after the word "experience".
Break pageBreak = new Break(doc, BreakType.PageBreak);
paragraph.ChildObjects.Insert(index + 1, pageBreak);
Step 5: Save the word document to file and process it.
doc.SaveToFile("Break.docx", FileFormat.Docx);
System.Diagnostics.Process.Start("Break.docx");
Effective screenshot of the inserted page break after the word "experience":
Full codes:
using Spire.Doc;
using Spire.Doc.Documents;
using Spire.Doc.Fields;
namespace InsertPageBreak
{
    class Program
    {
        static void Main(string[] args)
        {
            Document doc = new Document();
            doc.LoadFromFile("Test.docx");
            TextSelection[] selections = doc.FindAllString("experience", true, true);
            foreach (TextSelection ts in selections)
            {
                TextRange range = ts.GetAsOneRange();
                Paragraph paragraph = range.OwnerParagraph;
                int index = paragraph.ChildObjects.IndexOf(range);
                Break pageBreak = new Break(doc, BreakType.PageBreak);
                paragraph.ChildObjects.Insert(index + 1, pageBreak);
            }
            doc.SaveToFile("Break.docx", FileFormat.Docx);
            System.Diagnostics.Process.Start("Break.docx");
        }
    }
}
All too often, we start a table near the bottom of a page. Microsoft Word automatically places a page break in a table if a single row or several rows are too long to fit between the top and bottom margins of the page. So we'd rather the same row can be placed on one page or have the entire table on the next page instead of being broken over two pages. In this article, I'll introduce you two ways to avoid page breaks in Word tables via Spire.Doc.
Assume that we have a Word table like this (Row 2 splits to different pages), we may want to optimize the layout by the following two methods.
Method 1: Keep the entire table on the same page.
Step 1: Create a new Word document and load the test file.
Document doc = new Document("Test.docx");
Step 2: Get the table from Word document.
Table table = doc.Sections[0].Tables[0] as Table;
Step 3: Change the paragraph setting to keep them together.
           foreach (TableRow row in table.Rows)
            {
                foreach (TableCell cell in row.Cells)
                {
                  foreach (Paragraph p in cell.Paragraphs)
                   {
                       p.Format.KeepFollow = true;
                   }
                }
           }
Step 4: Save and launch the file.
      doc.SaveToFile("Result.docx", FileFormat.Docx2010);
      System.Diagnostics.Process.Start("Result.docx");
Output:
Method 2: Prevent Word from breaking a table row across two pages.
There still exists a situation that the table is not small enough to fit on one page, you can prevent Word from breaking a table row that contains multiple paragraphs across two pages. In this example, the second row has been splitted in different pages, we can set property of TableFormat with following sentence to avoid this problem.
table.TableFormat.IsBreakAcrossPages = false;
Use this sentence to replace Step 3, you'll get the layout as below:
Full C# Code:
Method 1
using Spire.Doc;
using Spire.Doc.Documents;
namespace PreventPageBreak
{
    class Program
    {
        static void Main(string[] args)
        {
            Document doc = new Document("Test.docx");
            Table table = doc.Sections[0].Tables[0] as Table;
            foreach (TableRow row in table.Rows)
            {
                foreach (TableCell cell in row.Cells)
                {
                    foreach (Paragraph p in cell.Paragraphs)
                    {
                        p.Format.KeepFollow = true;
                    }
                }
            }
            doc.SaveToFile("Result.docx", FileFormat.Docx2010);
            System.Diagnostics.Process.Start("Result.docx");
        }
    }
}
Method 2
using Spire.Doc;
using Spire.Doc.Documents;
namespace PreventPageBreak
{
    class Program
    {
        static void Main(string[] args)
        {
            Document doc = new Document("Test.docx");
            Table table = doc.Sections[0].Tables[0] as Table;
            table.TableFormat.IsBreakAcrossPages = false;
            doc.SaveToFile("Result.docx", FileFormat.Docx2010);
            System.Diagnostics.Process.Start("Result.docx");

        }
    }
}
How to reset page number for each section start at 1 in a word document in C#
2014-07-17 09:27:54 Written by support iceblueSections are widely used by developers to set different formatting or layout options to each different section, such as use the different header and footer information for different sections and reset page number for each section dynamically. With the help of Spire.Doc for .NET, we can easily insert word section and remove word section in C# and VB.NET. We will show you how to reset page numbering that starts at 1 for each section easily by using Spire.Doc.
Firstly make sure Spire.Doc for .NET has been installed correctly and then add Spire.Doc.dll as reference in the downloaded Bin folder though the below path: "..\Spire.Doc\Bin\NET4.0\ Spire.Doc.dll". Here comes to the codes of how to reset page numbering for each section.
Step 1: Load three different word documents
Document document1 = new Document();
document1.LoadFromFile("..\\..\\1.docx");

Document document2 = new Document();
document2.LoadFromFile("..\\..\\2.docx");

Document document3 = new Document();
document3.LoadFromFile("..\\..\\3.docx");
Step 2: Use section method to combine all documents into one word document
foreach (Section sec in document2.Sections)
{
document1.Sections.Add(sec.Clone());
}
foreach (Section sec in document3.Sections)
{
document1.Sections.Add(sec.Clone());
}
Step 3: Traverse the document
//Traverse every section of document1
foreach (Section sec in document1.Sections)
{
//Traverse every object of the footer
foreach (DocumentObject obj in sec.HeadersFooters.Footer.ChildObjects)
{
if (obj.DocumentObjectType == DocumentObjectType.StructureDocumentTag)
{
DocumentObject para = obj.ChildObjects[0];
foreach (DocumentObject item in para.ChildObjects)
                        {
if (item.DocumentObjectType == DocumentObjectType.Field)
Step 4: Find the field type FieldNumPages and change it to FieldSectionPages
//Find the item and its field type is FieldNumPages
if ((item as Field).Type == FieldType.FieldNumPages)
{
//Change field type to FieldSectionPages
(item as Field).Type = FieldType.FieldSectionPages;
Step 5: Restart page number of section and set the starting page number to 1
document1.Sections[1].PageSetup.RestartPageNumbering = true;
document1.Sections[1].PageSetup.PageStartingNumber = 1;

document1.Sections[2].PageSetup.RestartPageNumbering = true;
document1.Sections[2].PageSetup.PageStartingNumber = 1;
Step 6: Save the document to file and launch it.
document1.SaveToFile("sample.docx",FileFormat.Docx);
System.Diagnostics.Process.Start("sample.docx");
Full codes:
namespace ResetPageNumber
{
    class Program
    {
        static void Main(string[] args)
        {
            Document document1 = new Document();
            document1.LoadFromFile("..\\..\\1.docx");

            Document document2 = new Document();
            document2.LoadFromFile("..\\..\\2.docx");

            Document document3 = new Document();
            document3.LoadFromFile("..\\..\\3.docx");

            foreach (Section sec in document2.Sections)
            {
                document1.Sections.Add(sec.Clone());
            }

            foreach (Section sec in document3.Sections)
            {
                document1.Sections.Add(sec.Clone());

            }
            foreach (Section sec in document1.Sections)
            {
                foreach (DocumentObject obj in sec.HeadersFooters.Footer.ChildObjects)
                {
                    if (obj.DocumentObjectType == DocumentObjectType.StructureDocumentTag)
                    {
                        DocumentObject para = obj.ChildObjects[0];
                        foreach (DocumentObject item in para.ChildObjects)
                        {
                            if (item.DocumentObjectType == DocumentObjectType.Field)
                            {
                                if ((item as Field).Type == FieldType.FieldNumPages)
                                {
                                    (item as Field).Type = FieldType.FieldSectionPages;
                                }
                            }
                        }
                    }
                }
            }

            document1.Sections[1].PageSetup.RestartPageNumbering = true;
            document1.Sections[1].PageSetup.PageStartingNumber = 1;

            document1.Sections[2].PageSetup.RestartPageNumbering = true;
            document1.Sections[2].PageSetup.PageStartingNumber = 1;

            document1.SaveToFile("sample.docx",FileFormat.Docx);
            System.Diagnostics.Process.Start("sample.docx");
        }
    }
}
In Word document, users can add new page break or remove existing page breaks. This sample shows how to remove page breaks from the word document by using Spire.Doc. Spire.Doc supports to remove the page breaks from the word document from the format of .docx, .doc, and RTF etc.
Firstly make sure Spire.Doc for .NET has been installed correctly and then add Spire.Doc.dll as reference in the downloaded Bin folder though the below path: ".. \Spire.Doc\Bin\NET4.0\ Spire.Doc.dll". Here comes to the details of how to remove page breaks in C#.
//Create a new word document and load from the file.
Document document = new Document();
document.LoadFromFile("sample.docx");

// Traverse every paragraph of the first section of the document
for (int j = 0; j < document.Sections[0].Paragraphs.Count; j++)
  {
   Paragraph p = document.Sections[0].Paragraphs[j];

// Traverse every child object of a paragraph
for (int i = 0; i < p.ChildObjects.Count; i++)
    {
     DocumentObject obj = p.ChildObjects[i];

//Find the page break object
 if (obj.DocumentObjectType == DocumentObjectType.Break)
    {
     Break b = obj as Break;

// Remove the page break object from paragraph
p.ChildObjects.Remove(b);

//save the document to file.
document.SaveToFile("result.docx");
Please check the effective screenshot:

Full codes:
using Spire.Doc;
using Spire.Doc.Documents;
namespace RemovePageBreak
{
    class Program
    {
        static void Main(string[] args)
        {
            Document document = new Document();
            document.LoadFromFile("sample.docx", FileFormat.Docx);
            for (int j = 0; j < document.Sections[0].Paragraphs.Count; j++)
            {
                Paragraph p = document.Sections[0].Paragraphs[j];
                for (int i = 0; i < p.ChildObjects.Count; i++)
                {
                    DocumentObject obj = p.ChildObjects[i];
                    if (obj.DocumentObjectType == DocumentObjectType.Break)
                    {
                        Break b = obj as Break;
                        p.ChildObjects.Remove(b);
                    }
                }
            }
            document.SaveToFile("result.docx", FileFormat.Docx);
            System.Diagnostics.Process.Start("result.docx");
        }
    }
}
In Microsoft Word, you can easily split the document into sections by insert a section break in the place where you want, thus allowing you to apply different formatting or layout options to those sections. Section breaks in Microsoft Word can be a godsend if you need to perform any of the following tasks:
- Use page numbering that starts at 1 for each section of your document (for example, different chapters in the same document).
- Display text in two columns for only a portion of your document and then return to the default one column afterwards.
- Display different header and footer information for different parts of your document.
This article demonstrates an easy solution to insert section break to split document into sections in C#, VB.NET via Spire.Doc for .NET. The following screenshot shows result after inserting Word page break.
Spire.Doc for .NET provides Paragraph.InsertSectionBreak method for customers to insert break easily in Word. The overload, which should be passed to this method, is SectionBreakType (enum-type). There are five section break options offered by Spire.Doc for .NET such as EvenPage, NewColumn, NewPage, NoBreak, OddPage. Download and install Spire.Doc for .NET and follow the code blow to insert section break behind the specified paragraph.
using Spire.Doc;
using Spire.Doc.Documents;
namespace InsertSectionBreak
{
    class Program
    {
        static void Main(string[] args)
        {
            Document doc = new Document();
            doc.LoadFromFile("E-iceblue Technology_new.docx");
            doc.Sections[0].Paragraphs[0].InsertSectionBreak(SectionBreakType.NoBreak);
            doc.SaveToFile("SectionBreak.docx", FileFormat.Docx);
        }
    }
}
