

Spire.Doc for .NET (332)
Children categories
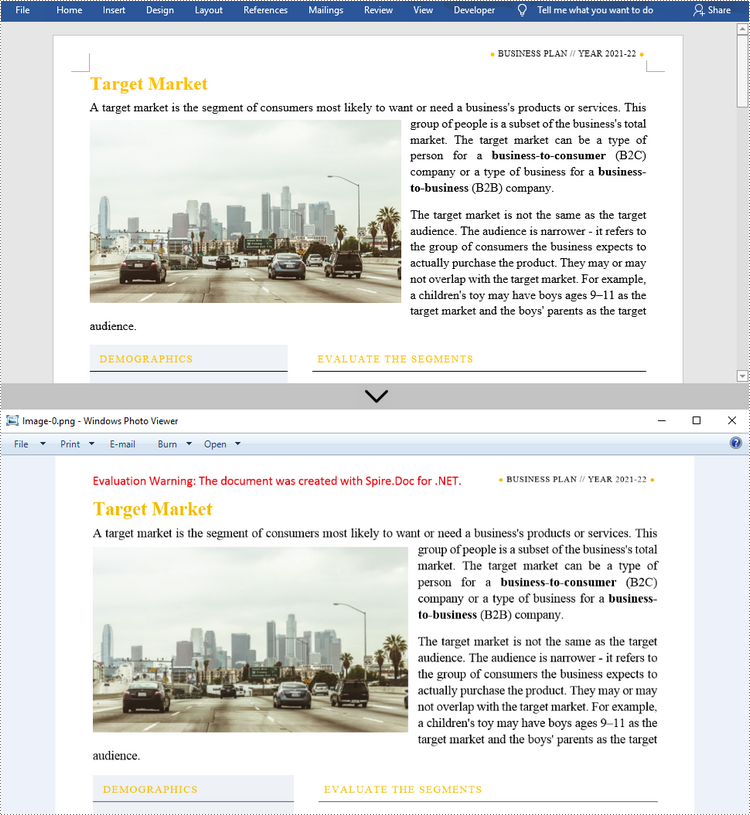
Compared with Word document format, pictures are more convenient to share and preview across platforms, because they do not require MS Word to be installed on machines. Moreover, converting Word to images can preserve the original appearance of the document, which is useful when further modifications are not desired. In this article, you will learn how to convert Word documents to images in C# and VB.NET using Spire.Doc for .NET.
- Convert Word to JPG in C#, VB.NET
- Convert Word to SVG in C#, VB.NET
- Convert Word to PNG with Customized Resolution in C#, VB.NET
Install Spire.Doc for .NET
To begin with, you need to add the DLL files included in the Spire.Doc for.NET package as references in your .NET project. The DLL files can be either downloaded from this link or installed via NuGet.
PM> Install-Package Spire.Doc
Convert Word to JPG in C#, VB.NET
Spire.Doc for .NET offers the Document.SaveToImages() method to convert a whole Word document into individual Bitmap or Metafile images. Then, a Bitmap or Metafile image can be saved as a BMP, EMF, JPEG, PNG, GIF, or WMF format file. The following are the steps to convert a Word document to JPG images using this library.
- Create a Document object.
- Load a Word document using Document.LoadFromFile() method.
- Convert the document to Bitmap images using Document.SaveToImages() method.
- Loop through the image collection to get the specific one and save it as a JPG file.
- C#
- VB.NET
using Spire.Doc;
using Spire.Doc.Documents;
using System;
using System.Drawing;
using System.Drawing.Imaging;
namespace ConvertWordToJPG
{
class Program
{
static void Main(string[] args)
{
//Create a Document object
Document doc = new Document();
//Load a Word document
doc.LoadFromFile("C:\\Users\\Administrator\\Desktop\\Template.docx");
//Convert the whole document into individual images
Image[] images = doc.SaveToImages(ImageType.Bitmap);
//Loop through the image collection
for (int i = 0; i < images.Length; i++)
{
//Save the image to a JPEG format file
string outputfile = String.Format("Image-{0}.jpg", i);
images[i].Save("C:\\Users\\Administrator\\Desktop\\Images\\" + outputfile, ImageFormat.Jpeg);
}
}
}
}
Convert Word to SVG in C#, VB.NET
Using Spire.Doc for .NET, you can save a Word document as a queue of byte arrays. Each byte array can then be written as a SVG file. The detailed steps to convert Word to SVG are as follows.
- Create a Document object.
- Load a Word file using Document.LoadFromFile() method.
- Save the document as a queue of byte arrays using Document.SaveToSVG() method.
- Loop through the items in the queue to get a specific byte array.
- Write the byte array to a SVG file.
- C#
- VB.NET
using Spire.Doc;
using System;
using System.Collections.Generic;
using System.IO;
namespace CovnertWordToSVG
{
class Program
{
static void Main(string[] args)
{
//Create a Document object
Document doc = new Document();
//Load a Word document
doc.LoadFromFile("C:\\Users\\Administrator\\Desktop\\Template.docx");
//Save the document as a queue of byte arrays
Queue<byte[]> svgBytes = doc.SaveToSVG();
//Loop through the items in the queue
for (int i = 0; i < svgBytes.Count; i++)
{
//Convert the queue to an array
byte[][] bytes = svgBytes.ToArray();
//Specify the output file name
string outputfile = String.Format("Image-{0}.svg", i);
//Write the byte[] in a SVG format file
FileStream fs = new FileStream("C:\\Users\\Administrator\\Desktop\\Images\\" + outputfile, FileMode.Create);
fs.Write(bytes[i], 0, bytes[i].Length);
fs.Close();
}
}
}
}
Convert Word to PNG with Customized Resolution in C#, VB.NET
An image with higher resolution is generally more clear. You can customize the image resolution while converting Word to PNG by following the following steps.
- Create a Document object.
- Load a Word file using Document.LoadFromFile() method.
- Convert the document to Bitmap images using Document.SaveToImages() method.
- Loop through the image collection to get the specific one.
- Call the custom method ResetResolution() to reset the image resolution.
- Save the image as a PNG file.
- C#
- VB.NET
using Spire.Doc;
using System;
using System.Drawing;
using System.Drawing.Imaging;
using Spire.Doc.Documents;
namespace ConvertWordToPng
{
class Program
{
static void Main(string[] args)
{
//Create a Document object
Document doc = new Document();
//Load a Word document
doc.LoadFromFile("C:\\Users\\Administrator\\Desktop\\Template.docx");
//Convert the whole document into individual images
Image[] images = doc.SaveToImages(ImageType.Metafile);
//Loop through the image collection
for (int i = 0; i < images.Length; i++)
{
//Reset the resolution of a specific image
Image newimage = ResetResolution(images[i] as Metafile, 150);
//Save the image to a PNG format file
string outputfile = String.Format("Image-{0}.png", i);
newimage.Save("C:\\Users\\Administrator\\Desktop\\Images\\" + outputfile, ImageFormat.Png);
}
}
//Set the image resolution by the ResetResolution() method
public static Image ResetResolution(Metafile mf, float resolution)
{
int width = (int)(mf.Width * resolution / mf.HorizontalResolution);
int height = (int)(mf.Height * resolution / mf.VerticalResolution);
Bitmap bmp = new Bitmap(width, height);
bmp.SetResolution(resolution, resolution);
using (Graphics g = Graphics.FromImage(bmp))
{
g.DrawImage(mf, Point.Empty);
}
return bmp;
}
}
}
Apply for a Temporary License
If you'd like to remove the evaluation message from the generated documents, or to get rid of the function limitations, please request a 30-day trial license for yourself.
The emphasis mark is used in Word documents to emphasize words and make them more noticeable. It is usually a dot or a circle placed above or under the emphasized words. However, manually selecting words and applying emphasis marks on them takes a lot of work. Fortunately, Spire.Doc for .NET provides a much easier way to apply emphasis marks by codes. This article will show you how to apply emphasis marks to text in Word documents using Spire.Doc for .NET.
Install Spire.Doc for .NET
To begin with, you need to add the DLL files included in the Spire.Doc for.NET package as references in your .NET project. The DLL files can be either downloaded from this link or installed via NuGet.
PM> Install-Package Spire.Doc
Apply Emphasis Mark to Specified Text
The detailed steps are as follows:
- Create a Document instance.
- Load the Word document from disk using Document.LoadFromFile() method.
- Find the text you need to emphasize using Document.FindAllString() method.
- Apply emphasis mark to the found text through CharacterFormat.EmphasisMark property.
- Save the document to another Word file using Document.SaveToFile() method.
- C#
- VB.NET
using System;
using Spire.Doc;
using Spire.Doc.Documents;

namespace applyemphasismark
{
    class Program
    {
        static void Main(string[] args)
        {
            //Create a Document instance
            Document document = new Document();

            //Load the Word document from disk
            document.LoadFromFile(@"D:\testp\test.docx");

            //Find text you want to emphasize
            TextSelection[] textSelections = document.FindAllString("Spire.Doc for .NET", false, true);

            //Apply emphasis mark to the found text
            foreach (TextSelection selection in textSelections)
            {
                selection.GetAsOneRange().CharacterFormat.EmphasisMark = Emphasis.Dot;
            }

            //Save the document to another Word file
            string output = "ApllyEmphasisMark.docx";
            document.SaveToFile(output, FileFormat.Docx);
        }
    }
}
Apply for a Temporary License
If you'd like to remove the evaluation message from the generated documents, or to get rid of the function limitations, please request a 30-day trial license for yourself.
Sometimes you may want to print Word documents in accordance with your own preferences, for instance, print your files on custom paper sizes to make them more personalized. In this article, you will learn how to achieve this function using Spire.Doc for .NET.
Install Spire.Doc for .NET
To begin with, you need to add the DLL files included in the Spire.Doc for .NET package as references in your .NET project. The DLLs files can be either downloaded from this link or installed via NuGet.
- Package Manager
PM> Install-Package Spire.Doc
Print Word on a Custom Paper Size
The table below shows a list of core classes, methods and properties utilized in this scenario.
| Name | Description |
| Document Class | Represents a document model for Word. |
| PaperSize Class | Specifies the size of a piece of paper. |
| PrintDocument Class | Defines a reusable object that sends output to a printer, when printing from a Windows Forms application. |
| PrintDocument.DefaultPageSettings Property | Gets or sets page settings that are used as defaults for all pages to be printed. |
| Document.PrintDocument Property | Gets the PrintDocument object. |
| DefaultPageSettings.PaperSize Property | Sets the custom paper size. |
| Document.LoadFromFile() Method | Loads the sample document. |
| PrintDocument.Print() Method | Prints the document. |
The following are the steps to print Word on a custom paper size.
- Instantiate a Document object
- Load the sample document using Document.LoadFromFile() method.
- Get the PrintDocument object using Document.PrintDocument property.
- Set the custom paper size using DefaultPageSettings.PaperSize Property.
- Print the document using PrintDocument.Print() method.
- C#
- VB.NET
using Spire.Doc;
using System.Drawing.Printing;

namespace PrintWord
{
    class Program
    {
        static void Main(string[] args)
        {
             //Instantiate a Document object.
            Document doc = new Document();

            //Load the document
            doc.LoadFromFile(@"Sample.docx");

            //Get the PrintDocument object
            PrintDocument printDoc = doc.PrintDocument;

            //Customize the paper size
            printDoc.DefaultPageSettings.PaperSize = new PaperSize("custom", 900, 800);

            //Print the document
            printDoc.Print();

        }
    }
}
Imports Spire.Doc
Imports System.Drawing.Printing

Namespace PrintWord
	Class Program
		Private Shared Sub Main(args As String())
			'Instantiate a Document object.
			Dim doc As New Document()

			'Load the document
			doc.LoadFromFile("Sample.docx")

			'Get the PrintDocument object
			Dim printDoc As PrintDocument = doc.PrintDocument

			'Customize the paper size
			printDoc.DefaultPageSettings.PaperSize = New PaperSize("custom", 900, 800)

			'Print the document
			printDoc.Print()

		End Sub
	End Class
End Namespace
Apply for a Temporary License
If you'd like to remove the evaluation message from the generated documents, or to get rid of the function limitations, please request a 30-day trial license for yourself.
